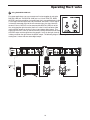
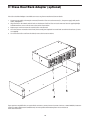
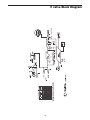
1
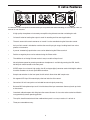
C Class Signal Processors
TUBE MICROPHONE/INSTRUMENT
PREAMPLIFIER WITH DIGITAL OUTPUT
Safety Instructions
Caution: To reduce the hazard of electrical
shock, do not remove cover or back.
No user serviceable parts inside. Please refer all
servicing to qualified personnel.
WARNING: To reduce the risk of fire or electric shock, do not expose this unit to rain or moisture.
The lightning flash with an arrowhead symbol within an equilateral triangle, is intended to alert the user to the
presence of uninsulated "dangerous voltage" within the products enclosure that may be of sufficient magnitude to
constitute a risk of electric shock to persons.
The exclamation point within an equilateral triangle is intended to alert the user to the presence of important operating and maintenance (servicing) instructions in the literature accompanying the product.
Important Safety Instructions
1.
Please read all instructions before operating the unit.
2.
Keep these instructions for future reference.
3.
Please heed all safety warnings.
4.
Follow manufacturers instructions.
5.
Do not use this unit near water or moisture.
6.
Clean only with a damp cloth.
7.
Do not block any of the ventilation openings. Install in accordance with the manufacturers instructions.
8.
Do not install near any heat sources such as radiators, heat registers, stoves, or other apparatus
(including amplifiers) that produce heat.
9.
Do not defeat the safety purpose of the polarized or grounding-type plug. A polarized plug has two
blades with one wider than the other. A grounding type plug has two blades and a third grounding
prong. The wide blade or third prong is provided for your safety. When the provided plug does not fit
your outlet, consult an electrician for replacement of the obsolete outlet.
10.
Protect the power cord from being walked on and pinched particularly at plugs, convenience receptacles and at the point at which they exit from the unit.
11.
Unplug this unit during lightning storms or when unused for long periods of time.
12.
Refer all servicing to qualified personnel. Servicing is required when the unit has been damaged in any
way, such as power supply cord or plug damage, or if liquid has been spilled or objects have fallen into
the unit, the unit has been exposed to rain or moisture, does not operate normally, or has been
dropped.
Table of Contents
Introduction
C valve Features
Controls and Functions
Front Panel Layout
Rear Panel Layout
Operating the C valve
Setting Up the C valve
Setting a Good Level
Using The C valve For Getting A Sound
Using the Low Cut Filter
Using the Tube Process
Using the Enhancer
Using C valve With An External Signal Processor
Using the Digital Output
Using the Digital Link Jack
System Set-ups
Stacking and Tilting the C valve
C valve Connections
C•Class Dual Rack Adapter (optional)
Block Diagram
Specifications
Copyright 2003, Samson Technologies Corp.
Printed October, 2003
Samson Technologies Corp.
575 Underhill Blvd.
P.O. Box 9031
Syosset, NY 11791-9031
Phone: 1-800-3-SAMSON (1-800-372-6766)
Fax: 516-364-3888
www.samsontech.com
2
3
4-5
4
5
6-13
6-7
8
9
9-10
10
10
11
12
13
14-15
16
17
18
19
20
Introduction
Congratulations! You just purchased one of the most useful audio tools for digital audio
recording, C valve from Samson Audio. The C valve is a high quality microphone/instrument
tube pre-amplifier offering a tremendous amount of transparent gain with a pristine audio
path that terminates in both balanced analog and S/PDIF digital outputs. By using discreet
transistor pre-amp topology, along with the warmth from the incorporation of the12AX7 tube,
the C valve takes advantage of the latest technology, together with time proven circuit technique. The result; a super clean pre-amp for microphones or instruments with the warmth
and personality of a classic unit, which makes C valve the perfect tracking device for any
recording situation. And, with the SATURATION control you can dial up specific amounts of
harmonics that are right for your recording or performance. An optical limiter with a musical
response is built into C valve, which will help you get a good level to your mixer or recorder.
The C valve also features a variable LOW-CUT filter and a musical ENHANCE circuit to add
a pleasant “high-frequency lift” to the overall sound. To monitor your input levels, the C valve
features a six segment LED bar VU meter, along with a classic analog circular VU meter,
which displays the output level. In order to bridge the classic sound of the warm mic-pre to
today’s digital audio world, the C valve features a high quality, 24Bit, A to D converter with a
selectable sample rate of 48 or 96K feeding the S/PDIF digital output . In addition, two C
valve’s can be linked together to make a stereo mic-pre with digital out. The C valve is a
perfect addition to any recording studio, especially those using computer based hard disk
recorders, as well as for live use to capture that studio sound live.
Although this unit is designed for easy operation, we suggest you take some time out first to
go through these pages so you can fully understand how we’ve implemented a number of
unique features. In this manual, you’ll find a more detailed description of the features of the
C valve, as well as a guided tour through the front and rear panels, step-by-step instructions
for using the C valve and full specifications. You’ll also find a warranty card enclosed—
please don’t forget to fill it out and mail it so that you can receive online technical support
and so we can send you updated information about other Samson products in the future.
With proper care and adequate air circulation, your C valve will operate trouble free for
many years. We recommend you record your serial number in the space provided below for
future reference.
Serial number:
Date of purchase:
Should your unit ever require servicing, a Return Authorization number (RA) must be
obtained before shipping your unit to Samson. Without this number, the unit will not be
accepted. Please call Samson at 1-800-3SAMSON (1-800-372-6766) for a Return
Authorization number prior to shipping your unit. Please retain the original packing materials
and if possible, return the unit in the original carton and packing materials.
2
C valve Features
The Samson C valve microphone and instrument pre-amp utilizes the latest technology in circuit design. Here are
some of its main features:
•
A high quality microphone or instrument pre-amplifier using discrete transistor and tube gain cells.
•
On board Limiter for leveling the output is useful in recording and live sound applications.
•
The total amount of harmonic overtones or “warmth” can be controlled using the Saturation control.
•
An Input Gain control is included to maximize the overall input gain stage, handling levels from microphones or instruments.
•
A pre-set “sweetening” equalization curve can be added using the Enhance switch.
•
Positive or negative phase can be selected using the Phase switch.
•
The addition of an Analog VU meter makes it easy to read the Output Level.
•
48-volt phantom power for powering condenser microphones is available by pressing the LED, backlit,
48-Volt push switch located on the front panel.
•
S/PDIF output via an internal, high quality A-to-D (analog-to-digital) converter sends 24-bit digital audio to
hard disk recorders via the rear panel RCA connector.
•
Sample rate selection via the front panel, backlit switch allows 48 or 96K sample rates.
•
Six segment LED Input VU meter displays the level after the Gain control.
•
Convenient 1/4-inch insert points are included for external signal processing.
•
Balanced XLR microphone input and 1/4-inch balanced line input connectors allow easy hook up of mics
or instruments.
•
Oversized, rubber bumpers with tilting feet allow several Samson C class units to be stacked and tilted in
an ergonomically correct operating position.
•
The stylish, bead blasted, electric blue anodized front-panel is as easy to read as it is to look at.
•
Three-year extended warranty.
3
C valve Layout
Front Panel Layout
1
INPUT GAIN – Rotary control used to adjust the
input level.
2
LOW FREQUENCY – This rotary control is used to
set the EQ cut off point for the Low Cut filter.
3
INPUT METER – Six segment LED VU meter displays the input level after being affected by the
Gain control.
4
SATURATION – Rotary control used to adjust the
total amount of harmonic overtones generated
by the tube circuit.
5
PILOT LIGHT - Illuminated indicator that rises in
intensity, and when fully lit, signifies the tube circuit is ready for operation.
6
VOLUME – Rotary knob used to control the overall Output level.
7
Digital Overload - LED indicator, which when
illuminated, displays the digital clipping point of
the Analog to Digital converter.
8
VU METER – Classic round analog VU meter displays the amount of output level.
9
POWER SWITCH – Heavy-duty rocker switch
which, when pressed to the “on” position, lights
the internal green LED, indicating the unit is powered up and ready for operation.
4
10
MIC/INST switch – This switch is used to select
the proper input operating level for either a
microphone or a line/instrument signal source.
11
48 VOLT – When pressed in, the switch will illuminate red indicating the 48-volt phantom
power is on.
12
PHASE – LED backlit switch which will invert the
phase of the mic or instrument input.
13
LOW CUT SWITCH – Used to engage the variable low-cut filter, which attenuates or rolls-off
the low frequency at a rate of 12 dB per octave
starting at the point set by the Low Frequency
control knob.
14
VOCAL EQ - When pressed in, the push switch
activates the Vocal EQ circuit providing a pre-set
equalization curve for “sweetening” the signal
with a subtle, but useful, airy high-end lift .
15
LIMIT SWITCH – When engaged, the LED lights
indicating the Limiter circuit is activated.
16
ENHANCE - When pressed in, the switch activates the Enhance circuit which helps restore
the high frequencies that can be lost when the
signal is being protected by the on-board LIMITER.
17
48/96 SWITCH - LED backlit switch which is
used to select the sampling frequency of the
internal A-to-D converter for either 48 or 96
kiloHertz operation.
C valve Layout
Rear Panel Layout
A
AC INLET – Connect the included AC1800 power
supply here.
F
SEND (INSERT) - 1/4-inch phone jack for carrying
the send signal for the external processing loop.
B
24 BIT 48 / 96 (DIGITAL OUT)- 24-bit S/PDIF
Digital Output on an RCA connector.
G
INSTRUMENT IN - 1/4-inch phone input jack for
connecting signals from instruments or line level
devices.
C
DIGITAL LINK IN- 1/4-inch input jack for connecting the balanced line output of a second C
valve so that the two units work as a stereo unit
transmitting the left and right signals from a single S/PDIF digital output.
H
MIC INPUT – 3-Pin XLR input connector for connecting microphone level signals.
D
BALANCED OUTPUT – 1/4-inch TRS
(TIP/RING/SLEEVE) connector for balanced, line
level output.
E
RETURN (INSERT) – 1/4-inch phone jack for carrying the return signal of the external processing
loop.
5
Operating The C valve
Setting up the C valve
Setting up your C Valve tube pre-amp is a simple procedure, which takes only a few minutes:
1. Remove all packing materials (save them in case of need for future service) and decide where the pre-amp is
to be physically placed. To avoid potential overheating problems, be sure that there is good ventilation around
the entire unit.
2. Plug the provided AC power adapter in the rear AC inlet, but don’t plug the power pack into a wall outlet just
yet.
3. Set the controls to the following positions:
INPUT GAIN
LOW FREQUENCY
SATURATION
VOLUME
MIC/INSTRUMENT
48-VOLT
PHASE
LOW CUT
VOCAL EQ
LIMIT
ENHANCE
48 / 96
6
90
1
-10
OUT
OUT
OUT
OUT
OUT
OUT
OUT
48 (OUT)
4. Using a standard XLR microphone cable, connect your microphone to the MIC input located on the rear panel.
If you are using an instrument like a guitar or bass guitar, use a standard 1/4-inch phone cable and connect the
instrument to the INST input located on the rear panel. For a detailed wiring guide, see page 16 in this manual.
5. Now, connect the rear panel output to your mixer or recorder.
6
Operating The C valve
Setting Up the C valve (continued)
6. Plug the C valve power pack into a wall outlet and switch the unit on by pressing the power switch.
7. If you are using an instrument with your C valve, press the MIC/INST switch in to set the C valve’s input to
accept instrument levels. The LED will illuminate. If you are using a microphone skip this step and go on to the
next step.
8. The C valve features on board 48-volt phantom power supply for connecting condenser
microphones.
IMPORTANT NOTE: With all phantom power supplies, you can get an annoying POP when you engage
the phantom power supply, or when you unplug a
cable that has phantom power on it. Depending how
loud you are monitoring, this POP can cause damage
to your speakers, and even to your hearing. Be sure to
turn your speakers, and/or headphone levels, all the
way down when switching the phantom supply on and
off or plugging and unplugging cables.
If you are using a condenser microphone, turn
down your monitor speakers and/or headphones,
and then press the front panel 48 VOLT switch to
engage the phantom power.
9. Now, set a level by playing your instrument or
singing into your mic, and slowly raise the INPUT
GAIN control until you see the LED VU meter
reach a level of about “0dB”.
10. Be sure that your mixer or recorder’s input is
enabled and turned up. Now, slowly raise the
output VOLUME control until you reach a good
level, about “-3dB”, on the analog output VU
meter. Then, set a good level on your mixer or recorder.
At this point you should be sending a clean signal to your mixer or recorder and you can experiment with the
SATURATION, VOCAL EQ and ENHANCER features for fun. A detailed explanation of these functions will be
covered in the following sections of this manual.
7
Operating The C valve
Setting a Good Level
One of the most important fundamentals of good audio engineering is setting proper levels. Even on a small typical mixer, or basic multi-track recorder, there are several controls that affect the level of a signal as it makes it’s
way from your sound source to your speakers and then, ultimately, the level of your headphone or monitor system. These include pre-amp gain, EQ, aux sends and returns, channel fader level, bus or group levels, and finally, the master fader. That’s not to mention the level of the 5:15 train on its way to Pennsylvania station who’s
thunderous crossing horn can be picked up from 5 miles away while miking a nylon string guitar, despite the use
of double moving blankets over the windows of your project studio. But that’s another story with another set of
disciplines. Start off by being aware that anytime you change any control in the audio path, you are probably
affecting gain somewhere. Then, be sure to carefully monitor the levels on your input and output meters to avoid
a clipped signal with too many peaks. Also, remember your ear is the most sophisticated and calibrated piece of
test gear you have. So, setting a good level should be approached from a technical point of view, and then confirmed, by a creative point of view.
1
INPUT GAIN – Control Knob
As the name implies, the INPUT GAIN is used to set the level of the input signal. The
rotary control knob provides a range of gain from +6 to +60 dB. The C valve can accept
levels from most microphones when the MIC/INST switch is set to the MIC position.
When the MIC/INST switch is set to instrument, the C valve can accept signals from
instruments or line level sources. Once you set the MIC/INST switch to the proper position, you can use the INPUT GAIN control to adjust the level of your input signal. It is a
1
good idea to start with the level low and raise it up as you need. Be sure to monitor the
input LED VU METER and try to set the INPUT GAIN control so that the meter reads +0 to
+6dB. If you see the OL LED light you are “Over–Loading” and the sound may become distorted. If this happens,
simply back down on the INPUT GAIN control until the OL light stops flashing.
2
LED VU METER – Input Level
To monitor the signal being presented to the C valve’s input, there is a six-segment LED-bar VU
meter indicating –20, -10, -6, 0, +6 and OL (OVER-LOAD). The level displayed on the meter will be
affected by the MIC/INST switch so be sure that you have that set to the correct position for your
sound source. The LED VU METER features “VU” ballistics, which means it reacts to the signal
based on an average level. Use the VU METER when you are setting your initial input level with the
INPUT GAIN control. Try to set the INPUT GAIN control so that the meter reads +0 to +6dB. If you
see the OL LED light you are “Over–Loading” and the sound may become distorted. If this happens,simply back down on the INPUT GAIN control until the OL light stops flashing.
3
ANALOG VU METER - Output Level
To monitor the signal being sent from the C valve’s OUTPUT, there is an ANALOG
VU METER with a scale from infinity to +4dB. The level displayed on the meter will be
affected by the MIC/INST switch so be sure that you have that set to the correct position for your sound source. The ANALOG VU METER features “VU” ballistics, which
means it reacts to the signal based on an average level. Use the ANALOG VU
METER when you are setting your output level using the VOLUME control. Try to set
the level so that the meter reads about 0dB. If you see the needle stay all the way to
the right, you are “Over–Loading” and the sound may become distorted. If this happens, simply back down on the VOLUME control until the meter reads about 0dB.
8
3
2
Operating The C valve
4
MIC/INST - Select switch
The MIC/INST switch is used to set the operating level of the C valve’s input. When using a microphone, set the
switch to the “MIC” position, which is selected when the switch is in the out position
and the green LED is off. When you press the MIC/INST switch in, the green LED
will illuminate indicating that the C valve is ready to accept a signal from an instrument like a guitar or bass guitar. You can also use the INST input to connect a line
level device like a keyboard or drum machine.
5
48 VOLT - Phantom Power Switch
The C valve provides on-board phantom power supply for powering condenser
microphones.
4
5
6
IMPORTANT NOTE: With all phantom power supplies, you can get an annoying POP when you engage the phantom power
supply, or when you unplug a cable that has phantom power on it. Depending how loud you are monitoring, this POP can
cause damage to your speakers, and even to your hearing. Be sure to turn your speakers, and/or headphone levels, all the way
down when switching the phantom supply on and off or plugging and unplugging cables.
If you are using a condenser microphone, turn down your monitors speakers and/or headphones, and then press
the front panel 48 VOLT switch to engage the phantom power. The red LED will illuminate indicating the phantom power is present on the mic connector.
6
PHASE – Switch
For a variety of miking and mixing techniques, it may be necessary to invert the signal phase from the source you
have plugged into your C valve pre-amp. When the PHASE switch is pressed in, the yellow LED will light showing that the input signal is now out-of-phase.
Using The C valve For Getting A Sound
In addition to providing a pristine signal path, the C valve offers several features to
help you get a sound. They include the LOW CUT, VOCAL EQ, LIMITER, ENHANCE
and SATURATION control. Each one of these parameters has an effect on the signal.
8
Using the Low Cut Filter
Like any good mic pre, the C valve features a LOW CUT, or (High-Pass), filter for
attenuating the bottom-end frequencies. The LOW CUT filter allows you to remove the
lower frequencies that you sometime just don’t want to pick up. For example, when
you are miking a high-hat you only want to capture the frequencies that the hi-hat is
7
producing. Therefore, by using the LOW CUT filter, you can reduce the amount of
pick-up from the low toms and bass drum that may leak into the hi-hat mic. You can use the same
technique on other instruments like acoustic guitar, violin, piano and even on vocals. In live sound applications,
the LOW CUT filter is especially useful for removing stage rumble. The C valve provides a variable LOW CUT filter that allows you to adjust the exact frequency at which the low frequencies begins to roll-off, or attenuate.
7
LOW CUT
Use the LOW CUT switch to engage the LOW CUT filter. When the switch is pressed in, the green LED will illuminate indicating the LOW CUT filter is active. The bottom-end will begin to roll-off starting at the frequency set
on the LOW FREQUENCY control knob. The LOW CUT filter attenuates all the frequencies below the set frequency at a 12dB per octave slope.
9
Operating The C valve
Using the Low Cut Filter ( continued)
8
8
LOW FREQUENCY
You can set the exact frequency to start attenuating the low-end using the LOW
FREQUENCY control knob. Be sure that the LOW CUT filter switch is engaged
as described in the previous section. The variable LOW FREQUENCY rotary
knob allows you to set the low-cut filter to operate at any frequency from 18 to
300Hz.
Using the Tube Process
The C valve features a 12AX7 vacuum tube for adding extra harmonic content to
the signal. It produces a subtle amount of even order harmonic distortion (the distortion we like), the amount of which can be controlled by the SATURATION control knob.
9
9
SATURATION
Use the SATURATION rotary control knob to adjust the amount of “Tube
Process”. Start with the SATURATION knob turned all the way down and slowly
raise the control until you have the amount of “Tube Process” that you want.
10
VOCAL EQ
The C valve features a pre-set equalization curve for “sweetening” your vocal, or
for that matter, your instrument signal. The VOCAL EQ is a “shelving” equalization curve that lifts the high frequencies by 6db starting at 10 kilohertz. When
you press the VOCAL EQ switch to the in position, the green LED will illuminate
and you will be adding some airy top-end to the signal.
11
LIMIT
In order to help set, and keep, a good signal level, the C valve features on onboard limiter circuit. A limiter is a type of dynamics processor that automatically
10
11
12
controls the gain of the signal by setting the maximum level that the signal can
reach. Using a limiter will help you avoid unwanted peaks or overloads in the signal, which can sometime
cause undesirable distortion. When the LIMIT switch is pressed in, the yellow LED will illuminate indicating
the C Valve is limiting the signal.
12
ENHANCER
The C valve’s ENHANCER will restore the high frequency content that can sometimes be lost when high gain
reduction is applied from the limiter circuit. The enhancer circuit works by applying an equalized signal to the
control voltage that is used in the LIMIT circuit. The equalized signal adds high frequencies back to the control voltage so that the limiter works with a little less effect on the high frequency content. The result is a
restoration of the high frequency even if the LIMIT circuit is heavily active, so you get a thick sound that’s not
dull.
Use the ENHANCER in conjunction with the LIMIT circuit, by pressing both the ENHANCER and LIMIT
SWITCH in. The ENHANCER is active when the switch is in and the yellow LED is lit.
10
Operating The C valve
Using C valve With An External Signal Processor
To further control your signal, the C valve features an insertion point, or “effects loop”, on two 1/4-inch phone
jacks, INSERT SEND and RETURN. An insertion point is a patch-point that interrupts the signal, allowing you to
bring that signal outside to be processed by another device. You can use these connections to interface an
external signal processor like an equalizer, compressor, noise gate, reverb and other audio devices to process
the signal directly inside the C valve. A common application for the C valve’s insert point is using a compressor.
13
Insert Send and Return
To send a signal to an external processor, use a standard 1/4-inch cable
to connect the rear panel INSERT SEND jack to the input of the external
processor. The signal is sent back to the C valve using a second 1/4-inch
cable by connecting the output of the external processor to the RETURN
jack located on the C valve’s rear panel.
The diagram below shows a typical application for using a compressor (in
this example a Samson C com opti) in the C valve’s insertion point.
11
13
Operating The C valve
17
Using the Digital Output
If you are using a digital recorder that has an S/PDIF digital input, you can take
advantage of the C valve’s high quality 24-bit A-to-D converter to make a direct
digital connection. Use a high quality co-ax digital cable to connect the C
valves RCA S/PDIF output to the S/PDIF. When using one C valve, the mono
signal is sent to both the left and right S/PDIF output. You can use two C valve’s for
stereo recording by using the DIGITAL LINK jack as explained on page 13 of this manual.
17
The C valve’s A-to-D converter has a selectable sampling rate. Simply put, the sampling rate is how many times
per second the A-to-D converter takes a digital picture of the sound. Use the 48 / 96 switch to select the sample
rate that is compatible with your digital recording device.
18
48 / 96 Switch
19
The C valve has an internal 24-bit A-to-D converter that can be set to either 48 kilohertz or 96 kilohertz sampling rates. Be sure to set the digital input on your sound
card or digital recorder to the same sample rate. To set the sampling rate on your
sound card or digital recorder, see the manufacturers owners manual for your specific
device. When the 48 / 96 switch is set to the out position (the LED is off), the sample
rate is set to 48 kilohertz. When the 48 / 96 switch is set to the in position, the LED will
illuminate indicating that the digital sampling rate is set to 96 kilohertz.
19
Digital OL indicator
18
In order to confirm that you are not clipping or overloading the input to the internal Ato-D converter, the C valve provides a Digital O.L. (Over Load) LED. Ideally, this LED
should never come on while using the C valve’s digital output for recording or live use.
If this LED illuminates, turn down the output VOLUME control, and if necessary the INPUT GAIN control.
12
Operating The C valve
20
Using the DIGITAL LINK Jack
For stereo applications, you can connect two C valves together by using the
DIGITAL LINK jack. The DIGITAL LINK jack is a 1/4-inch TRS (TIP, RING,
SLEEVE) connector providing a balanced input that is connected directly to the
20
C valve right channel input of the A-to-D converter. Since the C valve’s signal
is internally connected to the left A-to-D converter input, the signal from the
second C valve’s OUTPUT can be connected the DIGITAL LINK jack of the
first unit to feed the right channel of the first C valve’s A-to-D converter. Now
use the S/PDIF output on the first C valve as one stereo digital output. The
signal from the first C valve (or the left channel) is being carried on the left side
of S/PDIF output and the signal from the second C valve (or the right channel)
is being carried on the right side of the S/PDIF output. The following diagram shows a typical hook-up for connecting two C valves with one stereo digital output.
13
C valve System Set-Ups
Using C Valve in a Live PA System
In this example, a condenser microphone is connected to the C valve’s MIC input using a standard XLR cable. To
make a balanced connection, the C valve’s output is connected to the input of a standard PA mixer using a standard 1/4-inch TRS (TIP-RING-SLEEVE) cable. The mixers main left and right outputs are connected to powered
PA speakers (for example, the Samson dB500a).
Using C Valve to Warm-up a signal
You can use the C valve to “warm-up” the signal from recorded tracks or instruments such as digital electric
piano or bass, to name a couple. The example above shows the two C valves inserted into the insert point of a
mixer on the keyboard and bass channels. Set the input and output level so that you get unity gain (the same
level in and out), and then use the SATURATION control to adjust the amount of tube sound.
14
In this example, two C valves are used for recording a stereo signal to a computer based hard disk recorder. The
balanced OUTPUT of the second C valve is connected to the DIGITAL LINK input on the first C valve so that both
signals are sent the S/PDIF out on C valve one. For extra dynamics control, a compressor (in this case the
Samson C com opti optical compressor) is connected to each C valve via the INSERT SEND and RETURN jacks.
C valve System Set-Ups
C Valve Stereo Digital Recording Set-up with External Compression
15
Stacking and Tilting the C valve
Stacking the C valve
You can stack one C valve, or
any other Samson C Class
units, on top of each other by
simply lining up the bumpers.
Important Note: When stacking
the C valve, be sure that only
the bottom unit has the tilting
feet installed.
Installing the Tilting Feet
You can install the tilting rubber feet included with
your C valve so that you can set the unit at a comfortable operating angle on a workstation or desktop. Follow the simple instructions below to install
the tilting feet.
•
Remove the bottom screw from right front
bumper.
•
Identify the right tilting foot by the locating
“R” marking on the inside top.
•
Position the angled foot under the right
bumper as shown in the drawing.
•
Use the included 4 x 10mm screw to attach
the foot.
•
Repeat the steps above for the front left
bumper.
16
C valve Connections
CONNECTING THE C valve
The are several ways to interface the C valve to support a variety of applications. The C valve features servobalanced inputs and outputs, so connecting balanced and unbalanced signals is possible without any signal loss.
The C valve can be used on a single instrument by connecting to a channel’s insert points, or on an entire mix
"in-line" between a mixer’s outputs and a power amp or equalizer.
INSERT POINTS
Many mixers today provide channel and bus or group inserts. Insert points are input and output patch points that
interrupt the channel or bus signal so that external processors can be connected. Channel insert points are ideal
for connecting to when using the C valve to process a single channel like a vocal, bass or guitar. Bus insert
points are ideal for compressing groups of instruments like vocals, strings or drums. If you are connecting to a
channel’s insert points, you may have a single TRS jack for Send & Return. In this case, use an Insert "Y" Cable
that is configured like the one in the wiring diagram below.
Insert Cable 1/4” male TRS connector to two male 1/4”
in send and return configuration.
IN-LINE
In live sound operation, the C valve can be installed in-line between a mixer and equalizer or power amplifier.
For these applications the C valve provides both 1/4" TRS connectors and XLR connectors to easily interface
with most any professional audio device. Follow the wiring examples below for your particular installation.
Unbalanced 1/4” Connector
XLR Balanced Wiring Guide
Balanced TRS 1/4” Connector
17
C•Class Dual Rack Adapter (optional)
The C Class Dual Rack Adapter is available as an accessory from an authorized Samson dealer.
1.
2.
3.
4.
5.
Disconnect any cables, that may be connected, from the C•Class unit to be mounted, i.e., the power supply cable, audio
cables, headphones.
Align the holes in the C•Rack with the holes on the bottom of of the C•Class unit to be mounted. Use the supplied phillips
head M4 machine screws to fix the unit to the rack as shown below.
Repeat steps 1 and 2 to mount the second C•Class unit if desired.
Once the units are mounted on the C• Rack, the assembly can be placed into a rack and secured via the rack ears. (Screws
not supplied)
To remove the C•Class unit from the C•Rack, reverse the instructions above.
If you experience any difficulties, or require further assistance, contact Samson Customer Service at 1-800-3SAMSON (1-800-3726766) M–F 9AM to 5PM (eastern standard time). For more product information please visit our website at
www.samsontech.com.
18
C valve Block Diagram
19
Specifications
System Specifications
Frequency Response
Dynamic range
THD
Crosstalk
Detector
20Hz to 20kHz + - 0.5 dB
95 dBu, un-weighted, 22 Hz to 22 kHz
0.008 % typ. @ +4 dBu, 1 kHz
90dB 22 Hz to 22 kHz
RMS
Inst/Line In
Connectors
Impedance
Max. Input Level
1/4"TRS jack
1 meg Ohm balanced
+21 dBu, balanced and unbalanced
Mic Input
Connectors
Impedance
Max. Input Level
CMRR
XLR
2.5k Ohm balanced
+21 dBu, balanced and unbalanced
Typ. 40dB, >55dB @ 1kHz
Analog Output
Connectors
Impedance
Max. Output Level
1/4"TRS jack
60 Ohms balanced, 30 Ohms unbalanced
+21 dBu, balanced and unbalanced
Digital Output
Connector
Type
Converter
Sampling Rate
RCA
S/PDIF
24-bit
Selectable 48 / 96 kilohertz
Insert Send
Connector
Impedance
Max. Input Level
1/4" jack
>100 Ohm
+21 dBu
Insert Return
Connector
Impedance
Max. Output Level
1/4" jack
>10k
+21 dBu\
Power Supply
AC1800
AC1800UK
AC1800E
AC1800AU
18 VAC, 1 Amp
USA/Canada
U.K.
Europe
Australia
Dimensions
1.61" (41 mm)H x 8.67'' (220.68 mm) x 7.5'' (192mm)
Net Weight
2.5 lbs (1.14 kg)
Shipping Weight
7.5 lbs (3.4 kgs)
20
Samson Technologies Corp.
575 Underhill Blvd.
P.O. Box 9031
Syosset, NY 11791-9031
Phone: 1-800-3-SAMSON (1-800-372-6766)
Fax: 516-364-3888
www.samsontech.com