1
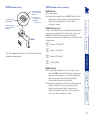
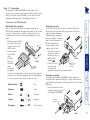
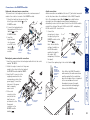
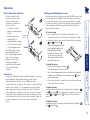
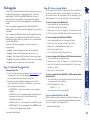
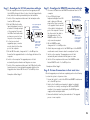
Now please follow Stage D. Now please follow Stage E. Stage E - Return all connections to their usual states Once the upgrade process has been completed, perform the following to return the system to its previous state. 1 Ensure that switch 1 on both the LOCAL and REMOTE modules are set to their OFF positions. 2 Refer to the ‘Installation and operation’ chapter for detailed instructions on correctly connecting the LOCAL and REMOTE modules to the computer, its peripherals, the REMOTE power supply and the twisted pair cable. 3 Remove the diskette from the system and reboot. The upgrade process is now complete. 1 Disconnect all cables from the REMOTE module and take it to the computer. 2 Use a ‘KVM switch-type’ Use a KVM switch-type keyboard connection cable keyboard cable (6pin mini-DIN between the REMOTE module and the computer male to 6pin mini-DIN male plugs with all lines connected) - not supplied. Attach one end of the cable to the keyboard port of the computer. Connect the other end of the cable to the keyboard port of the Leave the video monitor connected REMOTE module. This is the to the computer so that you can only connection required. check progress 3 On the REMOTE module, change switch 1 to the ON position. 4 Attach the power supply unit to the POWER input of the REMOTE module and connect the mains lead to a nearby wall socket. 5 Switch on the computer. The upgrade process will start automatically and confirmation will be given on screen. 6 Switch off the computer and disconnect the REMOTE module. Return REMOTE switch 1 to the OFF position. Stage D - Reconfigure the REMOTE connections and begin 1 On the computer from which you will run the upgrade, ensure that its BIOS settings will allow it to boot from the floppy diskette drive, rather than booting immediately from the hard drive. 2 Switch off the computer and disconnect the twisted pair cable from the LOCAL module. 3 On the KVM+A multi-cable, Leave only the keyboard connection intact leave the keyboard connector between the LOCAL attached to the keyboard port module and the computer of the computer. Disconnect the KVM+A multi-cable video and mouse connectors from the ports on the computer. Connect a video 4 So that you can check monitor to the upgrade progress, connect a computer so that you can check monitor directly to the video progress port of the computer. 5 On the LOCAL module, change switch 1 to the ON position. Ensure that the upgrade diskette is in the floppy disk drive of the computer. 6 Switch on the computer. The upgrade process will start automatically and confirmation will be given on screen. 7 Switch off the computer and disconnect the KVM+A multi-cable. Leave the monitor connected and the upgrade diskette in the floppy disk drive. Return LOCAL switch 1 to the OFF position. Stage C - Reconfigure the LOCAL connections and begin 16