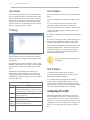
1
Digital Video Player
User Manual
DVP
An Advanced Media Design Technology
DVP |
Digital Video Player
©2009, Advanced Media Design, Inc
All rights reserved. This document contains information that is proprietary to Advanced Media Design, the manufacturer of all MediaPOINTE® products. No part of this publication may be reproduced, stored in a retrieval system, or
transmitted, in any form, or by any means, electronically, mechanically, by photocopying, or otherwise, without the
prior written permission of Advanced Media Design, Inc. Nationally and internationally recognized trademarks and
trade names are the property of their respective holders and are hereby acknowledged.
MediaPOINTE® is a registered trademark of Advanced Media Design, Inc.
Disclaimer
The information in this document is believed to be accurate and reliable; however Advanced Media
Design, Inc. assumes no responsibility or liability for any errors or inaccuracies that may appear in this
document, nor for any infringements of patents or other rights of third parties resulting from its use. No
license is granted under any patents or patent rights of Advanced Media Design, Inc.
This document was written by the Development Department of Advanced Media Design, Inc. We are fully
committed to, and take pride in maintaining high quality documentation. We welcome and appreciate
any comments or suggestions you may have regarding content, presentation, structure and distribution of
this document. Please use the contact information below for all correspondence:
Development Department
Advanced Media Design, Inc.
667 Rancho Conejo Blvd..
Newbury Park, CA 91320
USA
[email protected]
Version 4.0
ii
| DVP User Manual 4.0
August 2009
Safety Precautions
For your protection, please read all related safety instructions, observe all warnings and precautions, and exercise common sense
while operating this electronic equipment.
•
Always place the unit on a stable cart, stand or table.
•
Do not use the unit near water or sources of heat.
•
Do not drop or shake the unit. Do not place or install the unit in environments where it can be dropped or shaken.
Make sure the unit is powered off while being moved even for short distances.
•
Observe the power requirements of the unit; if you are not sure of the power available, consult your local dealer or power company.
•
When plugging into a power outlet, insert the plug firmly into the outlet. Route the power cord so as to avoid any activity that may result in
fraying or other damage to the cord or the plug.
•
Under no circumstances should you attempt to override the polarization or grounding protection on the plug.
•
Do not overload wall outlets, integral convenience receptacles or extension cords.
•
Unplug the unit from the wall before cleaning. Do not use liquid or aerosol cleaners.
•
For proper ventilation, do not block the slots and openings. Do not install the unit in a location where the ventilation slots and openings can be
plugged during everyday use.
•
Do not place or install the unit under, on top of or near any heat-producing equipment (i.e. radiators, stoves, or amplifiers),
or in a heated place.
•
Unplug the unit during lightning storms, when it will not be used for extended periods of time, or before you have a
scheduled power outage.
If the unit is visibly damaged either by not observing the precautions above or for any other reason, contact your local dealer
immediately. If the unit does not operate to the specifications set forth in this user guide, or exhibits a distinct change in performance, this may be an indication of a problem needing repair.
Environmental Operating Limits of DVP
Operating Temperature: 0°C to 32°C (32°F to 90°F)
Relative Humidity: 10% to 90% non-condensing
Storage & Transport Temperature: -20°C to 80°C
(-4°F to 140° F)
Electrical requirements
Input: 100-240V ~50/60Hz
Service Support and Training
MediaPOINTE®, Inc. is committed to providing the service support and training needed to install, manage, and
maintain your MediaPOINTE® equipment.
All MediaPOINTE® products are sold through a wide network of Authorized MediaPOINTE® Dealers. For help
with your products, contact your local dealer for assistance first. If for any reason, you would like to contact
MediaPOINTE® directly for information regarding service programs and extended warranty information, training,
installation or usage, we are glad to be of assistance. You can contact us at the phone number listed below, or
visit our website.
MediaPOINTE® Technical Support
Hours: 8:30 a.m. – 5:30 p.m. Pacific Standard Time
(866) 709-0444 TOLL FREE
(805) 214-7911 INTERNATIONAL
[email protected]
DVP | iii
DVP Package Contents
• 1 - MediaPOINTE DVP •
1 - CAT-5e LAN Cable
•
1 - AC Power Cable
•
1 – Male DVI-D Cable
•
1 – IR Remote Control plus 2 AAA batteries
•
Documentation CD-ROM
•
Warranty Document
•
Registration Sheet
iv | DVP User Manual 4.0
August 2009
Warranty
MediaPOINTE warrants that the DVP (but excluding spare parts and consumables) will be free from any defect
in materials or workmanship, and shall perform in accordance with its specification. MediaPOINTE’s sole liability
for breach of this warranty will be (at its option) to repair or replace the defective DVP or component thereof.
Customer may not return defective product to MediaPOINTE until authorization has been given. MediaPOINTE shall
not be liable for any loss of profits or incidental or consequential loss for whatever reason.
Warranty on the DVP may be voided under the following circumstances:
•If the unit becomes defective resulting from transportation damage.
•Damage caused by incorrect storage.
•Damage caused by incorrect operation.
•Damage caused by incorrect handling.
•Use or maintenance in an environment not conforming to the instructions or product specifications of MediaPOINTE.
•Product which is altered or modified such as by the removal or replacement of parts and stickers.
•Minor electrical or mechanical maladjustments.
•Missing or defaced product labelling.
•Damage caused during installation or removal.
•Units that have been determined as being stolen or scrapped.
Document Conventions
The following conventions are used throughout this user’s guide.
The hand symbol indicates a note, containing special instructions, and
in some cases, circumstances that require caution.
The light bulb symbol highlights suggestions or hints.
The high voltage symbol is intended to alert the user to the presence of un-insulated, dangerous
voltages.
Table of contents |
Table Of Contents
About this guide
Disclaimer. . . . . . . . . . . . . . . . . . . . . . . . . . . . . . . . i
Safety Precautions. . . . . . . . . . . . . . . . . . . . . . . . . . . . . ii
Services & Support . . . . . . . . . . . . . . . . . . . . . . . . . . . . ii
Package Contents . . . . . . . . . . . . . . . . . . . . . . . . . . . . iii
Warranty. . . . . . . . . . . . . . . . . . . . . . . . . . . . . . . . iv
Document Conventions . . . . . . . . . . . . . . . . . . . . . . . . . . iv
1
Digital Video Player Introduction & Overview
Introduction . . . . . . . . . . . . . . . . . . . . . . . . . . . . . . . . . 1
Sample Configuration . . . . . . . . . . . . . . . . . . . . . . . . . . . . . 1
Front Panel View. . . . . . . . . . . . . . . . . . . . . . . . . . . . . . . 2
Power Switch. . . . . . . . . . . . . . . . . . . . . . . . . . . . . . . 2
IR Receiver. . . . . . . . . . . . . . . . . . . . . . . . . . . . . . . . 2
USB port. . . . . . . . . . . . . . . . . . . . . . . . . . . . . . . . . 2
Rear Panel View. . . . . . . . . . . . . . . . . . . . . . . . . . . . . . . 2
DC Power Connector. . . . . . . . . . . . . . . . . . . . . . . . . . . . 2
Audio . . . . . . . . . . . . . . . . . . . . . . . . . . . . . . . . . . 2
LAN/ Ethernet. . . . . . . . . . . . . . . . . . . . . . . . . . . . . . . 2
USB 2.0/1.1 (STD. Type A). . . . . . . . . . . . . . . . . . . . . . . . . 2
S-Video. . . . . . . . . . . . . . . . . . . . . . . . . . . . . . . . . 2
HDMI. . . . . . . . . . . . . . . . . . . . . . . . . . . . . . . . . . . 2
DVI. . . . . . . . . . . . . . . . . . . . . . . . . . . . . . . . . . . 2
Serial RS-232 Port. . . . . . . . . . . . . . . . . . . . . . . . . . . . . 2
DVP Specification. . . . . . . . . . . . . . . . . . . . . . . . . . . . . . . 3
2
Access & Network Setup
4
Logging In. . . . . . . . . . . . . . . . . . . . . . . . . . . . . . . . . . 4
Web Portal Access. . . . . . . . . . . . . . . . . . . . . . . . . . . . . 4
Administrator Access. . . . . . . . . . . . . . . . . . . . . . . . . . . 4
vi | TABLE OF CONTENTS
Changing Administrator Password. . . . . . . . . . . . . . . . . . . . . 4
User Access. . . . . . . . . . . . . . . . . . . . . . . . . . . . . . . . 5
User Login Security. . . . . . . . . . . . . . . . . . . . . . . . . . . . 5
Author Access. . . . . . . . . . . . . . . . . . . . . . . . . . . . . . . 5
Author Login Security . . . . . . . . . . . . . . . . . . . . . . . . . . . 5
Network Configuration. . . . . . . . . . . . . . . . . . . . . . . . . . . 5
System Name. . . . . . . . . . . . . . . . . . . . . . . . . . . . . . . 6
IP Settings . . . . . . . . . . . . . . . . . . . . . . . . . . . . . . . . 6
Static IP Address. . . . . . . . . . . . . . . . . . . . . . . . . . . . . 6
DHCP Address. . . . . . . . . . . . . . . . . . . . . . . . . . . . . . . 6
Configuring IP via USB. . . . . . . . . . . . . . . . . . . . . . . . . . . 6
3
System Management Tools 8
AV Controls . . . . . . . . . . . . . . . . . . . . . . . . . . . . . . . . . 8
Audio Setting. . . . . . . . . . . . . . . . . . . . . . . . . . . . . . . 8
Video Setting . . . . . . . . . . . . . . . . . . . . . . . . . . . . . . . 8
AV Test. . . . . . . . . . . . . . . . . . . . . . . . . . . . . . . . . . 8
Date & Time. . . . . . . . . . . . . . . . . . . . . . . . . . . . . . . 8
Command Line . . . . . . . . . . . . . . . . . . . . . . . . . . . . . . 9
RS-232. . . . . . . . . . . . . . . . . . . . . . . . . . . . . . . . . . 9
SMTP Mail. . . . . . . . . . . . . . . . . . . . . . . . . . . . . . . . 9
Notifications. . . . . . . . . . . . . . . . . . . . . . . . . . . . . . . 9
Logging. . . . . . . . . . . . . . . . . . . . . . . . . . . . . . . . . 9
Update. . . . . . . . . . . . . . . . . . . . . . . . . . . . . . . . . . . 10
Software Update. . . . . . . . . . . . . . . . . . . . . . . . . . . . . 10
Reset Configuration. . . . . . . . . . . . . . . . . . . . . . . . . . . 10
System Info. . . . . . . . . . . . . . . . . . . . . . . . . . . . . . . . . 10
Shutdown. . . . . . . . . . . . . . . . . . . . . . . . . . . . . . . . 10
Reboot. . . . . . . . . . . . . . . . . . . . . . . . . . . . . . . . . 10
4
Channels & Media Control
11
Video On Demand Channel Settings. . . . . . . . . . . . . . . . . . . . 11
Viewing a Video On Demand Channel. . . . . . . . . . . . . . . . . . . 11
Live Streams. . . . . . . . . . . . . . . . . . . . . . . . . . . . . . . 11
Archives. . . . . . . . . . . . . . . . . . . . . . . . . . . . . . . . . 11
1
DVP |
DVP Introduction & Overview
Introduction
Welcome to the user’s guide for the MediaPOINTE®
Digital Video Player (DVP). The DVP is one of the
smiplest most cost effective professional media player
in the market. It is capable of receiving media content
via IP/LAN line from other AMD archivers/streamers
(e.g. DMR, DMR HD, and VIdi HD) and playing it locally
on a PC monitor or a nearby LCD TV, big screen
projector, etc. with the same audio and video quality
and resolution of its source.
This user’s guide describes how to set up and use
the DVP to play, transport graphics, video and audio
content over IP networks. As with all MediaPOINTE AVover-IP products, you can control the DVP by different
methods. These methods include Web Portal interface,
remote control, RS-232 serial ports, and Telnet.
This guide is written for units running 4.0 software. If
the DVP is operating on a different version of software,
some capabilities and screenshots may be different.
Key Applications
The DVP player can be used in a variety of situations for
live communication and collaboration. Such as:
• Play live streamed or archived media content from
multiple AMD archivers/streamers sources. • Play visual information, designs, and concepts with
dispersed groups of people to gather input during a
video conference
• Play important videoconferences to other locations
such as overflow rooms or remote conference locations
over your corporate network or stream archived or live
employee training sessions across vast geographical
areas.
• Play research discussion, engineering, architecture,
product design, or process analysis when the
participants are not able to meet in one central
location.
Sample Configuration
The DVP is an AV-over-IP player. It receives the audio/
video input content via IP/LAN line. The video outputs
consist of DVI-D, analog RGB, S-Video, HDMI. The audio
outputs consist of Stereo, Line level, and 3.5mm Jack
(PC audio type). This player supports NTSC and PAL
standards.
The DVP is capable of linking up or channeling to other
AMD product (e.g. DMR, DMR HD, and VIdi HD). Once
the channels between them established, the user is
able to view and play archived or live streamed content
from a variety of AMD archivers/streamers. The media
can be viewed via local PC monitor or a TV monitor
if desired. Please see chapter 4 for information on
Channels setup.
| DVP User Manual 4.0
August 2009
1
2
3
Front Panel View (above)
The front panel consists of a power switch, IR receiver,
and an USB port.
1. Power Switch
Rear Panel View (below)
1. DC Power Connector - Input 100-240 VAC 50/60Hz
external power supply with 12VDC–3A output. This POWER button on the front of the unit will turn
the unit on and off. It is used in conjunction with the
main power switch on the rear of the unit.
2. Audio - Three audio outputs consist of Stereo, Line
level, and 3.5mm Jack (PC audio type)
1. Ensure power supply switch is in the ON position
2. Start the unit by pressing the POWER button
4. USB 2.0/1.1 (Std. Type A) - The two USB ports can
be used for network configuration of the DVP. For
more information on USB network configuration, see
chapter 2.
2. IR Receiver
5. S-video - One S-video output
The IR Receiver is used with the included remote
control.
6. HDMI - One HDMI output
(on back panel)
3. USB Port
The USB port can be used to offload media from and
to the DVP. It can also be used to set or capture an IP
address. See the Network Configuration section for USB
IP address configuration. Use this information when you first purchase the DVP
and when you are ready to install the hardware at
your site. To turn on the unit ensure the power supply
switch is in the ON position then start the unit by
pressing the POWER button. 3. LAN/Ethernet - 10/100 Mb (RJ-45) input
7. VGA - HD-15 Female output connector for local
monitor. NOTE: THIS IS NOT A PC LOOP-THROUGH
8. DVI - One DVI output
9. Serial RS232 Port - Two DTE Male DB-9 connectors
used to attach a computer or other equipment for
serial control.
7
9
8
5
6
3
4
1
2
DVP |
DVP Specification
PLAYBACK
RTSP stream from channeled MediaPOINTE
appliances
OUTPUTS
Line level 3.5” Audio output
DVI
VGA
S-Video
HDMI
NTSC or PAL
RESOLUTIONS & FRAME RATES
Plays native resolutions and frame rates from
source stream
NETWORK INTERFACES
1 x Ethernet (10/100/1000 MBit)
PROTOCOLS
HTTP, TCP/IP, FTP, UDP, RTSP, SMTP, DHCP, NTP.
Uses channels to communicate wiith DMR,
DMR HD, & VIDi HD
SYSTEM MANAGEMENT
HTTP Web Portal
Application Interface (API) for custom web
applications
RS232 control
telnet control
OSD w/ IR controller IE6
SECURITY
Two user level accounts
ENVIRONMENTAL DATA
Operating temperature: 0º C to 40º C (32º F
to 104º F)
Relative humidity: 10% to 90%
Storage and transport temperature: -20º C to
80º C (-4º F to 140º F) non-condensing
POWER
Input 100–240VAC, 50–60Hz, 250W max.
external power supply
Output 12VDC–3A
PHYSICAL DIMENSIONS
1/2RU Height: 3.5” (89mm)
Width: 19” (483mm)
Depth: 14” (355mm)
19” rack mountable, 2U height
| DVP User Manual 4.0
2
August 2009
Access & Network Setup
Logging
Setup In
Administrator Access
This
section
describes
the
procedure
for athe
first
Use this
information
when
you
first purchase
DVPtime
and
login,
andare
theready
DVPto
access
when you
installrights.
the hardware at your site. This
The Administrator maintains all rights to the DVP. section shows the back panel and explains how to connect the
separate input connections to the unit.
The default IP address is:
192.168.1.253
Web Portal Access:
When the unit is initially accessed, it will default to a
“guest” user access however, you’ll need to click on the
LOGIN menu item to initiate another login launcher. To log into the DVP, browse to its IP address using your
Internet browser. There are three levels of access
rights. There is a “user” login, an “author” login, and a
system “admin” login.
1. If you are already logged into the DVP as a user or
author, click on the LOG IN selection at the top of the
main menu. You will be prompted to enter a username
and password.
2. Use the login id “admin”. The default password
is “MediaPOINTE”. Note that the login id and the
password are case sensitive.
3. From the Security selection of the main menu, the
Administrator can enable or disable logins for users and
authors and can change the admin password.
Changing the Administrator Password
Administrator rights are required to access or change
any of the settings under the “Configure” and “Manage”
sections in the main menu. These sections include:
Config IP, Security, Update, and System Information.
By default, the Administrator ID and password are set
to “admin” and “MediaPOINTE” respectively. It is not
possible to change the Administrator ID. It will always
be “admin”.
To change the Administrator password, enter a new
Administrator password in the “New admin Password”
field (10 characters maximum) and confirm it by
clicking Change Admin Password button. The next time
the DVP is accessed, the new admin password will take
effect.
Be sure to write down the new administrator password
and keep it in a safe place. If you forget the admin
password, the DVP will have to be reset back to the
factory defaults to enable an administrator to access
the “Configure” and “Manage” sections of the unit.
User Access
The user has the ability to view existing content on the
DVP. 1. Once you have navigated to the site, you will be
presented with the default menu page. Anyone who
logs into the DVP is considered a ‘Guest’ user until
they complete the admin login. Administrative login is
required to make changes to the system settings under
the “Configure” and “Manage” sections of the menu. If all you wish to do is playback content from the DVP
you will not need administrator rights. No password is
required for the standard Guest user login as a default. However, the administrator has the ability to modify
this feature to require a password for viewers to login.
2. In order to change the default IP settings of the DVP
or any of the other configuration settings, you must log
in with administrator rights.
User Login Security
By default, user security is turned off. Anyone can
LOGIN to the DVP without being asked for a login ID or
password. Checking the Enable user security checkbox
will enable security for the user. This will require all
users to have an ID of “user” and the password created
in the “user password” field.
Enter a user password in the “user password” field and
confirm it by clicking the Save user Security Settings
DVP |
button. The next time the DVP is accessed, anyone
logging in will be presented with a login box asking for
the ID “user” and a password.
Un-checking the Enable user security checkbox will
restore the default settings.
Author Access
The Author maintains content creation rights on the
DVP. The Author can set recording options but does not
have access to the “Configure” and “Manage” sections
of the menu.
1. If you are already logged into the DVP as a user or
admin, click on the LOG IN selection at the top of the
main menu. You will be prompted to enter a username
and password.
2. Use the login id “author”. The password will be
user defined in the User Security section of the main
menu. Note that the login id and the password are case
sensitive.
Author Login Security
Author rights are required to access or change any
of the settings under the “Options” section in the
main menu. By default, the author login password is
disabled. Checking the Enable author checkbox will
enable the author login security. Enter an author
password in the “author password” field and confirm it
by clicking save author Security Settings button.
Un-checking the Enable author LOGIN checkbox will
deactivate the need for an author login password
Network Configuration
The System Name and all network configurations can be
set in the IP Settings menu page. Network settings may
also be configured via USB memory stick.
| DVP User Manual 4.0
August 2009
System Name
Static IP Address
The factory set system name is the unit build number.
You can change the name in the IP setting menu page
by entering a new name in the text field. A reboot is
required for the new name to take effect. The name
can be up to 15 characters long and consist of alphanumeric characters. No special characters or symbols
will be accepted except for a hyphen.
To set a Fixed (Static) IP address, follow the procedure
below.
IP Settings
1. Connect the Ethernet / LAN cable and power up the
DVP.
2. On your Internet browser, enter the current IP
address of the DVP. (Note: If the unit has factory
settings, the default static IP address is: 192.168.1.253)
3.Login to the DVP using the procedure shown in the
Logging In section.
4. Navigate to the network settings page by selecting IP
Settings.
5. In order to change to a Fixed or Static IP address, set
the DHCP Client checkbox to “Disable”. Fill in the IP
Address, IP Subnet Mask and Default Gateway fields.
Once you have completed all of the above steps, select
the Apply Changes button. You will receive a pop-up
window warning you to use this option with caution
as you are changing the default address and should
remember the new settings.
The System Name and all network settings can be set
in the IP Settings section of the main menu. Network
settings may also be configured via USB memory stick
configuration.
To quickly find the system’s IP Address, connect a VGA
(RGBHV) or DVI monitor to the output. Use the keypad
to navigate to the System Info page of the on screen
menu.
IP addresses may be assigned to the DVP by two
ways: DHCP and Fixed (Static) IP. If your network is
configured for DHCP, the IP address will be provided
automatically and will be visible on the video output of
the DVP on power up. Network Configuration
Setting
Description
DHCP Client Enable DHCP settings for automatic address retrieval f rom
DHCP Server. Disabling the DHCP client will require a static IP
address (with subnet mask and default gateway) to be entered.
IP Address
Assign a static IP address to DVP. This field will also display the
currently assigned IP address
IP Subnet
Mask
Assign subnet mask to DVP. This field will also display the
currently assigned subnet mask
Default
gateway
Assign a default gateway to the DVP. This field will also display
the currenty assigned default gateway
DNS server
If the network supports DNS, enter the DNS Server Address(es))
here.
Note: The new IP settings will take place
immediately
DHCP IP Address
1. Follow the same steps as above (1 thru 4)
2. To allow the DVP to pick up an IP address, set the
DHCP Client checkbox to “Enable”.
3. If you have made any changes to the network
settings, select the Apply Changes button. You will
receive a pop-up window warning you that you to use
this option with caution as you are changing the default
address and should remember the new settings.
Configuring IP via USB
The network parameters of the DVP can be set via a
special configuration text file on a USB memory stick. Insert the memory stick into one of the DVP USB ports
at any time. The unit will look for the presence of this
configuration file and will implement the settings from
the file. Use a simple ASCII text editor to create the
file.
DVP |
This file must be placed on the root of the USB drive.
This file must be named dmx_ip_conf.txt and must have
the following format (note: the fields in RED should be
configured for your network settings).
dhcp=(bool)0
dns_1=(string)192.168.0.2
dns_2=(string) 192.168.0.3
ethernet=(string)auto
gateway=(string)192.168.1.1
ipaddress=(string)192.168.1.253
netmask=(string)255.255.255.0
If the dmx_ip_conf.txt file is intentionally
left blank with no text of any type within
the body of the file, the DVP will write
its network settings to this file. This is
an easy way to obtain the unit’s network
settings.
| DVP User Manual 4.0
3
August 2009
System Management Tools d ea Toolbar
The DVP can be controlled by several different methods.
These include, a Web Portal interface, IR remote control, contact closure, RS-232 serial port, Telnet, or by the convenient
button panel (Keypad) on the front of the unit. This section
will cover each of these control interfaces in detail.
AV Controls
Audio setting
In the AV Control menu page, audio input and output
levels can be adjusted either by sliding the pointer
along the bar, or by entering a value from 0 to 100 in
the text field. You can also mute the output by clicking
on the icons. Event tones can be turned on to alert you
when an event occurs. For example you will hear a tone
when you stop recording.
front panel. The power switch has an internal RED LED
that will turn on when the power is activated.
• The DVP has a fully featured Web Portal that can be
accessed via a web browser once the unit has booted
up. Enter the unit’s IP address in the web browser’s
address bar to access the main menu. Then, navigate
to and click on the AV Test menu page. .
• There you can click on various video test patterns and
audio clips to test AV output. When done, click on STOP
TEST to suspend the AV test. Each of these tests will
auto-suspend it-self after 10 seconds of being initiated.
Video Setting
Display Settings (AV Controls menu page)
Setting
Description
Aspect Ratio
The aspect ratio of the output can be
specified to be either 4x3 or 16x9
Media Player Status
When enabled overlays the elapsed
and duration time of the media file
during playback on the DVP
AV Test
Navigate to the AV Test menu page and begin by making
the following connections to the back panel of the DVP: • Begin first by plugging in the network control cables
(i.e. Ethernet, and RS-232)
• Plug in all of the output connections (i.e. VGA, DVI,
S-Video, and HDMI)
• Finally, plug in the power cable connector and turn
the unit on by pressing the power switch located on the
Date & Time
When content is recorded using the DVP, it is given a
time and date stamp. These can be set in the Date &
Time menu page. The date can be selected from a popup calendar. Confirm any changes by clicking on the Set
Date & Time button. If desired, the NTP (Network Time
Protocol) feature can be enabled to synchronize the
clock of the DVP to an NTP server; click on the “Enable
NTP” box and enter the server information, then click
on Save NTP settings
DVP |
Command Line
DB-9 Female
Navigate to the Command Line menu page to set the
command line interface that can be accessed from
Telnet or RS-232. A list of these commands
Function
DB-9 Female
2
Rx to Tx
3
3
Tx to Rx
2
5
Signal Ground
5
Telnet (TCP/IP)
The Telnet port by default is disabled. To turn on Telnet
control, set the Telnet port number (typically Port 23)
and check the TCP/IP port enable checkbox. A password
for the Telnet session can be enabled by entering a
password in the Password for TCP/IP connection text
box. If a password is not desired on the Telnet session,
leave the text box blank.
To access the telnet client, open a command prompt on
your computer and enter: telnet <ipaddress>
Once connected to the DVP, a connect message will be
displayed.
DVP Welcome to MediaPOINTE
Password:_
Once logged in, type ‘help’ or ‘?’ for a list of
commands. You can also see below for a list of the
available commands.
bye
quit
cli
displayratio
help
?
ipassign
ipset
key
log
netstat
notify
ntp
play
playstatus
reboot
resetconf
shutdown
smtp
status
sysinfo
test
usersec
volume
RS-232
On the back of the DVP there are two serial control
ports configured as a DTE that supports the RS-232
protocol. A Null-Modem cable should be used between
the DVP and the COM port on your PC.
Terminal session settings required for RS-232 control
are: 9600, 8, None, 1 with No Flow Control.
There is no password protection on this interface
and, by default the RS-232 port is enabled. The
administrator has the ability to disable the port by unchecking the COM port enable checkbox.
SMTP Mail
The DVP has the ability to send email messages to a
remote SMTP server. Enter the address of the SMTP
server in the appropriate text box (use the IP address
if DNS settings are not set). The Email field will set the
default “From” field to the entered email. Leave this
field blank to allow the user to enter their own “From”
email address. Confirm any changes to the SMTP mail
configuration by clicking Save SMTP settings button.
Notifications
The DVP can be configured by the Administrator to send
email event notifications from the Notifications section
of the main menu.
• First, navigate to the SMTP Mail menu page to enable
SMTP mail and fill in the mail server and mail author
information (if not already set) then confirm these
settings with the Save SMTP settings button.
• Next, navigate to the Notification menu page and
enter the email address to which the notifications will
be sent and select the events to track. Confirm these
settings with the Save Notification Settings button. Logging
The DVP can be configured by the Administrator to log
events from the Logging section of the main menu. Select the events you wish to save to a log and confirm
these settings with the Save Logging Options button. LOGS (Notification menu page)
Log name
Description
Event Log
The time and date of all media play of live streams or
archived content are captured in this log
Failed Logins
All failed logins attempts are logged and date stamped
SMTP Log
All e-mails sent from DVP are logged and date
stamped
Current logs will hold 14 days of data. Logs listed as
“old” will include the previous 14 days of data.
10 | DVP User Manual 4.0
August 2009
Update
System Info
The Update section of the DVP menu enables the
system administrator to perform several key functions.
These include upgrading the system software to a new
version; and resetting the DVP configuration to factory
default network settings.
The System Information section gives the user
important information about the DVP. The system can
be shutdown or rebooted from this page of the DVP. See the table for more details.
Software Update
MediaPOINTE’s Development Team is constantly striving
to refine and upgrade features on the DVP to lead
technological advances in the archiving and streaming
marketplace.
In order to keep the DVP up to date with all of the
latest features, you may want to update the system
software from time to time. Follow the following steps
to upgrade the DVP software.
• Contact your MediaPOINTE dealer for the latest
software version. This file will have an *.mpup
extension. The downloaded file must be placed on the
same network as the PC that will be used to browse the
web portal.
• Go to the Update section of the main menu and click
on the browse button to search for the downloaded
*.mpup file. Locate the file and specify the path to the
file as shown in the window.
• Select the Upgrade button to begin the upgrade.
Be sure to wait until the upgrade is complete before
proceeding.
• If your DVP doesn’t automatically reboot, manually do
this by selecting the Reboot button in the Info section. This will reboot the unit and the new software will be
in place.
Reset Configuration
Selecting the Reset Configuration button will reset all
DVP passwords and network settings to factory default. This will not delete any of your recorded files. This is
the same as using the reset button within the hole on
the front on the DVP. SYSTEM INFORMATION (info menu page)
Setting
Description
Product Name
Name of DVP
Series
Product Series Number
Version
The installed version number of
current software
Serial Number
The DVP Serial number
Manufacturer
Name of the manufacturing company
Copyright
Copyright date of the DVP
Available disk space
The amount of disk space still
available for media content recording
SDI
This is a unique identifier specific
to each DVP. Provide MediaPOINTE
technical support with this number
should you call to start a ticket
Options
Future Optional Features will be listed
here
Option Keys
This key will be required to activate
an option
Shutdown
Select the Shutdown button to remotely power-down
(shut off) the DVP. Any access to the unit will be lost
as the unit is powered down. In order to power up the
unit, the user must physically push the power switch
on the front of the unit. No communication is possible
with the DVP when it is powered down.
Reboot
Select the Reboot button to power off the DVP and
then turn the unit back on. This is a useful option after
changing passwords or IP Addresses.
DVP | 11
4
Channels & Media Control
The DVP is capable of channeling or bridging over the
network to other channeled or bridgeable AMD product
(e.g. DMR, DMR HD, and VIdi HD) to view/play archived
content, and or play live streams.
Viewing a Video-On-Demand Channel
The following table describes AMD devices’ play/stream VOD capabilities:
Video-On-Demand Channel Product Matrix
Video-On-Demand Channel Settings
Capabilities
Description
DMR
DMR HD
DVP
VIDi HD
VIDi
HD-d
A Video-on-Demand channel is a way to link up to a like
optioned DMR, DVP, DVP, VIDi HD-d, and VIDi HD units
simultaneously. By clicking on “Add New Channel” a
window will open allowing you to enter the IP address
of the device you want to connect to.
View/Play
recorded content
from
Yes
Yes
No
No
No
View/Play live
stream from
Yes
Yes
No
Yes
No
It is important to mention that if a DVP for example is
Web Porting into a DMR-HD that the DMR-HD Channel
settings has allowed the live streams viewing and
archived media playback. Otherwise, the DVP will not
be able to make a proper channel linkage. If a password
has been set for Channel access into the DMR-HD, then
the DVP will need to provide it as well to be able and
channel to it.
Make recorded
content available
to
Yes
Yes
Yes
No
No
Stream live
content to
Yes*
Yes*
Yes
No
Yes
* With Video-On-Demand Option enabled
Live Streams
Navigate to the Live Streams menu page you will see
current live streams from all your VOD channels. To
view the stream click on the play icon under Actions
and a window will open and display the stream.
Archives
Navigate to the Archives page to start and stop a
previously archived material from other channeled
media sources. Simply selecting the desired recorded
media and then clicking the play locally button will
start the content playback.
After filling in the IP address of the media source,
typing in the password if applicable, and clicking on the
“Add Channel” button, you will be able to view any and
all channeled units simultaneously.
During playback, the pause, stop, skip forward and skip
backward controls will be provided.
To play content on the local PC that is browsing the
DVP click on the Play button. In order to play the
file, an MPEG-4 capable playback application (such as
Quicktime Player) is required on the viewing PC. DVP
An Advanced Media Design Technology
Technical Support
805.214.7911
[email protected]
Main Office
667 Rancho Conejo Blvd.
Newbury Park, CA 91320
805.480.3700
www.mediapointe.com