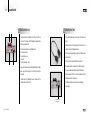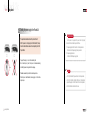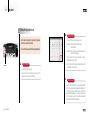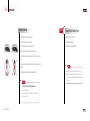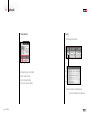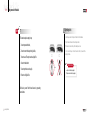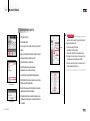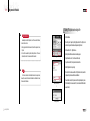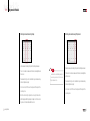
1
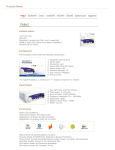
Manual for Use and Installation (a warranty card enclosed)
BTO Co., Ltd. www.plusdeck.com
User manual (a warranty card enclosed) Version. 3.50
Thank you for using Plusdeck2c
This manual includes the installation process, Plusdeck2c operation,
and troubleshooting. In the back of the manual included is the
registration card.
■ The contents of this manual can be changed without prior notice due to any
change in the product.
■ Printed images may differ from the actual images.
■ Copying or distribution of the contents of this material without our written
permission is forbidden.
Copyright
2000–2005 BTO Co., Ltd.
Contents
플러스데크2c사용
Before Installation
1. Before installation ……………………………… 3
1. About Plusdeck2c …………………………………… 4
2. Installing Plusdeck2c …………………………… 9
2. Product Information and Requirements ………… 5
3. Plusdeck2c components …………………………… 5
3. Connecting Plusdeck2c………………………… 15
4. Getting Started ………………………………… 21
5. Using Plusdeck2c ……………………………… 33
6. Getting more out of Plusdeck2c ……………… 47
4. Plusdeck2c specification and electromagnetic
wave regulation ……………………………………… 6
5. Suggestions when installing and using
Plusdeck2c …………………………………………… 7
6. Electromagnetic Waves Validation ……………… 7
7. Suggestions about Installation And Use ………… 8
7. Warranty and Registration Card ……………… 63
Note: Throughout this manual, the names PC and
computer are used interchangeably.
Part 1
Before Installation
1 About Plusdeck2c
2 Product Information
• It uses normal type cassette tapes.
Patent issue 0390012/International patent PCT/KR01/1567
• It is a cassette deck for PC.
Registration of design 30-2001-0034551
• It has software controlled full logic mechanism.
• It is assembled with a high quality Japanese deck and audio mechanism to deliver
CD quality sound.
• It has auto-reverse function.
■ The followings are possible with the Plusdeck2c.
• Play the tape: Listen to the cassette tape on your PC.
Registration of program 2001-01-23-4046
Best prize of the second Digital Innovation/Success Design of KIDP (Korea Institute
of Design Promotion, 2002)/Procurement Success Designed Special Product chosen
by Supply Administration/Best New Product chosen by Hankook Ilbo/Hit Product
chosen by Electronic Newspaper/Hit Product chosen by Computer Times/Emerging
SuccessTechnique Award chosen by the Seoul Economy, etc..
3 Requirements for Plusdeck2c installation
• Convert the tape: Sounds in cassette tapes can be converted to the digital
files on PC as wav or mp3 format.
• 5.25” bay 1EA
• Save Streaming audio into files on PC
• Soundcard(analog Line In)
• Expansion slot 1EA
• Minimum 10M of hard drive space for the software installation
• Windows 95/98/ME/2000/XP(Windows is the trademark of Microsoft)
4 ● www.plusdeck.com
5
Part 1
Before Installation
4 Plusdeck2c components
5 Plusdeck2c Specification
• Size (W×H×D): 145×40×215mm
•Tape speed: 4.75Cm/sec
•Wow & Flutter: 0.09%(WRMS)
•Frequency response: 20 ~ 18,000Hz
•Separation: 40dB
•Signal to Noise Ratio : 55dB
•Power: DC12V
Check all following components are in the box. If you find any component missing or
damaged, contact the distributor or manufacturer.
❶ Plusdeck2c main body
❸ Connection card
❷ 20 pin cable
❹ Serial cable (RS232C cable)
1. Plusdeck2c main body
2. 20 pin cable
3. Connection card
4. Serial cable(RS232C cable)
5. Stereo cable 3 EA
6. Installation CD
7. User manual
8. Fixing screws
green
FCC ID : R4EPlusdeck2c-1
blue
■ A crossed screwdriver is needed to install the Plusdeck2c.
pink
■ If you move it to a different computer, all other components should follow it.
❺ Stereo Cable 3 EA
❼ User manual
6 ● www.plusdeck.com
6 Electromagnetic Wave Compliances
❻ Software CD
❽ Fixing screws
E-H900-01-5845(B)
FCC Information
This is device complies with Part 15 of the FCC Results.
Operation is subject to the Following two conditions:
(1) This Device may not cause harmful interface, and
(2) This Device must accept any interference received,
including interference that may cause undesired
operation.
Note: This equipment has been tested and found to
comply with the limits for CLASS B digital device,
pursuant to Part 15 of FCC Rules. These limits are
designed to provide reasonable protection against harmful
interference when the equipment is operated in a
commercial environment.This equipment generates, uses
and can radiate radio frequency energy and, if not installed
and used in accordance with the instructions, may cause
harmful interference to radiocommunications. However,
there is no guarantee that interference will not occur in a
particular installation. If this equipment does cause
harmful interference to radio or television reception, which
can be determined by turning the equipment off and on,
the user is encouraged to try correct the interference by
one or more of the following measures:
1.1.Reorient or relocate the receiving antenna.
1.2.Increase the separation between the equipment
and receiver.
1.3.Connect the equipment into an outlet on a circuit
different from that to which receiver is connected.
1.4.Consult the dealer or experienced radio/TV
technician for help.
WARNING
Changes or modifications not expressly approved by the
manufacturer could void the user's authority to operate
the equipment.
7
Part 1
Before Installation
7 Suggestions when installing and using Plusdeck2c.
Installing Plusdeck2c
• Make sure that the power is off during the installation.
• A caution should be given with the sharp edges inside the PC
• Do not leave other materials or do not touch other parts inside the PC.
1 Make room for the installation ……………………10
• Avoid a direct exposure to the sun or moisture when installing.
2 Inserting Plusdeck2c ………………………………11
• Mechanical or chemical damage should be avoided.
3 Connecting 20 pin cable……………………………11
• Keep screws or other small components out of children’s reach.
• Do not use bent or damaged tapes.
• Do not move the product while in operation.
5 Fixing connection card and Plusdeck2c …………13
• A great care must be given when using important tapes.
6 Closing PC case ……………………………………14
• Avoid inserting the finger or materials other than tapes.
• Do not disassemble, modify, fix the product by an unauthorized personnel.
8 ● www.plusdeck.com
4 Connecting power cable …………………………12
Part 2
Installing Plusdeck2c
1 Make room for installation
Caution
2 Inserting Plusdeck2c
1.Fully insert the Plusdeck2c into an empty 5.25”bay.
•Turn the power of PC off before installing.
2.Make sure that the back of the Plusdeck2c does not touch other PC components.
•It can cause an electrical shock if it is installed with the power switch
on.
3.For some PC models, you may need a side bracket to hold the Plusdeck2c.
(A side bracket is sold separately.)
1.Open the PC case.
2.Caution should be given with sharp edges inside PC.
3.Locate an empty 5.25 inch bay where Plusdeck2c is installed.
3 Connecting 20 pin cable
1.Connect one end of the 20 pin cable to the Plusdeck2c and the other end to the
connection card. Connecting 20 pin cable may well be done after step 5.
Note
•How to open the case differs from manufacturer to manufacturer.
•If you are having a difficulty, read the user’s guide or contact the PC
manufacturer.
10 ● www.plusdeck.com
2.The 20 pin cable is connected between the Plusdeck2c and ocnnection card.
Notice that there is a notch in the middle of the connector which prevents you
from connecting the cable upside down.
11
Part 2
Installing Plusdeck2c
4 Connecting Power Cable
1. The internal power cable is shown in the picture on the left.
1.Fix the connection card at an empty slot of PC with a screw.
2. A 4 pin power cable supplies 5V and 12V.
2. It can be installed in any empty slot as it does not connect to a PCI bus or
controller.
3. Before connecting the power cable, check the power cable direction as shown in
the picture.
power cable of
computer(inside computer)
5 Fixing Connection Card and Plusdeck2c
3. Fix the Plusdeck2c main body with screws as shown in the picture on the left.
4. The rounded edge of the power cable must face downward when inserted.
4. In order to reduce noise or other related problems, fix all PC components firmly.
5. An extra caution should be used as the power cable connection of the Plusdeck2c
can be different from that of CD or DVD drive.
5. It is recommended that you use the screws that come with the product to fix the
product well.
6. If the power cable is connected wrong, it could damage the the unit.
7. If there is no available power cable, a Y adapter power cable can be used for
extension.
four lines of power cable
(yellow, black, black, red)
12 ● www.plusdeck.com
13
Part 2
Installing Plusdeck2c
6 Closing PC case
Connecting Plusdeck2c
1.A completed cable connection inside PC is shown in the figure on the left side.
2.Close the PC case to finish the installation.
1. About the connection card ……………………… 16
2. Connect serial cable ……………………………… 17
3. Connect to the sound card ……………………… 18
1. Standard connection ………………………………… 18
2. Advanced connection ……………………………… 19
3. Microphone connection ……………………………… 20
14 ● www.plusdeck.com
Part 3
Connecting Plusdeck2c
A
1 About Connection card
D
2 Connecting Serial Cable
1. The connection card can be installed in any slot of the PC as it does not
connect to a PCI interface. It lets the Plusdeck2c communicate with the
PC(serial port and sound card).
1. Connect the serial cable between the serial ports of the connection card
and PC.
2.“Hardware Connect error”message appears if the serial cable is not
properly connected and the software will not work.
2. Its main components as shown on the left side consist of
A. 20 pin cable connector
B. audio input/ouput ports
C. serial port
D. Jumper (default value – open)
B
C
3. The PC serial port is usually located near the printer port below the mouse
and key board port.
4. The 15 pin port in the sound card is a MIDI port not a serial port.
5. The serial cable included in the product uses 1:1 direct communication.
The crossly connected serial cable will not work with the Plusdeck2c.
3. The jumper D is the switch to ground the Plusdeck2c circuitry. The default
value is open position. Changing it to short position could improve the
sound quality.
6. In case the serial port in the PC is out of order or not available, install a PCI
RS232 expansion card to make a serial port.
4. The tape sound from the Plusdeck2c flows out of the blue jack of the
connection card and flows into the PC.
7. The USB/serial connector will not work as it does not allow two way
communication.
The same port can be found
in the back of the PC.
16 ● www.plusdeck.com
17
Part 3
Connecting Plusdeck2c
3 Connecting to Soundcard
2. Advanced connection
1. Standard Connection
① The advanced connection is useful when a headphone set is used. The
headphone sound volume can be adjusted by the volume control located in the
front panel of the Plusdeck2c. Since the headphone is a two channel system,
output sounds from rear and center speakers can still be heard if you are using a
multichannel system.
① Connect the blue jack of the connectin card to the blue jack of the sound card
with the blue stereo cable. If the sound card jacks do not have color distinction,
find the jack with “inward arrow” icon.
② If “Line In” of the soundcard can not be located, contact the sound card
manufacturer for more information.
③ The tape sound flows out of the blue jack of the connection cand and flows into
the blue jack of the sound card. Then the sound card delivers this sound to the
speaker or store it on the PC
④ Using with the TV capture car
The TV capture card works like the Plusdeck2c by sending the analog sound to
Line In jack of the sound card. Since two cables need to be connected to one
input jack, a Y jack can be used. But with a Y jack, one of the input sound levels
could be reduced due to an impedance difference. If this happens, use an audio
splitter instead.
② Connection to use a headphone set
C
B
A
A. Move the speaker cable connected to the green jack(Line Out)of the sound
card to the black jack of the connection card. (If a multi channel speaker setup is
used, other speaker cables except the one to the green jack of the sound card
should remain where they are.)
B. Connect the green jack of the connection card to the green jack of the sound
card with the green stereo cable.
C. Sound flow -Before advanced connection : green jack(Line Out) of the sound
card
speaker
After Advanced connection : green jack(Line Out) of the sound
card
green jack of the connection card
headphone in the
front panel(or black jack of the connection card speaker)
•Tape sound out jack
•This is connected to Line In of the sound card.
18 ● www.plusdeck.com
19
Part 3
Connecting Plusdeck2c
Getting Started
3. Connecting to Soundcard
① Connect the pink jack(D) of the connection card to the pink jack of the soundcard
with the pink stereo cable.
Caution
• If the advanced connection is not done, no sound will be heard through the
headphone jack.
•The tape playing sound will be heard from the front panel jack only when
the advanced connection is done.
•Make sure that the headphone volume control is not in the minimum
1. Starting PC ………………………………………… 23
2. Checking power supply…………………………… 24
3. Checking tape playback sound ………………… 26
4. Installing Software ………………………………… 28
1. Methods of installation ……………………………… 28
2. Installation …………………………………………… 29
position.
5. Running Software ………………………………… 31
Check
Now all cable connections are completed.
Follow the steps in Section 4 to test the installation.
20 ● www.plusdeck.com
Part 4
Getting Started
1 Starting the PC
Getting started with the Plusdeck2c
After the installation and cable connection is finished, this section lets you
test the setup and helps familiarize yourself with the Plusdeck2c operation.
Start PC after you plug the power switch on.
Problem/Solution - PC won’t start
•Check if the power cable is connected properly or power switch is on.
•There are too many devices connected or power supply is not sufficient.
Upgrade the power supply or remove devices no longer in use
•Check if other PC parts are properly connected or get loosened.
22 ● www.plusdeck.com
23
Part 4
Getting Started
2 Checking the power supply to the Plusdeck2c
Problem/Solution
The tape should be inserted as shown in the picture on the left.
When the power is normally supplied to the Plusdeck2c, the tape
should be inserted without excessive force and ejected by itself with
the eject button.
When the power is not supplied or the power cable is not properly
connected, the Plusdeck2c will not operate. Check these
1. The power supply cable to the Plusdeck2c is connected upside down
- the rounded side of the power supply should go downward.
2. The power supply cable is dead
- connect with a different power supply cable.
Side A
•If you push the tape by 2~3 cm, it will be inserted by itself.
•Do not insert the tape by force. If the tape is not inserted automatically,
most likely the power is not supplied. See the next page.
Caution
•Plusdeck2c assumes the top side of the inserted tape as A side.
•When the tape is inside Plusdeck2c, the swinging door in the front face
may look open.
•If all LED lights are dimmer, the power cable is connected upside down.
•If all LED lights are flashing constantly and the tape can not be inserted or
ejected, the tape gets stuck or the Plusdeck2c has a mechanical problem.
•Contact the distributor or manufacturer for service.
24 ● www.plusdeck.com
25
Part 4
Getting Started
3 Checking the tape playback sound
Problem / Solution 2
•After the tape is inserted, play the tape by pushing the playback
button shown in the picture on the left side.
•If you don’t hear the tape sound, check the following problem/solution.
1. Check if Line In in the Recording control window is selected.
•Windows98 : Start 1 Control Panel 1 Multimedia 1 Audio 1
Click Sound playback
•Windows XP : Start 1 Control Panel 1 Sound and Audio devices 1 Audio 1
Click Volume in Sound playback.
(If line in is not seen in the recording control window, click Option Properties and select line in and click OK.)
PlayBack Button
Problem / Solution 1
2. If Line In in the volume control is muted, mute must be unchecked. Also
increase the Line In level if it is set too low.
1. Check the standard connection in page 18.
2. To hear the sound from the headphone jack in the front panel, the
advanced connection in page 19 must be completed.
Problem / Solution 3
If you still not hear the sound after steps 1 and 2 are checked, it is likely that
the Line In of the soundcard has been assigned to perform a different function.
In order for the sound card with only three jacks(Line In, Line Out, Mic) to
support a multichannel speaker setup, Line In and Mic jack are used as Line
Out. To fix this problem, you need to select desktop stereo speaker(2
channel) setup instead of multichannel speaker setup.
26 ● www.plusdeck.com
27
Part 4
Getting Started
4 Installing Software
2. Start Installing
1. Methods of installation
1) Install over the internet
① Go to http://www.plusdeck.com
Click Next
② Search for the latest version at DOWNLOAD menu
③ Download the software
2) Install from a CD
① Insert the Plusdeck2c installation CD in the CD-ROM drive
② If the setup program is not started automatically, double click setup.exe in the
disc.
If you agree to te terms of the licence,
click Next to continue the installation.
Specify a folder where Plusdeck2c is Installed.
28 ● www.plusdeck.com
29
Part 4
Getting Started
2
5 Running the software
① The software can be started by either double clicking the shortcut icon in the
desktop or clicking start 1 Plusdeck2c
Click Next
② When the software has started, the interface as shown on the left appears.
③ The software is closed by clicking X on the upper right corner.
The installation is in progress.
Close program
Click Stop to finish the installation.
30 ● www.plusdeck.com
31
Part 4
Getting Started
Problem / Solution
3
Software will not run
Using Plusdeck2c
1. The problem with the serial cable
① The serial cable is not properly connected. (See page 17)
② The serial cable you are using is not provided by us. (The Plusdeck2c uses 1:1
direct communication. The crossly connected serial cable will not work with the
Plusdeck2c.)
③ The pin in the serial cable has been bent.
2. The problem with the serial port
① The serial port is already in use by other device.
- Other program (including previously installed program) may be blocking the
serial port. This program must be removed.
② The serial port is set to disable at the BIOS setup.
- Change the setting to auto or enable.
Note
If the serial port is not available or out of order, a PCI
RS232 expansion card can be used to make an additional
serial port. An unknown serial port problem may go
away if you use a PCI RS232 card.
32 ● www.plusdeck.com
3. Others
① When there is no power supplied
② When multiple Plusdeck2c software’s were launched
③ When the serial port has gone bad
1. Inserting the tape ………………………………… 34
2. Plusdeck2c hardware……………………………… 36
1. Command Buttons ………………………………… 36
2. LED lights …………………………………………… 38
3. Using Software …………………………………… 39
1. Operating Deck ……………………………………… 39
2. Converting and Recording …………………………… 40
3. Menu List …………………………………………… 46
Part 5
Using Plusdeck2c
1 Inserting the tape
Caution 2
Do not use the Following Tapes
1. Insert the tape as shown in the picture on the left.
1. Wet tapes(can cause rust in the deck)
2. If you push the tape gently, it is inserted by itself.
2. Physically bent or damaged tape
3. Do not insert the tape by force. It can damage the deck.
3. Tape with loose label or partly detached label
4. The Plusdeck2c recognizes the top of the inserted tape as A side.
5. When the tape is inside the deck, the swinging door in the front face may look
open.
Side A
6. Make sure the tape is well winded before inserting. A loosened tape could get
entangled.
7. Foreign materials inserted inside the deck could damage the deck.
Caution
Caution
■ Do not leave the tape inside the deck for long when it is not in use.
■ When longer tapes(C-90 or C-120 minutes) are used, a care must
be given to prevent any damage as these tapes are thinner than C-60
minute tapes.
■When the tape can not be inserted, the possible causes are
A. The tape is bent significantly
B. The power supply problem - the power cable is connected upside down or
the power cable is dead
34 ● www.plusdeck.com
35
Part 5
Using Plusdeck2c
2 Plusdeck2c main body
I : Headphone jack - You can hear all sounds from PC or tape sound using a
headphone set.
1. Command Buttons
A : Playback A side
B
D
L
B : Playback B side
B
D
L
J : Microphone jack - You can connect an external microphone to this port. It
supports mono and stereo microphone.
L : LED lights - 2 green and 1 red LED lights show the status of the Plusdeck2c
operation.
C : Stop - Stop all Plusdeck2c operation
D : Pause playing back the tape
E : Volume Control - adjusting the volume of the headphone jack in the font panel
of the deck
C
A
E
F
G
H
I
J
K
Caution
F and K : Eject the tape
C
A
E
F
G
H
I
J
K
G : Fast forward
H : Fast rewind
36 ● www.plusdeck.com
Caution
The stereo cable connection described in page 19 must be done properly
in order to use the front panel headphone and microphone jack.
If E is at the minimum position, no sound will be
heard from the headphone jack.
37
Part 5
Using Plusdeck2c
2
3 Plusdeck2c main body
1. Deck control buttons
2. LED indicator
- Control buttons for playing the tape on the PC
LED lights(1 red, 2 green) show the status of the Plusdeck2c operation.
LED
Nothing No tapes
◀ ▶
▶
◀
▶
◀
A
Condition
Gray shows flickered
Tapes are inside
Play side A
Play side B
Fast forward
Fast rewind
B
C
A. Window shows the status of Plusdeck2c operation.
※ ◀▶ : Flashing arrow
B. Mode of operation
stops at the end of the current side
Note
All 3 LED lights are flashing constantly when the tape gets stuck or the
Plusdeck2c has a mechanical problem.
play B side
continuous playing mode
fast
rewind
fast
forward
pause
38 ● www.plusdeck.com
auto-reverse mode
play A side
stop
C. Control buttons – play, fast froward, fast rewind, pause, stop, eject
eject
39
Part 5
Using Plusdeck2c
2. Converting and Recording
1. file setting
Press Configure to open the file setting window.
A
A
B
B
C
C
Digital files are generated using A, B, and C control buttons.
A-1
A (Configure) : File setting can be changed.
B (Convert) : Convert the tape into digital files
C (Save) : Record the PC output sound to digital files.
A-2
①
②
③
④
⑤
A-3
A-1(Tape Side) option includes ① A side ② Bside ③ auto reverse
④ auto reverse but it splits between A and B side ⑤ the timer
40 ● www.plusdeck.com
41
Part 5
Using Plusdeck2c
3
A-2(Type) specifies file format
A-1
①
②
③
④
⑤
A-2
A-1
① Wave is a Windows native file format which requires a large storage space
② Mp3 is a compressed file format which requires a less storage space. The number
following Mp3 indicates bit rate. The higher the number is, the better the sound
quality is. Mp3 64 option is recommended for converting voice and mp3 64 or
higher for converting music.
A-3
①
②
③
④
A-2
A-3
③ The table below shows the file size comparison table between wave and various
mp3 bit rate file format.
Sorts of file
Wave
Mp3 256
Mp3 192
Mp3 128
Capacity for 1 min
10MB
2MB
1.5MB
1MB
Sorts of file
Mp3 64
Mp3 32
Mp3 16
Mp3 8
Capacity for 1 min
0.5MB
0.25MB
0.125MB
0.063MB
(The number of after mp3 is bitrate. The size of file is approximation.)
Why converting can be done only in real time
⑤
A-3(Auto Cut) One file option generates an entire tape in one file. Files option
splits the tracks and creates each track as a separate file. It is not
recommended to use Files option for the tape with voice recording
because it can create numerous files as it cuts wherever there is
no sound.
Note
Recommended option
When using Files option, the number of created files differ from soundcard to
soundcard as input level values depend on soundcard. So Line In level in Recording
Control window should be adjusted for Files option to improve.
Note
The file setting will not change once it is set.
High speed recording between different medium can
not be done at this point due to the speed error
problem.
42 ● www.plusdeck.com
43
Part 5
Using Plusdeck2c
3
2. Convert button in B convert the tape to digital files
A
A
B
C
① This is the main funtion of the Plusdeck2c.
② Converting can be started when the tape is inside the deck and the deck is not
in operation.
③ A window which lets you specify a folder and file name appears when convert
button is pressed. After you click OK button, the tape palys and converting is
started.
B
C
3. Save button in C records PC output sound to digital files
① All output sounds from the PC, such as, internet radio, CD, DVD, can be
recorded to the PC.
② A window which lets you specify a folder and file name appears when Save
button is pressed. Recording is stopped by pressing ■button located on the
right side.
④ You can manually stop converting by pressing button on the right side.
Othewise, it will stop accoding to the option selected.
It is recommended that you test a short portion of the tape before converting an
entire tape.
44 ● www.plusdeck.com
45
Part 5
Using Plusdeck2c
3
Getting more out of Plusdeck2c
3. Menu list
①
②
③
④
⑤
⑥
⑦
⑧
① Shows the version of the current software.
② Directs you to the online manual.
④ Lets you send you an email to the manufacturer.
2. Converting the tape to digital files ……………… 50
⑤ Lets you to adjust the soundcard setting.
3. Saving PC output sound as digital files ………… 53
A. Auto setting off turns off auto setting
4. Optimizing sound quality ………………………… 56
B. View volume opens volume cotrol panel
C. View Control Panel opens control panel
⑥ Lets you operate the Plusdeck2c by the keyboard.
⑦ Lets the Plusdeck2c appear above other windows.
⑧ Close the program.
46 ● www.plusdeck.com
1. Deck operation …………………………………… 49
③ Directs you to the manufacturer’s web site.
5 Editing digital files ………………………………… 61
Part 6
Getting more out of Plusdeck2c
3
1 Operating deck
Note
1. Inset the tape as shown in the picture on the left and start the software.
This section explains step by step
2. Try fast forward or fast rewind to check the tape condition.
1. how to operate the deck,
3. The Plusdeck2c assumes the top of the inserted tape as A side.
2. how to convert the tape into digital files,
4. F.F. (▶▶) winds the tape to the end of Side A and REW (◀◀) rewinds to the
beginning of Side A.
3. how to save PC output sound as digital file
4. how to troubleshoot
5. how to optimize sound quality.
6. How to edit digital files
Problem/Solution
Side A
If the tape is not inserted, see page 24.
If the tape sound is not heard, see page 26.
Familiarize yourself with these features by repeating
several times.
48 ● www.plusdeck.com
49
Part 6
Getting more out of Plusdeck2c
3
2 Converting the tape to digital files
Problem/Solution 1
1. Insert the tape to be converted.
In case there is no sound in created files, the sound card setting needs to be
changed as shown in the picture on the left.
2. Start the Plusdeck2c software.
3. Find where you want to start converting in the tape and stop all Plusdeck2c
operation.
4. Setting can be changed by clicking Configure button. The setting does not need to
be changed each time because the previous setting is stored.
5. Click Convert button under Tape ▶ Digital File menu
6. Specify a folder and file name when Save As window appears.
(Special characters such as ?./ can not be used in the name.)
Windows
XP
1. Check the sound card setting in the control panel
Windows98: Start 1 Control Panel 1 Multimedia
WindowsXP: Start 1 Control Panel 1 Sounds and Audio devices 1 Audio tab
2. Sound playback and recording device must use the same device. If Sound
recording appears gray, the sound card driver needs to be reinstalled.
3. Click Volume in Sound recording and check if Line In is selected. The Line In
volume level should be increased if it is set too low.
7. If you click Save button, converting is started while the tape is being played.
Specify a folder and file name
8. Click ■(Stop) button to finish the process manually or the process will continue
until it stops according to the stop option selected.
9. File is stored first as native wave format. If mp3 format is selected, wave file is
compressed to mp3 and wave file is removed afterward.
Compressing wave to mp3
50 ● www.plusdeck.com
10. If wave format is selected, the process ends without mp3 compression process.
(If the intended job is to make an audio CD, it is recommended that file be stored
as wave format.)
51
Part 6
Getting more out of Plusdeck2c
3 Saving PC output sound as digital file
Problem/Solution 2
1. Start the software.
If the above step does not fix the problem, Line In of the sound card functions as
Line Out or it is out of order.
2. File setting can be changed by clicking Configure button. The setting does not
need to be changed each time because the previous setting is stored.
1. In the program which controls the sound card, check if Line In jack is set to Line
Out jack.
3. Click Save button in PC ▶ Digital File menu.
2. If none of the above fixes the problem, it is likely that Line In of the sound
card(Line In) is out order. You should use a different sound card.
4. Specify a folder and file name when Save As window appears.
(Special characters such as ?./ can not be used in the name.)
5. If you click Save button, PC output sound is recorded as a file.
6. Click ■(Stop) button to stop recording.
Note
7. File is stored first as native wave format. If mp3 format is selected, wave file is
compressed to mp3 and wave file is removed afterward.
Even if the sound card driver is not installed, the sound card can output sound.
However, the sound card driver must be installed to use Plusdeck2c as it uses
other sound card functions also.
Specify a folder and file name
8. If wave format is selected, the process ends without mp3 compression process.
(If the intended job is to make an audio CD, it is recommended that file be stored
as wave format.)
Compressing wave to mp3
52 ● www.plusdeck.com
53
Part 6
Getting more out of Plusdeck2c
Problem/Solution
Problem/Solution
In case there is no sound in created files, the sound card setting needs to be
changed as shown in the picture on the left.
The name Stereo Mix may be called differently in some sound cards. The item
which corresponds to Stereo Mix must be selected.
1. Check the sound card setting in the control panel
Windows98 : Start 1 Control Panel 1 Multimedia
WindowsXP : Start 1 Control Panel 1 Sound and Audio devices 1 Audio tab
In order to find the correct one, refer to the manual or select the item one by one
to find which one successfully saves.
2. Sound playback and recording device must use the same device. If Sound
recording appears gray, the sound card driver needs to be reinstalled.
3. Click Volume in Sound recording and check if Stereo Mix is selected. The Stereo
Mix volume level should be increased if it is set too low.
Note
The items on the Recording control window are sound sources which the PC can
recognize. Only one sound source can be selected. When converting the tape, the
PC accepts sound from Line In source. When saving PC output sound, the PC
accepts sound from Stereo Mix source.
54 ● www.plusdeck.com
55
Part 6
Getting more out of Plusdeck2c
4 Optimizing Sound Quality
2. Controling tape playing sound
1. Understanding Sound Card Setting
There are two sound control panels - one is master volume control panel which
controls output sound and the other is recording control panel which controls input
sound.
•Windows98 : Start 1 Control Panel 1 Multimedia
•WindowsXP : Start 1 Control Panel 1 Sounds and Audio devices 1 Audio tab
▶ Click Volume button in Sound playback to open master volume control panel and
click Volume button in Sound recording to open recording control panel.
▶
▷ If you don’t see the items you want, they may be added. In each panel, go to
Option - Properties and select items you want to add. Click OK to complete the
process.
Master Volume control panel
◀
1. Line In level in master volume control panel controls the tape palying sound level.
2. If Line In volume level is the minimum or muted, the tape sound will not be heard.
3. When converting the tape to digital files, if Line In in master volume panel is
muted, you will not hear the tape playing sound but converting will be done.
4. If volume level in volume control or wave is the minimum or muted, you will not
hear any PC output sound.
5. Unneccessary items, such as phone or AUX, should be muted to improve sound
quality.(Volume control, wave, Line In must NOT be muted.)
Recording control panel
56 ● www.plusdeck.com
57
Part 6
Getting more out of Plusdeck2c
3. Controling volume level when converting the tape
4. Controlling volume level when saving PC output sound
1. Line In volume level in Recording control panel controls the input volume level
2. If Line In is not selected or volume level is the minimum, created digital files will
have no sound.
3. If volume level is too high, sound can be distorted. So adjust volume level bar up
and down to optmize sound quality.
4. In most sound cards, 50~70% value should be good but this depends on the
sound card you have.
Note
The name Stereo Mix is called differently depending on
the sound card you have. Some of other names are
What you hear, Wave Out, etc…
1. Stereo Mix volume level in recording control panel controls the input volume level.
2. If Stereo Mix is not selected or volume level is the minimum, created digital files
will have no sound.
3. If volume level is too high, sound can be distorted. So adjust volume level bar up
and down to optmize sound quality.
4. In most sound cards, 50~70% value should be good but this depends on the
sound card you have.
5. After the sound card setting is optimized, if sound quality of created file is
significantly degraded from the original tape, most likely Line In of the sound card
has gone bad. You should test with a different sound card.
58 ● www.plusdeck.com
59
Part 6
Getting more out of Plusdeck2c
5 Editing digital files
5. Getting rid of sound effect
1. It is very difficult to edit sounds in the tape but it is simple to edit converted files
using a sound editing software.
1. Go to Start 1 Control Panel 1 Sounds and Audio devices.
2. In the Sounds and Audio devices window, select Sounds tab.
2. Ther are many programs available, such as Gold Wave, Cool edit. Among them,
the simplest but very powerful to use is Wave Pad by NCH.
3. Select“none”in the sound scheme.
3. Wave Pad can be downloaded from http://www.nch.com.au/wavepad/index.html
Caution
4. Wavepad features
Converting analog sound to digital sound process requires a large hard drive space.
Check your available hard drive space frequently.
In My Documents or desktop folder, there may be a limit set for saving. It is
recommended that you save fles in other folders.
① Copy, cut, paste
Wave Pad
② noise reduction
③ playback speed control
④ Adding silence, Fade In/Out, reverse play
60 ● www.plusdeck.com
61
Part 6
Getting more out of Plusdeck2c
Warranty Card
If you have any question or suggestion, send an email to us at
([email protected]). Also visit us at http://www.plusdeck.com for
updated product information.
Thank you!
■ This product is manufactured under thorough quality control and test.
During the warranty period, you can get the product serviced by the distributor or manufacturer.
■ Warranty period: 1 year from date of purchase
■ Warranty guidelines
1. If a mechanical or other serious problem is found within 10 days from date of purchase, contact the distributor
with the product registration and receipt for refund.
2. If a problem occurs which is not caused by user mishandling within the warranty period, you can get the
product serviced for free.
3. If a problem occurs after the warranty period is over, a service fee will be charged.
4. A service fee will be charged within the warranty period in the following cses.
- malfunction, damage, or lost components by user mishandling or error
- problem or damage caused by natural disasters
- problem or damage caused from repair by unauthorized personnel
- problem or damage caused by the PC
- problem or damage caused by defective tapes
62 ● www.plusdeck.com
8
5. We are not responsible for any damage done on the tape or computer caused by
user mishandling or error.
Product
Purchased date
Purchased place
Customers’ address
Name
Trouble particulars
plusdeck 2c
20 .
.
.
Serial number
Warranty period
Within 1 year from
purchased
Phone number
BTO Co., Ltd. www.plusdeck.com