1
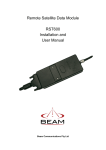
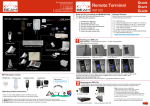
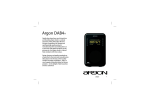
Beam Communications Pty Ltd
8 Anzed Court, Mulgrave
Victoria, Australia, 3170
SatRADIO
T: +61 3 8851 0400
F: +61 3 9560 9055
E: [email protected]
W: www.beamcomm.net
The quick dials are accessed in the following way;
1. Ensure the quick dial locations have been programmed in the main satellite terminal
2. Enter the PIN from the handset as per above instructions
3. Once acceptance pips received enter a Qucik Dial location digit between 0->9 then *, obviously only those locations that
have been preconfigured can be called in this manner.
For example if you enter your PIN followed by 2 * this would dial the preset Quick Dial in location 2
Answering a call
There are two ways of answering a call on the two-way radio, by either using the DTMF controls on the handheld to accept the
call or if you want all incoming calls answered automatically. This can be configured on the terminal.
Answering on a Radio
A RING signal will be intermittently transmitted on the Radio channel and the handheld user can reply to answer the incoming
call by sending a DTMF-0 to answer the incoming call.
Note: The DTMF-0 must be sent in the gap between rings for it to be heard by SatRADIO.
Auto Answer
The firmware can be set to automatically auto-answer an incoming call as long as the Radio is On.
Note: Auto answer cannot work concurrently with Autodial being ON
Using Autodial Mode
This mode enables the RST825 to continuously maintain a phone call link to either the last dialed destination or the Quick Dial
position “0” if configured that way. This is ideal for emergency or disaster recovery situations when the terminal may be being
used as a primary communication tool or a replacement for a Radio link that is down.
Setting up Autodial feature
The Auto-dial switch indicates to the SatRADIO that a number is to be auto-(re)dialed once the Radio is turned on
There are two means of setting an Autodial number into the system
1/ Last number dialled
2/ Quick Dial location “0” ( zero)
Last number dialed
The last number dialled is simply the last number dialled on the SatRADIO either via the Iridium handset or the DTMF radio.
This provides the most convenient means of having an easily changeable number, however caution must be exercised as the
Autodial switch will automatically dial as soon as activated. To check the last number dialled simply take the handset from the
cradle and press the OK button this will display the last number dialled. To enter a new number simply enter the number in
the full dialing sequence and then press OK
Now as soon as the Autodial switch is activated this is the number that will be continually attempted to be called. If at any time
the call drops out the system will automatically redial in order to re-establish the call within 20 30 seconds.
RST825
USRMAN000xxx
Accessing Speed Dials form Radio Handset
The quick-dial mechanism can also be used if any of the quick-dial numbers have been setup in the SatRADIO. Dial PIN, then a
digit between 0->9 then *, to identify the quick dial number. The quick dials can be programmed only using the Beam
Management System when connected with a PC to the configuration port.
Thank you for purchasing the BEAM
RST825 SatRADIO
Optimising Iridium performance
More info @
www.beamcomm.net
Iridium is a line-of-sight Satellite network, conditions that can
compromise the quality of the service you may receive include:
1. Obstructions: Provide the best satellite view for your antenna by removing all obstructions where possible
2. Cabling: Use the shortest cable length and the fewest number of connectors on all Iridium certified antenna cable runs
3. RF Interference: Install antenna as far away from other transmitters as possible.
Package Contents
Before commencing installation ensure your package
has the following components:
This QuickStart Guide lists the steps to install
your BEAM Satellite equipment:
1 x SatRADIO unit in rugged case
1 x Iridium Handset with curly cord
1 x RST915 magnetic-mount Iridium antenna with 5m cable
1 x Radio Handset with curly cord
1 x 110V/240V IEC AC power lead
1 x DC power cable
1 x Hex-Wrench for SIM cover
1 x Printed user manual
1 x Printed Iridium Antenna Guide
1. Install SIM card
2. Getting started
3. Making calls...
1
Installing your SIM card
The RST825 requires that an active Iridium or Telstra Mobile Satellite
SIM card to be installed. This is not included with this RST825 kit.
Refer to your place of purchase if you do not have an active SIM card enabled to
make Iridium Satellite calls.
Tools required:
1. Philips-head screwdriver 2. Allen Key (supplied)
SIM
Socket
Follow the instructions below to install your SIM card:
1
Unscrew holding screw
Quick Dial - Autodial
The Quick Dial Autodial feature uses the Quick Dial memory location “0” of the satellite terminal. This enables a fixed number
to be programmed for permanent application where the SatRADIO is always to call the same location. This is PIN protected
using the Beam Management System and can only be changed by an authorized person.
So long as the main terminal has been set up for Quick Dial with a number programmed into location “0” then as soon as
Autodial is switched ON then the system will automatically and continually maintain a call with the preset number.
Hanging Up: To deactivate Autodial switch Autodial button to OFF or alternatively switch the Satellite Terminal to OFF.
Quick
Start
Guide
5
2
3
Slide panel RIGHT
Locate SIM cover
6
7
4
Unscrew with 2mm Allen Key
8
5. Slide the top black clip back towards you. 6. Flick this clip up to expose the rails to slide the SIM into(7).
8. Gently push down on the grey SIM housing and push away from you to LOCK the SIM in place.
Replace covers by following steps 4 to 1.
NOTE: Metallic SIM contacts must be face-down to engage with the SIM card reader.
Using your BEAM RST825 SatRADIO
2
Connecting the Antenna Cable
If any problems, try the following:
Plug the antenna cable into the TNC antenna jack located on the front right side of the RST825 case.
Ensure that the specified cable being used does not exceed the Iridium maximum-loss rating of 3dB to
ensure maximum performance of the terminal. Refer to your Service Provider for full details or to purchase
and approved cable if using a cable other than the magnetic mount antenna included.
Connecting the Power Cable (if required)
Make sure the AC power switch supplying the RST825 is OFF. Plug in power cable into the 2-pin power socket
located on front left side of RST825 case. Only use plug pack provided.
Connecting to the Data Port (if required)
Connect a PC/Laptop to the Data port to make dial-up modem calls. The Iridium data speed is 2400bps, and can
be as high as 10kbytes if using Direct Internet compression. A data call cannot be made at the same time as a
voice call.
Connecting to the Config Port (if required)
Connect a PC/Laptop to the Log port to use the Beam Management System. The Config Port should only be used
for configuration and control of the terminal equipment.
3
Two-way
Antenna
Connector
For additional troubleshooting refer to
your manual or visit us:
www.beamcomm.net
System Power up
After installation has been completed, the RST825 system is now ready to be switched on. To turn on the system:
1. Switch on the Radio Component by simply selecting the ON position
2. Switch on the Satellite Component by simply selecting the ON position
3. Ensure that the Autodial switch is off, this will avoid making unnecessary calls when the unit is first powered on
4. Wait for the system to initialise and the DPL Satellite Handset to show registered status. This will typically take 40 to 60
seconds.
5. Once the Signal LED is solid green or orange, a call can be made attempted.
SIM
Socket
Power
input
4
Operating the Satellite Module
The RST825 is installed with an Beam SatRADIO interface. The Satellite module provides the air interface to allow
two-way radio systems to interface to either another Beam SatRADIO terminal or any terrestrial phone service
anywhere on earth. There are three key ways to use the Satellite component of the RST825:
1. Handset Mode
This mode enables you to simply make a satellite telephone call using the Iridium handset of the terminal. Simply take the
handset off the cradle and make a satellite call as though you were using a typical cellular telephone.
Radio Handset DTMF Model
Using a DTMF compatible Two-way Radio it is possible to make or receive a call over the satellite network from the Radio
device. To make a call from a Radio handset a PIN is required. This is configurable, and to protect against unauthorized calling.
5
2. Autodial Mode
This mode enables the RST825 to continuously keep connected into a preset destination. This is ideal for emergency or
disaster recovery situations when the terminal may be being used as a primary communication tool or a replacement for a
Radio link that is down.
3. Satellite Handset Mode make a satellite telephone call using the Intelligent handset of the terminal, similar to using a
typical cellular telephone.
1. Remove the handset from the cradle by pushing the handset up
2. Enter the phone number you wish to call.
A. Consult your Satellite SIM provider for standard dialing instructions as this may vary depending on the type of
satellite SIM used
3. Once the number has been entered press the OK button to commence calling. To end call simply press C
To adjust the volume in call simply press the arrow up/down on handset
Config Port
Data Port
Operating the Two-Way Radio
The RST825 is installed with a Two-way radio interface that will be to the specification when the terminal was purchased. The
Radio component needs to be tuned to your desired channels to ensure that it can communicate with other radios within your
user group. Tone or CTSS squelching schemes can be programmed on the SatRADIO terminal.
To ensure optimum performance check the following
1. Ensure the Radio component is switched on and there is power to the Radio control handset
2. Ensure that the other Radios you want to interface with this unit are on the same frequency as the RST825 main terminal.
3. Test that from the Radio Control handset you can talk to the other radios on the same frequency / Channel. If not ensure
that the correct Channel has been selected and any required CTSS or tone squelch has been set up correctly.
4.There is a speaker control button on the RST825 that allows you to monitor the audio on the Radio. Simply press to switch
on/off
5.If you do not believe that you have communications between your Radio's consult your radio provider to ensure the unit has
been programmed to your required channel set up.
1. Repeat these instructions to ensure
everything has been completed.
2. Is there power to the unit?
> Check all connections and fuses.
3. Is the SIM card active?
> If not, refer to your Service Provider
4. If the antenna signal is not strong you
will need to move location to access
better coverage and re-test.
Iridium
Antenna
Connector
Handset Mode Transferred to Radio Mode
It is possible to make a call on the Intelligent Satellite handset and then place the handset back into the cradle to
connect the call through to the Radio network, in order to this you must activate the autodial switch by placing it in the
on position and then returning to the on position.
Using a Radio Handset DTMF Model
Using a DTMF compatible Two-way Radio it is possible to make or receive a call over the satellite network on the Radio device.
To make a call from a Radio handset a PIN is required. This is configurable to protect against unauthorized calling.
Making a call
1. Ensure that the Autodial switch on the main terminal is turned OFF as it is not possible to override autodial status.
2. Ensure the radio handset is on the same frequency as the main unit
3. Ensure the Satellite & Radio units are both powered ON (default PIN is 9876)
4. Whilst pressing the transmit button of the radio enter the PIN to access the system.
A. If PIN accepted a couple of acceptance pips are issued to indicate it is now ok to dial the phone number.
B. If the PIN number fails the handheld user receives a rising crescendo tone.
C.The access (after the PIN has been entered) times out after approx 10 secs, after which the PIN will need to be to be
re-entered.
D. In the event you have trouble entering the correct PIN wait 20 secs between attempts to allow the reset the unit.
E. Remember that it is not possible to transmit DTMF tones whilst another party is transmitting on another radio in
the group.
6
5. Once the acceptance pips are heard depress the transmit button and enter the full number you wish to call, and then
release the button.
A. Usually the transmit button of the radio needs to be pressed the entire time the number is being entered In order to
transmit the tones to the base unit.
B. If the dialed number seems to be a valid format acceptance pips will be transmitted to the handheld from the
satellite base.
C. If the number is invalid then a FAIL tone is sent; a long, low, beep.
6. Progress calling tones will be heard whilst the call connects, if the number was incorrect or the satellite network is not
available a busy tone will be heard through the radio network.
7. Hanging up the call: If the call was manually dialed or was incoming, it can be hung-up by the handheld user by simply
pressing the transmit button of the radio followed with a DTMF- 0. ( zero ).