1
Owner's
Manual
36" Stainless Steel
Gas Cooktop
ZGU375LS
ZGU375NS
Monogram:
ge,com
Consumer
Inff)nnation
Gas
Introduction
Your
new
Monogram
planning
or for
and
both
will
Monogram
cabinetry.
The
Contents
Care
and
Bm'ner
Steel
Consumer
the
fl)llowing
will
.................
Assemblies
Surihces
Call
for
..............
Nmnbel_
Number
Registration
Instructions
operate
13
13
.............
16
.............
. ..............
17
4
................
...............
cooktop's
19,
to blend
the
and
maintain
If the information
in with
yore" cooktop
Optional
Griddle Accessory
Wok Cooking
........................
20
in this manual
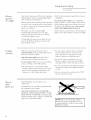
• Do not try to light any appliance.
switch; do not use any phone
• Immediately
call your gas supplier from a neighbor's
phone. Follow the gas supplier's instructions.
reach your gas supplier,
your
kitchen
properl>
10
9
10
9
TO DO IF YOU SMELL GAS
• If you cannot
department.
of form
Electric Ignition
......................
Features
.............................
Flame Size ..........................
12 (;as
..............................
18
• Do not touch any electrical
in your building.
blend
12
11
Do not store or use gasoline or other flammable
vapors
and liquids in the vicinity of this or any other appliance.
-WHAT
superior
kitchen
to detail--
Using Your Cooktop
Cookware
...........................
Dual-Flame
Burners
...................
is not followed
exactly, a fire or explosion
may result
causing property damage, personal
injury or death.
--
and
attention
kitchen.
2, 3, 5-8
...........................
WARNING:
convenience
assiduous
flexibility
hel I) you
14
................
the
into
13
Service
Monogram
integrated
15
15
.......................
Important
Phone
Model
and Serial
_'\.uTanty
to provide
beautifully
pages
wmr
Services
You
Product
be
that
of style,
of design,
to come.
........................
.......................
Knobs
Be%re
designed
can
statement
its purity
Cleaning
Sub-assemblies
Stainless
was
design
on
eloquent
it ior
find
cooktop
Burner
SMbtv
reasons--you'll
fin" years
Caps
Grates
Sealed
an
chose
you
Burner
Burner
( ontrol
you
delight
Its sleek
inflmnation
makes
Whether
of these
hmction
Your
cooktop
flexibility.
Cookto/)
call the fire
-- Installation and service must be performed
installer, service agency or the gas supplier.
by a qualified
..............
9
12
AVERTISSEMENT
:
Si les informations
de
ce manuel ne sont pas suivies h la lettre, un incendie
une explosion
peut r6sulter et causer des dommages
mat6riels,
des blessures
ou la mort.
--
ou
Ne stockez pas ou n'utilisez
pas de l'essence
ou d'autres
vapeurs
ou liquides
inflammables
a proximit6
de cet
appareil 61ectrique
ou de tout autre.
- QUE FAIRE SI VOUS SENTEZ
DU GAZ
• N'essayez
pas d'allumer
un appareil
quelconque.
• Ne touchez
aux interrupteurs
61ectriques
pas les t616phones de votre immeuble.
; n'utilisez
• Appelez
imm6diatement
votre fournisseur
de gaz h
partir du t_l_phone
d'un voisin. Suivez les instructions
du fournisseur
de gaz.
• Si vous ne pouvez pas contacter
de gaz, appelez
les pompiers.
--
votre
L'installation
et l'entretien
doivent
un installateur
qua]ifi(_, une agence
fournisseur
du gaz.
fournisseur
6tre effectu6s
par
d'entretien
ou le
Consumer
Inff)rnlation
Gas
Be/bre
using your
eoohtop
Read
this manual
carefulb:.
help you operate
cooktop
properly.
Keep
it handy
It is intended
and maintain
for answers
your
to your
to
new
questions.
Cookto/J
If wm don't understand
more help, call:
GE Answer Center
800.626.2000
24 hours
something
or need
_'
a day, 7 days a week
OR
Visit our \'\Tebsite at: ge.com
-Wd te
down
the
You'll
model
These
dr"
find
underside
on
cooktop.
nmnbers
Product
included
serial
them
of the
are
a label
also
located
on
the
on
the
Before sending in tiffs card, please write these
numbers here:
( onsmner
Ownership
Registration
in this manual.
Model
Card
Number
n uTylDers
Serial
Number
lJse these lltlI/lbel"s
ill
service calls concerning
[./you
received
a
Immediatelx
contact the dealer
that sold }ou the cooktop.
all}'
correspolldellce
}our
of
cooktop.
(or builder)
damaged
eooht@
Save time
& money
Before }on request service,
you call for service" section
[./you
;vteed
To obtain
service
We're
check the "Befi)re
in the back of this
It lists causes of minor operating
}ou can correct }ourself.
problems
that
n/alltlal,
page
in the
steps
FIP, ST, contact
In most
of this
some
service
to follow
appliance.
the
Consmner
you
cases,
reason
receive,
want
wm
are
here
help.
the
who
this
people
why you
will
solve
NEXT,
if wm
are
details--including
and
for further
Explain
Services
manual.
of ore" service
If ti)r
the
see
back
proud
pleased.
with
service,
you
not
are
to be
happy
some
serviced
are
not
the
problem.
yore"
pleased.
Manager,
still
not
yore"
Customer
GE Appliances
Appliance
Park
Louisville,
KY 40225
pleased,
phone
Relations
write
numbe_to:
all the
IMPORTANT
SA 37T
SAFETY INSTRUCTIONS
PRECAUTIONS
IMPORTANT
NOTICE:
SAFETY
* The California
Safe Drinldng Water and Toxic
Enforcement
Act requires
the Governor
of
Califln_nia to publish a list of substances
known to tile state to cause cancel; birth
detects or other reproductive
hamL
and requires
businesses
to warn customers
of potential
exposm'e
to such substances.
, Gas appliances
can cause minor exposure
to
four of these substances,
namely benzene,
carbon monoxide,
flmnaldehyde
and soot,
caused primarily
by the incomplete
combustion
of natm'al gas or I,P tuels.
Properly
ac{justed burners,
indicated
by
a bhfish rather than a yellow flame, will
minimize
incomplete
combustion.
Exposure
to these substances
can be minimized
further
by venting
ventilation
with all open
tim.
window
or using the
"When you get your cooktop, have the installer
show you the location
of the gas shut-off valve
and how to shut it off if necessary.
, Have your cooktop
installed
a_ad properly
grounded
by a qualified installer,
in
accordance
with tile installation
instructions.
Any a@ustment
and seswice should be
perflmned
only by qualified
gas range
installers
05"service technicians.
, Plug your cooktop into a 120=volt grounded
outlet only. Do not relno\ e tile round
grotmding
prong ti_om the plug. If ill doubt
about the grotmding
of the home electrical
system, it is yore" personal
responsibility
and obligation
to have an ungrounded
outlet replaced
with a i)roperlDgrounded
3-prong outlet in accordance
with the
National
Electrical
Code. Do not use an
extension
cord
with this appliance.
, Be sure all pacMng materiaJs are removed
from the cooktop
befln'e operating
it,
to prevent fire or smoke damage
should
tile packing material
ignite.
" Be sure your cooktop is correctly
adjusted
by a qualified
service technician
or installer
for the type of gas (natura3 or LP) which is
to be used.
* Do not attempt
to repair or replace any
part of your cooktop unless it is specifically
recommended
in this manual.
All other
servicing should
technician.
be retbrred
to a qualified
" Do not leave
children
alone
or unattended
where a cooktop is hot or in operation.
They could be seriously bm'ned.
. CAUTION:
children
should
Items
ofinterest
to
not be stored
above a cooktop--children
cooktop
to reach items
i*_jm'ed.
in cabinets
climbing
on the
could be seriously
, Clean the cooktop
with caution.
If a wet
sponge or cloth is used to wipe spills on a
hot cooktop,
be careful to avoid steam bm'ns.
, Do not clean the cooktop
volatile cleaning
fluids,
with flammable
, Do not clean
is in use,
when
the cooktop
or
the appliance
" Avoid scratching
the cooktop with sharp
instrmnents,
or with rings and other jewelry.
, Let the burner
grates and other surfaces
cool
before touching
them or leaving them where
children
can reach them.
" Never
use the cooktop
as a cutting
board.
• Never wear loose-fitting
or hanging garments
while using the appliance.
Be careful when
reaching
flw items stored in cabinets over the
cooktop.
Flamnlable
material
could be ignited
it brought
in contact with flame or hot
sm'thces and may cause severe burns.
, For your
warming
safety, never use your
or heating the room.
appliance
for
, Do not use water on grease fires. Never pick
up a flaming pan. Tm_n the controls
off.
Smother
a flaming pan on a surthce burner
by covering
the pan completely
with a
well-fitting
lid, cookie sheet or flat tray. Llse
a multi-purl)ose
dry chemical
or timm-t)])e
fire extinguisher.
Flaming grease outside a pan can be put
out by coveting
it with baking soda or, if
available,
by using a multi-pin'pose
dry
chemical
or fl/am-t_pe
fire extinguisher.
" Do not store flammahle
materials
near the
cooktop.
Do not store or use gasoline
or
other flammable
vapors and liquids in the
vicinity of this or any other appliance.
* Do not let cooking grease or other flammable
materials
accumulate
on or near the cooktop.
, Never leave surface burners
unattended
at
high flame
and greasy
settings.
spillovers
Boilo\ ers cause
that may catch
smoking
on fire.
" Adjust surface burner
fla_m size so it does
not extend beyond the edge of the cookware.
Excessive flame is hazardous.
IMPORTANT
" Use only dry pot holders--moist
or damp pot
holders
on hot surfhces may result in burns
fl'om steam. Do not let pot holders
come near
open flames when litfing cookware.
Do not
use a towel or ()tiler bulky cloth in place of
a pot hokler.
" To minimize
the possibility
of burns, ignition
of flammable
materials
and spillage, turn
cookware
handles
toward tile side or center
of tile cooktop
without extending
over
ac{jacent btlrner or vent area.
, Always turn the surface
removing
the cookwaxe.
, Foods
for frying
burners
to off before
should
be as dry as possible.
Frost
(211 [l"ozen
tk)o(ls
or llloisttlre
o21 t_'esh
foods call cause hot tht to bubble
III) and over
tile sides of tile pan.
" Use least possible
amount
of fat for effective
shallow or deep fat frying, Filling the pan
too full of tht can cause spillovers when food
is added.
" Carefully
watch foods being fried at high
flmne setting.
, If a combination
of oils or fats will be used
in frying, stir together
betore heating,
or as
ti_ts melt slowly.
" Always heat
fat slowly,
and watch
as it heats.
SAFETY INSTRUCTIONS
" Keep
all plastics
away from
* To avoid the possibility
certain that the controls
burners.
of a burn, always be
for all burners
are at
the off position
and all grates
attempting
to remove
a grate.
are cool before
* If the cooktop is located near a window,
do IIot rise long curtains which cotlld blow
over the burners
and create a fire hazard.
" If you smell gas, turn off tile gas to tile
cooktop
and call a qualified service technician.
Never use an open flame to locate a leak.
, Do not cover
or block
cooktop
knobs,
clear tor proper
pert)finance.
the area around
the
This area must be kept
ventilation
and burner
, Cook meat and poultry thoroughly--meat
to
at least all INTERNAl,
temperature
of 160°K
and poult_ T to at least all INTERNAl,
temperature
of 180°E Cooking
to these
temperatm'es
usually protects
against
fl)odborne
illness.
, When using a wok on the cooMng surface,
always use the provided
metal ring which
is placed over the center burner
grate to
support
the wok.
, Do not flame foods on the cooktop. If you do
flame foods under the hood, turn the fan on.
" Use a deep fat thermometer
whenever
possible
to prevent
overheating
_ht beyond
the smoking
point.
, Use proper
pan size--avoid
pans that are
unstable
or easily tipped. Select cookware
having fiat bottoms
large enough
to properly
contain
fl_od and avoid boilovers
and
spillovers,
and large enough
to cover burner
grate. This will both save cleaning
time and
prevent
hazardous
accumulations
of fl2od,
since hea W spattering
or spillo\ ers let* on
cooktop
call ignite. Use pans with handles
that can be easily grasped
and remain cool.
SAVE THESE INSTRUCTIONS
INSTRUCTIONS
PRECA U770NS
DE SECURITE IMPORTANTES
DE SECURIT>
AVIS IMPORTANT
DE
SECURITE•.
" La loi de l'6tat de Californie
sur Feau potable
s6curis6e
et Fapplication
des lois sur les
produits
toxiques
exige que le Gouvernem"
de
Califl)rnie
publie une liste de substances
qui,
selon les connaissances
de l'Otat, causent le
cancer, les maladies
cong6nitales
on autre
16sion reproductive,
et exige que les
entreprises
avertissent
leurs clients de leur
exposition
potentielle
a de telles substances.
, Les appaaeeils fi gaz peuvent
causer une
exposition
mineure
a quatre de ces
substances,
soit le benz&ne, le monoxvde
de
carbone,
le fbrmak|_hyde
et la suie, st/rtotlt
5 cause de la combustion
incompl&te
du gaz
naturel
ou des carburants
PI.
Des brOleurs correctement
ajust_s, ce qui est
indiqu(_ pa_ des flammes
bleui_tres plut6t que
jaunes,
r(_duiront
au minilnum
la combustion
incompl&te.
L'exposition
fi ces substances
peut 6tre r(4duite davantage
ell a_rant avec
une fbnOtre ouverte
ou en utilisant le
ventilateur
d'aOration.
, Lorsque vous recevez votre cuisinibre,
demaaadez _tl'installatenr
de vous montrer
l'emplacement
de la soupape
d'arr6t
et la
fagon de la fermer en cas de besoin.
, Demandez
a tm instaJlateur
qualifi6
d'installer
et de mettre a la terre correctement
votre
cuisini_re,
confbrmg_ment
an* instructions
d'installation.
Tout ajustement
ou entretien
dolt &tre eflbctuO settlement
par des
installateurs
de cuisini_re
_'lgaz qualifi_s
ou des techniciens
de seiMce,
" Branchez
votre cnisinibre seulement
snr une
prise de 120 volts raise fi la terre. Ne retirez
pas la broche
ronde de raise ir_la terre de la
prise. En cas de doute concernant
la raise ir_la
terre du svstbme 61ectfique
de la r6sidence,
wins assumez la responsabilit_
et l'obligation
personnelles
de taire remplacer
toute prise
non raise i?_la terre par tree prise 5 trois
broches
correctement
raise fi la terre
conformg_ment
au Code national
de
l'_lectricit_.
N'utilisez
pas de rallonge
ci_ble avec cet appareil.
de
, Assnrez-vous
que tous les mat6riaux
d'emballage
sont retir6s de la cuisini6re
ax:mt
de la mettre ell marche,
pour emp6cher
les
dommages
d'incendie
et de fumg_e au cas (>t'l
le matg_riau d'emballage
s'enflammerait.
, Assurez-vous
que la cuisini&re est ajust6e
correctement
par tm tecbnicien
de service on
tm instaJlateur
qualifi6 en fonction
du type de
gaz (naturel
ou PL) qtti sera utilis&
, N'essavez
pas de r6paacer on de remplacer
toute piece de la cnisini6re sauf si cela est
sp6cifiqnement
recommand6
dans ce manuel.
Tomes les autres actions de service doivent
&tre r_f&'_es
_'lun technicien
qualifi_.
, Ne laissez pas les enfaaats seuls on non
snrveill6s
lorsqu'une
cuisini_re
est chaude
on en marche.
Ils pom'raient
&tre brfil6s
gri_vement.
"
ATTENTION
•
. Les articles
snscitaaat l'int6r6t
des enfants ne doivent pas
6tre raaag6s dams les armoires
au-dessns
de la
cttisini_re-les
enfimts grimpant
sin" la
cuisini_re
pore" saisir ces articles pourraient
6tre gri_vement
blessg_s.
, Nettoyez
la cttisinibre
avec pr6caution.
Si une
_ponge
ou un chiflim mouill_ est utilis_ pour
essuyer les renversements
sur une cuisinibre
chaude,
fidtes attention
d'6viter les brOlures
caus6es par la x;q)eur.
, Ne nettoyez
pas la cuisinibre
avec des
nettoyants
inflammables
ou volatils.
, Ne nettoyez
en marche,
pas la cuisini6re
lorsqu'elle
est
, Evitez de raver la cuisinibre
avec des
instruments
pointus
(m avec des bagues
ou d'autres
b{joux.
, Laissez refroidir
les grilles des brNeurs
et les
autres surfaces avant de les toucher
on de les
laisser la off les enfants peuvent
les atteindre,
" N'utilisez jmnais
fi d6couper,
la cuisini_re
comme
plaaache
• Ne portez jamais de v6tements
lfiches on
a_nples lorsque
vous utilisez cet appaaeeil,
Faites attention
pour saisir des articles ranges
dans les armoires
au-dessus
de la cuisini&re.
I.a mati_re inflammable
si elle entre ell contact
les surthces
chaudes
brfllures
groves.
petit s'enflammer
avec les flamn/es
ou
et pent
causer
des
, Pour votre s6curit6,
n'utilisez jaJmais votre
appaJ_eil pour chauffer
ou r6chauffer
la piece.
INSTRUCTIONS
DE SECURITE IMPORTANTES
" N'utilisez pas de l'eau sur les incendies
de
graisse. Ne saJsissez jamaJs tree po61e
enflaxnm&e.
Arr&tez les contr61es.
Etonttez
les
flammes
d'une poOle plac(_es sur t111brOleur
de surihce en la recouvrant
enti&rement
d'un
couvercle
bien ajust(4, d'un plateau a gateau
ou d'un plateau plat. Utilisez t111extincteur
5
produit
chimique
secm ulti-nsages
ou du type
;'! Ill o51sse.
Le graisse enflamm(4e
_'ll'ext(4rieur
d'tme
poOle pent 6tre &einte en la convrant
de
bicarbonate
de sonde otl, s'il est disponible,
en utilisant
t111extincteur
"l produit
chimique
sec multi-usages
ou du type a mousse.
, Ne stoekez pas de marl&re inflammable
pr&s
de la euisini6re.
Ne stockez pas et n'utilisez
}:)as d'essence
ou d'autres
vapem's ou liquides
inflammables
5 proximit(_ de cet appareil
otl
de
font
atltre.
" Ne laissez pas la graisse de cnisson ou autre
marl&re inflammable
s'accumuler
sur ou pr&s
de la cuisini&re.
, Ne laissez jmnaJs les brffleurs
de surface sans
surveillance
lorsqn'tis
sont r_gl_s pour des
flaammes hautes. Les d(4bordements
excessits
causent
de la fumg_e et des renversements
graisseux
qui pourraient
s'enflammer.
* Ajustez la taJlle des flmnmes
des brflleurs
de
surface pour qn'elles ne dOpassent pas du
bord du eonteneur.
Les flammes
excessives
sont
dangereuses.
* Utilisez seulement
des gants sees pour saisir
les plats--les
gants 11umides otl monill& plac(4s
sur des sm'ihces chaudes
peuvent
causer des
brfilures
dues a la vapem'. Ne mettez pas les
gants pr&s des flammes vives pour soulever
les plats. N'utilisez
pas de serviette
ou autre
chiflim encombrant
au lieu des gants de plat.
* Pour r6dnire au minimum
la possibilit&
de brfllnres,
d'inflammation
de mati&re
inflammable
et de renversement,
tournez
les
poign6es
des plats veFs le c6t6 on le centre
de la cuisinibre,
sans les placer au-dessus
d'un
b*fileur ac{jacent ou Hne ZOlle d'a(4ration.
* Arr6tez toujours
les br_eurs
de surface avant
de retirer les plats.
* Les aliments
fi frire doivent 6tre aussi sees
qne possible.
Le gel des aliments
congelt_s ou
l'hmnidit_
des aliments fl'ais pent causer le
bouillonnement
des matibres
grasses chaudes
et leur dOversement
sur le c6tO de la po61e.
* Utiliser la qnaaatit& de graisse la pins
possible pour la friture fi la po61e ou
friteuse.
Si l'ustensile
est trop rempli
graisse, celle-ci pent &4border
lorsque
aliments
sont ajoutOs.
* Observez
avee soin les aliments
frits
flaJmmes bautes.
faible
it la
de
les
sur
, Si tm mblange
d'hutie et de mati&res grasses
va 6tre utilis& pour la friture,
m(qangez
avant
le chauflhge
ou _'lmesure que les mati_res
grasses timdent
lentement.
* R6ehauffez
toujours lentement
les matibres
grasses et obse,xez
lem" r(4chauflbment.
* Uttiisez un thermom&tre
de friteuse
lorsque
cela est possible
possible pore" empOcher
de
surchaufler
les matibres
grasses au-dela de
lem" point de fmn(4e.
* Uttiiser des po61es de taJlle appropri6e-&itez les poOles qui sont instables ou qui
peuvent basculer thdlement.
S(qecfionnez
des ustensiles de cuisine avec des tkmds
plats, suflisamment
grlmds pour pomoir
correctement
contenir les aliments et &'iter
les dObo_dements
et les dOversements,
et
suflisamment
grlmds pour reconwir les grilles
des brt_dem_. Cela r(4duira le temps de netto}zlge
et empOchera
les accumulations
dlmgereuses
d'aliments,
(4taut donn_ que les (4clabonssm'es
ou les dt_ve>ements
importants
laiss_s sur la
cuisinibre peuvent s'enflammer.
Utilisez des
poOles avec des poign(4es qui petaent
6tre
fi_dlement
saisies et qui restent fl'oides.
* Eloignez tons les mat&riaux
des brfileurs.
* Pour 6viter les risques de
toujours que les contr61es
position d'arr6t et tomes
avaaat d'essayer
de retirer
en plastiqne
brfllures, assurez:vous
des brffleurs sont it la
les grilles sont froides
tree grille.
* Si la cnisinii_re est sitube pri_s d'tme fen6tre,
11'utilisez pas de longs Hdeaux qui pore'talent
6tre pro jet(4s au-dessus des brOleurs
et
constituer
tm risque d'incendie.
* Si vous sentez du gaz, coupez l'arriv(% du gaz
a la cuisinibre
et appelez t111technicien
de
service qualifi& N'utilisezjamais
de flamme
rive pour rechercher
les fuites.
* Ne eouvrez pas et ne bloquez pas la zone
autour des boutons
de la euisinii_re. Cette
zone dolt rester d(_gag(4e potn" assurer
une
bonne ventilation
et tree bonne perti)rmance
des brfileurs.
* Cnisez la viande et la volatile compli_tement-la viande i?ttree temp(4rature
INTERNE
d'au
moins l(;0°F, et la volaille i_Jtree temp(4ratm'e
INTERNE
d'au moins 180°K La cnisson aces
temp(_ratures
protege
en ggmg_ral contre les
maladies
causOes par les aliments
contaminOs.
* Lorsque vous uttiisez un wok sur la surface de
cuisson, uttiisez toujours
l'anneau
m&tallique
fourni qui est plae& sur la grille du brfileur
central pour supporter
le wok.
* Ne pr6parez
pas des mets flamb&s sur la
cttisini&re. Si vous pr6parez
des mets flamb&s
sous la botte, mettez le venttiateur
en marcbe.
CONSERVEZ CES INSTRUCTIONS
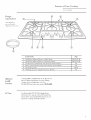
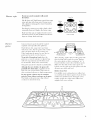
Features
of Your Cooktop
Gas Cookto/)
Design
inJbrmation
©
®
Feature
Optional
Gas
Page
()utput
1
Dual-Flame
Spillproof
Burners--Itigh
2
Dual-Flame
Spillproof
BurnetmMaximun_
3
Tactile-touch
4
Burner
5
Interlocking
6
\_i)k Ring Accessory
"()N"
Control
Indicator
Knobs
(()he
I,amps
For Each
(()he
10, 11, 13, 14
()utput
()n Each
Sm:tiiee
Control
(',rates
and order
10, 11, 13, 14
Bin:her)
Knob)
13
10
10, 15
(Supplied
()n Some
Models)
A dual griddle is awfilable that can be placed over
the two fight or lett burnei_ on your cooktop,
Cont;_ct wmr local distributor
or GE at
800.626.2002
lJ
Index
part nulnber
ZX375GRD.
Cooktop model ZGU375NS is shipped fl'om
the ti_ctorv set to operate only with Natural Gas.
If wm wish to use I,iquefied Petroleuln
Gas, you
nlust have cooktop model ZGU375I,S.
12
Using Your Cooktop
Gas
Electric
igrzitiorz
& relight
Cookto/)
Your sur_hce burners
are lit by electric ignition,
eliminating
tile need tot standing
pilot lights
with constantly
burning
flames.
All of the burner
is relighting.
All five igniters make clicking sounds and si)ark
even when only a single burner
is being turned
on. Do not touch any of the bm'ners
when the
surthce burners
on your cooktop
with a match.
Hold a lighted match to the burner,
then turn
the knob to the HIGH position.
Use extreme
igniters
caution
are clicking.
The burners
on this cooktop
relight
automatically
if the flame goes out. This
heli)s prevent
the inconvenience
of having
to manually
relight a burner.
ignite_
In case of a power
spark
outage,
when lighting
while
a burner
you can light
burners
the
this way.
Sur_hce btu'ners
in use when an electrical
power
ihilure occurs will continue
to operate
normall>
Occasionally,
the burners
may spark if excess
wind or dratt blows the flame away i_'om the
btlrner's
flame sensor.
Push
the
control
knob
counterclockwise
HI
to LO
or simmer
After the burner
either direction
To turn
down
to the
and
desired
turn
it
position
f]'om
(SIM).
ignites, turn the knob in
to at!just the flame size.
a burner
off, ttu'n
the knob
clockwise,
as lhr as it will go, to the OFF position.
, All of the burners
can be used _br both
general
cooking
and simmering.
The center
burner
is tile maximum
output btu'ner fi)r
larger pans or f_lst boiling operations.
How to
seh?ct
Watch
reduce
Jlame
The flaxne size on a gas burner
the cookware
you are using.
size
the flalne,
heat.
not the knob,
" Do not operate
a burner
fox" an extended
period of time without cookware
on the
grate. The finish on the grate may chip
without cookware
to absorb the heat.
, Be sure the bm'ners
and grates are cool
before you place your hand, a pot holder,
cleaning
cloths or other materials
on them.
" For your convenience,
the indicator
lamp in
the bezel for each knob verifies the burner
is "ON".
" Be sure you turn the control
when you finish cooking.
knob
to "OFF"
as vou
should
inatch
FOR SAFE HANDI.ING
OF COOKX4_RE,
NEVER I,ET THE FIAME EXTEND
UP THE
SIDES OF THE COOKX4_I_,E. Any flame larger
than the bottom
of the cookware
is wasted aim
only serves to heat the handle.
NOTE:
The
burner
has
or larger
high
10
heat
center
an
extra
dialneter
settings,
nlaxinmm
large
cookware
output
flalne.
when
Use
10"
using
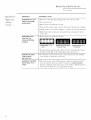
All fiveburne_onyourcooktophavetwo
rowsofflames_
Thesedual-flame
burners
haveasimmer(lower)flameanda main
(upper)
flalne.
When a btlrner is turned
oil, the simmer
will always light and stay on.
flame
Simmering:
The simmer
(SIM) setting will use
only the lower flames. Use simmer
(SIM) to
melt chocolate,
hold delicate
sauces or fk_r
other
When
ti_ods requix_ing
holding
some
low simmer
foods
Simmer Burner
heat.
at serving
temperature
(such as mashed
potatoes),
it
may be best to use the LO flame setting tot
a few minutes
before turning
the knob to
simmer
(SIM).
Main Flame
Primary
CooMng: Settings fl'om LO to HI will
use both rows of flames. Use LO to HI fl)r all
purpose
SimmerFlame
cooking.
Main Burner
11
Using Your Coo k top
Gas
(fOOk70(_Te
Aluminum:
Medium-weight
cool<ware is
recommended
because it heats quickly
Heatproof
Glass-Cermnic:
Can be used fin"
either sm'thce or oven cooking.
It conducts
and evenly. Most foods brown evenly it* an
alumimm_
skillet. Use saucepans
with
tight-fitting
lids fin" cooking
with minimum
heat very slowly and (()()Is very slowly. Check
cookware
mantflhcturer's
directions
to be sure
aIno/llltS
it cast be used
Enamelware:
Under some
enamel of some cookware
cookwilre
conditions,
may melt.
IIXIIIIH_IctHI'er's
will
the
Follow
Stainless Steel: This metal alone has poor
heating
properties,
and is usually combined
with copl)er, aluminum
or other metals fi)r
improved
heat distribution.
Combination
metal
skillets generally
work satistimtorily
if they are
used at medium
heat as the manutacturer
recol/n/xe(t(liltio(ts
recoI/t
for cooking
methods.
Glass: There are two types of glass cookwarethose tot o\ en use only and those tot surthce
cooking
(saucepans,
coffee and
Glass conducts
heat very slowly.
cooking
Use
woks
with
some
models)
Make
sure
a support
on the
that
a ring.
You
be
Use
a 12" or smaller
ring
seriously
on
only.
is securely
burned
diameter
If wall
covered
with
as masonry,
steel,
etc.)
that
prior
surtaces
if the
are
wok
is properly
wok
stainless
may
be
used.
nested
in the
should
be
to cooking.
The
stable
and
the
of the
wok
touch
the
center
when
in the
grate
of
materials
granite,
diameter
bottom
wall
constructed
ceramics,
wok
if the
to standard
non-combustible
a larger
the
wok
a({jacent
is installed
(such
ring
(provided
burner
()vet'.
surfaces.
12
could
tipped
Ensm'e
teapots).
center
grate
fingers.
Do not
bottomed
woks without
wok
cooktop
ring
center
support
the
locked
onto
the
try to use round
or
on gas cooktops.
of water.
Cast Iron: If heated slowly, most skillets
give satist_mtorv results.
Wok
( ookto D
should
not
wok
ring.
l/X exlds.
(;are and (;leaning
Gas
Crener(Ll
in/brmation
Proper care and cleaning
are important
so your cooktop
will give you eflficient and
satisfi_ctorv service. Follow these directions
careh/lly
Stainless
steel
s<lg_/(lces
in caring
Before cleaning
any part of your cooktop,
be sure all burners
are off and cool.
DISCONNECT
ELECTRICAL
POWER TO
THE COOKTOP
at the h*se box or circuit
fl)r it.
Some cooktop
models are provided
with cleaners.
Follow the instructions
oll
tile colltaillers.
breaker
panel, (>r pull tile cooktop
power
located beneath
the cooktop
and inside
the cabinets.
Do not use a steel wool pad; it Mll scratch
the surface.
To inquire about pro'chasing
stainless steel
appliance
cleaner or polish, or to find the location
of a dealer nearest you, please call our toll-fl'ee
To clean the stainless steel surfitce,
use WalI/1 sHdsv
water or a stainless
steel cleaner
polish. _M\\'a}:_wipe the SUltilce in the direction
the grain. [_))llow the cleaner instrurtions
fl)r
cleaning the stainless steel SUltitce.
Control
hnobs
( ooktop
The control
cleaning.
To remove
knobs
knob,
may be removed
pull it straight
or
of
flw easier
up.
The knobs have a tactile grip surihce, but no
special cleaning
is required.
The knobs ca** be cleaned in a dishwasher or they
plug,
ntllnber:
National
Parts
Center
1.800.626.2002
ge.com
Replace the knobs after cleaning,
NOTE: The knob stem is "D" shaped, Replace
the flat side (>f the knob (into the fiat side (>f
the stem,
may also be washed with soap and \vaml: Make sure
the insides (ff the knobs are (h y befi>re repladng.
Sealed
burner
assemblies
Turn
burner
The
all controls
OFF
befl>re
removing
the
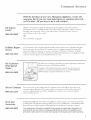
Electrode,---....._.
pal_s.
burner
suNassemblies
easv to clean.
grates,
can
burne_
be lifted
caps
and
burner
off; maldng
ring
them
CAUTION: DO NOT OPERATE THE
BURNER WITHOUT ALL BURNER PARTS
IN PLACE.
Tile
electrode
of
the spark igniter is
behind
each burner.
When one burner is
turned to "ON" to
light, all the burners
spa_rk. Do not
attempt
to disassemble
or clean around
any bm'ner while another
burner
is on.
An electric shock may result, which could
cause you t() knock over hot cookware.
13
re and (;leaning
Gas
Cool:top
Maximum
sub-assemblies
NOTE:
Before
remember
them
their
in the
proper
removh_g
size
same
burner
the
burner
mad location.
location
Output
parts,
Replace
after
demlh_g
for
operation.
For proper ignition,
make sure the small holes in
the bm'ner rings are kept open. A sewing needle
or wire twist-tie works well to unclog them.
Slits
Holes
Usea sewing needle,
twist-tie and/or toothbrush
to unclogthe small holes
and slits in tbe burnerbeads
and burner rings.
The silts in the burner
heads of your cooktop
must be kept clean at all times for an even,
mthmnpered
flmne.
You should clean the sm'iace
especially
alier bad spillovers,
these openings.
High
Output
0
]
0
000
Front of Cooktop
burners routinel)',
which could clog
To remove burned-on
t0od, soak the bm'ner
heads and rings in a solution
of mild liquid
detergent
and hot water fin" 20-30 minutes.
[TOV inoYe
Clean
sttlbborn
the bm'ner
To remove
stains,
tlse
bases in place
the burner
(Brass)
BurnerRing
LockingNut
witbChamfer
a toothbrush.
on the cooktop.
LocatorPins
parts:
(SideView)
1. I,ifl oil' the bm'ner
cap and
bm'ner
head.
2. Remove the bm'ner ring locking nut using
a 11A_;"socket wrench,
crescent wrench
or
channeMock
pliers.
3. i,ift ott the bm'ner
the burner
bases.
ring.
LocatorPin /__
Electrode
BurnerBase
Do not remove
Pin
get0re
putting
the burner
parts back, shake out
excess water and then dry them thoroughly
by
setting them in a warm oven fin" 30 minutes.
NOTE:Locaterpin fits
into burner basepin slot.
Maximum OutputCenterBurner
Replace
the bm'ner parts. Make sure that the
rings, heads and caps are replaced
in the
correct location.
There are flmr medium
sets
and
one large
To replace
set of rings,
the burner
heads
z
and caps.
parts:
/
Make StlI'e all parts are for the correct
btlrnei;
are in the correct location and are firefly seated.
1. _Mign the locator pin on the burner
into the labeled hole in the bm'ner
Seat in place and push toward
to set gap i)roperl>
Toaid reassembly,each
brassBurnerHeadis
markedwith a clockface.
Replacethe BurnerHead
with the arrow pointing
to the rear of the cooktop
(12o'clockposition).
14
ring
base.
3. _Mign the two locator pins in the burner head
into the holes in the burner ring. Seat in place.
NOTE: Make sure the burner head pins
completely
engage in the burner ring holes
and that burner head is level.
the burner
caps.
(Brass)
BurnerRing
LockingNut
witbChamfer
LocatorPins
the electrode
2. Replace the burner ring locking nut and
hand-tighten.
Using the wrench or pliers,
turn the nut 1/4 turn to secure it in place.
4. Replace
BurnerRing
(Aluminum)
(SideView)
BurnerRing
(Aluminum)
LocatorPin
Electrode
BurnerBase
Pin
NOTE:Locaterpin fits
into burner basepin slot.
High Output Burners
Burner
cads
Do not use a steel wool pad; it will scratch
the surface.
LargeCap
I,ilt off when cool. X4'ash burner caps in hot, soapy
water and rinse with clean watei: You inav scour
with a plastic scotwing
tood pmticles.
pad to remove
Medium
Cap
Medium
Cap
Medium
Cap
Medium
Cap
bm'ned-on
D_y them in a wam_ oven or with a cloth--don't
reassemble
them wet. Replace the btmaer caps.
00%
Make sm'e that caps are replaced on the correct
size burnei: There ale tour inediuln sets and one
large set of rings,
Cast-iron
regularly
FrontofCooktop
heads and caps.
bm'ner grates
and especially
should be washed
atter spillovers.
_'Xash them ill hot, soapy water and rinse
with clean water. Dry the grates with a cloth-don't put them back on the cooktop
wet.
When replacing
the grates, be sure they're
positioned
securely over tile burners.
To get rid of burned-on
food, place the
grates in a covered container
or plastic bag.
Add l/4 cup ammonia
and let them soak
for 30 minutes.
Wash, rinse well and dry.
Tile grates may also be cleaned
in a dishwasher.
Although
they awe durable, the grates will
gradually lose their shine, regardless
of the
best care you can give them. This is due to
their continual
exposure
to high temperatm'es.
Do not operate
a burner
for an extended
period
of time without cookware
on the grate.
Tile finish on tile grate may chip without
cookware
to absorb the heat.
Arc
After cleaning,
replace tile two side grates with
their locking rails toward the center. Replace
tile center grate so that a COlltintlO/lS "arc" is
formed with the center ribs of all three grates.
Make sure the rails on the center grate are
locked over the rails on tile side grates and that
all grates are stable and level.
Rubber
Grate
Feet
For stabilit> your cooktop
has two rubber _bet
on each leg of tile bm'ner grates. If ally of these
rubber _bet shoukl become
damaged
or lost,
replace it with one of the extra rubber
feet
supplied
with your cooktop.
Arc
15
Before You (;all For Service
Gas
Questions ?
PROBLEM
POSSIBLE
Be[bre you
call./br
service...
BURNERS DO NOT
LIGHT OR SPARK
RANDOMLY
* Make sure
* ()itS
not
" Burner
, Holes
* Clogged
CAUSE
electrical
plug
is plugged
not replaced
correctly.
[Ill'ned
parts
* Burner
in the simmer
orifice
parts
into a live power
outlet.
on,
rings
or slits in the burner
or wet due to spillage
* Rubber discs below
to tile valve.
BURNERS HAVE,
YELLOW
OR
YELLOW-TIPPED
FLAMES
(ooklop
knobs
not replaced
A. Yellow flames: Call for
service.
or burnel_
are not pushed
down
rings
may be clogged.
not chy after
through
tile bezel
correctly.
B, Yellowtipsonoutercones: C. Solt blue flames: Normal
Normalfor LPgas.
for natural gas.
* If bm'ner flames look like (A), call ii)r service. Normal burner
should look like (B) or (C), depending on tile type of gas.
16
cleaning.
flames
BURNER FLAMES
VERY LARGE
OR YELLOW
, If cooktop is connected to LP gas, contact
yotlr cooktop or made tile COllVelNiOll.
BURNER
CONTROL
KNOB WILL NOT
TURN
* When tile knob is at tile OFV position,
it must be pushed
in be_bre
it call be turned,
and it can only be tin'ned in a counterclockwise
direction.
Similarly, when the knob
it must also be pushed
ill to change
the person
who installed
is in the LOW or HIGH
flame settings.
positions,
Consumer
Services
With the purchase
of your new Monogram
appliance,
receive the
assurance
that if you ever need information
or assistance from GE,
we'll be there. All you have to do is call--toll-free!
G E Answer
Centd _
800.626.2000
Whatever
your question
about any Monogram
major appliance,
GE Answer Center"
inflwmation
se_xice is a_dlable
to help. Yore" call--and
your question--will
be answered
promptly
and courteously.
And you can call any time. GE Answer Center" selMce is
open 24 hours a da> 7 days a week.
OR
Visit our \'\Tebsite at: ge.com
In-Home
Service
Repair
800.444.1845
AGE consumer
service protessional
will provide
expert repair service, scheduled
at a time
that's convenient
fl)r you. Many GE Consumer
Service company-operated
locations
ottbr
you selMce today or toIllorrow,
or at your
convenience
(7:00
a.I/l,
to 7:00
p.I/l,
weekdays,
9:00 a.m. to 9:00 pan. Saturdays).
Our fimtorv-trained
technicians
know your appliance
inside
and out--so
most repairs can be handled
in just one visit.
For Customers
GE otters, fl'ee of charge, a brochure
to assist in planning
kitchen fl)r persons with limited mobilit>
With Special
Needs...
Consumers
with impaired
a TDD or a conventional
(800.833.4322)
to request
800.626.2000
a barrie>t]'ee
hearing
or speech who have access to
teletypewriter
may call 800.TDD.GEAC
inflwmati(m
or service.
SECVlON_
Service
Con_ac_
800.626.2224
You can have the secure teeling
that GE Consumer
Service will still be there after your
warranty
expires. Purchase
a GE contract
while your warranty
is still in effect and you'll
receive a substantial
discount.
With a m ultiple-year
contract,
you're assm'ed of future
service at today's prices.
Par_ and
Accesso_es
Individuals
qualified to service their own ai)p]iances
can have parts or accessories
sent directly
to their home. The GE parts system provides
access to over 47,000 parts...and
all GE Genuine
Renewal Parts are fully warranted.
VISA, MasterCard
and Discover cards are accepted.
800.626.2002
User maintenance
instructions
contained
in this manual cover procedures
intended
to be
performed
by amy user. Other servicing generally
should be referred
to qualified
service
personnel.
Caution must be exercised,
since improper
servicing may cause unsafe operation.
17
WARRANTY
YOUR
MONOGRAM
COOKTOP
WARRANTY
Staple sales slip or cancelled
check here, Proof of original
purchase
date is needed to obtain service under warranty.
WHAT IS
COVERED
LIMITED
For
one
ONE-YF&R
year
service
fl'om
labor
WARRANTY
date
in vom"
of a manufilcturing
of original
home
purchase,
to repair
or
we will
replace
pro\ide,
any part
_]'ee of charge,
of the
cooktop
that
parts
and
ihils
because
detect.
This warranty
is extended
to the original purchaser
and any succeeding
owner fin" products
pro'chased
fin" ordinary
home use in the 48 mainland
states, Hawaii and _'L_shington,
D.C.
If the product
is located in an area where service bv a GE Authorized
Servicer is not available,
you may be responsible
tot a trip chasge or you may be required
to bring the produrt
to an
Authorized
GE Service I_ocati(m fin" service. In Alaska the warranty
is the same except that it
is LIMITED
because you must pay to ship the product
to the service shop or fin" the service
technician's
travel costs to your home.
All warranty service will be provided
by our Factory Service
Customer
Care' servicers during
normal working
hours.
Should vom" appliance
Please have your serial
WHAT IS NOT
COVERED
"Service
trips
to use
the
to your
Centers
need serxice, during warramy
period
nmnber
and model nmnber
a_:dlable
home
to teach
you
fuses
or resetting
"Damage
to the product
caused
fire, floods or acts of God.
* Failure of the product
other than its intended
commercially.
* Improper
installation,
maintenance.
of
by accident,
* Incidental
or consequential
damage caused
by possible
defects with this appliance.
if it is used for
purpose
or used
delivery
or beyond,
call 800.444.1845.
when calling for service.
If you have an installation
problem,
contact
your dealer or instaJler. You are responsible
for providing
adequate
electrical,
gas,
exhausting
and other connecting
facilities
as described
in the Installation
Instructions
provided
with the product.
how
product.
* Replacement
of house
circuit
breakers,
(55"by our authorized
or
* Damage
caused
* Product
required
not accessible
service.
after
delivery.
to provide
EXCLUSIONOFIMPLIED WARRANTIES--Yoursole and exclusiveremedyis productrepa#
as provided in this Limited Warranty.Any impliedwarranties,includingthe impliedwarranties of
merchantability or fitnessfor a particularpurpose,are limited to one year or the shortestperiod
allowed by law.
Some
states
so the
above
fights,
and
To know
office
not
allow
limitation
you
what
or your
Warrantor:
18
do
may
your
state's
General
the
exclusion
or exclusion
also
have
legal
rights
_ttorlley
Electric
other
are
or limitation
may
not
apply
rights
which
in your
state,
of incidental
to you.
_u'v
consult
fl'om
Company,
Louisville,
KY 40225
consequential
warrant?
state
yore"
(;ellerak
or
This
gives
damages,
you
specific
to state.
local
or state
consumer
aflidrs
legal
GE Service
Protection
Plus 'M
GE, a name recognized
_orktwide
for quality and dependabilibl;
Service Protection
Plus"'--comprehensive
protection
on all yore
No Matter What Brand!
Benefits
Include:
We'll CoverAny Appliance.
Anywhere. Anytime.*
* Backed by GE
* All brands covered
* Unlimited
service calls
*
*
*
o
offers yon
appliances--
All parts and labor costs included
No out-of-pocket
expenses
No hidden
deductibles
One 800 number
to call
You will be
on
the
Protect
Plus
completel}
remaining
veto"
no
and
household
extra
food
are
fl)r
om" ser;'ice
contr_ct.
dishwasher,
charge
spoilage
prodtlcts
with
of yore"
refligerator,
there's
coverage
satisfied
value
No
washer
protected
and
emergency
protection
protection
questions
service
is offered.
against
expensive
or }ou
asked.
dryer,
and
You
It's
r;mge,
low
call
m_}
that
TV_ VCR
monthly
rest
request
easy,
your
mone}
back
simple.
and
umch
finandng
more--any
is a\_filable.
knowing
that
brand!
Even
icemaker
all yore" _duable
repairs.
_'_.,e >.r ,,,H_kle,.e i. (ZE_._d,.U .s i. the US toUhee _t 800.626.2224
for more
*All
brands
inform;ffiOll.
co_
r_d,
up
to 20 3e_lls
old.
in II_
cominemal
U.S.
,_
(]111
hel-e
Please place in envelope and mail to:
General Electric Company
Warranty Registration
EO. Box 32150
Louisville,
Department
KY 40232-2150
19
Consumer
Dear
Product
Ownership
Registration
Customer:
Thank
you for purchasing
We are proud
Follow
our product
and thank
you for placing
your confidence
in us.
to ha_e you as a customer!
these
three
Complete
your
steps
and
to protect
your
new
mail
Atter
ConsiLinler
Product
tt_we the
mind
Call
to dav.
l)e_l(u
tile mllikely
in a sati.
contains
of
of knowing
colltact
we
VOll
investment:
the
Read
below,
document
of a
saI_ T, modificalion.
800
your
Manual
Owner's
careflllly.
It will help
place. It
intonnation
operate
appliance
you will need should
you require
service.
Our serxice
ntmlber
ill
_ent
mailing
registration
store this
Ownership
Registration
appliance
you
yore- new
properly.
is
GE CARES
(800.432.2737).
Model
Number
Serial
I
Important:
Number
I
, I
If you did not get a registration
card with your
product, detach and return the form below to
ensure that your product is registered,
or register
online at ge.com.
lm_ ( _111her<
Consumer
Product
Ownership
Model
Registration
Number
Serial
I
MI: [
Fil"q I
Name
Sl r(!el ss
Addr<
I
Ms.
M*s.
Number
I
Mixs
I
I
I
I
I
I
I
I
I
I
I
I
I
I
I
I
I
I
I
I
Ap .#l, , , , , , , I
L_sl I
Name
I
I
I
I
I
I
I
I
I
I
I
I
I
I
I
I
I
I
I
I
I
I
I
I
I
I
I
I
E-lnailAddress
....
I
Zip
l)awPlaced
Month
_.m,.
J
GE Consumer
& Industrial
*
For
more
"Pri_acy
12-05JR
in the United
States
e-mail
here
if you
do not
address
to receive,
fl-om
GE Appliances
want
to receixe
AND
RE'F[ RN
II,,
I
xia e-mail,
II
discomlts,
special
,
I
,
otlbrs
and
other
((;EA).
COlnmunications
ti-om
GEA's
carefllllv
selected
partllers,
TO
_,%kRlg\N'IY
49-80378
11167 B
Check
your
commmlications
FAIL[ RE
164D4290P369
Printed
provide
important
Appliances
General Electric Compan U
Louisville, KY 40225
ge.com
Please
I
COMtHJ{TE
TttIS
CARD
DOES
NOT
DIMINISII
YO[ R
RI(;IITS.
information
Policy"
about
GEA's
or <:all 800.626.2224
privacy
and
data
usage
policy,
go to ge.coln
and
click
on