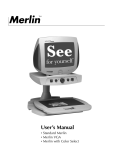
1
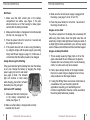
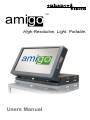
TM
High-Resolution. Light. Portable.
Users Manual
Congratulations on your purchase of Amigo from
Enhanced Vision. Like all Enhanced Vision products,
Amigo is designed to give you the highest quality and
convenience available.
Amigo enables people with low vision to see objects
on-the-go. This battery-operated system incorporates
a 6.5” high resolution viewing screen with tilting
capabilities for optimal viewing.
The slim, light and portable Amigo can be used for
reading newspapers, writing a check, looking at photos,
viewing price tags at the grocery store, and much
more. Amigo is designed to incorporate the flexibility
and freedom of your life in one compact video magnifier.
Prior to using this system, please carefully read and
follow the instructions provided within this booklet. A
thorough understanding of the functionality will allow
you to fully benefit from the flexibility and great features
of this device.
If you have any questions, please contact the Eye Care
professional or the supplier from whom you have
acquired the unit.
FCC compliance notice
This device complies with Part 15 of the FCC Rules. Operation
is subject to the following two conditions: (1) This device may
not cause harmful interference, and (2) this device must accept
any interference received, including interference that may cause
undesired operation.
This equipment has been tested and found to comply with the limits
for a Class B digital device, pursuant to Part 15 of the FCC Rules.
These limits are designed to provide reasonable protection against
harmful interference in a residential installation. This equipment
generates, uses, and can radiate radio frequency energy and, if
not installed and used in accordance with the instructions, may
cause harmful interference to radio communications. However,
there is no guarantee that interference will not occur in a particular
installation. If this equipment does cause harmful interference to
radio or television reception, which can be determined by turning
the equipment off and on, the user is encouraged to try to correct
the interference by one or more of the following measures:
– Reorient or relocate the receiving antenna.
– Increase the separation between the equipment and receiver.
– Connect the equipment into an outlet on a circuit different from
that to which the receiver is connected.
– Consult the dealer or an experienced radio/TV technician for help.
Unauthorized changes or modification to this system can void the
user’s authority to operate this equipment.
If your Low Vision device has an option to connect to a TV, it
must be used with shielded interface cables in order to meet FCC
emissions limits for Class B digital devices. It is the responsibility
of the user to use the shielded interface cables supplied with the
equipment.
FCC Compliance Notice
Chapter 1: Important Safety Precautions
System Warnings & Precautions . . . . . . . . . . . . 2-3
Chapter 7: Connecting to TV
Connecting to TV . . . . . . . . . . . . . . . . . . . . . . . . . 17
Chapter 8: Troubleshooting
Troubleshooting . . . . . . . . . . . . . . . . . . . . . . . 18-21
Chapter 9: Specifications
Specifications . . . . . . . . . . . . . . . . . . . . . . . . . 22-23
Chapter 10: Warranty
Warranty . . . . . . . . . . . . . . . . . . . . . . . . . . . . . 24-25
Chapter 11: Enhanced Vision Products
Other Enhanced Vision Products . . . . . . . . . . 26-28
Chapter 12: Contact Information
Contact Information . . . . . . . . . . . . . . . . . . . . . . . 28
Chapter 13: Notes
Notes . . . . . . . . . . . . . . . . . . . . . . . . . . . . . . . 29-31
Caring For Amigo . . . . . . . . . . . . . . . . . . . . . . . . . . 3
Chapter 2: Package Contents & Controls
Amigo Controls . . . . . . . . . . . . . . . . . . . . . . . . . . 4-5
Amigo Contents . . . . . . . . . . . . . . . . . . . . . . . . . 6-7
Chapter 3: Quick Start
Quick Start . . . . . . . . . . . . . . . . . . . . . . . . . . . . . . . 8
Chapter 4: Using Amigo
Charging the Battery . . . . . . . . . . . . . . . . . . . . . . . 9
Adjust Size & Viewing Modes . . . . . . . . . . . . 10-11
Using Freeze Feature . . . . . . . . . . . . . . . . . . . . . 12
Tilting LCD . . . . . . . . . . . . . . . . . . . . . . . . . . . . . . 12
Tightening LCD Hinge . . . . . . . . . . . . . . . . . . . . . 13
Writing Stand . . . . . . . . . . . . . . . . . . . . . . . . . . . . 13
Chapter 5: Tips for using the Amigo
Amigo . . . . . . . . . . . . . . . . . . . . . . . . . . . . . . . . . . 14
Conserving the Battery . . . . . . . . . . . . . . . . . . . . . 14
Chapter 6: Replacing & Recharging the Battery
Replacing & Recharging the Battery . . . . . . . 15-16
Table of Contents
Table of Contents
Important Safety Precautions
To obtain the maximum benefits from your Amigo,
please read these safety precautions carefully.
SYSTEM WARNINGS
The Amigo is designed to help people with low vision
read and write. The extent to which Amigo can improve
the ability to see images depends on an individual’s
condition and level of vision. These products are not
designed to restore vision, correct eye conditions or
halt degenerative vision loss. An eyecare professional
can determine the suitability of Amigo for a patient's
condition.
SYSTEM PRECAUTIONS
Avoid exposing Amigo to extreme or rapid changes in
temperature or humidity as these conditions may cause
fogging or damage to the product. Amigo should never
be placed near a radiator or heat register.
Do not smoke while using Amigo. Cigarettes, cigars
and pipe smoke release abrasive particles which are
potentially damaging to the Amigo’s optics and
electronics.
Do not use this product near water ( i.e. near a bathtub,
kitchen sink, swimming pool, etc).
Do not place this product on an unstable cart, stand or
table, as the product may fall, causing serious
damage.
Always place the Power/Video cord in an area where it
will not be damaged by persons walking on them.
To avoid the risk of electrical shock, do not disassemble
this product. Return it to the place of purchase if service
or repair work is required. Any attempt to disassemble
your Amigo product will void the warranty.
Always use the power supply provided within your
package. Do not attempt to use any other power supply;
doing so will harm the unit and void the warranty.
CARING FOR Amigo
Always turn the power OFF when you are not using the
system. Make sure the power is OFF and Amigo is
unplugged from the wall outlet before cleaning. Do not
use liquid cleaners.
The plastic surfaces of your Amigo product may be
dusted with a dry cloth.
The optical surfaces should be cleaned as needed for
best performance. Dampen a lens cleaning tissue with
a small amount of water and gently wipe the surfaces
clean.
Never apply lens cleaning solution directly on any
surface of your Amigo.
Do not use the Amigo for 1 hour after transporting
the unit from a cold room to room temperature.
2
Chapter 1 Important Safety Precautions
Chapter 1 Important Safety Precautions
3
Package content and control
Front View
Your Amigo is packaged in a convenient soft case for
storage and transport. All required accessories for operation
are included inside the box.
Amigo is comprised of:
1. Power Button: turns the unit ON and OFF.
1
2. 6.5” LCD screen: displays magnified images.
2
3. Size Wheel: rotates between 5 magnification sizes.
Side View
4. Mode Wheel: rotates between 6 different viewing modes.
5. Freeze button: takes a temporary picture of the image
on the LCD screen.
6. Video Out: used to connect the included Video Out
cable to a TV or external display.
3
7. LED indicator light: shows the status of the battery.
4
Blinking: Battery is currently charging
OFF: Battery is 100% charged
8. DC IN: used when plugging the external power supply into an AC outlet.
10
Back View
9. Battery Compartment: holds the battery and can be used as a charger when plugged into an AC outlet .
10. Battery: powers Amigo for approximately 1.75 hours.
5
4
(continued on page 6)
Chapter 2 Package Content & Control
6
7
8
Chapter 2 Package Content & Control
9
5
Included Accessories:
11.Carrying Case with Shoulder Strap
11
15
14
12.Amigo 12 Volt Power Supply
13.Right Angle Power Supply Adaptor Plug
(For export versions only. Style depends on country)
14. Video Out Cable
16
15. Lens Cloth
16.Writing Stand
17. External Battery Charger
18.Power Supply for External Battery Charger
(style may vary depending on the country where used)
18
12
17
19.Extra Battery
Optional Accessories (Sold separately):
20. Car Charger
13
6
Chapter 2 Package Contents & Controls
19
Chapter 2 Package Contents & Controls
20
7
Using amigo
Quick start
Here are some of the things you can do with Amigo.
• Read
• Write
• Freeze images
The following steps will give you a quick start on using
the Amigo.
1.Turn the Power ON /OFF
Press and hold the Power button for more than 1
second. Amigo should turn ON. (see Figure 1)
2. View the Image
Amigo comes with one fully charged external battery
and one partially charged battery inside the unit. Before
using your Amigo, we recommend plugging the Amigo
into an AC wall outlet to allow the battery inside the unit
to fully charge. This may take up to three hours.
Charging the battery inside Amigo:
Your Amigo will emit a series of short "beep" tones
when less than 10 minutes of battery power remain.
Follow the steps below in order to charge the battery:
1. Connect the Power Supply together with the Right angle Power Plug. (see page 7, items 12 and 13)
Simply rest or set the Amigo on top of the desired
object and view the magnified image.
2. Connect the Power Supply tip into the unit where the
DC IN is located. (see page 5, item 8)
3. Magnify the Image
3. Plug the Power Supply into an AC outlet or preferably
a power strip.
Rotate the Size Wheel to change the magnification
size. (see Figure 2)
4. While the battery is being charged, the green LED
indicator light will blink. When the battery is fully
charged, this light will remain solid.
(see page 5 item 7)
5. You can continue to use the unit while charging the
battery at the same time. This will not effect the
charging time which may be up to three hours.
Figure 1
8
Figure 2
Chapter 3 Quick Start
Note: The LED indicator light will turn off when the
power supply is not plugged into the Amigo.
Chapter 4 Using Amigo
9
Using the Amigo with the
Power Supply
Amigo has the following 6 Viewing Modes:
Follow the steps below:
Full Color Image
This mode gives a true color representation of the
image that is being displayed. This mode is ideal for
looking at pictures and writing.
1. Connect the Power Supply
together with the Right Angle
Power Supply Plug. (see
Figure 1)
Figure 1
2. Connect the Power Supply tip
to the Amigo as shown. (see
Figure 2)
3. Plug the power supply into an
AC wall outlet or preferably a
power strip.
Figure 2
4. Press and hold the power
button to turn on the Amigo
To adjust the size, rotate the
dial located on the side of the
unit labeled “Size.” There are 5
magnification levels, 3.5x-14x
(see Figure 3)
Yellow Text on Blue Background
For some users, this mode increases the contrast to
offer crisp text images for reading.
Adjusting the Viewing Mode
10
Chapter 4 Using Amigo
High-Contrast Positive Image
This mode provides a white background with black text.
This mode increases the contrast to offer crisp text
images for reading.
High-Contrast Negative Image
This mode provides a black background with white text.
This mode increases the contrast to offer crisp text
images for reading.
Adjusting the Image Size
To adjust the Viewing Mode,
rotate the dial located on the
side of the unit labeled “Mode.”
(see Figure 4)
Black & White Image
Based on your preference, you can choose the Black &
White mode for viewing objects. This may improve the
legibility of newsprint or other printed text.
Yellow Text on Black Background
For some users, this mode increases the contrast to
offer crisp text images for reading.
Figure 4
Chapter 4 Using Amigo
11
Using the Freeze Function
Tightening the LCD Hinge
FREEZE allows you to take a
temporary picture of an image.
This enables you to move the
unit to better view the desired
object.
Depending on the user’s
preference, the LCD hinge can
be tightened or loosened. To
tighten the hinge, turn the
Phillips screws clockwise
located on the front of the unit.
To loosen the hinge, turn the Phillips screws counter
clockwise. DO NOT OVER TIGHTEN.
1. Hold or place the unit over
desired location.
Figure 1
2. Press and hold the “FREEZE” button for 2 seconds.
(see Figure 1) to freeze the image
3. You may freely adjust the image size and color
viewing mode as desired after freezing the image.
(Refer to page 10 for more details)
4. Press the “FREEZE” button
a second time to exit.
Tilting the LCD Display
The LCD screen is designed
to tilt up 90 degrees.
Depending on the user’s
position, tilting the screen can
sometimes make viewing
images easier and clearer. (see
Figure 2)
90° max.
Writing with Amigo
1. Place the writing stand over the desired material. The tallest portion of the stand should face you.
2. Turn the Amigo ON. Gently set the Amigo into the stand with Power Button facing you. Tilt the LCD toward you.
3.Make sure the viewing mode is set to either Color
or Black & White mode. Reduce the magnification
to the lowest level.
4. Place your pen under stand and write on the material.
Figure 2
Note: Do not force the LCD beyond the angle of 90
degrees or you will cause damage the unit.
12
Chapter 4 Using Amigo
Chapter 4 Using Amigo
13
Tips for using amigo
Replacing the battery
Tips for Conserving the Battery
REMOVING AND INSTALLING THE BATTERY
• When not using unit for an prolonged period of
time, remove the battery to extend battery life. The
battery will slowly lose its charge while inside the
Amigo.
Removing the Battery from the Amigo:
The battery is located in the
battery compartment. To
remove, push down on the
small tab of the battery
compartment and slide the
battery out. (see Figure 1)
• To maximize total battery time, charge both batteries
by using either the internal or external chargers.
(see page 9 or 16). Keep a spare battery charging
in the external charger at all times for future use.
Note: Never allow the battery to completely drain.
Figure 1
Tips for Using Amigo
Amigo works best when placed directly on desired
material. This allows you to change viewing modes
and magnification with ease. Tilting the Amigo allows
you to view images at a comfortable angle. When
viewing objects "on-the-go", hold the object close to
the camera for clearer images. (see Figure 1 & 2)
Installing the Battery in the Amigo:
To install the battery, set the
battery directly on top of the
battery compartment with
the charging contacts facing
towards the back of the
LCD. Gently press down
and forward to lock it in
place. (see Figure 2)
Figure 2
Note: Do not force the battery into the battery
compartment. It will only fit in one direction.
Figure 1
Figure 2
Chapter 5 Tips for using Amigo
14
15
Chapter 6 Replacing the Battery
Charging the battery
connecting to tv
To Charge the Battery on the External Charger:
1. Remove the battery from the Amigo. (see page 15)
2. Plug the external battery charger into an available AC
outlet.
3. "Status" LED indicator
will show RED when
charger is ready and
"Charge" LED indicator
will show a flashing
GREEN when waiting for
battery.
4. Place the battery aprox 1/2
in. from the front with the
contacts facing the end of
the charger. Slide battery
forward and "CHARGE"
LED indicator will turn RED
when charging.(see figure
2 & 3)
5. "CHARGE" indicator
flashes RED and GREEN
alternatively when battery
has been charged to over
90%.
Figure 1
1) Plug one end of the Video Cable into the “VIDEO
OUT” jack on the back of Amigo (see Figure 1).
2) Plug the other end into the yellow “VIDEO IN” jack on
the front, side or rear of your TV. Then switch your
TV to Video Mode. This will allow you to view
magnified images on your TV screen (see Figure 2).
Note: The LCD of the Amigo will remain OFF while
connected to a TV in order to conserve battery life.
Figure 2
Figure 2
Figure 1
Yellow VIDEO IN
on front or back
of TV
Figure 3
6. When the battery is fully charged, the "CHARGE" LED
indicator turns to a steady GREEN.
7. After the battery is fully charged, slide the battery out.
8. Unplug power, "CHARGE" and "STATUS" indicator will
go out.
16
Connecting Amigo to a TV
To connect the Amigo to a TV you will need to use the
included Video Cable (see item #14 on page 7).
Chapter 7 Charging the Battery
Video Out
Video Out Cable
Chapter 8 Connecting to TV
17
Troubleshooting
Troubleshooting
No Power:
1. Make sure that both contact pins in the battery
compartment are visible. (see Figure 1) The pins
should protrude out of the housing to make proper
contact with the battery terminals.
2. Make sure the battery is charged and correctly inserted
into the unit. (see page 9 or 16)
3. Press the power button for more than 1 second and
the Amigo should turn on.
4. If the power does not turn on when using the battery,
try using the Amigo with the power supply (see Using
Amigo with Power Supply on page 10). In this case, it
is most likely that the battery needs to be charged.
Amigo Green Light is blinking:
If the green indicator light is blinking fast, then the battery
is very low. Charge the battery by plugging the Amigo
power supply into an AC wall outlet
(see page 9) Note: The indicator
light will continue to blink slowly
while charging, but will turn off when
the battery has fully charged.
Unit turns OFF suddenly:
1. Make sure that both contact pins
in the battery compartment are
visible (see Figure 1).
Figure 1
3. Make sure the correct power supply is plugged into
the Amigo. (see page 7, items 12 and 13)
4. Press the power button for more than 1 second and
the Amigo should turn on.
Images are too dark:
If a picture is present on the display but excessively dim
while using Color mode, check the lights under the unit
underbody. A bright, white light should clearly be visible. If
no bright light is visible underneath, your unit may require
service. Please contact Enhanced Vision technical support.
Images are blurry/distorted:
1. This is usually caused by finger prints or dirt on the
glass underneath the unit. Make sure the glass is
cleaned with a lens cleaning cloth. Use the cleaning
cloth or a cotton swab only when needed.
2. Hold or place Amigo directly on the target material that is to be read. Amigo is designed to be in focus
when positioned on the target material.
3. If using the Writing Stand, some level of blurriness is unavoidable. Only use the writing stand for
applications requiring your handwriting and at
minimum magnification. Resume normal use without
the writing stand whenever possible.
2. Make sure the battery is charged and correctly
inserted into the unit.
18
Chapter 9 Troubleshooting
Chapter 9 Troubleshooting
19
Troubleshooting
Controls do not respond:
1. This may be caused by a stuck button. Make sure
that none of the thumb wheels are stuck between two
different positions. When turning a wheel, a different
effect should be felt.
2. Check that the FREEZE button can clearly be
depressed. A distinct click feeling should be felt.
The Battery does not charge inside the Amigo:
Make sure the Amigo Power Supply is used with the unit.
Verify that the battery is properly inserted. The LED on the
Amigo should be blinking if the battery is not full. Amigo
will recharge batteries which are either fully or
partially depleted. Fully charged batteries will not be
recharged until their level is low enough. Should you
continue to have difficulty charging the battery inside the
Amigo, try charging the battery in the external charger
instead, preferably overnight. It is not possible to cause
damage by "overcharging" a battery.
Amigo does not remember the last settings used:
Amigo will remember the last settings used when the
power is shut OFF with the POWER button. If the battery
runs too low and the Amigo shuts off automatically, then
the unit may not save the last settings into memory.
Picture is not moving:
Check to make sure the FREEZE button is not engaged.
A click feeling should be clearly felt when depressed. The
FREEZE button must be pressed for at least 1 second.
20
Chapter 9 Troubleshooting
Troubleshooting
The LCD Swivel is loose and closes on the unit:
If this ever happens, use a small Phillips screwdriver to
adjust the swivel tension (see page 13).
Unit is warm:
Amigo integrates a battery charger and a powerful camera
processing unit. It is normal for the unit to become warm
during use. This does not pose a safety risk.
There seems to be a “delay” when moving the unit or
using the writing stand:
A slight delay in use is normal. When using the writing
stand, proceed writing slowly on the target material.
Problems viewing Amigo on a TV:
1. Plug one end of the 6-foot VIDEO-OUT Cable to the yellow VIDEO-IN jack on the back or front of your TV
2. Plug the other end into the VIDEO-OUT jack on the Amigo.
3. Use your TV remote control and press the button
associated with changing the video input source. For
most remote controls, the button for selecting the
input source will be labeled with one of the following:
• TV/Video, Auxiliary or AUX, EXT or External 1/2/3,
• Video, Video 1, Video 2 or Video 3
• Input, Input 1, Input 2 or Input 3
If you are still having problems, refer to your TV manual to
find the section “Video Mode” or "Input/Source Select".
Chapter 9 Troubleshooting
21
Specifications
Specifications
Horizontal Field of view:
- 37mm (maximum)
Charging time :
~2.5 hours when NOT using the unit.
Magnification levels:
- 3.5X, 5.3X, 7X, 10.X, 14X (using built-in 6.5" LCD)
- 10X, 15X, 20X, 30X, 40X (using external 20" TV)
Running time:
~1.75 hours per battery
Native LCD Resolution:
- 800x480 (384,000 pixels)
LCD Brightness:LCD Contrast Ratio:
- 500 cd/m2
- 400:1
Image Aspect Ratio:
- 15:9
Dimensions:
Unit : 16.5cm (L) * 9.8cm (W) * 4.3cm(H)
Display: 13.7cm (L) * 7.9cm (W), 15.8cm diagonally
Weight:
Unit only: <600g; <1.5 lbs
Environment :
Operating Temperature : 0 – 50C
Storage temperature : -20 +60C
Do not use unit for 1 hour after transporting unit from
the cold to room temperature.
22
Chapter 10 Specifications
Video Output: NTSC (or PAL, depending on model)
Battery:
Enhanced Vision Removable Li-Ion 7.2V L-series
battery. Nominal capacity is 2200mAh.
Note: Do not use a Sony NPF-550 battery or any
battery that is lower than 2200mAh provided. For more
information, please call Enhanced Vision.
Power:
Wall adapter:
Input: 100-240VAC 50/60Hz
Output: 9 VDC, 2.5A max load
Unit:
Input: 12VDC, 1.5A MAX Li-Ion charger built-in unit,
current may vary based on state of battery charge.
Regulatory information:
Unit : EN55022 Class B, EN61000-3-2, EN61000-3-3,
EN55024. (CE for IT devices); FCC Class B, ICES-003,
AS/NZS CISPR 22
Wall adapter: UL/CE
Chapter 10 Specifications
23
Warranty
warranty
Enhanced Vision
Amigo Video Magnifier Warranty Policy
Enhanced Vision products are designed to give you
the highest quality image, convenient features, ease
of use and reliable service. Amigo has been
inspected and tested prior to shipping. Enhanced
Vision warrants Amigo against defects in material and
workmanship under normal use for two years from
the date of original purchase. Enhanced Vision, at its
option, will at no charge either repair the product or
replace it during the warranty period. There are no
other expressed or implied warranties accompanying
this product.
This warranty does not cover: a) Defects or damage
from misuse, use in other than normal and customary
manner, accident or neglect; b) Defects or damage
from improper operation, maintenance, installation,
adjustment, alterations or modification; c) Defects or
damage from spills of food or liquid; d) All plastic
surfaces and all other externally exposed parts that
are scratched or damaged due to normal use; e)
Damage due to operation of Amigo with equipment
not supplied by Enhanced Vision. f) Up to 3 dark or
bright pixels that may appear on the Amigo LCD. All
products manufactured by Enhanced Vision meet
industry standard TFT LCD technology requirements.
• Anyone using this product does so knowingly
assuming certain risks, due to the need to utilize vision
enhancement devices.
• A two-year extended warranty option is available within 12 months from the date of purchase. Please
contact Enhanced Vision for detailed information.
Service Process
In the event that technical support or repair service is
needed, please contact your local Enhanced Vision
representative or the Enhanced Vision warranty service
center.
If warranty service is required, please contact Enhanced
Vision at (800) 440-9476 Monday through Friday,
between 8 a.m. and 5 p.m. Pacific Standard Time (PST)
to request a return authorization number. Warranty
repairs will not be accepted without a valid return
authorization number.
You may wish to keep the original product
packaging in case warranty service is required. The
manufacturer cannot provide packaging for
warranty repairs.
NOTE: Please completely fill out and send in the
enclosed warranty registration card.
• You must provide proof of purchase, bearing the
date of purchase, in order to receive warranty service.
24
Chapter 11 Warranty
Chapter 11 Warranty
25
other enhanced vision products
Merlin LCD – Easy to use!
Merlin LCD is a video magnifier that pivots
and swivels to the most comfortable viewing
position. This product includes all the same
features as the Merlin but with a sleek
ergonomic design. Available in 17”, 19” or 22”
LCD versions. Magnification: 2.4X – 77X
Merlin LCD Plus – Computer compatible!
Merlin LCD Plus offers the same advanced
features as the Merlin LCD but is also
compatible with most computer workstations
and offers a split screen mode. This mode lets
the user view magnified images and computer
files concurrently. The included footswitch
and Split Screen Control Box provides line
markers and window size controls.
Pebble – Compact, Ultra-Portable
Magnification!
The Pebble is a handheld electronic video
magnifier that you can take anywhere. Weighing
less than 8 ounces, Pebble features a uniquelydesigned folding handle and includes both nearviewing and table reading modes. Small enough
to fit in your pocket or purse, the Pebble is the
ideal companion to provide magnification, on
the go. Featuring a built-in 3 .5” or 4.3” LCD
screen, the Pebble's Freeze-Frame feature
allows you to capture any still image and adjust
magnification. Up to 28 different viewing modes
allow you to choose alternate color
combinations based on your personal
preference. Pebble can be powered using
standard rechargeable batteries (included)
Magnification: 2X – 10X
26
Chapter 12 Other Enhanced Vision Products
other enhanced vision products
Acrobat – Low Cost Meets Versatility!
The Acrobat’s innovative rotating camera
design enables people with low vision to
perform daily tasks more effectively. By
rotating the camera, the user can read,
write, self-view, and magnify images at any
distance. The full color, auto-focus Acrobat
features a removable camera head and
connects to any TV or VGA monitor in seconds. Now available in either long arm or
short arm configurations.
Magnification: 2X – 72X*
*Maximum limit depends upon display size
Acrobat LCD – Flexibility For Any task!
With a built-in 19” LCD, the Acrobat is a
3-in-1 video magnifier ideal for near,
distance and self viewing. By rotating
the camera, you can read, write, groom,
and magnify images at any distance. The
Acrobat LCD offers a complete system for
those at work, school or home.
Magnification: 2.5X – 65X (19” LCD)
Flipper Panel – Integrated and Portable!
This powerful, portable magnifier integrates the
Flipper 225-degree rotating camera with a slim, LCD
platform. Powered by an innovative battery pack, the
Flipper Panel runs up to 4 hours on a single charge.
The discrete camera projects a full-color, auto-focus
image on the screen for both near and distance
viewing.
Magnification: 1X – 26.4X (with optional stand)
Chapter 12 Other Enhanced Vision Products
27
other enhanced vision products
notes
Max - Low Cost, Powerful Magnification!
A powerful, low-cost magnifier for reading.
Connects to any TV in seconds. Available in
either Color or Black & White versions.
Magnification: 16X – 28X*
*Maximum limit depends upon display size
Accessories:
Lithium Battery (ACC-0038-00)
Additional batteries are available for your Enhanced Vision
products (USB Bridge, Amigo and Jordy)
Carrying Cases
Convenient cases for storage and transport of all Enhanced
Vision products.
Power Supplies
Spare power supplies for your Enhanced Vision products.
Contact information:
(US Office) Phone: (714)465-3400 Fax: (714)374-1821
(UK Office) Phone: +44 (0)115 9442317 Fax: +44 (0)115 9440720
(DE Office) Phone: +49 (0)6691 911588 Fax: +49 (0)6691 807958
www.enhancedvision.com
Technical Support:
Main Toll Free (800) 440-9476 ext. 3
Local Phone: (714) 465-3400 ext. 3
E-mail: [email protected]
28
Chapter 12 Other Enhanced Vision Products
Chapter 13 Notes
29
notes
30
notes
Chapter 13 Notes
Chapter 13 Notes
31
The Amigo video magnifier is designed to enlarge and
enhance images to improve the lives of people who
have low vision. The extent to which Amigo can
improve the ability to see images and text depends on
a person's individual condition and level of visual
impairment. Amigo is not designed to restore vision,
correct eye conditions or halt degenerative vision loss.
An Eye Care professional can best determine the
suitability of Amigo for a patient's specific condition.
For more information, please visit:
www.enhancedvision.com.
(800) 440-9476 (US Office, toll free)
(714) 465-3400 (US Office)
+44 (0) 9442317 (UK)
+49 (0)6691 911588 (DE)
Part # MAN-0100-00
January, 2011
Copyright © 2009 by Enhanced Vision. All rights reserved.
Product specifications subject to change without prior notice.