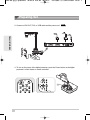
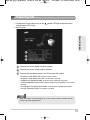
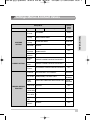
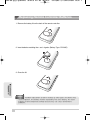
1
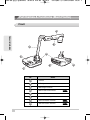
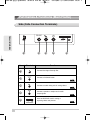
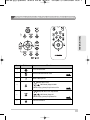
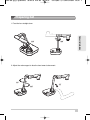
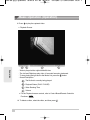
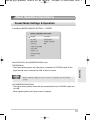
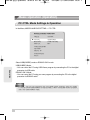
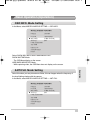
SDP-860-영문수정20100412
2010.4.28 9:30 AM
페이지2
G4-1G(Mac 2) C-2400 2438DPI 175LPI
ENGLISH
DIGITAL PRESENTER
USER’S MANUAL
SDP-860
Before attempting to operate this product, Please read the instructions carefully.
www.samsungpresenter.com
T
SDP-860-영문수정20100412
2010.4.28 9:30 AM
페이지3
G4-1G(Mac 2) C-2400 2438DPI 175LPI
This high-resolution presentation system generates images on display devices such as PC
monitors and projectors.
This user manual is for the SDP-860 product. Please read this manual and any
supplementary document(s) thoroughly before attempting to install and/or operate the
product.
This manual and the software and hardware explained here are protected by copyright
law. All copy, reprint and translation to other languages of a part of or all of the contents of
this instruction manual without permission of Samsung Techwin Co., Ltd. are expressly
prohibited except for fair use within the scope of copyright law.
The specifications of this product are subject to change and upgrade without prior notice.
2
T
SDP-860-영문수정20100412
2010.4.28 9:30 AM
페이지4
G4-1G(Mac 2) C-2400 2438DPI 175LPI
Product Warranty and Limitations
The manufacturer of this product is not responsible for the sale of the product, nor
does the manufacturer delegate such responsibility to a third party. The product
warranty does not cover accidents, negligence, abuse, or improper use of the item in
whole or in any part. Additionally, the manufacturer does not provide warranty for any
additional part or piece that was not supplied by the manufacturer.
The product warranty period is for two years from the purchase date. However, the
warranty does not cover any of the following problems, and a nominal service fee will
be charged if:
Malfunction due to user's negligence
Dismantling or replacement by the user
Product has been connected to power source that differs from that specified.
Malfunction due to natural disasters (fire, flood, tsunami, etc.)
To replace expendable components.
This warranty covers only the product supplied with the warranty.
After the warranty period has expired, a service fee will be charged for any inspection
and/or repair for the product. During the warranty period, a service fee will be charged
for repair and/or inspection for the product for any problems that are not covered by
the warranty.
This product is not an anti-theft or fire-prevention device; the manufacturer is not
responsible for any damage to property or personnel that may occur during its use.
This product must be installed by skilled and experienced personnel. Self-installation
by the user is prohibited. Self-installation by the user may result in fire, electrocution,
and/or product malfunctions. Please contact your local dealer for assistance with the
installation of the product.
3
T
SDP-860-영문수정20100412
2010.4.28 9:30 AM
페이지5
G4-1G(Mac 2) C-2400 2438DPI 175LPI
Product Features
1,300k-pixel High-Resolution & High-Definition Image
Generates real-time video images at 30 frames per second and at
1,300k pixels high-resolution for live presentations.
2D/3D Dual Noise Reduction Technology
Equipped with our proprietary ISP chipset and 2D/3D dual noise
reduction technology, this presentation system depicts vivid colors
even in low light environments.
Super-Macro Capacity
With 6x optical and 8x digital zooms, this system achieves a
maximum of a 48x combined zoom for an excellent magnification
power equal to a microscope. When equipped with an adapter
lens, it also delivers super-close-up images.
Convenient Multimedia Options
The SDP-860 not only saves and plays still images and videos
(VGA/30 fps) but also supports audio mixing for more versatile
multimedia capabilities.
Page Detection & Auto Save
The SDP-860 not only detections motion of document but also
saves still image for use of various application.
4
T
SDP-860-영문수정20100412
2010.4.28 9:30 AM
페이지6
G4-1G(Mac 2) C-2400 2438DPI 175LPI
Table of Contents
Safety Precautions
Warning
Caution
6
6
Product Information
Package Contents
Part Names & Functions (Main Frame)
Front
Back (Rear Connection Terminals)
Side (Side Connection Terminals)
Part Names & Functions (Main Frame Control Board/Remote Controller)
Preparing Set
Settings Menus & Default Values
8
10
10
11
12
13
15
18
Installation
Connecting In/Output Devices
Connecting Output Devices
Connecting Peripheral Devices
Connecting Computer for External Input
Watching Video from External Devices
20
20
22
23
24
Operation
Basic Operation (Functions)
Output Resolution Setup (DVI/VGA Output Mode)
Enlarging/Minimizing
Adjusting Focus
Adjusting Brightness
Adjusting the Image
Preset Setting
Basic Operation (Operation)
Capturing Image & Videos
Freeze Mode Setting & Operation
PC CTRL Mode Setting & Operation
OSD INFO. Mode Setting
ANTI FLK. Mode Setting
Page Detection Setting
Microscope Mode
System Reset
Checking System Version Information (VER. INFO)
25
25
26
27
28
28
31
32
32
39
40
41
41
42
42
44
44
Miscellaneous (Appendix)
Troubleshooting
Replacing Remote Controller Batteries
Product Specifications
45
46
47
5
T
SDP-860-영문수정20100412
2010.4.28 9:30 AM
페이지7
G4-1G(Mac 2) C-2400 2438DPI 175LPI
Safety Precautions
Safety Precautions
To prevent possible user injury or damage to property, please read and follow all
information below.
Warning/Caution/Special Mark Messages
This warning symbol indicates death, grave personal injury, and/or
damage to property as consequences for failure to comply.
This caution symbol indicates damage to the equipment, installed
programs, and/or contained data as consequences for failure to comply.
Warning
■ Do not connect multiple power cords to a
single outlet.
It is often the cause of short-circuits that may
cause fire.
■ Do not place vessels containing water on
the product.
Water leakage can cause serious malfunctions
in the product.
■ Do not forcibly bend the power cord or
place a heavy object on the cord.
It may result in fire.
■ Do not clean the product with water, paint
thinner, or other organic solvent.
To avoid product malfunctions and/or electric
shock, wipe with a dry cloth.
■ Avoid installing the product in places with
high humidity.
It may result in electric shock and/or fire.
■ Do not pull the power cord forcibly off the
outlet.
A broken cord may lead to fire and/or electric
shock.
■ Do not disassemble, attempt to fix, or alter
the product yourself.
There is a risk of malfunction, shock, and other
dangers. this will invalidate the warranty.
■ Do not touch the power plug with moisture
on your hands.
You may receive an electric shock injury.
Caution
■ Do not insert the power plug to a loose
socket.
It may result in electric shock and/or fire.
■ Avoid installing the product in places that
are vulnerable to impact.
■ Avoid installing the product in places that
are exposed to powerful magnetic fields or
vibrations.
■ Do not move the product while it is in
operation.
It may damage the product.
■ Do not insert or allow foreign objects to
enter the product.
It may damage the product.
■ Do not place heavy objects on the product.
It may damage the product.
■ Allow good air circulation around the
product.
Keep the back panel at least 10cm away from
a wall and the front panel 5cm away from
other devices.
6
■ Avoid installing the product in places that
are exposed to direct sunlight or heat
sources.
■ Install on a flat, stable platform.
Failure to do so may result in product
malfunctions.
■ Disconnect the power plug from the mains
outlet when the product is not in use for an
extended period of time, or during
electrical storms.
■ When detecting a strange noise or smell
from the product, unplug the power cord
immediately and contact your nearest
service center for assistance.
T
SDP-860-영문수정20100412
2010.4.28 9:30 AM
페이지8
G4-1G(Mac 2) C-2400 2438DPI 175LPI
T
Product Features
Safety Precautions
FCC Compliance Statement
This equipment has been tested and found to comply with the limits for a class A digital device, pursuant
to part 15 of the FCC Rules. These limits are designed to provide reasonable protection against harmful
interference when the equipment is operated in a commercial environment. This equipment generates,
uses, and can radiate radio frequency energy and, if not installed and used in accordance with the
instruction manual, may cause harmful interference to radio communications.
Operation of this equipment in a residential area is likely to cause harmful interference in which case the
user will be required to correct the interference at his own expense.
Caution
Random replacement of built-in battery by other types of batteries may cause
explosion. The battery shall be replaced by the same battery. The used batteries shall be
disposed carefully because they can cause environment pollutions.
Correct disposal of batteries in this product
(Applicable in the European Union and other European countries with separate battery return systems.)
This marking on the battery, manual or packaging indicates that the batteries in this product should not be
disposed of with other household waste at the end of their working life. Where marked, the chemical
symbols Hg, Cd or Pb indicate that the battery contains mercury, cadmium or lead above the reference
levels in EC Directive 2006/66. If batteries are not properly disposed of, these substances can cause harm
to human health or the environment.
To protect natural resources and to promote material reuse, please separate batteries from other types of
waste and recycle them through your local, free battery return system.
Correct Disposal of this product
(Waste Electrical & Electronic Equipment)
(Applicable in the European Union and other European countries with separate collection systems.)
This marking shown on the product or its literature, indicates that it should not be disposed with other
household wastes at the end of its working life. To prevent possible harm to the environment or human
health from uncontrolled waste disposal, please separate this from other types of wastes and recycle it
responsibly to promote the sustainable reuse of material resources.
Household users should contact either the retailer where they purchased this product, or their local
government office, for details of where and how they can take this item for environmentally safe recycling.
Business users should contact their supplier and check the terms and conditions of the purchase contract.
This product should not be mixed with other commercial wastes for disposal.
7
SDP-860-영문수정20100412
2010.4.28 9:30 AM
페이지9
G4-1G(Mac 2) C-2400 2438DPI 175LPI
Package Contents
The picture of the contents may differ from actual products, and certain contents may
change if deemed necessary.
Default Contents
Product Information
8
User’s Manual
Remote Controller
Power Cable
Power Adapter
DVI Cable
VGA Cable
USB Cable
USB Program
CD & Manual
Diffuser Sheet
(220x190)
T
SDP-860-영문수정20100412
2010.4.28 9:30 AM
페이지10
G4-1G(Mac 2) C-2400 2438DPI 175LPI
Package Contents
Accessories
SD Card
Product Information
RS232C Cable
Adapter Lens
Caution
RS232C cables and adapter lenses from other brands may not be compatible with this
product.
Samsung Techwin cares for the environment at all product
manufacturing stages to preserve the environment, and is
taking a number of steps to provide customers with more
environmentally friendly products.
The Eco mark represents Samsung Techwin’s will to
create environmentally friendly products, and indicates
that the product satisfies the EU RoHS Directive.
9
T
SDP-860-영문수정20100412
2010.4.28 9:30 AM
페이지11
G4-1G(Mac 2) C-2400 2438DPI 175LPI
Part Names & Functions (Main Frame)
Front
1
Product Information
2
3
6
4
8
7
5
No.
10
Name
1
Camera
2
LED Light
3
Main Support Column
4
Main Frame Control Board
5
Status LED
6
Remote Control Signal Receiver
7
Rear Connection Terminal
P.11
8
Side Connection Terminal
P.12
P.13
T
SDP-860-영문수정20100412
2010.4.28 9:30 AM
페이지12
G4-1G(Mac 2) C-2400 2438DPI 175LPI
Part Names & Functions (Main Frame)
Back (Rear Connection Terminals)
Product Information
1
No.
2
Terminal
3
4
5
Function
1
Connect the power adapter cable.
2
Connect the video output terminal of a VGA output device.
When External Input is selected, video is displayed via this
VGA video output terminal.
P.23
3
Connect the RGB video output terminal of a PC monitor
or a projector.
P.20
4
Connect an LCD monitor or projector that supports DVI.
P.20
5
Connect to USB cable when transmitting image to a
PC by USB port
P.21
11
T
SDP-860-영문수정20100412
2010.4.28 9:30 AM
페이지13
G4-1G(Mac 2) C-2400 2438DPI 175LPI
Part Names & Functions (Main Frame)
Side (Side Connection Terminals)
Product Information
RS-232C
1
No.
2
Terminal
1
2
3
4
5
Function
Connect Kensington Security Slot.
RS-232C
Connect an RS-232C cable.
P.21
3
Connect an audio mixing mic for saving videos.
P.22
4
Connect a speaker or earphones for audio
output signals.
P.22
5
Insert an SD/SDHC card for saving or
importing videos and pictures.
P.22
12
T
SDP-860-영문수정20100412
2010.4.28 9:30 AM
페이지14
G4-1G(Mac 2) C-2400 2438DPI 175LPI
Part Names & Functions (Main Frame Control Board/Remote Controller)
Product Information
No.
Button
Function
1
Turn On/Off Power
2
Select Internal/External Video
3
Built-in Microphone
4
(
Mode) Auto Focus
(
/
LIST Mode) Page DOWN
(While Playing Video) Play Previous File
5
(
Mode) MF/Auto Color Adjustment
(
/
P.27
LIST Mode) Page UP
(While Playing Video) Play Next File
6
P.24
P.27
Cancel Command
13
T
SDP-860-영문수정20100412
2010.4.28 9:30 AM
페이지15
G4-1G(Mac 2) C-2400 2438DPI 175LPI
Part Names & Functions (Main Frame Control Board/Remote Controller)
No.
Button
7
Function
(
Mode) Brighten/Darken Screen
(
/
LIST Mode) Move Up/Down
(While Playing Video) Adjust Volume
Product Information
8
(
Mode) Enlarge/Minimize Screen
(
/
P.28
LIST Mode) Move Left/Right
(While Playing Video) Rewind/Fast Forward
9
(
Mode) Open Menu
(
/
P.26
LIST Mode) Execute Selected Menu
(While Playing Video) Play/Stop
(
10
Mode) Capture Screen as Picture(
) / Video(
File (SD Card Required)
Switch to LIVE(
11
(Picture (
(
13
), Picture (
) and Video (
), or Video (
(
Mode) Turn On/Off Light
(
/
LIST Mode) Delete Picture & Video
In Still Image Mode,
14
In Video Mode,
Status LED
)Mode
) Modes Require SD Card)
Mode) Pause Screen
In LIVE Mode,
14
P.32
(While Playing Video) Switch to Full Screen
12
)
In External Mode,
Blue LED
Blue LED
Blue LED
Blue LED
P.39
T
SDP-860-영문수정20100412
2010.4.28 9:30 AM
페이지16
G4-1G(Mac 2) C-2400 2438DPI 175LPI
Preparing Set
1. Face the lens straight down.
Product Information
330。
180。
2. Adjust the main support to face the lens toward a document.
110。
180。
55。
15
T
SDP-860-영문수정20100412
2010.4.28 9:30 AM
페이지17
G4-1G(Mac 2) C-2400 2438DPI 175LPI
Preparing Set
3. Connect a VGA OUT, DVI, or USB cable and the power cord.
P.20
Product Information
4. To turn on the power of the digital presenter, press the Power button on the digital
presenter’s control board or remote controller.
16
T
SDP-860-영문수정20100412
2010.4.28 9:30 AM
페이지18
G4-1G(Mac 2) C-2400 2438DPI 175LPI
Preparing Set
※ Pressing the Power button turns on the
power LED light around the button
and set status LED in blue.
※ Initial Screen
Product Information
1
2
3
1
Displays the current digital presenter settings.
2
Displays the current screen-capture settings.
3
Displays the operational status of an SD card and the system.
- SD (SDHC) CARD DETECTED: The SD card is inserted.
- SD (SDHC) CARD DOES NOT EXIST: No SD card is inserted.
- CAMERA SYSTEM INITIALIZING: In the process of initializing the system.
- SYSTEM FIRMWARE FILE EXISTS: System update files are available in an inserted
SD card.
- PLEASE WAIT FOR UPDATE PROCESS: In the process of updating the system.
- UPDATE PROCESS DONE!: The system is updated.
Caution
While the system is being updated, do not turn off the product or detach the SD
card. It may cause system errors.
17
T
SDP-860-영문수정20100412
2010.4.28 9:30 AM
페이지19
G4-1G(Mac 2) C-2400 2438DPI 175LPI
Settings Menus & Default Values
Setup Menu
Ⅰ
Product Information
DVI/VGA OUTPUT
MODE
Ⅱ
Ⅲ
Ⅳ
SXGA 1280x1024 4:3
UXGA 1600x1200 4:3 Up-Scaled
XGA 1024x768 4:3 Down-Scaled
720p 1280x720 16:9 Window Cut-out
1080p 1920x1080 16:9 Window Cut-out
720p 1280x720 16:9 Stretched
1080p 1920x1080 16:9 Stretched
WB Mode
DNR
Rotation
Default
Value
/State
SXGA
ATW(Tracking)/AWB
(One Push)/MANUAL
ATW
OFF/AUTO/MAX
AUTO
0
0/180
TEXT
IMAGE
ADJUSTMENT
IMAGE
IMG Mode
CUSTOM
ZOOM/FOCUS
18
TONE - Very LOW / LOW /
NORMAL / HIGH / Very High
COLOR LOW/MIDDLE/HIGH/B.W
SHARPNESS LOW/MIDDLE/HIGH
TEXT
MACRO Mode
--
MICROSCOPE Mode
--
D-ZOOM
MAX
8x
OFF/4x/8x
T
SDP-860-영문수정20100412
2010.4.28 9:30 AM
페이지20
G4-1G(Mac 2) C-2400 2438DPI 175LPI
Settings Menus & Default Values
Setup Menu
Ⅰ
PRESET SETTING
MISCELLANEOUS
FUNCTION
Ⅲ
Ⅳ
PIC
Format
JPEG/BMP
JPG
Quality
BEST/FINE/NORMAL
NORMAL
MOV
Quality
STANDARD/BEST
STANDARD
Mic Mute
ON/OFF
OFF
Time
ELAPSE
OFF/5MIN/10MIN/15MIN/20MIN/30MIN/
45MIN/1HOUR
OFF
Reset File
Number
--
--
PresetEXE
PRESET1/PRESET2/PRESET3/PRESET4
--
PresetSAV
PRESET1/PRESET2/PRESET3/PRESET4
--
Boot
Preset
OFF/PRESET1/PRESET2/PRESET3/PRESET4
FREEZE
DVI,VGA ONLY / ALL DISPLAY
DVI/VGA
PC CTRL
USB(HYBRID) / RS-232C ONLY
USB
(HYBRID)
OSD
INFO.
SHOW ANYTIME/HIDE WHEN MOVIE REC
SHOW
ANYTIME
ANTI FLK.
OFF/ON
JPEG
Product Information
CAPTURE
SETTING
Ⅱ
Default
Value
/State
OFF
OFF
PAGE
-DETECTION
--
Ver. INFO
--
--
USEFUL
TIP
--
--
SYSTEM
RESET
ON/OFF
OFF
19
T
SDP-860-영문수정20100412
2010.4.28 9:30 AM
페이지21
G4-1G(Mac 2) C-2400 2438DPI 175LPI
Connecting In/Output Devices
Connecting Output Devices
To use a normal or DVI monitor, you must connect the monitor to the digital presenter
using a monitor or DVI cable.
Connection
Monitor Cable
Connect to VGA Input Terminal
Installation
Monitor or Projector
Digital Presenter
DVI Cable
Connect to DVI Input Terminal
DVI Monitor or Projector
Digital Presenter
※ Depending on the specifications of the SDP-860 D/A converter and the monitor A/D
converter, the color of RGB and DVI outputs may vary.
20
T
SDP-860-영문수정20100412
2010.4.28 9:30 AM
페이지22
G4-1G(Mac 2) C-2400 2438DPI 175LPI
Connecting In/Output Devices
Connecting Computer for Output
You can view images from the presenter on a PC monitor by connecting the PC to the
digital presenter via USB cable.
Connect this cable to the
USB port on a computer.
Digital Presenter
Caution
Connect this cable to the
RS-232C port on a computer.
Installation
For the USB cable connection, using a USB port on the main board of a computer
is recommended. (Using an extended front port or wireless USB hub may cause errors
depending on the computer brand and model.)
Please do not use a USB cable longer than 4.0m for the connection between the projector
and a computer.
RS-232C
Digital Presenter
Caution
A RS-232C cable is not included in the product package. Please purchase it
separately. RS-232C cables from other brands may not be compatible with this product.
※ When connecting via USB, install the included USB drivers and SDP-860 Viewer
program in your computer. For instructions on installing the software, please read the
manuals. For connecting via RS-232C cable, no extra program is provided. Install and
use an appropriate program.
21
T
SDP-860-영문수정20100412
2010.4.28 9:30 AM
페이지23
G4-1G(Mac 2) C-2400 2438DPI 175LPI
Connecting In/Output Devices
Connecting Peripheral Devices
Connecting SD/SDHC Storage Device
You can connect an SD/SDHC card for data storage.
1. Hold an SD card with the metal tip (golden finger) facing upward, and then insert to
the projector.
RS-232C
Installation
2. The “SD Card Detected” message displays on the screen. Once the card is ready to
use, the Picture and Video Capture menus become available.
Caution
If the SD card is locked, the Video Capture menu cannot be used.
※ An SD/SDHC card is not included in the product package; please purchase it
separately. MMS cards are not supported.
Connecting Audio/Mic
Audio and mic use the 3.5Ø terminal.
Caution
If the external mic is connected, the internal mic does not support.
22
T
SDP-860-영문수정20100412
2010.4.28 9:30 AM
페이지24
G4-1G(Mac 2) C-2400 2438DPI 175LPI
Connecting In/Output Devices
Connecting Kensington Security Slot
Kensington Security Slot is an anti-theft system that is integrated to the projector. Wind
Kensington Security Cable around a fixture apparatus such as a rack, and then insert
the end of the cable to the Kensington Security Slot in the projector.
RS-232C
Caution
Kensington Security Cable is not included in the product package. Please
purchase it separately.
Installation
Connecting Computer for External Input
To view VGA images on a PC monitor, connect the digital presenter to the computer
using the computer monitor cable.
※ DVI Output does not support this option.
Connect to VGA Input Terminal
PC Monitor or Projector
Digital Presenter
Insert to the VGA port on a computer.
Note
Bypass Option: Turn on the power of the digital presenter to output video from the
VGA IN terminal to VGA OUT.
23
T
SDP-860-영문수정20100412
2010.4.28 9:30 AM
페이지25
G4-1G(Mac 2) C-2400 2438DPI 175LPI
Connecting In/Output Devices
Watching Video from External Devices
1. Install the digital presenter as instructed in this manual.
P.15
Installation
2. Select an Input option. Press
on the digital presenter control board or remote
controller to select an input.
External input or digital presenter video switches back and forth each time the
button is pressed.
External Input Video [Ext]
- Enables Viewing video
from an external VGA
generator on a connected
PC monitor or projector.
Digital Presenter Video [Int]
- Select to View video
directly from the digital
presenter lens.
Caution
If an external input device is not connected, the output device displays only the
black screen. In this case, check if the external input device is connected properly.`
Selecting the INT or EXT button does not display the current input status on the screen.
24
T
SDP-860-영문수정20100412
2010.4.28 9:30 AM
페이지26
G4-1G(Mac 2) C-2400 2438DPI 175LPI
Basic Operation (Functions)
Output Resolution Setup (DVI/VGA Output Mode)
Various output resolutions are available depending on the output.
Available resolutions are as listed below.
- SXGA (1280x1024) 4:3
- UXGA (1600x1200) 4:3 Up-Scaled
- XGA (1024x768) 4:3 Down-Scaled
- 720p (1280x720) 16:9 Window Cut-out
- 1080p (1920x1080) 16:9 Window Cut-out
- 720p (1280x720) 16:9 Stretched
- 1080p (1920x1080) 16:9 Stretched
1. Select DVI/VGA OUTPUT in the Menu.
2. To select a resolution, move the cursor (▶) between resolutions in the sub menu.
SXGA
1280x1024
UXGA
1600x1200 4:3
Up-Scaled
▶ XGA
1024x768
4:3
Down-Scaled
720p
1280x720
16:9
Window Cut-out
16:9
Window Cut-out
16:9
Stretched
16:9
Stretched
1080p 1920x1080
720p
1280x720
1080p 1920x1080
Operation
DVI/VGA OUTPUT MODE
4:3
Return
CURRENT: SXGA MODE
Note
In case of that a resolution may not be available, Press the
15sec.
button or wait
25
T
SDP-860-영문수정20100412
2010.4.28 9:30 AM
페이지27
G4-1G(Mac 2) C-2400 2438DPI 175LPI
Basic Operation (Functions)
Enlarging/Minimizing
You can zoom in and out on screen objects.
To enlarge or shrink, press the (Enlarge) or (Minimize) button on the control
board or remote controller (6x Optical Zoom & 8x Digital Zoom).
※ When using the Enlarge and Minimize buttons, the blue gauge indicates the optical
zoom portion while the red indicates digital.
button no longer enlarges an object once the 6x
optical zoom gauge is at 6x. To zoom further with the digital zoom, press the
Enlarge button once more. This also applies to zooming out on an object.
To zoom out from the digital to optical zoom, press the Minimize button once
more.
※ Using the digital zoom may cause the degradation of image quality.
※ Holding down on the Enlarge
Macro Mode
You can capture documents at extremely close ranges within 1cm to 5cm.
(This is the object distance from the lens).
In the Menu, select ZOOM/FOCUS MACRO Mode.
Operation
Zoom / Focus Setting
▶ MACRO MODE
MICROSCOPE MODE
D-ZOOM
MAX x4
Return
To check the mode availability, press the button 1 to 5cm away from a document.
(This is the object distance from the lens).
cancels the Macro Mode.
※ In Macro mode, the optical zoom is disabled and only the digital zoom works.
26
T
SDP-860-영문수정20100412
2010.4.28 9:30 AM
페이지28
G4-1G(Mac 2) C-2400 2438DPI 175LPI
Basic Operation (Functions)
Maximizing Digital Zoom (D-Zoom Max)
You can select a maximum digital zoom power.
In the Menu, select ZOOM/FOCUS D-ZOOM MAX.
Zoom / Focus Setting
MACRO MODE
MICROSCOPE MODE
▶ D-ZOOM
OFF
Return
Pressing the ▶ button changes the maximum zoom power to OFF 4x 8x.
After selecting a D-ZOOM MAX value, press the
main unit key in Live mode
to verify if the zoom value has been applied.
Operation
Adjusting Focus
Automatic Focus
You can auto-focus on the Live mode screen.
To auto-focus, press the
button on the control board or remote controller while in
Live mode.
Manual Focus / Fine Adjust
You can manually focus / fine adjust on the Live mode screen.
Press the
Press
button and then
to focus on the screen.
to finish.
27
T
SDP-860-영문수정20100412
2010.4.28 9:30 AM
페이지29
G4-1G(Mac 2) C-2400 2438DPI 175LPI
Basic Operation (Functions)
Adjusting Brightness
You can use the lens iris to adjust the brightness of an object. If the object is too dark,
brighten it, and if it is too bright, darken it.
To brighten: Press
on the control board or remote controller.
To darken: Press
on the control board or remote controller.
Note
For glossy paper documents, turn off the upper light to use only natural light. For
better visual quality, use
or the remote controller’s Darken button to lower the
brightness, and then adjust the position of the document.
Adjusting the Image
White Balance
You can automatically adjust the color of the Live mode screen.
In the Menu, select IMAGE ADJUSTMENT WB Mode.
Operation
IMAGE ADJUSTMEMT
▶ WB Mode
AWB (KEY)
DNR
AUTO
Rotation
0
IMG Mode
CUSTOM
Return
Pressing the ▶ button changes the White Balance mode to ATW (Auto Tracking)
AWB (KEY) MANUAL WB.
■ Auto Color Adjustment Method 1: AWB (KEY)
Automatically adjusts the color of the Live mode screen.
Select AWB (KEY), and then press the button on the Live screen.
28
T
SDP-860-영문수정20100412
2010.4.28 9:31 AM
페이지30
G4-1G(Mac 2) C-2400 2438DPI 175LPI
Basic Operation (Functions)
Select AWB between MF and AWB.
SELECT FUNCTION
▶ AWB
SET(AWB KEY)
MANUAL FOCUS
CANCLE
Press
to adjust the color automatically.
Save the settings and then exit to the Live screen.
■ Auto Color Adjustment Method 2: ATW (Auto Tracking)
Automatically adjusts WB mode when the color temperature of a light source
changes.
Select ATW (Auto Tracking).
Save the settings and then exit to the Live screen.
■ How to Adjust Color Manually
Adjust the RED and BLUE gains manually to adjust the WB mode.
Select MANUAL WB.
Use the Up, Down, Left, and Right buttons to select a value.
Save the settings and then exit to the Live screen.
Operation
Noise Reduction (DNR)
DNR stands for Digital Noise Reduction that uses 2D/3D noise filtering to achieve
clear images.
In the Menu, select IMAGE ADUSTMENT DNR.
IMAGE ADJUSTMEMT
WB Mode
▶ DNR
AWB (KEY)
AUTO
Rotation
0
IMG Mode
CUSTOM
Return
Pressing the ▶ button changes the Noise Reduction mode to OFF
AUTO
MAX.
■ AUTO: Automatically controls the NR amount depending on the lighting conditions.
■ MAX: Always keep the maximum NR amount.
※ Selecting DNR may cause afterimages if there are many movements on one screen.
29
T
SDP-860-영문수정20100412
2010.4.28 9:31 AM
페이지31
G4-1G(Mac 2) C-2400 2438DPI 175LPI
Basic Operation (Functions)
Rotating Image
You can rotate images on the screen.
In the Menu, select IMAGE ADJUSTMENT
Rotation.
IMAGE ADJUSTMEMT
WB Mode
AWB (KEY)
DNR
AUTO
▶ Rotation
IMG Mode
0
CUSTOM
Return
Pressing the ▶ button brings up a screen that rotates an image from 0°to 180°
.
Image Outline Adjustment (IMG Mode)
Operation
This mode optimizes visual quality according to display types.
In the Menu, select IMAGE ADJUSTMENT IMG Mode.
IMAGE ADJUSTMEMT
WB Mode
AWB (KEY)
DNR
AUTO
Rotation
0
▶ IMG Mode
CUSTOM
Return
Pressing the ▶ button changes to TEXT IMAGE CUSTOM.
TEXT Mode: Optimizes the screen for documents with dense text.
IMAGE Mode: Optimizes the screen for pictures and videos.
30
T
SDP-860-영문수정20100412
2010.4.28 9:31 AM
페이지32
G4-1G(Mac 2) C-2400 2438DPI 175LPI
Basic Operation (Functions)
When selecting CUSTOM Mode, the following sub menus appear.
CUSTOM IMAGE SETTING
▶ TONE
LOW
COLOR
MIDDLE
SHARPNESS
HIGH
Return
TONE: Changes the gamma value of luminance. Pressing the ▶ button changes to
Very LOW LOW NORMAL HIGH Very HIGH.
COLOR: Change the gain. Pressing the ▶ button changes to LOW MIDDLE HIGH.
SHARPNESS: Changes the sharpness of images (outline adjustment value).
Pressing the ▶ button changes to LOW MIDDLE HIGH.
Preset Setting
You can save zoom and focus positions and brightness levels as presets.
In the Menu, select PRESET SETTING.
PRESET SETTING
PRESET1
Preset-SAV
PRESET1
BOOT PRESET
OFF
Operation
▶
Preset-EXE
Return
P1: z: -11, F:1271, B:60
P2: z: -11, F:1271, B:60
P3: z: -11, F:1271, B:60
P4: z: -11, F:1271, B:60
Select Preset-SAV, and then press the
button to enter the current settings to a
preset number.
To check the availability of the number, whether or not the number already contains a
preset, select Preset-EXE in the menu, and then press the
button.
The BOOT Preset menu automatically applies saved settings when turning on the projector.
※ Up to 4 presets can be saved.
31
T
SDP-860-영문수정20100412
2010.4.28 9:31 AM
페이지33
G4-1G(Mac 2) C-2400 2438DPI 175LPI
Basic Operation (Operation)
Capturing Images & Videos
Capture
For screen captures, the image format and resolution can be configured.
In the Menu, select CAPTURE SETTING.
CAPTURE SETTING
▶ PIC Format
JPG Quality
JPEG
FINE
MOV Quality
STANDARD
MIC Mute
OFF
TIME ELAPSE
OFF
RESET FILE NUMBER
Return
Operation
Selecting Capturing Image Format (PIC Format)
Press the ▶ button to select a format. Still image formats switch between JPEG
BMP.
Selecting Image Resolution (JPG Quality)
Press the ▶ button to select a desired resolution. Still image resolutions change to
BEST FINE NORMAL.
Selecting Video Resolution (MOV Quality)
Press the ▶ button to select a desired resolution. Video resolutions switch
between BEST STANDARD.
Enabling Mic (MIC Mute)
Press the ▶ button to use the Mic Mute option: OFF or ON.
Time Elapse Setup (TIME ELAPSE)
Press the ▶ button to select a video recording duration from 5 minutes to 1 hour.
Resetting Filename (RESET FILE NUMBER)
Resets the filename of an image or video capture.
Caution
If an inserted SD card contains the same filename, the old file may be
deleted. Please back up the SD card data before using this option.
Press the
32
button to reset the filename of an image or video capture.
T
SDP-860-영문수정20100412
2010.4.28 9:31 AM
페이지34
G4-1G(Mac 2) C-2400 2438DPI 175LPI
Basic Operation (Operation)
Capturing Images
1. Install the digital presenter as instructed in this manual.
2. Insert an SD card.
3. To capture an image, press the
P.15
button on the control board or remote controller.
Operation
4. To check the captured image, press the
button to enter Picture List mode.
33
T
SDP-860-영문수정20100412
2010.4.28 9:31 AM
페이지35
G4-1G(Mac 2) C-2400 2438DPI 175LPI
Basic Operation (Operation)
5. Picture List Mode:
1
2
3
Operation
- Screen Description
1 Indicates remaining free space of the current SD memory card.
2 Indicates the current folder name.
3 Indicates the number of images in the current folder.
4 Indicates the current page and total pages in the current folder.
6. Press the ▲▼◀▶ buttons to select an image.
(To move between pages, use the
buttons.)
34
4
T
SDP-860-영문수정20100412
2010.4.28 9:31 AM
페이지36
G4-1G(Mac 2) C-2400 2438DPI 175LPI
Basic Operation (Operation)
7. Press
or
to check the captured image.
※ Full Screen
- While in full screen mode, use the Left and Right keys to move between images.
- The
button moves to the first file in the folder. The
button moves to the last
file in the folder.
- To exit full screen to Picture List mode, press the
button.
Operation
8. To delete an image, select the image, and then press
.
35
T
SDP-860-영문수정20100412
2010.4.28 9:31 AM
페이지37
G4-1G(Mac 2) C-2400 2438DPI 175LPI
Basic Operation (Operation)
Capturing Video
1. Install the digital presenter as instructed in this manual.
※ To record audio, connect a external microphone or use an built-in microphone.
If the external mic is connected, the internal mic does not support. P.15
2. When the control board or remote controller is turned on, the projector activates
LIVE mode (
).
Operation
3. Insert an SD card.
4. To capture video, press the
button on the control board or remote controller.
※ While capturing video, the filename and running time display on the bottom of the
screen.
If the video recording duration (TIME ELAPSE) is set, the remaining time displays
instead of the running time.
36
T
SDP-860-영문수정20100412
2010.4.28 9:31 AM
페이지38
G4-1G(Mac 2) C-2400 2438DPI 175LPI
Basic Operation (Operation)
5. To finish capturing, press the
button.
6. To check the captured video, press the
button and enter Movie List mode.
7. Movie List Mode
1
2
3
4
Operation
1
Indicates remaining free space of the current SD memory card.
2
Indicates the current folder name.
3
Indicates the number of videos in the current folder.
4
Indicates the thumbnail of a selected video.
8. Press the ▲▼◀▶ buttons to select a video.
(To move between pages, use the
buttons.)
37
T
SDP-860-영문수정20100412
2010.4.28 9:31 AM
페이지39
G4-1G(Mac 2) C-2400 2438DPI 175LPI
Basic Operation (Operation)
9. Press
to play the captured video.
※ Playback Screen
1
2
3
4
Operation
- Video is played at the original 640x480 size.
- The Left and Right keys play video 10 seconds forward or backward.
- To stop playing and go back to the Movie List, press the
button.
- Screen Description
1
The file that is currently being played
2
Playback Status (PLAY / PAUSE)
3
Video Running Time
4
Volume
※ For the Playback screen controls, refer to Control Board/Remote Controller
Functions.
P.13
10. To delete a video, select the video, and then press
38
.
T
SDP-860-영문수정20100412
2010.4.28 9:31 AM
페이지40
G4-1G(Mac 2) C-2400 2438DPI 175LPI
Basic Operation (Operation)
Freeze Mode Settings & Operation
In the Menu, MISCELLANEOUS SETTING
FREEZE
MISCELLANEOUS FUNCTION
▶ FREEZE
DVI/VGA
PC CTRL
USB(HYBRID)
OSD INFO.
SHOW ANYTIME
ANTI FLK.
OFF
PAGE DETECTION
VER INFO
USEFUL TIP
SYSTEM RESET
Return
Select DVI/VGA or ALL(USB/SD/DVI/VGA) mode.
Operation
DVI/VGA Mode:
- The Freeze button pauses only video that is connected to a DVI/VGA output. It also
plays external video, connected via USB, on the Live screen.
Caution
When capturing video, the Live screen is captured, not the Freeze
screen.
ALL(USB/SD/DVI/VGA) Mode:
- The Freeze button pauses videos that are connected both from a DVI/VGA output and
via USB.
- When capturing video, the Freeze screen is captured.
39
T
SDP-860-영문수정20100412
2010.4.28 9:31 AM
페이지41
G4-1G(Mac 2) C-2400 2438DPI 175LPI
Basic Operation (Operation)
PC CTRL Mode Settings & Operation
In the Menu, MISCELLANEOUS SETTING
PC CTRL
MISCELLANEOUS FUNCTION
FREEZE
▶ PC CTRL
DVI/VGA
USB(HYBRID)
OSD INFO.
SHOW ANYTIME
ANTI FLK.
OFF
PAGE DETECTION
VER INFO
USEFUL TIP
SYSTEM RESET
Return
Select USB(HYBRID) mode or RS232C ONLY mode.
Operation
USB(HYBRID) Mode:
- You can control the PC using USB Viewer program by connecting the PC to the digital
presenter via USB cable.
RS232C ONLY Mode:
- You can control the PC using your own program by connecting the PC to the digital
presenter via RS232C cable.
Caution
You can not control the PC using USB Viewer program, when the mode
is changing from USB(HYBRID) to RS232C ONLY. When using USB Viewer program,
select the USB(HYBRID) mode.
40
T
SDP-860-영문수정20100412
2010.4.28 9:31 AM
페이지42
G4-1G(Mac 2) C-2400 2438DPI 175LPI
Basic Operation (Operation)
OSD INFO. Mode Setting
In the Menu, select MISCELLANEOUS SETTING
OSD INFO.
MISCELLANEOUS FUNCTION
FREEZE
PC CTRL
▶ OSD INFO.
ANTI FLK.
DVI/VGA
USB(HYBRID)
SHOW ANYTIME
OFF
PAGE DETECTION
VER INFO
USEFUL TIP
SYSTEM RESET
Return
Select SHOW ANYTIME or HIDE WHEN MOVIE REC.
SHOW ANYTIME Mode:
- The OSD Menu display on the screen.
HIDE WHEN MOVIE REC Mode:
- While capturing video, the OSD Menu does not display on the screen.
Operation
ANTI FLK. Mode Setting
Select this when you see picture/move flicker, this can happen when the frequency of
the local lighting clashes with the camera.
In the Menu, select MISCELLANEOUS SETTING ANTI FLK.
MISCELLANEOUS FUNCTION
FREEZE
DVI/VGA
PC CTRL
USB(HYBRID)
OSD INFO.
SHOW ANYTIME
▶ ANTI FLK.
OFF
PAGE DETECTION
VER INFO
USEFUL TIP
SYSTEM RESET
Return
41
T
SDP-860-영문수정20100412
2010.4.28 9:31 AM
페이지43
G4-1G(Mac 2) C-2400 2438DPI 175LPI
Basic Operation (Operation)
Page Detection Setting
This is the motion detecting function of the book or paper for auto-saving pictures to
SD card.
1. Display the book or paper on the screen.
2. In the Menu, select MISC.SETTING PAGE DETECTION.
MISCELLANEOUS FUNCTION
FREEZE
DVI/VGA
PC CTRL
USB(HYBRID)
OSD INFO.
SHOW ANYTIME
ANTI FLK.
OFF
▶ PAGE DETECTION
VER INFO
USEFUL TIP
SYSTEM RESET
Return
Operation
3. Confirm the position of paper or book with guide line.
4. Select the “Yes” to activate the PD & Auto-Save Mode.
5. When turning the page of a book or putting(leaving) on the paper, Motion Rectangle
will be shown on left and right side.
6. Please wait 2 second for saving the image. If it is a valid motion, the image will be
saved to SD Card Automatically.
7. Press the
Button.
Caution
PAGE DETECTION must have need of both left and right motion.
If there is only one side motion, It'll be regarded as the “Invalid Motion”.
Microscope Mode
Attach a microscope adapter lens to the digital presenter lens part.
42
T
SDP-860-영문수정20100412
2010.4.28 9:31 AM
페이지44
G4-1G(Mac 2) C-2400 2438DPI 175LPI
Basic Operation (Operation)
Bring the microscope adapter lens to the ocular part of the microscope that is
properly focused, as close as possible. Adjust the position of the digital presenter to
bring the circular image of an object in the center of the monitor.
In the Menu, select ZOOM/FOCUS
MICROSCOPE Mode.
Zoom / Focus Setting
MACRO MODE
D-ZOOM
MODE
Operation
▶ MICROSCOPE
OFF
Return
Check if the screen is focused properly. If not, adjust the micromanipulator of the
microscope to refocus. Check if the screen is now focused.
To cancel Microscope mode, press the
button.
※ Super Macro Mode:
- When used in conjunction with an adapter lens, the projector can capture the
screen at an extremely close range minimum 1cm.
Caution
In case of the MICROSCOPE mode, The Auto Exposure(AE) is operated
by center 25% area
43
T
SDP-860-영문수정20100412
2010.4.28 9:31 AM
페이지45
G4-1G(Mac 2) C-2400 2438DPI 175LPI
Basic Operation (Operation)
System Reset
Resets all current settings.
In the Menu, select MISCELLANEOUS FUNCTION
SYSTEM RESET.
Caution
This System Reset menu automatically executes Reset File Number
under the Capture Settings. Please back up your SD card data before using this.
Press the
button to reset the system.
MISCELLANEOUS FUNCTION
FREEZE
DVI/VGA
PC CTRL
USB(HYBRID)
OSD INFO.
SHOW ANYTIME
ANTI FLK.
OFF
PAGE DETECTION
VER INFO
USEFUL TIP
▶ SYSTEM RESET
Return
Operation
Checking System Version Information (VER. INFO)
Displays the current system version of the product.
In the Menu, select MISCELLANEOUS FUNCTION
VER.INFO.
MISCELLANEOUS FUNCTION
FREEZE
USB(HYBRID)
OSD INFO.
SHOW ANYTIME
ANTI FLK.
OFF
PAGE DETECTION
▶ VER INFO
USEFUL TIP
SYSTEM RESET
Return
44
DVI/VGA
PC CTRL
T
SDP-860-영문수정20100412
2010.4.28 9:31 AM
페이지46
G4-1G(Mac 2) C-2400 2438DPI 175LPI
T
Troubleshooting
Error
Solution
Please make sure that the resolution of the display
device and presenter are matched. (e.g. If a
projector's resolution is set to the maximum SVGA
while the main unit is XGA or SXGA, the screen
cannot display video.
Video doesn't display.
Check if the display device is connected with a
proper input type.
Check if the screen is properly adjusted for
brightness and focus.
Check if the display device is switched on.
P.25
Check if the PC is installed with the SDP-860
program properly.
The projector doesn’t
communicate with a PC
when connected via
USB.
Check if the PC operating system is Windows XP
or higher. Older versions of the operating system
may cause operational errors.
For more detailed information about the SDP-860
program, please refer to the included manual.
Miscellaneous
(Appendix)
The remote controller
doesn’t work.
Check the remote controller’s batteries. Replace
with new ones if necessary.
P.46
45
SDP-860-영문수정20100412
2010.4.28 9:31 AM
페이지47
G4-1G(Mac 2) C-2400 2438DPI 175LPI
Replacing Remote Controller Batteries
1. Remove the battery lid on the back of the remote controller.
2. Insert batteries matching the + and - signals. (Battery Type: CR-2025)
3. Close the lid.
Miscellaneous
(Appendix)
Caution
Random replacement of built-in battery by other types of batteries may
cause explosion. The battery shall be replaced by the same battery. The used
batteries shall be disposed carefully because they can cause environment
pollutions.
46
T
SDP-860-영문수정20100412
2010.4.28 9:31 AM
페이지48
G4-1G(Mac 2) C-2400 2438DPI 175LPI
Product Specifications
The following specifications are subject to change and upgrade without prior notice.
SDP-860
OPTICAL SYSTEM
Lens
F = 2.5(Wide) ~ 3.12(Tele), f = 4.1~ 24.6㎜, 6X Zoom Lens
Shooting Area
Max: 420 x 336㎜
Zoom
48X Zoom(Optical 6X / Digital 8X)
Focus
Auto focus / Manual
Iris
Auto (with fine level adjustment)
VIIDEO
Pick-up Device
1/3” PS CMOS Sensor
Total Number of Pixels
1,384(H) x 1,076(V), 1.49M pixels
Number of Effective Pixels
1,329(H) x 1,049(V), 1.39M pixels
Frame Rate
VGA Output
Resolutions
SXGA: 30fps
SXGA (1,280 x 1,024), XGA (1,024 x 768), UXGA (1,600 x 1,200),HD (1028 x 720p)
Full HD (1,920 x 1,080p)
H: 700 TV Lines / V: 700 TV Lines
FUNCTIONS
White Balance
Aperture Function
ATW / AWC(One-touch) / Manual
Image Mode / Text Mode / Custom Mode
Noise Reduction
Available (Low Light presenter with 2D / 3D NR)
Preset Function
Up to 4 User settings
Image Freeze
Image Rotation
Available
Available (180 degree)
Photo
JPEG, BMP
Movie
MPEG-4 640x480@30fps with Audio (Mic), SDHC card(Up to 32GB)
Image
Photo
4 x 4(16 Split)
Playback
Movie
Internal Movie Player
Image Save
USB 2.0
USB
Input Selection
Illumination
2 Channels (Internal: 1, External: 1)
LED Illumination System
INTERFACE
VGA In
15 Pin DSUB Connector x 1
Audio In
Φ3.5 Jack x 1 (Built-in Microphone)
VGA Out
15 Pin DSUB Connector x 1
Input Port
Output Port
DVI Out
Φ3.5 Jack x 1
RS-232C
Φ3.5 Jack x 1
USB
I/F Port
Memory
Power Port
GENERAL
Operating Temperature
Operating Humidity
Power
Dimensions
Weight
Accessories
DVI Connector x 1
Audio Out
Supplied Accessories
Optical Accessories
USB B-type x 1
SD Slot x 1
12V DC In x 1
+5℃ ~ +35℃
30% ~ 90%
12V DC (Adaptor Input: 100V AC ~ 240V free voltage, 50/60Hz, Output: 12V, 4A)
In-use 374(W) x 449(H) x 431(D)㎜ / 14.72”(W) x 17.68”(H) x 16.97”(D)㎜
3.7kg (8.16lb)
Remote Controller, USB cable, DVI cable, VGA cable
Microscope adaptor lens, RS-232C cable, SD card
47
T
SDP-860-영문수정20100412
2010.4.28 9:30 AM
페이지1
G4-1G(Mac 2) C-2400 2438DPI 175LPI
SALES NETWORK
SAMSUNG TECHWIN CO., LTD.
Samsungtechwin R&D Center, 701, Sampyeong-dong, Bundang-gu, Seongnam-si, Gyeonggi-do, Korea, 463-400
TEL: +82-70-7147-8740~60 FAX: +82-31-8018-3745
SAMSUNG TECHWIN AMERICA Inc.
SAMSUNG TECHWIN EUROPE LTD.
New Jersey office
100 Challenger Road, Suite 700, Ridgefield Park, NJ 07660,
UNITED STATES
TEL: +1-877-213-1222 FAX: +1-201-373-0124
California office
1480 Charles Willard Street, Carson, CA 90746,
UNITED STATES
TEL : +1-310-632-1234 FAX: +1-310-632-2195
www.samsungpresenterusa.com
Samsung House, 1000 Hillswood Drive, Hillswood Business
Park Chertsey, Surrey, UNITED KINGDOM KT16 OPS
TEL: +44-1932-45-5301 FAX: +44-1932-45-5325
www.samsungtechwin.com
www.samsungpresenter.com
P/No: 6806.1063.02B
T