1
Instructions for use
9P5040C I
9P5540C I
9P6040CI
9P6440C I
MAGNAVOX
Once your PHILIPS MAGNAVOX purchase is registered, you're eligible to receive all the privileges of
owning a PHILIPS MAGNAVOX
product. So complete and return the Warranty Registration Card
enclosed with your purchase at once. And take advantage of these important benefits.
Congratulations on your purchase,
and welcome to the "family!"
Dear PHILIPS
MAGNAVOX
PHILIPS
product owner:
Thank you for your confidence in PHILIPS MAGNAVOX. You've selected one of the best-built, bestbacked products
available today. And we'll do everything in our power to keep you happy with your purchase for many
years to come.
As a member of the PHILIPS MAGNAVOX "family," you're entitled to protection by one of the most
comprehensive warranties and outstanding service networks in the industry.
What's more, your purchase guarantees you'll receive all the information and special offers for which
you qualify, plus easy access to accessories from our convenient home shopping network.
And most importantly you can count on our uncompromising commitment to your total satisfaction.
All of this is our way of saying welcome-and thanks for investing in a PHILIPS MAGNAVOX product.
Sincerely,
Robert Minkhorst
President and Chief Executive
P.S. Remember, to get the most from your PHILIPS
MAGNAVOX product, you must return your
Warranty Registration Card within 10 days. So
please mail it to us right now!
Officer
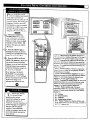
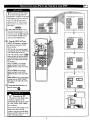
Know these
safetysymbo/s
_t_, This "boltof lightning" indicatesuninsulatedmaterial within your trait which may cause an
electrical sh_"k. For the safety of everyone in your household,please do not removethe product
covering.
,_, The =exclamation point_ calls attenSon1ofeatures for whichyou shouldread the enclosed
literatureclosely1opreventoperatingand maintenanceproblems.
WARNING: TO PREVENT
TO RAIN OR MOISTURE.
CAUTION:
FIRE OR SHOCK HAZARD,
DO NOT EXPOSE
THIS EQUIPMENT
To prevent electric shock, match wide blade of plug to wide slot, and fully insert.
ATTENTION: Pour _,_iter les choca electdques, intToduire la lame la plus large de la fiche darts la
borne correspondante de la prise et pousser jusqu'as fond.
SAFETYINSTRUCTIONS
- Readbeforeoperatingequipment
Thisproductwasdesignedand manufacturedto meet strict quality and
safetystandards.Thereare, however,some installation
and operation
precautions
whichyoushouldbe particularly
awareof.
1.
2.
3.
4.
5.
6.
8A.
6B.
7.
8.
9.
10.
ReadInstructions- Allthe safetyand operatinginstructions
should
be readbeforetheappliance
is operated.
RetainInstructions
- Thesafety and operatinginstructionsshould
be retained
for futurereference.
HeedWarnings- Allwarningson theapplianceand in theoperating
instructionsshouldbeadheredto.
FollowInslructions - All operatingand use instructionsshouldbe
followed.
WaterandMoisture- Theapplianceshouldnot be usednearwater
- for example,near a bathtub,washbowl,kitchensink,laundrytub,
in a wet basementor neara swimming pool,etc.
CartsandStands- Theapplianceshouldbe usedonlywitha cart or
standthat is recommendedby the manufacturer.
_
An applianceand cart combination should be moved
with care. Quick stops, excessiveforce, and uneven
surfacesmaycausetheapplianceand cart combination
to overturn.
Tilt/Stability - All televisions must complywith recommended
international
global safety standardsfor tilt and stability properties
of its cabinetdesign.
Do notcompromise
thesedesignstandardsbyapplyingexcessive pullforce to thefront, or top, of the cabinetwhichcould
ultimatelyoverturnthe product.
Also,do not endanger
yourself, or children,by placingelectronic equipment]toys
on thetop of the cabinet.Suchitems
couldunsuspectinglyfall fromthetop ofthe setand cause
productdamageand/or personalinjury.
Wall or CeilingMounting- The applianceshould be mountedto a
wallor ceilingonly as recommendedby the manufacturer.
Ventilation- Theapplianceshouldbe situatedso that its locationor
position doesnot interferewith its properventilation. Forexample,
the applianceshould not be situatedon a bed,sofa, rug, or similar
surface that may block the ventilation openings; or, placed in a
built-in installation,such as a bookcaseor cabinetthat may impede
theflow of air throughtheventilationopenings.
Heat - Theapplianceshould be situated away from heatsources
such as radiators, heat registers, stoves, or other appliances
(includingamplifiers)that produceheat.
Power Sources- The applianceshould be connectedto a power
supply only of the type describedin the operatinginstructionsor as
markedon theappliance.
11. Power-Cord
Protection- Powersupply cordsshould beroutedso
thattheyare not likelyto be walkedon or pinchedby itemsplaced
uponor againstthem, payingparticularattentionto cordsand
plugs,convenience
receptacles,
andthe pointwheretheyexitfrom
theappliance.
12. Cleaning- Theapplianceshould be cleanedonlyas recommended
bythe manufacturer.
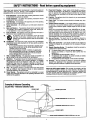
13. Power Lines- An outdoor antennashould be locatedaway from
powerlines.
14. OutdoorAntennaGrounding
- If an outsideantennais connected
to
the receiver,be surethe antennasystemis groundedso as to
providesomeprotectionagainstvoltagesurges and built up static
charges.
Section810 of theNationalElectricCode,ANS]/NFPA
No. 70-1984,
providesinformationwith respectto propergroundingof themats
and supportingstructuregroundingof the lead-in wire to an
antennadischargeunit,sizeof groundingconnectors,locationof
antenna-dischargeunit, connectionto groundingelectrodesand
requirements
forthe grounding
electrode.
SeeFig.below.
15. Non-usePeriods - The powercordof the applianceshould be
unplugged
from the outletwhen left unusedfor a long periodof
time.
16. Objectand Liquid Entry- Careshouldbe takensothat objectsdo
not fall and liquidsare not spilled into the enclosurethrough
openings.
17. DamageRequiringService- Theapplianceshould be servicedby
qualified
servicepereonnet
when:
A. Thepowersupplycordor theplughasbeendamaged;
or
B. Objects have fallen, or liquid has been spilled into the
appliance;
or
C. Theappliance
hasbeenexposed
to rain;or
D. Theappliancedoesnot appearto operatenormally or exhibits
a markedchangein performance;or
E. Theappliancehasbeendropped,orthe enclosuredamaged.
18. Servicing- The user should not attemptto servicethe appliance
beyond that described in the operating instructions. All other
servicingshouldbe referredto qualifiedservicepersonnel.
Noteto the CA'iVsysteminstaller:Thisreminderis provided
to callthe
CATVsysteminstaller'sattentionto A_icle820-40 of the NEC that
provides
guidelines
for propergrounding
and,in particular,specifies
that
the cableground shallbe connectedto the grounding system of the
building,as closeto the pointof cableentryas practical.
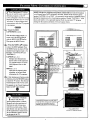
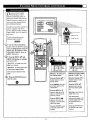
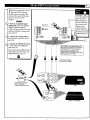
Exampleof AntennaGrounding
as per NEC- National ElectricCode
GROUND CLAMP
ANTENNA LEAD IN WIRE
ANTENNA
DISCHARGE
UNITINEC
SeCX_0"
_e-_O_
GROUNDING
CONDUCTORS
(NZC
SeC_ke_0-21)
GROUNDCLAMPS
"---"q''"_
ELECTRICSERVICE EQUIPMENT
POWER SERVICE GROUNDING ELECTRODESYSTEM (Ec MT Z',*0e_H)
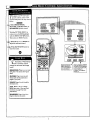
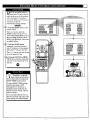
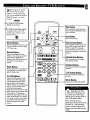
Welcome/Product
j
Registration ................... 2
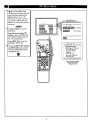
Remote
Operation
Setting the Control
Smart Picture
Control .......... 38-39
.....................................................
3
Using the Smart Sound Control .................. 40
Table of Contents .......................................................
4
Using the Smart Surf Control .................................. 41
Safety/Precautions
Features, Model and Cabinet Information ................. 5
[]
On-Screen
Setting the TV Remote to Work Optional Accessory
Devices:
Direct Entry/Code Number Method .............. 42-43
Search and Identify Method ................................ 44
Remote Control Direct Entry Code Lists ......45-46
Features
PICTURE MENU
<'Adjusting Color, Brightness, Sharpness,
Tint, and Picture Controls ...................................
6
<'Using the Clearview Control ...............................
7
Using the Remota's VCR buttons ............................ 47
[_]
Picture-In-Picture
(PIP)
<'Adjusting the TV's Convergence Control ........... 8
How to Use PIP (Connections) ............. 48-49
<'Using the Flesh Correction Control .................... 9
How to Use PIP with the TV Remote ...................... 50
FEATURES MENU
Selecting the Picture Source for PIP ........................ 51
10
Adjusting Picture-in-Picture Color and Tint............ 52
<'Setting the TV for Closed Captioning ............... 11
More PIP Connections (Cable Converter) ............... 53
<"Selecting a Picture Source ................................
<'Setting the TV for Cable or Antenna Signals....12
<'Adding Channels in Memory (Automatically).
I_l
13
15
<'Alarm Timer ......................................................
16
Information
TV Help Menu ...........................................
<'Adding Channels in Memory (Manually) ......... 14
<'Setting the TV Clock .........................................
General
54
Tips if Something Isn't Working ............................. 55
<'Using the Sleep Timer Control ......................... 17
Glossary of TV Terms .............................................
56
Index ........................................................................
57
Factory Service Locations ........ :......................... 58-59
<"Adjusting the Channel Display Control ............ 18
Warranty ..................................................................
60
<'Using the Time/Channel Reminder Control...... 18
<'Using Parental Control/Content Advisory:
• Code Setup/Blocking Channels ............... 19-20
• Content Advisory - Movie Ratings ......... 21-22
• Parental Guidelines ....................................... 23
• Blocking Options/Review Settings ............... 24
Use the simple Set-Up Guide (supplied
with
<'Using the Channel Label Control ...................... 25
<'Using the Language Selection Control .............. 26
SOUND MENU
<'Adjusting Bass, Treble, and Balance Sound
Controls .............................................................
27
<'Setting the Bass Boost Control ........................ 27
<'Setting the TV for Stereo and SAP Programs ..28
<'Using the Incredible Stereo Control ................. 29
<'Using the Volume Display Control ................... 30
<'Using the TV Speaker OrdOff Control with
the Audio Output jacks .....................................
31
<'Surround Sound Speaker Connections and
Variable Audio Output Control ........................ 32
<'Using the TV's Audio/Video Input and
Output Jacks ...............................................
33-37
Copyright
© 1999 Philips
Consumer
Electronics
Company.
All rights
reserved.
First Time Set Up - automatically sets the TV for
local channels, the correct picture signal (antenna or
cable), and assists in the setting of TV's Smart Clock
feature.
Infrared Remote Control - operates your TV set and
a variety of wireless remote control VCRs, Cable TV
Converters, and other accessory equipment.
Standard
TV broadcast
(VHF/UHF) or Cable TV
(CATV) channel capability.
Closed Captioning
- allows the viewer
program dialogue or voice conversations
text.
to read TV
as on-screen
Automatic Programming of channels - for quick and
easy selection of favorite stations available in your
area.
Picture-ln-Picture (PIP) - can show a TV program
and the direct video output from an accessory (VCR,
etc.) onto the TV screen at the same time.
Parental Control for "Censoring"
- this feature can
block out channels to keep children from watching
undesirable programming. Parental Guideline and
Movie Rating settings can also be used as part of the
new Content Advisory Data system available with TV
programming.
Stereo-TV - with a built-in audio amplifier and a twin
speaker system, reception of TV programs in both
broadcast stereo sound or (SAP) bilingual broadcast
are available.
Twin Antenna (A/B) Inputs - for easy displaying of
two separate signal sources on the 'IV. An A/B button
on the remote control switches the TV's Main screen
between the two Antenna (A & B) Input options.
Audio/Video Jacks - for direct connections with
VCRs (and other accessories) for quality TV picture
and sound playback.Component Video Input
connectors are also available for high fidelity color
and picture resolution when using digital video soume
material, such as DVD.
Surround Sound - this TV set contains external;
audio speaker connections for a more dynamic sound
fffect.
Sleep-Timer - automatically turns the TV OFF at
_reset time intervals.
Smart Button - for the control of TV Sound and the
Picture levels. Use the Smart Button on the remote to
quickly adjust Smart Sound (to select various audio
modes matched to specific types of TV programming);
Smart Picture (for programmed video level
adjustments on a variety of program sources); and
Smart Surf (for quick one button channel selection of
up to 10 of your favorite channels).
Digital Ready - Projection Television capable of
connecting to both the current analog television
signals of today as well as interfacing with new
upcoming digital source playback products and
devices. This TV includes multiple signal connectors
(Component
Video, S-Video, Composite Video)
which give you a variety of equipment playback
options for digital set top boxes, satellite receivers,
cable boxes, and other digital devices.
While there may exist some digital devices with
connections
not available on this television, you
should be adequately prepared for the vast majority of
product> uoming onto the digital consumer
electromc3
market. Note: You should always use the
connection output on digital devices that gives the
highest lexcl of picture quality possible. As listed
above the Component
Video (or Y PB PR) input
delivers the _'st color and picture reproduction;
follox_ cd b 3 S-Video; and then Composite Video. In
addition t,, the above listed inputs, your television also
includes the standard 75ohm cable signal connector
for usc s__th antennas or analog cable boxes.
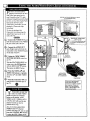
As ._ou unpack your "IV please note that the
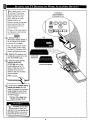
follox_tn_ items have been included with your set:
•
Or, hers Manual
Satct._ Tip Information
Factory Service Center Locations
•
Wa,'rant._ Registration Card
•
Remote ControITransmitter
•
Batteries for Remote Control Use
Please take a few minutes to complete your
registration card. The serial number for the TV is
on the back of the set.
Refer to the back of this manual for instructions
on the cleaning and care of the TV.
End-of-Life
disposal
Your new projection television and its packaging
contain materials that can be recycled and reused.
Specialized companies can recycle your product
to increase the amount of reusable materials and
minimize the amounts which need to be properly
disposed.
Your product also uses batteries which should not
be thrown away when depleted, but should be
handed in and disposed of as small chemical
waste. I
Please find out about the local regulations on how
to dispose of your old television, batteries, and
packaging materials whenever you replace
existing equipment.
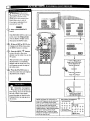
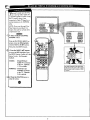
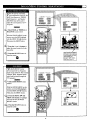
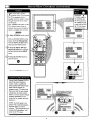
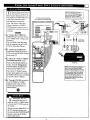
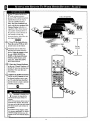
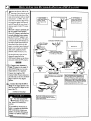
TpO
adjust your TV color and
ieture controls, select a TV
channel and follow the steps shown
below:
COLOR,
SHARPNESS
TINT,
or
picture control.
With the PICTURE MENU on
screen, move the REDAhigblight
with the MENU (M) _ buttons.
Then press the MENU button.
Press the (+) or (-) buttons to
ust the selected control.
<_
Press the STATUS button to
clear the screen.
Remember. When the bar
ii scale is centered, control
settings are at normal mid-range
t le'vels.
i
: BRIGHTNESS Press (-) or (+) until
dark parts of the picture show good
detail.
PICTURE Press (-) or (+) until
whitest parts of the picture are as
bright as you prefer.
COLOR Press (-) or (+)to add or
eliminate color.
T.....,!]_Press (-) or (+) to obtain
natural skin tones. (Also see Flesh
Correction on page 9 for more
information).
Press (-) or (+) to
improve detail in the picture.
(M) button to view additional
feature heading. For
Example: Tint, Brightness,
IPicture,
etc.
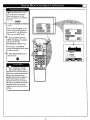
Clwearview
is a sharpness
hich smoothes out
feature
background
snow (or picture
without losing picture image
or crispness.
<_
Select CLEARVIEW
noise)
detail
control.
With the PICTURE MENU on
PICTURE MENU
screen, move the RED highlight
with the MENU (M)ql_ buttons.
Then press the MENU button.
<_
Press the MENU AY buttons
to move the RED highlight. Press
the MENU button to select (t,J) the
ENHANCED mode.
<_
Press the STATUS button to
clear the screen.
0
[]
C_linvergence
is the correct
sing up of the red and blue
light paths on the TV screen.
NOTE: If no color fringing (see
Smart Help) shows, then no
Convergence
adjustments
are
necessa_
<_
for your TV.
Select CONVERGENCE
control.
With PICTURE MENU (2 of 2) on
screen, move the REDhighlight
with the MENU (M)4_ buttons.
Then press the MENU button.
_
<_
PI_ruRE
If there is RED or BLUE color
fringing on the White cross, press
the MENU button to continue.
i,
, a
•
Press the MENU _1. buttons
to move the red or blue cross
directly over the white cross on the
TV screen.
20_2_
The red or blue cross is properly
adjusted when it is completely
merged with the white cross. (No
color appears around the edge of
the white cross).
_
MENU
i
If there is RED or BLUE
fringe ontheWHITEcross,
usethis adjustment
to
impr_=_ctura.
Press the STATUS button to
clear the screen when convergence
adjustments are complete.
press "M" m Continue
- oP-
Press
")" to Return
@
Remember. Convergence
=ihas been set at the factory for
best viewing, but if one or more of
the (red or blue) colors appear
around the edges of objects (color
fringing) follow the steps given in
this section.
MULTI-POINT
NOTE: Adjustments for "Multi-Point" onscreen color fringing can aJso be made as part
of the TV's Cortvergence control system.
Follow the TV's on-screen menu directions to
select individual screen areas that can be
re.adjusted and sat for varying red/blue color
fringing conditions. These multi-point settings
can then be "Saved" to memory for the
specific areas oftbe TV screen (or Faatory
Settings for convergence can be recalled and
put back into place for use).
CONVERGENCE
z777
+ + E+:+
I++++
+++++
+ + c+3+ +
+++++i
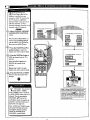
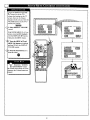
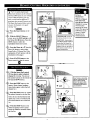
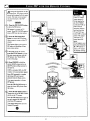
Use
the Flesh Correction
ontrol to keep skin tone hues
(or facial tint)from
varying from
TV channel to TV channel.
_
Select FLESH
CORRECTION
control.
With PICTURE MENU (2 of 2) on
screen, move the RED highlight
with the MENU (M)4_ buttons.
Then press the MENU button.
_
Press the MENU AY
buttons
to move the RED highlight. Press
the MENU button to turn (/,,") the
FLESH CORRECTION control
ON.
_
Press the STATUS button to
clear the screen.
O
--
PICTUI:_ MENU
_i,
,(,
i ,i,
,k,
20F2_
FLESH
[]
[]
The
picture for the TV can come
hrough either the ANTENNA
plug or the AUDIO/VIDEO
INput
jacks (on the rear of the TV). The
Picture Source control simply tells
the TV which one of these picture
sources it is to show on the TV
screen.
i<_l s ELECT
Select PICTURE
control.
SOURCE
I With the FEATURES
MENU on
screen, move the RED.highlight
with the MENU (M) 45_, buttons.
Then press the MENU button.
<_
Press the MENU A.V buttons
to move the RED highlight. Press
the MENU button to turn the
desired PICTURE SOURCE
control ON (_,").
ANT A or B- for a picture signal
coming from either the ANT(enna)
A or B Input plugs on the TV.
AUX 1 VIDEO- for a picture
signal coming from the AUX 1
Video Input jack on the rear of the
TV.
AUX 1 Y 1_ PR- for picture
signals coming from the component
(Y Pa PR) luminance and color
input jacks on the rear of the TV.
Note: A "S-VIDEO I" (or 2) Input
will appear as a PICTURE SOURCE
SELECT(ion) in place of the AUX I
V[DEO (or AUX 2 VIDEO) position
when the S-VIDEO plugs(on the rear
of the TV) are connected. Sc_ page 35
for operating details on S-VIDEO.
AUX 2 VIDEO- for a picture
signal coming from the AUX 2
Video Input jack on the rear of the
TV.
SIDE VIDEO- for a picture signal
coming from the Video Input jack
on the right side panel of the TV.
<_
Press the STATUS button to
i clear the scree_
Remember, the Auxiliary
Input modes (ALrX 1
VIDEO, etc.) must have a
compatible video signal source
properly connected (to the INPUT
plug on the rear of the TV), or the
TV screen will be blank.
10
m
ClyOSed Captioning (CC) allows
ou to read the voice content of
television programs on the TV
screen. Designed to help the hearing
impaired this feature uses on-screen
"text boxes" to show dialogue and
conversations while the TV program
is in progress.
<_
! NOTE: Not all TV programs and product commercials are made for broadcast
with C osed Caption (CC) information nc uded. Ne ther are all Closed Caption
modes (CAPTION 1-4; or TEXT 1-4) necessarily being used by a broadcast station
during the transmission of a closed caption program. Usually "CAPTION 1" is the
most used mode to view captioned material. Refer to your area's TV program
listings for the stations and times of Closed Caption shows.
Select CLOSED
CAPTIONING control.
With the FEATURES MENU on
--
FEATURE MENU
screen, move the RED=highlight
with the MENU (M) _ buttons.
Then press the MENU button.
<_
Press the MENU &.V buttons
to move the RED highlight. Press
the MENU button to select (_") the
desired Closed Caption mode - For
Example: "ALWAYS ON" and
"CAPTION l ".
CAPTION 1, 2, 3, 4:
dialogue (and descriptions)
for the action on the captioned
TV program shows on-screen.
(See Important Note on this
page.)
TEXT 1, 2, 3, 4:
often used for channel guide,
schedules, or bulletin board
information for CC programs.
<_
After making your Caption mode
selection, press the STATUS button
to clear the TV screen. The selected
Closed Caption mode will be active.
To cancel, set the Closed Captioned
feature to OFF when finished.
CAPTION
O
Remember. Broadcast
[ stations will often use
spelling abbreviations, symbols,
dropouts and other grammatical
shortcuts in order to keep pace
with the on-screen action. These
1 mode
Example Screen Display
in black and white (although some broadcasters
or networks may occasionally use color to
Closed
usually
appear
highlightCaption
or drawinformation
atlention towill
certain
areas.)
type factors vary upon the source
of the captioned text material and
do not indicate a need for service
on the part of the TV.
FULL SCREEN TEXT
will block TV semen from viewing
11
need to make sure the TV is
_ick up either Cable TV
or Antenna signals. In other words,
the TVneeds to know if you
connected a Cable TV signal or a
normal antenna to its ANTENNA
plug.
NOTE,: If you went through First
Time Setup (in your Quick Use
Guide), this rusk has already been
completed
_
for you.
Select CABLE
TUNING control.
CHANNEL
With the FEATURES
MENU on
screen, move the REDhighlight
with the MENU (M)_I_ buttons.
Then press the MENU button.
<_
Press the MENU AV buttons
to move the RED highlight. Press
the MENU button to select (t,w) the
desired mode - For Example:
CABLE.
CABLE-
If you DO have
Cable TV connected
to the TV. Channels
I-I25 available.
NORMAL-
<_
Press
Note: Both ANT(enna) A and ANT B inputs
a_ th_ rear of the TV can be set for the correct
connected signal (eitlx_ an Antenna or Cable
TV source).
If you have an
Antenna connected
to the TV. Channels
2-69 available.
the STATUS
button to
0
i clear the screen.
12
y;oUr
TV can automatically set itself
r local area (or Cable TV)
channels. This makes it easy for you
to select only the TV stations in your
area when the CHANNEL • •
MAI N
MENU
buttons are pressed.
NOTE: If you went through First
Time Setup (in your Quick Use
Guide), this task has already been
completed for you.
_
FEATURE MENU
Select CHANNEL MEMORY
(START AUTO-PROGRAMMINGI
control.
With the FEATURES MENU on
screen, move theRED highlight with
the MENU (M)4**_ buttons. Then
press the MENU button.
'_
Press the MENU button to turn
•
START
AUTO-PROGRAMMING ON.
The TV shows which channel
numbers are "SAVED" 0") as they
are added into memory.
"Auto-programming CHANNEL
MEMORY is finished" shows when
AUTO-PROGRAMIV_NG CHANNEL
MEMORY FOR ANT A
the TV is through adding channels.
1
'_ Press the STATUS or Menu (M)
button to clear the screen.
0
Channel Numbers
Saved in Memory
Try it out. Press the
CHANNELAT buttons
and see which channels you can
select.
Remember, an Antenna or Cable
TV signal must first be connected
to your TV so that channels can be
saved.
If you want to delete any
unwanted channels from the TV's
memory, see "ADD/DELETE
CHANNELS" on the next page.
13
are J
2_'
3",/
4.,"
9_
10
11
12
13
17
14
1G
15
19
16
L_]
21
;t2
23
24
(see
.previous page) adds all the
channels it can find (on your
Antenna or Cable TV system) into
the TV's memory. Add/Delete
Channels makes it easy for you to
add other channels, or drop
unwanted channels, from the list c
channels in the TV's memory.
<_
Sdect CHANNEL MEMORY
(ADD/DELETE CHANNELS)
control.
FEATURE MENU
With the FEATURES MENU on
screen, move the RED highlight
with the MENU (M) _*_buttons.
Then press the MENU button.
_" '_ Press the CHANNEL
&V or
10F5_
number buttons to select the
channel you want to add or delete.
C_'_NNEL MEMORY
<_
Press the MENU
button to
ADD the channel into the TV's
memory,
<
Press the MENU • button to
DELETE the channel from
memory.
Repeat steps 2 and 3 for each
channel you wish to add or delete.
<_
Press the STATUS
or
MENU
through.
0
I button to clear the screen when
Remember. You can also
[add the AUX 1 VIDEO,
AUX 2 VIDEO, AUX 1 Y PB PR,
or SIDE VIDEO modes just like a
channel. Then by pressing the
CHANNEL &._" buttons the
NOTE: A separate ADD/DELETE CHANNEL memory
may also be cr-_tted for the ANT(enna) B Input on the
rear of the set (if an Antenna _ Cabk: "IV signal has be_n
connected). Just press the _
button on the remote,
while in the ADD/DELEIE CHANNEL mode, to switch
bu_
the ANT A and ANT B channel n'_rnory lists.
Then follow steps 2 _d 3 as shown to the kft to add or
delete the desired channels.
AUX(iliary) mode can quickly be
selected to use the desired set of
Input jacks (see page 33).
Note: AUX(iliary) VIDEO modes
are located between the lowest
and highest channel numbers
within the ADD/DELETE
CHANNEL control screen.
14
your
TV comes with an oncreen clock. During normal
operation the clock appears on the
screen with every channel change
(and when the STATUS button is
vressed).
<_
FEATURE MENU
Select SET CLOCK control.
With FEATURES MENU (2 of 5)
on screen, move the RED highlight
with the MENU (M)4_ buttons.
Then press the MENU button.
<_
Press the remote's number
buttons to set the time clock.
_
Press the STATUS button to
set the clock in operation and clear
the screen.
O
Remember, be sure to
press "0" first and then the
hour number for single digit
entries.
.SETC_.OCK/_L&RM
The remote's MENU (M) 4_1.
buttons can also be used to set the
hours, minutes and AM/PM
portions of the clock.
TV Clock settings may be lost
when the TV is unplugged (or AC
power to the set is interrupted).
15
_MER
Just
like an alarm clock you can
et the TV to turn itself on at the
same time everyday.
c-aa- cm
_
Select SET ALARM TIMER
control.
With FEATURES MENU (2 of 5)
on screen, move the RInD highlight
with the MENU (M) 4_ buttons.
Then press the MENU button.
<_
Press the MENU AW and
MENU (M) buttons to highlight
and se ect 'ON" (t,_).
<_
Press the MENU AV and
then the MENU (M) buttons to
se ect SET ALARM TIME .
_
Press the remote's number
buttons to set the "TURN ON"
time for the TV. (Press MENU •
• for AM or PM.)
@
Press the STATUS button to
set the "ALARM TIME" and clear
the screen.
=
_
CLOCK/ALARM
TIMER
_
S_" ALARM TIME
30 AM
R.,EASEENn_ "i'HE
HOURTD TURN ON
n;rVe
you ever fallen asleep in
ont of the TV only to have it
wake you up at two in the morning
with a test pattern screeching in
your ears? Well your TV can save
you all that trouble by
automatically turning itself off
@_
FEATURE MENU
Press the SLEEP button on the
remote control.
Note: you can also select the
SLEEP control with the TV's onscreen FEATURES MENU (2 of 5).
Move the RED highlight with the
MENU (M) '1_ buttons. Then press
the MENU button.
_
Press the SLEEP button
repeatedly to pick the amount of
time (15 minutes to 2 hours ahead)
before the TV will turn itself off.
The (+), (-) buttons can also be used
to set the amount of time.
_
Press the STATUS or MENU
(M) button to clear the screen after
you have set the time for the "IV to
turn off.
Remember, to see how
! many minutes are left before
the TV shuts itself off, reselect the
SLEEP TIMER control screen.
To stop a SLEEP TIMER setting,
reset the timer back to OFF.
(Turning the TV off and on, or
pressing a button during the last
minute of a timer setting, will also
cancel a setting.)
A few seconds before the TV is to
shut offa message will come on the
screen telling you GOOD NIGHT.
17
V V control you can change the
size and location of the on screen
I_th
the Channel Display
channel and clock information.
I
Select CHANNEL
control.
Try it out.
Press the
CHANNEL AY
buttons and you
should see the
DISPLAY
Display Size you
selected.
With FEATURES MENU (2 of 5)
on screen, move the RED
highlight with the MENU (M)4_
....
buttons. Then press the MENU
button.
_
Remember. The
SMALL SIZE
V
F_TUp$
MENU .......
display shows only
the channel number
not the time (or
clock).
_ ,_
Press the MENU AY and
MENU (M) buttons to highlight
and select (v") the LARGE or
SMALL display control.
<_
...
......
2_5
.--
Press the STATUS button to
Wcth
the Half Hour Reminder
ontrol the TV automatically
shows you the current time and
channel every thirty minutes.
@
Remember.
The Time and
Channel Reminders
will show on the
hour and the halfhour for about five
seconds.
Select HALF HOUR
REMINDER control.
With FEATURES MENU (2 of 5)
on screen, move the RED
highlight with the MENU (M) l_k
--
g_
buttons. Then press the MENU
button.
<_
rm
Press the MENU AV and
MENU (M) buttons to highlight
and select (t,,') the EVERY HALF
HOUR item.
_
Press the STATUS
button to
I clear the screen z
18
MENU --
7ontrol allows parents
to block out, or "censor", an3'
NOTE:Your TV left the factory with the Parental Code set to "0000". If you are using 7
your TV and the Parental Control for the first time, and don't want to SETUP a new
Access code number, you can use the "0000' number to block channels - see next page•
The ' 0711" Parental Code (shown on this page) is given as a default or way to reset the
Code when the current Access number is not known•
Select the PARENTAL
CONTROL.
With FEATURES MENU (3 of 5)
on screen, move the RInD highlight
with the MENU (M)4,'_ buttons•
Then press the MENU button.
i
J
........
V
=_ = _ARENTAL
"CHANNEL BLOCKING" and
"SETUP CODE" show on screen.
==_, F_ATURE
MENU
.....
CONTR.*
......
......
_,_ ;' Press the MENU &._' and
MENU (M) buttons to highlight
and select the SETUP CODE item.
'_
Press 0, 7, 1, I on the remote.
.__.
....
.
..............
J
"XXXX" shows on the ACCESS
CODE SETUP screen as you press
the number buttons.
"INCORRECT ACCESS CODE TRY AGAIN" will also show on the
screen.
_)
Press 0, 7, 1, 1 on the remote
again.
' NextEnter, Your New Access
I Code shows on the screen.
<_
Enter a new four digit number
code using the remote.
"Access Code Changed" shows on
the screen to let you know the new
code has been set.
Continue to thenext
page to find
out how to "BLOCK"channels
viewing.
press MENU 11_ to go on and star_
to _block" channels.
from
Press MENU _[ to go to "Content
Advisory _ (or TV and Movie Ratings
system of channel blockang).
press MENU to return to the parental
Coatlol Menu screen.
Parents - it isn't possible
! to unlock or defeat your
Censor Code without changing to
a new code number. So if your
Code number changes, and you
didn't change it yourself, then you
will know that someone has
altered the code and the blanked
out channel has been viewed.
Pr*ss STATUS
19
to clear the screen.
previous page), you are now ready
to select the channels you want to
block out or censor.
<
Select the BLOCK
CHANNELS control.
_
With FEATURES MENU (3 of 5)
---.
i_lfq
M_NL_
FF._TUR_
_
MENU
]'17
on screet_, move the RED high[ight
with the MENU (M) 4_buttons.
Then press the MENU button.
_-,,_I
FF_'flJ_ MEMJ _
1'0='5_ -_ '
"2 DF_LJ._
t
i
I
Press the MENU &V and
T
and select the CHANNEL
item.
I BLOCKING
MENU (M) buttons
to highlight
_
:_ p_TAk
_=
CC_T_3L
F_/_TIJqE MENU
Enter the correct Parental
Code number.
_OF_
@Press
Channel AV or Channel
Number buttons to select the
$
channel you want to block.
<_
Press the MENU
button
"BLOCK VIEWING" on the
selected channel.
Press the MENU • button to
"ALLOW VIEWING" on a
blocked channel.
to
Repeat steps 3 and 4 for any other
channels you wish to block out.
O
°<
C_,NNEL 1 _
_,-_NNIB. _L_NG
ACTM[
Plmir.em
Remember, once set
_=ell
Code
Seteet **r_,3_.r _annel
'arental Control blocks out
the selected channel number on
both the ANT A and ANT B
BLOCKED CHANNEL SCREEN MESSAGE
(Appears when an attempt to se]ect a blocked
channel is made and Par¢ntal Control is ON,)
channel rings. Also, to make TV
viewing easier all channels (for
beth ANT A/B and Audio/Video
Input jacks) will be unblocked,
once the correct Parental Code
number has been entered.
When the TV is turned OFF and
then back ON again, is when
Parental Control is back in place
for all blocked out channels.
20
Note: You canalso blockout the
ase of the _kttcli_Videolrt_t j_egs
on the TV,This stops the viewing of
"¢CR prognanswlfieh can be shown
= through the A/V INjacks.Jus sele¢
AUX ] VIDEO, AUX 2 VIDEO,or
i S1DEVIDEO (loCatedbe weanthe
lowest _nd highest channel
r_mbers)ontheCh_net Blocking
screen, and select "blocked'.
Another
new area available to
parents for the censoring
of
program material is through the
TV Guidelines and Movie Ratings
system. Program Content Advisory
data will soon be contained
within
the broadcast
signals
Note: Please remember that a vailid and current Access Code number will be
required in the setup and use of the TV's "Content Advisory" system. Review the
previous SETUP CODE section on how to obtain a valid Parental Access Code
number before attempting to make adjustments within the Movie Ratings and
Parental Guidelines system.
of received
TV programs.
When setup by the
parent or viewer, the TV can
respond to transmitted advisor3_,
data by blocking out or denying
access to TV shows (based on
whether the program meets or
exceeds the limitations you select
as viewable). The TV program can
: then only be viewed by entering the
correct and current Parental Code
Access number.
The Content Advisory system uses
both "Movie Ratings"
and a
"Parental
Guidelines "form of
censoring. Refer to the following
page sections for explanations
on
the different Rating system levels
and their uses.
CONTENT_SO_Y
TO Block 04"Un-BloCk
Fq_0grarr_, gir_ Enter
your Access COde,
(_
<_
AC_._
Fx x_x x •
_o EXIT
Select the CONTENT
ADVISORY Menu option
With PARENTAL CONTROL
_
O01_fi_IT
An_lSORY
i
Menu on screen, move the RED
highlight with the MENU 4_1,
buttons. Then press the MENU (M)
button.
A Parental Guideline/Movie Ratir
status screen will appear with a
review of currently BLOCKED
Content Advisory categories.
<_
Press theMENU • button to
select the ENTER ACCESS
CODE Menu item.
_
Enter the correct Parental
Code number (see note at the top
of this page).
•
_
_,' _
"CONTENT ADVISORY" Menu
screen appears. Parental
Guidelines, Movie Ratings and
other blocking control items are
ready for selection and use.
0
C_A_NEL O
BLOCKEDBY C(]t_TENT A_rI_i_RY
TV G_L_EB
TV.1 a n
Lx
I=kem
x x x7
_t_r
Selec_ _
Acr:ess Cooe
C/_n_el
2!
NOTE: In normal Content Advisory system operation
the TV screen will display a message when
programming is blocked by a Movie Rating, Parental
Guideline, or Blocking Option control feature.
Entering the correct ACCESS CODE number will
unblock all the blocked Content Advisory Rated
channels until the TV is turned Off. The blocked
Advisory Ratings will be back in place when the TV
is turned back On again.
M:vie
Ratings set viewing
ccess levels for TV
! programming
according to current
Motion Picture Association
of
America (MPAA ) ratings. These
ratings are similar to the
categories used with the rated
movies appearing in cinema
theaters and with video rental
material.
_, l_
Select the MOVIE RATINGS
I Menu option.
With CONTENT
ADVISORY
G - General Audience: Most parents would find this
program suitable for all ages. This type of pro_amming
contains little or no violence, no strong language, and
little or no sexual dialogue or situations.
IPG - Parental Guidance: This programming contains
material that parents may find unsuitable for younger
children. It may contain one or more of the fallowing:
Moderate violence, some sexual situations, infrequent
coarse language, or some suggestive dialogue.
PG-13: This programming contains material that parents
may find unsuitable for children under the age of 13. It
contains one or more of the following: violence, sexual
situations, coarse language, or suggestive dialogue.
R - Restricted:
This programming is specifically
designed for adults. Anyone under the age of 17 should
only view this programming with an accompanying parent
or adult guardian. It contains one or more of the following:
intense violence, intense sexual situations, strong coarse
language, or intensely suggestive dialogue.
NC-17 - No one under 17 admitted: This type of programming should be viewed by adults only. It contains
graphic violence, explicit sex, or crude indecent language.
X - Mature audience only: This type of programming
contains one or more of the following: very graphic
violence, very graphic and explicit or indecent sexual acts,
very coarse and intensely suggestive language.
Menu on screen, move the RED
highlight with the MENU 4-_
buttons. Then press the MENU
(M) button.
<
Press
the MENU
_kV and
MENU (M) buttons to highlight
and select (J._') the desired MOVIE
BLOCKING level.
When in operation a "Blocked Movie Rating" TV screen appears
when movies are received which
include the same selected rating as
the Movie Blocking setting(s).
Only the correct Access Code
number, entered by the viewer,
will unblock or allow the viewing
of a block rated program.
Note: When a Movie
Rating is selected (t,€) all
higher level ratings are
automatically blocked (although
each individual Movie Rating can
be manually selected and turned
On or Offas desired). Programs
with lower than the selected rating
level are allowed for viewing or
unblocked.
22
J•
Darental
Guidelines
even more defined
can be
and specific
in the degree and extent of
material parents may allow for TV
program viewing. Sub-settings for
Language, Violence, and other
blocking factors can be manually
switched On or Off for use within
the major Parental Guideline
categories (TV-Y7, TV-PG, etc.).
NN
L_ Select the PARENTAL
GUIDELINES Menu option.
With CONTENT ADVISORY
Menu on screen, move the R_D
highlight with the MENU t_t
buttons. Then press the MENU
(M) button.
<_
_
Press the MENU "_l • to
highlight and select the desired
PARENTAL GUIDELINE rating
level (TV-Y, TV-Y7, etc.).
• TV-Y - -tppropriate for all children: Designed for a
very ._oun?au&cnce including childrenages 2_. This type of
programmmc t_ r_ expected to frightenyounger children.
• 'I_,'-Y7 -Appropriate
for children seven and older: It
may _ rr_r:, appropriatefor childrenwho have acquiredthe
developrnt'nc skills needed to distinguishbetween make-believe
and rearing.Th_ propaxnming may include mild fantasy and
comic violence IF'VL
• TV-G. General Audience: This type of programming
contains hole or no violence, no strong language, and little or
no sexual dialogue or situations.
• TV-PG. Parental Guidance suggested: This type of
programming contains one or more of the following: Moderate
violence (V), some sexual situations(S), infrequent coarse
language (L), or some suggestive dialogue (D).
• TV-t4 - Unsuitable for children under 14: Thistype of
programming contains one or more of the following: intense
violence (V), intense sexual situations(S), strong coarse
language (L), or intensely suggestive dialogue (D).
TV.MA - Mature audence only: This type of
_'ogramming contains one ormore of the following: graphic
violence (V), explicit sexual situations (S), or crude indecent
Ilanguage (L).
Press the MENU AV and
MENU (M) buttons to Block (_)
the selected Parental Guideline
category (or to set other individual
blocking feature items available
within tb.at Guideline category (L,
V. S, D, etc.) as desired).
Note: Selecting "ALWAYS
BLOCKED" (or individually
adjusting the L, V, S, D settings)
for any one rating will set all other
higher level ratings to be
automatically blocked as well.
O
The TV-Y7; TV-PG;
TV-14; and TV-MA
guidelines also include
customized settings for various
additional items such as V
(violence), S (sexual situations), L
(coarse language), D (suggestive
dialogue), and FV (fantasy
violence). These additional
settings are category specific and
can be individually selected for
use as desired.
(V) - Violence
(S) - Sexual situations
(L) - Language
(D) - Inappropriate
dialogue
(FV) - Fantasy Violence may frighten children under
seven. Some cartoons may have this rating. Available in
the TV-Y7 camgory only.
')'l
[]
_=
_ae
Content Advisory
lso has Blocking
_
_m_
_ _=_ _
system
Option "controls which can be
used to deny viewing access for
channel programs and movies
even when they are "unrated",
or
contain "no rating" information
as broadcasted.
+_tr_iiiiiiiiiliii!iii!i_
i
i
NN
<
Select the BLOCKING
OPTIONS Menu control.
With CONTENT
ADVISORY
Menu on screen, move the RED
highlight with the MENU 4_
buttons. Then press the MENU
(M) button.
<_
Press the MENU AV and
MENU (M) buttons to turn the
Blocking System On (highlight
and select t,," ENABLED).
Then
use the remote Menu buttons to
select the desired programming
and information
blocking options.
Please
refer to Note shown
with
this page section for details on
"unrated" and "no rating" program
control options.
O
U_e
the Review Settings control
o quickly check the status for
Content Advisory system Parental
Guidelines and Movie Rating
"Blocked"
)
program
levels.
Select the REVIEW
SETTINGS Menu option.
With CONTENT
Menu on screen,
highlight
ADVISORY
move the RED
with the MENU
4_
buttons. Then press the MENU
(M) button.
The TV screen will display the
current Parental Guideline and
Movie Ratings Blocked program
settings. Content Advisory system
status will also be shown (Enabled
-On, or Disabled - Off).
Note: Remember that Content Advisory data or encoded
information is not availabIe with all received TV
programming (this also includes commercia,]s, and other
program spot announcements). Broadcaster s can decide
I_
any kind of content advisory ratings with
their programming, or they can actually choose to
nro_rams to he "unrated."
The TV Blocking Options allow the viewer to block any
program without content advisory data with the use of its
"NO RATING INFORMATION" control. And to block
programs that are encoded as "unrated" with its
"'UNRATED PROGRAMMING" control option.
Since the reception of Content Advisory data can take a
few seconds, you may want m use the "CHANNEL
CHANGE" option to be sure no viewing is allnwed during
blocked program channel changes. This can eliminate the
display of a few seconds of undesirable video on the TV,
or receiving scenes from a Ratings blocked channel
source.
on which
channel
network
a particular
is located?
station or
The Channel
Labels Control is a quick way to
view and select channels from a
list of Labeled
channels.
A Label is a four letter callout you
".an set to appear with the on
screen channel number. Example
Label: WXYZ -for a TV station's
call letters.
To select channels from the
Channel Labels Control:
<_
With the FEATURE MENU
screen (3 of 5) on the TV's screen,
move the REDhighlight using the
MENU (M) _
buttons to select
CHANNEL LABELS. Press the
MENU (M) button.
<_
Press the MENU &._' and
MENU (M) buttons to highlight
and select either:
"MANUAL" to create your own
label for a channel.
"PRESETS" to choose from a list
of prewritten channel labels.
(See instruction details on this
page.)
<_
Press the STATUS button to
clear the screen.
0
MANUAL- To create your
own Channel Label:
PRESETS .To pick a Label
from the "LABEL" list:
Press the Channel •V or
Number buttons to select
desired station.
_'ress theChannel •V or
qumber buttons to select
tesired station.
A red highlight shows the
active letter space for the
channel label.
Press the MENU &•
Press the MENU •
25
•
)uttons to move up and
town the Channel Label
ist.
buttons to pick any of the
letters or symbols that are
given for your use.
Just stop on any label you
might want to use.
Press the MENU "9 I_
buttons to move the red
highlight to the other letter
spaces and repeat.
automatically
channel changes and when
"reSTATUS
button is
Press the STATUS button
to clear the screen when
finished.
Press the STATUS button
to clear the screen when
finished.
The selected
label
appears
with
ressed.
E3
N;ite:
lfyou went through First
me Setup, This task has
already been completed for you.
For our Spanish and French
speaking TV owners an on-screen
LANGUAGE option is present.
With the LANGUAGE control you
can set the TV's on-screen
features to be shown in either
English, Spanish or French.
_
FEATURE MENU
Select the LANGUAGE
DISPLAY control.
With FEATURES MENU (3 of 5)
on screen, move the RED _.
highlight with the MENU _.'_
buttons. Then press the MENU
(M) button.
<
--
FEATUAE MENU
Press the MENU AV and
MENU (M) buttons to highlight
and select (t,,') English, Espafiol,
or Francais on the display control.
Text for the on-screen Menu will
change to the selected language.
<
FEATURE MENU
Press the STATUS button to
clear the screen.
O
_
Remember, the
Language control only
makes the TV's on-screen
(MENU) items appear in English,
Spanish, or French text. It does not
change the other on-screen text
features such as Closed Captioned
(CC) TV shows.
26
3QFS_
yOsUr TV also has individual
ound adjustment coatrols, The
BASS (low frequency). TREBLE
(high frequency), and Speaker
BALANCE may all be used to
adjust the sound playback of 73/
programs.
cff drm
Select BASS, or TREBLE, or
BALANCE sound control.
With the SOUND MENU on the
screen, move the RED highlight
with the MENU (M)W_ buttons.
Then press the MENU button.
Press the (+) or (-) buttons to
adjust the sound control to levels
you prefer.
<_
Select and then press MENU
(M) button to view additional
controls grouped under same
feature heading. For
Example:
Bass Boost.Treble,
Stereo.Balance,
ere,
Press the STATUS button to
clear the screen.
_in e BASS BOOST control
creases the low frequency
audio range of the TV.Thiscreates
a deeper, fuller playback sound
which can be heard through the
TV' s speakers.
_
Select BASS BOOST sound
control.
With the SOUND MENU on the
screen, move the RED highlight
with the MENU (M)_I_-_buttons.
Then press the MENU button.
_
Press the MENU AV and
MENU (M) buttons to highlight
and turn ON (_) the BASS
BOOST control.
<_
Press the STATUS
clear the screen.
button
to
O
27
ybur
TV is able to receive
roadcast stereo TV programs,
The TV is equipped with an
amplifier and twin speaker system
through which the stereo sound
can be heard.
Remember,
If a stereo signal is
not available and
the TV is placed in
the STEREO mode,
sound coming from
_SOUNOMENU
the TV will remain
Note: STEREO will appear on the
TV's channel status screen to
indicate when a stereo broadcast
signal
<_
is available
monaural (mono).
and received.
Select STEREO sound control.
screen, move the RED highlight
with the
With
the MENU
SOUND(M)4_
MENU buttons.
on the
Then press the MENU button.
_
SOUND MENU
Press the MENU akV and
and turn ON (tl) the STEREO
MENU
mode. (M) buttons to highlight
<_
Press the STATUS button to
I clear the scree_
Second Audio Program (SAP) is
part of the stereo broadcast
system. Sent as a additional
audio channel SAP can be heard
apart from the current TV
program sound. TV stations are
free to use SAP for any number
of purposes, but many experts
believe it will be used for foreign
language translations of TV
shows (or for weather and news
bulletins.)
NOTE:
If a SAP signal is not
present with a selected program,
the SAP option can not be
selected. "This program does not
contain SAP information" will
show on the TV screen.
_
_UN
0 P._U
SECOND
PROGRAM
ONLY BE SELECTED
SOUND CAN
(_) WHEN
PRESENT
Tche an Incredible
control
be used to Stereo
add greater
depth and dimension to both
monaural (MONO) and STEREO
TV sound.
Select INCREDIBLE
control.
STEREO
MAIN MENU
With the SOUND MENU on the
screen, move the RED highlight
with the MENU (M) 4_ buttons.
! Then press the MENU button.
<_
Press the MENU AV and
! MENU (M) buttons to highlight
and turn ON (t,,') the
INCREDIBLE STEREO mode.
For Example: "MAXIMUM"
spreads the Incredible Stereo effect
as wide as possible.
<_
Press the STATUS button to
O
I clear the screen.
Remember, with the
Incredible Stereo control
turned ON even monaural (mono)
audio source material can be heard
through rear Surround Sound
speaker connections (see page 32).
Note: The monaural version of
Surround Sound may be louder at
the rear set of speakers than what is
normally heard with true stereo
signal Surround Sound, but this is
normal.
29
E2
Use
the DISPLAY VOLUME
ontrol to see the TV s
volume level settings on the TV
screen. Once set the Volume
Display will be seen each time the
VOLUME buttons (on the TV or
remote) are pressed.
,_
MAIN
MENU
_
_!i_
Select DISPLAY VOLUME
control
,rr
With SOUND MENU (2 of 3) on
screen, move the RED highlight
with the MENU (M) _ buttons.
Then press the MENU button.
<_
Press the MENU AV
i;i!:
and
MENU (M) buttons to highlight
and turn ON (t,J) the DISPLAY
VOLUME control.
<_
i ,L,
SOUND MENU
Press the STATUS button to
clear the screen.
0
20F3_
3O
W;uld
you like to hear TV
rograms through your audio
hi-fi system? The TV's Variable
Audio Output jacks and TV
Speaker
together
BACK OF TV
OrdOff control work
to offer you this TV sound
option.
Connect the R(ight) and L(eft)
VARIABLE AUDIO OUT jacks
on the TV to the R and L Audio
Input jacks on your amplifier or
sound system+
VARIABLE
AUDIO
OUTPUT JACKS
Set the audio system's volume to
normal listening level.
<_
AUDIO IN
"l_urn the TV and audio system
ON+ You can now adjust the sound
level coming from the audio
system with the Volume _,9"
buttons on the TV or remote.
<_To
hear the TV sound from only
the audio system speakers, sdect
TV SPEAKERS control.
With SOUND MENU (2 of 3) on
screen, move the REDhighlight
! with the MENU (M)47_ buttons.
Then press the MENU button.
_
Press the MENU Ay
AUDIO SYSTEM
and
MENU (M) buttons to highlight
and turn OFF (v,") the TV
SPEAKERS control.
You should now only hear TV
sound coming from the audio
system speakers.
<_
__
•
L
Press the STATUS button to
NOTE: The TV's FIXED
AUDIO OUTPUT jacks can
playback
clear the screen_
"
I
I
external audio amplifier, or
home theater hi-fi system,
Remember, the audio
isystem may have to be in
AUX(iliary) mode to play sound
from the TV (Outputs).
.@@
similar
NOTE: The TV's PIP
AUDIO OUTPUT jacks can
also be used for additional
ste_o playback options such
,a_ wireless transmitter
headphone hook-up, or as an
external amplifier connection
source. However, with normal
PIP feature operations (when
Note: When the TV SPEAKER
control is set to "NORMAL" (for
TV speaker operation) make sure
the VARIABLE AUDIO OUTPUT
control (see next page) is also set
to "STEREO" in order for the TV's
AUDIO OUTPUT jacks to work
properly.
31
to the Variable Audio Outputs
(as shown above). However,
specific sound level
adjustments will be made with
the controls at the extemal
amplifier or home sound
system (instead of through the
TV's audio level comrols.)
the ANT A and ANT B Input
sources
are counected
for
use), the PIP AUDIO
OUTPUTs will switch from
stereo to monaural (mono)
sound.StereO sound will only
be availablewith the TV's
Main sen_en(or ANT A
supplied signal) at that time.
F-3
REAR SURROUND SOUND
SPEAKER TERMINALS
By
adding optional external
speakers to the TV s sound
system, you can create the feeling
of reflected sound that surrounds
you at a movie theater or concert
"hall
<_
BACKOETV
Connect both external
speakers to the speaker wire
terminals on the TV.
"
SUBWOOFER OUTPUT
Use the Subwoofer Output (RCA
plug connector) to send the
subwoofer audio channel signal (at
line level) to an optional external
powered Subwcofer speaker The
Subwoofer audio signal is for the
playback of only the lowest
frequency notes (under 100 Hz)
Recommended speakers: 8ohm, 15
watt minimum. Be sure the (+) and
(-) speaker wires are connected to
the correct R(ight) and L(eft)
speaker terminals on the TV.
_
Remember,
Surround Sound
will not work with
only one speaker
connected; or with
monaural audio
material (unless
Variable Audio
Surround control is
turned ON - see
section below).
Place the speakers so the
viewing area is between the "IV
and the rear surround speakers.
I (See overhead view drawing.)
"IV
[][]
I
I
<_
Turn TV ON and place the
STEREO control to the "STEREO
IF AVAILABLE" (t,,") position.
After setup whenever a stereo
signal is received the audio will be
heard in Surround Sound.
SUBWOOFER
REAR SURROUND
SOUND SPEAKERS
I Note: The rear Surround Sound sp_akers will not
REAR SPEAKER
glue a background noise effect which requires a
}lower volume level than the TV's front speakers.
PRIMARY VIEWING AREA
he TV's Variable Audio Output
acks can also be used for
Surround Sound. Once they are
connected to an external hi-fi
system its speakers can be used for
the playback of Surround Sound.
<_
BACK OFTV
Connect the R(ight) and L(eft)
VARIABLE AUDIO OUT jacks
on the TV to the R and L Audio
Input jacks on your amplifier or
AUDIO
INPUT JACKS
sound system.
<_
Turn TV ON and place the
VARIABLE AUDIO OUTPUT on
screen control to the SURROUND
(_) position. (Sound Menu 3 of 3).
Note:This will change the
Left/Right channel audio line level
signal at the Audio Output jacks to
the same signal found at the TV's
Surround Sound Speaker terminals.
AUDIO SYSTEM SPEAKERS USED AS REAR
SURROUND SOUND SPEAKERS
ID
32
Tjhe
TV's Audio/Video Input
acks are for direct picture and
sound connections between the 73/
and a VCR (or Video Disc Player,
etc.) that has Audio/Video Output
jacks.
To view the playback of a VCR
tape by using the Audio/Video
Input jacks on the TV:
TV's rear AUX 2 VIDEO Input jacks
are the same as for the AUX ]jacks
(except Connections
"AUX 2" is selected
NOTE:
and use as
of the
the
PICTURE AND SOUND FROM
PLAYBACK OF VCR TAPE
_BACKm
•
_
_
Connect the VIDEO OUT jack
from the VCR to the AUX 1
VIDEO IN jack on the TV.
F_TU_
' I ' _ '
Picture Source in step 3).
OF "IV
MENU m
ANT A
Al>qT8
I
(_
II
+-
Connect the AUDIO OUT
jacks R(ight) and L(eft) from the
VCR to the AUX 1 AUDIO IN
jacks on the TV.
/'
'
++
(YELLOW)
(RED/WHITE)
AUDIO/VIDEO
OUTPUT JACKS
_
II
Select the "AUX 1 VIDEO"
PICTURE SOURCE SELECT
control on the TV.
ON VCR
,,_._
O
With the FEATURES MENU on
screen, move the RED highlight
with the MENU (M) (,'l'buttons.
Then press the MENU button.
VCR
<_
Press the MENU AY and
Audio Oulput VCR. "Y" connectors
are available to complete your
connection. Contact your dealer, or
our Pa_s lnfocraation Cent_ ( 1-8001f you have toa order
single any
(monaural)
I
851-8885)
optional
accessories.
and select (t,,") the AUX 1 VIDEO
I mode.
ENU (M) buttons to highlight
_Turn
the VCR ON and press
0
I PLAY to view the tape on the TV.
Remember, after it is
connected an easy way to
select the AUX 1 VIDEO mode is
to press the TV/VCR button on
the remote. AUX 2 VIDEO; SIDE
VIDEO; AUX 1 Y PB PR; ANT
A/B, and the last channel viewed
can also be selected in this way.
Also, if you have added AUX l
VIDEO to the TV's channel
memory (see page 14), you can
just press the CHANNEL AY
buttons to select the AUX 1 mode.
33
_pr
more convenient Direct
layback connections the TV's
Side Video Input panel can be
used. Located on the TV's right
side panel (angled toward the front
for easy access) these Audio/Video
Input jacks allow for quick
connections, particularly for the
playback of Camcorder tape
recordings.
PICTURE
AND SOUND FROM PLAYBACK
OF CAMCORDER TAPE
To view the playback of a
Camcorder recording using the
Audio/Video Input jacks on the
side of the TV:
<_
Connect the VIDEO OUT jack
from the Camcorder to the VIDEO
IN jack on the side of the TV.
_
Connect the AUDIO OUT
jacks R(ight) and L(eft) from the
Camcorder to the AUDIO IN jacks
on the side of the TV.
<_
Select the "SIDE VIDEO"
PICTURE SOURCE control on
the TV.
_ _*
I
_,--,
VIDEO IN
(YELLOW)
for
(S-VIDEO
possible Input
S-VHS
plug
tape
alsoplayback
provided
SIDEPANELAUDIONIDEOINPUT
JACKS
material.)
AUDIO IN
(RED/WHITE)
With the FEATURES MENU on
screen, move the RED.highlight
with the MENU (M) 4.-I, buttons.
Then press the MENU button.
<_
<_
Press the MENU AV and
MENU (M) buttons to highlight
and select (u') the SIDE VIDEO
mode.
Turn the Camcorder
AUDIO/VIDEO
OUTPUT JACKS
ON CAMCORDER
CAMCORDER
ON and
Audio Output C.amem'd¢_, "Y"
connectors are available to compleU_
your connection. Contact your
dea]er, or our Parts Information
lfyou have
a single °$885)
(monaural)
Center
( ] -800-851
to order
the'IV.
press PLAY to view the tape on
any optional accessories.
Remember, an easy way
li to select the SIDE VIDEO
mode is to press the TV/VCR
button on the remote, AUX 1
VIDEO; AUX 2 VIDEO; AUX 1
Y PB PP.; ANT A/B, and the last
channel viewed can also be
selected in this way.
Also, if you have added SIDE
VIDEO to the TV's channel
memory (see page 14), you can just
! press the CI-IAaN'NEL a,'v buttons
to select the SIDE VIDEO mode.
i
-34
Tthe S(uper)-Video connection on
he rear of the TV can give you
better picture detail and clarity, for
the playback ofS-VHS VCR tapes or
Video Discs, than the normal
antenna picture connections.
Note: The VCR (or Video Disc
Player) must have a S-VIDEO
OUT(put)jack in orderforyou to
complete the connections shown on
this page.
<_
Connect
the S-VIDEO
PICTURE AND SOUND FROM
PLAYBACK OF S-VHS VCR TAPE
NOTE: Connections and use of the
TV's AUX 2 S-VIDEO Inpet jacks are
the same as for the AUX 1 S-VIDEO
jacks (except "AUX 2 S-VIDEO" is
selected as the Picture Source in step 3).
BACK OF "IV
(S-
VHS) OUT jack from the VCR to
the S-VIDEO AUX 1 IN(put)jack
on the TV.
CABLE
IS-VIDEO
OUT
_
AUDIOOUT
(RED/WHITE)
The S-VIDEO connecting cable
will be supplied with the S-VHS
VCR (or Video Disc Player).
<_
Connect the AUDIO OUT
jacks R(ight) and L(eft) from the
VCR to the AUDIO AUX lIN(put)
jacks on the TV.
_
Select the "AUX 1 S-VIDEO"
PICTURE SOURCE controI.
With the FEATURES MENU on
S-VHS VCR
screen, move the RED highlight
with the MENU (M) 4_ buttons.
Then press the MENU button.
NOTE: A CD-i (Compact Disc Interactive)
player, Video Game, or other S-VIDEO
accessory can be hooked up to the TV using
this type of conr,ectt on. Pleas¢ be aware that
such video sources, which show a eomram
The "AUX 1 S VIDEO" picture
source option appears only when a
S-VIDEO cable has been connected
non-moving patter, on the TV r,crccn, can
cause pictttre tube damage. When not in use
turn your video accessories OFF. Also.
mguhirIy alternate theus_ of video sources
with normal TV viewing.
to the TV's AUX 1 IN(puts).
<_
Turn the VCR ON and place it
in the S-VIDEO (or S-VHS)
playback mode. Insert S-VHS
cassette tape and playback in a
normal manner.
Remember, after it is
connected an easy way to
select the AUX 1 S-VIDEO mode
is to press the TV/VCR button on
the remote.)
Also, if you have added AUX I to
the TV's channel memory, you
can just press the CHANNEL AY
buttons to select the S-VIDEO
mode (when active).
35
C;mponent
Video Inputs
rovMe for the highest
vossible color and picture
resolution in the playback of
digital signal source material such
as with DVD players. The color
difference signals (Pc, Pn) and the
luminance (Y) signal are
connected and received separately
which permits for improved color
bandwidth information (not
possible when using composite
video or S-Video connections).
_
Connect the Component (Y PB
PR) VIDEO OUT jacks from the
DVD player to the (Y PB PR)
VIDEO IN(put)jacks on the TV.
Connect the AUDIO OUT
jacks R(ight) and L(eft) from the
DVD player to the AUX 1 AUDIO
IN jacks on the TV.
<_
Select the "AUX 1 Y PB PR"
PICTURE SOURCE control on
the TV.
DVD PLAYER
(equipped with Component Color
& IMimJnanee Outputs)
With the FEATURES MENU on
screen, move the RED highlight
with the MENU (M) 4_} buttons.
Opdonal Video/Audio
[ RCA plug connectors)
Cables (with slandard
_re available to
[
Then press the MENU button.
connections. Contact your dealer, or our Pai_s
I complete
your
Component
Input
Jack to o_'derI
Information
Center
(] -800-S51
-SSgS)
Press the MENU _kV and
MENU (M) buttons to highlight
and select (tl) the AUX I Y PB PR
mode.
I any optional accessories.
<_
<_
Turn the DVD player ON and
press PLAY to view the source
material playback on the TV.
0
on the DVD
!
)layer or accessory digital source
equipment used (e.g. Y PB Pr; R-Y/BY/Y; Cr/Cb/Y, etc.). Although
abbreviations and terms may vary, the
letters "'B" and "R" stand for the blue
and redcolor component signal
connectors and "Y" indicates the
luminance signal. Refer to your DVD
or digital accessory Owner's Manual
for definitions and connection details.
36
J
Zohe
Audio/Video
Output jacks
n the 7"11can be used to
PICTURE AND SOUND BEING
RECORDED ON VCR.
record TV programs on VCRs
which have Audio/Video
Input
jacks.
BACK OF TV
To record TV prograrns by using
the Audio/Video
jacks on the TV:
<_
Connect the VIDEO OUT jack
on
thethe
VCR.
from
TV to the VIDEO IN jack
"_
VIDEO OUT
(YELLOW)
OUT
(RED/
Connect the AUDIO OUT
jacks R(ight) and L(efl) from the
TV to the AUDIO IN jacks on the
*_
AUDIONIDEO
INPUT
JACKS ON VCR
VCR.
<_
Select the "ANTENNA A"
PICTURE SOURCE control on
the "IV.
With the FEATURES MENU on
screen, move the RED highlight
with the MENU (M)4_ buttons.
Then press the MENU button.
VCR
Select the channel on the TV that
you want to record.
_Turn
the VCR ON. Put a
cassette tape in the unit and place
the VCR in the RECORD mode.
®
Remember, If the VCR
ahas an INPUT SELECTOR
switch, place it in the LINE or
CAMERA position.
Unattended Timer Recordings
with a VCR are possible, but not
recommended with this
connection since the TV must be
left ON for the VCR to record.
37
WHITE)
Wnth
Smart Picture you can set a
umber of video and audio
controls to your own personal
preference.
Once the individual
controls have been adjusted to the
levels you desire, use the list of Smart
Picture feature category titles to
quickly reselect these "personalized"
settings contained within the memory
of the TV. (See the next page for
more details on the labeling options
and use of Smart Picture.)
Press the SMART button on the
remote.
Press the MENU (M) button to select
I the Smart Picture feature
I (highlighted in RED).
<_
Press the MENU AV buttons to
highlight the category list for Smart
Picture. Press the MENU button to
<_
I select (v') the desired title.
Press the MENU(M) _) buttons
to choose any of the individual
controls you wish to adjust for the
Smart Picture selected title. Then
press the Menu (M) button to select
the highlighted control.
_
lth'ess the Menu
(M) _
to adjust the selected
@Press
the STATUS
buttons
control.
button on the
have finished with all of your Smart
Picture feature control adjustments.
I remote
0
to clear the screen after you
CUSTOM
L_
ARTOONSS_N1NGS
FACTORY
_to muEm
W
l_allowing
your initial setup
djustments (see previous page),
just select the desired Smart Picture
category in order to place the TV to
the personalized set of audio and
video control settings for that title.
_
Pr'ess the SMART button on the
I m;tLs
tbe
MENU
botton
to
select the SMART PICTURE control
feature.
<_
Press the MENU (M) _ILV
buttons with the list of "SMART
PICTURE" categories on the TV
screen to highlight the desired
category. Then press the Menu (M)
button to select the audio and video
control settings for that particular
title.
<_
Prtss the STATUS button on the
remote to clear the screen.
O
__
Tche
"CHANGE LABEL" control
an be used to change the title of
a SMARTPICTURE setting into a
name or label that may be easier for
you to remember.
<_
With the SMART PICTURE
"CHANGE LABEL" control on the
screen, press the MENU &V
buttons to spell out a new label or
title for the selected SMART
PICTURE category.
<_
Pros
the MENU _1 • buttons
to move the red highlight to each
letter space.
_
Pt-_s the STATUS button to clear
finished.
the screen when the new label is
39
•
L
re you tired of the sound of
_commercials following you
throughout the house? Smart Sound
allows you to preset a desired
volume level that the TV sound will
not go above. This makes for an
even, more consistent sound by
reducing the "peaks" and "valleys"
that can occur during commercials.
<_
Press the Smart button on the
[ remote.
<_
With the SMART Menu on
screen, move the RED highlight
with the Menu _
buttons. Then
press the MENU (M) button to
select the highlighted Smart Sound
control.
<_
Press the Menu • or • and
then the Menu (M) button to turn
the Smart Sound control ON (or
OFF.)
_
Press the STATUS button to
clear the screen when completed.
0
Remember, Smart Sound
! works for sound levels
coming from either the
Antenna/Cable input on the rear of
the TV (RF audio); or the
Auxiliary (VCR/AUX IN) audio
inputs.
When using a Cable Converter
Box with the Smart Sound Control
ON, the TV's volume level may
take up to ten seconds to gradually
increase to normal listening levels
! (when the "lV'-s first turned on).
This is considered NORMAL with
various Cable Converter Box use.
40
l
"list" or series of previously
selected
To Use 2Channel Surf:
with the SURF button on your remote
control With this feature you can
easily switch between different 73/
programs that currently interest you.
The Smart Surf control allows you to
set up to 10 channels in its quick
viewing "list ".
_
With the 2-Channel
Surf control ON,
select the two desired
channels for viewing
with the number
buttons on the remote
!control. Then press the
SURF button on the
Press the Smart button on the
remote to "toggle"
between the two
selected channels.
remote.
With the SMART Menu on
@_
<_
2 CHANNEL
SURF- Current and
screen, move theRED highlight with
the Menu (M) 4_ buttons. Press the
MENU button to select the
one previous channel in the ring•
highlighted Smart Surf control.
the ring. Note: Tbu Channel
SMART SURF - Current and up to
nine additional chanpels available in
Surf
ring can be used with fewer than ten
channels.
Press the Menu • or V, then the
Menu (M) button to select either
Smart Surf or 2-Channel Surf. (See
explanation of Surf options with the
illustration on this page.)
In this way, the number of
Surf channais
can match or fit your
present viewing interests.
Press STATUS button on the
remote control to clear the screen.
O
<_
With the Smart Surf control
ON (see above), select a desired
channel for viewing. You can use
the number buttons on the remote (or
the Channel AV buttons).
Note: To Delete a channel from
the Surf list justpressthe SURF
button to select _'_ desired
channel. _
press the Menu
button and the channel will be
Press the SURF button on the
remote. (Some channel numbers
may already appear within the Surf
channel list.)
immediately dropped from the
on-scr_.n Surf list.
1
SUI_F
--_ _
_,O_¸_
i
/
Press the Menu button to "ADD"
the selected channel to the Surf list.
Select the next desired channel and
ll
repeat steps 2 and 3. Continue until
all desired channels are on the Surf
list.
)Press
the SURF button on the
remote to quickly review current
action on channels contained within
the Surf list.
O
41
",
your
remote control is set to
or/: your TV and many
infrared remote (IR) control
VCRs, Cable TV Converter
Boxes, DVD players, Home
Satellite receivers, etc.
However, an easy one-time step
may be necessary before the
remote will work with your
accessory, device.
TV REMOTE
VCR/ACCESSORY
SYSTEM BU'I_ONS
To begin, try this initial check to
see if going on to the following
section is necessary.
<_
VCR
Press the VCR or
ACC(essory) System button on
the TV remote for the desired
accessory device category.
Note: The ACC(essory) system
button contains product codes
for Cable TV Converters, DVD
players, and Satellite receivers.
<_
Point the TV remote toward
I press
the desired
the POWER
accessory
button.
device and
SATELLITE
RECEIVER
_Does
the remote turn the
accessory device ON?
IF YES, • and try other
function buttons on the TV
remote. If they also work the
accessory device, then the
remote is ready and no further
steps are needed.
CABLE CONVERTER
If NO, continue...
x%-<_
First look up a THREE-DIGIT
remote code number for your
brand of Accessory Device before
going through the simple Direct
Access Method steps shown on
the following page.
Find your Three Digit Code
Number on pages 45-46.
42
J
gth
w that you have looked up
e three-digit Remote
Code Number for your brand of
accessory device (see page 4546), you are ready to follow the
simple steps shown below.
Please read through all the
steps before beginning.
Press and release the REC
I
(RECORD) button.
Within three seconds after
and release the correct VCR
I
_
releasing
or
ACC(essory)
the RECSystem
button, button.
press
Within thirty seconds after
releasing the VCR or ACC
System button, ENTER THE
THREE DIGIT CODE
NUMBER for the desired
device. The remote is now ready
to send commands to the
accessory.
<_
Point the remote at the
accessory device. Press the
POWER button on the remote to
turn the device ON.
O
Remember, if this does
not work the first time,
repeat steps using the same remote
code number.
If after a second try the remote
does not operate your accessory
device, and there are more code
numbers listed for your brand, use
the next listed code number.
If after repeated attempts the code
number method does not work
Four accessory device, try the
"SEARCH METHOD" shown on
the following page.
CON/O_FN
_ [] SW_[] rREtZl
}
PlI=_
azt J
!
your
TV remote can be set to
ork various accessory
devices (VCRs, Cable Converters,
Satellite Receivers) by what is
called the SEARCH method.
Note: The Search Method only
works with devices equipped with
Channel Display IndicatOrs or
capability. If the "Direct Access"
code number method (shown in
SATELLITE
CABLE TV
CONVERTER
091
the previous section) did not set
your remote to work your
accessory device, then follow the
easy steps listed below.
<_
RECEIVER
Turn ON the desired device.
Six Feet
systemthe
button
on the
remote.
I Press
correct
VCR
or ACC
(minimum)
_>
<_
Stand at least six feet away
from the front of the accessory
device. Point the remote toward
the unit. HOLD DOWN the
SURF and the desired System
(VCR or ACC) buttons at the
same time. KEEP HOLDING
BLrvI'ONS DOWN.
Watch the Channel Indicator
on the unit. Channel Numbers will
SCAN UP when the unit has been
identified. This may take up to
two minutes.
.np_
Release the SURF and System
(VCR or ACC) buttons as soon
as chianti numbers start to scan
up. The code has been identified
and the remote is ready to operate
with the accessory device.
Remember, a minute or two
can seem very long, but the
code should be located within two
minutes.
Don't let the accessory device scan up
more than five channels. The remote
may pass up the right code and another
two minute search cycle will have to
be repeated.
If no channelchange happens within
two minutes, repeat steps 1-4. Should
a channel change still not OCCur,the
remote will not work with the desired
unit,
azt
m
VCR BRAND REMOTE CODE NO.
_.ction .......................
317
Admiral ......................
048
Advantz ......................
356
Adventura ....................
000
Aiko .........................
278
Aiwa .........
406, 307, 468, 000, 037
Akai ..... 106, 053, 041,049, 061, 156,
.........................
242, 315
American High .................
035
Asha .........................
240
Audiovox .....................
037
Beaumark .....................
240
Bell & Howell .................
104
Broksonic .... 121,184, 002. 209, 211+
.....................
295, 361,479
CCE .....................
072, 278
Calix .........................
037
Canon ....................
167, 035
Capehart ..................
020, 554
Carver .......................
081
Cineral .......................
278
Citizen ...................
278,037
Colt .........................
072
Craig ........
037,072, 047, 240, 271
Curtis Mathes ......
035, 041,060, 162
Cybemex .................
051,240
Daewoo ......
278, 561,020, 554, 017,
.........................
045,087
Daytron ..................
020, 554
Denon ........................
042
Dynatech .....................
000
Electrohome
..................
037
Electrophonic ..................
037
Emerex .......................
032
Emerson ..... 184, 002, 209, 278, 036,
121,211,208, 294, 479, 561,061,088,
.212, 000, 037, 043,068, 295, 361,510
Fisher ............
047, 104, 054,066
Fuji ......................
033,035
Fujitsu .......................
000
Funai ........................
000
GE ......
035, 060, 048, 065, 202, 240
Garrard .......................
000
Go Video ..... 279, 432, 526, 350, 232
GoldStar ......
037,018, 038, 471,480
Gradiente .............
008,000, 408
Grundig ......................
195
HI-Q .........................
047
Harley Davidson ...............
000
Ham_an/Kardon ........
038, 075, 081
Harwood .................
068, 072
Headquarter ...................
046
Hitachi .......
042, 166, 105, 065, 292,
.................
000, 041,082, 235
JVC ..... 067, 008, 206, 207, 041,384
Jensen ........................
04-1
--
VCR BRAND REMOTE CODE NO.
KEC .....................
037, 278
KLH .........................
072
Kenwood .........
041,067, 384, 038
Kodak ....................
035, 037
LXI ..........................
037
Lloyd's ...................
000, 208
Logik ........................
072
MEI .........................
035
MGA ................
043, 061,240
MGN Technology ..............
240
MTC .....................
000, 240
Magnasonic ...................
278
Magnavox .... 035, 081,000, 039, 149
Magnin .......................
240
Marantz ..................
081,035
Marta ........................
037
Matsushita ................
035, 162
Memorex ..... 104, 047,000, 037, 048,
..... 035, 046, 240, 307, 039, 162, 299
Minolta ...................
105,042
Mitsubishi .... 043, 173,061,075, 214,
.................
242, 048, 067, 443
Motorola .................
035, 048
Multitech .................
000, 072
NAD .....................
058, 104
NEC .038,040, 041,050, 067, 082, 104
Nikko ........................
037
Nikon ....................
034, 253
Noblex .......................
240
Olympus .................
035, 226
Optimus . 048, 058, 037, 104, 162,432
Optonica .....................
062
Orion ............
479, 002, 184, 295
Panasonic ..... 035,226, 077, 162, 378,
.......................
225, 227, 246
Penney ......
035, 240, 037, 042, 038,
.........................
040, 054
Pentax ...............
042, 065, 105
Philco ................
035, 209, 479
Philips ...........
081,035, 062, 403
Pilot .........................
037
Pioneer ...............
058, 168, 067
Portland ..................
020, 554
Profitronic ....................
240
Proscan ...................
060, 202
Protec ........................
072
Pulsar ...................
039, 051
Quarter .......................
046
Quartz ...................
046, 155
Quasar ...............
035, 162, 077
RCA ........
060, 149, 202, 042, 105,
..... 035,048,065,
077, 106, 240, 277
Radio Shack ...................
000
Radix ........................
037
Randex .......................
037
VCR BRAND REMOTE CODE NO._
Realistic ..... 000, 104, 047, 048, 037,
.................
035, 062, 046, 066
Ricoh ....................
034, 253
Runco ........................
039
STS .........................
042
Salora ........................
075
Samsung ..........
045, 051,053, 240
Sanky ....................
039, 048
Sansui .... 041,479, 000, 067, 082, 271
Sanyo ............
047, 046, 104. 240
Scott .184, 211,121,043, 045, 210, 212
Sears ........
054, 105, 037, 042,000,
.........
035, 046, 047, 057, 066, 104
Setup ........................
045
Sharp ....................
048. 062
Shintom ......................
072
Shogun ...................
051,240
Singer ........................
072
Sony .033, 034, 032, 253, 000, 011,035
Sunpak .......................
253
Sylvania ..........
035, 081,000, 043
Symphonic ....................
000
TMK ................
036, 208, 240
Tandy ...................
000, 104
Tatung .......................
041
Teac .....................
000, 041
Technics ..............
035, 162, 246
Teknika ..........
000, 035, 037, 052
Thomas ......................
000
Toshiba ......
045,057, 210, 212, 043,
.........................
066, 366
Totevision ................
037, 240
Unitech .......................
240
Vector .......................
045
Vector Research ............
038, 040
Video Concepts .... 040, 045,061,221
Videosonic ....................
240
Wards ...035,060,
062, 000, 047, 212,
.........
240, 042, 048,072, 081,149
White Westinghouse ............
278
XR-1000 .............
072,000, 035
Yamaha ......................
038
Zenith ............
039,000, 033, 034
_,il+mlaln|lll[lillllniLllll+_lli_+_v.._
"h
" ,-,_-.__
J
ABC
V
TER
003, 001,007,
....
T
008, 011,013,
. ...............
014,017,
ABC Cable ....................
047, 206
033
Allegro ...................
Antronix
..................
153, 315
022, 207
_rcher
.......
022, 039,
BBT .........................
Belcor ........................
153, 207, 797
267
056
Bell & Howell
.................
Cable Star .....................
Cabletenna
....................
014
056
022
Cableview
_ .
....................
022
Century
......................
Citizen ...................
Colour Voice ..............
153
153, 315
025, 031
Comband
.................
Comtec .......................
232, 233
274
Comtronics
................
Contec
.......................
040, 060
019
Digi .........................
Eastern ...................
Electricord
....................
Emerson
.....................
637
002, 274
078
797
Everquest
.................
Focus ........................
GC Electronics
.............
GE ......................
GMI
........................
Garrard .......................
015, 040
400
056, 207
232, 233
057
153
Gemini
General
...........
Instrument
015,057,
070, 242
.276, 476, 011,810
GoldStar ..................
Goodmind
....................
040,
Hamlin
Hitachi
206, 273
011
...020,
009, 259,034,
.......................
144
797
Hytex ........................
007
Jasco .................
015, 153, 315
Jerrold .......
003, 012, 276, 014, 01 l,
.........
024, 476, 015,047,
098, 810
Linsay
Macom
.......................
.......................
Magnavox
................
027,
Memorex
.....................
Movie Time .......
063,078,
156,
NSC .............
156, 063,070,
Northeoast
....................
440
033
334
000
203
203
314
Novaplex
.....................
618
Oak .................
019, 007,248
Optimus
......................
021
Panasonic
.............
021,107,000
Panther .......................
637
Paragon
......................
000
Philips .......
025, 030, 031,242,
290,
.........
027, 028,029,
153, 334, 652
Pioneer ............
44, 023, 260, 533
Popular Mechanics
..............
400
AB
V R ER REMOTE CODE NO.
Prelude .......................
770
Pulsar ........................
000
Quasar .......................
000
RCA .........................
021
RK ..........................
304
Radio Shack .......
015, 315, 797, 883
Realistic ......................
207
Recoton ......................
400
Regal ............
273,279,
Regency ......................
Rembrandt ................
Runco ........................
SL Marx ......................
Samsung ..................
Scientific Atlanta ...008, 017,
Seam ........................
020, 259
002
011,070
000
040
040, 144
006, 477
510
Signal ...................
015,
Signature .....................
Sprucer ...................
307,
Standard Components ...........
StarSight .................
542,
Starcom ..........
003, 015,047,
Stargate ..........
040, 015, 770,
Starquest .....................
Sylvania ......................
TFC .........................
TV86 ........................
040
011
021
096
422
098
797
015
001
310
063
Tandy ........................
Tatung .......................
Teknika ......................
258
097
146
TeleCaption ...................
221
Teleview .....................
040
Texscan ..................
096, 001
Timeless ..................
274, 418
Tocom ...............
012, 013, 059
Toshiba ......................
000
Tusa .........................
015
Uniden .......................
225
Unika ................
153, 207, 022
United Artists ..................
007
Universal ..... 207,022, 039, 056, 077,
.................
078, 153, 191,322
Videoway .....................
250
Vidtech .......................
244
Viewstar ..... 258, 027, 060, 063, 11 I,
.........................
211,289
Zenith ................
000, 525, 054
Zentek .......................
400
_AT_;LLJTE RECEIVER
AlphaStar
.....................
Echostar
......................
Expressvu .....................
General Instrument
.....
HTS .........................
Hitachi .......................
Hughes Network Systems
JVC .........................
Jerrold
...................
772
775
........
Magnavox
................
Memorex
.....................
Next Level ....................
Panasonic
775
627
775
819
361,869,
749
775
36 l, 627
722, 724
724
869
.....................
Philips
...............
Primestar
.................
RCA .................
701
200, 722, 724
627, 36 I
566, 143, 855
Sony .........................
Star Choice ....................
Toshiba
......................
Uniden ...................
Zenith ........................
DVDBRAND
RE O ECO
Harman/Kardon ................
JVC .........................
Kenwood .....................
Magnavox ....................
Mitsubishi ....................
Onkyo .......................
Panasonic
................
Philips ...................
Pioneer ...................
Proscan .......................
RCA .........................
Samsung ......................
Sony .........................
Technics ......................
Toshiba ......................
Yamaha ..................
Zenith ...................
639
869
790
724, 722
856
EN .
818
814
807
800,
802,
805,
800,
822,
802
803
802
801
808
815
804
804
816
806
800
802
813
802
J
Wwen
using the TV remote
ith a VCR, first make
certain it is set to control your
VCR ( by the REMOTE CODE or
SEARCH method - see earlier
sections).
<_
Press the VCR System
button
<_
on the remote.
•Play Button
Point the top of the remote
(remote sensor window)
pressing buttons.
I toward
Press to playback a tape. Hold down
after pressing the RECORD button to
start a recording.
when
@
Button
the front of the VCR
Press to stop the tape.
•Fast Forward
Record Button
Hold the RECORD button down, and
then press the PLAY button to begin
a VCR recording.
Press to rapidly advance the tape. For
some VCRs you may need to press
STOP first then FT. In Playback
mode hold button down to view the
dctare moving rapidly in the forward
direction.
0
Rewind Button
Button
Press to rewindtapes. For some
(ON/OFFm POS[] SWAP[] FREEZE
)
VCRs you may need to press STOP
button first then REWIND, In
playback mode, hold button down to
view picture moving rapidly in
PlP_
•Channel Scan Buttons
I
Press to scan up or down through
VCR channel numbers.
reverse.
Number Buttons
Pause Button
Press to temporarily stop the tape during a playback, or recording. Press
again to release Pause.
TV-VCR
Button
Press to the VCR position ("VCR"
indicator on the VCR will light) to
view the playback of a tape. Press
again to place in the TV position
("VCR" indicator on the VCR will go
OFF) to view one program while
recording another program.
When used with the TV the TV/VCR
button works as a source button. Each
press cycles the TV between the
AUX(iliary) Input modes, ANT A/B
inputs, and the the last view channel.
It is a quick one-button way to select
these channels and modes (without
directly entering the TV's Menu
system.)
Press buttons for direct VCR channel
selections.
VCR System Button
/
Press to send remote commands to
I
the VCR.
Power Button
Press to tom the VCR ON and OFT.
Remember, the VCR
It buttons on the remote will
not operate your VCR if those
features are not already found on
your VCR remote control.
Note: All VCR functions
k.
j
47
(particularly Search, Rewind, Fast
Forward, etc.) will operate the
same as with the original VCR
remote control provided with the
VCR.
picture-in-Picture
(PIP) is the
showing of two pictures on the
TV screen at the same time. (One
main screen picture and one small
inset picture - or PIP). For your
ease and convenience
this TV has
two separate inputs (ANTenna A
and ANTenna B) for your home's
Antenna and/or Cable TV system
signal
The ANT A input is primarily for
the TV's main screen picture.
- PIP WINDOW
Display signal supplied
primarily through
A Input
on rear I ANT
- MAIN
SCREEN
_¢TV.
-
Disp/ay signal supplied
pn rna_51ythrough ANT
B Input on rear of TV
The ANT B input is provided as a
second, dedicated source option
for the TV's PIP "window" and
its feature operations,
The signal
connected to the ANT B input can
be either a Split Signal Input (as
described in the section on this
page), or another type of external
signal source (such as a satellite
dish system, additional
home
antenna,
video accessory,
Combimatlon
300 to 75_ Adapter
483521827003)
I
Antenna
\\\\ \\ n///
BACK OF TV
win Lead
Wire
- Outdoor or l_daor Antenna receives normal broadcast channels
2-13 (VHF) and 14-69 (UHFI,
etc.).
See the following steps on how
channels connected to the
VIIF/UHF
Round Cab_
7SD Ohm
ANT( enna) B Input can be shown
and used within the PIP window:
ANT(enna)
input
<_
Connect your Antenna or
Cable TV signal to the single 75
! ohm INPUT plug on a two-way
I Signal Splitter (not supplied),
OPTIONAL TWO-WAY
SIGNAL SPLI'rFER
Connect two lengths of RF
Coaxial Cable (F-type connectors
on both ends) to the two OUTPUT
plugs on the two-way Signal
Splitter.
<_
A
(single 75ohm Input to twin 75 ohm Outpuls -
optionalRF Coaxial connecting cables also
re.qthred)
For other possible
window through the use of the ANT B input.
75g) Ohm
PIP
connections see page 53 for
the "More PIP Connections"
section.
If you need any accessories or
parts to complete the described
PIP connections, contact your
dealer, or our Parts Information
Center at (1-800-851-8885) for
details.
NOte: The put]pose of the ANT n input is to
provide an easily connected, dedicated picture
source
PIPasfeature
use. Other.signal
options for
(such
a satellite
dish system, source
additional
external antenna, VCR, or Video Game) could also
be connected and displayed ot_the TV's PIP screen
Connect the twin OUTPUT
plugs on the Signal Splitter to the
ANT A and ANT B Inputs on the
rear of the TV.
continue to next page
ANT(erma) a
input
Cable "IV
Company
See the Set-Up Guide also provided with
your "IV set for further Cable "IV connection
'options and accessories.
_TOW thatyou have completed
I ¥ the required connections on
the previous page you are ready to
follow the simple steps shown
below.
<_
- MAIN SCREEN -
- PIP WINDOW
-
Turn the TV ON.
Place the TV's PIP SOURCE
SELECT control to "ANT B"• With FEATURES MENU (4
of 5) on screen, move the RED
highlight with the MENU (M)
<gk buttons. Then press the
MENU button.
>1P SOURCE SELECT SET TO "ANT B"
Press the MENU AY and
MENU (M) buttons to
highlight and select the
ANT B" (t,,_) item.
Also place the TV's Main
screen PICTURE SOURCE
SELECT control to "ANT A"See the Picture Source option
FEATURES MENU (1 of 5).
Press the STATUS button to
clear the screen when the above
Menu items have been set.
_
Press the PIP ON/OFF button
on the remote.
The PIP window should show in
one of the corners of the TV
MAIN PICTURE SOURCE SELECT SET
TO "ANT A"
BLACK frame around the PIP window appears
when the ANT A Input is on the Main screen.
WHITE frame around the PIP window appears
B Input is on the Main screen.
screen.
_
Press the SWAP (or _
)
buttons on the remote to move the
ANT B and ANT A Input pictures
between the PIP window and
Main screen.
Use the Channel Number or CH
Ay buttons to select desired
programs for viewing. Program
Sound occurs with the channels
displayed on the Main screen.
Remember, if you see the
liisame picture on the main
screen and in the PIP window,
check to be sure the TV's PIP
Source Select and Main screen
Picture Source select are set for
ANT B and ANT A respectively.
See the following page on how to
operate other PIP features with the
TV's remote control.
t_i"hOl_
PIP is CH 8 from ANT B input
then
with CHAY or
Number buttons
NOTE: Sound for TV programs
displayed in the PIP window can also
be heard through the use of PIP
AUDIO OUT jacks on the rear of the
TV. Just connect the TV's Left/Right
PIP AUDIO OUTPUTs to the correct
AUX(iliary) Inputs on an external
stereo sound system (through which
the PIP audio will be played).
i
'i_1
;_
i__
i
MainisSemen
PIP
CH 5 from
showsANT
CH A8 input.
from ANT B inpuL
"
REA_
OUTPUT will
he monaural
PIP
AUDIO
(mono) when
__
"_oth
Ar¢'rA _d
ANT a are being
usedfor normal
pip nperation.
See page 31 fo¢
6etails on other
stereo
jacks.
49
sound
ses for the PIP
Audio Output
m
By
using the PIP buttons on the
remote the PIP picture can be
moved and swapped with the main
screen. The main screen picture
can also be frozen in the PIP
window.
<_
Remember,
t
if the TV's Main
screen picture is
being supplied by
an AUX VIDEO
connected VCR (or
other external
accessory source);
and then both the
TV and VCR are
turned OFF, a blank
screen will appear
when the TV is
turned back ON
Press the PIP ON/OFF button
to show the PIP picture.
PIP appears in a comer of TV
screen. Press PIP ON/OFF again to
remove PIP from the main screen.
<_
Press the PIP POSITION
button to move the PIP picture
(from corner-to-corner on the TV
I. PIP ON I OFt e
again.
If this happens, just
press the CH(annel)
• or • buttons to
select a TV station
screen.)
This feature allows you to move
PIP and avoid blocking off any
main screen action.
<_
2. PIP POSITION
for normal viewing.
With PIP on the TV screen,
3
PIP SWAP
press the SWAP button to swap
the main screen picture with the
PIP picture. See "Smart Help"
note on this page.
@Press
FREEZE to hold the
current MAIN screen picture in
the PIP window (Main picture is
still active).
4. PIP P'REEZE
If PIP is currently OFF, the PIP
window will automatically appear.
Press FRZ repeatedly to update
the frozen PIP with current
pictures from the Main screen.
5. PIP SIZE(Large
You cannot reposition a frozen
PIP picture.
Press the PIP ON/OFF button to
drop the frozen PIP picture from
the screen.
< i_
Press the PIP SIZE button to
change the size of the PIP window
shown on the TV screen.
Press the PIP SIZE button again to
see and compare the large and
small size PIP windows.
You cannot change the size of a
frozen PIP picture,
O
50
or Small)
Tehe
picture for the PIP window
an come through either the
ANT(enna) A / B Inputs or the A UX
Inputs (on the rear and side
of the 73/). PIP Picture Source
simply tells the TV which one of
sources it is to show in the
PIP window.
;, Select PIP SOURCE
REATURe MENU
MAIN
MENU
_
_:
control.
With FEATURES MENU (4 of 5)
on screen, move the RI_=Dhighlight
with the MENU (M)4_ buttons.
FF.ATtdREMENU
Then press the MENU button.
<_
Press the MENU AT and
MENU (M) buttons to highlight
and select the desired (t,j) PIP
Picture Source.
ANT A or B- for a picture signal
coming from either the ANT(enna)
A or B Input plug on the TV.
Note: The remote control's
button can also be used to quickly
swap between the picture sources
for the TV's Main screen and the
PIP window.
I=_.ATUREMENu
AUX 1 VIDEO - for a picture
signal coming from the AUX 1
VIDEO IN jack on the rear of the
TV.
AUX 2 VIDEO- for a picture
signal coming from the AUX 2
VIDEO IN jack on the rear of the
TV.
FEATUR_ MENU
SIDE VIDEO- for a picture signal
coming from the SIDE VIDEO
Input jack on the right side of the
"IV cabinet.
<_
,t,i
,t,
Press the STATUS button to
clear the screen.
0
40_e 51
PIp _LI_CE
Remember, the PIP
! window will be blank unless
I:lz
a signal is connected to the
selected PIP Picture Source (ANT
B, AUX VIDEO, SIDE VIDEO,
etc.) on the set.
_1
AUX 1 'vlOEO
AUX 2
If you see the same picture on the
main screen and in the PIP
window, you may have the Main
Screen and PIP window set to the
same video input source.
51
l
The
Picture-ln-Picture(PIP)
J. Color and Tint controls are
used to make fine tune adjustments
to the color settings for PIP (when
it is shown on the TV screen).
<_
Select PIP COLOR
FEATURE MENU
(or PIP
TINT) control.
With FEATURES MENU (5 of5)
FEA'/_JRE MENU
on screen, move the RED highlight
with the MENU (M)_I' buttons.
Then press the MENU button.
_
Press the MENU akV buttons
to move the RED highlight. Press
the MENU button to turn (t,,") the
PIP COLOR or TINT control ON.
The PIP automatically comes on to
show the PIP window on the TV
screen.
<_
<_
Press the (+) and (-) buttons to
adjust the PIP for Color (or Tint)
levels you prefer.
Press the STATUS
clear the screen.
button
to
O
FEATURE MENU
Remember. Although
[ there are separate COLOR
and TINT controls for PIP, the
adjustment levels for these
controls depend on the TV's main
picture. For example: If the main
screen is showing a black and
white picture, PIP would also be
in black and white (even though
its source is in color).
52
_ae
fOllowing example is for an
lternative PIP connection
hookup using an external Cable
Converter Box and a VCR (as the
picture source for the PIP
window).
First use an optional signal
splitter and connect the original
cable TV signal to both the
CABLE IN on the Cable Convener
Remember
to use the Cable TV
Converter Box to
select channels for
PIP, the VCR must
be set to the same
channel as the
channel selection
switch on the rear of
the Cable Converter
(either channel 3 or
4).
REAROFTV
and the ANTENNA A plug on the
rear of the TV.
Connect the CABLE OUT on
the Converter to the ANT. IN on
the VCR.
Connect the VIDEO OUT jack
on the VCR to the VIDEO IN
jack on the TV.
Main screen picture, and the AUX l VIDEO Input
¢onnectioll from the VCR f_xvcs as the picture
source for PIP. Be sure to set the TV_s PiP
SOURCE SELECT con_ol to the "AUX l
TVIDEO"
be ANTENNA
signalto input
the TV's
mode i_ Aorder
displaysupplies
the Audio/Video
Input signals within the PIP window.
Also connect the AUDIO OUT (R
and L) jacks from the VCR to the
AUDIO IN jacks on the TV.
O
AUDIO VIDEO CABLES
(RCA Plug Cabl_
- optional)
m
Contact the Pans Information
Center I 8_0 851-8885
to orde_ any optional accessccies
VCR
CABLE TVCONVERTER
53
1
Zoffehe on screen HELP menu
rs both Operating Tips and
a list of Glossary definitions for
different features on your TV.
These items are given to provide
you with more information
and
details on a select group of feature
operations.
HELP MENU ,
•
Select
"HELP"
_
,
I
,
on the TV's
Main Menu.
highlighted
<_
t
Of"IVFear.ures
Press the remote's
Menu 4_
I buttons to move UP/DOWN
and
from SIDE-TO-SIDE
within the
! list of on-screen features.
Press MENU
f
-_ 0PERATIONGTIPS_ For Problems
(M) to select
"HELP"
Press the MENU
mm
the
item.
OPERATING
&'_' and then
the MENU (M) buttons
either the OPERATING
GLOSSARY
item.
TIPS
UStNG (_PERAT_NG TIPS
to select
TIPS or
• Use r.he •
and • keys on
your remoto to scro_
through l_e different
help items,
• Use the "M" key on
your rerno_e will go back
to the help menu.
FOLLOW THE ON SCREEN
DIRECTIONS TO VIEW
OPERATING TIPS
I
54
m
please
make these simple
checks before calling for
service.
These tips can save you
time and money since charges for
TV installation and adjustment
customer controls are not
covered
under your
of
CAUTION: A video source (such as a video game, Compact Disc Interactive - CDI, or
TV information channel) which shows a constant non-moving pattern on the TV screen,
can cause picture tube damage. When your TV is continuously used with such a source
the pattern of the non-moving portion of the game (CDI, etc.) could leave an image
permanently on the picture tube. When not in use, turn the video source OFF. Regularly
alternate the use of such video sources with normal TV viewing•
warranty.
No Power
No Picture
and push
button
i Check
thePOWER
TV power
cord.again•
Unplug the TV, wait 1 minute, then reinsert plug into outlet
Check to be sure outlet is not on a wall switch•
I
Check antenna connections on the rear of the TV. Are they properly secured to the
antenna plug on the TV?
Check the CABLE TUNING control for correct position.
Check PICTURE SOURCE control for correct position ANT A or B; AUX 1/2
VIDEO; AUX Y PB PR; or SIDE VIDEO position without a signal source will result in
a blank screen.
Check the CLOSED CAPTIONS control. Some TEXT modes could block the screen.
No Sound
I
the TV
SPEAKER
NORMAL/OFF
sound
control
for the correct position.
i Check
Check the
VOLUME
and MUTE
buttons on
the TV
and remote•
|
If attempting auxiliary equipment hook-ups, check audio jack connections and that the
auxiliary equipment is on and in the proper operating modes.
Remote Does Not
Work
TV Displays Wrong
Channel or No
Channels Above 13
button to send commands to the TV; VC.......RR
System to sent to VCR; etc.
Check batteries. Replace with AA Heavy Duty (Zinc Chloride) or Alkaline batteries
i if heck
VCR-ACC-TV "System" buttons on the remote. Press the remote's TV System
necessary.
Clean the remote and the remote sensor window on the "IV.
Repeat channel selection.
Add desired channel numbers (ADD/DELETE CHANNELS control) into TV memory.
Check CABLE TUNING control for correct position•
This TV is equipped with protective circuitry that shuts the TV off in case of moderate power surges. Should this occur turn the
TV back on by pressing the POWER button once or twice, or unplug and then replug the power cord at the AC outlet.
This feature is NOT designed to prevent damage due to high power surges such as those caused by lightning, which is not covered
IbYyour warranty.
Cleanin_ and Care
• To avoid possible shock hazard be sure the TV is unplugged from the electrical outlet before cleaning•
• When cleaning the TV screen take care not to scratch or damage the screen surface (avoid wearing jewelry or using
anything abrasive- do not use household cleaners). Wipe the front screen with a clean cloth dampened with water. Use
even, easy, vertical strokes when cleaning•
• Specially designed screen cleaning kits are also available which contain anti-static cleaners and cloths designed to get
into the ridges of the TV screen• If interested, ask your dealer about an optional Projection TV Screen Cleaning Kit or
call our toll-free Accessory Parts ordering number 1-800-851-8885.
• Gently wipe the cabinet surfaces with a clean cloth or sponge dampened in a solution of cool clear water and a mild soap
or detergent. Use a clean dry cloth to dry the wiped surfaces.
• Occasionally vacuum the ventilation holes or slots in the cabinet back.
• Never use thinners, insecticide sprays, or other chemicals on or near the cabinet, as they might cause permanent marring
of the cabinet finish•
55
I
Audio/Video
Inputs * Located on the rear of the TV these
connectors (RCA phono type plug) are used for the input of audio
and video signals. Designed for use with VCRs (or other
accessories)
in order to receive higher picture resolution
and offer
sound connection
options.
PTV * Projection Television (Rear and/or Front projection design
systems are available.)
Remote Sensor Window * A window or opening found on the TV
control panel through which infrared remote control command
signals are received.
Coaxial Cable * A single solid antenna wire normally matched
with a metal plug (F-type) end connector that screws (or pushes)
directly onto a 75 Ohm input found on the Television or VCR.
RF * Radio Frequency or modulated signal design used as the
carrier for television broadcasts.
Display * An on screen message or graphics that help the user
operate and adjust TV feature controls. See On Screen Displays
(OSD).
Second Audio Program (SAP) * Another or additional audio
channel provided for in the Multichannel
Television
Sound (MTS)
broadcast standard. A monaural soundtrack included within the
recorded
translation
Identify*
Method by which a remote control searches and finds an
operating code for another product (such as a VCR or Cable
Converter).
Once the code has been "identified"
then the TV
remote can operate and send commands
or video signal qusually containing
for the di_pla)cd
a second
language
programming.)
Status * Allows the u_cr to quickly confirm what channel number
is currently being _ie_cd Status can also be used to clear the TV
of on-screen displa.x, _,r information (rather than waiting for the
displays to "time out or automatically disappear from the screen).
to the other product.
LED * Light Emitting Diode or indicator.
Menu * An on-screen listing of feature controls shown on the TV
screen that are made available for user adjustments.
Subwoofer
* A slx'akcr
Multichannel Television Sound (MTS) * The broadcast standard
that allows for stereo sound to be transmitted with the TV picture.
S-Video Input *AIIo_, direct connection ofhigh-resolution video
sources, such as a Super VHS videocassetterecorder,
LaserDisc
player, etc. Providc_mproved
picture resolution, sharpness, and
clarity.
lowest-frequency
On Screen Displays (OSD) * Refers to the wording or messages
generated by the TV to help the user with specific feature controls
(color adjustment,
programming,
etc.).
note,
designed
(under
for audio playback
of only the
1O0 Hz.)
Twin Lead Wire * Tbe more commonly used name for the two
strand 300 Ohm amcnna x_ire used with many indoor and outdoor
antenna systems. In man_ cases this type of antenna wire requires
an additional
adapter _or balun) in order to connect to the 75 Ohm
Input terminals designed into the more recent Televisions
and
VCRs.
Picture -In-Picture (PIP) * Term used when two pictures are
shown on the TV screen at the same time. The smaller PIP picture
is supplied by a VCR (or other tuner/video playback source). The
PIP picture can also be moved and swapped with the TV's main
screen picture.
Variable Audio Output * An adjustable audio output which
allows for volume variations at the source.
Pre-Amplifier * The control center of a hi-fi system. Not only
amplifies source inputs, but also allows for source selection,
volume, tone, balance and all other controls that affect the sound.
Programming * The procedure of adding or deleting channel
numbers into the TV's memory circuits. In this way the TV
"remembers" only the locally available or desired channel
numbers and skips over any unwanted channel numbers.
56
Accessories/Optional
..............................
31-37. 48, 53, *Q/U-1
Add/Delete Channels ..........................................
13-14, *Q/U-2
Audio Controls ..................................................................
Audio/Video Input .......................................
Automatic Pro_amming
Picture-In-Picture
48-53, *Q/U-2
PIP Audio Output jacks ....................................................
31, 49
33, 48, 53, *Q/U-2
Picture Source Control ......................................................
10, 51
13, *Q/U-2
Battery Installation .........................................................
PrecantionsiSafety
*Q/U-3
Blocking Channels ............................................................
Programming
19-20
Channel Memory .................................................
2, 3, 55, *Q/U-1
Channels ............................................
13, *Q/U-2
38-47, 50, *Q/U-2, 3, 4
Remote with VCRs ............................................................
15, 16, l 8, *Q/U-3
Channel Label .........................................................................
............................................
Remote Control .....................................
................ 12, 48, 53 *Q/U-I, 2
ChanneltTime Display ..................................
(PIP) .......................................
23
27-32
..........................................
Cable TV Connections/Settings
Parental Guidelines .................................................................
Requesting Service ...............................................
25
RF Coaxial Cable ...............................................
Reminder/Time
13-14. *Q/U-2
42-47
55, 58-59. 60
48, 53, *Q/U- 1
and Channel ..................................................
Channel/Time Reminder .........................................................
18
Safety/Precautions
Clock Setting ..........................................................................
15
Second Audio Program (SAP) ................................................
Clock Timer ............................................................................
16
Sensor Remote ................................................................
Closed Captioning ..................................................................
11
Sleep Timer .............................................................................
Color Controls .............................................................
28
*Q/U-3
17
38-39
21
Smart Sound ............................................................................
40
8
Smart Surf ...............................................................................
41
*Q/U-2, 3, 4
Surround Sound ......................................................................
32
38-47, 50, *Q/U-2, 3, 4
Speaker Terminals ..................................................................
32
Convergence .............................................................................
Controls/TV ............................................................
...................................
2.3, 55, *Q/U-1
Smart Picture .....................................................................
6,*Q/U-4
Content Advisory ....................................................................
Controls/Remote
............................................
18
Exit .................................................................................
*Q/U-4
Features .....................................................................................
First Time Set Up ...........................................................
Help Menu ............................................................
Inputs/Audio and Video ........................................
Time/Channel
5
*Q/U-2
54, *Q/U-2, 4
Menu ...........................................................................
Minus(-)/Plus (+) Buttons ...........................................
16
Variable Audio Output ...........................................................
32
33, 47. *Q/U-3
VCR/TV Connections ............................. 33-37, 48, 53, *Q/U- 1
Tips for Service ...........................................................
26
55, 58-59
Q/U 2, 4
TV Speaker Control ....... :........................................................
31
*Q/U-3, 4
Volume Display ......................................................................
30
Warranty .................................................................................
60
Movie Ratings .........................................................................
Parental Control .................................................................
18. *Q/U-3
Timer (Turn On) .....................................................................
VCR Button ........................................................
33-36, 48, 53
Language .................................................................................
Display ..............................................
21
19-24
* Q!U indicates page number reference in the separate Quick Use Guide
57
Phi!ips Consumer Electronics Company
Factory Service Center Locations
/
Los An
les
•J
•
_
L llr_Pittsburg
"/
/
Atla_a/N Georgia
p
Indicates
In-Home
1-800-242.9225
Service
Only
_
Beaumont/Austin
Houston/Galveston
San Antonio
_'m
h/WV re_aS'_
PhUadelphiaP3
New Jersey
\_
Florida
Ft. MyerstSW
Miam_E
Florida
Florida
• Indicates In-Home/Carry-In Sere,ice
NOTE:If you residein one ofour PhilipsFactoryServiceBranchareas(seedirectoryon back),youcancontactthenearestServiceBranchto
obtainefficientandexpedientrepairfor your product.If your productis In-Warranty,you shouldhaveproof-of-purchaseto ensureNoCharge
Service.ForOut-of-Warrantyservice,callthe locationnearestyou.
NOTk Si vous r_sidezdartsunedesrdgionsdesservies
par unesuccursaledeserviceapr_sventedufabricantPhilips(voir liste ci-dessous),
vous
pourrezcontacterla branchede serviceapr_sventela pluspres de chezvouspour obtenirunserviceapr_sventerapideet efficace.Si le produit
estsous garantie,flsuffirade presenterune preuved'achat pour b(_n_ficier
d'unservicesansfrais. Pourlesproduitsnon couvertsparla garantie,
contactezle centrele plus prosdechezvous.
NOTA:Si Ud.resideenunadenuestras
zonasparasucursalesPhilipsdeservicioal def_brica(verdirectoriorodsabajo),Ud.puedecomunicarse
conla sucursalde serviciorn_scersanapara obtenerunareparationoportunay eficazde suproducto.Si su productoest4todaviabajogarantia,
Ud.debepresentarcornprobante
decompra parano ocasionarningunoscargosporservieio. Paraserviciodespu_sdel vencimientode la
garantia,Ilameal lugar m&scercanode los abajo indicados.
I. canada
Howyoucan obtainefficientandexpedient
carry-in,mail-in,or in-homeservicefor yourproduct
PleasecontactPhilipsat
1-800-861-6162(Frenchspeaking)
1-80@363-7278(Englishspeaking)
/w canada
Commentobtenirleserviceapr_s-vente
pour lesproduitsapport_sou envoyds
parla poste& notrecentredeserviceou le servicea domicile
Veuillezcontacterphilips_l:
1-800-661-6162(Francophone)
1-800-363-7278
C(_moreoibirservicioefficiente
parasu producto,enpersona,por correoo a domicillo
Favordecomunicarse
con Philipsah
1-800-661-6162(franc6fono)
1-800-363-7278(anglbtono)
MAC_0929 1/_98
58
QUALITY
SERVICEIS
AS CLOSEAS YOUR TELEPHONE!SIMPLY LOOK OVERTHE LIST BELOW FOR TIlE NUMBER OF A FACTORY SERVICE CENTER
NEAR YOU. YOUR PRODUCT WILL RECEIVEEFFICIENTAND EXPEDIENTCARRY'IN1 MAIL'IN, OR IN-HOME SERVICE1AND YOU WiLL RECEIVEPEACEOF MIND,
KNOWING YOUR PRODUCT IS BEING GIVEN THE EXPERTA'I'_ENTIONOF PHILIPS' FACTORYSERVICE. AND, IF THE PHONE NUMBER LISTED FORYOUR AREA
IS LONG DISTANCE, CALL 1-800-242-9225 FORFACTORY
SERVICE,
COMMENT
OBTENIR
NOTRESERVLCE
APR_SVENTEPA_DEETEFFICACE
COlTPARCOURRIER,
_ DOMICILE,
OUENSEPRI_SENTART
_ ONCENTRE
OESERVICE
PHILIPS.PLUSDE600CENTRES
DE
RI_CEPTION
DEPRODUITS
A RI!PARER
A TRAVERS
LEPAYS:CONTACTER
LECENTRE
DESERVICE
AUXCONSOMMATEURS
LEPLUSPROCHE
POURSAVOIR
L'EMPLACEMENT
DECESDEPOTS
DARC
UNRAYONDE50_ 75 MILES(80KMA 120KM)DUCENTRE
DESERVICE
LOCAL.
C6MO OBTENERUN SERVIOIOOPORTUNOY EFICIENTEPOR CORREO,EN CASA0 EN PERSONAPARASU PRODUCTOA TRAVI_SDE UN CENTROPHILIPS DE SERVICIO. MAC DE 600 SITIOS POR
TOUO ELPAlS PAPALA RECEPCIONDE PRODUCTOSNECESITADOSDE REPARACIONES:
COMUNICARSECON ELCENTROOESERVICIODE FABRICAMACCERCANOPARAESTOSLUGARESDENTRO
DE UNRADIO DE 80 A 120 KM (50 A 75 MILLA$) DEL CENTRODE SERVICIOLOCAL,
GEORGIA
Philips Factory Service of Georgia
200 N. Cobb Pkwy., Suite 120
Marietta, GA 30062
(770) 795-0085
CENTRALU.S.A.
Philips Factory Service Central US
950 KeynoteCircle
Brooklyn Heights, OH44131
(216) 741-3334
ILLINOIS
Philips FactoryService of Illinois
1279 W. Hamilton Pkwy.
Itasca,IL 60143
(830) 775-0990
FLORIDA
Philips Factory Service of Florida
1911 US Highway 301 North
Tampa, FL33619
(813) 621-8181
MICHIGAN
Philips FactoryService of Michigan
25173 Dequindre
MadisonHeights,MI 48071
(248) 544-2110
TENNESSEE
Philips FactoryService of East Tennessee
6700 D Papermill Rd.
Knoxville,
TN 37919
(423) 584-6614
WESTERNU.S.A.
Philips FactoryService Western Region
681 East Brokaw Rd.
SanJose, CA95112
(408) 436-8566
DALLASAREA
Philips FactoryService of Dallas
415 N. MainStreet, #107
Euless,TX 76040
(713) 682-3990
MID-ATLANTIC
PhilipsFactoryService Mid-Atlantic
352 DunksFerryRd.
Bensalem,PA 19020
(215) 638-7500
TEXAS
Philipa FactoryServiceof Texas
1110 N. PostOakRd., Suite 100
Houston,TX 77055
(713) 682-3990
59
PROJECTION
TELEVISION
One Year Free Labor
One Year Free Serviceon Parts
Two Years Free Service on Cathode Ray Tube Parts / 30 days Free Service on Projection "IV Screen
This product can be repaired in-home.
WHO
IS COVERED?
MAKE
You must have proof of purchaseto receive warranty service. A sales
receipt or other document showingthat you purchased the product is
consideredproof of purchase,
WHAT
All parts, includingrepaired and replaced parts, are covered only for
the originalwarranty period. When the warranty on the product
expires, the warranty on all replaced and repaired parts also expires.
Your
IS EXCLUDED?
warranty
does
not cover:
•
labor chargesfor installationor setup of the product, adjustmentof
customer controls on the product, and installationor repair of
antennasystemsoutside of the product.
• product repair end/or part replacement becauseof misuse,
accident,unauthorized repair or other cause not within the control
of PhilipsConsumer ElectronicsCompany.
• reception problems causedby signalconditionsor cable or antenna
systemsoutside the unit.
• a product that requires modification or adaptationto enable it to
operate in any country other than the country for which it was
designed,manufactured,approved and/or authorized, or repair of
products damaged by these modifications.
• incidentalor consequentialdamagesresulting from the product.
{Some states do not allow the exclusionof incidentalor
consequentialdamages,so the above exclusionmay nor apply to
you. This includes,but is not limited to, prerecorded material,
whether copyrighted or not copyrighted.)
• a product usedfor commercialor institutionalpurposes.
WHERE
YOU
KEEP...
Pleasekeep your salesreceipt or other document showingproof of
purchase. Attach it to this owner's manual and keep both nearby. Also
keep the original box and packing material in case you need to return
your product.
IS COVERED?
Warranty coveragebegins the day you buy your product for one year
thereafter (30 days for the projection TV screen),all parts will be repaired
or replaced, andlabor and transportation are free. From one to two years
from the day of purchase, you pay for the replacement or repair of all
partsexcept the cathode ray tube andthe "Clear-Vu" lens,and for all
labor andtransportation charges.After two yearsfrom the dayof
purchase, you pay for the replacement or repair of all parts except the
"Clear-Vu" lens (whichis guaranteedagainstmanufacturer's defects for
the life of the product), andfor all labor andtransportation charges.
WHAT
SURE
IS SERVICE
AVAILABLE?
Warranty serviceis availablein all countries where the product is
officiallydistributed by Philips Consumer ElectronicsCompany. In
countrieswhere PhilipsConsumer ElectronicsCompany does not
distributethe produc_ the IDea]Philips service organizationwill attempt
to provide service (althoughthere may be a delay if the appropriate
spareparts andtechnical manual(s) are not readily available).
BEFORE
REQUESTING
SERVICE...
Please checkyour owner's manualbefore requesting service.
Adiustments of the controls discussed there may save you a service
call.
TO GET WARRANTY
SERVICE...
Repair must be performed by an authorized service center or a factory
service center. If you do not live near a factory servicecenter, contactyour
dealer, If your dealer is an authorized servicecenter, he will arrange
repair. If your dealer is not an authorized service center, he will direct
you to the authorized service center engaged by him to service the
products he sells.
{In U.S.A., Puerto Rico and U.S.Virgin Islands,all implied warranties,
including implied warranties of merchantabilityand fitnessfor a
particular purpose, are limited in duration to the duration of this
expresswarranty. But, becausesome states do not allow limitations on
how long an implied warranty may last, this limitation may not apply to
you.)
{In Canada, this warranty isgiven in lieu of all other warranties. No
other warranties are expressed or implied,including any implied
warranties of merchantability or fitnessfor a particular purpose. Philips
is not liable under any circumstances for any direct, indirect, special,
incidentalor consequentialdamages, howsoever incurred, even if
nor_ed of the possibilityof suchdamages.)
IF YOU
HAVE
QUESTIONS...
Please contact Philips at;
1-800-66 I-6162 (French Speaking)
1-800-363-7278 (EnglishSpeaking)
REMEMBER...
Pleaserecord the model and serial numbers found on the product
below. Also, pleasefill out and mail your warranty registration card
promptly. It will be easier for us to notify you if necessary.
MODEL#
SERIAL#
Philips Service Company, P.O. Box 2976, Longview, Texas 75606,
(903) 242-4800
3135 015 13511