1
3.4 RNS 510
Navigation system
3.4
3.4 RNS 510 I Navigation system
Print status: 04.2007
Art.-N r.: 281.552.RN5.20 I Englisch 05.2007
Booklet 3.4 RNS 510
Contents
About this booklet
This booldet contains important information
and warnings on using your radio navigation
system. The other booldets in the vehicle wallet
contain further information which you should
be aware offor your own safety and for the safety
of your passengers.
Please ensure that this booldet is in the vehicle if
you lend or sell the vehicle to someone else.
Some sections of this booldet do not apply to all
vehicles. In these cases, the text at the start of the
section indicates to which vehicles it applies,
e.g. "Applies to vehi cles with: CD changer".
llIustrations may vary from you r vehicle in some
details. You should therefore regard illustrations
as a general gu id e.
An alphabetical index is included at the end of
the booldet.
Directions and positions (e.g. right, left, front,
rear) are always relative to the direction in which
the vehi cle is travelling unless otherwise stated.
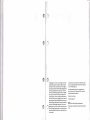
~
~
®
The section is continued on the next page.
Symbolises the end of a section.
Registered trademarks are marked with ®.
However, th e abse nce of this symbol does
@
not guarantee that the term is free from cop)'Tight restrictions.
=> & Cross- reference to a "WARN ING!" text
within a section. This "WARNING" text is located
outside of the section if a page number is given.
=> CD Cross-reference to a "caution" text within
a section. This "caution" text is located outside
of the secti on if a page number is given .
&. WARNING
Texts with this symbol contain information on
safety. They help protect you from accidents
and injury.
CD Caution
Texts with this symbol draw yo ur attention to
potential sources of damage to your vehicle.
<i' For the sake of the environment
Texts with this symbol contain addit ional information on the protection of the environment.
(l] Note
Texts wi th this symbol contain additional information.
Quick Reference Guide
2
Unit overview . ..... .................... .
Operation whilst the vehicle is in motion
General operation ............... .
Presentation in this operating manual
Switching on or off ...... ..... ....... .
2
5
NAV (navigation system) function
selection button . . .............. . ... . 58
58
Using input masks .......... ..
10
Overview........ .
. ....... . .
Inp ut mask for free text input ....... . .. . .
Input mask for entering numbers ..
10
12
Overview
Input windows for navigation .... . . . .. .. .
The Navigation main menu . ........ .... .
Destination entry: selecting 0 destination
Destination memory ............... . . .
Tour mode ... .......... . ......... . . . .... .
Waypoint navigation mode (off-rood
... .. ...... . ..... .
navigation)
Route guidance .... . . .... . . . . ......... .. .
Function selection button RADIO
13
MAP function selection button ... 102
Radio mode ...................... .. ... . .
Traffic programme (TP) fun ction
13
18
Mop di sp lay . . ......... .. . . .. . ... .. ..... . 102
location display with ou t route guidance
105
Function selection button MEDIA
19
General information on CD/DVD mode ..
MEDIA main menu
Audi o menu .. .
MP3 files ...... ..
Sto ring and editin g audio files (HDD) ... .
External CD changer ................... .
Vid eo DVD mode
TV mode ................... . ........ ... .
19
20
24
28
TRAFFIC function selection
. ...... . .... . ......... 107
button ...
5
7
8
11
30
33
38
42
Important information on
operating the CD player ..
53
Safety precautions for devices fitted with
lo se rs . ....... .
Tip s for the CD mode ...... .
Handling data media (CDs and DVDs) . . .
53
53
54
TON E function selection button
55
Changing the sou nd , so und focu s, and
volume .. . . .. ........................... .
Function overview table for the TONE
function selection button ................ .
Dis playing TMC traffic messages
62
65
67
78
83
89
95
107
PHONE function selection button 109
Requirements and ope ration ....... ... ...
Safety information .............. . .. ......
PHONE main menu ...... . ......... . . ...
Entering 0 telephone number ........... .
Selecting saved te lep hone numbers ......
Making 0 call ........ ............... ....
109
109
III
112
113
118
SETUP function selection button . 120
55
57
Settings main menu (setup) . . ....
Radio settings .. .. ........... .. .... ......
Map settings ....
. .. . .. ........ ... ...
Traffic information settings .. . . . ..... .....
Screen settings . .
. .. . ...... . .. . . . . . . . .
Media settings ............. ...... ........
Navigation setti ng s . . .. . . . . . . .......
Syste m setting s ....
. . .. . . . . .... . . . ..
Video settings
. . ....... .... .. . '"
Teleph o ne settings .. . . . . . .... . . ..... .....
120
121
122
122
123
124
124
126
126
127
Index ......... . ............. . ... .
128
Contents
Booklet 3.4 RNS 510
Booklet 3.4 RNS 510
• Please note that a dirty or scratched navigation DVD can seriously impair the speed and
functions of the navigation system.
rn
Note
• Your navigation system is a powerful computer. Just like your computer at home, the unit
needs a few seconds to process complex commands. In these cases, the unit may no longer
react to external commands until the commands being processed are finished. Be patient,
as the unit may already have "stored" the commands, even if it does not appear to be reacting
to them. These commands are processed one
after the other when background processing is
complete, which could lead to confusion.
• The DVD drive in this unit uses a Dolby Digital® audio coding system and MLP Lossless® for
optimal playback quality, including for audio
DVDs that conform to this standard. "Dolby®",
"MLP Lossless®" and the double-D symbol are
registered trade marks of Dolby Laborat.ories®.
• The surround sound of a DVD is converted
using "DTS®" and "DTS 2.0®" and reproduced in
optimal stereo quality. "DTS®" and "DTS 2.0®"
are registered trade marks of DTS, Inc.
• WMA audio files (Windows Media Audio) can
also be played on the unit and stored on the hard
drive (HOD) provided they are not copyright
protected by the DRM process (Digital Rights
Management). Their operation and performance on the unit is the same as for MP3 compressed audio files, and is t.herefore not described separately here => page 28, "MP3
files". <Ill
Opel'ation whilst the vehicle is in motion
Travelling on today's roads requires the driver's
full attention at all times.
&
WARNING
Please keep your attention on driving at all
times. Accidents and injuries can occur if the
driver is distracted.
• Do not allow yourself to be distracted from
the road by making settings in the unit or
using the unit itself.
• Please only use the unit when the road,
weather and traffic conditions are such that it
is safe to do so.
.&.
WARNING (con~nued)
-
• The volume settings should be selected so
that warning signals from outside the vehicle,
e.g. police or fire brigade sirens, can be heard
at all times.
rn
Note
Depending on the country, some radio navigation system functions can no longer be selected
when the vehicle is travelling above a certain
speed. This is not a malfunction, but simply the
legal requirements valid in this country. <Ill
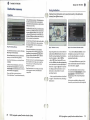
General operation
The screen of the unit is known as a touchscreen. Areas with a colour border on the
screen are currently "active" and can be operated by touching the screen.
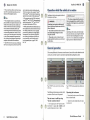
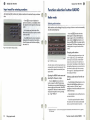
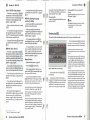
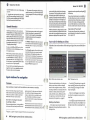
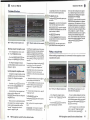
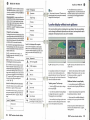
Fig. 2 SETU P function selection button: Settings
main menu.
The following information provides a brief
overview of how the unit is operated.
The main menu is called up using
"function selection buttons"
- For example, press the "function selection button" => page 2, fig. 1 I SETUP ), to call
up the Settings main menu => fig. 2.
4
Quick Reference Guide
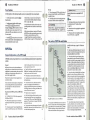
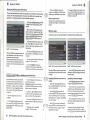
Fig.3 SETUP function selection button: Radio main
menu.
Operating the touchscreen
- Functional or active areas of the screen
have a colour border.
- Touch the screen inside the active area
to activate it.
Quick Reference Guide
5
Booklet 3.4 RNS 510
"Function keys" on the screen
- Active areas of the screen that call up a
function or menu are called "function
keys".
- After touching a function key, the
screen view changes to the corresponding
menu.
- For example, in the Settings majn
menu, touch thelRadia) function
key=:> page 5, fig. 2 to call up theRadio settings =:> page 5, fig. 3 menu. The title line
will show the menu where you are currently located 0.
- Use the ~ ® function key to change
from any menu back to the previous menu.
Moving objects or controllers
- Put your finger on the screen on a movable object such as the "slider" @ in a
"scroll bar" =:> page 5, fig. 3.
- Move your finger across the screen
without lifting it. The object follows your
movements but only within the pre-defined area.
- Lift your finger from the screen at the
desired position.
- To view the displayed menu section
=:> page 5, fig. 3 move the right slider in the
scroll bar all the way to the bottom.
- Alternatively you can move the slider
up and down by touching the function
keys ~ and (!) on the screen.
- A slider in a setting bar rn can also be
moved by pressing [] or G. For example in
the screen settings for Video/DVD operation =:> page 40.
If no function keys are shown with the unit
switched on (e.g. while playing a DVD), touch
6)
6
Booklet 3.4 RNS 510
the screen briefly to show the current available
function keys.
A function key highlighted in grey is currently
not available (e.g. the function key Iso card) in lhe
MEDIA main menu if no memory card is inserted => page 20, fig. 13).
"Scroll bars": moving the screen section
The vertical bar on the right edge of the screen
with a slider@ between the arrow keys ~ and
(!) is called a "scroll bar". It indicates that adrutional menu entries will become visible if the
slider is moved all the way to the bottom.
SeHings menu: modifying seHings
Settings or values are modified in the setting
menu => page 40, fig. 36. The settings are
changed by moving the slid er [I] or pressing the
function keys Gor(J. Touch the~function key
to accept a changed setting and to return to the
original menu.
"Pop-up window": selecting an option
A function key with an arrow ~ after another
function key indicates the currently selected setling, e.g. for IPreferred TMC station]l ~ Automotic)
=> page 5, fig. 3 @.
If you touch the~ function key on the screen,
a "pop-up window "S) is opened displaying all
the possible setting options.
Briefly touch the desired setting option. The
pop-up window disappears and the newly selected setting option is shown in the ~ function key. To close the pop-up window without
changing the setting, touch the® function key in
the pop-up window.
Presentation in this operating manual
A briefexplanation to better understand the presentation of procedures and functions shown in this manual.
This operating manual differentiates between
non-modifiable, printed keys on the unit, and
the "function keys" (soft keys) which appear on
the screen.
The printed unit buttons (e.g. the function selection buttons => page 2, fig. 1 0) are always accompanied by the word "button" in the text An
example instruction in the manual is: "Briefly
press the ITONE) function selection button." If a
"button" or a "function selection button" is
mentioned in the manual together with the
button symbol 0, you will find thi s button on
the unit and not on the screen. You will find an
overview and brief description of the unit buttons at the beginning of the manual => page 2,
fig. I.
Function keys are described in the text by the
word "function key" and the key symbol 0 or, in
some cases, only by the key symbol O.
\Nhen a function key is referenced in an illustration for the first time, an illustration reference is
inserted in addition to the key symbol. The illustration reference is shown at the beginning of an
illustration description. When the text refers to
another illustration, a new illustration reference
is inserted.
Procedure example
The procedure for switching the Traffic information function on or off is described as follows:
- Briefly touch the (SETUP) function selection
button.
-In the Settings => page 5, fig. 3 main menu,
touch thelRadio) function key and in the following
menu, touch ITroffic informotion) to switch the Traffic
information function on or off.
Structure of the manual
The unit overview is at the beginning of the
manual where the unit buttons (hard keys) and
additional control elements are explained in a
brief overview.
If more detailed information is required relating
to the position of a particular control element,
cross-references are made to the unit overview
and its numbering. Only the screen content is
shown in other illustrations in the manual.
An overview providing a brief explanation of the
available functions is included at the beginning
of each main chapter. The details of the individual commands can be found in the additional
chapters of this main chapter. A function overview in table form is provided at the end of some
main chapters . ..
"Checkbox": switching a function on or off
Some functions can only be switched on or off.
There is a "checkbox" CD in front of a function
that can be switched on or off. A tick in the
checkbox ~ indicates that the function is
switched on, and an empty checkbox Omeans
that it is switched off.
To switch it on or off, touch the function key
briefly...
A pop-up window is shown in fmnt of the current menu and is closed automatically after a selling has
been selected.
Quick Reference Guide
Quick Reference Guide
7
Booklet 3.4 RNS 510
Booklet 3.4 RNS 510
Switching on or oH
Anti-theft coding electronically prevents unauthorized persons from operating
the unit after it has been removed from the vehicle.
The display will di sappear aft er one hour, during
which t.ime the unit must remain switched on.
The electronic lo ck can be released as described
above.
The same cycle - two attempts, one hour lockapplies again. <Ill
- Touch@on the screen to delete numbers in the input line from right to left, thus
allowing you to correct your input.
- When the correct code number is
shown in the display, touch~.
When the unit is switched on, the las t audio or
video source used is activated at the most recent
volume setting, provided that the pre-selected
"switch-on volume" is not exceeded => page 55.
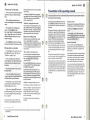
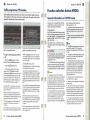
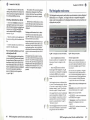
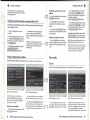
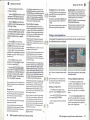
Fig.4 Entering the PIN.
Switching on or off
- Briefly press the onl off switch
:::::> page 2, fig. 1 to switch on the unit. The
system is started and the most recent settings are loaded. The most recently used
audio or video source is activated.
- Press the onl off switch again to switch
off the unit.
Entering the PIN
- If the keyboard field appears after the
unit is switched on, requesting that you
enter a code, the unit must be unlocked by
entering the correct, four-digit code
number. The number of possible attempts
is shown in the second line of the screen.
- Touch a number between @) and ® on
the number pad on the screen. The
number is entered in the input line.
- After you have entered a four-digit
number, the number pad becomes grey
(inactive) and no more numbers can be
entered in the input line.
8
Quick Reference Guide
Time out
The unit will be switched off if the ignition is
turned off. It is possible to switch the unit back
on when the ignition is switched off. The unit
will be switched off again automa tically after a
half an hour to protect the vehicle battery.
Convenience radio coding
If the unit is removed and reinstalled or the ve hicle battery disconnected, you will no longer
have to enter the anti-th eft coding manually as
the code number rem ains stored in the vehicle
when it is entered for the first time.
If the code numbers do not match, however, e.g.
because th e unit has been installed in another
vehicle, the electronic lock must be released
manually => page 8, "Entering the PIN ".
Code number
The code number can only be requested "online" via the Volkswagen system thus making
more effective anti-theft protection possible.
Please contact your Volkswagen dealer if you require assistance.
Incorrect code number
This whole procedure can be repeated once if
you enter an incorrect code number by accident
when releasing the electronic lock. The number
of possible attempts is shown in the second line
of the scree n.
If you enter an incorrect code number again, the
unit is locked for around one hour. This means it
cannot be started (display: "System locked!
Please woit ... minutes").
Quick Reference Guide
9
Booklet 3.4 RNS 510
Booklet 3.4 RNS 510
Input mask for free text input
Using input masks
An input mask for free text entry allows any letter, number, and special character
to be entered in any combination.
Overview
- You can also delete or alter the characters in the input line, as well as add additional characters => page ll, "Further input
options:".
Input masks are used to select an address or enter a name or numbers.
There are two kinds of input masks. The input
masks used to search for and call up information
in the unit (e.g "select" an address) and input
masks where "free text" can be entered.
Input masks appear in a wide range of menus
but their operation is almost identical. The highlighting colour of the available function keys depends on which menu the input mask was called
up from.
Input masks for selecting a saved entry
These input masks can be found in the navigation for selecting a target address [rom the available navigation data. Each entry limits the selection of available entries further => page 62,
"Input windows for navigation" or => page 114,
"Searching for an en try in the telephone book,,7).
Input masks for "free text input"
Free text entry allows any letter, number, and
special character to be entered in any combination at any time. All special characters are always
available for each letter. Touching the (QK) function key will apply the character sequence as it
appears in the input line. You can accept a name
offered by the unit or allocate your own name.
- Touch @El to accept the series of characters displayed in the input line. Touch
~ to close the input mask without accepting the entries.
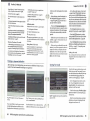
Selecting special characters based on letters
In input masks, a number of letters are also
marked with a small tTiangle " T ". This indicates
that s pecial characters based on this letter can
be selected.
Keep the function key pressed until a pop-up
window appears with the special character. Accept the desired character by touching the input
line - the pop-up window will be closed. If no
entries are made, the pop-up window is closed
automatically after a few seconds.
Some special characters can also be "written
out". Thus, instead of the German special characters "A", "0", and "0", the sequence of characters "AE", "UE", and "OE" are recognised by the
navigation system. Other special characters can
be ignored, e.g. instead of "E", "E", or "E", a
normal "E" is recognised by the navigation
system. "
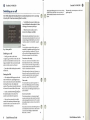
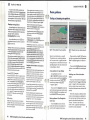
Fig. 5 Input mask for free text input.
Letters marked with a small triangle " T " indicate that special characters can be selected
based on this letter => page 10, "Selecting special
cha racters based on letters".
Further input options:
You can enter free text in some menus.
This can b e done, for example, when assigning a file name to save MP3 files on the
hard drive => page 30 or when searching
for the name of a point of interest
=> page 70.
(f) - changes from upper case to lower case and
vice versa.
- Touch @El to accept a sequence of characters offered by the unit, or touch @ to
delete the characters in the input line.
(=:::J - space bar for entering spaces.
- In the input mask, touch a character
displayed in the keyboard block to add it to
the input line .
@-opens the input mask for numbers and special characters. The function key changes to~.
Touch~ to change to the letter input mask
again.
8) or (B moves the cursor in the input line to the
left 0 r righ t.
@-deletescharacters from right to left in the
input line starting at the position of the cursor. "
7) only for vehicles with PREMIUM mobile telephone provision
10
Using input masks
Using input masks
11
Booklet 3.4 RNS 510
Booklet 3.4 RNS 510
Input mask for entering numbers
An input mask for number entry allows numbers to be entered in any combination.
- Touch ~ to accept a displayed sequence of numbers, or touch @ to delete
the characters in the input line from right
to left.
- In the input mask, touch one of the
function keys@) to ® to accept the number
in the input line.
~
Function selection buHon RADIO
Radio mode
Selecting radio stations
Radio stations can be changed simply by pressing a button or can be set manually
via the station frequency.
- Press the IRADlol function selection
button again to change the frequency
range=> page 14. Or, in the RADIO main
menu, touch the IBondl function key and
then pressIT0or~in the popup window
which opens. The current frequency band
is displayed in the top left corner of the
screen.
- Touch ~ when the correct number is
displayed in the input line. Touch ~ to
close the input mask without accepting
the entries. -Oil
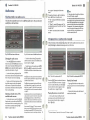
Fig.6 Input mask for entering numbers.
Changing radio stations
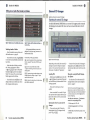
Fig.7 RADIO main menu .
All radio stations with strong reception are
automatically stored in the station list. The
station list is updated automatically on a
regular basis.
Opening the RADIO main menu and
selecting the frequency range
- Press the IRADlol function selection
button to open the RADIO main menu.
The station you are currently listening to is
shown at the top of the screen. With RDScompatible 8) stations, the station name is
displayed if reception is strong enough,
e.g. => fig. 7 "Radio 2" .
- Briefly pressing the arrow keys on the
unit => page 2, fig. 1 CD or touching the
arrow keys on the screen of the RADIO
main menu takes you to the previous or
next station. Depending on the settings in
the Radio settings menu, you move to a station from the station list or the memory
list=> page 121, "Specifying station selection using arrow keys".
Selecting radio stations from the station list
- Touch the IStation listlfunction key to view
a list of all radio stations which can currently be received. The list "jumps"
straight to a view ofthe station you are currently listening to.
- Move the slider in the scroll bar down to
see more stations.
- Touch the required station to select it.
The station list view closes automatically
after around 20 seconds of inactivity.
8) "Radio Data System "· used to transm it programme identification and additional services ~ page 16.
"RDS Function"
12
Using input masks
Function selection button RADIO
13
~
Booklet 3.4 RNS 510
Booklet 3.4 RNS 510
Selecting stored radio stations
O verview of functions for the RAD IO function selection button
Stored radio stations can be selected using the on-screen station buttons or from
the memory list.
Selecting stations via the station buttons
- Briefly touch one ofthe six station buttons:::::> fig. 10 CIJ to ([J displayed in the
RADIO main menu to activate the station
displayed.
Main menu: RADIO
Function keys
I. Sub-menu
8) and (t)
Go to the last or next station (from the station list or memory list depending on
the setup =:> page 121, "Specifying station selection using arrow keys").
Popup window: Frequency selection
Band
Station list
Selecting stations from the memory list
-
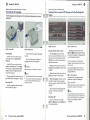
Fig.l0 RADIO main menu: Memory location 4 is
selected.
If the radio station you are currently listening to is already stored in the memory
list, the memory location number will be
displayed beside the frequency band (FM
or AM) :::::> fig. 10.
Memory list
If selecting from the I~ Memory listJ is programmed
in Radio settings =:> page 121 as an option for the
Io"ow keys J, then stored stations can aJso be selected using the arrow keys on the unit and the
on-screen arrow keys on the RADIO main menu
screen. In this case the word" Memory" will appear at top left beneath the function key 8).
You can specify which six station buttons will
appear in the RADIO main menu in the Radio
settings menu =:> page 121, "Selecting station
buttons for display".
-FM
-AM
- List view of radio stations that can currently be received:
Touch the station to select it.
- List view of stored radio stations:
Touch the stored station to select it.
Touch [MemoryJ to open the memory list.
- In the memory list, touch the display of
the station you require:::::> fig. 10.
2. Sub-menu
Extras
or~ Scan
Memory
- List view: Touch to select memory location.
ITn
- Popup window: Confirm Delete or select
Cancel.
Popup window: Turn speciaJ functions on or off
- Scan: Turn automatic scan on or off.
- TP function on or off: Activate ~ for "on".
If "~
Scan" is displayed in the function key, the scan function is on - touch to turn
it off.
Man.
Set radio station manually: The frequency band appears at the bottom - press the
settings knob 10 hide it.
Touching the function key~ takes you from any menu to the menu you previously selected.
Station list and Memory list close automaticaJly after 20 seconds of inactivity.
The view of the memory list closes automaticaJly
after around one minute of inactivity. <4
RDS Function
RDS ("Radio Data System") is used to transmit
programme identifiers and additional services,
thereby enabling functions such as automatic
station tracking.
With stations that are RDS-compatible, the station name will be displayed instead of the frequency, provided reception is good enough.
If a radio station broadcasts additional information with the RDS function while a station is
being stored, the name of the radio station may
16
Function selection button RADIO
not subsequently be correctly displayed in the
memory list.
Changing 0 station name
You can change the station name manuaJly.
Select the stored radio station and wait until the
correct name appears on the screen. Keep your
finger pressed on the display of the station name
between the arrow keys until "Station name has
been saved" appears. <4
Function selection button RADIO
17
Booklet 3.4 RNS 510
Booklet 3.4 RNS 510
Traffic programme (TP) function
If the traffic programme function is turned on, you will hear traffic announcements made by a TP station during active audio mode. The audio mode will be
paused for the duration ofan announcement.
Function selection buHon MEDIA
General information on CDIDVD mode
Audio CDs (CD-A) and audio DVDs, MP3 CDs
and MP3 DVDs, as well as video DVDs can be
played in the internal CD I DVD drive.
CD cannot be read
If a CD/DVD is loaded which the player cannot
read, the following messages appear briefly "CD
error. Please check CD." or "Incorrect data format.
Unable to read file." and the CD/DVD is ejected
after a few seconds.
Ifthe CD/DVD is not removed from the tray
within 10 seconds, it is retracted again to prevent
damage.
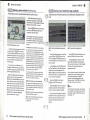
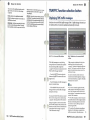
Fig. 11 Activating the TP function.
Fig. 12 Incoming traffic announcement.
&. WARNING
Turning the traffic programme (TP) on
or off
"No TP" is displayed instead of"TP". Note that
multi-storey car parks, tunnels. high buildings
or mountains can interrupt or even completely
block radio signals.
• The CD player is a class 1 laser product.
When the CD player is opened, there is a risk of
injury caused by the invisible laser beams escaping from the unit.
- Press the [RADIO) function selection
button to open the RADIO main menu.
- Touch the IExtra,) function key.
- In the popup window which open,
touch => fig. 11
briefly to turn the
traffic programme function on or off. A tick
in the checkbox ~ indicates that the TP
function is already active. Alternatively,
the TP function can also be turned on or
offin the RADIO settings => page 121.
cm
The display "TP" in conjunction with a station
name (e.g. in the station list or memory list) indicates a TP station.
Whatever radio station you happen to be listening to, an additional receiver section in the
unit ensures that a TP station is always received
so long as the TP function is turned on.
"TP" in the top right corner of the screen indicates that the TP function is ready for use
=> fig. 12.
If no TP station can be received at any time, e.g.
because radio reception is generally poor, then
18
Function selection button RADIO
Incoming traffic announcement
A popup window opens => fig. 12 while a traffic
announcement is being played .
!fyou wish to interrupt the announcement,
touchlcancellin the Traffic annoullcement popup
window. The TP function remains in standby
(display: TP) and the next traffic announcement
will be made in the current audio mode. Touch
IDeact TPJ to permanently deactivate the TP function.
The unit wiU be switched to predefined settings
for volume, balance and fader for the duration of
the announcement. You can change these settings while the traffic announcement is being
made.
Adjust the volume during a traffic announcement using the volume control. Press thelTONEJ
function selection button to adjust the settings
for balance during a traffic announcement
=> page 55.
• The CD player contains no parts which you
can service or repai.r by yourself. You should
therefore contact an authorised dealer if there
is a mechanical fault or if a repair is required.
CD Caution
• Inserting a second CD/DVD while an inserted CD/DVD is being ejected can destroy the
CD/DVD drive in the unit. Note that it takes a
few seconds to eject the CDIDVD after pressing
the Eject button @. The protective barrier in
front of the CD/DVD slot is opened while this is
happening. You must wait until the CD/DVD is
ejected before trying to insert a new CD/DVD.
•
If the CD/DVD drive has a mechanical fault
or if a CD/DVD has been incorrectly or not fully
loaded, the message " CD error. Please check CD: '
and then "OVD drive error" a ppears on the
screen. Check the CD/DVD and then insert it
properly in the drive. If the message "DVD drive
error" reappears, please contact your
Volkswagen Service => & .
• You wiU be unable to insert any more CDs or
DVDs if the temperature inside the unit is too
high. The unit will switch on in the last used
mode.
• Refer to the notes on handling CDs and DVDs
=> page 54, "Handling data media (CDs and
DVDs)".
[l) Note
• Ifthe@functionkeYisshownasinactive,it
means that no audio CD/DVD is currently
loaded or that a loaded audio CD/DVD cannot
be read.
• You might not be able to play copy-protected
CDs or CD-Rs, CD-RWs and DVD-RWs which
you have burned yourself.
• WMAaudio files (Windows Media Audio) can
also be played on the unit and stored on the hard
drive (HDD) provided they are not copyright
protected by the DRM process (Digital Rights
Management). Their operation and performance on the unit is the same as for MP3 compressed audio files, and is therefore not described separately here.
• Please also refer to the additional information on MP3 mode => page 28.
• Please observe the copyright laws applicable
in your country.
• The DVD drive in this unit uses a Dolby Digital® audio coding system and MLP Lossless® for
optimal playback qualiry, including for audio
DVDs that conform to this standard. "Dolby®",
"MLP Lossless®" and the double-D symbol are
registered trade marks of Dolby Laboratories®.
• The surround sound of a DVD is converted
using "DTS®" and "DTS 2.0®" and reproduced in
optimal stereo qualiry. "DTS®" and "DTS 2.0®"
are registered trade marks ofDTS, Inc. ~
In the volume presets you can also specify the
volume with which traffic announcements are
made => page 55. ~
Function selection button MEDIA
19
Booklet 3.4 RNS 510
Booklet 3.4 RNS 510
MEDIA main menu
Briefly press @] to go to the beginning of the current track or chapter, press again to go to the beginning of the previous track or chapter.
Overview of the M EDIA main menu
The MEDIA main menu is used to start and control the playback ofdifferent audio
and video sources or to store MP3 files on the unit's hard drive.
Briefly press (B to go to the beginning of the next
track or chapter.
In the menu of the audio source currently
playing, tracks can also be changed using the
settings knob .
Functian keys to control the currenl audio or
video source
Briefly press ~ to go to the beginning of the CUfrent track or chapter, touch again to go to the beginning of the previous track or chapter.
Briefly press (3 to go to the beginning of the next
track or chapter.
@- Pause: Playback is paused at the current
point - the icon changes to IB, - touch !B to
resume playback fTOm that point.
Selectable audio sources in the Audio menu
Fig.13 MEDIA main menu: Audio menu .
Fig.14 MEDIA main menu: Video DVD menu .
@-changestoaloaded CO/OVD ~ page 24 or
to playback from an external CO changer9 ).
Depending on the selected media source,
the MEDIA main menu is displayed as an
audio menu => fig. 13 or video DVD menu
=> fig. 14.
Selecting a different video source
- In the video DVD menu, touch one of
Iso cardl- changes to a loaded memory card
=:> page 24.
the function keys at the top of the screen
(i=ffiD)-changes to the audio files stored on the internal hard drive =:> page 28. MP3 files and unprotected WMA fileslO) can be stored on the hard
drive from all available media (CD, DVD,
memory card) =:> page 30.
Activating the MEDIA main menu and
selecting a media source
- Press the IMEDIAI function selection
button to go to the MEDIA main menu.
Playback of the media source last played is
resumed.
-
If video and audio sources can cur-
rently be selected on the unit, use the
[MEDIAl function selection button to switch
between the last audio source and the last
video source.
Selecting a different audio source
- In the audio menu, touch one of the
function keys at the top of the screen
=> fig. 13 to select a different audio source.
- Touch the [Videol function key to change
to the video DVD menu => fig. 14.
20
Function selection button MEDIA
=> fig. 14 to select a different video source
=> page 38.
- Touch the [Audio I function key to change
to the audio menu => fig. 13.
"Audio sources" are sources which only transmit
audio signals; "video sources" transmit both
audio and video signals. "Media sources" are all
audio and video sources which can be selected.
If a media source that has already been played is
selected again, playback is resumed from the
point that was last played.
If you cannot currently select a media source, for
example because no data medium (e.g. memory
card) is loaded, the function key is greyed out
=:. fig. 13: Iso card I.
Hardkeys to control the current audio or video
source
The arrow keys on the unit =:. page 2, fig. 1 @] or
(B always refer to the audio source you are currently listening to, whatever menu you are in at
the time.
~
~-
switches to an additionally connected external audio source ll ). Operating an externally
connected audio source from the radio navigation unit is subject to limitations and will largely
depend on the type of connection. Your
Volkswagen Partner will be pleased to help you.
Selectable video sources in the Video DVD
menu
(!Y)- switches to TV mode if a TV tuner 13) is connected ~ page 42.
@ZQ)-changes to a video DVD loaded in the internal CDIDVD drive =:> page 38.
Additional function keys in the Audio menu
(Video)- changes to the video DVD menu and
plays the last selected video source=:> page 20,
fig. 14.
IRepeatl- opens a popup window which defines
whether the repeat function will repeat thelTrack)
or the @ (in Audio CD mode) or the current
(Folder! (in MP3 mode =:> page 28).
(Extra,l-opens a popup window in which random
playback Mix =:> page 27 or the automatic Scan
=:> page 28 can be started. IfI~ Mixl or(~ scanl is already displayed, then the corresponding function is already active - touch the function key
briefly to close.
(Selection)-Opens the track list of the current audio
source for you to select a different track
=:> page 25 or a different audio source =:> page 24.
Additional function keys in the Video DVD
menu
(Audio 1- changes to the audio DVD menu and
plays the last selected audio source=:> page 20,
fig. 13.
(Menu) - switches the video DVD played in the internal CD/DVD drive to the menu selection of
the film a nd also opens the unit 's own menu
control =:> page 38.
~-
opens a setup menu where you can adjust the display setup for the current film
=:> page 40.
IChapterl- opens the chapter selection for the
video DVD playing in the internaJ CDIDVD drive
=:> page 40.
~
@Z]- changes to an optionaUy connected ex-
ternal video source I2).
9)
to)
11)
12)
13)
Optional equipment => page 33, "External CD changer"
Audio files that have been compressed via Windows Media Audio may also be copyright protected by the
DRM process (Digital. Rights Management). The unit does not support WMA files protected in this way.
Optional equipment => page 124, "Media settings "
Optional equipment, can only be connected if the unit is also fitted with a TV tuner => page 124, "Media
settings" and => page 126, "Video settings"
Optional equipment
Function selection button MEDIA
21
Booklet 3.4 RNS 510
rn
Booklet 3.4 RNS 510
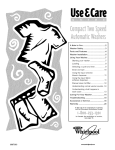
Inserting or removing a memory card
Note
Please also refer to the additional information
on MP3 mode ~ page 28 ....
MP3 files stored on a memory card can either be played directly from the card or
stored on the unit's hard drive.
Inserting and ejecting CD/DVDs
Audio CDslDVDs and MP3 CDsIDVDs, as well as video DVDs can be played in the
internal CDIDVD drive.
To select a CD/DVD that has already been
inserted in the internal CD/DVD drive
again, please read ~ page 24, "Selecting a
track or an audio source".
&. WARNING
• Please refer to ~ page 19, "General information on CD/DVD mode" and ~ page 53,
"Important information on operating the CD
player".
Inserting a CD/DVD
- Push the CDIDVD with the printed side
facing up into the CD/DVD slot to the
point where it is automatically pulled into
the unit ~ CD. Playback starts automatically (exception ~ page 19, "CD cannot be
read").
Ejecting a CD/DVD
- Press ~ to move the CD/DVD in the internal CD/DVD drive to the eject position.
- Remove the CDIDVD.
A CO/OVD will be retracted back into the player
to prevent damage unless removed from the
ejection position within around ten seconds.
Playable MP3 and WMA files can also be stored
on the unit's hard drive ~ page 30.
WMA files (Windows Media Audio)
Audio files that have been compressed via Windows Media Audio may also be copyright protected by the DRM process (Digital Rights Management). The unit does not support WMA files
protected in this way.
22
Function selection button MEDIA
CD Caution
• Inserting a second CD/DVD while an inserted CD/DVD is being ejected can destroy the
CD/DVD drive in the unit. Note that it takes a
few seconds to eject the CD/DVD after pressing
the eject button @. The protective barrier in
front of the CDIDVD slot is opened while this is
happening. You must wait until the CO/D\!]) is
ejected before trying to insert a new CD/D\!]).
•
COs/OVDs should always be sto red in the
rack from the Genuine Volkswagen accessories
range or in the original case when not in use.
rn
To re-select a memory card that has already been inserted, please read
~ page 24, "Selecting a track or an audio
source".
(Windows Media Audio)". Other data will be ignored.
Inserting a memory card
Memory card empty or data unreadable
If you insert a memory card that does not contain any audio files, the unit will nOI change 10
memory card mode. In the audio menu, the
(so cmd) function key on the top line ofthe screen
remains inactive and the function cannot be selected ~ page 20, fig. 13.
- Push the memory card into the memory
card slot ~ page 2, fig. 1 0, with the
clipped corner to the front and right (horizontal card slot) or to the front and top
(vertical card slot), until it engages into
place. Playback starts automatically (exception ~ page 23, "Memory card empty
or data unreadable").
Removing a memory card
- Push on the inserted memory card
against the spring resistance and the card
will "jump" to its eject pOSition.
- Remove the memory card .
Only MP3 files and unprotected WMA fLIes can
be read from an SD card ~ page 22, "WMA files
Playable MP3 and WMA files can also be stored
on the unit's hard drive ~ page 30.
Requirements for the memory card
The memory card slot accepts memory cards
with a size of32 mm x 24 mm x 2.1 mm or
1.4 mm.
The unit can read SO memory cards ("Secure
Digital Memory Cards") and MMC memory
cards ("Multimedia Cards") with a capacity of up
t02GB.
Other memory cards that fit the slot physically,
such as SOHC cards ("Secure Digital High-Capacity Memory Cards")' cannol be read . ...
Note
• Uneven road surfaces and strong vibrations
may cause the CDIDVD to jump. The CD ID\!])
play function should be switched offin this case.
• If the unit cannot read a CD I DVD please also
refer to ~ page 19, "General information on
CD/D\!]) mode".
• With cabriolet car models, for anti-theft rea sons, the ignition key must be inserted in the ignition when the eject button@ is pressed . ...
Function selection button MEDIA
23
Booklet 3.4 RNS 510
Booklet 3.4 RNS 510
Audio menu
key =:> page 37, "Opening the CD selection
menu".
Selecting a track or an audio source
You can select a specific music track or a different audio source. You can also store
audio files on the hard drive.
The top line of the track =:> fig. 17 or folder display =:> fig. 18 shows the audio source:
• "CD:" -Internal CD/DVD drive or external
CD changer J4 ) .
• "SD cord" - inserted SD memory card ("Secure Digital Memory Card") or MMC card ("Multimedia Card").
• "HDD" - Internal hard drive ("Hard Disk
Drive") .
rn
Note
• Please also refer to the additional information on MP3 mode =:> page 28.
• WMA audio files (Windows MediaAudio) can
also be played on the unit and stored on the hard
drive (HDD) provided they are not copyright
protected by the DRM process (Digital Rights
Management). Their operation and performance on the unit is the same as for MP3 compressed audio files , and is therefore not described separately here. ~
Changing tracks or selecting tracks manually
The arrow keys on the unit@) or(8 always refer to the audio source you are currently listening to, whatever menu you are in at the time.
Fig.15 MEDIA main menu: Audio menu.
Fig. 16 Selection menu of available audio sources.
Changing the audio source
- Touch the function key@ repeatedly
until t.he selection menu of available audio
sources opens => fig. 16.
- Press the [MEDIAl function selection
button to open the MEDIA main menu . If a
video source was last selected, press the
[MEDIAl function selection button again to
open the audio menu => fig. 15.
- In the audio menu, playback of the
audio source that was last played resumes
from the point that was last playing.
- Touch one ofthe function keys at the
top of the screen to select the required
audio source. Playback of the selected
audio source will resume from the point
that was last playing.
Opening a selection menu of the
available audio sources
- In the audio menu, touch the [Selectionl
function key to view the track list of the
audio source that is currently playing. The
track that is currently playing is highlighted => page 25, fig. 17.
24
Function selection button MEDIA
- Touch the icon of an audio source [@,CD I,
cordl or [!!IHDDI on t.he left of the screen
to view the contents of that folder or data
medium.
[~SD
The (§l) function key appears beside audio files
that can only be played back =:> page 26, "Audio
CD/DVD: Track selection".
The@function appears beside audio files that
can be played back =:> page 26 or stored on the
hard drive =:> page 30. Audio files that are stored
on the hard drive can also be renamed or deleted
=:> page 32.
An audio source that is not currently loaded with
a data medium cannot be selected (=:> fig. 16 ®
beside [SD cardD. Likewise, a video DVD that is
loaded in the internal CD/DVD drive cannot be
selected in the selection menu of available audio
sources.
Fig. 17 Track list of a playing audio CD.
Fig. 18 Track list of 0 playing audio MP3 CD.
Press the [MEDIAl function selection button
to open the MEDIA main menu. If a video
source was last selected, press the [MEDIAl
function selection button again to open
the audio menu => page 24, fig. 15.
Rewind, fast forward
Playing the previous or next track
- Press and hold the arrow keys on the
unit@lor(8ortheon-screen function keys
f8or(3.
- Release the button when the desired
track has been found.
- In the audio menu, briefly press the
arrow keys on the unit@l or (8, or touch
the on-screen function keys ~ page 24,
fig. 15 f8 or (3.
If an external CD changer l4 ) is also connected,
after you touch the ~ function key, you must
also select the required CD/DVD drive in the following selection menu by touching a function ~
14)
Optional equipment: Operation of the external CD changer => page 33.
Function selection button MEDIA
25
®
Audio CO/DVO: Track selection
- Touch the => page 24, fig. IS [Selection]
function key to view the track list of the
audio source that is currently playing. The
track that is currently playing is highLighted => page 25, fig. 17.
- Select a track from the list by touching
[Track ... ].
- Use the function key@to switch from
the track list back to the CD selection
menu l5) or the selection menu of avaiJable
audio sources=> page 24, fig. 16.
- Using the function key ~ always takes
you directly to the audio menu => page 24,
fig. IS.
MP3 files: Track selection
- Touch the => page 24, fig. 15 [Selection]
function key to view the track list that contains the track currently playing, and the
subfolders contained in this folder, if any.
The track that is currently playing is highlighted => page 25, fig. 18.
- Touch another track to select it. If the
track you want is in a different folder, you
must search through the folder structure.
- Touch the display of a file folder to open
the folder (in the figure => page 25, fig. 18:
[Lal.1]) .
- Using the function key~ always takes
you directly to the audio menu => page 24,
fig. 15.
MP3 files: Opening the popup
window for editing
- By repeatedly pressing@ you can
switch folder by folder until you reach the
selection menu of the available audio
sources => page 24, fig. 16. You can now
search for tracks, e.g. on a different audio
source.
Some audio CDs a nd a udio DVDs support "CD
text" . With these CDs/DVDs, the track name is
shown ins tead of "Track" => fig. 19.
- When you touch the function key
=> page 30, fig. 21 ~ beside the display of a
track, folder or audio source, a popup
window opens => page 32.
=> page 30, "Storing MP3 and WMA fil es on the
hard drive (HOD)"
[I] Note
Th e display of the names of tracks and artis ts
ca n be deactivated in "Media settings"
=> page 124 . ~
Ra ndom play (MIX)
The tracks of the selected audio source will be played in random order.
- Touch the function key[~ Mix)to stop the
function at the current track. Normal playback now resumes with the current track.
- The popup window can also be used to
store a number of audio files on the hard
drive => page 30. Audio files that are already stored on the hard drive can also be
renamed or deleted => page 32.
Random play remains active for the corresponding audio source until it is closed for that
source.
Repeat function
- Open the audio menu => page 20.
- Touch the [Repeat] function key.
-
If you touch @ (audio CD mode) or
the tracks on the current CD or in the current folder will automatically repeat.
In th e audio menu you can also ch a nge tra cks by
turning the settings knob => page 2. fig. 1 0 .
Playing audio COs from an external CD
changer
Optional e quipment: Operation of a n exte rna l
CD change r => page 33.
- In the popup window, touch ~ to
start playback. See also => page 29, "Play
order of MP3 files and folders".
- In the popup window which now appears, touch [Track] to automatically repeat
the current track at the end.
®
Storing audio files
- Select a track, folder or audio source for
playback, as described above.
[Folder) (MP3 mode) in the popup window,
- Touch the function key @ to open the
next higher folder. The parent folders are
displayed on the title bar (in the figure
"Fl.l" and "Fl ").
) 5)
Booklet 3.4 RNS 510
Booklet 3.4 RNS 510
Fig.19 MEDIA main menu: Audio menu.
- In the audio m enu, touch the [Extras]
function key.
-
In the popup window which open s,
touch~. The [Extras Ifunction key changes
to [~Mix) and random play starts with the
next track. AIl the tracks on the current
audio source now play in random order.
"Vhile random play is active in MP3 mode, only
th e audio files in the selected folder (e.g. Fl.l in
=> page 25, fig. 18) or all audio files in the select ed folder in addition to audio files from all
subfold ers, will be played in random order in accordance with the settings => page 124, "Media
settings".
To random play all of the folders in a data medium , you must first play a mu sic file at root directory level a nd then start random play. If a very
la rge number of mus ic files are stored on the
ha rd drive, the image on the screen may "freeze "
fo r a few seconds after you select the function
key ~ and the unit will not accept any opera·
tion for this pe riod of time. Please be patient
while this is happening! The unit is checking the
files you have selected for random play. ~
"CD int." appears at the top left of the screen if a
data medium is being played in the internal
CDIDVD drive .
The name of the artist, the album and the track
can be displayed while MP3 files are playing provided this information is available as an 1D3 tag.
If there is no ID3 tag, the folder or file nam e will
be s hown instead => page 28, "General informa tion on the MP3 mode".
~
only if a CD changer is fitted => page:rl.
26
Function selection button MEDIA
Function selection button MEDIA
27
Booklet 3.4 RNS 510
Booklet 3.4 RNS 510
Scan function
Bit rate
&
All the tracks on the selected audio source are scanned for ten seconds each.
• The unit supports MP3 files with bit rates of
between 32 and 320 kBit/ s and MP3 files with
variable bit rates.
portant information on operating the CD
player" .
- In the audio menu. touch the IExtras 1
function key.
Alternatively. you can also start and stop the
scan function by briefly pushing the settings
knob ~ page 2. fig. 1 0.
• The display for the track running time may
be incorrect for files with a variable bit rate.
[I] Note
The scan function remains active for the corresponding audio source until it is closed for that
source.
& WARNING
• The display of the names of tracks and artists
can be deactivated in "Media settings"
~ page 124.
Please refer to ~ page 19. "GeneraJ information on CDIDVD mode" and ~ page 53. "Im-
• Please observe the copyright laws applicable
in your country.
- In the popup window which opens.
touch IScan I. The IExtras I function key
changes to I~ Scan I. All the tracks on the current audio source are scanned for 10 seconds each. The scan function starts with
the next track.
- Touch I~ Sconl to stop the scan function
at the current track. Normal playback now
resumes with the current track.
While the scan fun ction is active in MP3 mode.
aJI MP3 files on the current audio source. or only
the files in a selected folder (e.g. Fl.l in
~ page 25. fig. 18) are scanned in accordance
with the settings ~ page 124. "Media settings". ~
• Please aJso refer to the additionaJ information on MP3 mode ~ page 28. <4
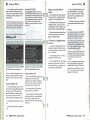
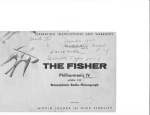
Play order of MP3 fi les and fo lders
specified in the setup ~ page 124. "Media settings ".
MP3 files
• Play starts with the first track in the "root directory" on the CD. In the example there are two
tracks 0 and ® in the root folder.
CD
General information on the MP3 mode
®
• Once the tracks in the root directory have
been played. the unit will access the folders in
the order in which they are arranged on the data
medium. In the example shown here. there are
two main folders in the root directory: Fl and F2.
The folder FI is in the first position in the root
folder. so tracks CD and 0 are played immediately after the tracks in the root folder.
MP3 files can be played back from a variety of media and stored on the hard drive
(HDD) .
General
MP3 music files stored on data media are normaJly subject to national and internationaJ copyright laws. In certain countries. they may not be
copied even for private use without prior consent of the copyright holder.
Cards") with a size of 32 mm x 24 mm x 2.1 mm
and a capacity of up to 2 GB.
• The CDslDVDs must comply with the ISO
9660 Level 2 standard and the )oliet file system
(single-session and multi-session) .
•
File names are restricted to 64 characters.
Please find out about rel evant copyright laws
and observe them.
• The folder structure is limited to a maximum
of 8 folder levels.
These restrictions do not apply to compositions
and recordings for which you personaJly hold
the copyright or for which you have been
granted rights.
• The name of the artist. the album and the
track ca n be displayed while MP3 file s are
playing provided this information is available as
an 103 tag. If there is no 103 tag. the folder or file
name will be shO\'\TIl instead.
Requirements for MP3 music files and MP3 data
media
• CD-ROM . CD-R. CD-RWwith a capacity of
650 MB and 700 ME.
• DVDs with a capacity of up to 4.7 GB and
double -layer DVDs with a capacity of up to 8.5
GB.
• SO memory cards ("Secure DigitaJ Mem ory
Cards") and MMC memory cards ("Multimedia
28
Function selection buHon MEDIA
WARNING (conl;nued)
•
Play lists are not supported.
WMA files (Windows Media Audio) can also
be played provided th ey are not copyright protected by the DRM process (Digital Rights Management). The unit does not support WMA files
protec ted in this way.
®
CV
•
•
The operation and performance of playable
WMA file s is the same as for MP3 fil es. and so is
not described separately here.
tra·0631
Fig.20 Possible structure on on MP3 CD.
The unit plays the MP3 files stored on a data medium in a certain ord er. The illustration shows a
typicaJ MP3 CD that contains tracks (Dt folders
(L:)Jand subfolders. Wh ether MP3 fil es from all
folders and subfolders will be played can be
• Once the tracks in the first folder have been
played. the unit will access subfolders in that
folder in th e order in which they are arranged on
the data medium . In the example. folder FI contains two subfolders: Fl.l and F1.2 as well as another subfolder Fl.l.l within Fl.l. The player first
plays all the tracks 0 in subfolder Fl.l
~ page 30. fig. 21. then changes to subfolder
Fl.l.l and plays the tracks in that subfolder 0.
Once all the tracks in sub-folder FI.l.I have been
played. the unit changes to sub-folder F1.2 and
plays the tracks stored there 0. If there are more
subfolders within F1.2. the unit changes to those
folders as described above. and plays the tracks
stored in them.
• Once all the tracks in the first main folder
(and its subfolders) in the root folder have been
played. the tracks in the next main folder are
played in the order described. In th e example.
~
these are tracks 0 and CV in folder F2.
Function selection buHon MEDIA
29
Booklet 3.4 RNS 510
• Use thelSelectionlfunction key to open the
track list from t.he audio menu. In the track list
=> page 30, fig. 21 the track that is currently
playing is highlighted. The name of the current
Booklet 3.4 RNS 510
main folder appears on the titl e bar together
with the current subfolder, if applicable. If the
tra ck is in the root directory on the data medium,
only the type of medium is di splayed. ~
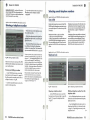
Storing and editing audio files (HOD)
Storing MP3 and WMA files on the hard drive (H OD)
- Here you can create another folder (a
folder can have up to seven subfolders) or
store the selected track or folder in the currently displayed folder. Touch the function
key @ to open the next higher folder.
- Select the function key
Ilnsert file/folder here jto store the track or folder
at the se lected position.
- When you touch Ilnsert file/folder here j, a
popup window opens. The number of
tracks still to be copied is displayed. Touch
ICancerJ to stop storing at the currently
stored track. The popup window closes automatically once storing is complete.
It takes around 40 minutes to store 100 music
tracks of average length (3-5 minutes).
If the unit is switched offwhile storing is in
progress. storing wiU be cancelled with the last
fully stored track.
Functions and progress display during the
storage operation
Fig. 21 Track list of a playing audio MP3 CD.
Fig. 22 Storing MP3 files .
The function key@ appears next to storable tracks or folders in the track lis t and in
the selection menu of available audio
sources.
- Press IContinuej in the pop-up window to
confirm that you have seen the message.
Selecting tracks or folders to be stored
- Browse the available audio sources b y
tracks or folders which you wish to store on
th e hard drive =::> page 26. In the selection
window of available audio sources you can
a) so select the entire contents of an inse rte d data m edium for storage on the
hard drive =::> page 24, fig. 16.
-
When you touch the function key
=::> fig. 21 ~ beside the display of a track or
folder, a popup window opens.
- In the popup window, touch ~ to
start playback.
- In the popup window, select[copyj to
store the required track or folder to your
hard drive.
30
Function selection button MEDIA
While audio files are being stored you can stiJJ
listen to tracks on this or a different audio
source.
File names up to 32 characters long can be displayed.
Note that the {Selection] function key in the audio
menu is disabled during storage. Jf you touch the
ISelection] fun ction key, a popup window opens instead of the selection menu and shows the
progress of the storage operation. If you touch
{Cancel] in the popup window, the storage operation will stop at the last completely stored track.
Press the IMEDIA] function selection button twice
to close the popup window and resume storing.
In the audio menuyou can now select a different
audio source using the function keys at the top
=> page 21, "Selectable audio sources in the
Audio menu".
To change tracks, use the arrow keys on the unit
or in the audio menu.
Some functions, such as fast forward and rewind, have only limited availability while storing
is in progress.
(]] Note
Only \"JMA audio files (Windows Media Audio)
that are not copyright protected by the DRM
process (Digital Rights Management) can be
stored on the hard drive (HOD). <4
- The "HOD" m enu (hard disk drive)
opens =::> fig. 22.
Selecting 0 memory location and
storing trocks
- Select IEnter file /folder j to store the track or
folder directly on t.he top level, the hard
drive's root directory. See also =::> page 29,
"Play order of MP3 files and folders" .
- Or select an existing folder by touching
it (in th e illustration =::> fig. 22: IC:MP3-CD OlD.
- Alternatively, select INew folderj if you
wish to create a new folder for the track or
folder. Enter a name for the new fold e r in
the follow-on menu =::> page n, "Input
mask for free text input". The folder you
have just created is opened and the name
you gave it appears on the title bar.
~
Function selection button MEDIA
31
@
Booklet 3.4 RNS 510
Booklet 3.4 RNS 510
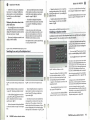
Editing stored audio files (tracks) and folders
@
External CD changer
Applies to vehicles: with an external CD changer
Operating the external CD change r
As well as the internal CDIDVD drive. an external CD changer can be connected
for playing up to six audio CDs. You do not have to load all the slots in the CD
changer.
Fig. 23 Selection menu of available audio sources.
Fig. 24 Stored oudio files (tracks) and folders on
the hard drive.
Selecting tracks or folders
- In the popup window you can start
playback. or you can copy. rename or delete the track or file .
- Open the selection menu of the available audio sources ~ page 24.
- Touch the function key~ fig. 23 I(ilHDD]
to view the tracks and folders stored on the
hard drive.
- Select the track or folder you wish to
edit. Touch the display of a folder
~ fig. 24 ID.. Name] to open it. Touch the
function key@to open the next higher
folder. The names of the currently open
folders appear on the title bar.
- Touch the function key@ next to the
display of the track or folder you wish to
edit. A popup window opens.
Fundion keys in the pop up window:
~- starts
Fig. 25 External CD changer.
~-
Depending on the model. the external CD
changer is loca ted in th e glove co mpartment or in the armrest between the tw'O
front seats ~ Booklet 3.1 "Operation".
- If none of the COs in the CD changer is
being played. press IEJECT ] and then one of
the buttonsGJ -@Jto select the CD you wish
to eject.
IRenome l- opens an
Loading COs
Operation using the Radio Navigation System
IOeletel- deletes
- Briefly press the I LOAD] button. The LED
~ fig. 25 CD above the next free CD slot will
start to flash slowly. I t shows wh ich CD slot
is being prepared .
the playback of the selec ted track or
folder => page 29. "Play order of MP3 file s and
folders".
saves a copy of t.he t.rack or folder
=> page 30. "Selecti ng a memory loca tion an d
storing tracks" .
input template where you can
rename the track or folder =:> page 11. "Input
mask for free text input".
the se lec ted track or folder when
you confirm a prompt . ..
- Wait until the LED starts to flash
quickly.
- Insert a standard 12 cm audio CD with
the unprinted side facing the buttons GJ to
@J into the CD slot until it is automatically
The LEDs above the billions ® indicate the
status of the corresponding CD slot.
Ejecting COs from the external CD
changer
- CD slot empty; the LED is off.
If you wish to eject the CD which is
being played in the CD changer. briefly
press ~ fig. 25 I EJECT ].
Function selection button MEDIA
If a CD in th e external CD changer is being
played. yo u can select a CD directly on the CD
changer by pressing one of the bUllons(j) t00. If
a CD slot contains a CD. th e LED G) above the
button wiU light up.
pulledin~0.
-
32
- You select the COs in the external CD
changer directly via the radio navigation
system ~ page 37.
- CD slot being prepared; the LED fla shes
slowly.
- CD slot ready; th e LED fla shes quickly. CD can
be inserted.
Function selection button MEDIA
33
~
Booklet 3.4 RNS 510
Booklet 3.4 RNS 510
- CD slot is loaded; the LED is lit continuously.
/1:). WARNING
Quick loading
The CD changer is also a class 1 laser product.
Ifit is opened, or is faulty or damaged, there is
a risk of invisible laser beams escaping from
the unit. The CD changer contains no userserviceable parts. Repairs should therefore
only be carried out by an authorised dealer.
Press and hold => page 33, fig. 25 (LOAD) for more
than three seconds to load all free CD slots one
after the other.
All free slots in the CD changer wiU be prepared
automatically and can then loaded one after another.
All CDs in the CD changer will then be ejected
one by one. If a CD is not removed from the eject
position, CD ejection will stop and the CD will be
puUed back into the changer after around 15 seconds.
/1:). WARNING
The risk of injury during a sudden braking
manoeuvre or in an accident is increased if the
glove compartment cover or armrest is open.
• Always keep the glove compartment cover
or armrest closed while the vehicle is in motion to reduce the risk of injury during a
sudden braking manoeuvre or in the event of
an accident.
Operating the external CD changer with magazine
This external CD changer contains a CD magazine which loads CDs into the
changer.
• Please refer to => page 19, "General information on CD/DVD mode" and => page 53,
"Important information on operating the CD
player".
Ejecting all COs
To eject all of the CDs from the CD changer,
press and hold the (EJEer) button for more than
three seconds.
Applies to vehicles, with on external CD changer with magazine
o
Caution
• Always insert the CDs in the CD changer with
the unprinted side to the buttons (D to@
• Before closing the glove compartment or
armrest, check that the CD has been inserted
properly or removed. The CD changer or the CD
could otherwise be damaged.
[]J Note
• The next free slot will automatically be selected if you do not select one after pressing the
[LOAD) button.
• A CD will be pulled back into the player to
prevent damage ifis not removed from the eject
position within 15 seconds.
•
MP3 CDs and audio DVDs cannot be played.
• You may not be able to play copy-protected
CDs or CO-Rs and CD-RWs which you have
burned yourself. <Ill
Fig. 26 CD changer.
Fig. 27 CD
The external CD changer with magazine is
located on the right-hand side of the luggage compartment or under the front passenger seat.
Operation using the Radio Navigation System
Removing and inserting the magazine
- Push the CD slot release => fig. 26
fully to gain access to the magazine.
CD up
- Press the button CD to eject the magazine. The magazine is ejected.
- Load the magazine as described
=> page 36.
- Insert the loaded magazine => fig. 27
into the changer with the word "disc"
facing up until it reaches the stop. The
arrow on the magazine must point towards the magazine slot.
- Close the CD slot release fully.
0
magazine.
- CDs in an external CD changer with
magazine are selected directly via the
radio navigation system => page 37.
/1:). WARNING
The CD changer is also a class 1 laser product.
If it is opened, or is faulty or damaged, there is
a risk of invisible laser beams escaping from
the unit. The CD changer contains no userserviceable parts. Repairs should therefore
only be carried out by an authorised dealer for
safety reasons.
• Please refer to => page 19, "General information on CD/DVD mode" and => page 53,
"Important information on operating the CD
player".
rn
Note
The CD slot cover should always remain closed
after the magazine has been inserted. This will
stop dust entering the magazine. <Ill
34
Function selection buHon MEDIA
Function selection button MEDIA
35
~
Booklet 3.4 RNS 510
Booklet 3.4 RNS 510
~
Applies to vehicles: with an external CD changer with magazine
Applies to vehicles: with on external CD chonger
Operating the CD magazine
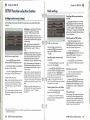
Selecting CDs in an external CD changer on the Radio Na vigation
System
The CD magazine can hold up to six CDs, but does not always have to be completely full.
Fig.31 CD selection menu.
Fig. 28 Inserting COs.
Inserting COs
- Hold the CD by its centre hole and
outer edge so that the printed side is
facing up.
- Load the CDs one at a time into the
magazine by sliding each CD in straight
until you hear it engage properly. When
doing this, hold the magazine with the
word "disc" facing up.
- The order of the COs can he seen on the
right-hand side of the magazine =:> fig. 28.
Removing COs
- Turn the magazine so that the release
lever is facing up =:> fig. 29.
Fig. 29 Removing COs.
- Turn the release lever against the spring
pressure.
- Press the CD gently out through the
ope ning at the rear of the m agazine.
CD Caution
Refer to the notes on handling COs => page 54.
Opening the CD selection menu
- Press the [MEDIA] fun ction selection
button to open the MEDIA main menu. If a
video source was last selected, press the
[MEDIAl function selection button again to
open the audio menu.
- Playback of the audio source that was
last played is continued in the audio menu
=:> fig. 30.
[I] Note
-
•
@ key on the top line of the screen.
MP3 COs and audio OVDs ca nno t be played.
• You may not be able to play copy-protected
COs or CO-Rs and CD-RWs which you have
burned yourself. <4
If the unit is not in CD mode, touch the
The top op tion [Inlern, _.1on the CD selectio n
m e nu activa tes a CD or OVD loaded in the interna l CO/DVD drive.
~ - random playback
The audio tracks on a CD will be played in
random order => page 27, "Random play".
[Scan] - scan function
- Touch the function key@ repeatedly
until the CD selection menu opens
=:> fig. 31.
rn
- Select a CD from the CD changer
··.1 by touching IPLAY I next
to the required option.
[@CD 1: ... 1to [@CD 6,
Function selection button MEDIA
A CD drive with no CD in it is indi ca ted by
"<Empty>" and the function key next to the option is in active.
- Touch the [Selection I function key to view
the track list of the CD that is currently
playing =:> page 26, "Audio CDIDVD: Track
selection" .
Selecting a CD
36
- Touching one of the function keys
[@CD 1, ... ltO[ @CD6: ... Idirectlyo pens the track
list ofthat CD =:> page 25, "Changing tracks
or selecting tracks manually".
All the a udio tracks on a CD are scanned for ten
seconds each => page 28, "Scan function ".
Note
COs a nd OVDs that cannot be read by the connected CD changer are also not available for selection in the CD selection menu of the radio
navigation system (display: "<Empty>"
=> fig. 31). <4
Function selection buHon MEDIA
37
Booklet 3.4 RNS 510
Booklet 3.4 RNS 510
Video DVD mode
- The "Intro" stored on the video DVD (a
short introductory sequence) is played.
Wait until the Intro has finished and the
film's menu options appear with the unit's
own menu prompts => page 38, fig. 34. The
film's menu options cannot be controIled
directly by touching the screen - instead
they are operated using the function keys
in the unit's own menu control system @
to the right of the film options 0 .
Notes o n video DVDs
tries, they may not be copied even for private use
without prior consent of the copyright holder.
Please fmd out about relevant copyright laws
and observe them.
These restrictions do not apply to recordings for
which you personally hold the copyright or for
which you have been granted rights.
- Depending on the inserted video DVD,
you may have to open the unit's menu
control system manuaIly.
(lJ Note
• Video COs cannot be played.
• You may not be able to play Video- OVDs
which you have burned yourself.
Fig.32 MEDIA main menu.
General information
Video OVDs are usually subject to national and
international copyright laws. In certain coun-
Opening and operating the menu
control
- Briefly touch the screen to show the
video DVD menu => page 38, fig. 33.
• The video image on the screen of the radio
navigation system is only displayed when the
vehicle is stationary. The screen is switched off
while the vehicle is in motion, but the sound can
still be heard. ~
- Now select one of the arrow keys on the
right @to move the pointer in the desired
direction around the film 's menu options
0·
- Once you have highlighted the required
option, select the IEnter! function key to activate it.
0
video DVD.
Inserting a video DVD
- Insert a video DVD with the printed side
facing up into the CDIDVD slot to the
point where it is automatically pulled in
=> page 22, "Inserting and ejecting
- Start the film by selecting the required
option from the film's menu selection 0·
- The film starts and the unit switches to
full-screen view.
Full-screen view
- In fuIl-screen view, all buttons are
hidden. Briefly touch the screen to see the
video DVD menu again => page 40.
- !fyou now touch inside the free area of
the screen again, the video DVD menu will
be hidden again . The video DVD menu is
hidden automaticaJly after 15 seconds of
inactivity.
Aspect ratio (4:3 or 16:9)
- Touch IMenu)to open the unit's menu
control system => page 38, fig. 34.
Inserting and starting video DVDs
Fig.33 Menu: Playing
- Make all the desired settings available
in the film's menu .
The film starts to play in the default aspect ratio
(4:3 or 16:9) . Th e aspect ratio is changed in the
setup menu ~ page 126, "Video settings".
(lJ Note
The visual appearance of a film's menu selection
and the options and settings which it offers is the
responsibility of the OVD manufacturer. The
OVD manufacturer is also responsible for the
different ways in which individual films respond
to identical commands. ~
Fig. 34 DVD menu options of the inserted film.
- The DVD starts automatically. It can
take a few seconds for the DVD to be read the screen stays dark while this is happening, so please be patient.
~
CDIDVDs".
38
Function selection button MEDIA
Function selection button MEDIA
39
Booklet 3.4 RNS 510
Booklet 3.4 RNS 510
- Select ~ to return to the film without
selecting another chapter.
The video DVD menu
While a film is being played, you can change settings in the video DVD menu, and
you can switch to another scene on the current video DVD or to a different audio
or video source.
- AJternatively you can change the current chapter by touching the arrow keys on
the unit or in the video DVD menu, or by
turning the settings knob 0·
To adjust the screen display for all functions, go
to the main Setup menu and select ~
~ page 120.
Function keys used to control the current audio
or video source
8 - touch briefly to go to the beginning of the
current chapter, touch again to go to the beginning of the previous chapter.
(3 - touch briefly to go to the beginning of the
next track or chapter.
film is running, briefly touch the screen to
see the video DVD menu => fig. 35. The
video DVD menu offers you the following
options:
Switching between audio and video
function
- In the video DVD menu, touch the
=> fig. 35 [Audio] function key to switch to
the audio menu => page 20, fig. 13.
Opening the unit's own menu control
- In the videoDVD menu, touch the [Menu]
function key to open the unit's own menu
control => page 38, fig. 34. A film that is
running is switched back to its menu selection => page 39, "Opening and operating
the menu control".
- Touch ~ to close the unit's menu control system. The view changes back to fullscreen mode. Depending on the file structure of the inserted DVD, the film will stop
in its menu selection or playback will
resume from the point where it stopped.
Function selection button MEDIA
changes to a video DVD loaded in the internal CD/DVD drive.
rn
Note
• The film's menu selection ~ page 38, fig. 34
®cannot be operated on the touchscreen, it can
only be operated using the unit's own menu
control 0.
• The visual appearance of a film's menu selection and the options and settings which it of·
fers is the responsibility of the DVD manufacturer. The DVD manufacturer is also responsible
for the different ways in which individual films
respond to identical commands . ....
Changing display settings
- In the video DVD menu, touch the
[Display] function key to adjust the brightness, contrast or colours of the film displayed on the screen. A slide control rn is
provided for each setting option => fig. 36.
- Press your finger against a sliderrn and
move it along the scaJe without taking your
finger off. The film's appearance wiII
change in the background accordingly.
- AJternatively, press the G or 0 key next
to the slider to change the setting incrementally. These settings wiJI not affect the
display in any other menus .
Opening chapter selection
- In the video DVD menu, touch the
[Chapter)function keywhiJe a film is running
to view a list of chapters on the video DVD.
The current chapter is at the top, with all
the following chapters underneath .
- Touch the display of a chapter directly
(e.g. (Chapler 3D. Film playback continues
from the beginning of the selected chapter. ~
16)
17)
40
~-
@-Pausefunction: playback is paused at the
current point - the icon changes to (8, - touching
(8 resumes playback from that point.
Fig. 35 Video DVD menu.
If the screen is in full-screen mode whHe a
Other function keys in the Video DVD menu
@-changes to an optionally connected external video source I6) .
@- changes to TV mode l7l .
Optional equipment
only when a TV tuner is fitted (optional equipment) => page 42
Function selection button MEDIA
41
Booklet 3.4 RNS 510
Booklet 3.4 RNS 510
Applies to vehicles : with TV receiver
TV mode
O verview
Analogue and digital IV stations can be displayed.
Applies to vehicles: with TV receiver
Explanation of technical terms
- If you now touch inside the free area of
the screen again, the TV menu is hidden
again. The TV menu is hidden automatically after 15 seconds of inactivity.
The IV receiver in the radio navigation system is equipped with a "hybrid receiver" capable of receiving both analogue and digital IV stations via the vehicle
aerial.
"Universal TV" or DVB_T1S )
Analogue TV stations that can be received everywhere by domestic aerials are becoming less frequent as a result of advances in digital transmission technology. The quality offered is often not
acceptable today. It has still been used for in-car
applications, however, as digital TV reception
relied on a fixed cable connection (DVB-CJ or a
directional satellite dish (OVB-SJ.
In DVB-T, digital TV signals are transmitted terres triallyl9) and can be received by an aerial.
DVB-T provides high quality mobile reception
without the need for a fIXed aerial connection.
DVB-T is also known as "universal TV" .
The advantages of DVB-T
Digital television offers conSiderably higher
quality than analogue television. Digital transmission tech.nology is also far better able to uti lise the transmission capacity of a television station than analogue signals. Digital terrestrial
broadcasting provides many more channels
than analogue broadcasting as signals can be
combined in a single stream ("multiplex:ing"J.
The transmission capacity can also be used for
additional services such as electronic TV guides
20) and radio broadcasts.
"Hybrid receiver" for analogue and digital reception
DVB-T is currently not available in all areas, and
the unit in the veh.icle still relies on an analogue
TV receiver. For this reason, a hybrid receive~1)
has been developed for the unit, co nsisting of a
conventional analogue TV receiver and a DVB-T
receiver.
18)
19)
20)
2 1)
In areas that do not have DVB-T, only analogue
TV is available with the corresponding restrictions.
Display of analogue and digital TV stations
The TV station that is being received is shown in
the display of the co mbi -instrument and also on
the screen of th e radio navigation sys tem when
you change over and activate the TV menu. Analogue and digital TV stations are shown in different ways and are identified on the screen by
"Anologue" or "OVB-T" ~ page 44, "Displays in
TV mode".
!IJ Note
• Information about the current channel and
digital TV stations in areas with DVB-T can be
found on the internet (e.g. at www.ueberallfernsehen .deJ and is also available from your
local TV retailer.
• The video image on the screen of the radio
navigation system is only displayed when the
vehicle is stationary. The televi sio n screen is
switched off while th e vehicle is in motion, but
the sound can still be heard.
• If the digital TV signal is very weak, there
could be temporary interruptions in the picture
and sound (display: ~ and i J. '4
DVB-T = digital video broadcasting - terrestrial
Digital terrestrial television is broadcast entirely using earthbound circuits.
also known as EPG (electronic programme guide).
A "hybrid receiver" uses both analogue and digital technology. A" receiver" is also known as a tuner.
42
Function selection button MEDIA
The TV image is d.isplayed on the screen of the
radio naviga tion system. The sound is relayed
via the vehicle's loudspeakers.
Availability of DVB-T and functional description
of the "hybrid receiver"
In areas where DVB-T is available, analogue TV
is gradually being phased out. This means that
in some areas only digital or only analogue TV
may be available. In some areas both analogue
and digital TV are available.
The aspect ratio in full- screen mode (4:3 or 16:9)
and other se ttings, as well as changes to the current TV standard, are made in the appropriate
setup me nu => page 51. "TV settings".
Fig. 37 TV menu over the TV image.
Hardkeys in TV mode
page 2, fig. I @)or(B - goes to the next stations on the station list.
~
The TV image is only displayed when the
vehicle is stationary. The television screen
is switched offwhile the vehicle is in motion, but the so und can stiIJ be heard.
Settings knob ~ page 2, fig. I 0- turn the knob
to select a TV channel or digital TV station manually.
Starting TV Mode
Gl or(B -
- Press the [MEDIAl function selection
button to go to the MEDIA main menu .
Playback of the media source last played is
resumed.
- Use the IMEDIAI function selection
button to switch between the last audio
and the last video source.
Function keys in the TV menu
goes to the next TV stations on the station list, similar to the arrow keys on the unit
~ page 2, fig. I 0 .
IAud;o]- changes to the audio menu and plays the
last selected audio source.
IS.ahon 1;,'1- opens the list of analogue TV stations
and digital TV and radio stations that can currently be received ~ page 45.
IMemory]- opens the memory list of manually
- In the video DVD menu, touch the
screen to open the video DVD menu
=> page 40, fig. 35.
- Select function keyIT2] to start TV mode.
The TV channel that you last selected appears in the default aspect ratio and in fullscreen display mode.
Show or hide TV menu
- While in TV mode, briefly touch the
screen to show the TV menu over the TV
image => fig. 37.
stored analogue TV stations and digital TV and
radio stations ~ page 47.
IEx'ras ]- opens a popup window where other
functions can be activated.
Popup window [Exlra,1
IT-TXTI - opens the teletext page for the currently
selected TV station if teletext is available for that
station ~ page 49.
ID;, playl- shows the menu for changing the dis-
play settings. Proceed as already described in
the section on video DVD mode ~ page 40,
"Changing display settjngs".
Function selection button MEDIA
43
~
Booklet 3.4 RNS 510
~ - opens the overview of the electronic pro-
gramme guide if digitallV stations can be received locally on DVB-T ~ page 50.
IManuai)- changes over to manual selection ora
lV channel using the arrow keys on the unit or
on the screen of the lV main menu ~ page 46,
"Manual station selection with the arrow keys ".
Selectable video sources in the Video DVD
menu
@J- changes to an optionally connected external video source 22 ) .
~-
changes to lV mode.
@Ql-changes to a video DVD loaded in the internal CDIDVD drive ~ page 38.
Displays in TV mode
Each time you switch stations, the TV menu is
displayed for a few seconds with information
about the current station. Any additional information that is displayed will depend on the type
of station (analogue or digital) and the services it
supports ~ page 42, "Display of analogue and
digitallV stations".
Booklet 3.4 RNS 510
you want to listen to. "CH A" or "CH B" will appear in the top left of the screen ~ page 43,
fig. 37.
A stereo broadcast is also indicated by the icon
" "on the right of the screen under the (B function key. A programme broadcast in twochannel sound is indicated by the icon" "in the
same position ~ page 43, fig. 37. Select the audio
channel in the lV setup ~ page 51, "Selecting
audio channel for two-channel sound".
The unit is constantly scanning the TV station 'landscape'. You can use the arrow
keys on the unit to browse through all of the TV stations you can receive.
Changing the TV standard when travelling
abroad
With analogue lV stations, the station ID can
only be displayed if the station provides one.
Otherwise only the channel number is shown.
Please keep your attention on driving at all
times. Accidents and injuries can occur if the
driver is distracted.
With digitallV stations broadcast via DVB-T, an
electronic programme guide provided by the
station can also display the name of the current
programme and its running time ~ page 43,
fig. 37. Activate the electronic programme guide
(EPG) to open a programme overview for all the
digitallV stations which you can receive
~ page 50, "Electronic Programme Guide
(EPG)".
• Do not allow yourself to be distracted from
the road by making settings on the unit or
using the unit itself.
&. WARNING
[I) Note
• The television screen is switched off automatically while the vehicle is in motion, but the
sound can still be heard.
Fig. 39 TV station list with three digital and two analogue TV stations.
Start TV mode => page 43, "Starting TV
Mode". Touch the screen to open the TV
menu => page 43.
Selecting TV stations from the station
list
-
Briefly press the arrow keys on the unit
=> page 2, fig. 1 @) or ~ to go to the previous or next TV station. Depending on the
settings in the Video settings menu, you
will go to a TV station from the list of locally available stations, or to a station from
the memory list => page 121.
• The volume settings should be selected so
that warning signals from outside the vehicle,
e.g. police or fire brigade sirens, can be heard
at all times.
nals in "stereo" or mono ".
Fig. 38 TV menu with digital TV station (DVB-n.
"Browsing TV stations"
• Please only use the unit when the road,
weather and traffic conditions are such that it
is safe to do so.
Some lV channels offer bilingual programmes
in "two-channel sound". In Video settings you
can choose which voice channel, i.e. language,
22)
Selecting TV stations
If the selected digitallV station supports the
electronic programme guide, this will be indicated by "EPG" at the top right of the screen. If
EPG is not generally available in your area, only
" "will appear when you attempt to select the
EPG function via the IExtras ) function key.
If you travel abroad, you may have to set the lV
standard to the standard for the country you are
visiting~ page 51.
If
Applies to vehicles: with TV receiver
If a lV channel also transmits teletext, this is indicated by "TT" at the top right of the screen. If
teletext is not available for the current channel,
" "is displayed when the teletext function is selected.
The top right corner of the screen shows
whether a digitallV station "OVB-T" or an analogue channel "Analog." is currently selected. If
a DVB-T radio station is selected, the screen
shows "Radio".
The top left corner of the screen shows whether
the current lV station is transmitting audio sig-
• If a lV station can no longer be received, the
icons for "sound off" ~and "no reception" i are
displayed on the screen. <Ill
- The TV menu with information about
the current station is shown when you
change stations => fig. 38.
~
- In the TVmenu you can also switch stations by touching the on-screen arrow keys
=> fig. 38 ~ or lB.
- Touch the (Station list) function key in the
TV menu to view a list of all of the TV stations which you can currently receive. The
list "jumps" straight to a view of the TV station that is currently selected. This is highlighted in the list => fig. 39.
- Move the slider in the scroll bar down to
see more stations. See also => page 46,
"Display order on the station list".
- Touch the required TV station to select
it. The selected station is displayed in the
TV menu. Touch inside the free a rea of the
screen to manually hide the TV menu.
- The station list closes automatically
after about 20 seconds of inactivity.
~
Optional equipment
44
Function selection button MEDIA
Function selection button MEDIA
45
Booklet 3.4 RNS 510
Selecting TV stations manually with
the settings knob
- In TV mode you can also select all TV
channels and digital TV stations manually.
- When you turn the settings knob in TV
mode, the TV channels are displayed in
order on the frequency band, whether they
are in use or not.
- Briefly push the settings knob to end
manual frequency selection.
Manual station selection with the
arrow keys
- Instead of selecting a TV channel manuallywith the settings knob, you can touch
the screen once in TV mode to open the TV
Booklet 3.4 RNS 510
Each time you switch stations, the TV menu is
displayed for a few seconds with information
about the current station.
Applies to vehicles: with TV receiver
Selected TV station after a change of location
You can store TV stations in the memory list.
After a change of location. the unit attempts to
"look for" the last selected TV station by means
of the station ID. If no digital TV stations are
available at the new location. then depending
on the setup. the unit also searches for the analogue ID of that station. and vice versa
=:> page 52. "Making settings for "station
tracking"".
Display order on the station list
- Touch the IExtras I function key to open a
popup window => page 49, fig. 41.
Digital TV stations that can be received by DVBT are displayed at the top of the station list, fol lowed by the analogue TV stations with their station ID and then the analogue TV stations with
no s tat ion ID (only th e channel number is
shown).
- Press the arrow keys on the unit or
touch the on-screen arrow keys to view all
TV channels and digital TV stations one by
one in their order on the frequency band.
- In the TV menu, touch the [~ Manual)
function key to close the function. The
arrow keys can now only select the receivable stations on the station or memory list.
- Touch ~ to open the memory list. You
can now select another TV station and
store it as described => page 45.
Calling up stored stations
- In the TV menu, touch the => page 45,
fig. 38 I Memory I key to open the memory
list. If the currently selected station is
stored in the list, the list will "jump"
straight to the view of that station.
However. the unit relies on the ID of the station
that it is looking for being absolutely identical. If
the particular station transmits an ID that is different from region to region. the unit will not
find the last selected TV stalion at the new location.
menu.
- In the popup window, selectlManuatl.
The ~ key in the TV menu changes to
I~ Manual! and the popup window closes.
Memory list
[1]
Note
• When you swi tch over. the station and programme information is shown differently for the
analogue and digital TV stations =:> page 44.
"Displays in TV mod e".
• Any radio s tati ons that can also be received
via DVB-T at the new location will be found at
the bottom of the list after the analogue TV stations with no station ID =:> page 45, fig. 39.
• If the digital TV signal is very weak. there
could be temporary interruptions in the picture
and so und (display: l3- and i). <4
Fig. 40 Memory Iisl wilh three digital and one analogue TV slalion.
- Touch the required TV station to select
it. The selected station is displayed in the
TV menu. Touch inside the free area of the
screen to manually hide the TV menu.
Start TV mode => page 43, "Starting TV
Mode". Touch the screen to open the TV
menu => page 43.
- The memory list closes automatically
after about 20 seconds of inactivity.
Storing TV stations
- Open the memory list as described.
- In the TV menu, touch the => page 45,
fig. 38 [Memory) key to open the memory
list.
- Touch the function key => fig. 40
side the station yo u wish to delete.
- The memory list shows the currently selected TV station in the top line of the
screen => page 14, fig. 9. Previously stored
TV stations and all the ava ilable memory
locations are displayed in a list below. To
view all of the memory locations, move the
slider at the right of the screen down.
- Touch the => page 14, fig. 9 [Savel function key to store the displayed TV station (
"TV Di9itol15" in this example) at a
memory location.
- In the Memory list menu, select a
memory location from the list by touching
it. If you select a memory location where
another station is already stored, the other
station will be overwritten.
Deleting stored stations
mID be-
- Confirm the security check by touching
IDelete) to permanently remove the station
from the memory list.
- You can also simultaneously delete all
of the TV stations that are stored in the
memory list => page 52, "Deleting the TV
memory list".
Depending on the setup , only stations from the
memory list are retrieved with th e arrow keys on
the unit or on screen =:> page 121.
Please note that many more stations are available in regions with digital TV than in regions
\'lith analogue TV. This means that some digital
TV stations are not available as analogue stations. If this is the case, a digital TV station will
not be displayed in a region with analogue TV
only (display: ~ and").
When a TV s tation is stored. either the "station
ID" (the name transmitted by the TV station) is
46
Function selection button MEDIA
Function selection button MEDIA
47
~
Booklet 3.4 RNS 510
Booklet 3.4 RNS 510
stored or if no name is transmitted, the channel
number on which that TV station broadcasts at
your location. This will determine whether the
unit can find the stored TV station at a different
location later on.
different station is broadcasting on that channel
at another location. In this case the TV station
broadcasting with that channel number at the
new location will be displayed when the
memory location is selected.
TV station stored with stotion ID
If no TV stations are broadcasting on that
channel. then no station will be displayed when
the memory location is selected, and the icons
"1(!. and Tfor poor reception will appear on the
screen.
If you are at a different location with a different
channel 'landscape', the unit uses the station's
ID to try and "find" it at its new channel and to
display it after opening the memory location.
If the station 10 of the stored TV station cannot
be found at the new location, or if a digitally
stored TV station is only available as an analogue
station or vice versa, a popup window opens to
tell you that the programme you are looking for
is not available.
Confirm the message with @R) and consult the
station list to see whether the required TV station may be broadcasting under a different regional name or is available in analogue or digital
form. Alternatively, select another station from
the station list ~ page 45.
TV station stored under a channel number
If a TV station that has no ID has been stored
under the channel number with which it has
broadcast at one location, you may find that a
Applies to vehicles: with TV receiver
Viewing te letext
If the selected TV station provides teletext, this will be indicated by '11" at the top
right of the TV menu.
Station selection in border areas
TV stations from a different country which
broadcast using a different TV standard and can
be received in areas close to the border can also
be stored in the memory list.
If you are travelling abroad for longer periods, it
is advisable to set the TV standard to the country
in which you are travelling ~ page 51,
"Changing the TV standard".
Fig. 41 Popup window for selecting other functions.
The way in which TV stations and stations families broadcast their IOs is the responsibility of
the particular station. If the same TV station uses
different IDs for different regions, the unit may
be unable to find it. -4
Start TV mode::::> page 43, "Starting TV
Mode".
Opening a teletext page
- In TV mode, touch the screen once to
open the TV menu.
- Touch the! Extras I function key to open
the popup window::::> fig. 41.
- In the popup window, touch !nXT] to
open the teletext page for the currently selected TV station ::::> fig. 42.
- Touch the function key ~ to close the
teletext.
Changing teletext pages
- Open the teletext page of a TV station as
described . The number of the current page
is shown on the top left.
- Now select ~ or ~ to go to the next or
previous available page number. Teletext
pages are identified clearly by a unique
page number. Unused page numbers are
skipped when you browse ~vith the arrow
keys.
48
Function selection button MEDIA
Fig. 42 Typicol teletext page.
[l] Note
Opening a specific teletext page
- The teletext home page displays a list of
the available pages. To go to a specific teletext page you must enter the corresponding number.
- Select the ~ function key to open a
screen where you can enter the page
number.
- Enter the number ofthe teletext page
you want and confirm your input as described::::> page 12, "Input mask for entering n urn bers". The page is opened. The
running numbers next to your number entered at the top left of the screen indicate
the progress of the page search.
When the number of a teletext page is entered,
all available teletext pages for the selected TV
station are browsed in ascending numerical
order. When the highest number has been
reached, the search starts again with the lowest
number. The search for a particular teletext page
may take a few seconds depending on the page
number you want and the number ofthe current
~~
Function selection button MEDIA
~
49
Booklet 3.4 RNS 510
Other function keys for displaying
poge
Booklet 3.4 RNS 510
0
teletexi
If you touch the teletext page on the screen, the
TV image will appear in the background behind
the teletext page. Touch the screen again to remove the TV image behind the teletext page.
~- freezes the teletext page view at the cur-
rent sub-page. This is because some teletext
pages consist of a number of sub-pages which
are normally displayed continuously one after
the other.
IZooml- magnifies the view of the current teletext
page. Touch once to view the top half an d twice
to view the bottom half of the current teletext
page filling the screen. Touch again to return to
the normal view of the teletext page.
• TV stations are responsible for the scope and
content of the information provided in the EPG.
Applies to vehicles: with TV receiver
TV settings
[I) Note
• If there is no teletext available for the selected TV station, the screen remains black and
the icon " "shows that teletext is not available.
• lfreception is poor, some additional services
such as teletext and EPG (electronic programme
guide) may be temporarily unavailable. ~
The "Video settings" menu is also used to make the settings for the TV mode. You
can change the TV standard and TV format (4:3 or 16:9), select an audio channel
for audio output (two-channel sound) and set up the analogue/DVB-T selection.
You can also specify the list from which TV stations will be accessed via the arrow
keys.
Changing the TV standard
- In the Video settings menu, move the
Applies 10 vehicles: with TV receiver
slide control down and touch the [TV norm)
function key to open the popup window in
which you can select a TV standard.
Electronic Programme Guide (EPG)
If the selected TV station offers an electronic programme guide, this will be indicated by "f: PG" at the top right of the TV menu. You can also select a different TV
station directly from the EPG.
Start TV mode =:> page 43, "Starting TV
Mode". Touch the screen to open the IV
menu =:> page 43.
Opening the electronic programme
guide
- In TV mode, touch the screen once to
open the IV menu.
- Touch the [Extras I function key to open
the popup window =:> page 49, fig. 41.
- In the popup window, touch [~ to
view the electronic programme guide. For
each digital TV station that you can currently receive, the list displays the programme that is currently running and the
programme that immediately follows it.
The programme on the selected TV station
is highlighted.
- Touch ~ or ~ to highlight the current
programme of a different station in the list.
- Touch the required TV standard to select it. Ask your specialist retailer about the
TV standard used in the country you are
visiting.
- rryou touch the~key, you can view
more information about the highlighted
programme and the next programme provided the station makes this information
available.
Fig. 43 Video sellings with selection of TV sellings.
- Touch the [Select.] function key to close
the EPG and display the highlighted station in TV mode.
- If you select the function key~, the EPG
will close and the station that was previously selected is displayed.
The electronic programme guide is only avail able for digital TV stations received on DVB-T
and only when they support EPG.
[I) Note
• If reception is poor, some additional services
such as teletext and EPG (electronic programme
guide) may be temporarily unavailable.
Function selection button MEDIA
slide control down to display the ITV format)
function key. The aspect ratio that is currently set is shown beside the ITV format) key.
Specifying station selection using
arrow keys
- In the Video settings menu, move the
- Touch the [TV format) function key, and in
the popup window which opens, select@]
or ~ to set the required aspect ratio for
displaying the TV image =:> page 45, fig. 38.
- Touch IStation list) or IMemory list) to specify
the list from which sel ections will be made
with the arrow keys in TV mode. If you select (Memory list ], only TV stations that are
stored in the memory list will be accessed
with the arrow keys =:> page 45, ''''Browsing
TV stations"".
The programmes listed cannot be selected di recty by touching them. They can only be highlighted, di splayed and opened llsing the right
hand function keys.
~
Changing the aspect ratio of the
screen display
- In the Video settings menu , move the
Call up the Video settings menu by
preSSing the ISETUP] function selection
button and the [Video ] function key.
slide control down and touch the
=:> fig. 43 (TV search mode) function key.
• If no EPG is currently available, the screens
remains black and the icon " " is displayed.
50
• The EPG cannot display any information
about analogue TV stations. ~
Selecting audio channel for twochannel sound
- If a programme is broadcast in two languages v,rith two-channel sound (display
=:> page 45, fig. 38: J. you can manually select the audio channel with the language
you want.
- In the Video settings menu, move the
slide control down and touch the
(TV audio channel) function key to open the
popup window in which you can select an
audio channel.
Function selection button MEDIA
51
~
Booklet 3.4 RNS 510
- Simply touch to select/cH AI or [CH BI.
Your selected audio channel appears at the
top left of the IV menu => page 45, fig. 38.
Making settings for "station tracking"
- In the Video settings menu, move the
slide control down to display the function
key [Automatic DVB-T/Analogue switch ]. A tick in
the checkbox ~ shows that station
tracking will also search for the analogue
or digital pendant of the selected TV station => page 46, "Selected TV station after a
change oflocation".
- Briefly touch the function key to check
or clear the checkbox.
Booklet 3.4 RNS 510
Setting the audio/video standard
- In the Video settings menu, move the
slide control fully down to see the function
keys [AV 1 norm] and [AV 2 norm]. Here you can
set up the necessary playback standard 23)
for an optionally connected external
audio/video source for both of the available video inputs.
Important information on operating
the CD player
Safety precautions for devices fitted with lasers
Laser devices are classified into safety classes 1 -
- Touch the function key [AV 1 norm] or
IAV 2 norm], then in the popup window,
touch to select the required standard .
4 in accordance with DIN IEC 76 (CO) 6/ VDE
For more settings for the video OVD mode and
for operating a n external audio/video source in
the Video settings menu, refer to chapter
=> page 126.
The lasers used in class 1 devices are low ene rgy
lasers, or are shielded in such a way that they
present no danger when used correctly.
0837.
Volkswagen CO players conform to safety class l.
Deleting the TV memory list
- In the Video settings menu, move the
slide control down and touch the
[Delete TV memory list] function key.
- Confirm the prompt if you no longer
need the TV stations stored in the memory
list, e.g. because they are not available at
your new location => p age 47, "Memory
list" .
(l) Note
If a TV programme that is transmitted in 4:3
format is displayed using the 16:9 screen format
setting, then the top and bottom of the TV image
will be "cut off" . ~
~
.& WARNING
• The CO player is a class 1 laser product.
When the CD player is opened, there is a risk of
injury caused by the invisible laser beams escaping from the unit.
• The CD player contains no parts which you
can service or repair by yourself. You should
therefore contact an authorised dealer if there
is a mechanical fault or if a repair is
required. ~
Tips for the CD mode
To ensure perfect, high-quality so und, use only
clean, undamaged COs.
.& WARNING
Please note that a dirty or scratched naviga tion
OVD ca n seriously impair the speed and functions of the navigation system.
The volume settings should be selected so that
warning signals from outside the vehicle, e.g.
police or fire brigade sirens, can be heard at all
times.
Compact discs shou ld always be stored in the
CD rack from the Genuine Vol.kswagen accessories range or in their original case when not in
use.
Please do not stick any labels onto the CDs.
Never expose CDs to direct su nli ght'
[l] Note
• You might not be able to play COs with copy
protection or CD-Rs and CO-RWs which you
have burned yourself.
• Not every CD playe r can play MP3 COs.
Please refer to the notes in the corresponding
chapter.
• Please observe the copyright laws applicable
in your country. ..
23)
Optional equipment! Please refer to the manufacturer's operating manual.
52
Function selection button MEDIA
Important information on operating the CD player
53
Booklet 3.4 RNS 510
Booklet 3.4 RNS 510
Handling data media (COs and DVDs)
TONE function selection buHon
To ensure perfect, high-quality sound, only clean, undamaged data media should
be used.
Cleaning data media
Hold the data medium by its edge. Avoid leaving
fingerprints on data media.
Clean data media using a soft, lint-free cloth.
Wipe the data medium in straight lines moving
from the centre out towards the edge. Stubborn
dirt can be removed with a commercial CO/OVD
cleaner or isopropyl alcohol.
• Push the COIDVD into the CD slot until it is
pulled in automatically.
• The data medium should be held straight
and at right angles to the front of the unit when
being inserted and removed from the drive.
taking care not to jam it. Surface scratches may
render the data medium unserviceable.
CD Caution
• Only write on data media using suitable
pens/markers. Unsuitable writing products will
damage the material.
• Never use fluids such as petrol. paint thinner
or vinyl record cleaner. as these can damage the
surface of the data medium!
• Do not affix stickers or similar items to the
data medium. as stickers can work loose and
damage the drive.
• Use standard 12 cm COs/OVDs only. 8 cm
single COs and irregular COs (known as "shape
COs") must not be inserted as they could
damage the CO/OVO drive.
• Do not place data media near heat sources or
in direct sunlight.
• OVO plus. dual discs and flip discs are thicker
than standard COs and must not be inserted into
the unit.
• OVDs should always be stored in the rack
from the Genuine Volkswagen accessories range
or in the original case when not in use.
• Please be careful when removing data media
that they do not fall and scratch their surface. <Ill
Changing the sound, sound focus, and volume
You can adjust the sound character and the volume of different audio sources to
suit your individual needs.
Fig.44 Main menu: Sound seHings.
Fig.4S Menu : Volume seHings.
In the Sound settings='> fig. 44 main menu.
functions can be switched off or on or are
infinitely adjustable ='> page 5. "General
operation". An overview of setting options
and the menu structure of the Sound settings main menu can be found at the end
of this chapter.
- Move the slid er DJ or press the G or (]
to change a setting.
Calling up the Sound settings main
menu
- Press the [TONE] function selection
button to open the menu to change the
sound and volume settings ='> fig. 44.
Changing the sound character or
sound focus
- Touch ='> fig. 44 [ Treble - Mid - Bass] to
open the settings menu for changing the
"sound character".
- Touch ='> fig. 44 [Balance - Fader] to open
the settings menu for changing the sound
balance from left to right (balance) and
from front to back (fader).
54
Important information on operating the CD player
Changing volume settings
Touch ='> fig. 44 {Volume ]. The Volume
settings menu is opened => fig. 45.
-
- Touch the function key [Switch'on volume],
[Traffic announcements] or {Telephone I. to open the
corresponding settings menu.
- Move the slider rn or press G or (] to
change the displayed volume.
- Touch the {Navigation] function key to
open the Navigation volume menu. In the
Navigation volume menu. you can adjust
the volume of the Nav. announcements
with [Announcement volumeJ. You can also
change the options for[Nav. announcementsJOr
specify how far the volume of other audio
sources should be lowered during a Nav.
announcement using [Audio seHings I
='>~~~.
TONE function selection button
~
55
Booklet 3.4 RNS 510
GALA - speed dependant volume
control
- Touch ~ page 55, fig. 44 IGALA). The
GALA settings menu is opened.
- Change the degree of volume increase
in stages from 1 to 6 by moving the slider
rn or pressing G or 0 ~ page 56, "OperatingGALA:" .
- Move the slider DJ all the way to the left
to swi tch off GALA.
Accepting settings
- Touch the ~ function key on the
screen to switch to the previous menu.
Press a function selection button (e.g.
IRADIO)) to go to that menu. The changed
settings are accepted in both cases.
Confirmation tone for screen operation
You can s\vitch a confirmation tone for operating the tOllch screen on or off. To do this, move
the slider IJJ in the Sound settings menu all the
way to the bottom and touch [Confirmation tone I. In
the pop-up window, touch [~Off) or[~ On).
Nov. announcements
~ - Navigation announcements are played
during audio mode at the preset volume
=> page 95.
Booklet 3.4 RNS 510
navigation announcements are only
issued when the calculated route has been left,
e.g. as a response to traffic congestion warnings.
This setting is recommended when navigation
announcements for a route travelled each day
are no longer needed and the navigation system
is only used for dynamic navigation => page 98,
"Dynamic route guidance with TMC (Traffic
Message Channel)". If a navigation announcement is issued again due to a change in route,
Nav. announcements are always switched on
again (display: [Nov. onnouncementsll~ On]) .
[Dynomicl-
@ID-nospoken navigation recommendations
are issued.
Function overview table for the TON E function
selection buHon
Main menu: Sound settings
Function keys
1. Sub-menu
Treble - Mid Bass
Settings menu for Sound settings:
- Treble
-Mid
-Bass
Balance - Fader
Settings menu for changing to volume from:
- right to left Balance)
- front to rear Fader
Operating GALA:
The noise level in the vehicle increases with vehicle speed. GALA automatically adjusts the
volume to the speed of the vehicle.
If a low GALA value is set, the volume rises
slightly when the speed of the vehicle increases.
3. Sub-menu
Switch-on
volume
Settings menu for the maximum switch-on volume
Traffic announcements
Settings menu for the volume of traffic announcements
If a high GALA vaJue is se t, the volume rises significantly when the speed of the vehicle increases.
In this way, GALA can be adjusted at any time
(e.g: windows open or closed or roof carrier attached) to su.it current situation in the vehicle.
2. Sub-menu
Volume
Navigation
Announcement
volume
Settings menu for the volume of Nav. announcements
- Volume
- Minimum volume
Nav, announcements
Pop-up window: Nav. announcements
- Off
-Dynamic
-On
Audio volume
reduction
Pop-up window:
lowering the audio volume during a Nav.
announcement
-Low
-Medium
-High
The basic volume is still changed via the volume
control => page 2, fig. 1 0. <11
Telephone
Settings menu for lowering the volume of a media source
during a telephone caJI
GALA
Settings menu for increase level of the Speed dependant volume control
=> page 56
Confirmation
tone
Pop-up window: confirmation tone when pressing a button
-On
- Off
Touch the ~ to return to the previous menu.
56
TONE function selection button
TONE function selection button
57
Booklet 3.4 RNS 510
Booklet 3.4 RNS 510
NAV (navigation system) function
selection buHon
Overview
How does the navigation system work and how is it operated?
An optimal route is defined using sensors, satellites and traffic reports and the
driver is then guided to his or her destination.
The current vehicle posit ion is determined using
a satellite system (GPS - Global Positioning
System). Sensors in the vehicle measure distances that have been driven. The values are
compared to the detailed map information on a
navigation DVD and are corrected as necessary
with the support ofTMC traffic reports (TMC =
Traffic Message Channel) =:> page 98. The data is
then used to calculate the optimal route to the
destination.
Navigation announcements. map displays on
the screen of the navigation device. and direction arrows shown on the screen and in the
combi-instrument guide you safely and comfortably to your destination. You can drive to an
address in a n unfamiliar town. find the nearest
petrol station or be guided to a hotel . for example.
This chapter contains answers to the following
questions:
• What rules do J have to adhere to when us ing
the navigation system? =:> page 59. "Safety information for using the navigation system"
How do I use the n aviga tion DVD?
page 60. "Navigation data and the navigation
DVD"
•
=:>
58
• Can I listen to music when using the navigation system? =:> page 62. "General information"
• What happens if I leave the recommend ed
route? =:> page 62. "General information"
• Can a navigation announcement be repeated? =:> page 96. "Issuing navigation recommendations"
• How does the navigation system respond
when driving in an underground car park or a
tunnel? =:> page 62. "General information"
• How do I enter destinations? =:> page 07.
"Destination entry: selecting a destination"
• How can I enter petrol stations, restaurants
or hotels as desti nations? =:> page 69, "Selecting
points of interest as a travel destination "
•
Can I store destinations in a memory?
=:> page 78. "Destination mem ory"
• What parameters can I set for route calculation? =:> page 66. "SpeCifying parameters for
route calculation"
•
How am) guided to a des tination?
page 96. "Issuing navi gation recommendations"
=:>
• Can I stop or interrupt the route guidance
function before I reach my destination?
=:> page 95. "Route guidance" ...
NAV (navigation system) function selection button
Safety information fo r using the navigation system
The navigation system dete rmines the position
of the vehicle. the direction. distance and the
route to a selected destination. However. it is not
able to take traffic rules and regulations into account =:> 6. The system provides navigation
recommendations in the form of spoken navigation announcements. Direction arrows indicating the direction of travel are also displayed
on the screen.
The destination is entered when the vehicle is
stationary. The route guidance function is designed for cars and is therefore unsuitable for
larger commercial vehicles.
The route is recalculated each time you ignore
recommendations or leave the recommended
route. This process takes only a few seconds.
Navigation recommendations can only be made
again when the process is complete.
Depending on the country. some radio navigation system functions can no longer be selected
when the vehicle is travelling above a certain
speed. This is not a malfunction, but simply the
legal requirements valid in this country.
Incomplete navigation data
The navigation system cannot receive data from
GPS satellites while passing under a heavy
canopy of trees. or when your vehicle is in a garage. underpass or tunnel. In these situations.
the navigation system relies the vehicle se nsors
to determine the position of the vehicle.
In areas that are not. or are on ly partially, digitalized on the navigation DVD. the navigation
system \i\~ll continue to attempt to establish
route guidance. Note that under these circumstances, faults may occur in the route guidance
when aspects such as one-way streets and street
categories (motorway. rural routes. etc.) are not.
or are only partiaUy. included in the navigation
data.
&. WARNING
Please keep your attention on driving at all
times. Accidents and injuries can occur if the
driver is distracted.
• Do not allowyourselfto be distracted from
the road by making settings or by using the
radio/navigation system.
• The radio/navigation system should only
be used when the road, weather and traffic
conditions are such that it is safe to do so.
• The volume settings should be selected so
that warning signals from outside the vehicle,
e.g. police or fire brigade sirens, can be heard
at all times.
&. WARNING
Please observe the laws of road traffic legislation when folloMng the recommendations
made by your radio/navigation system.
• The recommendations made by the system
can differ from the actual road situation, e.g.
due to road works or outdated navigation
data. In these cases, traffic legislations should
always be followed and recommendations
made by the navigation system ignored.
• Traffic signs and legislations always take
priority over the recommendations made by
the navigation system.
• Even if information regard.i ng one-way
streets, pedestrian zones etc. is stored on the
navigation DVD. route guidance is still subject
to constant changes. Information regarding
traffic lights. stop signs and right of way signs,
parking and stopping restrictions, as well as
lane constrictions and speed limits, is not included in the radio/navigation system.
• It is essential that you adjust your speed to
suit the road, weather and traffic conditions.
Do not follow the radio/navigation system
recommendations if it advises you, for example, to drive fast in foggy conditions. Risk of
accident! ~
NAV (navigation system) function selection button
59
Booklet 3.4 RNS 510
Booklet 3.4 RNS 510
Navigation data and the na vigation DVD
- Press [Continue] in the pop-up window to
confirm that you have seen the message.
Storing the navigation data can take up to an
hour. While the navigation data is being stored,
route guidance is started using the navigation
DVD. Note that the route guidance is cancelled if
the navigation DVD is removed. Route guidance
must then be restarted and receives data from
the navigation memory of the unit.
- Press the [Save] function key in the popup window to overwrite the data in the
navigation memory of the unit with the
data on the navigation DVD.
Ensure that when inserting and removing the
navigation DVD. it is kept straight and at right
angles to the front of th e unit. Do not hold the
DVD at an angle which could cause scratches.
rendering the navigation DVD useless.
It is advisable to store the data on the navigation DVD directly in the navigation
memory of the unit. The navigation DVD is then no longer needed for navigation.
If there is currently no navigation data
stored in the navigation memory of the
unit, the navigation data is saved automaticallywhen the navigation DVD is inserted.
Storing navigation data in the unit
Insert the navigation DVD into the
CDIDVD slot with the printed side facing
up until it is automatically pulled in => CD.
The unit compares the data on the navigation DVD to the data in the navigation
memory. If the data in the navigation
memory of the unit is identical to the data
on the navigation DVD, no message appears.
-
- Press the@ button to re move the navigation DVD => CD.
- If there is currently no navigation data
stored in the unit, the storing process starts
automatically in the background. If you
press the @ button during this process, a
message appears stating that the navigation data is currently being copied onto
the hard drive and th e process wi.1I be cancelled if the navigation DVD is removed .
- Press the ~ function key to be informed when the storing process has finished.
- When the message app e ars, press the
@ button or press the [Eject] function key,
and remove the navigation DVD. The current route guidan ce will be cancelled and
must be restarted.
Updating navigation data in the unit
- If the data in the n avigation memory of
the unit is not identical to the data on the
navigation DVD, a m essage appears.
60
- lfyou press the@button during this
process, a message a ppears stating that
the navigation data is currently being
copied onto the hard drive and the process
will be cancelled if the navigation DVD is
removed now.
- Press the [Notify] function key to b e informed when the storing process has fInished.
- When the message appears, press the
@button or press the [Eject ] function key,
and remove the navigation DVD. The current route guidance wifl be cancelled and
must be restarted.
Using the navigation DVD data for a
short period of time
- If you only leave the map area stored in
the navigation memory of the unit for a
short period of time, insert the navigation
DVD for the area where you will be travelling.
- Press [Continue] in the pop-up window to
confirm that you have seen the message.
- Press the [Temp.] function key in the popup window and exit the naviga tion DVD in
the unit. The unit now naviga tes using the
data from the navigation DVD.
- \Nhen you return to the area cove red in
the map material stored in the navigation
memory, press the@butto ntoremovethe
navigation DVD .
.,
NAV (navigation system) function selection button
Store the navigation DVD carefully so that it is on
hand when you have to temporarily replace the
data on the navigation DVD in the unit with the
data stored on another navigation DVD
=;. page 61. "Leaving the stored navigation area".
Compatibility of the navigation DVD
There are different generations of units in use in
Volkswagen vehicles. The data carriers for the
different units are not compatible with each
other. You will need the navigation DVD which is
valid for your navigation system. Your
Volkswagen dealer will be pleased to help you
find the right version.
Current navigation data and new navigation
DVD
Roads and streets are subject to constant change
(e.g. new roads, changes to street names and
house numbers). Your navigation DVD is an
enormous database whi ch. after some time. will
unfortunately no longer be up to date. This
could cause probl ems during route guidance.
For this reason. update the navigation data on
your unit regularly with a current navigation
DVD. Be sure to obtain a new navigation DVD in
time. also avail able at your Volkswagen dealer.
Leaving the stored navigation area
The map area stored in the navigation memory
of the unit is very large and contains multiple
countries. However. if you should leave the
stored navigation area. you will need another
navigation DVD willl th e appropriate navigation
data.
A navigation DVD compatible with your unit can
be obtained from your Volkswagen dealer. You
can then store the data of this navigation DVD in
the unit. vVhen this is done. the "old" navigation
data in the unit is overwritten.
If you are only leaving the stored navigation area
for a short period of time. you can also navigate
directly via the inserted navigation DVD. However. the navigation DVD must then remain in
the internal CD/DVD drive for the duration of
the route guidance =;. page 60. "Using the navigation DVD data for a short period of time".
Can I burn my own navigation DVDs?
Your navigation system will only accept original
DVDs. as only these can guarantee correct route
calculation.
Copyright laws are in place prohibit.ing unauthorized reproduction of navigation DVDs.
Using an iUegal copy of a navigation DVD will
nearly always cause problems in the navigation
system.
& WARNING
• Please refer to =;. page 19, "General information on CD/DVD mode" and =;. page 53,
"Important information on operating the CD
player".
o
Caution
• Please note that a soiled or scratched navigation DVD can seriously impair the complete
copying of all the navigation data needed for
navigation into the navigation memory. This can
significantly affect the speed and the funct.ions
of the navigation =;. page 54. "Handling data
media (CDs and DVDs)" .
• Inserting a second CD/DVD while an inserted CD/DVD is being ejected can destroy the
CD/DVD drive in the unit. Note that it takes a
few seconds to eject the CD / DVD after pressing
the eject button ® The protective barrier in
front of the CD/DVD slot is opened while this is
happening. You must wait until the CD/DVD is
ejected before trying to insert a new CD/DVD.
• Please note that a soiled or scratched navigation DVD can seriously impair the speed and
functions of the navigation system.
• DVDs should always be stored in the DVD
rack from the Genuine Volkswagen accessories
range or in the original case when not in use.
rn
Note
• The extent to which small villages. streets
and house numbers are included on the naviga- .,
NAV (navigation system) function selection button
61
Booklet 3.4 RNS 510
tion DVD depends on the version of the navigationDVD.
• In certain cases, you may need a new navigation DVD when travelling in another country. A
list of the countries included on the DVD can be
found on the rear side ofthe DVD case.
Booklet 3.4 RNS 510
• The content of the navigation DVD is being
updated constantly. You can obtain information
on new navigation DVDs from your Volkswagen
dealer. ...
General information
The fuU scope of the unit's audio sources are
available while you are being navigated to a destination 24 ) . Navigation announcements are
played at the preset volume in the current audio
mode. The volume of the current audio source
will then be lowered so that you do not "miss"
the navigation announcement =:> page 55,
"Changing volume settings" .
You can use the ~ and ~ function selection buttons to receive information on the current navigation status.
When entering an address (town, street), only
those characters which make up a logical entry
are made available for selection. A list of possible names are shown. Do not forget to enter
the blank space in names made up of more than
one word, such as "High Wycombe" .
The last announcement made can be repeated
during route guidance by pressing the@D
button. You can change the volume during a
navigation announcement by turning the
volume control(!).
If "Off Rood" is displayed on the screen, you are
on a street that is not included in the navigation
data used, such as a car park, a private road or a
country lane.
acters available for selection from the navigation memory. When fewer than one hundred
destinations are available for selection, the
number of destinations currently available is
displayed to the right next to the input line. If
fewer than six destinations are available for selection, the input mask is closed automatically
and a list of possible destinations is displayed.
Touch the desired destination to select it.
suggestions can be accepted by touching the@g)
function key.
While the destination is being entered, the characters are continuously compared with the navigation data in the navigation memory and suggestions are displayed in the input line. These
Input windows for "free text input"
Free text entry allows any letter, number, and
special character to be entered in any combination =:> page ]0 . ...
If one of your desired inputs is not available, either the address does not exist, or a previously
selected restriction will not allow you to make
the entry. For example, entering a particular
post code will only allow you to choose streets
that are actually located in that post code range.
Input masks fo r selecting an address
Only those letters and numbers which make up a logical entry are available for selection.
The GPS sateUite signals will not be able to reach
your aerial when you are in a tunnel or underground garage, forcing the unit to rely on the
wheel sensors for orientation. If you attempt to
carry out a route calculation in this situation you
may hear the announcement: "You are located
on a non-digitalised street". Drive on umil the
display "Off Rood" disappears . ...
The route wiu be recalculated if you leave or disregard the route that was originally calculated.
This process takes only a few seconds.
Input windows for navigation
O verview
Input windows are used to select an address or enter a name or numbers.
There are two kinds of input masks. The input
masks used to search for and call up information
in the unit (e.g "select" an address) and input
masks where "free text" can be entered.
Input masks for "searching for information"
(e.g. selecting an address)
When entering destinations, it is only possible to
enter names which are aLready stored in the nav-
24)
igation memory. For this reason, only those letters, numbers and special characters whkh
make up a logical entry are available for selection. A destination is therefore not entered
freely, but selected from a range of destinations
stored in the unit.
Every character you enter narrows the choice of
stored destinations further until there are only a
few destinations with this combination of char- ~
Fig.46 Address input: selecting a town.
Fig.47 Selecting from a list.
When entering destinations, it is only possible to enter names which are already
stored in the navigation memory. When
entering an address, for example, the town
selection is always restricted to a previously-selected country. Additional selection options are restricted by each new
character in the input line => page 62.
- Touch the @ function key to open the
input mask for numbers and special characters. Press ~ to change to the letter
input mask again.
Selecting a destination
- In the input mask, touch a character
displayed in the keyboard block to add it to
the input line.
- Each entry will suggest a new destination from the navigation memory in the
input line.
- Touch@KIto accept the destination displayed in the input line. Touch ~ to close
the input mask without accepting the entries.
~
Exception: ~ page 60, "Using the navigation DVD data for a short period of time"
62
NAV (navigation system) function selection button
NAV (navigation system) function selection button
63
Booklet 3.4 RNS 510
- Delete the characters in the input line,
starting at the position of the character insertion mark and moving from right to left,
by touching the ~ function key.
Selecting a destination from the list
- If you touch the ~ function key after
opening the input mask, a list is opened
with all of the destinations meeting the parameters (e.g. for [Country) and [Town Dthat
can be selected from the navigation
memory => fig. 47.
- Move the scroll bar on the right side of
the screen to display all of the entries in the
list.
- Touch the desired entry in the list to accept it for the address entry.
Narrowing the destination search and
selecting from the list
- While making entries in the input line,
you can touch the El function key behind
the input line at any time to open a list of
destinations which can be selected. Only
those destinations which can be selected
from the navigation memory are displayed
that meet the parameters and the sequence of characters in the input line
=> page 63, fig. 47.
Booklet 3.4 RNS 510
- The number of the currently available
destinations is ctisplayed in the El function key when fewer than one hundred
destinations can be selected => page 63,
fig. 46.
If fewer than six destinations can be selected, the input mask is closed automaticaUy and the list of possible destinations is
displayed .
-
The Navigation main menu
The Navigation main menu is used to select a new destination, to store a displayed
destination, to set a "Flagdest. ", to change to the tour or waypoint navigation
mode, to start route guidance to the displayed destination, and route options are
displayed and specified.
Selecting special characters based on letters
A few letters are also marked with a small triangle "T". This indicates that special characters
based on this letter can be selected.
Keep the function key pressed with your finger
until a pop-up window is shown with this special character. Accept the desired character by
touching the input line - the pop-up window
will be closed. Ifno entries are made, the pop-up
window is closed automatically after a few sec·
onds.
A few special characters can also be "written
out". Thus, instead of the German special characters "A", "0 ", and "0", the sequence of characters "AE", "UE", and "OE" are recognised by the
navigation system. Other special characters can
be ignored, such as instead of "E", "n", or "E", a
normal "E" is recognised by the navigation
system. <4
Fig. 48 The Navigation main menu with address.
- Touch the [NAV) function selection
button to switch over to navigation. The
last opened menu in navigation is displayed.
- Touch the [NAV ] function selection
button again if the Navigation => fig. 48
main menu is not displayed. In navigation,
touching the [NAV) function selection
button always selects the Navigation main
menu .
The Navigation main menu is displayed either
in "normal" Travel destination mode => fig. 48 or
in Tour mode => page 83, fig. 69. rfTour mode is
displayed, change to "normal" Travel destination mode => page 85, "Leaving Tour mode".
In the upper third of th e screen, the add ress last
used as route guidance is di splayed. If no address is displayed, route guidance was not yet
performed with the unit or the "destination
memory" was manually deleted => page 78,
"Destination memory".
Next to the (Op';on,] function key the currently set
route options are displayed => page 66, "Specifying parameters for route calcu lation ".
64
NAV (navigation system) function selection button
Fig. 49 Selecting route options.
Setting the Ipos;t;on] and !El
opens a window with information
abo ut your current location. In this menu, you
can store the displayed location in the destina tion memory using ~ => page 78, "Destination memory" .
(pos;';on]-
(El - stores the current position as a "Flagdest."
in the destination memory. Only one destination can be stored usi ng the name "Flagdest." in
the destination memory. If the flagged destination is not renamed, it will be (El overwritten
=> page 81 when the screen is touched again.
Additional function keys in the Navigation main
menu
opens a selection menu to select
the type of destination entry => page 67.
INew des';no';onl-
~-
opens a pop-up window:
(load de.';notion 1- to
select a travel destination
that is already saved => page 76.
•
• (Save de,';no'ionl- to save the travel desti nation
displayed in the Navigation main menll
=> page 81.
• (Monage memoryl- swi tches to the destination
~~ry=>~~~
NAV (navigation system) function selection button
~
65
Booklet 3.4 RNS 510
Booklet 3.4 RNS 510
specify a point along the route or the destination
area as the search area => page 69.
by touching it => page 76- or saves the displayed
Recent destinations => page 80.
select a point from the map as travel
destination => page 74.
(Fovourites)-
(Home oddr... ) -
opens the list of saved travel destinations which were previously defined as "favourite destination". and starts route guidance
to one of the displayed travel destinations by
touching it:::) page 76 - or edits "Favourites"
=> page 81.
opens the list of the destinations recently travelled to and starts route guidance to one of the displayed travel destinations
opens the list of saved travel
destination and starts route guidance to one of
the displayed travel destinations by touching it
=> page 76 - or edits the "Destination memory"
=> page 80. <4
(Mop/GPS) -
New destination: selecting a travel destination
from the destination memory
selects a previously entered and
saved home address as destination - or defines
the home address => page 82.
(Recent destinotions) -
(Oestinotion memory)
looking for that is not in the post code area
cannot be found when selecting a street later.
Function key ~
The:::) page 68. fig. 52 @] function key selects
the input mask for points of interest :::) page 69.
You can narrow down the target area for points
of interest searches in the Address entry
:::) page 68. fig. 52 menu . for example, byentering the {Country] and (Town ).
The ~ function key in the Address entry
menu
[n the Address entry=> page 68, fig. 52 menu, you
can specify before switching to ~ which area
should be displayed, for example by selecting
(Country] and (Town ]. Otherwise the last travel destination travelled to on the map display is displayed. [f a travel destination has not yet been
used, the current location is displayed in an
overview map.
Additional function keys
The function keys ~ and ~ are active after
a town is selected.
~-opens
a menu to save the displayed target
address => page 81.
Selecting a ta rg et add ress
The ~ function key is used to select map display where you can further specify the target
area by moving a cross hair:::) page 74, "Selecting a travel destination from the map".
Entering an address using an input mask for selecting a target address. The travel
destination is narrowed down further with each entry.
Selecting points of inte rest as a travel destination
- If the parameters are sufficient for route
guidance, the (Start] function key is active.
~-
starts route guidance to the displayed
target address:::) page 95. <4
In the search mask "POI search" options are specified to search for a point ofinterest.
- If you touch the (Stort)functjon key, route
guidance is started => page 95.
Changing the target address
Fig. 52 Selecting addresses.
In the New destination menu, touch the
=> page fil. fig. 51 (Address] function key.
Selecting a target address
- Select the target address in the Address
entry menu.
- Touch one of the left function keys
(Country], (Twn.lP.cd.], (Street] or (Number] to open
the appropriate input mask => page 62,
"Input windows for navigation". A target
address must always be selected in the displayed sequence, first the country, then
the town, etc.
68
- If a travel destination was previously
defined, this travel destination is displayed in the Address entry menu . You only
have to change the addresses that differ
from the desired target address. If the correct country is displayed, touch (Twn.lP.cd.] to
begin by selecting a town.
If a target address is already displayed, the
changes to the upper level destination parameters and the lower level destination parameters
that would narrow down the travel destination
are deleted. If the destination parameters after
(Twn.l P.cd.] are changed. the old parameters after
[Street], (Number] and (inters ect.] are deleted .
Narrowing down the address entry
Note that each destination parameter that narrows down the travel destination restricts subsequent selection options. When entering an address, only narrow down the target area to the
extent you are comfortablewith your entries. For
example, if you are not sure about a post code.
then just enter the town name. A street you are ~
NAV (navigation system) function selection button
Fig. 53 Search mask for a Point of interest search.
Fig.54 Point of interest information window.
In the New destination menu, touch the
=> page 67, fig. 51 (fQD function key. In the
PO] search menu, options are specified to
search for a point of interest.
ICategory] Selecting a
point of interest
category
- If you are looking for a specific type of
destination, for example a hotel, touch
~ and select a main category in the
following menu by touching it, e.g.
(CAR AND TRAVEL].
NA V (navigation system) function selection button
69
~
Booklet 3.4 RNS 510
Booklet 3.4 RNS 510
- After selecting a main category, the list
of available point of interest categories is
opened, e.g. IHOlels/Molels). There could be
other sub-categories available, e.g.ITRAVEL).
To switch from the sub-category view to a
main category, touch @.
- As an alternative touch the
IALL CATEGORIES (ALPHABETICAL)) function key to
display all available point of interest categories in a list in alphabetical order. All displayed symbols can also be displayed in
map display => page 122, "Selecting the
map details to be displayed" .
- A telephone number can also be entered in the manner described => page 12,
"Input mask for entering numbers". When
looking for a telephone number, first select
a category where you should search and always enter the telephone number without
a city or country code.
- When you are finished entering the information in the search mask, touch the
=> page 69, fig. 53 (Search) function key. A
pop-up window is opened and the point of
interest is searched for according to the
options you selected in a range of a maximum of200 kilometres.
- The range where the search is taking
place is expanded step by step and the
number of points of interest found is displayed in the pop-up window.
- Touch ~ to return from the category
overview to the POI search menu without
selecting a point of interest category.
- Touch the IResults) function key to cancel
the search at the distance displayed for the
search area and display the results.
Specifying the search area
- If you touch thelCancel] function key, the
search is ended without displaying the results.
- Touch ISearch area) to specify the area
where a point of interest should be
searched => page 71, "Search area options".
Specifying additional search options
- If you are looking for a specific destination, for a hotel for example, where you
know the name or telephone number,
touch the function key(Name with) or~.
- Enter the name or parts of the name
=> page 11, "Input mask for free text input".
If you are looking for a hotel at a specific
location where you know "Smith" is in the
name, you only need to enter "Smith" in
the input mask. Then select a search area
and start the search => page 70, "Starting
the search". The hotel you are looking for
can be found in the list of search results
=> page 70, "Selecting a point of interest
from the search results".
70
calling up the menu. the search area is set to the
current location.
_ Additional information is obtained
here, such as the exact address and telephone number of the selected point of interest => page 69, fig. 54.
[Near de,tinotion) - if a travel destination is selected.
you can select the radius around this travel destination as the search area for the point of interest.
- In the "Point of interest information
window" touch@EJto start route guidance
to the displayed point of interest
=> page 95.
Starting the search
- Select the desired point of interest category by touching it. This point of interest
category is now displayed in the POI search
menu => page 69, fig. 53. An overview of all
avaiJable point of interest categories can
be found at the end of this chapter
=> page 72.
Point of interest information window
_ Touch the [@) function key if you only
want to save the displayed point of interest
=> page 8I.
- Touch the 8J or (8 function key to display other points of interest from the list if
multiple points of interest have been
found.
_ Touch the ~ function key to display
the current vehicle position G and the selected point of interest on the map display.
Search area options
Touching the( Search meo) calls up the Select search
area menu.
In then Select search area menu. specify where
you should search for a point of interest. When
[location)-limits the point of interest search to the
radius of the current location (default setting).
(Neortown)- enter the town using an input mask
where you want to search for the point of interest
~ page 63.
ISelect point on mop) move the crosshair to select a
point on the map where you would like to search
for a point of interest. Proceed as is described in
the Chapter "Selecting a travel destination from
the map" ~ page 74.
[Along the rautej- during the current route guidance. the point of interest search is limited to the
surroundings of the calculated route.
Additional options for a Point of interest search
~ page 70. "Specifying additional search options"
[Name withj-Iook for a specific point ofinterest by
entering a name.
@-look for a specific point of interest by entering a telephone number. Only enter the telephone number without the city or country code. ~
Selecting a point of interest from the
search results
- If a point of interest was found that
meets the pre-selected options, the Point
of interest information window is opened
=> page 71 .
- If multiple points of interest were
found , this are displayed in a list. The
points of interest are shown at the top of
the list that are closest to the entered
search area (distance and direction parameters refer to as the crow flies, and not
road distances) . If you touch a point of interest in the list, the Point of interest information window is opened => page 71.
NAV (navigation system) function selection button
~
NAV (navigation system) function selection button
71
Booklet 3.4 RNS 510
Booklet 3.4 RNS 510
Available point of interest categories
Category overview
Category overview
Main categories
Sub-categories
and available
point of interest categories
All categories
Search in all categories
Sub-categories
and available
point of interest categories
Main categories
Available
point of interest categories
Boating- ~
SPORTS
- Rental cars - ~
- Train stations - t;J
OTHER MEANS OF TRANS- Bus stations -ltJ
PORTATION
-Ferries - ~
-Airports - ~
CAR AND TRAVEL
- Natural gas petrol station - Hotels/Motels - !!I
- LPG petrol statiOns- Car parks - El
- Petrol stations- .
- Volkswagen Service - ®
DINING AND SHOPPING
- Bars and Lounges- Shopping centres- 1iiJ
- Cash dispensers -I!!J
- Restaurants - Wine and Spirits-
m
Touching a point of interest category will accept this in the search mask.
Touching the ~ function key will return you to the search mask without accepting a point of interest category.
Touching the@ function key will switch from a sub-category to a main category.
72
POINTS OF INTEREST AND
FREE TIME
- Motorway exits/entrances _ ®
- Motorway intersections - ®
- Border crossings - e
- Toll areas - rI1
- Service area - 48
- Tourist information - 0
TRAVEL
NAV (navigation system) function selection button
Available
point of interest categories
- Golf- II
- Skiing - fa
-Spor/centres - g
- Casinos - .,;
- Art exhibits-If]
- Monuments- Movie theatres- I&
-Museums- m
-Parks- City centres - Tourist points o/interest- I!i
- Amusement parks-
- Education institutions - g
- Companies - Cemetery- 1l5i
COMPANIES AND PUBLIC FA- - Town centres - ilB
CILITIES
- Church- ~
- Convention centres- 1;tD
- Post offices -Ill
- Government, Administration- Ill
EMERGENCIES
- Hospitals - ~
- Police - P!1i
ALL CATEGORIES (ALPHABETICAL ORDER)
A list of all point of interest categories is opened in alphabetical
order.
Touching a point of interest category will accept this in the search mask.
.
.
.
Touching the~ function key will return you to the search mask without accepting a pomt of mterest category.
.
Touching the@ function key will switch from a sub-category to a mam category.
~
NAV (navigation system) function selection button
73
Booklet 3.4 RNS 510
Booklet 3.4 RNS 510
[Map/GPSI Selecting a travel destination from the map
[Map/GPSI Entering a travel d estination using coord inates
In map display, select a travel destination by moving the crosshair.
A destination can be entered using the exact coordinates for longitude and latitude.
- If the desired travel destination or
target area is displayed, touch the ~
function key. The route guidance function
will start automatically => page 95.
- Touch thelsAVE] function key if you only
want to save the displayed destination
=> page 81, "Edit/save entry".
Fig. SS Travel destination on mop.
- In the New destination menu, touch the
=> page 67, fig. 51 I Mop / GPS] function key.
The last travel destination used on a route
guidance is displayed in the map display. If
a travel destination has not yet been used,
the current location is displayed in an
overview map.
- To zoom in or out of the m ap, Le. to
change the scal e of the m ap, turn the setting knob => page 2, fig. 1 0. Alternatively,
press the ~ or [El function key.
- Keep your finger pressed on the map
display and move your finger without
lifting it. The crosshair follows your movements. The next section of the map will be
shown after a few seconds when the crosshair is moved to the side of the screen . The
geo-position (position display using coordinates) or the street name for the current
position of the crosshair is displayed
above on the screen => fig. 55.
You ca n specify which symbols (e.g. petrol stations, hotels, etc.) for additional information
you would like to display in the map displ ay in
the Settings menu forthe map ~ page 122, "Map
settings".
Specifying the mop destination more precisely
You can further narrow down a travel destination selected from the map display later in the
Address entrymenu. To do this, press on th e ~)
function selection button arter starting route
guidance to change from the map display to the
Navigation main menu. There you can touch the
~ fun c tion key to stop route guidance. If you
change to the Address entry menu now, th e travel
destin ation selected on the map is displ ayed in
the form of an address and can be specified
more precisely there => page 68.
You can also specify the area you would like to
display for destination selection beforehand in
th e Address entry menu ~ page 69, "The function key in th e Add ress entry menu".
Additional function keys in the map display
@- switches the map display briefly to th e overview di spl ay (larger scale). After a few seconds, it
returns automatically to the last selected zoom
displ ay (smaller scale).
(@-opens a menu to enter a travel destination
using its coordinates => page 75.
ISAVE 1- saves th e travel destination selected on
the map in the destination memory
page 79. ~
~
74
NAV (navigation system) function selection button
Fig. 56 Enter the travel destination using coordinates.
Fig. 51 Input mask for coordinate entry.
- In the New destination menu, touch the
=> page 67, fig. 51 I Mop /GPS] function key.
The unit changes to map display where a
travel destination can be selected from the
map => page 74.
- Touch@Klifthe desired latitude or longitude is displayed in the entry fields.
- In map display touch the ~ function
key. The coordinates of the last travel des·
tination used for route guidance is displayed => fig. 56. If a travel destination has
not yet been used, the coordinates of the
current location is displayed.
- TOllch the Ilotitude ] function key or
to open the input mask.
(longitude]
- Touch 8J and (B to move the character
insertion mark within the entry fields or
switch to the next entry field => fig. 57.
- Touch a character displayed in the keyboard block in the input mask to insert it
after the character insertion mark. Any
characters present there will be overwritten.
- Touching@D deletes characters from
right to left starting from the position of
the character insertion mark. Touching~
will close the input mask \'lfithout accepting the entries.
If the coordinates entered a re outside the saved
navigation area, a pop-up window is opened
with the following message: "These GPS
coordinates cannot be processed by the unit.
Check your entries." Touch @ to close the popup window and correct your entries.
[l] Note
The coordinates for the current vehicle position
can be displayed in the additional window of the
map display ~ page 105, ':Additional window in
map display". ~
NA V (navigation system) function selection button
75
Booklet 3.4 RNS 510
Booklet 3.4 RNS 510
new ones => page 80. "Saving or deleting
recent destinations".
Selecting the saved destina tion
You can start route guidance to a Saved[Home address ], to one of the recent travel destinationS[Recent destinations], to a travel destination saved as afavourite destination
[Fovourites] or to another travel destination stored in the [Destination memory].
Function buttons in the list view
In the example: list of recent destinations
=> page 76. fig. 58.
ISemchj- opens an input mask. Enter individual
characters or an entire word. as described above
=> page 10. !fyou confirm your entries with@K).
only travel destinations which contain the entered characters or the entered word are shown
in the list. With IShow 011) you can switch back to
the overall view of the selected list.
ISorl;n9)- opens a pop-up window. Touch to select
if the list should be arranged according to
IAlphabet;catJ order orlBy dote). iflBy dote] is selected.
the recent destinations that were travelled appear at the lOp of the list.
Additional options in the list view
Fig. 58 list of recent destinations.
Fig. 59 Detail view: recent destinations.
If you touch the ~ function key. a pop-up
window is opened \~~th additional options:
Select the New destination menu from the
Navigation main menu => page 67. In the
New destination menu, only the function
keys can be selected where destinations
are already saved. For example,
(Recent destinations] can only be selected when
route guidance was already started for a
destination.
- A list of saved destinations is displayed.
for example. the Recent destinations list
=> fig. 58.
~~j _ starts route guidance to the selected des-
Starting route guidance to a saved
"home address".
- In the New destination menu, touch the
=> page 67. fig. 51 ( Home address] function
key. If a home address is saved, the unit
changes to the map display and route
guidance starts automatically=> page 95.
Route guidance to a saved "Favourite
destination", to another destination
from the destination memory or from
the "Recent destinations" list.
- Starting from the New destination
menu . touch the appropriate => page 67.
fig. 51 function key.
76
- In the left column. touch the display of
a destination. The unit changes to the map
display and route guidance for this travel
destination starts automatically
=> page 95.
Displaying a destination in Detail
view.
10elele] - deletes the selected destination
=> page 78.
Function buttons in the Detail view
~or(B-opens the next destination from the list
in the detail view.
(Show on map]- opens an overview map with location and selected travel destination in the map
display => page 77. "Displaying a destination on
the map".
~ - starts route guidance to the displayed
travel destination => page 95.
Displaying a destination on the map
The {Show an map] function key opens an overview
map where the current location and the selected
destination are displayed.
~ _ opens the destination in the Detail view
=> page 77.
The meaning of other function keys in the map
display can be found in the chapter "Map display" => page 102.
Saving or editing destinations:
tination => page 95.
IShow deta;l.]- shows the destination in the detail
view => page 76.
[Show on map ]- opens an overview map with location and selected travel destination in the map
display => page 77.
~ _ saves a selected destination from the
Recent destinations list in the destination
memory => page 80.
{Home address] save or edit => page 82.
(Recent de.tinations) automatically saved travel destinations a re stored in the destinat.ion memory
c> page 79.
(Favoudtes)-save travel destination and specify as
favourite destination => page 8J.
[Dest;nat;on memory)- edit all of the travel destinations stored in the destination memory or delete
the saved travel destinations => page 80. ~
- Open a list with the saved travel destinations as described above.
- Touch the => fig. 58 @ function key
after a destination. and touch (Show details) in
the pop-up window to open the appropriate destination in detail view => fig. 59.
All destinations that are saved manually are
stored in the destination memory and can be
called up using theID"t;nal;an memory) function key.
Destinations that have been used with route
guidance are automatically saved in the list of
recent destinations and can now be called up
using thelRecenl dest;nahon.) function key. (fthe list
is full. the old destinations are overwritten by
NAV (navigation system) function selection button
NAV (navigation system) function selection button
77
Booklet 3.4 RNS 510
Booklet 3.4 RNS 510
Destination memory
Saving destinations
Overview
Displayed travel destinations can be saved permanently in the destination
memory from different menus.
in the destination memory. Old destinations in
the Recent destinations list are automatically
overwritten by new destinations when the list is
full (maximum often).
The function keys for saving a travel destination
are active, i.e. available, when the travel destination was sufficiently defined. For example, the
~ fig. 60 I Save] function key can be called up in
the menu to select an address when at least one
town was entered as a destination.
Fig. 60 Selecting addresses.
The destination memory is a memory for manually saving travel destinations.
All travel destinations saved in the destination
memory can be used for route guidance.
Saved travel destinations can be edited further
or deleted.
In the list of recent destinations, the destinations for which route guidance was started are
automatically saved. The destinations in this list
can be used for route guidance.
If you would like to permanently save a
"recent destination", it must be stored manually
78
In some menus, the function key must be called
up to save a destination via a pop-up window.
An example of this is the Recent destinations
menu ~ page 80.
You can save an address as a home address.
Route guidance for this address can be started
immediately by touching the IHome address] function key without additional entries ~ page 82,
"Saving or editing the home address".
For faster selection of a saved travel destination
and to display it on the map, you ca n specify a
"Favourite status" for frequently used travel
destinations=:> page 81.
Travel destinations can be stored permane'ntly
in the destination memory and edited later
page 80. ~
~
NAV (navigation system) function selection button
Fig. 61 Destination on map.
Fig. 62 Point of interest information window.
Depending on the menu selected for destination entry, different function keys are offered for saving a displayed travel destination. For example, ~ fig. 61 I SAVE) or
~ fig. 62 (@). These function keys are active, i.e. available, when the corresponding
travel destination has been sufficiently defined (see ~ page 78, fig. 60) . The process
for calling up the function key to save a
destination is described in the corresponding chapters.
-
- Select a travel destination as described
~ page 67, "Destination entry: selecting a
destination".
If you have sufficiently defined a travel
destination, you can open the menu to
save this travel destination using the appropriate function key.
- In the menu Edit/save entry specify the
name and favourite status for the destination to be saved ~ page 81.
You can find information on how to call up a
destination from the I Recent destinations] list, a saved
I Favourite destination], or a destination from the
I destination memory] in the corresponding chapter
~ page 76.
Further options available by calling up the@
function key can be found in the same chapter. ~
NAV (navigation system) function selection button
79
~
Booklet 3.4 RNS 510
Booklet 3.4 RNS 510
Saving or deleting recent destinations
The last ten destinations for which route guidance was started are saved automatically in the "Recent destinations" list and can be called up for repeated route
guidance or stored permanently in the destination memory.
- In the New destination menu, touch the
::::::. page 67, fig. 51 I Recent destinations) function key.
- Alternatively, in the Navigation main
menu, touch the::::::. page 65, fig. 48 ISave]
function key. In the pop-up window which
opens, touch IManage memory] followed by
IRecent destinations] in the following menu.
Fig. 63 List of recent destinations.
If you would like to permanently store a recent destination, it must be saved in the
destination memory from the
Recent destinations list. Old destinations
are automatically overwritten by new destinations when the Recent destinations list
is full .
- Open the Navigation main menu
::::::. page 65.
- In the Navigation main menu, touch
the::::::. page 65, fig. 48 ISave]function key. In
the pop-up window which opens, touch
(Manage memory].
80
If the flagged destination is not renamed, it will
be overwritten when rE) is touched again. If you
would like to keep a flagged destination, it must
therefore be renamed . ...
Editing a flagged destination
Note that only one destination can be stored
under the name "Flagdest." in the destination
memory.
Edit/save entry
In this m enu, you can save destinations or edit destinations already saved.
- In the Recent destinations menu, touch
the ::::::. fig. 63 ~ function key after a destination to open a pop-up window with editing options.
- If you touch thelSave] function key in the
pop-up window, the Edit/save entry menu
is opened.
- Save the travel destination as descrihed
::::::. page 81, "Edit/save entry".
- If you touch IDelete] in the pop-up
window, the destination is deleted after
confirming an additional security check. ...
IDestination memory) Editing or deleting travel destinations
In the destination memory, you can find
all of the manually saved destinations, including destinations defined as a favourite
destination ::::::. page 81, and a set flagged
destination. To set a flagged destination,
refer to chapter "[Position] and lE) Setting"
::::::. page 65 .
- If you tOllch IDelete] in the pop-up
window, the destination is deleted after
confirming an additional security check.
~
- If, in the Manage memory menu, you
touch the function key
(Destination memory entries ), a list of all of the
destinations saved manually in the destination memory is displayed.
- Touch the ::::::. fig. 63 ~ function key in
the list view after a destination to open a
pop-up window with editing options.
- If you touch the ~ function key in the
pop-up window, the Edit/save entry menu
is opened .
- Change the entry as described
::::::. page 81, "Edit/save entry".
NAV (navigation system) function selection button
Fig. 64 Menu for saving and editing a destination.
Fig. 65 Available favourite categories.
The menu Edit/save entry is opened when
a destination has bee n selected to be saved
or edited.
- Touch the ISave) function key to save the
destination under the displayed name and
favourite status.
Specifying destination parameters for
saving
- TOllch the::::::. fig. 64 ~ or~ function
key to completely display the information
about this destination.
- Touch (Favourite status) to specify a fa vourite category for the displayed destination in the following menu or to change
the displayed one::::::. page 81, "Specifying a
favourite category".
- Touch [Name] to change the displayed
name used to store th e destination in the
destination memory ::::::. page 11, "Input
mask for free text input".
Specifying a favourite category
- In the Edit/save entry menu, touch the
::::::. fig. 64 ( Favourite status) function key.
- Touch the favourit e category where you
would like to save the destination::::::. fig. 65.
The menu is closed and the selected favourite category is displayed in front of the
::::::. fig. 64 [ Favourite stotus )function key.
- Touch the ISave] function key to save the
destination using th e displayed name and
favourite status.
A destination which was assigned a favourite
category can be called up using t.he => page 01,
fig. 51 I Favourites Ifunction key and is displayed in ~
NAV (navigation system) function selection button
81
Booklet 3.4 RNS 510
Booklet 3.4 RNS 510
the map display with the assigned symbol. depending on the setting =:> page 122. "Displaying
favourite symbols". ~
Saving the current position as home
address
- In the New destination menu . touch the
[Home address]
Deleting the destination memory or recent destinations list
All entries in the destination memory and all automatically saved destinations
can be deleted in one go.
- Open the Navigation main menu
==> page 65.
- Confirm the corresponding security
check to delete the entire destination
memory or all of the recent destinations in
one go.
- In the Navigation main menu. touch
the ==> page 65. fig. 48 [Save] function key
and in the pop-up window which opens
touch [Manage memory].
In the list view of the destination memory
=:> page 80 and recent destinations =:> page 80.
you can also delete the saved destinations
individually. ~
- In the Manage memory menu. touch
the [Delete destinotion memory] or
[Delete all recent destinations] function key.
Saving or editing the home address
function key.
- If a home address has not been selected. the Enter home address menu is
opened.
- Jfyou touch the [Current position] function
key. the current vehicle position is saved as
a home address.
@
- In the Settings main menu. touch the
==> page 120. fig. 105 [Navigation] function
key, and in the Navigation settings menu,
touch the ==> page 124,
fig. 108 [ Define home address] function key.
- In the Edit home address menu. you can
==> page 82. fig. 67 [delete ], ~, or overwrite
the currently saved home address using
the [Selling current position] function key.
Navigation seHings: editing the home address
the saved home address
is overwritten with the current vehicle position.
ISeHing.he current posi.ionJ-
Editing the saved home address
- Touch the ISETUP] function selection
button to change or delete a home address
already saved in the Navigation settings
menu.
IDel ••• I- deletes
the saved home address. A new
home address is saved as described above.
~-
the current saved home address is opened
in the Address entry menu and can be changed
there as described in the chapter "Changing a
displayed target address" =:> page 68. ~
Tour mode
You can specify an address as a home address or edit the saved home address.
General
In Tour mode, multiple destinations can be travelled during route guidance.
Fig_ 66 Menu: new destination.
Select the menu New destination by
pressing the I NAV] function selection
button and touching the [New destination]
function key ==> page 67.
Selecting a home address
- In the New destination menu. touch the
[Home oddress] function key.
82
- If a home address has not been defined .
the Enter home address menu is opened.
- If you touch the IDestinotion e ntry] fu nction
key. the Address entry menu is opened. Select the home address as described above
==> page 68. "Selecting a target address".
NAV (navigation system) function selection button
Fig. 68 Navigation main menu.
Fig.69 Navigation main menu: Tour mode.
- In the Navigation main menu. touch
the ==> fig. 68 I Extras] function key and then
ITour mode] to change to Tour mode ==> fig. 69 .
The ~ function selection button is used to
switch over to naviga tion. The last set menu v.~1I
be selected. The Navigation main menu is called
up by pressing the ~ function selection
button again. The Navigation main menu is dis- ~
NAV (navigation system) function selection button
83
Booklet 3.4 RNS 510
Booklet 3.4 RNS 510
played either in "normal" Travel destination
mode ~ fig. 68 or in Tour mode ~ fig. 69.
- Additionally, you can save a compiled tour
~ page 87, "Saving a tour"
To leave Tour mode ~ page 85.
- as well as call up a saved tour ~ page 87,
"Calling up a saved tour"
The "travel destination" is the end point of a
tour.
A "stopover destination" always appears before
the travel destination.
A trip with multiple destinations is called a
"Tour".
A tour always consists of a travel destination
which is the end point of the tour and a maximum of five stopover destinations.
A maximum of 10 tOUTS can be saved in the destination memory ~ page 87.
Overview of functions in Tour mode
- After entering a travel destination, you can
enter an additional stopover destination
~ page 84 , "Entering a stopover destination".
- You can also switch directly to Tour mode to
enter an entire series of destinations ~ page 86,
"Compiling a new tour in Tour mode".
-or edit a saved tour~ page 88, "Editing a saved
tour".
Additional symbols
Displays in the tour overview ~ page 86, fig. 73.
p- Starting point of the tour
~ - Stopover destination of a tour
~ - End point of a tour
~ opens a pop-up window to open a detail
view, edit the destination, or insert an additional
destination.
Route guidance in Tour mode
During route guidance, the parameters for
driving time or anival time always refer to
reaching the final travel destination. The es ti mated travel time or arrival time at a stopover
destination is not displayed. ~
of the tour after the displayed travel destination.
- After selecting a travel destination, in
the Navigation main menu, touch the
=> page 84, fig.70 1 Extras) function key. A
pop-up window is opened.
- If you touch INew stopover destination), the
New destination menu is opened to select
a stopover destination. The unit changes
to Tour mode automatically in the background.
- Select the stopover destination as is described => page 67, "Destination entry: selecting a destina tion".
- When you have con firmed the new destination, you will be requested to select an
entry after which you "'rill place the new
destination . This is how you specify the
order of destinations you will travel. Touch
@R) to close the message.
- In the Move object menu, if you touch
=> page 84, fig. 711 Current position ), the destination is set as the first stopover destination . If you touch the last destination ofthe
tour, the new destination will become the
end point of the tour, the new travel destination. The former travel destination becomes a stopover destination.
- The Navigation main menu is now
opened in Tour mode => page 83, fig. 69.
- Touch the IStart) function key to start
route guidance for the first stopover destination of the displayed tour => page 95.
- Touch the (Extras) function key and then
IEdit taur) to add additional destinations to
your tour => page 86, "Compiling a new
toUT in Tour mode".
Calling up Tour
mode
You can change directly to Tour mode from the
Navigation main menu to compile a new tour
~ page 86 . ...
Entering a stopover destination
After selecting a travel destination, you can insert an additional "stopover destination" that can be travelled to during route guidance.
Leaving To ur mode
Note that all stopover destinations are de leted when you end Tour mode. You can
save the displayed tour with all of the stopover destinations before ending Tour
mode by touching IMemory) => page 87.
- In the Navigation main menu, touch
the => fig. 72 1 Extras) function key and
I Leave To ur mode) in the opening pop -up
window to end Tour mode.
Fig.70
Navigation main menu: Extras pop-up
Fig. 71
window.
Moving a menu object: specifying the position for 0 new destination.
If you would like to travel to one or more
multiple destinations in addition to the
displayed travel destination , proceed as is
described below. You can also insert the
additional destination as a new end point ~
84
NAV (navigation system) function selection button
Fig.72 Navigation main menu in Tour mode: Extras
pop-up window.
- Confirm the message "Would you like to
leave Tour mode?" by touching the 1Leave)
function key.
Only the travel destination previously
defined as end point is displayed in the
Navigation main menu . ~
-
NA V (navigation system) function selection button
85
Booklet 3.4 RNS 510
Booklet 3.4 RNS 510
Compiling a new tour in ,Tour mode
Saving a tour
You can change directly to Tour mode to compile a tour with multiple stopover
destinations.
- When you have confirmed the first destination, the menu Tour plan: new tour is
opened. Touch the~functjonkeyafterthe
destination where you would like to insert
an additional destination.
- Touch I Destination entry I again in the
opening pop-up window and select an additional destination => page 67, "Destination entry: selecting a destination ".
Fig.73 Tour plan menu: new tour with a stopover
destination .
- Touch ~ when you would like to end
the tour entry. In the Navigation main
menu, the travel destinatio n of youI tour
and the next stopover destination is displayed.
- In the Navigation main menu, touch
the => page 84, fig. 70 I Extras I function key
and then ITour mode] to change to Tour
mode.
- Touch the IStart) function key to start
route guidance for the first stopover destination of the your tour => page 95.
- Touch the => page 85, fig. 72 I Extra,]
function key and then [New tour] to compile
a new tour.
- Touch the [Memoryl function key to permanently store the dis played tour with its
own name in the destination memory
=> page 87, "Saving a tour" .
- In the Tour plan: new tour menu, touch
the => fig. 73 ~ function key after the display of the starting point or a displayed
destination .
In the Tour plan: new tour menu => fig. 73, "New
tour" is the space holder for a name you can assign this tour when saving it.
- Touch [Destination entryl in the opening
pop-up window.
A tour always consists of a travel destination
which is the end point of the tour and a maximum of five stopover destinations.
- Select a destination as is described
=> page 67, "Destination entry: selecting a
destination ".
86
[I) Note
You can permanently store a tour displayed in Tour mode in the destination
memory.
A tour can only be displayed in Tour mode
and can only be saved in Tour mode.
- Touch the => page 83, fig. 69 [Save] function key to save a displayed tour in the
Navigation main menu=> page 83, fig. 69.
- Touch ~ in the opening pop-up
window. An input mask for free text entry
is opened.
- Give your tour a name => page n,
"Input mask for free text input" .
- Confirm the name by pressing (Qg).
In the Navigation main menu the name of the
tour, the destination, and the first stopover destination is displayed. You can edit the saved tour
later => page 88.
Name the tour with a unique, informative name
so that you can later distinguish between individual tours. If there is already a tour saved using
that name, you have to give it a different name.
When you have saved the tour, you can leave
Tour mode again, without losing the displayed
tour => page 85.
A maximum of 10 tours can be saved in the destination memory. ~
- The message "Tour saved" appears.
Touch (Qg) to confirm the message.
Calling up a saved tour
To call up a saved tour, first change to Tour
mode.
- In the Navigation main menu , touch
the =-> page 84, fig.70 [Extras I function key
and then [Tour mode I.
- Touch the IMemory] function key and
in the opening pop-up window.
I Load tour]
- In the Lomi tour menu, touch the ~
function key next to a tour name to display
information about the corresponding tour
in t.he Tour details menu.
- In the Tour details menu, if you touch
the [Select] function key or in the Load tour
menu if you directly touch the name ofa
tour, the selected tour is displayed in the
Navigation main menu.
- Touch the IStart] function key, to start
route guidance. ~
Note that all stopover destinations of a compiled
tour, except the end point of the trip (the travel
desOnation) are deleted when you end Tour
mode without saving the displayed tour ahead of
time => page 87. ~
NAV (navigation system) function selection button
NAV (navigation system) function selection button
87
Booklet 3.4 RNS 510
Booklet 3.4 RNS 510
Editing a saved tour
Waypoint navigation mode (off- road navigation)
If you touch the ~ function key next to
the starting point ofthe tour up", you have
the option usinglDestination entry) to specify
the first stopover destination after the
starting point. The starting point is specified automatically by the GPS position
specification and therefore cannot be
changed.
-
-
If you touch the ~ function key next to
one of the other destinations, you are offered additional options for editing.
Fig. 74 Specify the position of a new destinotion.
A tour can only be displayed in Tour mode
and can only be edited in Tour mode. To
select the tour to be edited =::> page 87.
- If you touch the tour at the top of the
display =::> page 83, fig. 69, the tour plan is
opened for this tour =::> page 86, fig. 73.
- As an alternative open the tour plan by
touching the =::> page 85, fig.72 I Extras)
function key. In the opening pop-up
window, touch IEdit tour ).
- In the tour plan, touch the =::> page 86,
fig. 73 ~ function key next to the destination you would like to edit. The pop-up
window with the editing options for this
entry is opened.
- Select the desired option by touching it.
Options for editing a tour destination
[Detaas)- opens the
Destination data menu for the
detail viewofthe selected destination. Touch the
[Show an mop) function key to display the destination in the map => page 102. The~function key
will return you to the detail view.
~ - touching ~ again only starts route
glJidance for this tour destination, and a ny stopover destinations are ignored. Touch ~ to
change to the view of th e tour plan wit.hout
starting route guidance.
[Delete)- deletes
the displayed tour destination
after an additional confirmation.
select an entry after
which you would like to move the selected tour
des tination => fig. 74.
Ge neral
Waypoint navigation mode is an off-road function which was developed for travelling in non-digitalised areas at slow speeds. Waypoint navigation mode is not
intended for driving on normal streets, since one- way streets, motorways exits and
entrances, etc. are not detected.
Operating waypoint navigation
Awaypoint tour consists of a chain ofwaypoints.
A waypoint is a geo-position determined by GPS
which is saved in the unit with time and date.
When recording a waypointtour, waypoints can
be set automatically or manually. A recorded
waypoint tour can be driven in the recorded direction or in the opposite direction.
Waypoints can only be driven in the order that
they are stored in the system. There is the option
of skipping individual waypoints when driving a
waypoint tour or to inform the system the waypoint one would like to "travel toward" (next
waypoint).
The system cannot perform a1ternat.ive routes or
automatically avoid obstacles. You have the option while driving a saved waypoint tour, to set
additional waypoints manually to save the rerouting around an obstacle, for example, for the
next trip.
[MoveJ- Touch [ContinueJ to
to enter an additional tour destination => page 86, "Compiling a new tour in
[Destination entryJTourmode " . ~
What can waypoint navigation perform and
what can it not:
Waypoint navigation mode is not intended for
driving on normal streets. because when driving
a saved waypoint tour, all of the points have to be
driven exactly, and in the same order as they
have been saved.
For example. the system would attempt to guide
you against the direction of travel on motorways
or on a one-way streets in order to reach the set
waypoints. if you drove the saved waypoint tour
88
NAV (navigation system) function selection button
on public roads in the opposite direction. Visual
turning information is also given rather late, and
only a general direction of travel is displayed.
Therefore it is better to use waypoint navigation
mode only for driving in non-digitalised areas
without prescribed traffic regulations and only
at slow speeds.
Non-digilalised areas are areas that do not have
any street or off-road information. Thus natural
limits like mountains and rivers are also not detected even if they are shown on the map.
Waypoint navigation mode is thus only an orientation aid for driving in non-digitalized areas.
Thus there is no spoken instructions on a waypoint tour. Only the approximate direction to the
next waypoint is displayed.
GPS reception interrupted
If the GPS reception is interrupted while driving
because you are travelling for a long time under
a canopy of trees, for example. or you are in a
tunnel or underground car park. the symbol for
displaying your vehicle position G is shown in
grey. The unit can only determine the waypoints
then using lhe vehicle sensors (rotation of the
wheels and steering angle).
If this condition last a long time. it will result in
inaccuracies in the recording or departing from
the tour. This problem is worsened when driving
on an unstable surface where the wheels temporarily lose contact with the ground, i.e. can
"spin". ~
NAV (navigation system) function selection button
89
Booklet 3.4 RNS 510
Booklet 3.4 RNS 510
:=> page fJ1. fig. 51 to select an "On road destination " from the available navigation data.
O verview of functions
The (Memoryl function key
Touching the {MemoryJ function key opens a popup window:
{load woypointtourJ- opens a list of saved waypoint
tours. Touch the waypoint tour to select it.
{Manage waypo;n' 'our memoryl - opens the waypoint
tour memory. Saved waypoint tours can be displayed. ren amed. or deleted.
The (Woypoint tour I function key
Touching the {woypo;n, 'ourl function key opens a
pop-up window to reco rd a new waypoint tour
or edit the displayed one.
Fig. 75 Calling up waypaint navigation mode.
Opening waypoint navigation mode
- In the Navigation main menu, touch
the => fig.75 (Extras I function key.
- Touch the (Waypoint navigation mode I function key in the opening pop-up window.
- The Waypoint navigation menu is
opened and the last active waypoint tour is
displayed => fig. 76.
leaving waypoint navigation mode
{Record warpo;n' ,ourl- after the waypoint tour is
given a name and the recording mode is seIn the Waypoinc navigation menu , the last active
waypoint tour and your current geo-position is
displayed. If a waypoint tour has not been recorded or if everything was deleted, a message is
shown. When this happens. the function keys for
starting. loading. or editing a waypoint tour are
not active.
Plotting a waypoint tour
When recording a waypoint tour, it is recommended to have waypoints set automatically by the system.
Operating the m en us and sub -menus is done
analogously the menus that have been described so far. so they will not be described in detail here.
• Touching the di splayed entry or the@ function key always opens the detail view.
- Touch the => fig. 76 ~ function key
there and selectlExit waypoint model in the
opening pop-up window.
• Touching the@functionkeyopensa pop-up
window for editing the acco mpanying entry
analogously to =:> page 88. "Editing a saved
tour".
- As an alternative, close waypoint navigation mode by calling up the
[New destination I function key in the Waypoint
navigation menu.
• Fo r input masks to change a name :=> page ID.
"Using input masks".
90
{Ed;, warpo;n, lourl- opens a list with the waypoints
of the tour currently displayed in the Waypoint
navigation menu. The waypoints in the list can
be displayed. deleted. moved. or renamed in the
map. Also. other waypoints can be added by selecting them on the map or entering the GPS position. analogous to:=> page 74. "Selecting a
travel destination from the map" and :=> page 75.
"Entering a travel destination using coordinates". If you would Ii.ke to edit a waypoint tour
other than the one that is displayed, it must be
called up using {load waypo;n' 'ourl from the
{Memoryl· ~
If a waypoint tour is displayed. touching th e~
function key will start this waypoint tour
:=> page 93. "Driving a saved waypoint tour".
- In waypoint navigation mode, pressing
the (NAVI function selection button always
changes to the Waypoint navigation
menu.
- When you have reached the destination
of a waypoint tour, waypoint navigation
mode is ended automatically and the
"normal" Navigation main menu is
opened => page 83, fig. 68.
lected. starts the recording of a new waypoint
tour. A displayed waypoint tour is saved automatically and can be called up later using the
{load warpo;n! lourl from the (Memoryl.
The (New destination I function key
Touching the{New des'ino'ionl fun ction key ope ns a
securi ty check:
~ - switches back to waypoint navigation
mode.
{On rood des'ino'ionJ - ends waypoint navigation
mode and opens the New destination menu
NAV (navigation system) function selection button
Fig.78 Plotting in the map display with an additional window in the compass view.
- In the Waypoint navigation menu,
touch the => fig. 77 ( Way point tour) function
key.
- Touch the [Plot waypoint tour] function key
in the opening pop-up window.
- If a tour is already displayed in the Waypoint navigation menu, you need to select
in the following menu whether you would
like to record the displayed [Expand tour} or a
[New tourl by touching it.
- Give the waypoint tour an informative
name => page ID, "Using input masks".
Confirm the name by pressing~.
~
NAV (navigation system) function selection button
91
Booklet 3.4 RNS 510
- Select a recording mode in the following by touching it.
- Touch the !Automatic]function key to have
the system set the waypoints automatically during recording (recommended).
- Touch the!Manual] function key if you
would like to set all of the waypoints yourself during recording.
- After the recording begins. the number
of used and available waypoints and the
set recording mode is displayed using the
Waypoint navigation menu::::> page 91.
fig. 77.
- Press the !MAP] function selection
button to change to map display. Pressing
the !MAP] function selection button again
opens and closes the additional window
::::> page 91. fig. 78. Further information on
operation in the map display can be found
in chapter::::> page 102, "MAP function selection button" .
- Press the !NAV] function selection
button to return to the Waypoint navigation menu::::> page 91, fig. 77.
- Touch the! Save current position as warpoint]
function key to set waypoints manually. In
map display, you can find this function key
in the pop-up window of the::::> page 91,
fig. 78 ~::::> page 93, "The function key
in the map display" function key.
Booklet 3.4 RNS 510
In the Waypoint navigation menu. touch the
function key and in the list view,
touch the waypoints on the@lfunction key after
the waypoint whose name you would like to
change. In the pop-up window, touch IRename]
and give it an individual name using the input
mask ~ page 10. "Using input masks".
IEdi. woypoin"our]
Recommendations for recording
When recording a waypoint tour. it is recommended to have waypoints set automatically by
the system. This is because the system sets the
waypoints so that they can be best driven later.
At any time, you can still add waypoints manually or change the type of recording.
During automatic recording, the system registers each direction change using sensors in the
vehicle and sets a waypoint before and after the
turning point.
Naming waypoints
If a waypoint is set, it is given a name automatically. The waypoint name consists of date and
time when it was saved (year/month/dayhours/minutes/seconds) .
You can rename the waypoints of the displayed
waypoint tour afterwards.
It is recommended to name the staning and
ending point with a unique name so that the selected direction of travel can always be clearly
detected when driving the tour.
92
In the I Record] function key, the waypoints previously used for the tour and the total still available are displayed.
Touching the =:} page 91, fig.78 I Record] function
key opens a pop-up window to control the recording.
~- ends the
recording; the last set waypoint is
used as the end point of the waypoint tour.
(~Au'omo~c recording]
switches the function on or
off that waypoints are set automatically when
there is a change in direction using the sensor
system in the vehicle. A check in the checkbox ~
indicates that the function is switched on.
sets a manual waypoint
at the current vehicle position.
(Add current pos. os waypoin.]
Further information on operation in the map
display can be found in chapter =:} page 102,
"MAP function selection button". <Ill
Driving a saved waypoint tour
The waypoints ofa waypoint tour can only be driven in order, one after the other.
But individual points can be skipped.
On long straight sections, a waypoint is set automatically every few kilometres.
At any time, you have the opportunity to set additional waypoints manually as has been described, and to name them later to designate
special landmarks or to be able to find positions
along t.he route again.
It is not recommended to set a waypoint manually on the "vertex" of a curve. When driving the
tour. the complete direction change would be
displayed using this waypoint. The result of this
would be that the driver could only poorly estimate the extent of the change in direction before
driving into a curve while driving the waypoint
tour, and the direction instructions would come
very suddenly, one directly after the other.
l! would be more reasonable, as the system does
After recording, the saved tour is displayed in the
Waypoint navigation menu. You can further edit
the tour there.
The !Record] function key in the map display
automatically. to set a waypoint when entering
and when leaving a curve. When driving the
waypoint tour, the complete direction change is
displayed shortly before reaching the turning
point. This allows you to better prepare yourself
for the change in direction.
Since the number of way points is limited to 500,
under cettain circumstances it could be useful
to turn off automatic recording. When a lot of
curves must be driven on clear off-road conditions. because of street conditions for example,
the system would "use" trivial waypoints that
could better be used later.
Fig. 79 Waypoint navigotion with active waypoint
tour.
Before starting to drive a waypoint tour,
you should be near the desired starting
point of this waypoint tour.
Selecting
0
waypoint tour
- In the Waypoint navigation menu,
touch the ::::> fig. 79 ~ function key.
- Touch the (load waypointtour] function key
in the opening pop-up window.
- Select a waypoint tour from the list by
touching it.
Fig. 80 Driving a waypoint tour in the map display
with additional window.
Driving a displayed waypoint tour
- In the Waypoint navigation menu.
touch the::::> fig.79 (Start] function key. The
Start from which waypoint? menu is
opened. The starting and destination
point of the waypoint tour are displayed
above.
- Touch the (Turn around war pt. tour] function
key to drive the selected tour in the opposite direction. The starting and destination
point of the waypoint tour are displayed
above in the changed order.
Switch off the automatic recording using the
function key.
IRecord]
NAV (navigation system) function selection button
NAV (navigation system) function selection button
93
Booklet 3.4 RNS 510
Booklet 3.4 RNS 510
- Touch to select which waypoint you
would like to use to start the waypoint tour
in the displayed djrection. If[From the ciosest]
is selected, the waypoint tour starts at the
next waypoint "as the crow flies". Off-road
characteristics are ignored here.
If the waypoint was not reached, you have to
slcip it otherwise the system attempts to continue to guide you to this waypoint. In the third
function key below in the map display, the distance to the next waypoint and the number of
this waypoint, corresponding to the order in the
waypoint tour, is displayed=> page 93, fig. 80.
Stopping route guidance
Touch this function key and in the pop-up
window select (Nex, waypoin') to skip the waypoint
where the system is trying to guide.
- In map display touch the third function
key below with the display of the distance
to the next waypoint and in the opening
pop-up window, touch the
[Stop route gUidonce] function key.
- As an alternative press the [NAVI function selection button and then touch the
~ function key.
"Starting" off in a saved route is not detected by
the system automatically. In this case, you need
to select IFrom the closest) as the option for the
starting point of the waypoint tour.
When you have reached the starting point, you
will hear the announcement: "You have reached
the stopover destination! ". When you reach a
manuaJly set waypoint (black in the map display) a brief signal tone sounds. All other
acoustic navigation information is suppressed.
When the end point of the tour is reached, an additional announcement is made.
Starting [from the first] waypoint
/fyou have chosen the "the first" waypoint as t.he
starting point for the waypoint tour, the option is
offered to drive to this point using "normal" "On
road" route guidance. Touch the (On road] function key when the starting point of the waypoint
tour can be reached using public roads. Of
course, the requirement for this is that the navigation data valid for this area is available in the
unit ~ page 60, "Navigation data and the navigation DVD". Otherwise, touch the IOff-rood)
function key.
While driving
Follow the turning instructions to the extent
possible. When you are 50 meters from the waypoint, the navigation recommendation is given
for the next waypoint.
94
Route guidance
Starting and stopping route guidance
As an alternative press the (NAV] function selection button and then touch the (Next waypoint]
function key.
Touch the function keys (Prev. woypoint]
or (Previous waypoint) in the corresponding menu to
drive to the last waypoint again.
While driving a waypoint tour, touch the third
function key at the bottom in map display and in
the opening pop-up window touch
(Add curren' position as waypoint) to expa nd the tour
with add itional waypoints. You can designate
landmarks and name then later for example, or
save the detour around a new obstacle on the
route. As an alternative, call up this function by
pressing the~ function selection button and
touch the IWaypoint tour] function key.
Navigation recommendations and symbols in
map display
When you are driving a saved waypoint tour, you
only hear the starting and end point of the waypoint tour. For all other information, it is displayed using direction arrows in the display of
the combi-instrument and the approximate direction of travel to the next waypoint is displayed in symbol display on the screen.
In map display automatically set waypoints are
grey, manually set ones are black and starting
and ending points are blue. The end point is also
designated by the symbo l~.
All points displaying your waypoint tou r are
connected by a Une like the pearls of a necklace.
The connection between two points is shown as
a straight lin e, "curves" are not displayed.
Direction arrows always indicate the direction to
the next waypoint as the crow flies. Directions
instructions for the next waypoint are given
briefly before reaching the upcoming waypoint.
So don't drive too fast! ~
NA V (navigation system) function selection button
Fig. 82 Navigation main menu during route guidonce.
Select a travel destination => page 67,
"Destination entry: selecting a destina tion" or enter a tour => page 83 and start
route guidance as is described in the corresponding chapter. The unit switches over
to map display => fig. 81.
route guidance in map display
-
In map displ ay tou ch the
=> fig. 81 ($ ... /0... ] function key and in the
pop-up vvindow touch (Stop route guidance] to
interrupt route guidance. The [ ... /0... 1
function key changes to (Navigation 1
=> page 102, fig. 86.
- Jfyou touch the (Navigationl function key
and in the opening pop -up vvindow touch
the [Start route guidance ], route guidance vvill
be continued at th e current position.
Route guidance in the Navigation
main menu
- Touch the (NAV] function selection
button after starting route guidance to
switch to the Navigation main menu.
- Jfyou touch the => fig. 82 ~function
key, the route guidance is interrupted and
"Start" is displayed again in the function
key.
- If you touch the(start]function key, route
guidance is con tinued at the current position.
Selecting one of three alternative
routes
- Jfyou h ave selected in the Navigation
settings the function "Suggest 3 alternative
routes " => page 124, after route guidance
has been started , three routes for the selec ted travel destination are calculated. Be
patient!
- When the calculation is finished , three
routes to the destination are displayed in
the overview map. The three routes correspond to the selected route options
"Fastest", "Shortest" and "Most economic" route => page 66, "Specifying parameters for route calculation".
~
NAV (navigation system) function selection button
95
Booklet 3.4 RNS 510
Booklet 3.4 RNS 510
- Additional infonnation about each
route is displayed in the function keys on
the right. If you touch one of these function keys, route guidance is started on the
selected route. Depending on which route
was selected, the route options for navigation are changed accordingly. You can
change the route options again later
=> page 66.
After route guidance has started, the route to the
first travel destination that meets the parameters is calculated ~ page 66. "Specifying parameters for route calculation".
When swi tching to map display. the map in the
last selected display type is displayed (2D. 3D.
topographical) ~ page 103. "Changing display
type".
imity bar shows how far away the turning point
is. The distance to the next change of direction
will be shown in the display after you have
turned.
Other functions and displays during route guidance
The distances that are announced depend
highly on the type of road being travelled. On
motorways. the first announcement occurs
2500 meters before an exit.
Show routes or manoeuvre list ~ page 100.
Function keys and displays in map display
~ page 102. "MAP function selection button "
•
•
• Dynamic route guidance with TMC (Traffic
Message Channel) ~ page 98
•
~
Starting virtual demonstration trip
page 124. "Navigation settings". ...
Issuing navigation recommendations
Navigation recommendations are issued as navigation announcements and displays in the combi-instrument display and the screen.
In the opening pop -up window touch
to display travel direction arrows in
the additional window => t1g. 83.
-
[Symbol]
-
In the opening pop-up window touch
~ to display an overview map in the
additional window with the starting and
ending point. Briefly touch this map to
change the display type.
- Touch the ® function leey or the [MAPl
function selection button to close the additional window.
Fig. 83 Visual navigation recommendation in the
additional window of the mop display.
When route guidance starts. the system
automatically switches to map display.
- Press the @D button on unit => page 2,
fig. 1 0 if you would like to repeat the last
navigation announcement.
- In map display touch the [MAP! function
selection button to display the additional
window.
- Touch the function leey in the upper left
additional window.
96
Information on other options available in the
additional window~ page 106, "Display options
in th e additional window".
Other information on the map display
page 102. "MAP function selection button ".
~
Navigation recommendations while driving
You will hear the first announce ment after the
route has been calculated. e.g. "Continue along
the road". Up to three announcements will be
made before a turn has to be made. e.g. within a
town "Prepare to turn left", "Turn left after
300 meters " and" Now turn left". For the message before the last one. a proximity ba r is displayed to the right next to the turning arrow in
the sc reen or display view ~ fig. 83. The prox-
NAV (navigation system) function selection button
On multi-lane roads that branch. corresponding
messages are issued, for example "Prepare to
drive on the left side" and then "Now drive on
the left side".
The I Extras! function key can be used to select the
option Ilane recommendotion! in the map display
~ page 103. Then when driving and turning on
multi -lane roads in map display, a small additional wi ndow with a lane recommendation is
shown when the corresponding information is
recorded in the navigation data used. The displayed lane recommendation always displays
the direct turning situation with the locally
avai lable driving lanes.
Approximately 300 meters before entering a
roundabout, you will be told which exit to use.
e.g. "You s hould leave by the second exit.". The
announcement will then be "Now turn at the
second right" when you are travelling round the
roundabout. If it is a large roundabout. a third
message "Exit now" is issued.
Travel destination reached
An announcement will be made when you reach
your destination. If the destination is on a digitalised road. you wiU hear the announcement
"You have reached the destinati on" on arrival. If
the destina tion is not on a digitaJ ised road. you
will receive the announ cement "You have
reached the destination area". The latter may
occur if you have entered the destination using
coordinates and it is not on a digitalised road.
Tour plan route guidance
When departing [rom a tour plan. the route
guidance starts automatically for the next destination after reaching a stopover destination (announceme nt "Yo u have reached the des tination"). If a stopover destination ca.nnot be
reached exactly, this stopover dest ination must
be deleted from the tour plan before the route
guidance to the next destination can be continued. Jf route guidance to the next destination
is started manually, only this destination is used
and other destinations of the tour plan will be ignored ~ page 88. "Editing a saved tour".
Traffic congestion during dynamic route guidance
~ page 98. "Dynamic route guidance with TMC
(Traffic Message Channel)"
If the "Dynamic route" is set to automatic in the
route options, you wiJJ hear the announcement:
"Warning! The route was changed due to the current traffic problems.". if there is traffic congestion on your route ~ page 99.
"'& Dynamic route ~ automatic".
Such an announcement is also issued when
there were traffic problems on th e original route
calculation which has now been rectified and
the navigation system now sees a chance to
trave l a more favourable route.
If "Dynamic route" is set to manual in the route
options. a pop-up window is opened where information is given about the announced traffic
congestion on your route and you will hear the
announcement: "The route is being re-calcu lated taking into account the traffic congestion!"
~ page 99, "'& Dynamic route ~ manual".
Shortly before announced traffic congestion.
you will be informed about this thorou gh ly by an
a nnouncement: "Warning! Traffic congestion!" .
Setting for the Navigation announcements
You ca n. whilst a navigation recommendation is
being made. change the volume using the
volume control ~ page 2. fig. 1 CD to a defined
minimum or maximum volume. All following
an nouncem en ts will then be made at this
vol ume.
To switch off the navigation recommendations
completely ~ page 124. "Navigation settings".
&
WARNING
Please observe the laws of road traffic legislation when fol.lowing the recommendations
made by your radio/navigation system.
• Please keep your attention on driving at all
times. Accidents and injuries can occur if the
driver is distracted.
• Always observe safety information concerning the use of the navigation system
~page59.
NAV (navigation system) function selection button
~
97
Booklet 3.4 RNS 510
Booklet 3.4 RNS 510
[I) Note
If you miss a turning during route guidance
and you have no possibility to turn the vehicle
round, keep on driving until the navigation
system has calculated a new route for you => &,
•
• The quality of the announcements issued by
the unit depend on the navigation data available
and during traffic congestion, also on the traffic
information sent. The radio stations broadcasting this information are responsible for the
content and the quaJity of the traffic information
sent.~
Dynamic route guidance with TMC (Traffic Message Channel)
During dynamic route guidance, traffic announcements broadcast by a TMC station will be incorporated into the route calculation.
- In the Route options menu ~ fig. 84
touch the function key I ~ Dynamic route J and
select a setting by touching it in the
opening pop-up window.
- Confirm your setting by pressing~ .
Fig. 84 Route options.
In route options you can specify whether
TMC traffic information should be included in the route calculation or not, and
whether a detour should be calculated automatically if needed or only if confirmed.
Route options can be altered whilst the
route guidance function is active.
Switching dynamic navigation on and
off
- In the Navigation main menu , touch
the ~ page 95, fig. 82 [Options J function
key.
- In the map display, touch ~ page 102,
fig. 86 [Navigation J or during route guidance
touch ~ page 95, fig. 81 [$ ... / 0 ... J and in
the opening pop-up window touch
(Route options J.
98
Traffic congestion received byTMC th at is on the
route is shown on the map by a coloured
symbol. Traffic congestion that is not on the
route is shown on the map by a grey symbol
=> page 104, "Symbols for displaying traffic congestion". The direction where the traffic congestion is located is shown by an arrow in the
symbol. The length of the traffic congestion is
displayed in the map by continuous car symbols
t'ft on the route.
You can have all of the currently received TMC
uaffic information displayed in a list => page 107,
"TRAFFIC function selection button".
0& Dynamic route ~ off
If dynamic navigation is switched off, yo u will
not be given traffic conges tion messages concerning your route during route gui dance. TMC
traffic information is nevertheless updated automatically in the unit => page 99, "Requirements
for dynamic route gu idance" and displayed by
pressing the [TRAFFIC] function selection button
=> page 107, "TRAFFIC function selection
button".
'fi' Dynamic route ~
manual
If dynamic navigation is set to manual, you can
select during route guidance if you want to bypass the traffic problems on your route or not
=> page 99, "Requirements for dynamic route
guidance".
If the navigation system receives a traffic
problem that is on the calculated route, the
driver is informed by an announcement, and a
message about the traffic problem in a pop-up
window.
The expected delay when bypassing this traffic
congestion and the length of the detour are displayed. The expected delay from driving through
the traffic congestion is also displayed.
• Touch (Current route] to stay on the calculated
route and to drive through the traffic congestion.
• Touch (Detour route] to calculate a detour for the
signalled traffic co ngest.ion.
0& Dynamic route ~ automatic
If dynamic navigation is set to automatic, you will
automatically be re-routed during route guidance around traffic problems on your route
=> page 99, "Requirements for dynamic route
guidance".
After receiving a t.raffic message relevant to your
route, you will hear the spoken instructions
"Warning! The route was changed due to the current traffic problems.", informing you about a
change in the current route guidance. This fun ction will automatically guide you round t.raffic
jams or blocked roads, if th.is will help get you to
your destination faster.
calculation which has now been rectified and
the navigation system now sees a chance to
travel a more favourable route.
Requirements for dynamic route guidance
TMC (Traffic Message Channel) is a digital radio
data service for the constant transmission of
traffic reports.
The unit is constantly supplied with TMC traffic
messages in the background when a TMC transmitter can be received at the current location.
The quality ofthe traffic messages sent depends
on the radio station broadcasting it. The reception ofTMC traffic messages cannot be switched
on or off.
The transmitter must not be the TMC transmitter.
TMC traffic messages can only be evaluated by
the device and displayed when the navigation
data for the currently driven area is stored in the
unit memory or can be called up using an inserted navigation DVD.
The current TMC traffic messages can be displayed by pressing the [TRAFFIC) function selection button => page 107.
rn
Note
• If there are serious traffic problems, you may
find that a diversion based on the TMC information does not save you time as the alternative
route is also subjec t to traffic problems.
• You ca n also block the route manually if an
upcoming traffic problem has not yet been re corded via TMC traffic messages => page IO!. ~
Such an announcement is also issued when
there were traffic problems on the original route
If one of the traffic problems is on your route,
you can switch on dynamic route guidance
during current route guid ance or block the route
manually => page 101. "Manually blocking the
route section".
NAV (navigation system) function selection button
NA V (navigation system) function selection button
99
Booklet 3.4 RNS 510
Booklet 3.4 RNS 510
Showing routes or a manoeuvre list
Manually blocking the route section
During route guidance, the route or manoeuvre list can be shown to display the
route section or turning points yet to be driven.
Upcoming route sections can also be blocked manually.
Navigation main menu
- Open the Navigation main menu
during route guidance by pressing the
[NAV] function selection button.
- In the Navigation main menu, touch
the [Route] function key and in the opening
pop-up window touch [Route list] or
{Manoeuvre list].
Fig. 85 Manoeuvre list in the map display.
In the Manoeuvre list the turning points yet to
be driven are displayed in a list with travel direction arrows. Street names or street designation
refers to streets where turns are made => fig. 85.
The route or manoeuvre list can be displayed only during route guidance.
In the route list the street names or street designation of the route sections to be driven are displayed in a list.
Additional window in the map display
- In map display touch the {MAP] function
selection button to open the additional
window.
- Touch the function key at the upper left
in the additional window and the
[Manoeuvre list] in the opening pop -up
window. The manoeuvre list is displayed
=> fig. 85. The route list can only be called
up using the Navigation main menu.
100
In the additional window of the map display. the
symbol display with visual navigation recommendations or an overview map are displayed
during route guidance => page 96.
Additionally. information about the current vehicle position can be displayed in the additional
l'llindow at any time. even if there is currently no
active route guidance => page 105. "Addit.ional
window in map display".
Blocking the route section
- During route guidance, touch in the
map display the [$ ... /0 ... ]function key or in
the Navigation main menu, touch the
(Route] function key.
- Touch the [Congestion ahead] function key
in the opening pop-up window. An overview map with the current vehicle position
G and the travel destination ~ is displayed .
- Turn the settings knob ® counterclockwise, and move the ~ flag symbol
starting at the travel destination in the direction of the current vehicle position. If
you touch the displayed route with your
finger, the flag symbol "skips" directly ~ to
this pOSition. The length of the entered
block is displayed below in the screen
starting at the current vehicle position .
- Press the setting knob or touch the @El
function key when the approximate length
of the route section to be blocked is displayed.
- You will receive a spoken announcement that the route contains a blocked
route section and the detour is being calculated.
Removing an exclusion
- Press the [NAV) function selection
button if you are not in the Navigation
main menu, as the exclusion can only be
removed again here.
- Press the ~ function key.
- Touch the [Remove exc!usion]function key in
the opening pop-up window.
Received TMC traffic messages are displayed as
traffic problems on the map. Curren tly reported
traffic problems can also be displayed in the list
ofTMC traffic messages => page 107. ''TRAFFIC
fun ction selection button" .....
(l) Note
It takes some seconds after route guidance has
started for the route list and manoeuvre list to be
compiled so that it can be displayed .....
NAV (navigation system) function selection button
NA V (navigation system) function selection button
101
Booklet 3.4 RNS 510
Booklet 3.4 RNS 510
MAP function selection buHon
Map display
During route guidance, map display is shown automatically. You can also switch
to map display manually without route guidance being active.
Centring the map display on vehicle position or
travel destination
If you have moved the screen section, another
function key is shown in the top right below the
function key for compass view => page 102,
fig. 87. If you press this function key, the map is
centred again based on m e current vehicle position.
In a number of map views, you can centre the
view on the travel destination using theE) functionkey.
Changing display type
The symbol in the second fun ction key m, ~ or
_ shows the currently selected display type. To
change it, briefly touch the function key and
touch another display type in the pop-up
~ndow.
~-2D -
Fig.86 3D mop display with vehicle position.
During route guidance, map display is shown
automatically. You can also change to map display manually at any time.
Pressing me@@ function selection button "~l\
change to map display from any menu.
In map display, pressing the ~ function selection button ~U open or close the additional
~ndow where further information is shown and
can be se lected => page 105, "Additional window
in map display".
Map display during route guidance differs from
"normal" map display in a number of ways.
During route guidance the route to be driven is
shown as a blue line => fig. 87. In the bottom line,
the distan ce to the travel destination is shown in
the third function key after •. After (9 the estimated arrival time or travel time is displayed
=> page 124, "Navigation settings".
During route guidance, additional information
about route guidance can be called up in me additional ~ndow. For example, me manoeuvre
list can be shown where the turnjng points to be
102
MAP function selection buHon
Fig. 87 3D map display during route guidance
(map section moved).
travelled are displayed in a list with travel direction arrows => page 100.
Upcoming route sections can also be blocked
manually during route guidance => page 101.
The fol\o~ng gives a brief overview of the avail able function keys in both di splay types:
Using the El function key, the bar wim the function keys can be shown or hidden in any view.
Display and operation in map display
The symbol G indicates the vehicle position
and direction of travel.
Points of interest and destinations saved as favourite destinations are shown in the display in
accordance ~th the settings => page 122, "Map
settings".
The map scale is changed by turning me settings
knob => page 2, fig. I 0 . The "Autozoom" function is switched off => page 104, "Changing the
scale and display".
You can move the displayed map section by
pressing and holding your finger on the screen
and moving your fin ger "~thout lifting it.
Thel $ ... / (9... ] function key in map display during
route guidance
Touching the => page 102, fig. 87 [ $ ... / 0 ... ]function key opens a pop-up ~ndow ~th route
guidance settings.
(Stop route guidonce]- stops
route guidance at the
current position. Route guidance can be co ntinued at any time by touching the => page 102,
fig. 86 (Navigation J function key and
(Start route guidance J.
(N ew stopover destination ]- calls
Up the
New destination menu to enter a stopover desti nation mat you would like to travel to during the
current route guidance => page 84.
(Congestion aheodJ -
to manuaUy enter a route exclu-
sion => page 1O!.
to change the para meters for route
calculation => page 66.
[Route options]-
two -d imensional: conventional map
display from above.
(El - to store the vehicle position as flagged des-
~- 3D -
tination in the destination memory.
~ -Topographic -
For additional navigation functions, open the
Navigation main menu by pressing the [:§ill
function selection button=> page 65.
three-dimensio nal: map display from
me front at an angle as would be seen approaching from an airplane (see illustrations) .
conventional map display
from above ~th colour display of landscape
forms (mountains, valleys, etc.) .
The [Navigation] function key in map display
without route guidance
Touching the => page 102, fig. 86 [Naviga tion ]
function key opens a pop-up ~ndow ~m navigation settings.
starts route guidance or continues route guidance to the travel destination
selected in the Navigation main men u.
(Start route guidance]-
Controlling the media source
The fourth function key => page 102,
fig. 86 (Radio 2] indicates the currently selected
media ,so urce (here the radio station "Radio 2 ").
To control the selected media source, briefly
touch the function key and touch another station (radio mode) or title (media mode) in the
pop-up ~ndow.
Radio mode: the six station buttons of the
RADIO main men u are shown.
calls up the New destination
menu to change the travel destination selected
in the Navigation main menu => page 01.
Media mode: me title name and the function
keys for controlling the current media source are
shown.
IRoute options] - to change th e parame ters for route
Function key [Extras I
Touching the [Extros] function key opens a pop-up
~ndow for additional settings and displays.
(Enter new de,ti notion] -
calculation => page 66.
(El -
to store the vehicle position as flagged destin ation in the destination memory.
For additional navigation functions, for example
to change the travel destin at ion, open the Navigation main menu by pressing the~ function
selection button=> page 65.
shows the current travel destination selected in the Navigation main menu in
map display. The map is centred again on the vehicle position using me function key on the right
under the compass view.
(D estinati on view] -
(Doy/nightJ-
changes between day and night de-
s~n.
MAP function selection buHon
~
103
Booklet 3.4 RNS 510
IAddilional windowJ- opens the additional window.
The additional window can also be opened or
closed in map display by pressing the ~ function selection button.
Booklet 3.4 RNS 510
Symbol
m
Restaurant
~,
I~ lane recommendationJ- during route
guidance, a
small additional window with a lane recommendation is shown in map display when driving
and turning on mu1ti-lane streets. A tick in the
checkbox ~ indicates that the function is
switched on ==> page 96, "Navigation recommendations while driving".
Sight-seeing
Various
Relaxation
@)-switches the map display briefly to the overview display (larger scale). After a few seconds, it
returns automatically to the last selected zoom
display (smaller scale).
G or 0 - to zoom in or out in a map, i.e. to
change the map scale. Alternatively, move the
slider rn in the scale.
I@-,..)- switches to overview map \o\~th a starting
and ending point during route guidance.
~-
Shopping
11
Symbol
&
.&
Symbols for displaying favourite destinations
~
Symbol
Designation
Infrastructure
Private
104
MAP function selection button
Location display without route guidance
The current vehicle position is displayed in map display. The scale and display
can be changed, additional information can be shown, and map details can be
displayed. The displayed section can also be modified.
Sports
Symbols for dIsplaYing traffIC congestIon
&
.4&
In accordance with the settings, favourite destinations are displayed in the map with their assigned favourite symbol => page 122, "Map settings".
• The activated "Autozoom" fo> function is deactivaled again when the map scale is manually
changed with the setting knob.
• If the (El function key is used to save a
"flagged destination", it must be renamed in the
destination memory if you do not want it to be
over-written by the next flagged destination
==> page 81. ~
The road will be displayed in red if the traffic
delay is on the route that has been calculated.
The symbol will be displayed in greyifthe traffic
delay is not on the route that has been calculated.
to switch on Autozoom during route guidance. If "Autozoom" is active, the map scale is
adjusted automatically depending on the route
(small scale for driving on the motorway and a
larger scale for driving in a town). The switchedon Autozoom is displayed in the sca1e display by
,®. To switch it off~ touch it again or manually
change the sca1e using the setting knob
==> page 2, fig. I 0.
A favourite category can be specified for saved
destinations ==> page 81, "Edit/save entry".
Note
Business
Changing the scale and display
Touching the function key with the display of the
currently selected map scale on the bottom right
shows additional function keys for changing the
map section and map scale. These function keys
are hidden after five seconds of inactivity.
rn
Designation
&
®
=
~
Designation
Slow-moving traffic
Fig. 88 Mop display for the current location.
Fig. 89 Mop display with additional window in the
compass view.
-
Risk of skidding
In map display without active route guidance the current vehicle position is displayed on the map. You can "look around"
on the map and view further information
about the additional window.
Danger
"Looking around" on the map
Road works
- Touch the (MAP) function key to change
to the map display.
Traffic congestion
Accident
Black ice
Touch the function key with the symbol
m. or m and select another view type
in the pop-up window => page 103,
"Changing display type".
~,
Additional window in map display
Strong wind
Street blocked
Traffic problem (is shown for the
entire length of a traffic problem)
- Turn the menu knob in the map display
to change the map scale => page 104,
"Changing the scale and display".
- Press and hold your finger on the screen
and move it without lifting it off the screen
to move the displayed map section.
- In map display press the [MAP] function
selection button to display the additional
window.
- Touch the function key in the top left of
the additional window => fig. 89.
- Select one of the available displays by
touching it in the pop-up window which
opens.
During route guidance further displays can be
selected for the additional window ==> page 95,
"Route guidance".
MAP function selection button
105
~
Booklet 3.4 RNS 510
The posilion of the additional window on the
right or left. can be selected in the settings
:::::> page 122.
Display options in the additional window
indicates compass view with the CUTrent direction of travel.
(CompassJ-
indicates a map with the vehicle
position in the additional window. To change
this map display. touch the map once in the ad-
IAdditional mapJ
Booklet 3.4 RNS 510
ditional window. In the following menu. cha nge
the display options as described :::::> page 102.
"Map display".
(GPS viewerJ- shows
the currentvehicIe position in
coordinates. The number of received satellites is
also displayed. Forthe absolute height above sea
level to be shown beside the mountain symbol.
at least five satellites must be received simultaneously (display: "3D fix"). ~
TRAFFIC function selection buHon
Displaying TMC traHic messages
Brief texts in received TMC traffic messages ([MC = Traffic Message Channel) can
be called up from a list and are updated automatically in the unit.
Fig. 90 List of announced traffic problems.
Fig.91 Detailed view of an announced traffic
problem .
TMC traffic messages are used during
route guidance to automaticaJly optimise
the route during traffic congestion
=> page 98. "Dynamic route guidance with
TMC (Traffic Message Channel)".
Traffic congestion is displayed in both the de tailed view and in the map by a symbol
:::::> page 104. "Symbols for displaying traffic congestion". The direction in which the traffic congestion is located is shown by an arrow in the
symbol on the map.
- Touch the [TRAFFIC] function selection
button to display the current traffic messages in a list.
You can also manually calculate a detour to
avoid announced traffic congestion coming up
on the route ahead of you :::::> page 101. "Manually
blocking the route section".
- Touch the display of a traffic message to
show it in detailed view.
- In the detailed view you can scroll
through all the received traffic messages
using the arrow keys.
You can specify whi ch TMC stations you would
like to receive messages from in Radio settings
:::::> page 121. "Selecting preferred TMC stations".
During route guidance. the list contains either
all TMC traffic messages in the proximity of the
location or only the ones on the calculated route
in accordance with the settings:::::> page 122.
"Traffic information settings".
106
MAP function selection button
~
rn
Nate
• The unit is constantly supplied with TMC
traffic messages in the background, provided
that a TMC transmitter can be received at the
current location. The tra nsmitter does not have
to be the TMC transmitter.
• TMC traffic messages can only be evaluated
and saved by the device if the navigation data for
the area currently being driven is stored in the
unit memory or can be called up using an inserted navigation DVD.
• The qua lity of the dynamic route guidance
depends on the information contained in the
traffic announcements. The radio stations
TRAFFIC function selection button
107
~
Booklet 3.4 RNS 510
broadcasting this information are responsible
for the content.
• TMC traffic messages are required for dynamic navigation => page 98.
Booklet 3.4 RNS 510
• If there are serious traffic problems, you may
find that a diversion based on the TMC information does not save you time as the alternative
route is also subject to traffic problems. ~
PHONE function selection buHon
Applies to vehicles: with PREMIUM mobile telephone provision
Requirements and operation
A few basic telephone functions can only be called up using the radio navigation
system when the PREMIUM mobile telephone provision has been installed in the
vehicle and a mobile phone is paired with it.
- Follow the instruction manual for the
PREMIUM mobile telephone provision
when pairing with your mobile phone.
to "connect" the units to each other. A user profile is created in the PREMIUM mobile telephone provision which is clearly linked to the
mobile telephone and the SIM card.
The PREMIUM mobile telephone provision
combined with a compatible mobile telephone 25l is a fully-fledged GSM car telephone
system. The mobile telephone must be compatible with the Bluetooth®26l Remote SIM Access
Profile (RSAP) . The PREMIUM mobile telephone
provision does not use its own SIM card. but
"borrows" the SIM data from the mobile telephone using a Bluetooth® connection. The mobile telephone logs itself out of the GSM network
and logs into the PREMIUM mobiJe telephone
provision using the data from the "borrowed"
SIM card. The telephone is then controlled exclusively via the controls in the vehicle. The mobile telephone switches into pause mode.
Once the pairing process has been carried out,
the mobile telephone provision PREMIUM will,
when the ignition is switched on, connect automatically with the known mobiJe telephone via
the Bluetooth® connection.
Pairing process and user profile
To operate the PREMIUM mobile telephone provision. follow the instruction manual for your
vehicle. ~
Before the PREMIUM mobile telephone provision can be used. a one-time pairing process
with the mobile telephone must be carried out
If a mobile phone is not paired, telephone functions cannot be called up using the radio navigation system.
&
WARNING
Observe the instructions in the following
chapter => page 109, "Safety information".
[l) Nate
Applies to vehicles: with PREMIUM mobile telephone provision
Safety information
When using the PREMIUM mobile telephone
provision. please note the following points for
your own safety and the safety of others:
25)
26)
108
TRAFFIC function selection buHon
&
WARNING
Your attention must always be concentrated
on road traffic as an absolute priority! The telephone should only be used if the road traffic
situation allows. Accidents and injuries can
occur if the driver is distracted.
Optional equipment.
Bluetooth®is a regi stered trademark of Bluetooth SIG. Inc.
PHONE function selection buHon
109
~
Booklet 3.4 RNS 510
&
WARNING (continued)
• Please only use the telephone when the
road, weather and traffic conditions are such
that it is safe to do so.
Booklet 3.4 RNS 510
&
plosion, but they are not always clearly indicated. These include, for example:
- the vicinity of chemical pipelines and
tanks,
• The different volume settings should be selected so that warning signals from outside
the vehicle, e.g. a police or fire brigade siren,
can be heard at all times.
- below deck on a ship,
WARNING
• When making telephone cal.ls during your
journey please note - road traffic demands the
full attention of all drivers. You should only
use the PREMIUM mobile telephone provision whilst the vehicle is in motion if the traffic
situation allows. Remember: traffic safety always has priority - Risk of accident!
• Always maintain a minimum distance of
20 cm to the vehicle aerial. This applies in particular to passengers with a pacemaker, thus
avoiding potential interference with the pacemaker. If you notice that there are problems,
switch the PREMIUM mobile telephone provision off immediately - Risk of fatal injury!
• When fuelling, always switch the mobile
phone and the PREMIUM mobile telephone
provision completely off according to the instruction manual applicable for your vehicle.
Electro-magnetic waves could generate
sparks which could in turn cause a fire or explosion.
• Switch off the PREMIUM mobile telephone
provision at locations where there is a risk of
explosion and proceed according to the appropriate notices and regulations. You should
also switch the mobile telephone off if necessary - Risk of explosion! There are a large
number of locations where there is a risk of ex-
Applies to vehicles: with PREMIUM mobile telephone provision
PHONE main menu
Afew basic telephone functions can be called up using the radio navigation unit.
For further operation of the PREMIUM mobile telephone provision, please read
the instruction manual for your vehicle.
- the area around vehicles which run on
liquid gas (e.g. propane or butane)
• It will not be possible to make a telephone
call in areas with no signal or with only a very
weak mobile telephone network and in some
cases, in tunnels, garages and SUbways. This
also means that no emergency calls can be
made.
&
WARNING (continued)
- places where the air is laden with chemicals or particles such as flour, dust and
metal powder,
- any other location where you are normally recommended to switch off the vehicle engine.
<D Caution
Do not forget to foHow special regulations for a
particular area and always switch the PREMIUM
mobile telephone provision off if the use of mobile telephones is forbidden as interference or
dangerous situations could be caused through
the use of the telephone.
rn
Note
• In some mobile telephone networks, an
emergency call can be made without the mobile
telephone being connected using the PREMIUM
mobiJe telephone provision when the ignition is
switched on and the network is strong enough.
In the Telephone menu, select the menu option
"SOS".
• If you wish to connect the PREMIUM mobile
telephone provision with another device using
Bluetooth® wireless technology, please read the
operating manual for detailed safety information. Use Bluetooth® compatible products only.
• Most electronic devices are shielded against
high-frequency signals. In rare cases, however,
electronic devices may not be shielded against
the high-frequency signals emitted by the PREMIUM mobile telephone provision. This could
cause interference.
• Find out whether special regulations apply
for the use of a headset in your country. <4
Fig.93 PHONE main menu: connection established.
Follow the instruction manual of the PREMIUM mobile telephone provision to pair
your mobile phone.
- Press the IPHONE) function selection
button to open the PHONE main menu.
It takes a few minutes after the pairing process
PHONE function selection button
Function keys in the PHONE main menu
ca - accept, dial, or hold calls. In the PHONE
main menu , the call list of the dialled call numbers is displayed after touching it => page 116,
"Call lists".
until the telephone book data of the paired mobile phone is available on the radio navigation
unit.
0- end call or refuse call.
Display in the PHONE main menu
~ - establishes
In the upper line in the centre of the screen
=> fig. 92. the name of the mobile phone provider where the SIM card of the paired mobile
phone is registered is displayed. The name of the
paired mobile phone is displayed in the second
line (in the illustration: "FON 01").
During a call, the telephone number or the
name of the person you are talking to is displayed in the upper line if they are stored in the
telephone book, as well as the call duration
=> fig. 93.
The syrnbol ®shows an existing Bluetooth® connection.
110
The green bars on the top right => fig. 92 or
bottom right => fig. 93 indicate the current field
strength (signal strength of the currently received mobile phone transmitter station).
a connection to an emergency
number after confirming it. This function is also
available without a paired mobile phone. The requirement is that a connection can be established using a mobile phone provider.
and [Memory 2] to [Memory 6]- speed
dial keys; these can be assigned a telephone
number => page 117.
[Voice moilbox)
[J)-opens the number pad to enter a telephone
number => page 112.
~- opens
a pop-up vvindow to select a call list.
Only call lists from missed, dialled, or answered
calls on the PREMIUM mobile telephone provision can be displayed => page 116, "Call lists".
PHONE function selection button
III
~
Booklet 3.4 RNS 510
ISwitching off the microphone 1- switches off the microphone during a call. When the microphone is
switched off. the person on the Line cannot hear
what is being said in your vehicle.
Booklet 3.4 RNS 510
0- opens the telephone book of the paired mobile phone to select a telephone number
=> page 113. ~
Selcecting saved telephone numbers
Applies to vehicles: with PREMIUM mobile telephone provision
User profile
Applies to vehicles: with PREMIUM mobile telephone provision
Entering a telephone number
- This is how you enter telephone numbers in the input line.
- Delete the characters in the input line
moving from right to left, by touching the
~ function key.
- Touch the 0 function key when you
have finished entering the telephone
number in the input line. The entered telephone number will be dialled =:> page 118.
Follow the instruction manual of the PREMIUM mobile telephone provision to pair
your mobile phone. The saved user profile
is loaded.
If telephone book entries of the SIM card or the
Telephone book data => page 113. call lists
=> page 116. and saved speed dial keys
=> page 117 are assigned a user profile and saved
in the PREMIUM mobile telephone provision.
They are available when the SIM card is paired
again mth the PREMIUM mobile telephone provision.
A maximum of three user profiles can be stored
in the PREMIUM mobile telephone provision. If
you would like to pair an additional SIM card.
you have to delete a user profile first. To do this.
follow the vehicle instruction manual for the
PREMIUM mobile telephone provision. ~
mobile phone have been changed in the mean
time. you can start a manual update of the telephone book data => page 127. "Telephone settings".
Applies to vehicles: with PREMIUM mobile telephone provision
Fig_94 Entering a telephone number.
Follow the instruction manual of the PREMIUM mobile telephone provision to pair
your mobi.le phone.
Entering and dialling a number
- In the PHONE main menu. touch the
function key on the lower left =:> page Ill.
fig. 92 to open the number pad to enter a
telephone number =:> fig. 94.
To enter a country code. instead of the first two
numbers (for example "00") you can select the
character "+". Press and hold the@) function key
with the small triangle ....... until a pop-up
window is shown with the function keys@)and
(B. Accept the desired character by touching the
input line - the pop-up window will be closed. If
no entries are made. the pop-up v.~ndow is
closed automatically after a few seconds.
Telephone book
The special keys "Asterisk" [) and "Hash" OD
have the same function as on a normal telephone. These characters are needed primarily
when sending tone signals during a call
=> page 119. "DTMF tones". ~
- Touch the number button to enter the
number in the input line.
Fig. 95 Telephone book
Fig. 96 Displaying
Opening a telephone book
Dialling a telephone number from the
telephone book
- In the PHONE main menu. touch the
function key on the lower right => page 111,
fig. 92 0 to open the telephone book
=:> fig. 95.
0
telephone book entry.
- In the Telephone book menu. move the
slider in the scroll bar downward to display
additional entries.
- Touch the ISearch) function key to select a
telephone book entry via the search mask
=> page 114. "Searching for an entry in the
telephone book".
112
PHONE function selection button
PHONE function selection button
113
~
~
Booklet 3.4 RNS 510
Booklet 3.4 RNS 510
- In the left column. touch a telephone
book entry in the display. The first telephone number stored in the telephone
book for this entry will be dialled
=> page U8.
Displaying information about a telephone book entry
- Touch the@function key to the right of
the telephone book entry you would like to
display. The telephone numbers stored in
thjs entry are shown => fig. 96.
- If you touch a telephone number in the
display. it wiJI be dialled.
- Jfyou touch the function key to the right
ofthe telephone number. an input mask to
modify the stored telephone number is
opened => page 115. fig. 99.
- Delete the characters in the input line.
starting at the position of the cursor and
moving from right to left. by touchjng the
@) function key.
- To modify the displayed telephone
number. follow the instructions described
in => page 115. "Modifying a telephone
number".
- Touch the function key after the input
line to change to the Jjst view of available
entries => fig. 98.
It takes a few minutes after the fIrst paring
process until the tel ephone book data is available on the radio navigation unit. To do this.
follow the vehicle instru ction manual for the
PREMIUM mobile telephone provision.
~
- You select a number here as described
in the chapter Telephone book=> page 113.
You can find additional information about input
masks in => page 10. "Using input masks". ~
Applies to vehicles : with PREMIUM mobile telephone provision
Modifying a telephone number
A telephone number saved in the telephone book or in a callUst can be changed
before you dial it. You can add a country code. for example.
The telephone book can also be opened during
an ongoing tel ephone call. ~
_ Delete the characters in the input line.
starting at the position of the cursor and
moving from right to left. by touching the
@ function key.
Applies to vehicles : with PREMIUM mobile telephone provision
Searching for an entry in the telephone book
_ Tf you touch the 0 function key. the tel ephone number displayed will be dialled.
_ Touching~will close the input mask.
Fig. 99 Modifying a telephone number.
Fig.97 Search mask for selecting a telephone book
entry.
Fig. 98 Search results from the telephone book.
Open the telephone book as is described
=> page 113. "Opening a telephone book".
- Touch the 0 function key to open the
input mask for numbers and special characters. Press ~ to change to the letter
input mask again.
- In the telephone book menu touch the
=> page 113. fig. 95 (Search I function key to
select a telephone book entry using a
search mask => fig. 97.
- Touch a character in the keyboard block
in the search mask to accept it in the input
line.
114
PHONE function selection button
The entries in the telephone book of the mobile
phone cannot be changed permanently on the
radio navigation unit. You can only modify a telephone number saved in the mobile phone telephone book when making a call from the vehicle. You can add a country code. for example.
To open the display of a telephone number
from the telephone book or a call list.
follow the instructions described in the
corresponding chapter (for example:
=> page 114. "Searching for an entry in the
telephone book").
After the telephone number has been dialled. it
is t.hen available in the call list => page 116. "Call
lists".
- Touch the 8J or (8 arrow keys to move
the cursor in the input line.
I[you have changed the data in the mobile
phone telephone book or the SIM card since the
last pairing. you can update the telephone book
data in the unit directly using the
Telephone settings menu => page 127. ~
- Touch a character in the keyboard block
to insert it after the cursor in the input line.
To change an entry in the mobile phone telephone book. see the descrjption in the instruction manual of the mobile phone manufacturer.
- Only those characters are available that
correspond to an entry saved in your telephone book. The number of entries that
can be selected with this sequence of characters is displayed in the function key after
the input line (in Illustration => fig. 97 G). ~
PHONE function selection button
115
®
Booklet 3.4 RNS 510
Booklet 3.4 RNS 510
Applies to vehicles: with PREMIUM mobile telephone provision
®
Applies to vehicles: with PREMIUM mobile telephone provision
Call lists
Saving nu mbers to speed dial keys
The call numbers from calls made with the PREMIUM mobile telephone provision and missed calls are saved in call lists and can be called up from these again.
The five speed dial keYS!Memory 2] to!Memory 6] can each be assigned a telephone
number. The speed dial key! Voice mailbox] is reserved for the telephone number of
your mailbox.
- Touch the telephone number or the
name to dial it => page 118.
Use the@function key to show additional information about the saved telephone number.
You can also change the telephone number before dialling it ~ page lIS, "Modifying a telephone number".
• [Missed col/,]- shows a list of calls not answered
on the PREMIUM mobile telephone provision .
• [Diol/ed numbers] shows a list of telephone
numbers that were dialled with the PREMIUM
mobile telephone proviSion.
Fig.l00 Seledion from a call list in the PHONE
main menu.
Only telephone numbers that were
missed, dialled, and accepted with the
PREMIUM mobile telephone provision in
the vehicle are saved. The call lists stored
in the mobile phone are not copied to the
vehicle.
- In the PHONE main menu, touch the
=> fig. 100 ~ function key.
- In the pop-up window which opens, select the call list containing the telephone
number you would like to select by
touching it. The list will be displayed. Tele·
phone numbers with an entry in the telephone book are shown by their name.
• /Incoming col/,] shows a list of calls answered
on the PREMIUM mobile telephone provision.
If the telephone number from a call list is saved
in the telephone book, the name saved in the telephone book is displayed instead ofthe telephone number.
Incoming calls rejected with the 0 function key
are saved in the call list of incoming calls.
Call lists are always assigned to a user profile and
are only displayed when the SIM card is paired
again with the PREMIUM mobile telephone provision ~ page 113, "User profile". ~
Fig.l0l Entering or changing a speed dial number.
Fig.l02 PHONE main menu with assigned speed
dial key.
After the first pairing with the SIM card of
your mobile phone, all of the speed dial
keys are still unassigned when the PHONE
main menu is called up for the first time
=> page Ill. fig. 92.
- Touch the ~ function key to delete the
entries in all input lines at once, after confirming with @R).
Assigning speed dial keys
- [fyou touch a non-assigned speed dial
key, the Speed dial menu opens to enter
the name and telephone number.
If you touch the => fig. 101 IName] function key, an input mask is opened where
you can assign a name => page 11, "Input
mask for free text input".
-
- Jfyou touch the INumber) function key, a
mask is opened to enter the telephone
number. A telephone number is entered
analogously to the description in the
chapter "Modifying a telephone number"
=> page us.
- Touch the [Coli list) OrlT.lephone book) function key to accept a telephone number for
this speed dial key from the list.
116
PHONE function selection button
- When you are finished making your entries in the Speed dial menu, touch the
=> fig. 101 @R) function key.
- The name you entered is displayed in
the speed dial key in the PHONE main
menu => fig. 102. The speed dial key now
stored the entered telephone number.
Dialling using a speed dial key
If you touch an assigned speed dial key
briefly, its stored telephone number is dialled => page 118.
-
Editing assigned speed dial keys
- [fyou would like to change the telephone number of a speed dial key, press
and hold the speed dial key until the Speed
dial menu is open for editing => fig. 101.
..
PHONE function selection buffon
117
Booklet 3.4 RNS 510
Booklet 3.4 RNS 510
- You can change the name and the telephone number by calling up the input
mask or you can select another entry from
the telephone book or call list as was described above.
The speed dial key assignments remain saved in
the unit, but are only shown when the SIM card
is paired again with the PREMIUM mobile telephone provision ~ page ll3, "User profile".
Speed dial key (Voice mail box I
The (Voice mailbox) speed dial key also does not
have a factory-default telephone number, as this
number depends on the mobile phone provider
and country. However, the name for this speed
dial key is assigned and cannot be changed. This
is a good place to store the number of your
mailbox so you can quickly listen to your voice
messages . ~
Applies to vehicles: with PREMIUM mobile telephone provision
M aking a call
Provider
- Touch the 0 function key during a call
to put it on "hold", as is described above
=> page 118, "During a telephone call".
- Call another person by entering a new
telephone number => page 112 or select a
saved telephone number => page 113, as is
described in the corresponding chapter.
.... ~ccLJ
~
8,...0.5.
Fig. 103 PHONE main menu : Telephone call
Fig. 104 Playing the DTMF button melody.
If you have dialled a telephone number or
answered a call, the PHONE main menu
changes to the Telephone call => fig. 103
view.
During a telephone call
Incoming telephone calls
- An incoming telephone call is shown on
the screen as "Incoming call" along with the
telephone number of the caUer. If the
number of the caller is saved in the telephone book, the name of the caller is
shown instead of the telephone number.
- Touch the ID function key to accept the
call.
DTMF tones
"Call waiting" and toggling between
two callers
If you are asked to enter an DTMF tone during a
- In the "Incoming call" line, touch the 0
function key to answer the call. The call
with the first calle r is put on hold, but not
ended (display: "Call being held") .
__
- Touch the 0 function key to end the call
to the telephone number shown in this
line.
- When you have made another call, you
can switch between the two calls ("toggling"), as described below.
- In the "Incoming call" line, touch the 0
function key to refuse the ca ll.
'1~
Annels~~
~ ~~~(jL
- If you touch the 0 function key in the
line "Call being held", the call with this
caller is continued and the other caller is
put on "hold". You can toggle back and
forth between callers.
Every telephone button has a specific DTMF
tone assigned to it. DTMF tones are used to enter
a password over the telephone or to select an
employee in a "Call centre", for example.
- If you receive a call during another call,
the number or name of the caller is shown
on the screen below the current call (function: "Call waiting").
000012345678910
~ ·~O
Making a second call while telephoning
call, open the keyboard field by touching the
bottom left function key and follow the instructions ~ page U8, fig. 104 (for example: "To speak
to one of our staff, please press 0").
You can also save a series of DTMF tones in your
mobile phone. If you are asked to enter this seri es ofDTMF tones during a call, call up the entry
[ram the telephone book, as described
~ page 114.
If you touch the (DTMF) function key in the input
mask, the character sequence shown in the
input line is played as a series of DTMF tones.
Note that in a series of DTMF tones, the character "+" must not be used, as it interrupts the
playing of the DTMF tones. ~
- If you touch the 0 function key during
a telephone call, the current call is
switched to "mute" (display: "Call being
held"). This means that the call continues
to be held while the sound is muted.
- When you touch the 0 function key
again, the call can be continued .
- If you touch the 0 function key during
the caU, the call to the current telephone
number will be ended and the unit
changes to the PHONE=> page 117, fig. 102
main menu.
- Touch the 0 function key to refuse the
call.
118
PHONE function selection button
PHONE function selection button
119
Booklet 3.4 RNS 510
Booklet 3.4 RNS 510
SETUP function selection button
Radio seffings
Switching traffic announcements on
and off
Seffings main menu (setup)
- In the Radio settings menu, touch the
(Traffic information) function key to switch the
traffic announcements playback function
on or off ~ page 18. "Traffic programme
(TP) function". A check in the checkbox ~
indicates that the traffic information function is switched on.
In the settings main menu, first select the area where you would like to make
changes.
select preferred TMC stations
and specify the range for TMC messages
=;> page 122, "Traffic information settings".
{Traffic infarmationJ
{scr•• nl- set the brightness of the screen, and
check/uncheck day/night design of the map display and button confirmation tone=:> page 123.
"Screen settings".
settings for playing and displaying MP3 files and activate or deactivate external connections =:> page 124, "Media settings".
Selecting preferred TMC stations
{MediaJ- specify
specify settings for issuing navigation recommendations. define or change the address as the home address and start a virtual
demonstration drive with a manually set
starting point =:> page 124, "Navigation settings".
{NavigationJ
Fig. 105 Main menu settings: Seledion.
- Press the (SETUPI function selection
button to open the Settings main menu.
- Touch the area where you would like to
change or perform settings.
- Touch the ~ fig. 105 ~ function key to
switch back to the last selected menu.
Overview of the setting menus
perform settings for the function of the
arrow keys in radio mode, for the displayed
memory buttons, for the memory list, and for
TMC traffic messages =;> page 121. "Radio set·
tings".
(RadioJ-
@W- perform settings for map display and select symbols for display on the map =;> page 122,
"Map settings".
27)
system settings such as language and
time and undoing or deleting performed and
saved settings in individual areas =:> page 126.
"System settings".
{System J-
(Video
1- perform settings for language selection
when inserting a video DVD and adjust the aspect ratio. When operating an external media
source27) the audio/video standard can be set
=:> page 126, "Video settings" and settings for TV
operation can be performed =:> page 51, "TV settings".
ITelephone ) - update the telephone book in the
unit, delete all call lists, and edit the speed dial
key assignments =:> page 127, "Telephone
se ttings". ~
Call up the Radio settings menu by
pressing the (sETupl function selection
button and the (Radial function key
~ fig. 106.
Specifying station selection using
arrow keys
- In the Radio settings menu. touch the
function key after [arrow keys I.
- Touch (Station list] or (Memory list] to specify
which list should be used to select stations
using the arrow keys. If (Memory list I is selected. only stations stored in the memory
list are called up using arrow keys
~ page 16, "Select.ing stored radio stations". In the RADIO main menu "memory"
is displayed in the top left.
Selecting station buttons for display
- In the Radio settings menu. touch the
function key after[Station buttons I.
- In the pop-up window which opens.
touch the stations to be displayed in the
RADIO main menu.
- In the Radio settings menu. the
(Current TMC stotion: ... 1function key shows the
TMC station from which TMC traffic messages are currently being received.
- Touch the function key after
(Preferred TMC station] and touch to select your
preferred TMC station in the pop-up
window which appears.
- Touch (Automatic) if you would like the
unit to search for a TMC station automatically.
Deleting a memory list
- In the menu Radio settings move the
slid er all the way down to show the
[Delete memory list) function key.
- Touch the (Delete memory list) function key
and confirm the following security check
to delete all of the radio stations saved in
the memory list ~ page 14, "Storing radio
stations".
Preferred TMC station
If the "preferred" TMC station can no longer be
received. the TMC station offering the best reception for the area currently being travelled is
automatically searched for by the system. The
TMC station sending the messages currently on
display is shown in Radio settings. ~
Optional equipment Only if a TV tuner is installed =:> page 42. Please refer to the operating manual provided by the manufacturer.
120
SETUP function selection button
SETUP function selection button
121
~
Booklet 3.4 RNS 510
Booklet 3.4 RNS 510
Selecting messages to be displayed
Map seHings
Call up the Map settings menu by pressing
the ISETUP) function selection button and
the IMop) function key.
Position of the additional window
- In the Map settings menu, touch the
function key after IAdditional window).
- Touch ~ or ~ to specify the position of the additional window in the map
display => page 105.
Selecting the map details to be displayed
- In the Map settings menu, touch the
IAdditional window) function key. The Select
point of interest category menu is opened.
- The available map details correspond
to the available point of interest categories
=> page 72, "Available point of interest categories".
- Select a map detail you would like to
display in the map by touching => page 69,
"Selecting a point of interest category". Selected map details are shown by a check in
the checkbox ~ and below in the input
line.
- Touch a map detail marked with an active check box ~ to remove the check in
the checkbox. The corresponding symbol
is deleted from the input line at the
bottom.
Selecting preferred TMC stations
- In the Traffic information settings
menu , touch the function key after
IPreferred TMC station) and touch your preferred
TMC stations in the pop-up windowwhich
opens.
SETUP function selection button
- If you touch @D all current TMC traffic
messages are displayed.
- Touch IAutomatic) if you would like the
unit to search for a TMC station automatically.
Switching traffic announcements on
and off
- In the Traffic information settings
menu, touch the ITraffic information) function
key to switch the traffic announcements
playback function on or off => page 18,
"Traffic programme (TP) function". A
check in the checkbox ~ indicates that the
traffic information function is switched
on .
If the preferred TMC station can no longer be received, the TMC station offering the best reception for the area currently being traveUed is automatically searched for by the system. The TMC
station sending the messages currently on display is shown in Radio settings.
If "automatic" is selected, the TMC station offering the best recep tion for the area currently
travelled is always searched for automatically by
the system . ...
Displaying favourite symbols
- In the Map settings menu, touch the
function key after IFovourite symbol) to activate
or deactivate the checkbox. I f the checkbox
is activated ~ the destinations stored as a
favourite destination are displayed in the
map with the symbol of the selected favourite category => page 104 . ...
Call up the Traffic information settings
menu by pressing t.he ~ function selection button and the ITraffic information)
function key.
122
- Touch IOn the route) to show only those
TMC traffic messages relating to traffic
congestion along your route during route
guidance.
- Touch the INone) function key to delete
all of the marked map details displayed in
the input line at once.
Traffic information seHings
Fig. 107 Menu: Traffic information settings
- In the Traffic information settings
menu, touch the function key behind
ITMe filter) and select which TMC traffic messages you wish to be displayed from the
pop-up window which opens.
®
Screen seHings
The brightness of the screen and the type of map display are adapted automatically or can be set manually. The "button tone" (confirmation tone) can be
switched on or off.
Call up the Screen settings menu by
pressing the (SETUP) function selection
button and the (Screen) function key.
Brightness
- In the Screen settings menu, touch the
function key behindlBrightness ) and select a
setting in the pop-up window which
opens.
- Touch the (Automatic ) function key to
adapt the brightness of the screen automatically to the current light conditions
via sensors on the unit.
Day / night
- In the Screen settings menu, touch the
function key behind IDay / night) and select a
setting in the pop-up window which
opens.
- Touch the IAutomatic) function key to
change the map display from night to day
design, depending on whether the driving
light is switched on or off.
- Touch the ~ or ~ function key to
manually specify the day or night design
for the map display.
- Touch one of the other function keys to
set the screen brightness manually.
SETUP function selection button
123
~
Booklet 3.4 RNS 510
Confirmation tone
- In the Screen settings menu, touch the
function key after [Confirmation tone) and select a setting in the pop-up window which
opens.
Booklet 3.4 RNS 510
- Touch ~ or @ill to switch the confirmation tone of an operation or function
key on the screen on or off.
rn
Nav. announcements
- In the Navigation settings menu, touch
the function key after [Nav. announcement) and
select a setting in the pop-up window
which opens=> page 125.
Note
Note that manually setting the screen under un favourable conditions can make the screen
unreadable. ~
Media seHings
Call up the Media settings menu by
pressing the [SETUP) function selection
button and the [Media) function key.
- Activate the checkboxes in front of the
entries [;1 by touching the appropriate
function key. Touch the function key again
to deactivate the checkbox O.
Function keys in the menu: Media seHings
,Active'e AUX inpu'l
to pl ay back an external audio
source.
,Deactiva'e a"is'/track name )- the settings determine
- In the Navigation settings menu, touch
the function key after [Time display) and, in
the pop-up window which opens, touch to
select the [Arrival time) or [Drive time ). During
route guidance the set time is shown in the
map display => page 102.
Defining or changing the home address
if
the track and artist name. or just the file and
folder name are displayed on audio COs with CD
text and in MP3 mode ~ page 28.
- In the Navigation settings menu touch
the [Define home address) function
key=> page 83, "Editing the saved home
address".
pl ays all MP3 files stored in
fold e rs a.nd subfolders according to the sequence on the played medium ~ page 29. "Play
orderofMP3 files and folders ". ~
(Ploy wi,h subfoldersl-
Demo mode
(Activa'e AV inpu' I-to play back an
audio/video source28),
stalled ~ page 42.
Time display
optional external
when a lV tuner is in-
- In the Navigation settings menu touch
the [Advanced navigation settings) function key.
- In the Advanced navigation settings
menu, touch the [Demo mode) function key to
switch demo mode on or off. A check in the
checkbox ~ indicates that demo mode is
switched on => page 125, "Demo mode".
Navigation seHings
Call up the Navigation settings menu by
pressing the [SETUP) function selection
button and the [Media ) function key.
- If demo mode is activated, you can also
manually enter a fictitious location . Select
the location from the map, analogue to selecting a travel destination from the map
=> page 74.
Have three alternative routes suggested
- Touch Navigation settings in the main
menu on the [Suggest 3 alternative routes) function key to switch the function on or off. A
check in the checkbox [;1 indicates that the
function is switched on => page 95.
Entering the average speed for the
time calculation
~
- [n the Navigation settings menu touch
the [Advanced navigati on settings) function key.
- [n the Advanced navigation settings
menu, touch [0 Av. speed for time cale.) and, in
the pop-up window which opens, touch to
select~, [Medium) or [Slow) => page 125,
"Adjustable average speed".
Demo mode
In demo mode. you can start virtual route guidance. Virtual route guidance is repeated when
the fictitious travel destination has been
reached. Stop virtual route guidance in the usual
way and deactivate the demo mode so you can
start" real " rou te guidance.
Because the unit has to re-oriented itself first , it
could take a while for the unit to determine your
reallocation. depending on the number of satellites currently available. Drive a few meters.
Nov. announcements
@El- no spoken navigation recommendations
are issued.
naviga tion announcements are onJy
issued when the calculated route has been left.
e.g. as a response to traffic congestion warnings.
This se tting is recommended when navigation
announcements for a route traveUed each day
are no longer needed and the navigation system
is onJy used for dynamic navigation ~ page 98,
"Dynamic route guidance with TMC (Traffic
Message Channe l) ". If a navigation announcement is issued again due to a change in route .
Nav. announcements are always switched on
again (display: 'Nov. onnouncemen'sJl~ OnO.
[Dynomicl-
~-
navigation announcements are played
during audio mode at the preset volume
~ page 96, "Issuing navigation recommendations".
Adjustable average speed
Depending on the average speed set, an arrival
or travel time is determined and displayed by
the unit during a route calculation ~ page 125,
"Time display". ~
Fig.108 Menu: Navigation settings
28)
Optional equipment
124
SETUP function selection button
SETUP function selection button
125
~
Booklet 3.4 RNS 510
Booklet 3.4 RNS 510
System seHings
Call up the System settings menu by
pressing the ISETUP) function selection
button and the ISystem) function key.
Changing system settings
- In the System settings menu, touch one
of the displayed function keys and select
the desired setting in the pop-up window
which opens.
- In this way, you can set the language for
spoken text and screen displays, and
change the distance or temperature units,
or the time and date format.
Resetting the unit to the factory settings
Changing the aspect ratio of the
screen display
- In the Factory settings menu, activate
the checkboxes in front ofthe entries ~ by
touching the appropriate function key.
Touch the function key again to deactivate
the checkbox O.
- The aspect ratio currently set can be
displayed by pressing the (DVD format) function key.
- Touch the [DVD format) function key and,
in the pop-up window which opens, touch
~or~to set that aspect ratio. All video
data is now played back in this aspect
ratio.
Settings for vehicles with TV tuner
unit, additional
setting options are available here::::> page 51, "TV
settings" ...
If a TV tuner is connected to the
- In this way, you can select settings you
would like to reset.
- Touch the (Reset) function key and confirm the following security check to reset
the selected settings to factory settings and
delete the data stored there.
Applies to vehicles: with PREMIUM mobile telephone provision
Telephone seHings
In certain cases, sett.ings for "time" and "date"
may only be performed manually. The time and
date from the vehicle is usually copied automat·
ically into the unit . ..
- Confirm the following security check.
The "old" data of the telephone book in
the unit can still be selected while the data
is being updated .
- In the System settings menu, touch the
key.
- To do this, follow the vehicle instruction manual for the PREMIUM mobile telephone provision.
I Factory sellings) function
Video seHings
Deleting call lists
-
You can change the settings for language and aspect ratio of the screen display
during video-DVD operation.
Fig.110 Menu: Telephone sellings
Call up the Video settings menu by
pressing the (SETUP) function selection
button and the IVideo) function key.
Call up the Telephone settings menu by
pressing the @.@ function selection
button and the ITelephone) function key.
Changing the language
- In the Video settings menu, touch the
[audio language ], [menu longuage] or [Sub-title] and,
in the pop-up window which opens, touch
to select the desired language 29J .
- The sub-titles function can be fully
switched off by touching @!D.
Fig.109 Menu: Video sellings.
29)
~
Updating the telephone book in the
unit
~
- Touch the
=> fig. 110 '["-;U-pd-'--o"-te-'t-:el-ep'7h-on-e-:b-o-ok"] function
key to update all of the entries changed
since the last pairing in the telephone
book of the mobile phone or SIM card.
This procedure can take a few minutes.
Press the (Delete coli lists] function key.
- Jfyou confirm the following safety
check with IDelete], the saved telephone
numbers of all the calls made on the unit.
as well as non-answered calls are deleted.
Editing speed dial keys
- Touch the ISpeed diol) function key to edit
the assigned speed dial keys.
- In the following menu, touch the speed
dial key to change its assignment.
- Edit the entry as is described
=> page 117, "Saving numbers to speed dial
keys" . ..
The languages available for selection as the menu, audio or sub· title language depend s on the inserted
video-DVD.
126
SETUP function selection button
SETUP function selection button
127
~
Booklet 3.4 RNS 510
Booklet 3.4 RNS 510
Index
A
CD
Blocking the route section 101
Button tones
Switching on or off 56
Eject 22
External CD changer with magazine 35
Insert 22
CD changer
Status displays 33
CD changer and radio mode 37
CD mode
CD unreadable 19
General information 19
MIX function 27
MP3 CD unreadable 19
random play 27
Safety precautions 53
scan 28
scan function 28
Tips 53
Traffic Programme TP 18
CD player
operating information 53
CD player operation 53
CD-R 53
CD-RW 53
Centring the map 103
Checkbox 6
Cleaning a CDIDVD 54
Cleaning data media 54
Code number 8
Confirmation tone
Switching on or off 56
Control elements 2
Controllers
Sliders 6
Convenience radio coding 8
Coordinates 75
Geo-posirion 75
Cursor
Cursor 11
c
o
Cabriolet models
Eject button 22
Category overview
PO! 72
Destination entry
Coordinate entry 75
Destination on the map 74
PO! 69
Position destination 75
AM
Frequency band of the medium wave
(MW) 14
Analogue 1V reception 42
Announcements 96
Anti-theft coding
Incorrect entry 8
Audio
Audio menu 24
change track 25
Change track manually 25
Changing audio source 24
Forward 25
Rewind 25
Select track 24
Selection menu 24
Track list 24
Track list (audio CD) 26
Track list (MP3 or WMA) 26
Audio CD
Unreadable 19
Audio me
MP3 track 28
WMAtrack 28
Audio mode
Repeat 26
Repeat track/folder 26
Audio source 20
Auto scan
Radio 14
Autozoom 104
B
128
Index
Desbnation memory 78
Deleting 82
editing 80
Destinations
editing 81
saving 81
Digital1V reception 42
Diversion with TMC
Automatic 99
Manual 99
off 98
DRM
Copyright protected 21
Digital Rights Management 21
DTMF tones 119
Dual disc 54
DVB-C
Cable1V 42
DVB-S
Satellite 1V 42
DVB-T
Digital aerial 1V 42
Digital video broadcasting - terrestrial 42
Multiplex 42
Universal 1V 42
DVD 54
DVDmode
General information 19
DVD Plus 54
Dynamic route 98
Dynamic route guidance 98
E
Eject
Cabriolet models 22
Eject button
Cabriolet models 22
Emergency call
Telephone (SOS) 111
Entering the PIN 8
EON (Enhanced Other Network) 18
EPG (Electronic Programme Guide) 50
External CD changer 33
Audio DVDs 34
CD-R 34
~
CD-RW 34
Ejecting all CDs 34
Ejecting CDs 33
Loading 33
MP3CD 34,36
overview 33
Operation 33
Quick loading 34
External CD changer with magazine 35
Audio DVDs 36
CD magazine 36
CD-R 36
CD-RW 36
Changing CDs 36
F
Flip disc 54
FM
VHF frequency band 14
Forward
Audio 25
Frequency band 14
Full-screen view
Show menu 39
Start or end 39
Function
Switching on or off 6
Function keys 5
Function selection button
MAP 102
MEDIA 19
NAV naviga tion 58
PHONE 109
RADIO 13
SETUP 120
TONE 55
TRAFFIC 107
Function selec tion buttons 5
G
GALA 55,56
Operation 56
Speed dependant vo lume control 56
Geo-position
GPS coo rdinates 75
Index
129
Booklet 3.4 RNS 510
H
HDD
Editing audio files 32
Editing folders 32
Editing tracks 32
Home address
Editing 83
Hybrid receiver
TV mode 42
Ignition off
Timeout 8
Incompletely digitalized areas 59
Incorrect code number 8
Information window
PO! 71
L
Laser, CD mode
Safety precautions 53
M
Main menu
Navigation 65
PHONE III
RADIO 13
Settings (setup) 120
Sound settings 55
Telephone III
TRAFFIC 107
TV 43
MAP
2D/3D 103
Additional window 105
Autozoom 104
Centring the map 103
Changing display type 103
Changing the scale and display 104
Controlling the media source 103
Display options in the additional
window 106
Displaying favourite symbols 122
Favourite destination symbols 104
Function keys 103
130
Index
Booklet 3.4 RNS 510
Location display 105
Map display 102
Perspective 103
Position of the additional window 122
Selecting map details 122
Settings 122
Topographic 103
Map
2D/3D 103
Additional window 105
Autozoom 104
Centring on the travel destination 103
Centring on the vehicle position 103
Changing the scale and display 104
Controlling the media source 103
Display 102
Display options in the additional
window 106
Displaying favourite symbols 122
Favourite destination symbols 104
Function keys 103
Location display 105
Perspective 103
Position of the additional window 122
Selecting map details 122
Settings 122
Topographic 103
Map display
MAP 102
Media source 20
Medium wave frequency band (MW)
AM 14
MIX
CD mode 27
MP3CD
Unreadable 19
MP3mode
Bit rate 29
Copyright 28
General information 28
Play folder 124
Play order of tracks 29
Requirements for MP3 data media 28
Requirements for MP3 files 28
MUTE 2
Mute 2
MW
AM 14
N
NAV
Centring the map 103
Navigation 58
Automatic dynamic route 99
Automatic dynamic route guidance 99
Changing the list display 77
Changing the target address 68
Deleting destination memory 82
Deleting destinations 80
Deleting recent destinations 82
Deleting travel destinations 80
Destination entry 67
Destination from destination memory 76
Destination memory 78
Destination/stopover destination
reached 97
Dynamic route guidance 98
Dynamic route off 98
Edit/save destination 81
Edit/save entry 81
Edit/save travel destination 81
Editing a flagged destination 81
Editing destinations 80
Entering a block 101
Entering a stopover destination 84
Entering a travel destination using
coordinates 75
Fastest route 66
Home address as destination 76
Incompletely digitalized areas 59
List: searching 77
List: show all 77
List: sor ting 77
Main menu 65
Manoeuvre list 100
Manual dynamic route 99
Manual dynamic route guidance 99
Manually blocking 101
Map Autozoom 104
Most economic route 66
Navigation recomm endations 96
New destination 67
Off-road navigation 89
Overview of selecting a destination 67
Recent destination as destination 76
Removing an exclusion 101
Route guidance 95
Route guidance trip 96
Route guidance with TMC 99
@
Route list 100
Safety information 59
Saving a target address 69
Saving destinations 79
Saving/editing the home address 82
Searching in lists 77
Selecting a destination 67
Selecting a destination entry 67
Selecting a destination from a map 74
Selecting a favourite destination 76
Selecting a point of interest 69
Setting the Flagdest. 65
Shortest route 66
Specifying route options 66
Target address 68
Tour mode 83
Traffic congestion 97
Travel destination reached 97
Waypoint navigation mode 89
Navigation announcement
Navigation announcement 96
Repeating 96
Navigation announcements
Setting 97
Navigation DVD 60
Navigation recommendations 96
o
Objects
Moving 6
Off-road 62
On/offswitch 2
Operation
General 5
Whilst the vehicle is in motion 5
p
PHONE
Telephone 109
POI
Available point of interest categories 72
Category overview 72
Find 69
Information window 71
Names 70
Number 70
Search area options 71
Selecting a category 69
Index
131
Booklet 3.4 RNS 510
Booklet 3.4 RNS 510
Specifying search options 70
Specifying the search area 70
Starting the search 70
Telephone number 70
Pop-up window 6
Pop-up window 6
Selection window 6
Position destination 75
Presentation in the manual 7
Navigation recommendations 96
Repeating navigation announcement 96
Starting 95
Stopping 95
Symbol display 96
Tour plan 97
Traffic congestion 97
Travel destination reached 97
rSAP 109
Q
s
Quick loading
External CD player 34
Quick reference guide 2
R
Radio 13
Auto scan 14
Changing stations 13
Deleting a memory list 121
Function overview 17
Selecting station buttons 121
Set station manually 14
Station from sta tion list 13
Station name 16
stored stations 16
Storing stations 14
Traffic Programme TP 18
Radio station
Scan 14
random play MIX
CD 27
RDS 16
Recent destinations
Deleting 82
editing 80
saving 80
Remote SIM-Access-Profile 109
RemOving an exclusion 10]
Rewind
Audio 25
Route guidance 95
Alternative routes 95
Announcements 96
Map display 95
Navigation announcement 96
Navigation main menu 95
132
Index
SAFE 8
Safety information
Navigation system 59
Telephone 109
Scan
Radio scan function 14
scan function audio mode 28
Scan function
audio mode 28
Scroll bars 6
Selection window 6
Settings
MAP 122
Map 122
Media 124
Navigation 124
Radio 121
Screen 123
SETUP main menu 120
System 126
Telephone 127
Traffic information 122
Video 126
Sliders
Controllers 6
Move 6
SOS 1lJ
Sound 55
Station name
Changing 16
incorrectly displayed 16
RDS 16
Station scan function
Auto scan 14
Station search
Auto scan 14
Switching off 8
Switching on 8
Symbol display
Visual navigation recommendation 96
Symbols 6
T
Telephone
Call lists 116
Call waiting 119
Changing a telephone number liS
Dialling a number 1I2
Dialling a telephone number 112
DTMF tones 119
Emergency call (SOS) III
Entering a telephone number 112
Entry from the caJllist 116
Entry from the telephone book 113
Making a call 118
Modifying a telephone number ll5
Operation 109
Overview III
Requirements 109
Safety information 109
Saving DTMF tones 119
Searching the telephone book] 14
Selecting telephone numbers 113
Speed dial keys il7
Switching off microphone 112
Telephone book 113
Telephone number from the call list 116
Telephone number from the telephone
book 113
Toggling 119
User profile 113
Teletext 49
Television mode
TVmode 42
Text input mark II
Timeout 8
TMC
and dynamic route guidance 98
TMC traffic messages 107
Traffic Message Channel 98
Touchscreen 5
Touchscreen 5
Tour mode 83
Compiling a tour 86
Editing a tour 88
Entering a stopover destination 84
Leaving 85
Saving a tour 87
Selecting a tour 87
TP (Traffic Programme)
Display 18
Interrupt traffic announcement 18
Traffic announcement (INFO) 18
Traffic programme 18
Track 24
aud io file (MP3) 28
Audio file (WMA) 28
Music track 24
Piece of music 24
Track scan function
scan function 28
Track search
scan function 28
TRAFFIC
Selecting TMC stations 121
TMC traffic messages 107
Traffic announcement (IN rO)
Adjusting volume 18
Balance, Fader 18
Interrupt 18
TONE 18
Traffic Programme (TP)
Traffic programme 18
Traffic programme function
TP (Traffic Programme) ]8
Travel destination
Displaying the geo-position 75
saving 81
Travel destination reached 97
Travel destinations
deleting 80
editing 80
TV
Main menu 43
TV mode
Analogue 42
BroWSing stations 45
Digital (DVB-T) 42
Display order of stations 46
Displays 44
DVB-T avai lability 42
EPG (Electronic Programme Guide) 50
explanation of technical terms 42
Function keys 43
Hardkeys 43
Index
133
®
Booklet 3.4 RNS 510
Hybrid receiver 42
Hybrid tuner functional description 42
Memory list 47
Overview 43
Selecting stations manually 46
Settings 51
Station after a change of locat.ion 46
Station from station list 45
Station selection 45
Television mode 42
Viewing teletext 49
u
Unit card
Code number 8
Universal TV
TV mode with DVB-T 42
v
VHF frequency band
FM 14
Video DVDs
Copyright 38
Hints 38
134
Index
Video source 20
Visual navigation recommendation
Symbol display 96
volume modification
GAlA 56
w
Waypoint navigation mode
Driving a waypoint tour 93
Function overview 90
General 89
Navigation recommendations 94
Plotting a waypoint tour 91
Plotting recommendation 92
RECORD 93
Route guidance 93
Selecting a waypoint tour 93
Specifying the starting point 94
Symbols 94
Waypoint names 92
While driving 94
WMA
Audio data 21
Windows Media Audio 21
Volkswagen AG works continuously to develop
and further improve all models. Please appreciate that we must therefore reserve the right to
alter any part of the vehicle and its equipment or
technical specifications at any time. The data
provided concerning scope of delivery, appearance, perfo rm ance, dimensions, weights, fuel
consumption, norms and vehicle functions are
all correct at the time of going to print. Some of
the equipment described might not yet be available in vehicles (information can be provided by
your local Volkswagen dealership), and some
equipment may not be avai.lable in certain countries. No legal commitment can be derived from
the information, illustrations or descriptions in
this manual.
No part of this manual may be reprinted, reproduced or translated without the written permission ofVolkswagen AG.
All rights under t.he laws of copyright are expressly reserved by Volkswagen AG. Subject to
alteration and amendment.
Printed in Germany
© Volkswagen AG
~
For the sake of the environment
This paper was bleached without the use of chlorine.