1
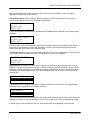
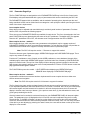
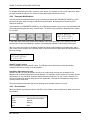
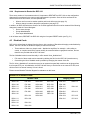
RCP-100
Guide to Installation and Operation
M191-9900-110
Remote
Control
Panel
Miranda
Technologies Inc.
3499 Douglas-B.-Floreani
St-Laurent, Québec, Canada H4S 1Y6
Tel. 514-333-1772
Fax. 514-333-9828
www.miranda.com
RCP-100
Copyright 2009 Miranda Technologies Inc.
Specifications may be subject to change
Printed in Canada
June 2009
GUIDE TO INSTALLATION AND OPERATION
Safety Compliance Information
Safety Compliance
This equipment complies with:
- CAN/CSA C22.2 No. 60950-1-07 Safety of Information Technology Equipment, Including Electrical Business
Equipment
- UL60950-1 (2nd Edition) Safety of Information Technology Equipment, Including Electrical Business Equipment.
- IEC60950 (2nd Edition) / Safety of Information Technology Equipment, Including Electrical Business Equipment.
CAUTION
These servicing instructions are for use by qualified service personnel only. To reduce the risk of electric shock, do not
perform any servicing other than that contained in the operating instructions unless you are qualified to do so. Refer all
servicing to qualified service personnel. Servicing should be done in a static-free environment.
Electromagnetic Compatibility
- This equipment has been tested for verification of compliance with FCC Part 15, Subpart B, Class A
requirements for Digital Devices.
- This equipment complies with the requirements of:
EN 55022 Class A, Radiated Emissions.
EN 55022 Class A, Conducted Emissions
EN 61000-4-2, -3, -6, -11 Electromagnetic Immunity
EN 61000-3-2 & -3-3, Electromagnetic Disturbance in Supply Systems
How to contact us:
For technical assistance, please contact the Miranda Technical support centre nearest you:
Americas
Telephone:
+1-800-224-7882
e-mail:
[email protected]
Asia
Telephone:
+852-2539-6987
e-mail:
[email protected]
Europe, Middle East, Africa, UK
Telephone:
+44 (0) 1491 820222
e-mail:
[email protected]
China
Telephone:
+86-10-5873-1814
e-mail:
[email protected]
France (only)
Telephone:
+33 (0) 1 55 86 87 88
e-mail:
[email protected]
Visit our web site at www.miranda.com
RCP-100
GUIDE TO INSTALLATION AND OPERATION
Table of Contents
1
RCP-100 Remote Control Panel ................................................................................................1
1.1
1.2
2
Overview .....................................................................................................................................2
2.1
2.2
3
4.3
4.4
4.5
Powering Up........................................................................................................................................ 8
Using the RCP-100 - Controls and Displays....................................................................................... 8
4.2.1 LCD Display ........................................................................................................................... 8
4.2.2 Function Keys ........................................................................................................................ 8
4.2.3 Pushbuttons ........................................................................................................................... 8
4.2.4 Rotary Encoders with pushbutton .......................................................................................... 9
4.2.5 Reset Switch .......................................................................................................................... 9
Device Selection Mode ....................................................................................................................... 9
4.3.1 Device Selection Error Messages........................................................................................ 10
4.3.2 Device Locking..................................................................................................................... 12
4.3.3 Panel Configuration.............................................................................................................. 12
Device Control Mode......................................................................................................................... 14
4.4.1 Parameter Page Keys .......................................................................................................... 15
4.4.2 Parameter Modifications ...................................................................................................... 16
4.4.3 Device Status ....................................................................................................................... 16
4.4.4 Requirement to Restart the RCP-100 .................................................................................. 17
Disabled Cards.................................................................................................................................. 17
Upgrading the Operating Software .........................................................................................18
5.1
5.2
6
Unpacking ........................................................................................................................................... 3
Rack Mount Installation....................................................................................................................... 3
Electrical Installation ........................................................................................................................... 3
Networking Considerations ................................................................................................................. 4
3.4.1 Serial Port Connection ........................................................................................................... 4
3.4.2 Ethernet Connection .............................................................................................................. 4
3.4.3 Typical Operating Configurations........................................................................................... 5
Operation ....................................................................................................................................8
4.1
4.2
5
Front Panel.......................................................................................................................................... 2
Rear Panel .......................................................................................................................................... 2
Installation ..................................................................................................................................3
3.1
3.2
3.3
3.4
4
Introduction ......................................................................................................................................... 1
Features .............................................................................................................................................. 1
Upgrading using an external Compact Flash card............................................................................ 18
Upgrading using Telnet and FTP ...................................................................................................... 19
Specifications ...........................................................................................................................21
RCP-100
GUIDE TO INSTALLATION AND OPERATION
RCP-100
GUIDE TO INSTALLATION AND OPERATION
1 RCP-100 Remote Control Panel
1.1
Introduction
The RCP-100 is a simple, 1RU remote control panel that controls the Miranda imaging and Densité families
of products, and the Aquila upconverter. It has been designed to address the demands placed by on-air
operations.
Emphasis has been placed on the ease of adjustment of key operational parameters by non-technical
operators. In designing the user interface, it has been assumed that adjustments are often made under time
pressure. The use of large buttons with integrated LCD displays, a bright backlit multi-line LCD display,
rotary encoders and push-button switches gives users instant access to all key operational and configuration
parameters of most modules, even in low-light environments.
1.2
Features
-
Support for RS-422 protocol
Five backlit buttons with built-in LCD for dynamic display of available functions
Four rotary encoders and six push-buttons with built-in LED for complete controls over functions
Large LCD for display of parameters
Built-in, universal power supply
RCP-100 | 1
GUIDE TO INSTALLATION AND OPERATION
2 Overview
2.1
Front Panel
The RCP-100 front panel consists of the following:
- the function keys: five large pushbuttons with backlit LCD;
- six pushbuttons, five with built-in LED;
- four rotary encoders with pushbutton;
- a large backlit LCD display;
- a Compact Flash (CF) card slot;
- reset switch;
- four mounting holes for rack mount installation.
Function keys
Mounting holes
LCD display
Pushbuttons
Rotary encoders
CF card slot
Reset switch
Figure 2.1 RCP-100 front panel
2.2
Rear Panel
The rear panel includes an AC outlet, vents, an HD-15 connector for GPI inputs/outputs (future use), one
DE-9 connector for RS-232 communication (port A), two DE-9 connectors for RS-232 and RS-422
communication (port B) and one RJ-45 connector with LED indicator for ethernet communication.
Figure 2.2 RCP-100 rear panel
2 | RCP-100
GUIDE TO INSTALLATION AND OPERATION
3 Installation
3.1
Unpacking
Make sure the following items have been shipped with your RCP-100. If any of the following items are
missing, contact your distributor or Miranda Technologies Inc.
-
3.2
RCP-100 unit
AC power cord
Rack Mount Installation
The RCP-100 is intended to be mounted in a standard 19" equipment rack. The unit is secured to the rack
using appropriate rack screws and washers (not provided).
For proper ventilation, make sure the rear and side panel air vents are not blocked.
3.3
Electrical Installation
RS-232 (port A)
This connector is reserved for future expansion
RS-232 (port B)
Use this connector with an RS-232/RS-422 converter to connect the unit to imaging Symphonie, Solo,
Quartet and Quartet-2 series frames. Refer to figure 3.1 for connector pinout.
Figure 3.1 RS-232 connector Pinout (DE-9 male)
RS-422 Serial Connection (port B)
Use this connector to connect the unit to imaging Symphonie, Solo or Quartet and Quartet-2 series frames.
Refer to figure 3.2 for connector pinout.
Figure 3.2 RS-422 Connector Pinout (DE-9 female)
RCP-100 | 3
GUIDE TO INSTALLATION AND OPERATION
Ethernet
Use this RJ-45 female connector to connect the RCP-100 to a Local Area Network (LAN) using common
10BASE-T cables. The LED next to the RJ-45 connector will turn on to indicate network activity.
AC IN
The RCP-100 features a universal power supply. Connect the supplied AC power cord to the AC IN
connector on the rear panel.
3.4
Networking Considerations
The RCP-100 has two means of accessing devices which it can control:
3.4.1
Serial Port Connection
All imaging frame rear panels (except the Quartet base model) include 2 identical RS-422 ports which may
be used interchangeably as the source or as a daisy chain loop-through. These ports enable communication
between a series of imaging frames and the RCP-100. Remember that the last frame in a daisy chain
requires a termination. Figure 3.3 gives an example of a daisy chain hook-up. Refer to the imaging frame’s
Guide to Installation and Operation for details on daisy chain installation and cable construction.
Figure 3.3 Daisy chain installation example
RS-422 Serial ID Assignment
In order for an RCP-100 to control the cards in a daisy-chain of frames, the RCP-100 must be able to identify
and access each frame individually. The only way to accomplish this is to assign an identification code to
each member of the daisy chain. This is similar to assigning different addresses to buildings on a street.
Refer to the imaging frame’s Guide to Installation and Operation for details on how to set these ID codes.
3.4.2
Ethernet Connection
The RCP-100 can connect to a LAN through its ethernet port, and control those devices which have been
specified in the directory files. At present, RCP-100 supports the Miranda Densité series of frames and
cards, when they are equipped with an ethernet controller card (ETH-CPU). It is also possible to order an
RCP-100 configured specially to operate Miranda's Aquila series of upconverters; such panels will not control
other Miranda devices.
From the software point of view, RCP-100 contains three separate modules: (1) Client, (2) Directory
Services, and (3) serial/ethernet Communications and Services. All three of these modules are required to
be present on the LAN, and each could run separately on a different RCP-100, which would communicate
among themselves using the TCP protocol. However, in most situations, there are only two practical
configurations for an RCP-100:
4 | RCP-100
GUIDE TO INSTALLATION AND OPERATION
CLIENT
runs only the Client module, and is connected through a LAN to an APPSERVER which is
basically running the Directory Services module and the Communications and Services
Module, or to another RCP-100 which is configured as a SERVER;
SERVER
runs the Directory Services module, the Communications and Services Module, and the Client
module.
Note that the Client module is running in all RCP-100s, whether configured as CLIENT or SERVER.
When RCP-100 is running as a SERVER, it can control up to ten Densité frames, whose IP addresses must
each be different, and which must lie within plus or minus five of the IP address of the RCP-100 itself. For
example, the RCP-100 whose IP address is 145.152.23.100 can recognize up to 10 Densité frames whose
IP addresses lie within the range 145.152.23.095 to 145.152.23.105. Note that if the last number in the IP
address of the RCP-100 is less than 6 or more than 249, fewer than ten frames can be recognized because
there are not 5 numbers available either above or below the RCP-100 IP address.
When RCP-100 is running as a CLIENT, it is not bound by the plus-or-minus-five restriction on IP addresses,
and can control more devices.
Detailed instructions on setting up the networking parameters, addresses, etc. and configuring RCP-100 as
CLIENT or SERVER can be found in section 4.3.4 of this guide.
3.4.3
Typical Operating Configurations
The following figures show three typical operating configurations which illustrate how the RCP-100 connects
to Miranda card frames through its RS-422 and ethernet ports. Configuration settings are shown for each
example. Note that the IP addresses shown are for illustration only – you must configure your RCP-100 for
your own network. Case 1 corresponds to a default configuration for the RCP-100.
Case 1 (figure 3.4)
Here is a minimal configuration in which a single RCP-100 connects to a daisy chain of Imaging frames
(Symphonie and Quartet in this case) through its RS-422 port, and connects to a number of Densité frames
on a LAN through its ethernet port. The RCP-100 must be configured as a SERVER for ethernet operations
Figure 3.4 Single RCP-100 Installation
Here are the settings for this set-up, where the IP address of the RCP-100 is 192.168.210.10:
IPADDR: 192.168.210.10
SERVICE CONFIG – ICOM:
DCOM:
DSRV:
DSRV IP: 192.168.210.10
ON
ON
ON
RCP-100 | 5
GUIDE TO INSTALLATION AND OPERATION
Case 2 (figure 3.5)
In this case, multiple RCP-100s are connected on the LAN. Only one of these can be configured as a
SERVER; all others must be configured as CLIENTs.
Figure 3.5 Multiple RCP-100 Installation
Here are the settings for this set-up, where:
•
the IP address of RCP-100 #1 (server) is 10.2.5.10
•
•
•
the IP address of Densité #1 is 10.2.5.11
the IP address of Densité #2 is 10.2.5.12
the IP address of Densité #3 is 10.2.5.13
•
•
the IP address of RCP-100 #2 (client) is 10.2.5.20
the IP address of RCP-100 #3 (client) is 10.2.5.21
Within the ±5 IP address range
around the server IP address
Outside the ±5 IP address range
around the server IP address
reserved for Densité frames
Settings for RCP-100 #1 (server)
IPADDR: 10.2.5.10
SERVICE CONFIG – ICOM:
DCOM:
DSRV:
DSRV IP: 10.2.5.10
ON
ON
ON
Settings for RCP-100 #2 (client)
IPADDR: 10.2.5.20
SERVICE CONFIG – ICOM:
OFF
DCOM: OFF
DSRV: OFF
DSRV IP: 10.2.5.10 (the IP address of the server, i.e. RCP-100 #1)
Settings for RCP-100 #3 (client)
IPADDR: 10.2.5.21
SERVICE CONFIG – ICOM:
OFF
DCOM: OFF
DSRV: OFF
DSRV IP: 10.2.5.10 (the IP address of the server, i.e. RCP-100 #1)
6 | RCP-100
GUIDE TO INSTALLATION AND OPERATION
Case 3 (figure 3.6)
Here an iControl APPLICATION SERVER is connected to the LAN. In this case, all RCP-100s must be
configured as CLIENTs, and the APP SERVER will function as the SERVER. An RCP-100 in CLIENT mode
will control Imaging and Densité cards through the APP SERVER via the ethernet connection.
Note: Any device can be controlled by a maximum of 8 RCP-100 CLIENTs
Figure 3.6 Installation of RCP-100s with an Application Server
In this set-up, the settings would be similar to these:
•
•
•
the IP address of the AppServer is 10.2.5.10
the IP address of RCP-100 #1 (client) is 10.2.5.20
the IP address of RCP-100 #2 (client) is 10.2.5.21
Settings for RCP-100 #1 (client)
IPADDR: 10.2.5.20
SERVICE CONFIG – ICOM:
OFF
DCOM: OFF
DSRV: OFF
DSRV IP: 10.2.5.10 (the IP address of the App. Server)
Settings for RCP-100 #2 (client)
IPADDR: 10.2.5.21
SERVICE CONFIG – ICOM:
OFF
DCOM: OFF
DSRV: OFF
DSRV IP: 10.2.5.10 (the IP address of the App. Server)
Note: When an RCP-100 is configured as the client of an AppServer running iControl, the iControl Services
Gateway component must be started in the iControl Services Monitoring and Configuration tool. See the
iControl User’s Manual for detailed information on this setting.
The ethernet ports of the RCP-100 (client) devices must be connected to the same LAN subnet as the ETH0
port of the AppServer.
RCP-100 | 7
GUIDE TO INSTALLATION AND OPERATION
4 Operation
4.1
Powering Up
The RCP-100 has no power switch. Plug the unit into an appropriate AC power source to turn it on.
4.2
Using the RCP-100 - Controls and Displays
The RCP-100 is designed for use in situations where quick and easy access to parameter adjustments is
important. The use of dynamically-labeled operational controls and a shallow menu structure facilitate this
functionality.
A brief description of the function of the interface elements follows. Figure 2.1 on page 3 illustrates the
location of the interface elements.
4.2.1
LCD Display
The central LCD display serves many functions, and is the primary source of information for the operator in
all operating modes. It identifies the module being controlled, gives parameter values and operational
feedback including error messages, and provides labels for the rotary encoders.
4.2.2
Function Keys
The function keys are five large pushbuttons with built-in LCDs which show their current functionality. The
functionality is programmable and changes with the operating mode. Pushing the key selects the displayed
function.
These keys are backlit for operation in a low light environment; the selected key is brighter.
4.2.3
Pushbuttons
These six pushbuttons (five with integral LEDs) have dedicated functions:
User
Used for backward menu navigation. See More Complex Devices in section 4.4.1 for details.
Alt
The Function Keys may have alternate functions in some operating modes. This pushbutton toggles between
the default (LED is OFF) and the alternate (LED is GREEN) sets of functions.
Status
The Status pushbutton’s multicolor LED reflects the status of the module which the RCP-100 is controlling.
Table 4.1 details the colors and associated card status. When the LED displays a warning or error status,
depressing the pushbutton will prompt the LCD panel to display the warning or error details for the selected
module.
Table 4.1 Status LED colors
Status LED color
Module Status
Dark (LED off)
Green
Yellow
Red
Frame/module not installed
Normal
Warning
Error
8 | RCP-100
GUIDE TO INSTALLATION AND OPERATION
Device
Activating this pushbutton (LED is GREEN) enables the device selection mode. Use the rotary encoders to
select a device to control. When inactive (LED is OFF) the panel is in the device control mode.
Enable
(Reserved for future use).
Esc
Used for upgrading the unit (see Section 5.1).
4.2.4
Rotary Encoders with pushbutton
The rotary encoders are used together to rapidly navigate through levels of installed frames and modules,
toggle, increase or decrease values of parameters, etc. Most of the time, the graphical display of functions or
parameters on the LCD display reflects the four rotary encoders: the first (leftmost) setting displayed can be
modified by the first encoder, the second setting by the second encoder, and so forth. The pushbutton
feature of the encoders is used to confirm certain types of data entry, or to select alternate step sizes when
adjusting certain parameters.
4.2.5
Reset Switch
Push this switch to restart the RCP-100. This is required after certain operations (see Sect. 4.3.5)
4.3
Device Selection Mode
This mode permits the operator to select a single device from among all those to which the panel has
access. Access to some devices may be restricted through the system configuration (see Section 4.3.2.
Device Locking and Section 4.5 Disabled Cards)
To enter the Device Selection mode, press the <Device> pushbutton so that the LED turns Green.
The Function Keys display these labels (BROWSE DEVICE is selected):
The RCP-100 has access to the following information about each controllable device:
•
•
•
•
•
•
Frame, given as type (Stellar, Symphonie, Quartet or Solo) and identifying number (e.g. Quartet 03)
Slot Number within the frame (e.g. 02)
Device ID (a number identifying a particular device type)
Device type (e.g.FRS-101i)
Device name (e.g. VTR 17B)
Group, usually assigned to reflect a practical grouping of devices (e.g. STUDIO 1)
To select a device, the operator may search among available devices using three list formats: a group list, a
device list or a frame list.
To select the preferred search method:
•
•
•
Press the <LIST ORDER> key;
Turn the first knob to select one of the three possible formats: GROUP, DEVICE or FRAME;
Press the <BROWSE DEVICE> key to return to device selection.
Device selection will proceed according to the list format selected, as follows:
RCP-100 | 9
GUIDE TO INSTALLATION AND OPERATION
Group list: This is the default list mode. All devices are listed in terms of group and device names. The user
browses through the groups first, and then through the devices in a group. When no name has been
assigned to a device, the slot number and the device type will be used as the device name, and the frame
number will be used as the group name. The group name <NO_GROUP> is used for all named devices
without an explicitly-assigned group name. For example,
GROUP:SATROOM
DEV:SAT 05
GROUP| DEV |
|
GROUP:STUDIO 04
DEV:DVTR 17B
GROUP| DEV |
|
GROUP:SYMPH. 10
DEV:14 (ASD-221i
GROUP| DEV |
|
Device list: All devices are listed alphabetically, identified by NAME and GROUP. This mode helps the user
to find a device even if he does not know or remember the group. Devices without name are listed using the
physical frame name. For example,
DEV:DVTR 17B
(STUDIO 04)
DEV |
|
|
DEV:SAT 05
(SATROOM)
DEV |
|
DEV:14 (ASD-221i)
(SYMPH. 10)
DEV |
|
|
|
Frame list: All devices are listed in terms of frame IDs and slot numbers. The physical device name is also
reported for information purposes. The user browses through the frames first, and then through the slots in a
frame. The reference card and the controller card of the Symphonie frame will also be treated as devices
since they have status and controls. If a device is a combination of more than one card, the slot number
represents the slot in which the first card of the device is inserted. For example,
FRAME:SYMPH. 10
SLOT:14 ASD-221i 20
FRAME|SLOT|
|
FRAME:QUARTET 03
SLOT:4 ADP-101i 32
FRAME|SLOT|
|
To select a device,
•
•
•
•
Press the <BROWSE DEVICE> key to select the device browsing function;
Turn the first knob to select a device / group of devices / to select a frame;
Turn the second knob to select the device in a group / to select the slot in a frame;
Press the <DEVICE> button to enter the device control mode (pushbutton LED turns OFF).
The RCP-100 is now in device control mode.
BROWSE DEVICE rotary control functionality
4.3.1
LIST ORDER
SELECTED
ROTARY KNOB 1
FUNCTION
ROTARY KNOB 2
FUNCTION
GROUP
GROUP
DEV
DEVICE
DEV
FRAME
FRAME
SLOT
Device Selection Error Messages
All accessible devices recognized by the current software version of the RCP-100 can be selected while in
device selection mode. However, some error messages may be reported when in the operating mode. Cards
which have been removed are still shown on the screen, but the card identification is shown inverted (white
letters on black) to indicate that the card is no longer accessible.
10 | RCP-100
GUIDE TO INSTALLATION AND OPERATION
When the selected device (or the frame that holds the device) is not accessible, an error message is
displayed. The status LED is also cleared.
Cannot Reach Device: When a device is selected, an RCP in CLIENT mode will try to connect to the
service corresponding to this device, displaying CONNECTING...
CONNECTING...
DEV:DVP-101i
GROUP| DEV |
|
If, after 10 seconds the connection is not established, the CANNOT REACH DEVICE error message will be
displayed:
CANNOT REACH DEVICE
DEV:DVP-101i
GROUP| DEV |
|
If the RCP-100 is in Device Control mode and the selected device becomes inaccessible (device removed
from frame or not responding, or frame not accessible), the RCP-100 will automatically quit the Device
Control mode and return to the Device Selection mode.
.TYP File Not Found: A device is not supported by the RCP-100 if the menu configuration file for this device
is not found or cannot be read when trying to access the device. The error message is:
.TYP FILE NOT FOUND
DEV:DVP-101i
GROUP| DEV |
|
Card Removed: After startup, the list of all found devices can be browsed and the desired device can be
selected. If a device is removed from a chassis, the name of this device will be displayed in reverse (white
characters on black background) in browse mode, signaling the absence of the card. If the card is inserted
into another slot, while the previous slot is left empty, restart the RCP-100 to remove the reference to the
removed card.
FRAME: SYMPH.10
SLOT:14.ASD-221i.20...
FRAME| SLOT |
|
If the DEVICE button is pressed in an attempt to enter into the Device Control mode, the message CARD
REMOVED will be displayed for two seconds, as shown:
CARD REMOVED
SLOT:14.ASD-221i.20...
FRAME| SLOT |
|
If the same card is put back into the same slot, the display will be refreshed and the name of the card will be
displayed in Normal (i.e. non-reversed) mode. Device Control mode is once again accessible for this card.
If another type of card is inserted into the slot, the new card name will be displayed in Normal mode.
RCP-100 | 11
GUIDE TO INSTALLATION AND OPERATION
4.3.2
Device Locking
The protection provided by this feature is only meant as a safety measure to prevent accidental modifications
to a device configuration. It is not designed to provide a highly secure protection mechanism. It inhibits
control by the local panel. Other panels connected to the device may modify the device configuration while
the local panel is locked out.
A given device has one of the two (2) following states:
State
Description
Unlocked
Device parameters can be modified by the local panel.
Locked
Device parameters cannot be modified by the local panel.
The lock feature is enabled via the <DEVICE LOCK> key available in device selection mode. An icon on the
LCD display indicates the current state of protection.
If a device is locked, the rotary encoders are disabled while the RCP-100 is in operation mode. If they are
turned, the current display changes and the following message appears for 2 seconds:
DEVICE IS LOCKED
LUMA|CHMA|GAIN|SETUP
1.00|1.00|LOCK|7.50
Lock status icon
To change the protection state of a device:
•
•
•
•
4.3.3
Press the <Device> button to enter the device selection mode (LED is GREEN);
Press the <DEVICE LOCK> key;
Turn the first knob to select either lock or unlock;
Press the <Device> button again to select the device.
Panel Configuration
The RCP-100 may exist on an ethernet network, and must therefore conform to the appropriate addressing
protocols. The panel set-up is accessed from the CONFIG function key.
Pressing the CONFIG key results in:
IP ADDR: Sets the IP address for this RCP-100. The LCD display shows:
IP ADDRESS
192.168.210.1
192 | 168 | 210 | 001
12 | RCP-100
GUIDE TO INSTALLATION AND OPERATION
Each of the 4 encoder knobs increments/decrements the associated field in the IP address. Pressing any
one of the encoder knobs saves the new IP address in flash memory. The RCP must be restarted before the
new address takes effect.
The SUBNET MASK and GATEWAY pages work exactly the same way (default values are shown):
SUBNET MASK
255.255.255.0
255 | 255 | 255 | 000
GATEWAY
0.0.0.0
000 | 000 | 000 | 000
The contrast adjustment page looks like this:
LCD CONTRAST ADJUST
CONT |
|
|
where the first encoder adjusts the contrast of the main LCD display.
Push the ALT pushbutton to access four additional set-up controls:
The first two function keys permit the user to set up the RCP-100 as a SERVER or CLIENT, and to
determine which services and tasks are running. See section 3.4 for a discussion of networking issues.
Srvice Config
Pressing SRVICE CONFIG brings up a screen at which the supported services and tasks can be turned ON
or OFF, as follows:
SRVICE CONFIG
ICOM | DCOM | DSRV |
ON | ON | OFF |
ICOM: activate or deactivate the Imaging Server tasks and services, which ensure communication with
Miranda’s Imaging series of frames and cards.
DCOM: activate or deactivate the Densité Server tasks and services, which ensure communication with
Miranda’s Densité series of frames and cards.
DSRV: enable/disable the Directory Services task.
• If the RCP-100 is a SERVER, DSRV must be ON
• If the RCP-100 is a CLIENT, DSRV must be OFF
Note - In practice, we will not have separate directory services (DSRV) for the Client and the
Communicator. In a system with several RCP-100 units connected to different frames, only one
directory services is allowed.
The DSRV IP address is automatically set to the value of the RCP-100’s IP address when:
RCP-100 | 13
GUIDE TO INSTALLATION AND OPERATION
1. DCOM is ON, (and follows the IP address if it is changed)
2. DCOM is changed from OFF to ON and the DSRV IP is different from the IP address.
In each case, press the encoder knob to save the new configuration once it has been selected. The RCP100 must be restarted before the new configuration takes effect.
An RCP-100 acting as a client-only panel must have all these selections set to OFF.
A stand-alone RCP-100 must have DSRV set to ON, and either or both of ICOM or DCOM set to ON,
depending on which types of frames are to be controlled. The user can save processor resources and speed
up system response by turning OFF communication with frame types which are not being controlled (i.e turn
ICOM OFF if there are only Densité frames to be controlled)
DSRV IP
Pressing DSRV IP opens a screen to set the IP address of the RCP-100 where Directory services task
DSRV is running. If the RCP-100 is client of an iControl Appserver, enter the Appserver’s address
DIR SERVICES
192.168.210.3
192 | 168 | 210 | 003
Panel Name:
If a panel name has been set using the Telnet client, then it will be displayed as shown. If no name has been
set, the display will indicate (NOT CONFIGURED):
PANEL NAME:
userPanelName
PANEL NAME:
(NOT CONFIGURED)
To set the panel name using the Telnet client, proceed as follows:
1
Start Telnet
2
Connect to the RCP-100 using the RCP-100’s IP address. The Telnet prompt RCP100.XXX will be
displayed, where XXX is the last group in the IP address.
3
Type the command: panelname yourchoice and then push <enter>
4
RCP-100 will respond with the message: panel name changed to: yourchoice
5
Close the Telnet session
4.4
Device Control Mode
In order for the RCP-100 to control a device, the device selection mode must be off (DEVICE pushbutton
LED is OFF), and the device must not be locked.
14 | RCP-100
GUIDE TO INSTALLATION AND OPERATION
4.4.1
Parameter Page Keys
The five FUNCTION keys are assigned the role of PARAMETER PAGE keys in the Device Control mode.
Each displays a keyword associated with a group of parameters which can be controlled by the RCP-100.
The PARAMETER pages which are available, and the method of accessing them, depend upon the card
being controlled. Access can be divided into three categories. It will quickly be evident upon using the device
which of the three is implemented.
Less complex devices
Many devices can be adjusted and controlled through a relatively small number of parameters. For these
devices, RCP-100 provides the following support:
There are up to ten PARAMETER PAGE keys available for each device. The five to be assigned to the front
panel FUNCTION keys are determined by the status of the ALT pushbutton. The default set of five appears
when the ALT pushbutton LED is OFF; the alternate set of five appears when the LED is GREEN.
More complex devices – method 1
More complex devices, which may have many parameters to be adjusted, require a greater number of
PARAMETER PAGES from which to access these parameters. For such devices, the RCP-100 provides an
enhanced access method which supports a virtually unlimited number of parameter pages.
Note: The RCP-100 requires version 1.7 firmware to support this method.
The device has two types of parameter pages: OPERATIONS pages and CONFIGURATION pages. There
may be any number of each type.
Push the ALT pushbutton to move forward, and the USER pushbutton to move backward, through all the
available pages, ordered with OPERATIONS pages in numerical order first, followed by CONFIGURATION
pages in numerical order. The top line of the display will show the page type and number for two seconds
after the page is accessed, and then revert to the normal presentation. Push the STATUS button to show the
page type and number again if needed.
The FUNCTION keys are color-coded: LIGHT GREEN when displaying an OPERATIONS page
ORANGE when displaying a CONFIGURATION page.
More complex devices – method 2
An alternative multilevel tree structure has been implemented for some complex devices to allow more
efficient access and navigation.
Note: The RCP-100 requires version 2.10 firmware to support this method
The five function keys are used to navigate forward in the tree structure until the lowest level, containing up
to four adjustable parameters which are shown on the LCD screen, is reached. None of the five function keys
will become brighter until this lowest level is reached. In all levels except the lowest, the LCD screen will
display in its three rows, from top to bottom: (1) the previous menu level, (2) the selected device name, and
(3) the group containing the device.
Once the lowest level is reached, the selected function key (the PARAMETER PAGE) will become brighter
green. The parameters (up to 4) displayed on the LCD screen can now be adjusted using the four rotary
encoder knobs. To facilitate orientation, the top line on the display will now show the previously-selected
menu item, while the bottom two lines show the parameter name and current value. You can verify the name
of the device you are adjusting by pressing the "status” button; the name will be shown on the top line of the
display for a few seconds.
RCP-100 | 15
GUIDE TO INSTALLATION AND OPERATION
To navigate backward up the menu, press the "user" button; you will back up one level for each push. When
you have reached the top level, the screen will show MAIN as the selected menu item.
4.4.2
Parameter Modifications
The user selects the desired parameter group by pushing the appropriate PARAMETER PAGE key, which
becomes a brighter green or orange to indicate its selected status. Activating the ALT button does not
change the selection.
Upon selection of a PARAMETER PAGE key, the LCD display presents a menu of up to four parameters that
can be adjusted using the four rotary encoder knobs. The device being controlled is identified on the display.
For example:
STUDIO 04:DVTR 17B
VERT|HORZ|2FRAM|
0 |0.14| OFF |
In this case, three of the rotary encoders are enabled. If the horizontal timing is to be adjusted, the 2nd
encoder from the left (corresponding in position to the parameter indication in the display) will be used.
When it is turned, the top line of the display changes to indicate a fuller definition of the parameter, and to
give a more precise measure of the selected value. It reverts to the device description two seconds after the
last value change.
TIMING H: 0.1481 US
VERT|HORZ|2FRAM|
0 |0.14| OFF |
ON/OFF Toggle Function
Some parameters have only ON/OFF states. The ON state can be selected by turning the encoder
clockwise, and OFF by turning it counterclockwise.
Speed Key (Adjustment step size)
Because the value of some parameters can vary over a wide range, the step size necessary for fine
adjustment is not always appropriate for large changes. For example, because each turn of a rotary encoder
has 30 steps, 57 turns would be required to adjust horizontal timing from 0 to 1727 clocks. Therefore, the
encoder is assigned an alternate step size for such parameters, such that the full adjustment range can be
covered in two or three turns.
The user accesses the alternate step size by pushing on the encoder knob as it is turned.
4.4.3
Device Status
When the operator has selected a device, the LED on the <Status> button represents the state of the device,
as indicated:
Status LED Color
Device Status
Dark
Green
Yellow
Red
Device/frame not installed
No error
Warning
Error
16 | RCP-100
GUIDE TO INSTALLATION AND OPERATION
4.4.4
Requirement to Restart the RCP-100
There are a number of circumstances when it is important to RESTART the RCP-100, so that configuration
changes will be registered in the memory and implemented in operation. Some of these are listed in the
relevant sections of this manual, and are repeated here:
•
•
When a card is moved to another position and its slot left empty (see page 10)
When a change is made to the panel configuration (see page 12)
In addition, all RCP-100s which are clients of an iControl Application Server must be restarted if the following
changes are made in iControl Navigator:
•
•
•
Device name change
Group added/deleted
Proc amps added/deleted
In all of these cases, RESTART the RCP-100 using the front panel RESET switch (see Fig. 2.1)
4.5
Disabled Cards
RCP-100 v2.40 and later is shipped from the factory with a number of Densité and Imaging cards disabled by
default. The RCP-100 will not be able to display or control those cards.
•
These cards are either very simple cards – distribution amplifiers, for example – with nothing to
control, or complex cards which cannot usefully be controlled without a graphical interface, and are
therefore not provided with an RCP-100 menu.
The list of disabled cards is stored internally in a file named “client_disabled.xml”
•
•
Full control of these cards can be restored by deleting the file from the RCP-100 internal memory.
Customizing the list of disabled cards is possible by changing the content of this file
The file “client_disabled.xml” can also be stored on an external compact flash card that can be plugged into
the front panel CF port. At initialization, the RCP-100 will first try to find the file on an external CF card, and
will then look in its internal memory if none is found.
Please contact Miranda Technical Support for assistance on this issue.
Default List of Disabled Cards
Densité Cards
Imaging Cards
SDA-1101
FIO-1811
HDA-1801
ACP-1721
SDA-101i
SDA-1102
FIO-1821
HDA-1802
DCP-1721
SDA 102i
SDA-1111
FIO-1831
HDA-1811
SCP-1121
SDA-111i
SDA-1112
FIO-1841
HDA-1812
VCP-1021
SDA-112i
SDA-1141
FIO-1851
HDA-1822
MSB-1121
SDA-801i
HDA-1832
REF-1701
SDA-802i
SDA-1161
VEA-1101
DDA-1111
VEA-1102
HDA-1841
SDM-111i
VDA-101i
VEA-101i
SDA-103i
VFC-123i
SDA-121i
VFC-321i
DDA-1112
DDA-1131
VDA-1101
DDA-1132
VDA-1102
RCP-100 | 17
GUIDE TO INSTALLATION AND OPERATION
5 Upgrading the Operating Software
Two methods exist for upgrading the RCP-100’s operating software:
•
•
Using a Compact Flash card
Using Telnet and FTP
[CF]
[T]
The method to use depends on the upgrade path chosen, as illustrated in this chart:
[T]
Version #
1.XX
[T]
1.71
[T]
1.80
[CF]
2.01
2.10
[T]
[CF]
[CF]
Figure 5.1 Software upgrade paths
Note that:
•
•
•
•
All upgrades to versions 1.80 and higher must be preceded by an upgrade to version 1.71, using Telnet
All upgrades to versions 2.01 and below are accomplished using Telnet
Any upgrade from version 2.01 or higher must be accomplished using Compact Flash.
Downgrading from Version 2.01 or higher to previous versions is also possible, using Compact Flash
Be aware that:
• When using the Telnet method, you must first go to the Srvice Config screen (see page 12) and set
ICOM, DCOM and DSRV to OFF.
• Remember to press the encoder knob to save any changes.
• Then, restart the RCP-100.
The two methods are described in the following sections.
5.1
Upgrading using an external Compact Flash card
Use a CF I type Compact Flash, with a minimum storage capacity of 4 Mb. It must be formatted in FAT 16
(DOS)
The upgrade data is a compressed file with a name like "191-21G01-210.zip", where the last number group
represents the version number (e.g. version 2.10).
Connect a compact flash reader/writer device to the USB port of the computer where the zip file is located. It
will appear as an external drive. Decompress the zip file directly onto the compact flash card. The zip file will
decompress into a folder named "RCP100_upgrade" containing:
•
•
•
folder "bin", where the main application "rcp_update.bin" resides;
folder "typ", where the *.typ menu files for all the supported cards reside;
file "version.txt", containing the version number of the distribution.
Do not modify the name and the contents of these folders and files, or the upgrade program will not be able
to find the expected components.
Once the upgrade files are stored on the compact flash card, follow these steps:
18 | RCP-100
GUIDE TO INSTALLATION AND OPERATION
1. Insert the compact flash on RCP-100 panel (left). Wait for 2-3 seconds to allow RCP-100 to detect the
new device. The LCD screen will display the message “FLASH CARD DETECTED” for 1 second.
2. Push the "Esc" button rapidly 5 times (all within 5 seconds).
3. The upgrade procedure begins. The LCD screen will display the written flash sectors gradually; then it
will display the typ files loaded on the RCP-100.
4. If the upgrade finishes without errors, remove the Compact Flash card and restart the RCP-100.
If during the upgrade the error message “UPGRADE BIN FAILED” is displayed, do not reset/restart the RCP100 unit. Retry the upgrade starting with step 2.
If the error message “UPGRADE TYP FAILED” is displayed, reset the RCP-100 unit and retry the upgrade
procedure from the beginning.
5.2
Upgrading using Telnet and FTP
The RCP-100 Operating Software can be upgraded using the Telnet and WS_FTP software.
IMPORTANT NOTE: Upgrading the RCP-100 to version 1.80 (0047) or to version 2.01 (0057) is only
possible if the RCP-100 was previously upgraded to version 1.71 (0042).
Required equipment:
PC with:
• Ethernet card, connected to a network via an Ethernet cable;
• Operating system: Windows 95,98,NT, 2000;
• Telnet and WS_FTP software;
• Ethernet cable to connect RCP-100 to the network, or a crossed Ethernet cable to connect RCP-100
to the computer.
The update includes loading the new version of the file rcp_update.bin and the files * typ in the flash memory
of the RCP-100.
1. Go to the Srvice Config screen (see page 12) and set ICOM, DCOM and DSRV to OFF. Remember to
press the encoder knob to save any changes. Then, restart the RCP-100.
2. Connect the Ethernet cable between RCP-100 and network or the crossed Ethernet cable between
RCP-100 and computer and the power supply cable to the RCP-100.
3. Start Telnet application and connect to RCP-100 via the RCP-100 IP address. The following message
will be displayed:
Telnet session
RCP-100 Telnet Shell session
RCP100.xxx>
Note: xxx will be the last group of the IP address of the RCP-100.
4.
Type makeupdatedisk. The following message will be displayed:
RCP-100 | 19
GUIDE TO INSTALLATION AND OPERATION
RCP100.xxx> makeupdatedisk
RAM disk initialized - size is 5000 blocks...
Volume name is 3.0.0
Current directory set to 3.0/
RCP100.xxx>
Do not close the Telnet application.
Note: If the command makeupdatedisk is not recognized by RCP-100, type the following command,
which gives the same result: makeramdisk 5000
5.
Start the WS_FTP application
6.
Connect to RCP-100 using the following parameters:
•
•
•
•
Host Name/Address:
Host type:
User ID:
Password:
WARNING:
(RCP-100 IP address)
Automatic detect
Anonymous
guest
Select the “BINARY” file transfer mode for steps 7 and 13!
Using another transfer mode could lead to an incorrect data transfer, and the RCP-100 will
no longer be able to work, or to be reprogrammed via Telnet. It will require factory
reprogramming.
7.
In WS-FTP, copy the file rcp_update.bin located in the same directory , (left window of WS_FTP) to
RCP-100 (right window of WS_FTP). Use the Binary file transfer mode - see WARNING!
8.
Disconnect WS_FTP from RCP-100 (click " Close " button)
9.
Return to the Telnet application window and type: updatercp. On the telnet application window the
written flash sectors will be displayed gradually.
10.
After the file is copied in the RCP-100 flash memory, type restart. RCR-100 will restart with the new
firmware.
In the following steps the * typ files will be loaded into the RCP-100 flash memory.
11.
Restart the Telnet application telnet connect to RCP-100 with the IP address of RCP-100. Type
makeramdisk. The following message will be displayed:
RCP100.xxx> makeramdisk
RAM disk initialized - size is 2048 blocks...
Volume name is 3.0.0
Current directory set to 3.0/
RCP100.xxx>
12.
In the Telnet window, type cp -r 45.0 3.0
13.
In WS-FTP, copy all the files * typ of the new version, located in the same directory, (left window of
WS_FTP) to RCP-100 (right window of WS_FTP). Use the Binary file transfer mode - see WARNING!
14.
Disconnect WS_FTP from RCP-100 (click the " Close " button)
15.
In the Telnet application window, type copytoflash. The following message will be displayed:
20 | RCP-100
GUIDE TO INSTALLATION AND OPERATION
RCP100.xxx> copytoflash
Erasing and copying may take several minutes.
Moving data to flash disk...
Disk data copied to flash memory.
RCP100.xxx>
16.
After the files are copied into the RCP-100 flash memory, type the command restart
RCP-100 will restart with the new upgrade.
17.
Close the Telnet and WS_FTP applications.
18.
Re-establish the initial settings for the RCP-100 (Imaging and Densité communicators activation,
Directory Services activation if necessary)
6 Specifications
Physical
Dimensions:
Full spec. temp. range:
Voltage input range:
Power:
1 RU x 236mm (8”) deep
0-40ºC
100-240V~, 50/60Hz
15W max.
Connectors
RS-232
RS-422
Ethernet:
DE-9M (port A and B)
DE-9F (port B)
RJ-45 (Ethernet 10BASE-T control)
RCP-100 | 21