1
Single Power Supply Configuration
Reconnecting Input Power and Powering Up the Router
The following procedures explain how to reconnect AC-input power to Cisco 7200 series routers,
power up the router, and verify a successful system boot.
Warning Read the installation instructions before you connect the system to its power source.
To reconnect AC-input power to Cisco 7200 series routers, complete the following steps:
Step 1
At the rear of the router, check that the power switch on the power supply is in the OFF
(O) position.
Step 2
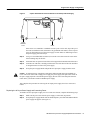
Slide the cable-retention clip up, away from the AC receptacle, and plug in the power
cable.
Step 3
Secure the cable in the power supply AC receptacle by sliding the cable-retention clip
down until it snaps around the connector. The cable-retention clip provides strain relief
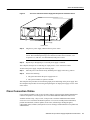
for the AC power cable (refer to Figure 5).
Connecting AC-Input Power to Cisco 7200 Series Routers
H6848
Figure 5
Hole for nylon
cable tie
Power switch
AC power cable
Step 4
Cable-retention
clip
Plug the AC power supply cable into the AC power source.
Note Each AC-input power supply operating at 120 VAC requires a minimum of 5A
service. We recommend powering Cisco 7200 series routers from a 120 VAC, 15A
receptacle U.S. (240 VAC, 10A international) at the power source.
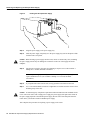
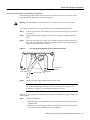
To power up Cisco 7200 series routers that have an installed AC-input power supply, complete the
following steps:
Step 1
Check for the following:
•
Each port adapter is inserted in its slot, and its respective port adapter lever is in the
locked position.
•
The network processing engine and the I/O controller are inserted in their respective
slots, and their captive installation screws are tightened.
280-Watt AC-Input Power Supply Replacement Instructions
11