1
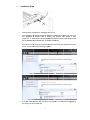
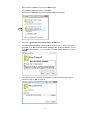
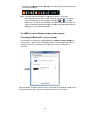
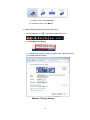
Strea am mHD D ™ Installatiion & Trou uble esho ooting Gu uide e P/N: SW WP120A Rev B 1 1. INTRODUCTION ........................................................................................................................... 4 2. FEATURES ................................................................................................................................... 4 3. SYSTEM REQUIREMENTS .......................................................................................................... 4 4. SPECIFICATIONS ........................................................................................................................ 5 4.1 Audio/Video Base................................................................................................................... 5 4.2 PC and Device Adapters ........................................................................................................ 5 4.3 Standards ............................................................................................................................... 5 4.4 General .................................................................................................................................. 5 5. PACKAGE CONTENTS. ............................................................................................................... 5 6. SOFTWARE INSTALLATION........................................................................................................ 6 7. 6.1 Installation Steps .................................................................................................................... 7 6.2 Removing the Software .......................................................................................................... 9 SETTING UP THE ADAPTER ....................................................................................................... 9 7.1 Connect the PC Adapter ........................................................................................................ 9 7.2 Connect the Reciever Base .................................................................................................... 9 7.2.1 Connect the Power Adapter ................................................................................................ 9 7.2.2 Connecting a monitor or TV or Project .............................................................................. 10 7.2.3 Connecting Audio devices ................................................................................................ 10 7.2.4 Connecting USB devices .................................................................................................. 11 8. USING THE STREAMHD™ ........................................................................................................ 11 8.1 Introducing the UWB Connection Manager. ......................................................................... 11 8.2 Accessing the UWB Connection Manager............................................................................ 11 8.3 Adjusting video settings........................................................................................................ 14 8.3.1 Selecting Extended mode or Mirror mode ......................................................................... 14 8.4 Configuring the Display ........................................................................................................ 15 8.4.1 Setting options for the display ........................................................................................... 15 8.4.2 Configuring the Display in Windows XP/Vista ................................................................... 16 8.4.3 Configuring the Display in Windows 7............................................................................... 17 8.5 Adjusting audio settings ....................................................................................................... 19 8.5.1 Configuring audio ports..................................................................................................... 19 8.5.2 Setting Audio Output Device ............................................................................................. 19 2 9. TROUBLESHOOTING AND SUPPORT ...................................................................................... 21 9.1 Troubleshooting ................................................................................................................... 21 9.1.1 Display/Video.................................................................................................................... 21 9.1.2 Audio/Sound ..................................................................................................................... 25 9.1.3 Connection/Docking.......................................................................................................... 26 9.1.4 USB PORT ....................................................................................................................... 26 9.2 Warpia Support .................................................................................................................... 27 9.3 Contacting Warpia ................................................................................................................ 27 3 1. Introduction y The StreamHD Wireless PC to TV Display Adapter with HDMI, VGA & Stereo Audio Outputs allows users to watch and share any notebook or PC content (such as pictures, movies and presentations) and any Internet content on their HDTV, projector, or monitor without cable limitations and in up to stunning 1080p HD. y The PC Adapter connects to a USB 2.0 port available in the notebook/ PC, and the Receiver Base connects to either an HDMI port available in flat screen TVs or a VGA connection in monitors & projectors. Stereo audio is supported via the HDMI port (along with the video) or via a separate 3.5mm audio jack. Use the S/PDIF output for connection to home audio components for a stunning wireless audio/video experience. y The StreamHD Wireless Display Adapter set provides full room coverage, is easy to set up and use, and is an ideal solution for both home and office use. It delivers the best combination of performance and cost in a variety of living room, conference room and classroom environments. 2. 3. Features y Wireless connectivity from notebook or PC to any HDTV, Monitor or Projector y HDMI with audio & video support, as well as VGA video output y Additional audio support through a 3.5mm stereo jack or S/PDIF optical output y Same room coverage, up to 30ft line of site range between PC & TV y Graphics resolution up to 2048 x1152 y 1080p Streaming Video y 6-9GHz Ultrawide Band Wireless technology – Free from Wi-Fi interference y QuickLink™ association between Host Transmitter and Receiver y Windows® 7/ Vista SP2/ XP® 32bit SP3 System Requirements • CPU: Core Core2Duo or equivalent, 2.2 GHZ • Graphics Chipsets Supported: Intel, AMD, and NVIDIA. • 2GB memory • One Host USB 2.0 port • 30MB of available disk space • Windows® XP SP2 or SP3, Windows Vista® SP1 or SP2 (32-bit or 64-bit), and Windows® 7 (32-bit or 64-bit) Note. The minimum system requirements described above support 1080p streaming video. Lower resolution video and static graphic screens are supported with lower system specifications. 4 4. Specifications Receiver Base 4.1 • Video Out: HDMI Connector, VGA Connector • Audio Output: S/PDIF optical, 3.5mm Stereo Jack • 32-bit True Color support with display resolution of up to 2048 x1152 (SXGA+) • Streaming video up to 1080p resolution • Supports both Mirror Mode and Extended Mode (TV/monitor as a second screen) • 48 kHz, 16-bit Stereo via audio jack, S/PIF, or HDMI connector • Whip Antenna • 5VDC Power Adapter • LED power and Tri-color signal strength indicators PC Adapter 4.2 • USB type-A male • Internal transmission antenna Standards 4.3 • Wireless USB 1.0, UWB certified • Certified WiMedia PHY and MAC General 4.4 5. • Same room, line of site range, up to 30ft • 128-bit AES security • Regulation compliant to US, Japan, Europe, Korea • Software drivers: Windows® 7/ Vista™SP2/ XP® SP3 • Input voltage: 100-240V, 50/60Hz • Operating temperature range: 0-40 C Package Contents. • PC Adapter • Receiver Base • Power Supply Unit • Quick Start Guide 5 • CD with h software drrivers and user informatio on Receiver Base Front Vie ew ew Receiver Base Back Vie 6. Software Insstallation. If your PC contains a previous Warpia W or oth her Wirelesss USB drive er installation n, please perform a proper p uninsttall procedure e using the Windows W Control Panel. y The installa ation software e requires .N NET Framew work version 2.0 (or later)) to be installed on the compu uter. In case it is not insstalled it mayy be downloa aded from the e following lo ocation: http://www w.microsoft.com/downloads/details.asspx?FamilyID D=0856EACB B-4362-4B0D D-8EDDAAB15C5E04F5&disp playlang=en s set to t very high security mayy prevent the e installer from m running. y Anti Virus software It is recomm mended to te emporarily dis sable the An nti viruses SW W during the installation. ation checks the PC capa abilities and compares c them to the miinimum syste em y The installa requiremen nts of the sysstem. For Vissta/Win7 it is recommended to run WE EI (Windowss experience index) calcu ulation prior to t installation n. 6 Installa ation Steps s 6.1 y Ensure e that the PC C Adapter is unplugged u frrom the PC. y Prior to o installing th he Warpia SttreamHD sofftware it is im mportant to make m sure there is no prior in nstallation of o Wireless USB or Display Link software fro om Warpia or other compa anies. IF YO OU HAVE TH HIS SOFTWA ARE IN YOU UR SYSTEM, THIS WILL L CAUSE THE STREAMHD SOFTWARE S E NOT TO WORK PROPE ERLY y Go to Control C Pane el- Programs s and Feature es and look through your programs to t ensure you do o not see eith her of the following progra ams: y s either W Wireless USB B or Display Link program ms, uninstall them by hig ghlighting If you see and clicking on the Uninstall tab b. 7 y DROM drive Next, Insert the installation CD in the PC CD y stallation CD D Autoplay menu is displa ayed The ins y Double e click on the e StreamHD_ _Setup.exe file to install driver d softwa are • Check the “I agree to the license terms an nd condition ns” box. • The sofftware will au utomatically create a fold der and load into the C: drive in the Prrogram Files fo older. If you are a ok with th he software ccreating its own o folder forr installation, click on the “Ins stall” tab to continue. c Iff you would like l to manua ally change the t directory, click on “Option ns” • h chosen to override the t Install loccation, browsse to find the e location of your y If you have choice, then click on “OK” to continue 8 Remov ving the Software S 6.22 • 7. In the event you need n to remo ove the softtware, go to o Control Panel – Progra ams and ect Warpia StreamHD S & ViewSpan to uninstall. Featurres and Sele t Adapte er Settting up the Connec ct the Wire eless USB B PC Adap pter 7.1 y Connect the Wirele ess USB PC Adapter to a high speed PC USB port. The sy ystem will auttomatically detect d and insstall the drive ers. 7.22 Connec ct the Rec ceiver Bas se 7.2.1 Con nnect the Power Ad dapter y Plug the AC Adapter cord into the DC-IIN on the back of the Recceiver Base y onnect the po ower plug to a live electrical outlet. The power light on the front panel Co glo ows red whe en the Receivver Base is powered p on. 9 nnecting a TV, Mon nitor or Prrojector 7.2.2 Con y You can connectt a digital (HD DMI) or analo og (VGA) mo onitor to the Receiver Base. Only one monitor m can be connecte ed to the HD Adapter at a time. y Conn nect an HDM MI or VGA Ca able to the HDMI or VGA A port on the Receiver Ba ase y Conn nect the othe er end of the cable to the TV, Projecto or or externa al monitor. 7.2.3 Con nnecting Audio A dev vices The Wirreless USB Device D Adaptter provides two audio po ort, as shown n in the follow wing illustrations y The e following ta able indicatess which port to use for ea ach type of audio a activity Aud dio Device Use thiss port Headphone es/headsets/sspeakers 3.5mm Jack J Digital audio o equipment: (e.g.: Sound d receivers and a speaker system with an optical inputt port) 10 S/PDIF Jack 7.2.4 Con nnecting USB U devices 8. y The e Receiver Base B providess one USB 2.0 2 port y Con nnection can n be made to o, Printers, Exxternal HDD’s etc. Som me Webcam’ss are not sup pported as th hey require th hroughput tha at the wirelesss signal can nnot support. Using the SttreamHD™™ T This section provides info ormation on using the folllowing softw ware to mana age the Strea amHD™ a adjust settings to suit your needss: and y C M Manager UWB Connection y Warpia a Multi-Channel Audio Device D utility y Warpia a Video Dockk utility Y You can also refer to this section to learn how to uninstall u the software. s Introdu ucing the UWB U Conn nection Manger M Sofftware 8.1 The UWB Connection C M Manager is th he driver softtware for the e Warpia Stre eamHD™. This T driver is auttomatically in nstalled when you run the e StreamHD™ Installatio on CD. The Stream mHD’s™ PC Adapter contains a radio o transmitter that enabless your compu uter to communica ate wirelesslyy with the Re eceiver Base. This radio is i known as the host radiio. The UWB Conn nection Mana ager driver so oftware enab bles you to manage m the host h radio and d perform tassks such as the t following: 8.22 y Connect/Disconnecct the Stream mHD™ from your computter y ed for radio communicatio c on Change/Select the channel use y e/Enable rad dio communiccations Disable y Disable e/Enable pop p-up messag ges Access sing the UW WB Connection Ma anger To starrt the UWB B Connecttion Manager: 11 y Double e-click the UW WB Connec ction Manage er icon in the e System tray/Notification n Area of your Windows® W de esktop. Note : Th he UWB Con nnection Man nager icon ap ppears as Grreen in your System tra ay/Notificatio on Area only when the PC C adaptor is s connected to your comp puter. Yo ou may need d to click the Show Hidde en Icons butto on [ ] or [ ], to disp play hid dden icons. If the icon is s not displayyed in the Sy ystem Tray Notification N Arrea, you ca an access the e UWB Conn nection Mana ager by doub ble clicking th he UWB Con nnection Ma anager icon on your Windows® deskktop. The UW WB Conne ection Man nager disp play windo ow appearrs Connec cting the StreamHD S D™ to your compute er The Stea amHD™ first appears on the Devices s tab of the UWB U Connec ction Manag ger as Not Conn nected. Sim mply click on the Connect tab next to the StreamH HD Device Iccon to establish a connection. It will take e a few minuttes for the Drivers to load d upon first on. connectio When the wireless w conn nection has been b made, a yellow starr will automa atically appea ar next to the StreamHD Device Iccon, making it the default device for future f connections. 12 Disconne ecting the e StreamHD™ from your computer Your compu uter can onlyy be connectted with one SteamHD™ at a time. If you have more than S SteamHD™ within w range of your computer, you may m want to temporarilyy prevent you ur computer from f connectting wirelesssly to a particcular SteamH HD™. On the Dev vices tab of the t UWB Co onnection Manager, righ ht - click on th he connected d StreamHD™ ™ Device an nd unselect “S Set as defau ult”. Once the t device is not longer th he default device you can then t either a. a double clicck on the devvice or b. righ ht-click and select s “Disconnec ct”. The device will now w move back to Not Conn nected statuss ou can chang ge the name of the each StreamHD™ S ™ listed on the e Devices ta ab of the Note. Yo W Wireless USB Manager. Th his is especia ally useful if you have mu ultiple Stream mHD’s, to differentiate e between the em. To renam me a Stream mHD™, right--click on the default ame, select Rename R from m the shortcu ut menu, and d then enter a custom nam me. na Radio Co ommunica ations Change e/Select th he channe el used forr radio com mmunicattion The Com mmunication ns tab of the Wireless US SB Managerr enables yo ou to view and change ra adio settingss. The defaullt channel se etting is Auto omatic, which enables the host radio to automatically a y locate an avvailable chan nnel for communications. 13 Note. Itt is recomme ended to leavve this setting g on Automa atic. If you ma anually selecct a c channel that is being used d by anotherr StreamHD™ ™ in the vicin nity, the chan nnel b bandwidth will be shared by both deviices. To maxximize perforrmance, a se eparate c channel shou uld be used fo or each StreamHD™ Disable e/Enable radio r communicatio ons To tempo orarily disable the host ra adio, do one of the following: Click the Off button on the Comm munications tab of the Wireless W USB B Manager (in the nication stattus area of the t window). Commun The radio o is now in Airplane Mod de and the Strea amHD Icon in n the System m Tray will no ow turn Orang ge: able commun nications, revverse the pro ocedure. To re-ena 8.3 Adjustiing video settings 8.3.1 Selecting Exttended mo ode or Mirrror mode e You ca an choose to o set the USB B to VGA Ad dapter’s video o output sign nal to Extend d mode or Mirror mode. The T default se etting is Exte end mode. 14 Extend mode m extends your deskktop space a across multip ple monitors, so that you can c display diffe erent informa ation on each h monitor connected to your y compute er. This provides a number of advantages a t increase productivity, to p including the e ability to: • View larrge spreadsh heets acrosss two screenss • Multitassk more effecctively withou ut overlappin ng windows • Comparre two docum ments simulta aneously acrross two scre eens • View vid deos/TV on one o screen and a reviews o on the other [ Exxtend Mode e] M Mirror mod de duplicate es the imag ge on your computer c sccreen on the e external m monitor(s) co onnected to o USB to VG GA Adapterr. This mode e is useful iff, for examp ple, you w want to view w information n on a large er, external desktop mo onitor instea ad of a sma aller, b built-in comp puter screen n. In Mirror mode, the Adpater A auttomatically adjusts the e external mon nitor’s resolution, colorr quality, and refresh ra ate settings to provide the t best o overall image quality ba ased on you ur computer’ss settings. w [ Mirror Mode ] 8.44 Configu uring the Display 8.4.1 Settting optio ons for the e display The follow wing are the suggested work w configurations when n connecting a display sccreen to the Base Adapter: y e Mirror Mode y Extend Mode y Laptop with Lid Closed y External Dissplay Only 15 8.4.2 Con nfiguring the Displa ay in Wind dows XP/V Vista 1) Using Viewspa an icon in Syystem tray/Notification Arrea Click Viewspan V ico on Advancced Settings Configuring the Display via Windo ows Display Properies in Windows XP/Vista Specify the extension n direction if you are usin ng multiple monitors m and Extended d mode. Thiss setting should match the physical orientation of the Exxtend to connecte ed monitors relative r to ea ach other. Fo or example, iff the externa al monitor is physically positione ed to the righ ht of your com mputer's disp play, select“E Extend to Right”. Set ass Entended Set as Mirror Set D Display Off Extend yyour desktop space acrosss multiple monitors, m so that you can display different information on o each mon nitor connectted to your co omputer. Duplicate e the image showing s on your y computer's screen on o the extern nal monitor Turn off the t external display. 2) Using Window ws Display Prreperties on Windows XP P/Vista 16 y Setting g the Displa ay to Extend d or Mirror Mode M Mirro or Mode : un ncheck the op ption “Extend my Windo ows desktop p on to this monitor” Exte end Mode : ch heck the option “Extend my Window ws desktop on o to this monitor” m y Adjustting Screen Resolution n(Screen ressolution) Use the Resolution slider to adjust a the de esired resoluttion of the display y Adjustting Color Level L (Colorr quality) Use the Colors drop-down d bo ox to select a color comp plexity level) y Setting g the Prima ary Display Sele ect the screen n that is conn nected to the e Base Adap pter- for exam mple 2.Defau ult Monitor on SMSC XDDM Graphics s Driver as shown in the screen abovve Checck the option n Extend my y Windows desktop onto this monitor (in Wind dows Vista –Exten nd the desk ktop onto thiis monitor”) Checck the option ns Use this device d as th he primary monitor m (in Windows W Vistta-This is my main monitor) w settings. Click OK to save the new 8.4.3 Con nfiguring the Displa ay in Wind dows 7 1) In n windows 7, 7 there is a built in sup pport for extternal monitor. To use it press th he windowss key togeth her with the P key( menu m will ap pper 17 + P), and th hen the follo owing 1) Forr Mirror mode e : choose Duplicate 2) Forr Extend mod de : choose E Extend 2) Using U Windo ows Display y Prepertiess on Window ws 7 y Click the Vie ewspan icon n( y Click Chang ge Display Settings S y To configure e screen resolution or an ny other display option, ch hoose Advan nced. ) in the System tray//Notification Area The followin ng windows will w apper W Windows 7 Display Settings S 18 y To change e any of the external disp play settings Select the e appropriate e display nam me in the Dis splay scroll down d optionss. You should select the name of the TV or o Monitor orr Projector co onnected to yyour Base Adapter. y e desired valu ue in any of the t available e settings Select the Resolutio on: your exte ernal display resolution. Orientatio on: select eitther Landsca ape or Portra ait. Multiple displays: d se elect either Mirror M or Extend mode. y Make this s my main display: d markk this option to make the external display the primary diisplay on which the deskttop is display yed 8.5 Adjustiing audio settings 8.5.1 Con nfiguring audio porrts y You can p playback aud dio either thro ough the Stre eamHD’s audio ports or the t PC’s audio portt. However, you y cannot use u the audio o ports on the e PC and on the StreamHD D™ at the sa ame time. y By defaultt, the audio ports p on the StreamHD™ S ™ are automa atically enabled each time you connect. c Whe en you disco onnect the SttreamHD™ from f the PC, the audio portts on the PC are automattically re-ena abled. y To change e the default settings, you may need to manually adjust the au udio settings in n Windows®,, as describe ed in this secction. For exa ample, if you want to use the PC C’s audio po orts while the e PC is docke ed, you will need n to change the default settings 8.5.2 Settting Audio o Output Device D The PC C audio output device should set itself automatica ally to the StrreamHD’s co onnected wireles ss audio deviice when the e wireless connection is made m to the Receiver R Basse. If it does not n switch auttomatically, it i can be sele ected manua ally. In Windows XP P: y Right clickk the Volume e icon in the S System Trayy and select Adjust A Volu ume y y Propertie es. In the Sou unds and Au udio Device es Properties s screen, select the Audiio tab. In the Sou und Playbac ck > Default Device drop p-down box, select the USB PnP 19 y Sound De evice. Click OK to t save the new n setting. In Windo ows Vista/W Win7: y Right clickk the Audio properties iccon in the Syystem Tray and a select Pllayback devices. utputs (HD DMI, 3.5mm or S/PD DIF) For all audio ou Click k “Speakers USB PnP So ound Device”” and click “S Set Default”. 20 9. Tro oubleshoo oting and Support 9.1 Trouble eshooting g This sec ction provides answe ers for prob blems you may enco ounter when using your StrreamHD ™. ™ If you ne eed to conttact Warpia, you will find inform mation regardin ng Warpia’’s support services at a the end of o this secttion. Before you y contacct Warpia, please rea ad the troubleshootin ng advice in n this manual, in your co omputer’s user’s guid de and/or in i any man nuals that came c with you ur optional periphera al devices. This sec ction provides trouble eshooting guidance for f problem ms in the following categories: y Display/Video y Au udio/sound y Co onnection/Do ocking y Ne etwork y US SB y Otther 9.1.1 Display/Video o ote For addditional information on trooubleshootinng StreamHD D™ video isssues, No please visit the Warpia Techniccal Support Website W at upport.warpia.com . www.su External monitor m does not turn on (the monitor’s s power lightt does not turrn on). 21 y Make sure that the external monitor’s power switch is on. y Confirm that the external monitor’s power cable is plugged into a live electrical outlet. y Make sure that the external monitor is securely connected to the StreamHD™. y Check the external monitor settings. y Refer also to the computer user’s manual and to the external monitor’s documentation. No image displays on the external monitor connected to the StreamHD™. y If you connect through an HDMI or VGA Cable, check to ensure your cable is connected properly on both sides. y Make sure you have the correct video input selected on the TV or Projector y Try adjusting the resolution, contrast and or brightness controls on the external monitor. y Check to make sure that the wireless connection is established between the PC and the StreamHD (the StreamHD™ icon in the System Tray is green, and when you double click on it, your TV or Monitor shows connected). y Make sure your Windows® operating system is updated with the latest available Service Pack from Microsoft®. y Your computer BIOS (Basic Input/Output System) may also need to be updated. Refer to the your computer manufacturer's Web site for more information. y Restart your computer after updating the operating system and/or the BIOS, and try using the StreamHD™ again. Display error. y Check that the cable connecting the external monitor to the StreamHD™ is firmly attached to both the Receiver Base and the TV/Monitor. The external monitor connected to the StreamHD™ shows only the wallpaper background of my Windows® desktop. . y The default configuration for the external monitor connected to the StreamHD™ is Extend mode (an extension of the image on the computer to a second screen). y This mode allows you to display different information on each monitor connected to your computer. Drag a window off of the right side of your primary display to have it appear on the external monitor. 22 y To switch to Mirror mode, so that an exact duplicate of the image on your primary monitor displays on the external monitor, please see “Adjusting video settings” beginning on page 14. Video or game playback is slow or choppy on the external monitor connected to the StreamHD™. y Confirm that the PC meets the minimum system requirements to run the StreamHD™. You can find the requirements on the packaging, or online in the product pages at www.warpia.com y Ensure the PC is within 30ft of the TV/Monitor and the PC Adapter has direct line of site to the Receiver Base. y Double click on the StreamHD™ icon in the system tray and note the signal strength meter next to the device icon in the Window. Signal strength must be 4-5 bars to play high definition video. y The StreamHD™ uses an advanced video graphics controller to display video images, however it does not support 3D Gaming. My Windows Vista® system runs more slowly when an external monitor is connected to the computer via the StreamHD™. y This may occur if the external monitor is set to Mirror mode and the display resolution is higher than 1280 x 800. You can take one or more of the following actions to resolve the problem: 9 Disable the Aero color scheme. (Click Start, Control Panel, Appearance and Personalization, Personalization, and then Window Color and Appearance. The Appearance Settings window opens. Select a different color scheme other than "Windows Aero." 9 Lower the display resolution. 9 Switch to Extend mode. Cannot play videos on an external monitor connected to the StreamHD™. y Try a different media player. VLC Media Player is recommended, though the StreamHD supports many different players. The Screen Resolution window in the Control Panel does not list all of the resolution modes my monitor is capable of displaying. y The StreamHD™ video card requires Extended Display Identification Data (EDID) to be supplied by a connected monitor. This information includes resolution settings supported by the monitor. Some monitors do not supply 23 this information, and in such cases the resolution settings available in the Screen Resolution Window will be limited, to avoid damage to the monitor. The external monitor connected to the StreamHD™ is incorrectly identified as a "Non-PNP monitor" in the Windows® Device Manager. y The monitor name displayed in the Windows® Device Manager is controlled by Windows®.This designation will not affect the functionality of the device. The computer's built-in display does not turn off when the external monitor connected to the StreamHD™ is set as the primary monitor. y On some systems, the StreamHD™ video adapter cannot control the internal display. Mirror mode is not available (grayed out). y Mirror mode is not available if the external monitor connected to the StreamHD™ is set as the primary display. y To enable Mirror mode, set the computer's built-in display as the primary display in the Windows Display Properties dialog box. Scalable Link Interface (SLI) mode is not available y This product does not support SLI mode when more than two graphics cards are installed in the connected computer. In such cases, SLI mode is disabled In Windows Display Properties, I cannot move the external monitor icon where I want relative to the icon of the computer's built-in display y Try dragging the computer's built-in display icon instead, relative to the external monitor icon. I cannot drag windows from my primary display to the external monitor onnected to the StreamHD y Follow these steps to fix the problem: 1) Open the Windows® Display Properties dialog box and position the monitor icons on the Settings tab to match the physical arrangement of your monitors. 2) Make sure the "Extend to" setting matches the physical arrangement of your monitors. 24 For example, if the external monitor is to the right of the computer display, select "Extend to right." 3) Drag the window you want to move in the direction that matches the extension setting. For example, if the desktop space is extended to the right, drag the window off of the right edge of the primary display and it will appear on the extended desktop. I cannot run a 3D program or a program using DirectDraw commands on the external monitor connected to the StreamHD™ y This product does not support 3D programs. y Running applications that use certain DirectDraw commands (such as some 2D gaming applications) is also not supported. If you want to play these games in full-screen mode, disconnect the StreamHD™ and use your computer's display. 9.1.2 Audio/Sound There is no sound coming from the external audio device connected to the StreamHD™. y Check and adjust the volume settings. y Make sure the cable connecting the audio device to the StreamHD’s audio output is secure. y Check that the Mute all/Mute checkboxes in Microsoft® Windows® are not selected or that the volume is not set too low. y To locate these settings, double-click the speaker icon in your Windows® System tray/Notification Area. y Close your media player application, if it is running. Wait approximately 1015 seconds for the operating system to recognize the audio device conne - ted to the StreamHD™ and then restart your media player application. y The audio port on the StreamHD™ may be disabled. To enable the port, follow the instructions in “Configuring audio ports” on page 19. There is no sound coming from the computer’s internal speakers, or from the headphones/headset connected directly to the docked computer. y By default, the internal speakers and audio ports on the computer are disabled when the computer is connected to the StreamHD. To enable the speakers or audio ports on the computer, follow the instructions in “Configuring audio 25 ports” on page 19 y Check that the Mute all/Mute checkboxes in Windows® are not selected. To locate these settings double-click the speaker icon in your Windows® System Tray/ Notification Area. y Close the media player application, if it is running. Wait approximately 10-15 seconds for the operating system to recognize the audio device and then restart the media player application. Sound is distorted or delayed when playing some multimedia files. y y Disconnect the StreamHD™ from your computer, reconnect and play the file again. Close the Media Player being used and restart the player. 9.1.3 Connection/Docking y My computer does not automatically detect the PC adaptor. Make sure you have properly connected the PC adaptor to your computer’s USB port. y Unplug, then re-plug in the adaptor. y Reboot the PC y The computer's USB port may be damaged. Check to see if other devices can be successfully connected to the port. The connection to the StreamHD™ has been lost. y The computer may be out of wireless communication range. Bring the computer within close range of the StreamHD™ to automatically reconnect. y The computer may be in standby/sleep/hibernation mode. The computer will reconnect when it resumes from standby/sleep/hibernation. y The USB adaptor may have been disconnected. Re-connect the USB adaptor to the computer. 9.1.4 USB USB device does not work. y Make sure the StreamHD™ is connected to your computer and the computer is docked (indicator light on StreamHD™ is green). y Check that the cable connection between the USB port on the StreamHD™ and the USB device is secure. 26 y Make sure that the StreamHD™ drivers are properly installed. Refer to the operating system documentation for more information. y Make sure that the AC adaptor (if applicable) is connected securely to the Receiver Base and a live electrical outlet. The StreamHD™ is not charging the USB device. My real-time device (for example, a Web camera, microphone, or speakers) does not operate properly when connected to the StreamHD™. y Due to USB bandwidth limitations, real-time devices (for example, Web cameras, microphones, and speakers) may not operate correctly and cannot be supported. 9.2 Warpia Support If you require additional help or are still having problems operating the StreamHD™, you may contact Warpia for additional technical assistance. Before you call Since some problems may be related to software or the operating system, it is important that you investigate other sources of assistance first.Try the following, before contacting Warpia y Review the user’s manual and/or troubleshooting sections in the documentation supplied with your StreamHD™. y Ensure you have the latest Windows software updates for your computer. y If a problem occurs when you are running particular software applications, consult the software documentation for troubleshooting suggestions. Contact the software company’s technical support department for assistance. y Consult the Warpia technical support website at www.support.warpia.com This is your best resource for current information and support. 9.3 Contacting Warpia Warpia’s technical support Web site To stay current on the most recent software and hardware updates for your StreamHD™ and for other product information, be sure to regularly check the Warpia Web site at http://www.warpia.com/support. Contacting Warpia’s technical support 27 Before contacting Warpia, make sure you have : y Your StreamHD’s serial number y The computer and any optional devices related to the problem y Backup copies of your Windows® operating system and all other preloaded software on your choice of media y Name and version of the program involved in the problem, if applicable, along with the its installation media y Information about what you were doing when the problem occurred y Exact error messages and when they occurred For technical support, email the Warpia Customer Support Center: Email Support [email protected] 28