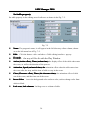
1
SHENZHEN VISUAL LUMEN CO.,LTD
Table of Contents
Chapter One: Overview................................................1
1.1 Features.................................................................1
1.2 Operating environment...........................................1
Chapte
terr two: Install and Uninstall............................
.............................. 2
2.1 Install......................................................................2
2.2 Uninstall .................................................................3
Chapte
terr Three
ee:: Use details ...............................
........................................
......... 4
3.1 Program composition .............................................4
3.2 Introduction of interface window.............................5
3.3 Feature detail .........................................................7
3.4 Program production process ................................14
ur: Text Di
splay
...............................
Chapte
terr Fo
Fou
Dis
ay...............................
......................................
....... 20
4.1 Play single-line text window .................................20
4.2 Play multi-line text window ...................................22
4.3 Play Word/Excel...................................................24
Chapte
splay ...............................
terr Five: Image Di
Dis
...................................
.... 27
5.1 New Multimedia Window......................................27
5. 2 Set Multimedia Window.......................................27
5.3 Open the Playing files ..........................................27
5.4 Set the property of the played image. ..................28
splay
...............................
Chapte
terr Six: Video Di
Dis
ay...............................
......................................
....... 30
6.1 New Multimedia Window......................................30
6.2 Set Multimedia Window........................................30
6.3 Open playing files.................................................30
6.4 Set property of Video files ....................................31
splay ...............................
Chapte
terr Seven: Table Di
Dis
.................................. 32
7.1 New Multimedia Window......................................32
7.2 Set Multimedia Window........................................32
7.3 Insert & Edit table.................................................32
splay ...............................
Chapte
terr Eight: Web Di
Dis
....................................
..... 36
8.1 New Multimedia Window......................................36
1
Technical web: www.visuallumen.com email:[email protected]
8.2 Set Multimedia Window........................................36
8.3 Open play files .....................................................36
8.4 Set Web property .................................................37
ne: Databas
e Di
splay ............................
Chapte
terr Ni
Nin
ase
Dis
.............................. 38
9.1New Multimedia Window.......................................38
9.2 Set Multimedia Window........................................38
9.3 New Access Database .........................................38
9.4 New ODBC drive database ..................................43
e ...............................
Chapte
terr Ten: Time and dat
ate
....................................
..... 44
10.1New Multimedia Window.....................................44
10.2Set Multimedia Window.......................................44
10.3 New date/ time ...................................................44
10.4 Set date/ time .....................................................45
Chapte
terr Eleven: Prog
ogrram ...............................
........................................
......... 48
11.1 New Multimedia Window ....................................48
11.2 Set Multimedia Window......................................48
11.3 New External program........................................48
11.4 Set External Program Window ...........................50
splay ..............................
Chapte
terr Twelve: Timer Di
Dis
................................ 51
12.1 New Multimedia Window....................................51
12.2 Set Multimedia Window......................................51
12.3 New timer Display ..............................................51
n: Instant Messa
ging ....................
Chapte
terr Thirtee
teen
essag
...................... 53
13.1 New instant messaging ......................................53
13.2 Set instant messaging ........................................54
13.3 Play instant messaging ......................................55
urtee
n: Video input Di
splay .................
Chapte
terr Fo
Fou
teen
Dis
................... 56
14.1 New Multimedia Window....................................56
14.2 Set Multimedia Window......................................56
14.3 New external video.............................................56
Chapte
n: Flas
h Di
splay...............................
terr Fiftee
teen
ash
Dis
................................. 61
15.1Make Flash effect text .........................................61
15.2 Play Flash ..........................................................63
2
Technical web: www.visuallumen.com email:[email protected]
15.2.2 Set Multimedia Window...................................63
n: Scree
n Capture ..........................
Chapte
terr Sixtee
teen
een
............................ 65
16.1 New multimedia window.....................................65
16.2 Set multimedia window ......................................65
16.3 New screen capture ...........................................65
16.4 Set Screen Capture............................................66
16.5 Start Recording ..................................................67
16.6 Play Video ..........................................................67
n: Time Di
splay .........................
Chapte
terr Seventee
teen
Dis
........................... 68
17.1 Open time repertoire ..........................................68
17.2 New time repertoire............................................69
17.3 Edit time order....................................................71
17.4 Delete time order................................................71
17.5 Start time order...................................................72
17.6 Exit .....................................................................72
n: Enviro nment monito
Chapte
terr Eightee
teen
torring .........
........... 73
18.1 Open Brightness Control Repertoire ..................73
18.2 New brightness control repertoire ......................74
18.3 Edit brightness control repertoire .......................74
18.4 Delete brightness control repertoire ...................75
18.5 Restore fault brightness control repertoire .........75
netee
n: Software Set
Chapte
terr Ni
Nin
eteen
ettting ......................
........................ 76
19.1 Set basic properties of software .........................76
Chapte
terr Twenty: Hardware se
settting ........................
.......................... 78
ne: Scree
n control .....................
Chapte
terr Twenty-o
-on
een
....................... 80
21.1 Set Brightness/Contrast/Color Temperature.......80
21.2 Set Screen Location...........................................81
21.3 Close/Freeze Screen .........................................82
vice Stat
us ..............
Chapte
terr Twenty two: View De
Dev
atu
................ 84
22.1 Open Device Status ...........................................84
Chapte
three
terr Twenty
ee:: View environment
87
monito
torring ...............................
...............................................................
..............................87
23.1 Open environment monitoring ............................87
3
Technical web: www.visuallumen.com email:[email protected]
23.2 Set Environment monitoring factors ...................88
ur: FAQ ...............................
Chapte
terr Twenty fo
fou
.......................................
........ 90
Technical support
support:
Tel: +86-755-28704020 Mobile: +86-13802700271
Web: www.visuallumen.com Email: [email protected]
Online support: Msn: [email protected] Skype: leddisplayme Yahoo: leddisplayme
Add: Dawang Industrial Park, Shiyan, Bao'an District, Shenzhen, Guangdong, China
4
Technical web: www.visuallumen.com email:[email protected]
D Manag
LE
LED
ageer 2010
Chapter One: Overview
1.1 Features
D Manag
<LE
LED
ageer 2010> is a professional player developed for LED display system, with
the powerful feature of easy-to-learn and easy-to-use.
D Manag
<LE
LED
ageer 2010> almost supports all of the mainstream media of computer files,
such as:
Videos
os: AVI/SWF/RM/MPEG/MPG...
Picture
ress: JPG/GIF/BMP/...
Fil
ilees: txt/doc/xls/rtf/…
D Manag
>can be smoothly implemented to play controls on a general
<LE
LED
ageer 2010
10>
computer; can be carried out several display window editor on one computer, and better
support for external video and audio input.
1.2 Operating environment
�
Operating System
�
Hardware
Windows2000/ XP Chinese and English
CPU: Celeron 2.4G or higher
Memory: 1G or higher
Display card: 32M or higher
�
Related Software
Video Decoder—compulsory(install special decoder when play RM or RMVB
files)
1
D Manag
LE
LED
ageer 2010
Chap
haptter two: Ins
nsttall and Unins
nsttall
2.1 Install
It is simple to install the <LED
Manager
2010>
as
below:
Double-click LED Manager
2010 file and then dialog box
popup,
see
Fig.2-1,
select
<Next step> to start installing.
When the installation of the
<LED Manager 2010> is made,
the
<LED
appear
software>
will
in
the
<Start/<Program>.
Click
Fig. 2-1
to
start operation after entering
<LED Manager 2010> in the program as Fig. 2-2 shows.
Fig.2-2
And there is a shortcuts of < LED Manager 2010> in the desktop as icon
double-click it can start the program.
2
shows,
D Manag
LE
LED
ageer 2010
2.2 Uninstall
D Ma
nager 201
<LE
LED
Man
0100>
offers the feature of automatic
un-installation
which
is
convenient for you to delete all
related
files,
shortcuts.
<Uninstall
programs
User
LE
D
LED
can
and
select
Ma
nager
Man
201
20100> in the <LED software>
as Fig.2-2 shows, and can
select <Add/Delete Programs>
Fig.2-3
in the <Control Panel>, to
uninstall software. Click Uninstall, the pop-up dialog box will ask for confirmation to
uninstall the software, click the confirmation button, the software will uninstall automatically.
The process is completed as Fig.2-3 shows.
3
D Manag
LE
LED
ageer 2010
ee
s
Chap
haptter Thr
hree
ee:: Use de
dettail
ils
3.1 Program composition
Program (program files) includes one or more episode. And there are two kinds of episode:
normal episode and instant messaging programs. The former is the main component of
program, which can have more than one and be played in order; the latter is only one which
will be cycle played during the whole process, it is used to play a fixed content.
Episode is composed of one or more multimedia window, which is used to display such
contents as the text, images, flash, multimedia clips. Multimedia windows can load 12 types
of multimedia materials to play: <Material File>, < Text display >, < Text display >, < Time
display >, < Audio control >, < External video >, < Custom Form >, < External program
window >, < Database Display >, < Web display >, < Temperature/humidity window >, <
Instant messaging > and < Screen capture >.
Ma
Matterial files: including pictures, video, flash, word, Excel and other media files.
Text display: including single-line text, multi-line text and Flash effects characters.
Time display: including the clock display, timer time display.
Aud
udiio control: including audio visual images and audio spectrum image.
External video: for other external video devices.
Cust
stoom Form: tabular data for editing play.
External program wind
ndoow: for embedding the external program into the display window,
mainly for playing small programs user developed for themselves.
Database Display: including ACCESS database and ODBC databases.
Web display: used to display web pages.
Temperature/humidity wind
ndoow: including environmental temperature and humidity.
Instant mess
ssaaging: for quick input a short text, such as notification letter.
4
D Manag
LE
LED
ageer 2010
Screen capture: used to record the current screen image inside the window.
n of interface window
3.2 Int
ntrrodu
ducctio
ion
The main interface of <LED Manager 2010> shows as Fig.3-1, it includes two windows:
Play Window and Console.
Fig.3-1
3.2.1 Play Window
Play wind
ndoow (The contents are displayed on the LED screen) is used to play the text,
images, animation, multimedia clips and other content the user want to. Here's the content
coincides with what the LED screen shows. This software supports play windows, up to 99
maximally, that means one computer can control the 99 pieces of display screen. Each play
window can have several multimedia windows. And each multimedia window can load
twelve types of multimedia files (that is described in chapter 3.1). Independently, each player
window can open program files and standalone play, independent editing without affecting
the other play window.
5
D Manag
LE
LED
ageer 2010
3.2.2 Conso
solle
Console is used to control the position, size and program content of play window. The
console can be expanded into edit mode, the expanded control buttons as shown by the red
mark in Fig 3-2.
Fig 3-2
In the edit mode, you can clearly see the console to expand in three parts, as shown in
Fig.3-3: Function Menu, Control Strip and Edit Area.
Fig 3-3
Function Menu:
orderly including seven sub-menu <Files>, <Edit>, <New>, <Material>,
<Settings>, <Tools>, <Help>.
6
D Manag
LE
LED
ageer 2010
Control Strip: orderly including five functions of <Back>, <Play>, <Pause>, <Stop>,
<Forward>
Edit Area: the toolbar at the top in sequence includes <new episode or media window>,
<import>, <move up>, <move down>, <delete>, <play>, <stop play>, <zoom in>, <zoom
out>; left are the options for the program, show programs and sub- window information; the
right are options to edit, includes the special play effects, content ,time and so on.
3.3 Feature deta
taiil
3.3.1 Menu
Function menu contains seven sub-menus : <Files>, <Edit>, <New>, <Material>,
<Setting>, <Tool>, and <Help>.
<Fil
ilee>: as shown in Fig. 3-4, including <New Project>, <Open Project>, <Save Project>, <
Save Project As>, <Project Full Save>, <Save the Default > and < Exit>.
Fig 3-4
�
D Ma
nager 2010 project files, it includes a
New Project: to create a new LE
LED
Man
variety of settings.
�
D Ma
nager 2010 project files.
Open Project: to open previously edited LE
LED
Man
7
D Manag
LE
LED
ageer 2010
�
�
D Manager 2010 project files.
Save Project: to save the current LE
LED
D Ma
nager 20
Save Project as: to save the current project file for the new LE
LED
Man
20110
project files.
�
Project Full Save: to save the current file and multimedia material. Differently
this function is to copy the current project of multimedia material (such as: video,
photos, documents and other material), a new folder convenient for user’
engineering backup and other uses. For example: If the current project called
"New" to save, the system will create a "New. Files" folder, and copy all
materials used in engineering to the documents for use. (Note: If a user backup,
or move the project file, you need to copy project file name and". files "folder
together).
D Ma
nager 2010
LED
Man
� Exit: Exit LE
<Ed
Ediit>: as shown in Fig.3-5, including the seven options: <Copy>, <Paste>, <Move Up>,
<Move Down>, <Delete>, <Edit Material>, <Play Material>.
Fig.3-5
�
�
�
Copy: Used to copy an episode or multimedia windows.
Paste: Paste an episode or multimedia windows.
Mov
ovee up
up:: Move up an episode or the position of multimedia window. Only can
move on the same level, not move over level
8
D Manag
LE
LED
ageer 2010
�
Mov
ovee down: Move down an episode or the position of multimedia
window. Only can move on the same level, not move over level.
�
�
�
Delete: Delete an episode or multimedia windows.
Edit material: Some material may be edited separately.
Play material: Play the currently selected material
<N
<Neew>: As shown in Fig.3-6, includes the two options of <Episodes>, <Multimedia
window>..
Fig. 3-6
�
�
Episodes:
used to increase an episodes in the current play window
Multimedia wind
ndoow: used to increase a multimedia window in the current
episode.
<Mate
terrial>: as shown in Fig 3-7, contains 12 categories of multimedia material:
<Material File>, <Text display>, <Time Display>, <Audio Spectrum>, <External video>,
<Custom Table>, <External program >, <Database Display>, <Web Display>,
<Temperature/Humidity Windows>, <Instant messaging>, and <Screen Capture>.
All kinds of media files have their own editing properties. Later, will be a detailed
description.
9
D Manag
LE
LED
ageer 2010
Fig.3-8
<Sett
ttiing>: as shown in Fig.3-8, contains the <Brightness/Contrast /Color Temperature>,
<Screen Location Settings>, <Freeze screen>, <Close Screen>, <Time Repertoire>,
<Brightness
control
repertoire>
<Environment
monitoring>,
<Device
Status>,
<Software settings>, <Hardware Settings>, <Audio Input Select>, <Video Input Settings>,
<New Display>, <Display Settings>, <Delete Display> and <language>.
10
D Manag
LE
LED
ageer 2010
Fig.3-7
rasst / Color Temperature: used to adjust the screen brightness,
� Brightness / Contra
contrast, color temperature (see "21.1 Setting Brightness / contrast / color
temperature").
� Screen Loca
cattion Settings: used to set the LED screen location (see Chapter 21.1 to set
the position of LED screen).
� Fre
reeeze Screen: used to lock the currently playing content of LED screen.
� Close scre
reeen: used to display the blank screen.
� Time Repertoire: used to set the time repertoires. (see "Chapter Seventeen “Time
play”)
� Brightness control repertoire: used to automatically adjust LED screen brightness
according to the environment. (see "Chapter eighteen, environmental monitoring.")
� Environmental Monitoring: used to monitor the external environment of LED screen.
(see " Twenty three: View environment monitoring ").
11
D Manag
LE
LED
ageer 2010
� Device Status: used to monitor the status of the system(. see Twenty two: View Device
Status)
ware Sett
� Soft
ftw
ttiings: used to set the basic parameters of software. (see details in
<Chapter Nineteen, software settings>)
� Hardware Settings: used to set advanced parameters of the screen. (see "Chapter
Twenty, hardware setting ")
� Aud
udiio inpu
putt options: use to select an audio source in this option, when playing music
materials files such as Audio spectrum.
ut settings: use to select a video source in this option, when there are
� Video Inp
npu
multiple external video sources.
� New display: used to create a new play window for display screen.
� Display settings: used to set play window. (see "3.4.1 the first step: setting play
window size").
� Delete display: used to delete the specified screen play window in the software.
� Language: used to switch the language in the software (supporting English, Simplified
Chinese, and Traditional Chinese).
l>
ool>
l>: as shown in
� <Too
Fig.3-9, including the
<Screen Test>,
<View Tools>, <Screen Correction >, <Remote Monitoring >.
Fig. 3-9
�
Screen Test: used to test the display screen effect. Click and pop up a text box to
shut up current play window. Then right click the mouse button in the player window,
12
D Manag
LE
LED
ageer 2010
do the appropriate testing according to the need, as shown in Fig.3-10. Currently
support: Grayscale test, grid test, splendid testing, color bar test and aging test.
�
View too
oolls: including the
color and location view.
View color: used to view
the gray value in one pixel.
View location:
used to
view the coordinate value
of a pixel.
�
Fig.3-10
Full Screen corr
rreection:
use to correct the screen brightness with LED Colorbrate system. This version can’t
support now.
�
Remote Monitoring:
use to control LED screen through a remote network.
<Help>: as shown in Fig.3-11, contains two options of <about> and< help>.
Fig.3-11
� Help: Display the Using Guide of the software.
� About: Display the details of the software version information.
3.3.2 Control strip
Control strip: used
to control the program
play.
button<
Click
the
Fig.3-12
>to
minimize the play window, as Fig.3-12 shows. The buttons from left to right:
13
D Manag
LE
LED
ageer 2010
�
Back<
>:Backward
�
Play <
>:Play program
�
Pause <
>:Pause play
�
Stop<
�
Forward <
>:Stop play
>:Forward
3.3.3 Ed
Ediit area
It is the core of this software; see the next section-program production process, for details.
ss
3.4 Program production proce
cess
3.4.1 Step 1: Set the size of Play Wind
ndoow
Fig.3-13
The size of Play window must be set correctly; otherwise the program may only display a
14
D Manag
LE
LED
ageer 2010
part because the play window is not big enough.
Set Method: <Menu>→<Settings>→<Display settings>, as shown in Fig.3-13, you can
lock display position in the set of software
Left border and upper border (X, Y) are set to (0, 0) to ensure the Play Window in the upper
left corner of the screen. And set the width, height, according to the size of your screen, such
as your screen width and height is 512×256, and then set to (512,256).
3.4.2 Step Two: New episodes
Fig.3-14
Episodes are the basic elements of the program. The toolbar as shown in Fig.3-14, click the
button <New
> and the main menu pop-up, you can click on episodes. Program can
contain any number of episodes. And the function button includes <Delete
up
>, <Move down
�
<Delete
�
<Move up
> and <Zoom in
>, <Zoom out
>, <Move
>.
>: used to delete episodes.
>and<Move down
>: The episodes are played in position order.
You can click the button to change the position of episodes.
�
<Zoom in
>and<Zoom out
>: used to change the display proportion of LED
screen.
de
3.4.3 Step Three
ee:: Set the options of episo
sod
As Fig.3-15 shows, the options of episodes includes <Name>, <Play Option>,
<Timer/Plays>, and <Background Music>.
15
D Manag
LE
LED
ageer 2010
Fig.3-15
3.4.4 Step Four: New Multimedia window
Episodes are only a framework; it contains any number
of multimedia windows. Click the button <New
>
and select the <Multimedia Window>, as shown in
Fig. 3-16
Fig.3-16.
ow
3.4.5 Step Five: Set property of Multimedia wind
ndo
Each Multimedia Window can set the attributes of < Location>, <Size>, <Background>, <
Transparency>, as shown in Fig.3-17.
16
D Manag
LE
LED
ageer 2010
Fig. 3-17
The details of each property as below:
Name: the name of the multimedia window, it will appear in the left directory editor
column, as on the left menu bar shown Fig. 3-17.
Left, Top: the distance from the left frame of media window to the left frame of its
play window; the distance from the upper frame of media window to that of its play
window.
Width, height: media window height and width.
nsparency: the transparency of the background of the media window
Tra
ran
nsparent background
Tra
ran
und:: on / off transparency.
Ma
Maxximize: media windows full with play window.
Back image: The background image of media window.
Stretch Mode: Display format of background image of multimedia window.
Back color: background color of the media window.
Border Style: border styles of windows media
Border Color:
border color of media window
Play options: used to set the play time or times of multimedia window.
Episodes Play, Set as the benchmark: The end time of episode if based on the time of
17
D Manag
LE
LED
ageer 2010
this multimedia window. For example: episodes includes ten multimedia windows, if
you select this option in the third multimedia window interface, then when the third
multimedia window finishes playing,
other multimedia windows are stop playing at
the same time.
Lock position: Lock location of multimedia window.
3.4.6 Step Six: Add Multimedia Mater
eriial
Each multimedia window can simultaneously play different texts, pictures, tables, animation,
and video. There are 12 kinds of multimedia material for choice, as shown in Fig. 3-18.
Fig. 3-18
Ma
Matterial Fil
ilee: the most important material, including pictures, video, Flash, Word and Excel
and other formats of media files.
Text Box: used to play text files, such as: notice, advertisement text, you can add single-line
text, multi-line text and the word special Flash effects (default rate of 12 frames / sec).
Time display: use to display time. Include the clock display, timer time.
Aud
udiio Sp
Speectrum: including audio visual images and audio spectrum image.
External Video: for other external video devices.
Cust
stoom Table: use to edit and display the tabular data.
18
D Manag
LE
LED
ageer 2010
m: for embedding the external program into the display window, mainly for
External progra
gram
playing small programs user developed for themselves.
Database: use to display the database file. Include ACCESS database and ODBC databases.
Web display: used to display web pages.
Temperature/Humidity Display: use to display the current environmental temperature and
humidity.
Instant Messaging: used to quick input a short text, such as notification letter.
Screen Capture
re:: used to record the current screen image inside the window.
3.4.7 Step Seven: Set property of multimedia mater
eriial
For each of the properties of multimedia material, we will point out in the later chapter. You
need to create multimedia form type upon needs, find the corresponding chapter, which can
obtain more detailed property information.
3.4.8 Step Eight: Finish prog
ogrram production
After eight steps above, a complete program can be completed. If need more episodes, just
repeat step 2 to step 7. When finished, click the drop-down menu→ <File> → <Save
Project> or <Save Project as> to facilitate the next use.
Step Nine: Play prog
3.4.9
3.4.9S
ogrram
Click the button <play
<Stop
> in the control to start playing shows, <Pause
> for stop playing.
19
>button, and
D Manag
LE
LED
ageer 2010
ur: Tex
Chap
haptter Fo
Fou
extt Display
There are four methods for playing text: single-line text window play, multiple-line text
window play, Word/Excel play and spot instant messaging.
ow
4.1 Play single-line text wind
ndo
This window is used to play single-line text such as <welcome subtitles>, <notices>, etc.
4.1.1 New M ultimedia Wind
ndoow
Click the button<
> for a new multimedia window.
Set Multimedia Window
4.1.2
4.1.2S
Set multimedia window properties (see 3.4.5 Step five: multi-media window property)
4.1.3 Add single line text
Click<
> to select the <Text Box>→<Single Line Text>, or right-click the <Multimedia
window>→<Single Line Text>, as Fig. 4-1 shows below.
20
D Manag
LE
LED
ageer 2010
Fig. 4-1
4.1.4 Set a single line text
The set interface window of <One-line text> shows as Fig. 4-2.
Fig. 4-2
�
Name: The program's name, it will appear in the left directory editor column, shown
as on the left menu bar of Fig. 4-2.
21
D Manag
LE
LED
ageer 2010
�
Action (action eff
ffeect), Time (action time): the effect of the text when enter the
scene shows, as well as the duration of the process.
�
Animation, Sp
Speeed (animated speed): the animation effect when the texts enter into
the scene after the stop, and the time of text to stay in the scene.
�
Clear (Clear effect), Time (clear time
me)): the animation effect of text out of the scene,
�
�
Border style, Border width: the outline effect of text, and the width of the effect.
and the time out of the scene.
d, and Texture Style: the texture animation effect, speed
Texture Mov
ovee, Texture Spee
eed
and styles of text.
�
�
Text Mask: This feature is to make text transparent, while the background opaque.
kgroun
d Anime (animation), Play (play coun
Bac
ack
und
untts): Text-background animation
supports AVI format video and video play times.
�
Font (set font): Set text attributes, including fonts, font, size, word width, spacing,
color.
Note: The text color and texture animation are mutually exclusive. Set the text color,
texture animation need to set the <no mixing>, when setting text color, software
automatically set texture animation to no mixing
�
Text (edit text): Edit the displayed text, such as <welcoming>, <notice> and so on.
xt window
4.2 Play multi-line te
tex
Need to enter multiple lines of text information on the screen such as advertisements, notices,
etc., can be achieved through multi-line text window.
4.2.1 New M ultimedia Wind
ndoow
Click button<
> for a new multimedia window
22
D Manag
LE
LED
ageer 2010
4.2.2 Set Multimedia Wind
ndoow
Set multimedia window properties (see 3.4.5 Step five: multi-media window property)
4.2.3 Add single line text
Click<
> to select the <Text display> → <Multi-line text>, or right-click the
<Multimedia window>→< Multi-line text>. As Fig. 4-3。
Fig. 4-3
4.2.4 Set multi-line text
The set interface of Multi-line text window shows as Fig. 4-4.
Fig. 4-4
23
D Manag
LE
LED
ageer 2010
�
Name: The program's name, it will appear in the left directory editor column, shown
as on the left menu bar of Fig. 4-4.
�
Edit: Click the <Edit> button will pop up editing interface, shown as Fig. 4-5, enter
the text to be displayed, such as the <welcome message>, <notification>, etc ,can also
be included in txt text. You can set text font, font, size, color in the editing interface
and also can use the shortcut of <cut> and <paste> and <copy>.
�
Action (Action effect), Times (ac
acttion time
me)): the effect of the text when enter the
scene shows, as well as the duration of the process.
�
Animation, Times (animated time): the animation effect when the texts enter into the
scene after the stop, and the time of text to stay in the scene.
�
nce effect
nce time): the animation effect of text out
Clear (Cleara
ran
ct)), Times (the cleara
aran
of the scene, and the time out of the scene.
�
Border Style, Border Width: the outline effect of text, and the width of the effect.
Fig. 4-5
4.3 Play Word/Excel
For the written Word or Excel document, you can directly play them.
24
D Manag
LE
LED
ageer 2010
4.3.1 New M ultimedia Wind
ndoow
Click button<
> for a new multimedia window.
4.3.2 Set Multimedia Window
Set multimedia window properties (see 3.4.5 Step five: multi-media window property)
4.3.3 Add single line text
Click<
> to select the <Material File> → <Word/Excel File> or right-click the
<Multimedia window>→ <Word/Exce
cell Fil
ilee> shown as Fig. 4-6.
Fig. 4-6
Exce
es
4.3.4 Set Word/
d/Exce
Excell fil
ile
The setting interface of Word/Excel shows as Fig. 4-7.
25
D Manag
LE
LED
ageer 2010
Fig. 4-7
�
Name: The program's name, it will appear in the left directory editor column, shown
as on the left menu bar of Fig. 4-7.
�
Edit: Click the <Edit> button will pop up the original Word/Excel files convenient for
editing.
�
File Path: shows the directory where files. Click the button<
> can replace the
Word / Excel documents.
�
�
Fit Mode: the way of files fit with the Play Window.
Action (Action effect), Times (ac
acttion time
me)): the effect of the text when enter the
scene shows, as well as the duration of the process.
�
Animation, Times (animated time): the animation effect when the text enters into the
scene after the stop, and the time of text to stay in the scene.
�
nce time): the animation effect of text out
Clear (Clearance effect), Times (the cleara
aran
of the scene, and the time out of the scene.
�
Invert Color:
invert the background color and text color, such as change fonts color
from white to black.
�
Lock rows, locking columns: Locking rows or column of Excel sheet.
26
D Manag
LE
LED
ageer 2010
Chap
haptter Five: Image Display
5.1 New Mu
Mulltimedia Wind
ndoow
Click the button<
> for a new multimedia window.
5. 2 Set Mu
Mulltimedia Window
Set multimedia window properties (see 3.4.5 Step five: multi-media window property)
5.3 Open the Playing files
Click button<
>, select the <Material File>→<Image File>,or right-click <Multimedia
Window>→<Material File>→<Image File>, as Fig. 5-1 shows.
Fig. 5-1
Popup the<Image Viewing Window> shown as Fig. 5-2 and then select the pictures needed
27
D Manag
LE
LED
ageer 2010
to play.
Fig. 5-2
5.4 Set the proper
ertty of the played imag
agee.
The setting interface of the picture (Imager file) shown as Fig. 5-3.
28
D Manag
LE
LED
ageer 2010
Fig. 5-3
�
Name: the program's name, it will appear in the left directory editor column, shown as
on the left menu bar of Fig. 5-3.
�
Edit: edit the pictures from pop-upped Window’s picture viewer.
�
File Path: shows the directory where files. Click the button<
�
Fit Mode: the way of files fit with the Play Window.
�
Action (Action effect), Times (ac
acttion time
me)): the display effect of the pictures when
> can replace the
Word / Excel documents.
enter the scene, as well as the duration of the process.
�
Animation, Sp
Speeed (animated time): the animation effect when the text enters into
the scene after the stop, and the time of text to stay in the scene.
�
nce effect
nce time): the animation effect of text
Clear (Cleara
ran
ct)), Times (the cleara
aran
out of the scene, and the time out of the scene.
�
Invert Color:
invert the background color and text color, such as change fonts color
from white to black.
29
D Manag
LE
LED
ageer 2010
Chap
haptter Six: Video Display
6.1 New Mu
Mulltimedia Wind
ndoow
Click the button<
> for a new multimedia window
6.2 Set Mu
Mulltimedia Wind
ndoow
Set multimedia window properties (see 3.4.5 Step five: multi-media window property).
ng files
6.3 Open playi
yin
Click the button <
>, select < Material file>→<Video File>, or right-click <Multimedia
window>→< Material File>→<Video File>, shown as Fig. 6-1.
Fig. 6-1
30
D Manag
LE
LED
ageer 2010
6.4 Set proper
ertty of Video files
The setting interface of video files shown as Fig. 6-2
Fig. 6-2
�
Name: The program's name, it will appear in the left directory editor column, shown
as on the left menu bar of Fig. 6-2.
�
File Path: shows the directory where video files. Click the button<
> can replace
the video.
�
me, End Fra
me: Users can select video from the first few frames to start or
Start Fra
ram
ram
end playing, which convenient for end user to remove the video they do not want to
play.
�
�
�
Play Rate: The play speed of the video episodes.
Volume: can adjust the volume of video, ranging from 0 to 100
Frame by frame: to play the video frame by frame to avoid the frame loss
phenomenon of some low-profile computer, but no audio during play.
31
D Manag
LE
LED
ageer 2010
n: Table Display
Chap
haptter Seve
even
There are two ways for table display, one is to add custom table to display, the other is to edit
table file in Word or Excel documents.
7.1 New Mu
Mulltimedia Wind
ndoow
Click the button<
> for a new multimedia window
7.2 Set Mu
Mulltimedia Wind
ndoow
Set multimedia window properties (see 3.4.5 Step five: multi-media window property)
7.3 Insert & Edit table
Click the button <
> and select <Custom Table>, or right-click <Multimedia Window> and
select <Custom Table>, then <Table Editor > interface pop up as Fig. 7-1shows.
32
D Manag
LE
LED
ageer 2010
Fig. 7-1
Too
oollbar
�
The button <Grid Color
>:used to set the color of table line
�
The button <Back Color
>:used to set the color of background
�
The button < merge (Merged Table)
�
The button <Paste
�
>, <Copy
>:used to merge the table
>,<Cut
>
ut features: font, size, color, background color, style,
Common text layo
you
alignment.
�
To right-click the table area have the features of <Merge>, <Cancel
Merge >, <Insert row>, <Insert column>, <Delete Row>, <Delete
Column>, etc.
33
D Manag
LE
LED
ageer 2010
Set table property
Set table property in the editing area of software as shown in the Fig. 7-2.
Fig. 7-2
�
Name: The program's name, it will appear in the left directory editor column, shown
as on the left menu bar of Fig. 7-2.
�
Edit:
�
�
Fit mode:
Click the button <edit> and above <Table editing interface> pop up.
the way of files fit with the Play Window
Action (Action effect), Times (ac
acttion time
me)): the display effect of the table when enter
the scene, as well as the duration of the process.
�
Animation, Sp
Speeed (animated time): the animation effect when the table enters into
the scene after the stop, and the time of table to stay in the scene.
�
nce effect
nce time): the animation effect of table
Clear (Cleara
ran
ct)), Times (the cleara
aran
out of the scene, and the time out of the scene.
�
Invert Color:
invert the background color and text color, such as change color from
white to black.
�
Lock rows, lock columns: Locking rows or column of table.
34
D Manag
LE
LED
ageer 2010
�
Merge//Cancel mer
ergge
Select the <Cell> you want to merge, then right-click it and select<Merge Table> as Fig. 7-3
shows.
Fig. 7-3
If want to cancel the merge, select the < cell> and right-click it, then select < Cancel Merge>
as Fig. 7-4 shows.
Fig. 7-4
35
D Manag
LE
LED
ageer 2010
b Display
Chap
haptter Eigh
ghtt: We
Web
8.1 New Mu
Mulltimedia Wind
ndoow
Click the button<
> for a new multimedia window
8.2 Set Mu
Mulltimedia Wind
ndoow
Set multimedia window properties (see 3.4.5 Step five: multi-media window property)
8.3 Open play files
Click the button <
> and select<Web display>, or right-click <Multimedia Window> and
select < Web display >, then <Web Editing interface> pop up as Fig. 8-1shows.
Fig. 8-1
Key in what web address you want in the edit box and click OK, then multi -media window
displays the address of the website. It is noteworthy that this software can only display
simple pages.
36
D Manag
LE
LED
ageer 2010
8.4 Set Web proper
ertty
Set web property in the editing area of software as shown in the Fig. 8-2.
Fig. 8-2
�
Name: The program's name, it will appear in the left directory editor column,
shown as on the left menu bar of Fig. 8-3.
�
File Path: shows the directory where current web is. Click the button<
> for
local save.
�
Cut top, Cut bott
ttoom, Cut left, Cut right: Used to adjust the web’s display
location.
�
Play Time: The web’s stop time in the multimedia window.
37
D Manag
LE
LED
ageer 2010
se Display
Chapte
terr Nine: Databa
bas
9.1New Multimedia Window
Click the button<
> for a new multimedia window
9.2 Set Mu
Mulltimedia Wind
ndoow
Set multimedia window properties (see 3.4.5 Step five: multi-media window property)
ss Database
9.3 New Acce
cess
New Access database
9.3.1
9.3.1N
Click the button <
> and select<Database >,
or right-click <Multimedia Window> and
select <Database>, then <Database Editing
interface> pop up as Fig. 9-1shows.
Fig. 9-1
In the pop-up Database window, select a
well-established database file, as shown in Fig. 9-2
38
D Manag
LE
LED
ageer 2010
Fig. 9-2
The control window after increasing the database shows as Fig. 9-3,
Fig. 9-3
The above table is a database list, you can use the button <Delete
following table is a list of the database table.
39
> to remove it, and the
D Manag
LE
LED
ageer 2010
9.3.2 New Access Data
Fig. 9-4
Set the data property
�
Name: Data table name.
�
Edit: edit the data base from pop-upped Window’s picture viewer.
�
File Path: shows the directory where files. Click the button<
> can replace the
Word / Excel documents.
�
Fit Mode: the way of files fit with the Play Window.
�
Action (Action effect), Times (ac
acttion time
me)): the display effect of the pictures when
enter the scene, as well as the duration of the process.
�
Animation, Sp
Speeed (animated time): the animation effect when the text enters into
the scene after the stop, and the time of text to stay in the scene.
�
nce effect
nce time): the animation effect of text
Clear (Cleara
ran
ct)), Times (the cleara
aran
out of the scene, and the time out of the scene.
Invert Color:
invert the background color and text color, such as change fonts color from
white to black.
9.3.3 Set table proper
ertty
On the left of the table property interface is the name of the Access data table, shown
40
D Manag
LE
LED
ageer 2010
as Fig. 9-5, there are three tables then. Click a table you want to edit on the left of the
interface and edit its property on the right. Note that the edit only change the table displayed
in the software, but does not change the original database file.
=
Fig. 9-5
�
Name: Data table name.
�
Font: Click the Color button to select font color of the table name.
�
Ali
liggnment: select the position of the table’s name flush.
�
SQL: select query data table (if familiar with it, you can customize the database
query).
�
Line height: the height of table rows.
�
Background
und:: Click the Color button to select the background color of the table.
�
Grid lines: click the color button to select the grid line color.
�
Stun
untts: the effect of the text when enter the scene shows
9.3.4 Set column proper
ertty
At the left of the column property interface, the list is shows all the keywords of
database tables, you can click a key word and edit it. Please note that the edit only change
the table displayed in the software, but can not change the original database file.
41
D Manag
LE
LED
ageer 2010
Fig. 9-6
�
�
�
�
�
�
�
�
�
Move up: move up the position of the selected key word and its
column.
Move down: move down the position of the selected key word and its
column.
Name: use to set the column name.
Width: use to set the column width.
Shown: click
, the column will be shown; click
again
, the column will not be shown.
Background: use to set the background color of the column.
Text: use to set the color of text in column, lines can be set
independently by parity
Fonts: use to select fonts.
Alignment: set the mode of text alignment.
9.3.5 Delete Acc
cceess data
Select the table you want to delete in the data table, then click the button< delete
data table toolbar.
> in
Click the button <Preview> to preview the table just added, click the button <OK> to
complete the steps of adding Access data table
42
D Manag
LE
LED
ageer 2010
9.4 New ODBC drive database
To add the ODBC database requires some basic knowledge of database, please look at the
relevant database books, do not be introduced here.
Click the button <New Database
> in Database toolbar; the dialog box < Select
Database > will appear as Fig. 9-3 shows. Then in dialog box, select <ODBC driver
database>, click <OK> and select the data source you want to open in the dialog box <Select
Data Source>.Click button <OK> to open the data source (Fig. 9-7).
If you have not set up a data source, can first click the button <Create>, open the <Create
Data Source wizard> to create a data source.
Table and set are the same as access database (see 9.3).
Fig.9-7
43
D Manag
LE
LED
ageer 2010
Chap
haptter Ten: Time and da
datte
10.1New Mu
Mulltimedia Window
Click the button<
> for a new multimedia window
10.2Set Mu
Mulltimedia Window
Set multimedia window properties (see 3.4.5 Step five: multi-media window property)
10.3 New date/ time
Click the button <
> and select<Time Display> →<Clock>,or right-click <Multimedia
Window> and select <Time Display>→<Clock>, shown as Fig.10-1.
Click the button<
> for a new multimedia window
44
D Manag
LE
LED
ageer 2010
Fig. 10-1
10.4 Set date/ time
You can set the date / time in the software editor, as shown in Fig. 10-2. There are two clock
modes - an analog clock and digital clock. There are the options in the < Display Style > of
<Setting interface>, and the default display in software is analog clock. Detail as below.
Analog Clock:
Setting interface and display of analog clock are as shown in Fig. 10-2.
Fig. 10-2
�
�
�
Time difference: set the time difference compared to local time.
�
Lag
ag: time lag
Name: The name of the program.
d: the time difference ahead.
Lea
ead
For example: the local time is 7:00 pm, Tokyo time is 8:00. If you want to show
the time in Tokyo, simply fill out the time difference of 1 hour, you can choose in
advance, no need to adjust local time
�
Display Style: the clock's display style.
45
D Manag
LE
LED
ageer 2010
�
Text: setting the text appears in the dial, such as: Beijing. Location and font can
be set.
�
Hour tick: Set the marker of hours tick inside dial clockwise, can adjust marker
color, size and shape.
�
Minute Tick: Set the marker of hours tick inside dial clockwise, can adjust
marker color, size.
�
�
�
Hour hand, Minute hand, Sec
ecoond Hand: Set their colors
Date: Set whether to display the date inside the dial and date display location.
k: Set whether to display week inside the dial, and the week display
Wee
eek
position.
Digi
Digittal Clock:
Setting interface and display of analog clock are as shown in Fig. 10-3.
Fig. 10-3
�
�
�
Time difference: set the time difference compared to local time.
�
Lag
ag: time lag
Name: The name of the program.
d: the time difference ahead.
Lea
ead
For example: the local time is 7:00 pm, Tokyo time is 8:00. If you want to show
the time in Tokyo, simply fill out the time difference of 1 hour, you can choose in
advance, no need to adjust local time
46
D Manag
LE
LED
ageer 2010
�
�
Display style: the clock's display style.
Text: setting the text appears in the dial, such as: Beijing. Location and font can
be set.
�
�
12 hours / 24 hours: the time format is set to display 12 hour or 24 hour clock.
�
�
Single / mult
ne: the time, date, etc is displayed in a line or multiple-line way.
ltii-li
lin
2 digit year / 4 digit yea
earrs: set the display format is two digit years or four
digits.
Year
arss/Day/Minute/Sec
ecoond
nd:: Set the year, month, day, hour, minute, second,
week, Chinese New Year, Lunar New Year date.
�
�
Date / time / week / Lun
unaar: set display fonts, font, size, color
Unified:
As unified way to set the fonts, font, size, color in the clock interface
47
D Manag
LE
LED
ageer 2010
n: Progr
am
Chap
haptter Eleve
even
rogra
11.1 New Mu
Mulltimedia Window
Click the button<
> for a new multimedia window
11.2 Set Mu
Mulltimedia Window
Set multimedia window properties (see 3.4.5 Step five: multi-media window property)
11.3 New Ext
xteernal program
Click the button <
> and select<External Program Window>, or right-click <Multimedia
Window> and select <External Program Window>, then the dialog box popup as Fig.
11-1shows. Select what program you want to open.
48
D Manag
LE
LED
ageer 2010
Fig. 11-1
Sometimes the application program will have several windows; software will list all the
windows to the window menu. For example, in this case, select the calculator application
program carried with the Windows system, this program has two windows: Calculator
window and CalcMsgPumpWnd window, as shown in Fig. 11-2. Some of these windows
are not used to display, while others cannot display it, so you must correctly select the
window to display in the window list.
49
D Manag
LE
LED
ageer 2010
Fig. 11-2
ow
11.4 Set Ext
xteernal Program Wind
ndo
The setting interface of external program is shown as Fig.11-2.
� Name: The program's name, it will appear in the left directory editor column,
shown as on the left menu bar of Fig. 11-2.
�
File Path: shows the directory where the program is in the local computer. Click
the button<
�
> to select other application programs.
Cut Top, C ut Bottom, Cut Left, Cut Right: Used to adjust the
application program’s display location.
� Play time: The program’s stop time in the multimedia window.
� Select Play form: Software has listed program windows related to this
external application program, so the users need to correctly select the desired
display window.
50
D Manag
LE
LED
ageer 2010
er Display
Chap
haptter Twelve: Tim
ime
12.1 New Multimedia Window
Click the button<
> for a new multimedia window
12.2 Set Multimedia Window
Set multimedia window properties (see 3.4.5 Step five: multi-media window property)
12.3 New timer Display
Click the button <
> and select<Time Display> → <Timer> or right-click <Multimedia
Window> and select<Time Display>→<Timer>, as Fig. 11-1 shows.
Fig. 12-1
51
D Manag
LE
LED
ageer 2010
12.4 Set Timer
The setting interface of timer is shown as Fig. 12-2.
Fig. 12-2
�
Name: The name of the program.
�
Fixed text: the fixed text shown in the time display box, such as "Welcome Mr.
Johnson"
�
�
�
�
�
Arr
rriival date: Set arrival date.
Arr
rriival time: Set the time of arrival.
Days / Hours / Minute / Second
nd:: Set the time amount need to show or hide.
ne: Set single or multi-line display.
Multi-li
lin
Coun
unttdown: the countdown or set time being.
52
D Manag
LE
LED
ageer 2010
n: Ins
aging
Chap
haptter Thirtee
een:
nsttant Mess
essa
It is used to insert the instant messaging temporarily and urgently, when the
screen is played.
ng
13.1 New instant mess
ssaagi
gin
Click the button <
> and select <Instant messaging>, or right-click <Multimedia
window>→<Instant messaging>, as Fig. 13-1 shows.
Note: the instant messaging is universal, not a proprietary for some multi-media, and
therefore only one can be created.
Fig.13-1
53
D Manag
LE
LED
ageer 2010
ng
13.2 Set instant mess
ssaagi
gin
The setting interface of instant messaging is shown as Fig.13-2.
Fig. 13-2
�
Name: The program's name, it will appear in the left directory editor column, shown
as on the left menu bar of Fig. 13-2.
�
Action (Action effect), Times (ac
acttion time
me)): the effect of the text when enter the
scene shows, as well as the duration of the process.
�
Animation, Sp
Speeed (animated time): the animation effect when the text enters into the
scene after the stop, and the time of text to stay in the scene.
�
nce effect
nce time): the animation effect of text out
Clear (Cleara
ran
ct)), Times (the cleara
aran
of the scene, and the time out of the scene.
�
�
Border Style, Border Width: the outline effect of text, and the width of the effect.
Texture Mov
oviie, Tex
extture Sp
Speeed, and Texture Style: the texture animation effect,
speed and styles of text.
�
�
Text Mask: This feature is to make text transparent, while the background opaque.
kgroun
d animations), Play (Play Coun
Back Anime (Bac
ack
und
untts): Text-background
animation supports AVI format video and video play times.
54
D Manag
LE
LED
ageer 2010
�
Plays (Set the font)
t):: Set text attributes, including fonts, size, word width, spacing, and
color.
Note: The text color and texture animation are mutually exclusive. Set the text color,
texture animation need to set the <no mixing>, when setting text color, software
automatically set texture animation to no mixing
13.3 Play instant mess
ssaaging
Instant messaging is generally being played during inserted into other programs. When play,
right-click the <Control Strip> and select <Play Instant Messaging>, as Fig. 13-3 shows.
Fig. 13-3
When the interface <Instant Messaging Insertion> as Fig. 13-4 shows, select which screen to
play the instant messaging, key in message and click the button <Play>. Then the screen will
play this inserted instant messaging.
Fig. 13-4
55
D Manag
LE
LED
ageer 2010
urtee
n: Video input Display
Chap
haptter Fo
Fou
een:
External video input display is mainly used to display the external video accessed to, such as
the camera.
14.1 New Multimedia Window
In order to ensure the external video device work in normal, please make sure the computer
is connected to an external video device and installed the drivers.
Click the button<
> for a new multimedia window
14.2 Set Multimedia Window
Set multimedia window properties (see 3.4.5 Step five: multi-media window property)
er
nal video
14.3 New ext
xter
ern
Click the button <
> and select<External Video> → <External Video Device>,or
right-click <Multimedia Window> and select<External Video>→<External Video Device>, as
Fig. 14-1 shows.
Fig. 14-1
56
D Manag
LE
LED
ageer 2010
Click【Settings】→“Video Input Settings”→ “Video Source Settings”, as
Fig. 14-2 shows. The “video source settings” interface pops up.
图 14-2
Select the “radio” option in the “video source settings” interface, click the
“application” button, as Fig. 14-3 shows.
57
D Manag
LE
LED
ageer 2010
图 14-3
At this time there is no TV signal in multimedia window, click the "TV Tuner"
button, as Fig. 14-4 shows.
58
D Manag
LE
LED
ageer 2010
图 14-4
Select "Cable TV Signal" or "Antenna TV Signal" in the "parameters" interface,
then you can select the channel to play television programs.
59
D Manag
LE
LED
ageer 2010
图 14-5
60
D Manag
LE
LED
ageer 2010
n: Flas
h Display
Chap
haptter Fiftee
een
ash
This software can play flash files, and moreover can make Flash effect text.
sh effec
15.1Make Fla
lash
ectt text
ec
15.1.1 New FLASH eff
ffec
ectt text
Click <
> and select <Material File>→<Flash Effect Text>, as Fig. 15-1 shows.
Fig. 15-1
15.1.2 Make Flash effec
ectt text
The interface of Flash Effect Text as Fig. 15-2 shows, it includes the features of video clips,
background selection, background effects, text editing, font effects, font interactive, sound
playback. You can edit the Flash effect text upon need. If edit the half, you want to save the
current progress of the work, please click the button <Save> in the lower left corner of
61
D Manag
LE
LED
ageer 2010
interface. It can store your work process as in the format of <. ini> file. When need to
continue to make next, click the button <Add>, load the last stored <. ini> file, will continue
production.
Fig. 15-2
ec
15.1.3 Save Flash eff
ffec
ectt text
When finish making the Flash effect text, click the button <Release> in the right bottom
corner of interface, and then output the SWF format of flash, as Fig. 15-3 shows.
62
D Manag
LE
LED
ageer 2010
Fig. 15-3
15.2 Play Flash
15.2.1 New Multimedi
diaa Window
Cli
licck the butt
ttoon<
ow
> for a ne w multimedia wind
ndo
15.2.2 Set Multimedia Window
Set multimedia window properties (see 3.4.5 Step five: multi-media window property)
New Flash fil
15.2.3
15.2.3N
ilee
Click the button <
> and select<Material Files>→<Flash Files>,or right-click <Multimedia
Window> and select<Material Files>→<Flash Files>, as Fig. 15-4 shows.
63
D Manag
LE
LED
ageer 2010
Fig. 15-4
15.2.4 Set Flash proper
ertty
The setting interface of flash property is shown as Fig. 15-5.
Fig. 15-5
�
Name: The program's name, it will appear in the left directory editor column,
�
File Path: shows the directory where the program is in the local computer. Click
shown as on the left menu bar of Fig. 15-2.
the button<
�
> to replace flash files .
Play Time: The program’s stop time in scene.
64
D Manag
LE
LED
ageer 2010
n: Screen Capture
Chap
haptter Sixtee
een:
Screen capture function is to store the operations in the screen as AVI video
16.1 New multimedia window
Click the button<
> for a new multimedia window
16.2 Set multimedia window
Fig. 16-1
Set multimedia window properties (see 3.4.5 Step five: multi-media window property)
n capture
16.3 New scree
een
Click the button <
> and select<Screen capture>, or right-click <Multimedia Window> and
select<Screen capture>. The dialog box will pop up as Fig. 16-2 shows.
65
D Manag
LE
LED
ageer 2010
Fig. 16-2
n Capture
16.4 Set Scree
een
Select a save path, the <video compression options> pop-up. Upon need, select the
appropriate compression procedures and compression quality, and then click OK as Fig. 16-3
shows. As for general requirements for video recording, we recommend using the default
settings as Fig. 16-4 shows.
Fig. 16-3
66
D Manag
LE
LED
ageer 2010
Fig. 16-4
16.5 Sta
tarrt Recording
The recording interface shows as Fig. 16-5, it includes in sequence the buttons <Record>,
<Pause>, <Stop> and <Capture Rate>. Click the button <
> to start recording. The
software will record automatically the contents of multimedia window and save as AVI
format to the path regulated.
Fig. 16-5
16.6 Play Video
See the details in the < Animation Display> of Chapter Six.
67
D Manag
LE
LED
ageer 2010
ntee
n: Time Display
Chap
haptter Seve
even
teen
17.1 Open time reperto
toiire
Click <Settings> in the menu and select the button <Time Repertoire> as Fig. 17-1, then
start the Dialog box <Scheduled Command Table> as Fig. 17-2.
Fig.17-1
68
D Manag
LE
LED
ageer 2010
Fig.17-2
17.2 New time reper
erttoire
17.2.1 Step One: Open the Dialog Box < Scheduled Command Table >
Click the button <Add> in the < Scheduled Command Table >, the Dialog box < Scheduled
Command > pop up as Fig. 17-3 shows.
69
D Manag
LE
LED
ageer 2010
Fig. 17-3
17.2.2 Step Two: Set < Schedu
dulled Comm
mmaand >
�
Order content: Select the implementation of orders, the default is to display the
option of large-screen contents.
�
�
Screen number: Choose the number of the screen.
Program file: when Directive content is only the Play Grogram, the option will
be valid. Click the button <Select> to select the file.
�
�
�
Execution time: the time set to open orders.
Effective Date: set the date the order takes effective.
Effective weeks: setting the effective date within the week the orders take
effective.
17.2.3 Step Three
ee:: Exit<Time Repertoire>
Click the button <Confirm> to finish adding the orders, as Fig. 17-4 shows.
70
D Manag
LE
LED
ageer 2010
Fig. 17-4
17.3 Edit time order
Select what orders need to edit in the time repertoire, and click the button <Edit> to open the
dialog box <Time order> to edit orders.
17.4 Delete time order
Select what orders need to delete in the time repertoire, and click the button <Delete>; if
need delete all orders, click the button < Delete All>.
71
D Manag
LE
LED
ageer 2010
17.5 Sta
tarrt time order
Click <Start time order table> in the <Time Repertoire>, make it stay in the selected
condition. Otherwise it cancels the time repertoire, as Fig. 17-5 shows.
Fig. 17-5
17.6 Exit
Click the button <Exit> to finish time display.
72
D Manag
LE
LED
ageer 2010
een: Enviro
nment monitor
Chap
haptter Eight
ghte
ron
oriing
Environmental monitoring is that the system monitors environment information around
screen, such as ambient light, temperature, humidity, etc; and according to these
environmental parameters, the system will automatically adjust screen brightness and make
the screen always running in top condition. This function must comply with the
environmental monitor device.
18.1 Open Brightness Control Repertoire
Click the <Setting> in the menu and select <Brightness Control Repertoire> as Fig. 18-1
shows, the interface < Brightness control repertoire > pop up as Fig. 18-2shows.
Fig. 18-1
73
D Manag
LE
LED
ageer 2010
Fig. 18-2
18.2 New brightness control reperto
toiire
Map Relation of the illumination value and brightness of the LED screen in the
Brightness Control Repertoire.
htness control reperto
18.3 Edit brig
igh
toiire
Select what brightness orders needing to edit in the automatic brightness control repertoire,
enter the new illumination value or brightness value, click the button <Update>, a new set of
values will replace the original content.
74
D Manag
LE
LED
ageer 2010
18.4 Delete brightness control repertoire
Select what brightness orders needing to edit in the automatic brightness control repertoire,
click the button <Delete>; or the button<Delete All> to remove all orders needed.
18.5
Resto
torre
default
brightness
control
reperto
toiire
Software has its own default brightness control orders; click the button < Default > can
display the default value of this brightness.
Click the button <Exit> to finish settings.
75
D Manag
LE
LED
ageer 2010
n: Software Sett
Chap
haptter Nine
nettee
een
ttiing
19.1 Set basic proper
ertties of software
Click the <Setting> in the menu and select <Software Settings> as Fig. 19-1
shows; the interface < Software Settings> pops up as Fig. 19-2 shows.
Fig.19-1
76
D Manag
LE
LED
ageer 2010
Fig.19-2
There are following functions to set in the software setting interface: Start automatically
when Windows is running, Software runs automatically play, Auto Play and then minimize
to the system tray icon, Show Mouse Cursor, Play Window Always on Top, Border width,
sequential play upon display screen, timing off.
77
D Manag
LE
LED
ageer 2010
tt
Chap
haptter Twenty: Hardware se
sett
ttiing
Click the <Setting> in the menu and select <Hardware setting> as Fig. 20-1 shows, the
interface < Hardware settings> pop up as Fig. 20-2 shows.
Fig. 20-1
Fig. 20-2
From: load down a LED screen connect file.
Send to Screen: click it to send the LED screen connect file, and immediate take effect, and
the file will lose when power off.
Save to screen: Write the LED screen connect file into the hardware, and take effect when
78
D Manag
LE
LED
ageer 2010
reset the system.
Advance: Use in specific application.
Exit: exit the interface.
79
D Manag
LE
LED
ageer 2010
Chap
haptter Twenty-one: Screen control
htness/Contrast/Color Temper
ature
21.1 Set Brig
igh
era
Click the <Setting> in the menu and select < Brightness/Contrast/Color Temperature> as Fig.
21-1 shows, the interface < Brightness/Contrast/Color Temperature > pop up as Fig. 21-2
shows.
Fig. 21-1
Fig. 21-2
The interface < brightness/contrast/color temperature includes below :
Brightness: Set the screen’s brightness
�
Contra
rasst Ratio: Set the screen’s contrast
�
80
D Manag
LE
LED
ageer 2010
�
�
CCT
CCT((Correlated Color Temperature) :Can be manually set the linear
adjustability of three-color(RGB) contrast
ment of brightness available: If you click this option, open
Automatic adjust
stm
the automatic adjustment of brightness, the system automatically adjusts screen
brightness according to the feedback value of environmental monitoring and the
parameters of automatic brightness control table; otherwise, turn off the
automatic brightness adjustment.
n Locatio
n
21.2 Set Scree
een
ion
Click the <Setting> in the menu and select < Screen Location Settings> as Fig. 21-3 shows;
the interface < Set Screen Area > pops up as Fig. 21-4 shows.
Fig. 21-3
Fig. 21-4
The interface <Set Screen Area> contains following parameters:
Start X:Horizontal starting point
81
D Manag
LE
LED
ageer 2010
Start Y:Vertical Starting Point
Border width: Set the Border width of the display area.
Border Color: Set the color of the display area.
Virtual Display: click it and output control signal of virtual display.
Start up Mouse Drag: click it and you can drag the display area with mouse.
Inner frame of display area: click it and there will be a 1 pixel border in the display area.
Lock Screen Position: click it and display area will follow the screen area. It can be set in
display setting interface, shown as Fig.21-5
Save to display
Fig. 21-5
ee
n
21.3 Close/Freeze Scr
cree
een
Click the <Setting> in the menu and select < Close Screen > as Fig. 21-5 shows.
Fig. 21-5
System will stop outputting the display images, and the screen is close. Re-click will re-start
82
D Manag
LE
LED
ageer 2010
screen, the screen will be open.
Click the <Setting> in the menu and select < Freeze Screen > as Fig. 21-6 shows.
Fig. 21-6
Screen will freeze the current display image. Re-click will defreeze the image. And the
screen will restore to normal.
83
D Manag
LE
LED
ageer 2010
Chap
haptter Twenty two: View Dev
eviice Status
22.1 Open Device Status
Click the <Setting> in the menu and select <Device Status> as Fig. 22-1 shows, the interface
< Device Status > pop up as Fig. 22-2 shows.
Fig. 22-1
84
D Manag
LE
LED
ageer 2010
Fig. 22-2
The area on the left of the top shows the status of the transmitting card, the
area on the right shows the statue of the receiving cards. The area on the
bottom shows some information.
Start Detection: start to detect the statue of receiving cards. When it be
pressed, the button turn to Stop Detection, when you press it, the detecting will
stop.
Clean Content: Reset the counter of the receiving card. The total packages
and wrong packages will be count start of zero.
View Report: Chick it to read the statue report of txt format, shown as Fig.
22-3. Content the statue of the transmitting card and receiving card.
Exit: Exit the interface.
85
D Manag
LE
LED
ageer 2010
Fig. 22-3
86
D Manag
LE
LED
ageer 2010
ee
ment
Chap
haptter Twenty thr
hree
ee:: View env
nviiron
ronm
monitor
oriing
23.1 Open environment monitoring
Click the <Setting> in the menu and select <Environment Monitoring> as Fig. 23-1 shows,
the interface < Environment Monitoring > pop up as Fig. 23-2 shows.
Fig. 23-1
87
D Manag
LE
LED
ageer 2010
Fig. 23-2
23.2 Set Environment monitoring factors
�
Illumination (Illumination value): the system shows the value of the current
environment.
�
Screen brightness: The system displays the current screen brightness.
�
Sensitivity: sensitivity from 0-100. Higher sensitivity, temperature displays shorter test
time.
�
Environment Temperature: The system displays the current environment temperature;
optional temperature value is Celsius or Fahrenheit.
�
Environment Humidity: The system displays the current humidity.
�
Speed (Sampling rate): the faster sampling, the shorter the time of environmental
88
D Manag
LE
LED
ageer 2010
monitoring devices detect.
�
Monitor Setting: Change the measuring range of temperature and humidity (set
measuring range the same with the probes). Double click to change them, shown as
Fig.23-3.
Fig.23-3
89
D Manag
LE
LED
ageer 2010
Chap
haptter Twenty fou
ourr: FAQ
1、
ec
tu
tu
How to set th
thee display eff
ffec
ectt of pic
ictu
turre in pic
ictu
turre?
Fig.24-1
1) Create a program episode
2) Create a multimedia window (window1) in this episode. Adjust the size of
the window, and load a material file.
3) Create another multimedia window (window2) in this episode. Adjust the
size of the window, and load a material file.
4) The window 2 will superimposed on the window 1, this is the display
effect of picture in picture, shown as Fig.24-1.
5) If you want to the window1 superimposed on the window 2, select the
window1 and click the “move on” button, as shown in Fig.24-2.
90
D Manag
LE
LED
ageer 2010
Fig.24-2
2、
How to adju
jusst th
thee wo
worrd or excel file size, making it
suitable for play wi
nd
wind
ndoow.
Fig.24-3
Select the file name in the left part of the interface, and set the file size in
“Fit mode” items in the right of the interface. There are four modes, you
can select the appropriate mode which you need, as shown in Fig.24-3.
3、
How to set the background transparent?
91
D Manag
LE
LED
ageer 2010
Fig.24-4
Select the multimedia window in the left part of the interface, and click the
“transparent” items in the right of the interface, as shown in Fig.24-3.
4、 How to lock the row / column of c ustom table.
Select the custom table in the left part of the interface, you can input the
number of locked row / column in the right of the interface, as shown in
Fig.24-5.
Fig.24-5
d?
5、 How to set the video play spee
eed
Select the video in the left part of the interface, you can adjust the speed
in the right of the interface, as shown in Fig.24-6.
92
D Manag
LE
LED
ageer 2010
Fig.24-6
6、
How to so
sollve the problem of multi wind
ndoow play is not synchronized.
Avoid playing large video files and reduce the number of the play
window.
7、
ds attention when play Word/Exce
What nee
eed
cell document..
The excel file can’t be too large.
8、
ds attention when play the multiple lines
What nee
eed
text
Please don’t directly copy the text from word document to multiple lines
text. Because word document may contain special characters not recognized by
software. You can copy the text from word document to TXT file, then copy
the text form the TXT file to multiple lines text.
9、H
How to lock scre
creeen pos
osiition?
See chapter 21.2 set screen position
n area and play wind
10
10、 Set scree
een
ndoow area.
Set screen area: It shows the area that LED screen display. Click Setting →
Screen Location Setting. Screen area border consist Inner frame border and
External frame border. External frame border only displays on the monitor and
can be set as one to ten pixels width. Inner frame border displays both on the
monitor and LED screen display, has a fixed width of 1 pixel. The color of
them is the same.
Setting screen area: you can set border width and border color and inner border
frame of display area on the Setup Screen Area interface as shown in Fig. 24-7.
93
D Manag
LE
LED
ageer 2010
Fig.24-7
Set inner frame of display area: click Inner frame of display area in Setup
Screen Area interface. It shows in the display area.
Set play window area: click Setting→Software Setting→Border Width,
shown as Fig. 24-8.
Fig.24-8
94
D Manag
LE
LED
ageer 2010
External frame
Inner frame of
of display area
display area
Window
area border
Fig.24-9
11 How to set the stay time of the picture whe n play Image Fil
ilee.
The set interface window of < Image File > shows as Fig. 24-10. Set Clear as Wait, and the
Time(s) you set is the time the picture stay.
Fig. 24-10
Tel: +86-755-28704020 Mobile: +86-13802700271
Web: www.visuallumen.com Email: [email protected]
Online support: Msn: [email protected] Skype: leddisplayme Yahoo: leddisplayme
Add: Dawang Industrial Park, Shiyan, Bao'an District, Shenzhen, Guangdong, China
95