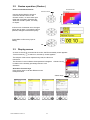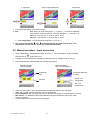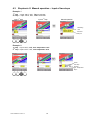
1
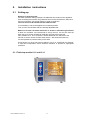
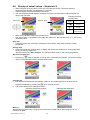
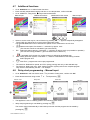
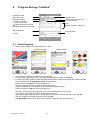
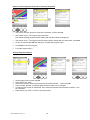
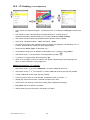
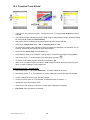
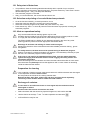
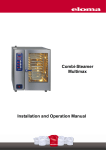
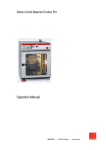
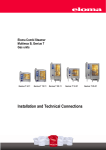
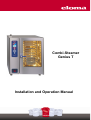
Combi-Steamer
Genius T
Installation and Operation Manual
Installation and Operation Manual
Combi-Steamer Genius T
6-11, 10-11, 20-11, 12-21, 20-21
Table of contents:
1.
2.
3.
4.
5.
6.
7.
Hints on operational safety ................................... 3
Installation instructions ........................................ 4
2.1 Setting-up..................................................... 4
2.1.1 Table top models 6-11 and 10-11 ............ 4
2.1.2 Floor models 20-11, 12-21 and 20-21 ....... 5
2.2 Electrical connection .................................... 6
2.3 Connect water supply................................... 6
2.4 Connect drain............................................... 7
2.5 Exhaust air ................................................... 7
2.6 Extractable shower with automatic return .... 7
Control panel and functional description............... 8
3.1 Control panel Genius 6-11, 10-11, 12-21,
20-11, 20-21................................................. 8
3.2 Genius operation ( Rocker ) ......................... 9
3.3 Display screen.............................................. 9
Start-up in manual operation ................................ 10
4.1 Manual input ................................................ 10
4.2 Manual operation – Input of one step........... 11
4.3 Steptronic ® Manual operation
Input of two steps ......................................... 12
4.4 Steptronic ® Manual operation
Input of several steps ................................... 13
4.5 Display of the actual situation
Steptronic ® ................................................. 13
4.6 Display of actual values – Steptronic ®........ 14
4.7 Additional functions ...................................... 15
4.8 Delay start programming – Manual input ..... 15
Cooking procedures ............................................. 16
Program Storage “Infothek“ .................................. 17
6.1 Save Programs ............................................ 17
6.2 Delete a Program ......................................... 20
6.3 Copy a Program ........................................... 20
Program Operation ............................................... 21
7.1 Select and start a Program .......................... 21
7.2 Select and start a Program from the
Favourite List................................................ 21
7.3 Select and start a programme via
menu group .................................................. 22
7.4 Picto operation ............................................. 22
7.5 Delay start in program operation .................. 23
7.6 Combi cooking ............................................. 24
8
Navigation of interfaces and programme lists....... 25
9.
Active Temp ......................................................... 25
10. Special programs.................................................. 26
10.1 Function BANQUET .................................... 26
10.2. LT-Cooking (Low temperature) .................. 27
10.3 Function Cook & Hold .................................. 28
10.4 Delta-T- Cooking .......................................... 29
10.5 Function HACCP.......................................... 30
10.5.1 Serial Interface
Connecting cable ...................................... 30
10.5.2 Selection and printing
of recorded cooking processes ................. 31
11. End of operation ................................................... 32
12 Autoclean ( Option)............................................. 32
12.1 Delay start of Autoclean ............................ 33
12.2 Selection and printing of recorded
Autoclean protocols................................... 33
12.3 Hints on operational safety........................ 33
13 Service ................................................................. 34
13.1 Week program ............................................. 34
13.2 Function Daytime/Date................................. 34
13.3 Function Start Sreen .................................... 35
13.4 Function Language ...................................... 35
13.5 Unit parameters ........................................... 35
14. Connection to Kitchen control systems (KCS)...... 36
15. Failure indication .................................................. 36
16.Cleaning and maintenance ...................................... 37
17. Valuable information............................................. 39
17.1 Trouble Shooting.......................................... 39
18. Communication ProConnect ↔ Combi steamer... 39
18.1 Start up communication
ProConnect ↔ Combi steamer .................... 39
19. Accessories - Optional Extras ............................ 40
20. Warranty Conditions ............................................. 41
21. Data of the oven ................................................... 42
22. Service notes........................................................ 42
Version 1.7
Article No. 791318 01/2007
Dear customer,
Congratulations – on your purchase of an Eloma Genius combi-steamer.
Please do read these instructions carefully, before starting to work with the Genius combi-steamer.
They contain important information on correct installation and operation.
Functional method of the combi-steamer
The combi-steamer Genius offers every possibility to experience modern professional cooking
technology. Use fresh or convenience products and select for every product the best possible
cooking cabinet climate. With just a light touch you direct the operating rocker Genius any way
you like to determine cooking temperature and humidity levels for any type of food in up to
20 cooking steps, a feature we call Steptronic ®.
Temperatures and humidity levels are displayed in the movable Climatic ® cursor. Every movement
of the Climatic® Cursor generates a change of the cooking parameters, temperature and humidity,
one after the other or simultaneously. The interactive monitor displays all those important points.
This simple and quick settings facilitate your daily work, leaving you more time for whatever you like.
The settings are automatically monitored guaranteeing perfect cooking results. No need to control
constantly temperature and humidity levels.
Temperature settings range from 30 to 300 degrees Celsius and the chamber humidity levels from
0° to 100%. Many functions offer optimum utilisation for steaming, poaching, baking, roasting, grilling,
stewing, blanching, thawing, preserving, regenerating and a lot more.
The Genius will certainly become your reliable partner. Extremely easy to operate, offering
unlimited possibilities.
SPS - The SPS Steam Protection System
Pure innovation when it comes to work safety and ambient atmosphere.
No more steam that escapes when the door is opened upon completion of the program.
1.
Hints on operational safety
Use for intended purpose
The appliance shall only be used for its intended purpose, namely the professional
preparation of food.
Installation
Follow the local regulations of the electricity supply companies and observe the
instructions for the installation of kitchen equipment in accordance with the
actual standard specifications.
Electrical connection must be performed by an approved electrician.
No heat or steam sources may be installed underneath the oven.
In case of an installation next to materials that are sensitive to heat or even might
catch fire, make sure to observe the existing fire protection regulations.
Make sure not to block the air exhaust pipe.
If a water softener is installed, follow the installation and operating instructions for the unit.
Pay attention to connect correctly to hard and soft water.
Operation
Caution : The outer surfaces become hot in operation
The convection steamer shall only be operated
by trained staff
for its intended purpose, as outlined in this operation manual
when there are no defects.
Danger of burning : When opening the oven door hot air and steam escape.
Caution! Hot fluid in container
CAUTION ! When loading containers with liquids or cooking good which becomes liquid during
cooking do not use higher levels than such where you can look into the inserted containers.
If the protecting glass cover of the internal light is damaged or missing, the appliance should
not be started.
Call the after-sales service.
In case of operating trouble, disconnect the convection steamer from the mains,
close water tap and call the after-sales service.
Repair and maintenance work on the unit shall only be performed by
AUTHORIZED PERSONNEL i.e. Eloma or partners.
Do not use a water hose or a high pressure sprayer on outer surfaces.
A water jet may damage parts of the appliance or else get in contact with electric
live parts.
DANGER – personal injury caused by an electric shock.
To avoid accidents the door lock must be removed when dismantling and destroying the
appliance.
Noise level
The emission value of the noise level is less than 70 dB (A).
791318 Genius T Vers. 1.7
3
2.
Installation instructions
2.1
Setting-up
Removal of protecting film:
For better protection during transport, the adhesive film remains on the appliance.
Prior to starting the machine, this protective film must be removed from side, back
and cover surfaces. Use special cleaner to clean to perfection.
The oven must not be started with this adhesive film.
It is mandatory to set-up the appliance in horizontal position.
True up minor unevenness with the vertically adjustable feet.
Make sure to have a minimum clearance of 50 mm to side walls right and left
to allow air circulation. We recommend to set up the unit 50 mm also from the
back wall, it is however possible to install the unit right to the back wall.
Floor models 12-21, 20-11 and 20-21 need at least 500 mm clearance to the
left side, to ensure access for after-sales service. We recommend 800 mm,
it is then possible to park the trolley on this side.
Avoid having any other heat sources behind, next to or underneath the steamer.
If case this is impossible, ensure sufficient clearance or provide for appropriate
protection.
2.1.1 Table top models 6-11 and 10-11
791318 Genius T Vers. 1.7
4
2.1.2 Floor models 20-11, 12-21 and 20-21
Floor models must invariably be operated with the trolley, ( also when preheating and
cleaning).
For maintenance and easy access to the unit for after-sales operations
use flexible water and electric connections.
The appliance should be removable approximately 1 meter from its standard
position.
Hints for setting up units with trolley (roll-in-pan-rack)
The floor underneath the appliance must be plane to ensure a smooth driving-in of
the trolley (roll-in pan-rack).
In case of a sloping floor underneath the unit, the trolley will be placed in an
oblique position, which might influence its proper functioning.
Minor unevenness can be trued up using spacers at the wheel fastenings. Major
unevenness must be adjusted on site.
There should be a minimum distance of 15 +/- 5 mm between the trolley and the
top edge of the oven cavity bottom.
The trolley must never touch the door gasket and must be level with the
appliance.
Door gasket
Trolley
15 ± 5mm
MAXIMUM CHARGE TROLLEY
791318 Genius T Vers. 1.7
Spacer
(center position)
5
20-11 150 kg
12-21 150 kg
20-21 200 kg
2.2
Electrical connection
Pay attention to the data on the type plate for the electrical connections.
The movable power supply lead must be a rubber-insulated flexible cable,
type H 07 RN-F complying with VDE standards.
In case a plug is mounted, the plug device must be accessible after settingup.
Observe the sense of rotation of the ventilator when connecting to the mains.
Sense of rotation with humidity level 100% always RIGHT (in one chamber ovens) !
In two-chamber ovens rotation in the lower chamber is then automatically inverse.
Next to the appliance, an all-pole circuit breaker, contact opening at least 3 mm,
has to be provided for on site.
We recommend to install an earth-leakage circuit breaker.
The unit must be incorporated
into the potential equalisation
system (ground) according to
VDE. Terminal under
indication plate.
2.3
Connect water supply
Install on-site an easily accessible water shut-off-valve.
Use a pressure-resistant, flexible hose 1/2" DVGW approved (DVGW = German technical
scientific association on gas and water) .
Check all connections for leaks. Supply hoses must not be bent or pressed flat.
The concentration of chloride and sulfate ions in the supplied water should be lower
than 100 mg/l
Index of pH
6,5 - 9,5
Minimum water pressure :
200 kPa = 2 bar
Maximum water pressure :
600 kPa = 6 bar
In case of differing water pressure values a pressure-regulator must be installed.
It is recommended to insert a mudguard.
Referential values
All appliances are equipped as standard with 2 water-connections for soft water
and hard water.
Both connections are under the indication plate and both must be connected.
Soft water connection – steam production
Water temperature max. 50°C/
120 °F
Hard water connection
Cooling down of condensed water, shower
Water must be cold
We recommend to install a water softener for the steam production if the water
hardness exceeds 6°dH (1°dH = 10 mg CaO/litre). Then lime (calcareous) deposits inside
the oven cavity are avoided. Water temperature must not exceed 50°C/120° F.
Normal hard and cold water must be used to cool down the water of condensation.
Please observe installation and operation instructions for the water softener.
Do not use any connections of galvanised steel or any corrodible material between
water softener and the unit. Danger of Rusting !
791318 Genius T Vers. 1.7
6
2.4
Connect drain
In accordance with DVGW instructions (DVGW = German technical scientific association on
gas and water) the appliance is intrinsically safe and can be connected directly to the sewer
without any further measures.
Diameter of the drain pipe : 50 mm
appliance
direct connection
•
Material water drain hose
HT-Pipe PA-I 1818, DIN 19560, steam temperature- and flame-resistant.
• It is not permissible to taper the cross-section of the drain duct.
To fill the siphon, give about 3 liters of clear water into the oven prior to any first start.
2.5
Exhaust air
A built-in cooling device cools down the water of condensation to a great extent, then it
runs down the drain. It is not imperative to install the appliance under a ventilation hood.
In case, however, such a ventilation hood is used, its design and power ranges should comply
with the appropriate regulations .
2.6
Extractable shower with automatic return
If the shower is extracted, it remains locked in different positions.
To roll back the hose, just extract it completely and let it return automatically.
Water runs only in locked position of the hose.
791318 Genius T Vers. 1.7
7
3.
3.1
Control panel and functional description
Control panel Genius 6-11, 10-11, 12-21, 20-11, 20-21
Actual time
Operation system
Climatic Cursor
Program step
Climatic Monitor
Time
Core temperature
Info line
Menu selection
Sensor keys
LED START
Master key
ON/OFF
Touch key START/STOP
LED STOP
OK to confirm
Genius
Operating rocker
791318 Genius T Vers. 1.7
Genius direction arrows
8
3.2
Genius operation ( Rocker )
How to work with the Genius
Climatic Monitor
Direction arrows
Temperature
Use the Genius direction arrows to
move the Climatic cursor on the
Climatic monitor, to reach other input
fields and to set data, characters etc.
Whenever a field is yellow, it is ready
for inputs.
Humidity
A short touch of whatever arrow changes
inputs step by step. If you keep the arrow
pressed, changes are executed quickly.
Press OK to confirm every input or
setting.
OK
3.3
Display screen
As soon as the unit is connected to the mains, the Eloma standby screen appears
Touch master key
to switch on, the start-up screen appears.
The red part of the screen represents dry heat, the blue one
moist heat
The Climatic® Cursor indicates the temperature in degrees
in relation to the humidity percentage. Move it in all
directions.
Climatic Cursor
Allocation of sensor keys
Press sensor keys to call the different menus.
Examples below
Sensor keys
791318 Genius T Vers. 1.7
9
4.
Start-up in manual operation
Prior to start : Open water tap.
Press key ON/OFF, a start-up screen appears. The appliance is ready for work.
LED is lit.
Eloma Standby-screen
Start-up screen
•
As standard the operation mode indication displays manual input as first start-up screen.
•
Press sensor key *service* to select your desired start-up screen. Three possibilities are available:
Manual input – Favourites – Program list – Cooking procedure – Menu group.
•
The basic setting in the Climatic Cursor after ON/OFF
temperature T = 150° C and humidity H = 50%.
•
In lines *time* and *core temperature* only the symbols are displayed.
is
4.1 Manual input
•
Use the Genius to select a cooking procedure by adjusting the desired temperature and humidity
level. The Climatic cursor moves accordingly. Confirm with OK
•
When moving the Climatic cursor, the „Info line“ indicates the following cooking procedures:
Indication
Cooking procedure
Defrosting
Poaching
Stewing
Steaming
Regenerating
Baking
Roasting
Grilling
Gratinating
•
Input
Temperature range in
Humidity range
°C
/
°F
in %
30 – 45
86 – 113
50 - 100
60 – 90
140 – 194
90 - 100
90 – 100 194 – 212
80 – 100
95 – 130 203 – 266
60 - 100
90 – 160 194 – 320
25 - 75
120 – 220 248 – 428
0 – 30
150 – 230 302 – 446
0 – 50
180 – 275 356 – 527
0 – 10
220 – 300 428 – 572
0 – 5
After selection of a cooking procedure and OK, you must set – time – or core temperature.
791318 Genius T Vers. 1.7
10
1. Input time
•
2. Input core temperature
3.Input lines
Four-figure time display from 00:00 to 23:59.
Basic setting is 00:00 move arrow
to get to ∞ = continuous operation.
Time setting is 23:59 move arrow and you get again ∞ = continuous op.
Setting is ∞ move arrow
and you get to 23:59
Setting is ∞ move arrow
and you get to 00:00
1. Time:
1. Core Temperature Core temperature range from 0° C to 99° C.
3. Use the direction arrows
and
to change between the input fields for time, core
temperature and the Climatic Cursor for Temperature/Humidity.
4.2 Manual operation – Input of one step
•
Input of parameters, “temperature/humidity“ and “time“ or “core temperature“ being completed,
start the Genius
LED START is lit.
•
If desired, you can activate the preheating by pressing the key “PreHeat Cool on” see § 7.
•
The Climatic Monitor indicates data of the advancing program.
Manual operation
with time setting
Manual operation
with core temperature
Remaining
time
Set temperature and
humidity
Actual core
temperature
Set time
Set core
temperature
•
•
•
•
•
There are yellow bars in the in the input fields indicating the advance of the program.
Time : Bar is getting shorter to the left, time is running down.
Core temperature : Bar is getting longer to the right until the desired core temperature is reached.
Man. Steam : An additional manual humidification is always possible as long the key “Man.
Steam” is pressed.
A sound signal announces the end of the program .
791318 Genius T Vers. 1.7
11
4.3
Steptronic ® Manual operation – Input of two steps
Example 1
1st step → Input 190°C, 50%, Time 10 minutes
2nd step → Input 220°C, 20%, Time 15 minutes
Input 1st step
Input 2nd step
Manual operation
Remaining
time
Total time
Step 1+2
Example 2
1st step → Input 140°C, 50%, Core temperature 72°C
2nd step→ Input 170°C, 10%, core temperature 78°C
Actual
core temp.
Set final
core temperature
step 2
791318 Genius T Vers. 1.7
12
4.4
•
•
•
•
•
•
Steptronic ® Manual operation – Input of several steps
Steptronic ® allows to combine several steps, also time and core temperature combined.
Input of the first cooking step as described in § 4.1.
To proceed to a second step, press touch key “Next step“ and repeat input as described before.
Continue until all desired steps are entered and press START.
The actual situation of the program is displayed step by step.
Up to 20 cooking steps are possible.
Step 1
•
•
•
•
Step 3 etc.
Manual operation
The four first steps are indicated, yellow bars with step number, further steps to a program are
displayed once the first four steps have been executed.
To control previous steps, just touch briefly, 1 second, “Menu/back“.
If you keep this touch pressed too long, 3 seconds, you return to the start-up screen and entered,
not stored data is lost.
4.5
•
•
Step 2
Display of the actual situation – Steptronic ®
Example :
A program consisting of several steps was entered, the second step including core temperature
control and the third one a time setting.
In this case, the remaining cooking time is only displayed while the third step is running down, the
core temperature being reached.
1. Step → Input: Time 10 min
2. Step → Input: CT 72°C
3. Step → Input: Time 10 min
Actual situation step 1
791318 Genius T Vers. 1.7
Actual situation step 2.
13
Actual situation step 3.
4.6
•
•
•
Display of actual values – Steptronic ®
While a program is running down, touch one of the direction arrows. The actual values for
temperature and humidity are displayed for 5 seconds.
Then the display returns to the desired set values.
The core temperature field displays constantly the actual core temperature and the desired one
down in the right field.
Indication of actual
humidity level
Actual value
Desired value
Display in
Cursor
Interpretation
Humidity level
too low
Humidity level
too high
=
Humidity level
within tolerance
•
•
Basis of the indication is the actual humidity level.
The actual value is considered to be within the tolerance if the humidity level is +/- 10% of the
desired/set value.
Next step
•
Press the function key "Next step" to display the next cooking steps while running a cooking
programme.
Change step
•
Press the function key "Change step" to display and change the settings for a cooking step while
running a cooking programme.
With the function key "Save changes", the changes will be active for the running programme.
Abnormal program end
•
Pressing key
while a program is running down, terminates the program. The monitor display
returns to the initial input screen. All data remain stored.
Program end
• The appliances switches off automatically, LED is lit, the sound signal of 30 seconds can be
•
or by opening the door.
stopped immediately by pressing key
The screen returns to the initial input screen.
Indication while buzzer sounds
Indication after Start/Stop
Memory :
After abnormal program stop or program end, data remain stored and the same program can be
started once again.
791318 Genius T Vers. 1.7
14
4.7
•
•
•
Additional functions
Go to “Additional >>“ to select further functions.
Enter manually temperature/humidity and time or core temperature, confirm with OK.
and proceed as described
Go to “Additional“, using arrow
Manual input
Additional functions
Additional function active
Manual Input
Info line
•
•
Select or, as the case may be, cancel function by pressing OK, “ “ appears respectively disappears.
Touch briefly key “Menu back“ to return to the initial input screen.
The selected additional function “Reduced fan speed“ is now mentioned in the Info Line.
•
Reduced fan speed, if activated “ ”, reduction by approx. 50%
(This function cannot be activated in gas units Genius)
Reduced heating capacity, if activated “ ”, reduction by approx. 50% (not possible in operation)
(This function is only possible in gas units Genius 20-11 and 20-21)
•
E/2
•
•
if activated, the first step of a cooking program is defined as preheating step.
SPS Safety protection system, if activated “ ”, steam is exhausted from the cooking chamber
before program end.
•
Start Time , program start can be pre-programmed.
•
•
The functions “Reduced fan speed“ and “E/2“ (energy saving) refer only to the selected step.
The functions “Delay start“ and “SPS“ (safety protection system) refer to the complete program.
They are then automatically set with
for all steps.
4.8
Delay start programming – Manual input
•
Go to “Additional“ and use Genius arrow
•
Enter desired start time using arrows
Manual input
or
to proceed to “Delay start“, confirm with OK.
and press key
Delay start
Enter start
•
The appliance is now in a waiting position and cannot be used unless –
•
delay start programming is cancelled by pressing key
Indication
The monitor returns automatically to the initial input screen and the program can be started by
pressing key
791318 Genius T Vers. 1.7
.
15
5.
Cooking procedures
For a shortcut to the temperature/moisture constellations necessary for the desired cooking procedure,
you can use the screen "Selection cooking procedures" to select preset typical temperature/humidity
constellations by selecting a cooking procedure.
In "Selection cooking procedures", press the arrow keys to select the desired cooking procedure. Once you
selected and entered your choice, the interface for the cooking procedure definition opens, which you already
know from manual input.
The Climatic Cursor on the Climatic Monitor shows the predefined values for temperature and humidity.
Proceed with the other settings as usual.
predefined values for
temperature/humidity
Symbol/Display
Gratinating
Values
Temperature/Humidity
230/0
Roasting
130/30
Steaming
99/100
Grilling
180/0
Regenerating
Stewing
120/35
95/80
Baking
160/10
Defrosting
30/60
Poaching
85/100
Cooking procedure
The Climatic Cursor on the Climatic Monitor shows the predefined values for temperature and moisture.
•
•
After accepting changing the predefined parameters "temp/moisture", other cooking steps can be
entered, as described in Sec. 4.1.
You can save and assign the cooking programmes of a menu group, as described in Sec. 6.1.
791318 Genius T Vers. 1.7
16
6.
Program Storage “Infothek“
Program number
Input field name
Input field number
<< Cursor to the left
>> Cursor to the right
x Delete characters to the left
⌧ Delete characters to the right
Program name
Confirm Program name / No.
Symbol Favourite
Field :
Letters, numbers, characters
Name proposals
Favourite mark
Info line
6.1
•
Save Programs
Enter whatever program and touch sensor key “Save“
Program Name
Program Number
•
•
The programme number is preset, but can be changed.
For new cooking programmes, the next unassigned programme number is suggested.
For writing programme names, select the letters/number with the Genius arrow keys and confirm with OK.
The maximum length of programme names is 22 characters.
Press the sensor key Save to save the programme.
The menu interface with the suggested menu groups opens.
Assign programmes to a menu group or save without a programme group.
Press the sensor key Save to save the programme.
With Start, you can start the programme, or you can go back to the start-up screen.
If you want to enter more information, follow these instructions:
After entering the programme name, use the Genius arrow keys to select Enter and confirm with OK.
You can highlight the programme as a favourite with OK.
With Programme Info, you can enter more information about the cooking programme.
791318 Genius T Vers. 1.7
17
Select and edit a program name out of the name proposals
•
Use Genius direction arrows to bring up the first letter, confirm with OK.
•
Use Genius arrow
to bring up name proposals.
Two already existing program names starting with the same letter are displayed.
•
Use Genius arrow
•
Confirm a proposal with OK and change or complete the program name
•
Go to Enter to save the program.
•
For further inputs see § 5.
to bring up further program names, starting with the same letter, if available.
Change Program numbers
•
•
•
•
•
•
Select program and confirm with OK .
Press sensor key “Save“
Use Genius direction arrows and proceed to input field “Number“ , confirm with OK
The input field “Number“ is marked yellow and the number can be changed.
In case the new number is marked red, this number has already been allocated, however, it can
be overwritten.
Press sensor key “Save“ to return to the input screen.
791318 Genius T Vers. 1.7
18
Select a program to be a Favourite
Symbol Favourite
•
We recommend to mark programs that are frequently used to be Favourites.
It is then possible to create the list of favourites, facilitating a quick search.
•
Two possibilities to mark a Favourite:
1. Set the cursor to the symbol favourite ☺ and confirm with OK
2. Confirm program name with enter, the cursor goes to “Favourite“.
Confirm with OK, it is marked „ “.
•
•
•
The Favourite list is restricted to 20 programs.
It is followed by the last ten programs executed.
If you want to mark more than 20 programs to be a “Favourite“ , the info line indicates
“Favourites full“, sound signal.
Program Info
•
Use Genius arrow and go to “Program Info“, confirm with OK, the input field appears and it is now
possible to enter individual, additional information to this program – see § 5
791318 Genius T Vers. 1.7
19
6.2
Delete a Program
•
Bring up the program from the program list and confirm with OK .
•
•
Set the time or the core temperature to 00:00 “ and press sensor key “Delete program“.
The complete program is deleted.
6.3
Copy a Program
•
•
Saved programs can be overwritten or copied.
Bring up the program and confirm with OK .
•
•
•
Press sensor key “Save“
See § 5 and write the new program name and/or number, confirm with “Enter“ .
Press sensor key “Save“, the program is copied or overwritten. Thus the same program can be saved
several times with different names.
791318 Genius T Vers. 1.7
20
7.
Program Operation
7.1
Select and start a Program from the Program List
•
Touch sensor key “Program List“ to bring up all saved programs, maximum 300
•
Favourites are marked with the smiley ☺ .
Display 1st step
Select a program
Program indication
•
•
•
Use Genius direction arrows
and
to select a program. .
Press Start/Stop to start this program immediately.
Press OK to have it displayed for information and continue with Start /Stop .
7.2
•
•
•
Select and start a Program from the Favourite List
Press sensor key “Favourites“ to bring up the list and use the Genius arrows
favourite.
Press Start/Stop to start this program immediately.
Press OK to have it displayed for information and continue with Start /Stop.
791318 Genius T Vers. 1.7
21
or
to select a
7.3
Select and start a programme via menu group
With the sensor keys Programme List, Favourites and Menu Group, you can open the display
Menu Group.
Use the arrow keys to select the desired menu group, the middle is selected with the OK key.
With the arrow keys
and
you can select the programmes saved in the respective menu
group.
Press Start/Stop to start it right away or display it by pressing OK
and then start it with Start/Stop.
Menu group
Display 1st step
Menu-group 5
7.4
Picto operation
If only one programme belongs to a menu group, the programme opens directly if you select that
menu group.
If you select Menu Group as your start-up display and have only 1 programme in each of the
menu groups, you can run the so-called picto operation:
Turn on the appliance, select Menu Group and start the respective programme.
791318 Genius T Vers. 1.7
22
7.5
Delay start in program operation
•
The start of a program can be delayed for up to 24 hours.
•
Select a program from whatever list and confirm with OK.
•
Press sensor key “Start time“.
•
Use the Genius arrows
or
Program selection
to set the start time and start pressing
Set Start time
Select “Start time“
•
To stop this function, press
•
The start screen displaying the program reappears. By pressing
started immediately.
791318 Genius T Vers. 1.7
key.
key.
23
key, the program can be
7.6
Combi cooking
Combi cooking can be selected manually or while running a programme.
Different cooking programmes can be started at different times.
The sensor key Combi Cooking is available:
1. during cooking
2. if you have pressed Preheating, after the Active Temp procedure.
3. in a multi-step programme during the Active Temp procedure of the last cooking step.
•
•
•
•
•
Manual selection as described in Sec. 4.1., select a cooking programme from the programme
list or select a cooking procedure.
Start the programme with START/STOP
With the sensor key Combi Cooking, other cooking programmes can be selected from the
programme list with a cooking step and time conditions. Start them with OK.
The remaining time of the started programmes is displayed.
If you started cooking procedure with KT temperature originally, that procedure's core time
and the remaining times of the other started programmes are displayed.
Display 1
Display 2
Display 3
Display 4
Display 5
•
If one hourglass is finished, display 0:00, it is marked with an
acoustic signal, and the line is highlighted in colour.
•
Open the door of the combi steamer, take out the cooked items.
•
•
The display of the expired programme vanishes.
The hourglass jumps to the cooking programme with the nextshortest time left.
•
With Start/Stop, you can interrupt the combi cooking operation; the
display changes to manual, see Sec. 4.
•
When all Combi Cooking operations are done, the display changes
to manual, see Sec. 4.
Display 6
791318 Genius T Vers. 1.7
24
8
•
Navigation of interfaces and programme lists
With the sensor key S 1, you can change between the interfaces cooking procedures and manual, as
well as the programme list and preview.
To work with the programme list displays, use the sensor key S 2 to change between displays for the
entire programme list, favourites and selection menu group preview.
Start up screen
Sensor key
S1
9.
Sensor key
S2
Active Temp
The combi steamer should always be preheated, respectively cooled down.
When selecting the function “Active temp“ the temperature in the oven cavity is brought to a
pre-set nominal temperature. Consequently this function offers two procedures.
•
In case the cooking chamber temperature is below this nominal value, the cavity is heated up.
•
In case it is too high for the following cooking program, the cavity is cooled down.
To make understanding of the following easier, we explain the function “preheating“,
cool down works exactly the same way, only the other way round.
For both there are two possibilities:
1st Step Active Temp
When selecting this function, it is defined as first step of a cooking program = here preheating.
• Having entered all cooking steps , proceed to “Additional functions”, mark “Active temp” „ “ .
•
•
•
•
•
.
Activate 1st Step = Active Temp with OK and start the program by pressing
Any opening of the door during preheating, interrupts the preheating process.
Close the door and preheating is continued until the pre-set nominal temperature is reached.
Once it is reached, there is a sound signal and the info line indicates Active Temp - Cool End.
The sound signal is repeated over and again until the door is opened.
The nominal temperature is maintained for 1 hour max.
Charge the oven and shut the door. The program starts automatically with the before entered
cooking steps.
Once the preheating process is stopped by the operator by touching the sensor key
Active temp off, it is possible to start directly with the first cooking program step after having
charged the oven .
•
is then marked in the
Such a program, including preheating, can also be stored. The symbol
program list .
2. Manual Active Temp
Manual preheating is possible. The nominal temperature is then 20% higher than the
temperature of the cooking program. .
• Select this function via sensor key Active Temp.
• Proceed as described under preheating 1st Step= Active Temp. The preheating function is
added to the cooking program.
• The function manual preheating cannot be stored as part of a cooking program
•
It is possible to deactivate the Cool Down function via sensor key Service in
the list of Unit parameters.
•
It is possible to add the 1st Step= Active temp or manual preheating also to the special
functions such as Banquet, LT-Cooking, Cook&Hold and ∆T-Cooking.
Further functions are selected via Additional functions as usual.
•
791318 Genius T Vers. 1.7
25
10. Special programs
•
Touch sensor key “Special Program“ to bring up further special programs and functions.
10.1 Function BANQUET
•
Press sensor key “Special program“ and confirm Banquet with OK
•
The Climatic monitor indicates between the striped field the banquet cooking range for
temperature/humidity. Standard setting for banquet is 140°C and 50% humidity.
•
Use Genius arrows to determine temperature/humidity and confirm with OK
•
Input range: Temperature 90°C –180°C; humidity level 0 - 100%
•
Select function Active temp as described in § 7
•
It is possible to enter up to 5 different cooking steps in a banquet program, see § 4.3/4.4
•
Use Genius arrow
•
To save a banquet program follow the instructions in § 5.
•
When such a program is saved, the letter “B“ appears automatically at the beginning of its name,
in order to identify it in the program list.
, set the time and start
.
Additional functions “banquet“ :
•
Use Genius arrow
, go to line “Additional“ and select additional functions.
•
Use Genius arrows
or
•
In total 3 additional functions per step are possible.
•
Confirm functions to be On or Off with OK , a selected function is marked “ “ .
•
Functin “SPS” is pre-set.
•
Fan speed: Only one varation is possible.
•
Without setting, the pre-set function “full speed” is in effect.
791318 Genius T Vers. 1.7
for selection.
26
10.2. LT-Cooking
(Low temperature)
•
Touch sensor key “Special Program“ , use Genius arrow
OK.
•
The Climatic monitor indicates below the striped field the LT cooking range for
temperature/humidity. Standard setting for LT cooking is 80°C and 20% humidity.
•
Use Genius arrows to determine temperature/humidity and confirm with OK
•
Input range: Temperature 30°C – 150°C; humidity 0 – 100%
•
As soon as this range is left, standard cooking processes are displayed. Consequently it is, for
instance, possible to start roasting at higher temperatures.
•
Select function Active Temp as described in § 7
•
It is possible to enter up to 12 different cooking steps in an LT program, see § 4.3/4.4
•
Use Genius arrow
•
To save an LT program follow the instructions in § 5.
•
When such a program is saved, the letters “LT“ appear automatically at the beginning of its
name, in order to identify it in the program list.
to select LT cooking and confirm with
, set time and/or core temperature and start
Additional functions “LT cooking“:
, go to line “Additional“ and select additional functions.
•
Use Genius arrow
•
Use Genius arrows
•
In total 4 additional functions per step are possible.
•
Confirm functions to be on or off with OK , a selected function is marked “ “ .
•
Already pre-set are the functions „“reduced fan speed“ and “SPS“
•
If the function “fan pulsing“ is used, the humidity level is adjusted accordingly.
•
Fan speed: Only one varation is possible.
•
Without setting, the pre-set function “full speed” is in effect.
791318 Genius T Vers. 1.7
or
for selection. In total 4 additional functions per step are possible.
27
10.3 Function Cook & Hold
•
Touch sensor key “Special Program“ , use Genius arrow
with OK.
•
The Climatic monitor indicates the Cook & Hold range for temperature/humidity. Standard setting
for Cook & Hold is 70°C and 40% humidity.
•
Use Genius arrows to determine temperature/humidity and confirm with OK
•
Input range: Temperature 30° C - 120° C, humidity level 0 – 70%
•
As soon as this range is left, standard cooking processes are displayed. Consequently it is, for
instance, possible to start roasting at higher temperatures.
•
Select function Active temp as described in § 7
•
It is possible to enter up to 5 different cooking steps in a Cook & Hold program, see § 4.3/4.4
•
Use Genius arrow
•
To save a Cook & Hold program follow the instructions in § 5.
•
When such a program is saved, the letters “C+H“ appear automatically at the beginning of its
name, in order to identify it in the program list.
to select Cook & Hold and confirm
, set time and/or core temperature and start
Additional functions “Cook & Hold“
, go to line “Additional“ and select additional functions.
•
Use Genius arrow
•
Use Genius arrows
•
In total 4 additional functions per step are possible.
•
Confirm functions to be on or off with OK , a selected function is marked “ “ .
•
Already pre-set is the functions “SPS“
•
If the function “fan pulsing“ is used, the humidity level is adjusted accordingly.
•
Fan speed: Only one varation is possible.
791318 Genius T Vers. 1.7
or
for selection. In total 4 additional functions per step are possible.
28
10.4 Delta-T- Cooking
•
Touch sensor key “Special Program“ , use Genius arrow
with OK.
•
The Climatic monitor indicates the ÌT-Cooking range for temperature/humidity. Standard setting
for ÌT-Cooking is 40°C and 40% humidity.
•
Use Genius arrows to determine temperature/humidity and confirm with OK
•
Input range: Temperature 20° C - 80° C, humidity level 0 – 100%
•
Select function Active temp as described in § 7
•
It is possible to enter up to 5 different cooking steps/modes in a ÌT-Cooking program, see § 4.4
•
Use Genius arrow
•
To save a ÌT-Cooking program follow the instructions in § 5.
•
•
to select ÌT-Cooking and confirm
, set the core temperature and start
When such a program is saved, the characters “ÌT“ appear automatically at the beginning of its
name, in order to identify it in the program list.
In a ÌT cooking process, the cooking chamber temperature is adjusted to the increasing
core temperature.
Example:
•
Input ÌT = 50°C Core temperature 65 °C
•
The ÌT – program is started, the actual core temperature is displayed, e. g. 20°C
•
ÌT = 50°C is added to the actual core temperature to determine the cooking chamber
temperature - at this moment CT 20°C + ÌT 50°C = 70°C
•
In the course of an advancing cooking process the core temperature is increasing constantly and
the cooking chamber temperature as well according to ÌT, e.g. CT 35°C + ÌT 50°C = 85°C
cooking chamber temperature.
•
Once the core temperature of 65°C has been reached, the cooking chamber temperature will be
CT 65°C + ÌT 50°C = 115°C
791318 Genius T Vers. 1.7
29
Additional functions “ ÌT cooking“:
, go to line “Additional“ and select additional functions.
•
Use Genius arrow
•
Use Genius arrows
•
In total 4 additional functions per step are possible.
•
Confirm functions to be on or off with OK , a selected function is marked “ “ .
•
Already pre-set is the function “SPS“
•
If the function “fan pulsing“ is used, the humidity level is adjusted accordingly.
•
Fan speed: Only one varation is possible.
•
Without setting, the pre-set function “full speed” is in effect.
or
for selection. In total 4 additional functions per step are possible.
10.5 Function HACCP
An annular memory is saving up to 200 programs. All processing data are recorded continuously
and automatically. It is possible to have these records printed via the serial interface RS 232
•
•
Once a cooking program is terminated with Start/Stop or through automatic switch off at program
end, its protocol is stored. The cleaning program Autoclean (Option) is also stored.
10.5.1 Serial Interface – Connecting cable
Protocols may be printed by means of connecting the steamer to a printer capable of printing
at least 40 characters per line. Printer adjustment : 9600, N, 8, 1.
The port for the cable connection is in the hose shower tulip.
Controls
Plug No.:
EXTERN 9pin. Min-D
bushing
Function:
RS 232 C Serial Interface
(9600, N, 8, 1)
9600 BAUD, 8 databit,
EVEN PARITY,
1 STOPBIT
Bushing top view
TxD (send data)
Paper end
GND
Connect
printer
Init. Printer
DRT
n.b.
Setting of DIP Switch Thermal Printer NP 104
1. Parallel Interface (DIP Switch 1)
1
2
3
4
5
6
7
2. Serial Interface (DIP Switch 2)
1
2
3
4
8
ON
ON
OFF
OFF
Switch
1
2
3
4
5...7
8
Switch
1
2
3, 4
SOLL
CR/LF:
Carriage Return + Line feed
40 Columns
Normal Character
Normal Zero
German
Not defined
791318 Genius T Vers. 1.7
30
SOLL
Parity Check
Even Parity
9600 bps
10.5.2 Selection and printing of recorded cooking processes
The connecting cable shall only be plugged or unplugged if both, the steamer and the
printer, are switched off, otherwise the control unit or the printer may be damaged
The appliance must be switched on with no program in progress.
Any exact HACCP recording presupposes the correct setting of the real time. Refer to 10.7.
•
Touch sensor key „Special Program“ and use Genius arrow
•
A list appears stating day and date, one day being marked yellow .
•
Use Genius arrow
•
Touch sensor key „Print“ to have the protocol of this day printed.
•
Once a week day is marked yellow and confirmed with OK, the individual programs of this day can
be selected by scrolling with the Genius arrows. Confirm the program that is supposed to be
printed with OK and touch sensor key „Print“ to have it printed.
•
By pressing sensor key „Print 7“ the programs, including Autoclean, of the last 7 days are printed.
to select HACCP, confirm with OK .
to scroll the HACCP list upwards to the desired day then marked yellow.
Printed record example
Serial number
Unit Type
Print date of protocol
Total operating hours of the appliance
Program date start and end
Program name
Nominal time, set time and humidity degre in percent
Program start
Hold time, i. e. period the set temperature was held
Recording of core temperature in a set 3 min.-cycle, resp. 10 min cycle
Nominal time, set time and humidity degre in percent
Hold time, i. e. period the set temperature was held
Program End
Energy consumption
Water consumtion
791318 Genius T Vers. 1.7
31
For combi cooking, there are no explicit logs for KT values starting with
the time of selecting Fct. Combi cooking.
11. End of operation
Switch off by pressing ON/OFF key. The LED in the key extinguishes.
Close water tap.
Disconnect the appliance from the mains, if it is not used for a longer
period of time.
Important notes
Door
Attention Hot steam is escaping when opening the door.
In the beginning open the door slowly and only a few centimeters
to let the steam escape.
Drip tray 6-11 and 10-11
It is underneath the chassis. Make sure to empty and clean it regularly.
12
Autoclean ( Option)
Programm Info
•
•
Prior to starting Autoclean, make sure that enough cleaning products are available – visual control
Touch sensor key “Special Program“ , use Genius arrow , select Autoclean and confirm with OK
•
Use the Genius arrows
•
By pressing key “Program Info“ a list appears, explaining details of the different cleaning steps.
or
to select the desired Autoclean cleaning step and start with.
Autoclean programs:
According to the degree of dirt inside the cooking chamber, different programs can be chosen.
Display
Duration
Step 1
50 minutes
Soak - 1 x Clean - Rinse – Dry
Step 2
1 hour 20 min.
Soak – 2 x Clean – Rinse – Dry
Step 3
1 hour 50 min.
Soak – 3 x Clean – Rinse – Dry
Step 4
2 hours 30 min.
Soak – 4 x Clean – Rinse – Dry
Flushing
approx. 2 min.
Quick flushing with clear water
Start up
approx. 2 min.
Filling of the tubes
see Autoclean manual
Program steps
•
Whenever the cooking chamber temperature is too high, the cool-down function starts
automatically and cools the appliance down to 80° C. The display indicates „Unit cooling-down“
•
Once the temperature is reached, the appliance starts Autoclean automatically.
791318 Genius T Vers. 1.7
32
12.1 Delay start of Autoclean
•
•
•
It is possible to have the cleaning started automatically within a period of up to 24 hours.
Select Autoclean on the screen “Special programs” and press sensor key “Start Time“! Set the
desired starting time – see § 4.8 and press Start/Stop.
The Autoclean program is recorded.
See § 10.7 and make sure, the correct date and time is set.
12.2 Selection and printing of recorded Autoclean protocols
•
•
•
•
Go to the function HACCP § 10.5 and proceed to 10.5.2
Select the week day desired by scrolling and confirm with OK.
Select the Autoclean program to be printed and press sensor key “Print”.
Press sensor key “Print 7” to have all protocols of the last seven days printed, including the
Autoclean programs.
12.3 Hints on operational safety
Only recommended Eloma cleaning agents may be used.
All safety devices inside the unit have been designed to the use of these products in order
to comply with the standard specifications of the drinking water supply.
The Eloma GmbH bears no liability for any damages caused by the use of any other
cleaning products (cleaner and rinse agent) than mentioned above.
Exchange of canisters and refilling of cleaner and rinse agent
Observe the directions of the manufacturer and wear suitable protective clothing , gloves
and glasses.
For safety reasons, the door must not be opened during an Autoclean program.
Cleaner, rinse agent, hot water and steam may escape. If it is absolutely necessary to open
the door, the Autoclean program must be stopped.
If the oven is not used for an extended period of time, rinse the whole Autoclean
system thoroughly with lukewarm water to avoid clogging caused by cleaner and
rinse-agent remainders.
Remove screwings from the canisters and clean the tube ends and the filter in warm water.
Start Autoclean step Start-up and rinse the appliance until no more cleaner is remaining
inside the tubes and the cabinet.
Preparation for cleaning
Prior to starting a cleaning program make sure that there is sufficient cleaner and rinse agent
in the respective canisters. Visual control.
No food products should be in the cooking chamber then.
Remove fat filter, drain filter, grids, trays and pans and clean those separately.
The trolley of floor models must be inside the combi steamer.
Exchange of canisters
In case there is not sufficient cleaner or rinse agent left, the canisters must be
exchanged or refilled.
Please ensure that correct connections are made.
•
Select Autoclean with the sensor key Special Programme, and confirm with OK.
•
Use the Genius arrow keys
•
AUTOCLEAN is ready for use.
791318 Genius T Vers. 1.7
and
to select operation and start with
33
.
13
Service
13.1 Week program
•
Use the function „weekly program“ for stored programs that are supposed to be started at a
certain day and time of the week.
•
Go to the Program List and select the program that is supposed to be started at a certain day and
time.
•
Touch sensor key “Special Program“ , and confirm “weekly program” with OK, function is activated
and marked „ “.
•
Use Genius arrows
selected program .
•
Confirm with OK . The appliance will start at the set day and time with the desired program.
•
Press sensor key „Main Menu Back“ to return to „Manual Input“.
to select the day of the week and
to set the desired start time of the
13.2 Function Daytime/Date
•
The correct date and time is set when the combi steamer is delivered. However, it may be
necessary to change date and time.
•
Press sensor key “Service“ and confirm Time/Date with OK.
•
Use Genius arrows or to change time and/or date and set new data using
Genius arrows
or . confirm with OK.
•
The screen Time/Date offers further possibilities to change data, for instance summer time or the
way of indicating time and date. Use Genius arrows or to select whatever you like, it is
marked “ “ .
and confirm setting with OK.
•
791318 Genius T Vers. 1.7
34
13.3 Function Start Sreen
•
You can select 5 different start-up displays.
•
•
Select or deselect with " " by pressing OK.
Screen Manualinput , see Section 4, is not displayed.
13.4 Function Language
•
All functions, menus and information can be displayed in different languages.
•
Press sensor key “Service“ , use Genius arrow
•
Use Genius arrows
or
and confirm Language with OK.
and confirm whatever language you like with OK, it is then marked „ “.
13.5 Unit parameters
•
Touch the sensor key Service and select Unit parameters. Activate, deactivate or change other
functions.
•
Confirm functions to be on or off with OK, a selected function is marked „ “
791318 Genius T Vers. 1.7
35
14. Connection to Kitchen control systems (KCS)
•
In case special hard /software is available, a connection to kitchen control systems is possible.
15. Failure indication
•
Press sensor key “Help“ to get valuable information regarding failures.
•
The displayed symbols explain possible failure causes and offer remedies.
•
If your Genius does not work correctly, take the following list and try to help yourself. If you do not
succeed, switch off and disconnect rhe unit from the mains .
Call the after-sales service
•
•
Press sensor key “menu back” to return to the previous screen immediately.
After a certain period of time this is also done automatically.
FAILURE Symbols
Possible cause
Remedy
No operation is possible, the door is open
Shut the door
Operation possible, even for programmes using Hard water on
water, but Autoclean is not p
Operation possible, even for programmes using Soft water on
water, but no moisture in the cooking space.
Only After-sales service!
This symbol remains
displayed until the after-sales
service has confirmed that the
repair has been done.
Miscellaneous defects
Operation possible
This symbol remains displayed until the correct
temperature for the Autoclean function is
reached.
No action is required!
In case the meat probe is broken, the appliance can be used in a limited way.
A running program can be finished without core temperature control.
Attention: visual/manual control !
Any further programs can only be performed without core temperature control, if not
repaired.
Gas Units only
Failure in the gas system
Check gas supply,
Gas tap is closed
Open gas tap.
Connection misphased
Change phase connection
Operation possible
Restart by pressing sensor key
“restart gas”
No heating.
Restart in two-chamber units
by pressing
the corresponding sensor key
“restart gas”.
791318 Genius T Vers. 1.7
36
16. Cleaning and maintenance
Regular cleaning of the MULTIMAX is of utmost importance.
Only Eloma recommended cleaner agents may be used.
Please observe the manufacturer's operating instructions.
Cleaning without Autoclean:
•
•
•
•
•
We recommend to set the Climatic Cursor to 60° C/100% humidity level.
Confirm setting with OK.
Use Genius arrow and proceed to the time field.
Use Genius arrows Õ or Ö and set 10 minutes.
Press START/STOP
Grids and fat filter may be left inside the oven
•
As soon as the time has run down, there is a sound signal. Spray special
cleaner thoroughly into the cooking chamber and on to hang-in racks etc.
Leave cleaner to work for 5 - 10 minutes .
Do not spray cleaning agent in a hot oven cavity.
Observe the manufacturer's instructions.
Press START/STOP.
As soon as the time has run down, there is a sound signal. The oven switches off.
If necessary repeat this procedure.
Rinse cooking chamber thoroughly with water, using the hand shower.
Remove drain-sieve and rinse with water. Switch off (ON/OFF) before rinsing
Use the shower only for rinsing the interior but not for outer surfaces.
In case cleaning agent remains in the cooking chamber, this may cause
corrosion problems.
Dry the inside and leave the door open by a small gap, so that the cooking
chamber is well ventilated. Do not damage thermostat sensor when cleaning !
Caring for the door sealing
A door sealing is subject to wear.
Proper care of sealing prolongs service life.
− Grease and caustic cleaning agents attack and weaken the sealing material and thereby
accelerate the rate of wear.
− Chicken and pork grease are very aggressive. Please observe the following care instructions:
− Manually clean the sealing daily with a mild grease solvent.
− Use fresh water to remove any remaining cleaning agent.
− Leave the door open overnight to allow the door sealing to relax.
The door should also be left open when the appliance is not in use.
− Inspect the sealing regularly for damage.
Replace damaged sealing to prevent steam/air from escaping.
− The sealing of appliances with Autoclean cleaning systems must also be cleaned by hand.
Grease and cleaner deposits often collect on the outer side of the sealing. If these are not
removed, the sealing decomposes at those places.
− Use original Salvis cleaner when cleaning.
Cleaning of glass panes:
•
•
Clean only with a soft rag, do not use scouring agents.
To clean between panes (open door!), open the outer door panes by puling back the bolt.
Cleaning of outer surfaces :
Use fat/grease dissolving cleaning agents or special stainless steel cleaners.
Do not use either water jet, high pressure sprayer or steam purifier on outer
surfaces. Water jets may damage parts of the appliance or else get in
contact with electric live parts. DANGER – personal injury caused by
an electric shock. Do not spray into a hot oven cavity.
791318 Genius T Vers. 1.7
37
hCleaning of drip gutter and tray : ( models 6-11 and 10-11 only)
Drip gutter under the appliance : Clean it regularly, including the drain opening.
Drip tray on the door : Remove it to the front for regular cleaning by pressing the
two clips underneath down.
Door inside
Fastening clips
hCleaning the cooking chamber behind the air conducting sheet :
Clean once a week or according to contamination.
Switch off the appliance and allow to cool down.
Remove fat filter
Remove shelf - supports (hang-in rack) models 6-11 and 10-11
Swing out air conducting sheet.
Clean area - now accessible - thoroughly
After cleaning replace all parts removed in reverse order.
It is not allowed to operate the oven without air conducting sheet !!
Air conducting
sheet
Hang-in rack
hCleaning the air intake filter
The air intake filter is laterally in the control panel and must be cleaned every two months.
Open for cleaning the door and take off the air intake filter.
The air intake filter can be cleaned in the wash basin or in the dishwasher.
791318 Genius T Vers. 1.7
38
17. Valuable information
17.1 Trouble Shooting
If your Genius isn’t working properly, review the following list first.
If you do not succeed, switch off, disconnect from mains, close water tap.
Call the after-sales-service
Failure
Possible Cause
Remedy
No required heating
capacity, fan does not start.
Mains switched off or fuse
blown.
Check the mains system and switch
on mains fuse.
Water tap closed
Open water tap
No steam generation
Water in the cooking
chamber does not run off
Calcareous deposits on
inner panels
Drain clogged
Water too hard. Watersoftener exhausted
Correct installation ??
Remove drain-sieve and clean it,
flush the drain
Connect the oven to a watersoftener
Regenerate water softener.
Poor water quality
Formation of rust in the
cooking chamber
Filter the water,
follow the installation instructions
Wrong cleaning agent
Use recommended cleaner agents
Wash the interior thoroughly and
regularly, use hand shower.
Steam escapes from door
Remains of cleaning agent
in the cooking chamber
There are iron chips in the
water supply system
Door sealing exhausted, not
enough contact pressure to
the oven
Door sealing defect.
Remove all parts of unalloyed steel
Readjust the door latch
Call the after-sales service
18. Communication ProConnect ↔ Combi steamer
18.1 Start up communication ProConnect ↔ Combi steamer
Genius
•
Use the appropriate cable to establish a communicating connection between PC and
combi steamer, “Point-to-Point” connection RS 232.
•
Plug the connecting cable to external SubD9 port in the hose shower tulip and connect
the other end to the PC.
PC
RS 232 Connection
•
or
The combi steamer is in standby mode, it may be necessary to switch off the combi steamer.
791318 Genius T Vers. 1.7
39
•
•
•
•
•
•
•
The PC is switched on and ProConnect is started
Set the device address of the combi steamer in the PCPrg:
Menue/Options/device address.
Set Com-Port in the PCPrg to the one used as interface for the connection
PCPrg ↔ Combi steamer.
Provided the connection is established via USB-Port of the PC and USB/RS 232 adapter, this
interface is also indicated as Com-Port on the PC.
It is possible to test the communication in the set-up dialog for device address and port,
“check communication”.
Of course, there are further individual possibilities for connection and connectivity via
RS 485 systems
Contact our Service Hotline or our sales department for further information.
19. Accessories - Optional Extras
Support stand 6-11, 10-11
Open, with 10 pairs of shelf supports
Lower rack 6-11, 10-11
with embossed hygienic shelf supports
Lower rack 6-11, 10-11
closed on 3 sides closed with embossed shelf supports,
Transport trolley 6-11, 10-11
for mobile oven rack
for mobile plate rack with rings
to hold plates /banquet service
Roll-in trolley incl. rack 12-21
accessible from two sides
for 12 x GN 2//1, 24 x 1/1
Roll-in trolley incl. rack 20-11
accessible from two sides
for 20 x GN 1/1
Roll-in trolley incl. rack 20-21
accessible from two sides
for 20 x GN 2/1, 40 x GN 1/1
Roll-in plate trolley with rings to hold
20-11, 12-21, 20-21
plates / banquet service
Insulated cover/hood for roll-in-racks
6-11, 10-11, 20-11, 12-21, 20-21
and trolleys – banquet service
Fat filter
Recommendation : Stock additional filters to change
1 l spray pistol bottle
Eloma Cleaning agent
10 l refill bin
Pressure pump sprayer
1,5 l
Grids
GN 1/1, GN 2/1, Chromium plated or stainless steel
Baking Trays
Pans
GN 1/1 , GN 2/1, 20 mm deep
enamelled, stainless steel or aluminium perforated
GN 1/1, GN 2/1
Enamelled or stainless steel, closed or perforated
different depths : 40, 65, 100, 150 mm
Manual water softener
WEM 40
Automatic water softener
WEA 40
791318 Genius T Vers. 1.7
40
20. Warranty Conditions
1. New Eloma catering appliances
The Eloma GmbH grants a twelve months regular warranty to end-users of new Eloma appliances
starting from the date of their dealers' invoice, however a maximum of eighteen months starting from
the date of dispatch from the Eloma factories in Maisach or Bad Gottleuba/Germany.
EXCEPTION: Damages to all glass parts and lighting glassware
Range of Warranty:
Within the warranty period, warranty is limited to the replacement of parts and/or repair of those at
Eloma's choice, in case their usability is considerably vitiated due to material defects, incorrect design
or imperfect construction. An Eloma-trained service technician in situ contributes to an adequate
decision. The final decision is to be made only by the service department of Eloma in
Maisach/Germany or its representative.
In case of recognised warranty, Eloma bears the costs for spare parts, as well as labour and travel
expenses of the service technician. If possible the repair work is done at the place of the machine's
installation. In case the appliance has to be returned to the Eloma factory in Maisach, for whatever
reason, transportation expenses back and forth are always at the customer's account. The customer
also bears transportation risk.
Eloma reserves the right to entrust certain persons with the execution of warranty repair work.
This Warranty excludes:
-
Normal wear and tear
Incorrect installation, not in accordance with our installation- and operation-manuals, local regulations and general technical rules.
Damages resulting from use of violence and/or malicious or incorrect handling and operation
Damages due to calcareous deposits or aggressive water
Damages resulting from use of cleaning agents not recommended by Eloma or incorrect use of the proper
cleaning agents
Technical intervention of any kind into Eloma appliances by staff not authorised and/or properly trained by Eloma .
2. Parts Warranty
The Eloma GmbH grants for each original Eloma spare part, provided it is correctly installed, an
operation warranty of six months. In case of failure within this period, Eloma supplies another
original part.. Further claims, also or such a replacement are not accepted. This warranty excludes
parts which are subject to more-than-wear and tear caused by the end-user.
3. General
Claims exceeding the stipulated elimination of defects, including consequential damages, loss of
wages or property damages of whatever kind cannot be accepted. Claims for change and depreciation
can only be made if a warranty repair is proved to be a failure. Verbal promises assuring certain
characteristics are only binding upon written confirmation.
Eloma appliances shall only be used for their intended purpose namely the professional preparation
of food. Whatever exception to this rule excludes all warranty claims and discharges Eloma from all
liability. Technical amendments, also in the sense of further development and/or technical progress
are reserved.
The warranty period is not renewed or extended in case of any repair or replacement delivery. Eloma shall regain
possession and control of such replaced parts and appliances.
This warranty is not transferable without Eloma's written consent.
Place of jurisdiction is the location of Eloma's registered office.
Maisach, March 2003
791318 Genius T Vers. 1.7
41
21. Data of the oven
Model
________________________________________________
Serial number ________________________________________________
22. Service notes
Date
After-sales service
Remarks
General Remark : Climatic® and Steptronic ® are Eloma GmbH trademarks registered in Germany
Technical amendments are reserved.
791318 Genius T Vers. 1.7
42
Notes:
791318 Genius T Vers. 1.7
43
Notes: