1
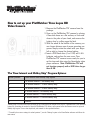
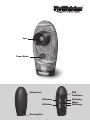
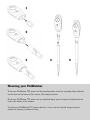
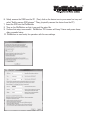
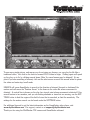
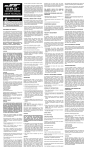
KNOW THE OPTIONS
for your next hunt!
The Day6 PlotWatcher Time Lapse HD Video Camera
records up to 84 hours of activity at a potential
hunting location onto a USB drive. All of the activity
can then be reviewed in just a few minutes, using the
included GameFinder video player software.
Package Contents
PlotWatcher TLV Camera Unit
• User Manual
• Ground Mounting Stake
• Tree Mounting Straps
• Installation CD
PlotWatcher Time Lapse HD Video Camera
User Manual
Thank you for purchasing the PlotWatcher Time
Lapse HD Video camera. The PlotWatcher TLV
camera is a breakthrough scouting tool. Mounted
at your potential hunting locations, it records HD
video of all the activity that happens in the days
before you hunt. Images are taken every 5 or
10 seconds from dawn until dusk, producing an
HD video you can review with the GameFinder
video player software. Let’s get started.
Minimum Requirements to install
and run the software
Windows XP and above.
How to set up your PlotWatcher Time Lapse HD
Video Camera
1. Remove the PlotWatcher TLV camera from the
package.
2. Open up the PlotWatcher TLV camera by placing
it Lens side down on a flat surface, or Lens side
down in the palm of your hand, and remove the
battery door by pulling open the latch.
3. With the wheel in the middle of the camera, you
can choose between one of seven operating programs. Simply rotate the wheel with your finger
left or right to choose the desired setting.
4. Insert a USB flash drive (4 or 8 GB) and 4 AA
batteries, and replace the rear cover. Your
PlotWatcher TLV camera is now ready for you to
set the time and date using the Gamefinder video
player software. Note: PlotWatcher TLV will
not function properly with a USB drive larger
than 8 GB.
The Time Interval and Midday Skip* Program Options:
Wheel position
Time Interval and Midday Skip Option
1
10 second interval / No midday skip
2
10 second interval / 4 hour midday skip
3
10 second interval / 8 hour midday skip
4
5 second interval / No midday skip
5
5 second interval / 4 hour midday skip
6
5 second interval / 8 hours midday skip
7
Custom**
*Midday Skip is a feature that stops recording of HD Video during the middle of the day for a specified time. This conserves
battery life, extending the number of days the PlotWatcher TLV camera will operate before the batteries must be replaced.
Midday skip begins 4 hours after daybreak, and extends for the specified duration.
** To modify the custom settings for wheel position 7, use the “Settings” option in the GameFinder software and follow the
instructions.
Lens
Power Button
Battery Cover
USB
Flash Drive
AA Battery
AA Battery
Mounting Hole
AA Battery
Wheel
AA Battery
1
2
3
4
5
Mounting your PlotWatcher
To set your PlotWatcher TLV camera on the mounting stake, screw the mounting stake clockwise
into the hole on the bottom of the camera. (See diagram above)
To set your PlotWatcher TLV camera on any standard tripod, screw the tripod clockwise into the
hole on the bottom of the camera.
To attach your PlotWatcher TLV camera directly to a tree, use the enclosed bungee straps to
restrain the camera just below the lens.
PlotWatcher TLV Camera Operation
Check to see you have 4 AA batteries installed and a 4 or 8 Gb USB Flash Drive installed as
described under “Camera Setup”.
To turn ON the PlotWatcher TLV camera, press and hold the grey power button on the front of the
camera until the green LED lights up. All LEDs will then flash, with an audible beep, about once
per second for 5 times to indicate that POWER UP is successful.
To turn OFF the PlotWatcher TLV camera, press and hold the grey POWER button on the front of
the camera until the green LED lights up. All LEDs will then flash, with an audible beep, several
time per second for 3 seconds to indicate that the POWER DOWN is successful.
On the front of the PlotWatcher TLV camera, above the lens, there are three LED lights. These LEDs
allow you to monitor the status of the PlotWatcher without having to move the camera from its
mounted position. Each event and status is represented by the LED lights:
Action
LED Light and Audible Activity
Power Up
All 3 LED lights flash, with audible beep, on a 1 second cycle for 5
seconds.
Power Down
All 3 LED lights flash, with audible beep, on a ¼ second cycle for 3
seconds.
Picture Taken
(5 or 10 sec.
interval)
Green “Power” light illuminates when each picture is taken.
Low Battery
Red “Battery” LED illuminates along with Green “Power” LED when each
(During Operation) picture is taken until batteries are out of power at which time the camera
powers down.
Low Battery
(At Power Up)
Red “Battery” LED illuminates, with audible beep, for 3 seconds and then
PlotWatcher powers down.
No USB Drive
(Or Incompatible)
Blue “Memory” LED illuminates, with audible beep, for 3 seconds and
then PlotWatcher powers down.
Sleep Mode
(Night or Midday)
No LEDs illuminate during Sleep Mode. When POWER button is
depressed while in Sleep Mode, the POWER DOWN sequence will occur.
Press POWER again to restart the camera.
Installing the GameFinder software
1. Insert the PlotWatcher TLV camera CD into your computer.
2. If Windows does not auto-open the CD to reveal the “GameFinder_Setup” icon, then browse to
the CD drive using “My Computer.” Once you see “GameFinder_Setup” in the Explorer window,
proceed to the next step.
3. Double Click on “GameFinder_Setup” to start the setup program.
4. Click NEXT for each of the steps of the GameFinder Installer Wizard. Note: For Vista and
Windows 7, you may have to click “yes” or “allow” when asked if you wish to “allow an
unknown publisher to make changes to this computer.”
5. Installation is complete. The GameFinder video player software is installed under “All
Programs” in the “Day6” folder, and a shortcut is also placed on the desktop. You can now
proceed to setting the Time, Date, and Custom Settings.
Setting the Time, Date, and Custom Settings on your
PlotWatcher TLV Camera
To set the time, date, and custom settings, the GameFinder software will write a settings file, based
on your preferences, to your USB flash drive. You will then move the flash drive to the PlotWatcher TLV camera, and power up the camera. The PlotWatcher then recognizes the setup file, loads
the values, and powers down, ready for use with the new settings. The following are the step by
step instructions:
1. Insert the 4 or 8GB USB drive you plan to use with your PlotWatcher camera into your PC.
Note the Drive letter assigned by Windows to the USB drive so that you can specify this drive
on step 4.
2. Run the GameFinder software.
(Use desktop shortcut, or select from “Start->All Programs -> Day6->GameFinder”)
3. Click on the Settings button
4. On the Settings form, Click on “Camera Settings”
5. On the Camera Settings form, set “USB Drive” to correspond to the drive letter for the USB
drive you noted in step 1. Set the Time and Date to the values you want programmed into
PlotWatcher. Make any changes to the Custom Settings that you prefer. Click “OK”. Note: the
remaining steps are the same as the ones outlined on the “Camera Settings” form.
6. S afely remove the USB from the PC. (First, click on the device icon in your menu bar tray and
select “Safely remove USB storage.” Then, physically remove the device from the PC).
7. Insert the USB into the PlotWatcher.
8. Turn on the PlotWatcher so that it can read the setup file.
9. C onfirm that setup is successful: PlotWatcher TLV camera will beep 3 times and power down
after successful setup.
10. PlotWatcher is now ready for operation with the new settings.
Managing Time Lapse Video files
The PlotWatcher TLV camera records one HD video file for each day of operation. Each daily
file uses around 300Mb of disk storage space. When the USB flash drive begins to fill up (about
10 days on a 4 Gb drive, or 20 days on an 8 Gb drive), the oldest file will be deleted to make
room for the newer file. This way, you always have the most recent time lapse video available to
review, even if you have collected more video than your USB drive will hold.
The files are stored on the USB flash drive in the folder “\DCIM\100_D60.” When you insert
the USB flash drive, browse to this folder and you will see a list of your time lapse video files.
Double click on a file to launch the GameFinder software and begin reviewing.
When you have reviewed the first file, you can close the GameFinder video player and double-click
on the next file, or you can use the “File” button to open your next file.
TIP: By having two USB flash drives, you can swap an empty one for a full one in the field.
Due to the large file sizes, you may not want to copy the full time lapse video onto your PC
- consider exporting only the interesting shorter clips from the GameFinder player. Use the
“Export” options on the “File” form to save images or short clips of interesting activity onto
your PC. After you review your time lapse video and save any interesting images or clips,
delete the files from the flash drive to have it ready for swapping in the field.
GameFinder video player software
The GameFinder video player is an easy, fast and fun way to view time lapse video files.
The quickest and easiest way to get an overview of a time lapse video is to use your mouse
to drag the “Position Arrow” across the play bar (this is the triangular indicator with the frame
number displayed in it). This will show, in a very quick time, what is contained in the file. You can
drag to the right to move forward in time, or to the left to move backward in time.
When you see an interesting portion of the file, stop dragging the Position Arrow and use the
scroll wheel on your mouse to move forward or backward one frame at a time. If you don’t have
a scroll wheel on your mouse, you can use the arrow keys or just click on the back or forward
STEP button.
To see every single picture, and ensure you do not miss any frames, you can play the file like a
traditional video. Just click on the back or forward PLAY button to begin. Clicking again will speed
up the play, up to 5x by clicking several times (After 3x, some frames may be skipped). At any
point if you see something of interest, click on the video screen or scroll the mouse wheel to pause
the video and enter step/scroll mode.
SEARCH will cause GameFinder to search in the direction of interest (forward or backward) for
motion and will move the “Position Arrow” to the frame in the video file where movement is
detected. A vertical line is drawn on the play bar at each point where movement is detected. If the
search feature is too sensitive, and you are finding shadows or trees that are moving, use the SETTINGS button to limit the region of the field of view that is searched, or limit the sensitivity. The
settings for the motion search can be found under the SETTINGS button.
For additional tips and to get the latest information on the GameFinder video player, visit
www.day6outdoors.com. For support, contact us at [email protected].
Thank you for using the PlotWatcher TLV camera and GameFinder software!
day6outdoors.com
1150 Brookstone Centre Pkwy #200
Columbus, GA 31904
(706) 256-2578