1
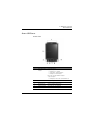
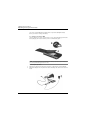
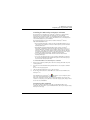
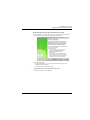
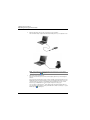
Acer n300 Handheld
User’s Guide
Disposal instructions
Disposal instructions
Do not throw this electronic device into the trash when discarding. To minimize
pollution and ensure utmost protection of the global environment, please recycle.
USA
For electronic products containing an LCD/CRT monitor or display:
Lamp(s) inside this product contain mercury and must be recycled or disposed of
according to local, state or federal laws. For more information, contact the Electronic
Industries Alliance at www.eiae.org. For lamp-specific disposal information, check
www.lamprecycle.org.
iii
Disposal instructions
Disposal instructions
Do not throw this electronic device into the trash when discarding. To minimize
pollution and ensure utmost protection of the global environment, please recycle.
USA
For electronic products containing an LCD/CRT monitor or display:
Lamp(s) inside this product contain mercury and must be recycled or disposed of
according to local, state or federal laws. For more information, contact the Electronic
Industries Alliance at www.eiae.org. For lamp-specific disposal information, check
www.lamprecycle.org.
iii
About this User’s Guide
Disposal instructions
About this User’s Guide
Welcome to the Acer n300 Handheld User’s Guide. This User’s Guide is designed to
help you get up and running quickly with your new Acer n300—a Microsoft® Windows
MobileTM Version 5.0 Software for Pocket PC handheld. It describes all you need to
know about how to use your handheld as well as the application programs that come
with it.
This User’s Guide will discuss the following topics:
•
•
•
•
•
•
A tour of the Acer n300 system
Setup and maintenance procedures
Taking advantage of your handheld’s expansion features
Synchronizing data between your handheld and your computer
Connecting your handheld to a computer, a network, or the Internet
Personalizing your handheld with your own preference settings
This User’s Guide introduces you to the many ways your Acer n300 can help you
organize and manage both business and personal information to make your everyday
activities a more productive and satisfying experience.
iv
First things first
Your guides
First things first
We would like to thank you for making Acer n300 your choice for your handheld
needs. Your new sleek Acer n300 is a multi-functional tool packed with user-friendly
features and high-performance applications designed to make organizing workrelated information and synchronizing it with your personal activities a time-efficient
task. We hope you enjoy using your Acer n300 as much as we enjoyed creating it for
you.
Use your Acer n300 to effectively manage information related to both business and
personal tasks.
• Software installation and new applications
• Use the Microsoft® Windows MobileTM Version 5.0 software to perform
organizing and computing tasks
• Synchronize the information on your computer with the information on your
handheld using Microsoft® ActiveSync®
• Get connected to the Internet with the Microsoft® Mobile Internet Explorer
• Create an on-the-go backup file
• Expand your handheld’s capabilities using the built-in SD/MMC slot
• Exchange information between devices that have Bluetooth® /
WLAN(optional) capabilities.
• Customize your handheld based on your personal requirements and
preferences
Your guides
To help you use your Acer n300, we have designed a set of guides:
For information on:
Programs on your handheld
Refer to:
This User’s Guide. Bundled in the Acer n300 Handheld
Getting Started Disk, it provides online reference for
using your Acer n300.
The Acer n300 Handheld Help. To view Help,
tap
and then Help.
Up-to-date information regarding
your handheld
http://global.acer.com/
Service enquiries
http://global.acer.com/support/index.htm
v
First things first
Package contents
Package contents
Your Acer n300 comes packed in a cardboard box. Carefully unpack the box and
remove the contents. If any of the following items are missing or damaged, contact
your dealer immediately:
• Acer n300 handheld
• Acer n300 Handheld Quick Guide
• Stylus
• Acer n300 Handheld Getting
Started Disk
• Cradle (for n311) or USB Sync
Cable ( USB Client, DC-in ) (for
n310)
• End User License Agreement
• AC Power Adapter
• International Travelers Warranty
• n300 series pouch
• Battery Pack
Maintaining your Acer n300
This section provides information on the following:
• Proper care and usage of your handheld
• Resetting your handheld
Proper care and usage of your Acer n300
Your Acer n300’s rugged and tough construction is designed to provide you with years
of reliable and trouble-free service. Observing the following general maintenance
procedures will help ensure this:
vi
1
Take care not to scratch the screen of your handheld. Keep the screen clean. When
working with your handheld, use the supplied stylus or plastic-tipped pens intended
for use with touch-sensitive screens. Never use an actual pen or pencil or other sharp
object on the screen surface.
2
Your handheld is not waterproof and should not be exposed to rain or moisture.
Under extreme conditions, water may enter the circuitry through the front panel
buttons or expansion slots. In general, treat your handheld as you would a pocket
calculator or other small electronic device.
3
Take care not to drop your handheld or subject it to any strong impact. Do not place
your handheld in your back pocket; if you sit on it, you may damage it.
4
Protect your handheld from temperature extremes. For example, do not leave your
handheld on the dashboard of a car on a hot day or on a day when temperatures are
below the freezing point. Also, keep it away from heaters and other sources of heat.
5
Do not use or store your handheld in any location that is extremely dusty, damp or
wet. Always use the (included) SD dummy card to protect the connectors when not in
use.
6
Use a soft, damp cloth to clean your handheld. If the surface of the screen becomes
soiled, clean it with a soft cloth moistened with diluted window-cleaning solution.
You can also use n300 series pouch to clean your handheld (included).
First things first
Maintaining your Acer n300
Resetting your Acer n300
You may have to perform a reset if your handheld no longer responds to the buttons
on the screen.
Performing a soft reset
A soft reset allows your handheld to get a fresh start, similar to rebooting a computer.
To perform a soft reset:
• Using the tip of your stylus, lightly press the reset button inside the hole on
the bottom of your handheld.
Performing a hard reset
A hard reset will erase all records and entries stored in your handheld. Never perform
a hard reset unless a soft reset does not correct your problem. To perform a hard reset:
1. Press and hold the Today and Messaging (a) buttons on your Handheld.
vii
First things first
Maintaining your Acer n300
2. While holding the Today and Messaging buttons (a), using the tip of your stylus,
lightly press the reset button inside the hole (b) on the bottom of your handheld.
NOTE: When you perform a hard reset, formats, preferences, and other settings including
date and time are restored to their factory default settings.
viii
Contents
Disposal instructions . . . . . . . . . . . . . . . . . . . . . . . . . . . iii
About this User’s Guide
iv
First things first
v
Your guides . . . . . . . . . . . . . .
Package contents . . . . . . . . . . . .
Maintaining your Acer n300 . . . . . . .
Proper care and usage of your Acer n300 .
Resetting your Acer n300 . . . . . . .
.
.
.
.
.
.
.
.
.
.
.
.
.
.
.
.
.
.
.
.
.
.
.
.
.
.
.
.
.
.
.
.
.
.
.
.
.
.
.
.
.
.
.
.
.
.
.
.
.
.
.
.
.
.
.
.
.
.
.
.
.
.
.
.
.
.
.
.
.
.
.
.
.
.
.
. v
. vi
. vi
. vi
. vii
.
.
.
.
.
.
.
.
.
.
.
.
.
.
.
.
.
.
.
.
.
.
.
.
.
.
.
.
.
.
.
.
.
.
.
.
.
.
.
.
.
.
.
.
.
.
.
.
.
.
.
.
.
.
.
.
.
.
.
.
.
.
.
.
.
.
.
.
.
.
.
.
.
.
.
.
.
.
.
.
.
.
.
.
.
.
.
.
.
.
.
.
.
.
.
.
.
.
.
.
.
.
.
.
.
.
.
.
.
.
.
.
.
.
.
.
.
.
.
.
.
.
.
.
.
.
.
.
.
.
.
.
.
.
.
.
.
.
.
.
.
.
.
.
.
.
.
.
.
.
.
.
.
.
.
.
.
.
.
.
.
.
.
.
.
.
.
.
.
.
.
.
.
.
.
.
.
.
.
.
.
.
.
.
.
.
.
.
.
.
.
.
.
.
.
.
.
.
.
.
.
.
.
.
.
.
.
.
.
.
.
.
.
.
.
.
.
.
.
.
.
.
.
.
.
.
.
.
.
.
.
.
.
.
.
.
.
.
.
.
.
.
.
.
.
.
.
.
.
.
.
.
.
.
.
.
.
.
.
.
.
.
.
.
.
.
.
.
.
.
.
.
.
.
.
.
.
.
.
.
.
.
.
.
.
.
.
.
.
.
.
.
.
.
.
.
.
.
.
.
.
.
.
.
.
.
.
.
.
.
.
.
.
.
.
.
.
.
.
.
.
.
.
.
.
.
.
.
.
.
.
.
.
.
.
.
.
.
. 1
. 1
. 1
. 1
. 2
. 2
. 2
. 2
. 2
. 2
. 3
. 3
. 4
. 5
. 6
. 7
. 7
. 7
.10
.11
.11
.13
.15
.15
.15
.15
1 Getting started
1
System requirements . . . . . . . . . . . .
Features summary . . . . . . . . . . . . . .
Performance . . . . . . . . . . . . . .
Display . . . . . . . . . . . . . . . . .
Audio . . . . . . . . . . . . . . . . .
Proprietary 26-pin I/O connector . . . . . .
Connectivity. . . . . . . . . . . . . . .
Expansion . . . . . . . . . . . . . . .
Battery . . . . . . . . . . . . . . . . .
Design and ergonomics . . . . . . . . . .
Acer n300 tour . . . . . . . . . . . . . . .
Front view . . . . . . . . . . . . . . .
Left view . . . . . . . . . . . . . . . .
Top view . . . . . . . . . . . . . . . .
Bottom view . . . . . . . . . . . . . .
Rear view . . . . . . . . . . . . . . .
Preparing to use your Acer n300 . . . . . . . .
Charging your Acer n300 . . . . . . . . .
Setting up your Acer n300 . . . . . . . . .
Installing the Microsoft® ActiveSync® software
Connecting the computer . . . . . . . . .
Performing the first synchronization process .
Command interface . . . . . . . . . . . . .
Handheld buttons and the stylus . . . . . .
Start menu . . . . . . . . . . . . . . .
Online help . . . . . . . . . . . . . . .
2 Backup and restore data
17
Backup function . . . . . . . . . . . . . . . . . . . . . . . . . . .18
Restore function . . . . . . . . . . . . . . . . . . . . . . . . . . .18
3 Using expansion features
21
Using an SD/MMC card . . . . . . . . . . . . . . . . . . . . . . . . . .21
Inserting an SD/MMC card . . . . . . . . . . . . . . . . . . . . . . .21
Removing an SD/MMC card . . . . . . . . . . . . . . . . . . . . . .22
1
Using an USB thumb drive . . . . . . . . . . . . . . . . . . . . . . . . 22
Inserting an USB thumb drive - Through the Cradle . . . . . . . . . . . . 22
Inserting an USB thumb drive - Through the 3-in-1 Sync cable
(optional accessory) . . . . . . . . . . . . . . . . . . . . . . . . . 22
Appendix A: Regulation & safety notices
FCC notice . . . . . . . . . . . . . . . . . . . . . . . . . . . .
Notice: Shielded cables . . . . . . . . . . . . . . . . . . . . . . .
Notice: Peripheral devices . . . . . . . . . . . . . . . . . . . . . .
Caution . . . . . . . . . . . . . . . . . . . . . . . . . . . . .
Operation conditions . . . . . . . . . . . . . . . . . . . . . . . .
Notice: Canadian users . . . . . . . . . . . . . . . . . . . . . . .
Remarque à l’intention des utilisateurs canadiens . . . . . . . . . . . .
Declaration of Conformity for EU countries . . . . . . . . . . . . . . .
Important safety instructions . . . . . . . . . . . . . . . . . . . . .
LCD pixel statement . . . . . . . . . . . . . . . . . . . . . . . .
Radio device regulatory notice . . . . . . . . . . . . . . . . . . . .
General . . . . . . . . . . . . . . . . . . . . . . . . . . . . .
European Union (EU) . . . . . . . . . . . . . . . . . . . . . . . .
List of applicable countries . . . . . . . . . . . . . . . . . . . . . .
The FCC RF safety requirement . . . . . . . . . . . . . . . . . . . .
Canada — Low-power license-exempt radio communication devices (RSS-210)
Exposure of humans to RF fields (RSS-102) . . . . . . . . . . . . . . .
2
23
.
.
.
.
.
.
.
.
.
.
.
.
.
.
.
.
.
.
.
.
.
.
.
.
.
.
.
.
.
.
.
.
.
.
23
23
23
24
24
24
24
24
25
26
26
26
26
27
27
27
27
1 Getting started
System requirements
1 Getting started
This chapter will discuss the following topics:
•
•
•
•
•
Basic requirements
Feature highlights of your Acer n300
Acer n300 system tour
Step-by-step procedures on how to prepare your handheld for use
Basic concepts in using your handheld
System requirements
In order to install the Microsoft® ActiveSync® software and use your new Acer n300
with a computer at work or at home, be sure the system(s) meet the following
minimum system and program requirements.
•
•
•
•
•
•
•
•
Intel® Pentium® processor (minimum 233 MHz)
64 MB RAM
120 MB disk space
CD-ROM drive
USB port
SVGA (or compatible) graphics card supporting 256 colours
Microsoft® Windows® XP, 2000
Microsoft® Internet Explorer 4.01
Features summary
Performance
• Samsung S3C2440 processor at 300/400 MHz
• System memory:
– 64 MB mobile SDRAM for system operation.
– 64 MB / 128 MB of flash memory for operating system, embedded
applications, user applications and storage
• Microsoft® Windows MobileTM Version 5.0 Software for Pocket PC, Premium
Edition with Microsoft® Outlook® 2002
Display
• 3.7" high-brightness transflective TFT LCD
• 480 x 640 (VGA) resolution
• 65,536 colors
1
1 Getting started
Features summary
Audio
• Built-in industry standard 3.5 mm stereo earphone jack , 3 ring type
• Built-in mono speaker
• Built-in mono microphone
Proprietary 26-pin I/O connector
•
•
•
•
USB Host (female)
USB Client (male)
Serial
DC power in
Connectivity
• Bluetooth® 1.2
• IEEE 802.11b WLAN (optional)
Expansion
• SD/MMC slot (SDIO compatible)
• USB Host 1.1
Battery
• Rechargeable 1200 mAH Lithium ion battery
• 8 hours operation time for normal usage (when backlight is inactive)
NOTE: Length of battery operation will depend on power consumption which is based on
system resource use. For example, constantly using the backlight or using power-demanding
applications will shorten battery life between charges.
• 3 hour charging time from empty to full capacity
Design and ergonomics
• Stylish, light and thin design
Specifications
Dimensions
Height
110 mm
Width
70 mm
Depth
13.7 mm
Weight
135 g (including stylus)
• User-friendly navigation features
– 5-way joystick for one-handed operation
– Quick buttons for easy launch of commonly-used applications
– Press
2
for one-tap access to all available applications
1 Getting started
Acer n300 tour
Acer n300 tour
Front view
No.
1
Component
Description
®
Power / Bluetooth /
802.11b WLAN LED
indicator
Power LED indicator.
- status description:
•
•
•
Flashing green - Charging
Steady green - Charging complete
Flashing red - Alarm indicator
Bluetooth® / 802.11b WLAN LED indicator.
- status description:
• Flashing blue - Bluetooth® / 802.11b WLAN is on
2
3.7” TFT LCD
Displays the applications and data stored in your handheld.
3
Today button
Displays the Today screen.
4
Messaging button
Activates the Messaging program.
5
Built-in microphone
Inputs audio into your handheld.
6
Calendar button
Activates the Calendar program.
3
1 Getting started
Acer n300 tour
No.
Component
Description
7
5-way joystick
Enables 5 direction scrolling in various menus and applications. Press the center of the joystick on to simulate the
function of the Enter key.
8
Contacts button
Activates the Contacts program.
NOTE: If your handheld is off, pressing any Quick button turns on the handheld and
launches the program assigned to that button.
Left view
No.
Label
Description
1
Power button
Press the button to turn on your handheld (power LED lights
up green) if it is off. Press the button to turn off your
handheld if it is on.
2
Hold switch
Slide to lock all buttons from being accidentally pressed when
handheld is placed in pocket or bag. A red dot is visible on
the hold switch when in hold state.
Using the backlight
If lighting conditions make it difficult for you to see the information on your
handheld, use the backlight to illuminate your screen.
When the backlight is off, press the power button and hold it down for about two
seconds. Release the button when the backlight turns on. Alternatively, you can tap
the LCD to activate the backlight.
When the backlight is on, press the power button and hold it down for two
seconds. Release the button when the backlight turns off.
4
1 Getting started
Acer n300 tour
Top view
No.
Label
Description
1
Stylus holder
Secures the stylus to your handheld. To use the stylus, remove
from its holder and hold it as you would hold a pen or pencil.
2
SD/MMC slot
Accepts a Secure Digital or MultiMedia Card, allowing you to
add more memory, install add-on applications or use audio or
text files stored on it with internal applications. You can also use
expansion cards to back up data from your handheld.
3
Earphone jack
Connects to audio line-out devices (earphones/headphones).
5
1 Getting started
Acer n300 tour
Bottom view
No.
6
Label
Description
1
Proprietary
26-pin I/O
connector
Connects your handheld to a portable or desktop computer and
DC power supply to an AC wall outlet to charge the battery.
- USB Host
- USB Client
- Serial
- DC power in
2
Soft Reset
Using the tip of your stylus, lightly press the reset button inside
the hole on the bottom of your handheld.
1 Getting started
Preparing to use your Acer n300
Rear view
No.
Label
Description
1
Speaker
Outputs audio from your handheld.
2
Battery access
latch
Unlatches the battery cover to remove the battery pack.
3
Battery bay
Houses the handheld’s battery pack.
Preparing to use your Acer n300
Perform the following easy installation tasks to begin using your handheld:
• Charge your handheld
• Set up your handheld
• Install the Microsoft® ActiveSync® software in your computer
• Connect n300 to your computer
• Perform the first ActiveSync operation
Charging your Acer n300
For initial use, you need to charge your handheld for four hours. After that, you can
charge it for a few minutes each day to recharge the battery to full capacity. Normally,
7
1 Getting started
Preparing to use your Acer n300
you can use your handheld for 8 straight hours of operation (backlight inactive)
before you need to recharge the battery.
To charge your Acer n300
Unlock the battery access latch to open the battery cover (a), insert the battery pack into the
battery bay (b), then close the battery cover to lock the battery pack..
NOTE: To take the battery pack out, first unlock the battery access latch to open the battery
cover, then pull the battery pack out of the bay.
Connecting the Sync cable
8
1
Plug the sync cable into the 26-pin I/O connector on the bottom of your handheld.
2
Plug the AC adapter into any AC current outlet and charge the device for at least four
hours.
1 Getting started
Preparing to use your Acer n300
Connecting the Cradle
1
Connect the AC adapter cord to the DC-in jack at the back of the cradle.
2
Plug the AC adapter into any AC current outlet and charge the device for at least 4
hours.
Power LED status during charging:
• Charging - LED indicator flashes green
• Charging complete - LED indicator steady green
If the battery level becomes low in the course of normal use, a status icon appears on
the handheld screen indicating low or critical low battery status. Perform an
ActiveSync® operation to back up your data; then recharge the battery.
9
1 Getting started
Preparing to use your Acer n300
Setting up your Acer n300
After you have initially charged your handheld for four hours, you can now set it up.
Refer to the instructions below.
To set up your Acer n300
10
1
Disable hold switch first.
2
Turn on your handheld by pressing the power button on the left side.
3
Follow the onscreen instructions to set up your handheld.
1 Getting started
Preparing to use your Acer n300
Installing the Microsoft® ActiveSync® software
The main function of the Microsoft® ActiveSync® software is to synchronize the
information on your computer with the information on your handheld.
Synchronization compares the data on your handheld with your computer and
updates the information on both locations. This will then serve as a backup data in
case something happens to your handheld.
The following instructions tell you how to install the ActiveSync® software.
Important installation notes
• Before installing ActiveSync®, make sure that your handheld cradle is not yet
connected to your computer. Connect the cradle only after you have finished
installing ActiveSync®.
• By default, the Getting Started Disk will check the version of Outlook®/
ActiveSync® included on the disk and will compare this with the version of
Outlook®/ActiveSync® installed on your computer. If the version of Outlook®/
ActiveSync® on the disk is newer than the version installed, then the disk will
recommend an upgrade. If the version on the disk is older or the same as that
installed, then Outlook®/ActiveSync® installation will be skipped.
• It is recommended that users install Outlook® 2002 from this CD before
installing ActiveSync®.
• Do not copy the ActiveSync® files to your computer’s hard disk. You must use
the Acer n300 Handheld Getting Started Disk to place the files in their proper
locations and to decompress the files.
To install the Microsoft® ActiveSync® software
1
Exit any open programs, including those that run at startup, and disable any virusscanning software.
2
Insert the Acer n300 Handheld Getting Started Disk into the computer’s CD-ROM
drive.
The CD’s welcome page appears.
3
Click the animated forward icon to go to the next screen.
4
Please follow the instructions to install Microsoft® Outlook® 2002 and Microsoft®
ActiveSync® 4.0.
After installation, the ActiveSync® icon
will appear on your computer’s system
tray (on the lower right-hand corner of the screen).
Refer to the ActiveSync® software online Help for information on how to use the
software. If at any time, you would like to restart this setup program, simply re-insert
the CD into the CD-ROM drive.
Connecting the computer
The USB sync cable or cradle that comes with your handheld enables you to
synchronize the information on your handheld with the data in your computer using
ActiveSync® technology.
11
1 Getting started
Preparing to use your Acer n300
To connect the computer
Via the USB Sync cable
1
Plug the sync cable into the 26-pin I/O connector on the bottom of your handheld.
2
Plug the AC adapter into any AC current outlet.
3
Plug the USB client connector into an available USB port on your computer.
1
Connect the AC adapter cord to the DC-in jack at the back of the cradle.
2
Put n300 on the cradle.
3
Plug the AC adapter into any AC current outlet.
4
Connect the mini USB client connector into the USB client port at the back of the
cradle.
5
Plug the USB client connector into an available USB port on your computer.
Via the Cradle
12
1 Getting started
Preparing to use your Acer n300
Performing the first synchronization process
After completing the setup procedures you can now perform the first ActiveSync®
operation with the help of the 'New Partnership' setup wizard.
This wizard will help you:
• Set up a partnership so you can synchronize information between your
handheld and your computer
• Customize your synchronization settings
To perform the first synchronization process
1
Connect the sync cable to your handheld.
13
1 Getting started
Preparing to use your Acer n300
2
Plug the USB client connector into a USB port on your computer.
The 'New Partnership' setup wizard will automatically start on your computer screen.
NOTE: If the wizard does not automatically appear, launch ActiveSync® on your computer
by clicking on its icon from
>Programs.
3
Follow the onscreen instructions.
The first synchronization process will automatically begin when you finish using the
wizard.
After your first synchronization, take a look at Calendar, Contacts, and Tasks on your
handheld. You'll notice that information you've stored in Microsoft Outlook on your
computer has been copied to your handheld, and you didn't have to type a word.
Disconnect your handheld from your computer and you're ready to go!
Once you have set up ActiveSync® and completed the first synchronization process,
you can initiate synchronization from your handheld. To switch to ActiveSync® on your
handheld, tap
>ActiveSync®.
14
1 Getting started
Command interface
Command interface
Handheld buttons and the stylus
Your handheld has hardware buttons that control actions and scroll functions, and a
stylus for selecting items and entering information.
On your handheld, the stylus replaces the mouse.
• Tap. Touch the screen once with the stylus to open items and select options.
• Drag. Hold the stylus on the screen and drag across the screen to select text
and images. Drag in a list to select multiple items.
• Tap and hold. Tap and hold the stylus on an item to see a list of actions
available for that item. On the pop-up menu that appears, tap the action you
want to perform.
Start menu
From the Start menu, you can select programs, settings and Help topics. To display the
Start menu, from the top of any screen tap
.
Online help
Refer to online Help for information on how to use the applications embedded. Please
press
>Help>Content for online help.
You can find information about the following Microsoft® applications.
• Outlook® Mobile - Organize personal information: calendar, contacts, tasks,
notes and messaging
• WordTM Mobile - Word processing application compatible with Microsoft®
Word
• ExcelTM Mobile - Spreadsheet application compatible with Microsoft® Excel
• PowerPointTM Mobile - View presentation slides (compatible with Microsoft®
PowerPoint)
• Windows® MediaTM Player 10 Mobile - Play back multimedia files: MP3,
Windows® Media audio, Windows® Media video, and streaming video files
• Internet Explorer Mobile - Browse websites and download files and images
• Calculator - Easy-to-use calculator
• Games - Enjoy playing classic Solitaire and Bubble Breaker.
• File Explorer - Manage files in main memory or on storage media cards
Microsoft® ActiveSync® 4.0 - Synchronize PIM data with Microsoft® Outlook®
Pictures & Videos - View pictures and videos
Lunar View - View the Chinese lunar calendar
Pocket MSN - Provide instant access to your Hotmail account, and MSN
Messenger Contacts list
• Terminal Services Client - Run applications or remotely manage a server from
the Pocket PC
•
•
•
•
15
1 Getting started
Command interface
If you need Help for any specific application, launch the application and then tap
>Help for online help.
You can use your handheld to exchange information with mobile devices, your
computer, a network, or the Internet. If you need more information on Bluetooth® or
Wireless LAN (optional):
Bluetooth® Help
• Turn Bluetooth® on by tapping
Manager or Bluetooth® Settings>
>Turn Bluetooth® on>
>Bluetooth®
>Help for Bluetooth® help.
• Or you can tap
>Help>Contents>Setting Up Connections for more
®
Bluetooth information.
Wireless LAN Help (optional)
• Turn Wireless LAN on by tapping
>Turn WLAN on>
>WLAN Utility>
>Help for WLAN help.
• Or you can tap
>Help>Contents>Setting Up Connections or Browsing the
Web for more information.
16
2 Backup and restore data
2 Backup and
restore data
Backup/Restore enables you to back up data files and applications from your
handheld to a storage device and to restore data to your handheld. Advanced security
features offer password protection for sensitive documents/applications during
Backup and/or Restore operations. The expansion features of your handheld allow
you to use any of the following storage devices:
• SD Card (Secure Digital Card)
• MMC card
• USB thumb drive
Please do not press any button including the power button during a backup or restore
operation.
There are two tabs (from left to right) in the program window corresponding to the
two functions of Backup and Restore.
• Backup
• Restore
To launch Backup/Restore:
1
Insert a storage device (SD/MMC card or USB thumb drive) if you want to do backup/
restore operation on a storage device.
For instructions on how to insert storage devices, please refer to "3 Using expansion
features" on page 21.
2
Tap
>Programs>Backup/Restore.
17
2 Backup and restore data
Backup function
To perform data backup
1
Close all running programs except for Backup/Restore.
2
In the Backup tab, choose whether to accept the default filename (MyBackup) or type
a new one by tapping on the keyboard icon on the bottom of the screen.
3
Select a storage device from the 'Backup to' pull-down menu.
4
Define the backup scope (default: PIM only) from ‘Option' pull-down menu.
5
Check the password box and enter a password if you want to secure the backup file.
6
Tap
to proceed with the backup process.
During the backup process, a progress screen will appear displaying backup status.
7
When the backup process is completed, a message box appears, saying that backup
operation is completed.
Restore function
You can only restore backup files that are generated by Backup/Restore; file format is
*.abk (Acer backup).
To perform data restoration
1
18
Close all running programs except for Backup/Restore.
2 Backup and restore data
2
Select a source storage device from the 'Restore from' pulldown menu.
The lower half of the screen will display a list of files contained in the selected storage
device. Filename, file size and date when the backup file was created are indicated in
the list.
3
Tap a filename to select the file you wish to restore, and please note that non-.abk
files are not shown.
Select file, then tap
information including:
•
•
•
•
button. The window will shift to display the backup file
File name - filename of the selected .abk file.
Backup date - date when the selected .abk file was created.
Backup option & file size.
Main memory free size - free space in your handheld’s main storage memory.
This should be bigger than the file size of the selected .abk file for the restore
process to continue.
4
Tap
again to proceed with the restore process.
5
During the restore process, a progress screen will appear displaying restore status.
6
When the restore process is completed, a message box appears, saying restore
operation is complete.
To delete a file from a storage device
To increase the size of available free space in a storage device, you can delete files that
you no longer need.
1
Tap the Restore tab.
2
Tap a menu item to select a storage device.
3
From the list, tap a filename until a delete pop-up menu is displayed.
19
2 Backup and restore data
4
20
Tap Delete to remove the file.
3 Using expansion features
Using an SD/MMC card
3 Using expansion
features
The slim and lightweight design of your Acer n300 belies its impressive expansion
features . These expansion features include:
• SD/MMC slot
• USB host port via sync cable or cradle
These expansion features allow you to:
• Install additional applications
• Increase storage capacity
• Perform backup procedures
NOTE: When using any peripheral device with your handheld, please refer to the
documentation accompanying each device for information on how to install and operate it.
Using an SD/MMC card
On the top side of your handheld is an SD/MMC slot. This allows you to expand your
handheld memory and perform data backup.
Refer to "Top view" on page 5 for the location of the SD/MMC slot.
Inserting an SD/MMC card
1
Hold your handheld securely.
2
Insert the SD/MMC card into the SD/MMC slot.
21
3 Using expansion features
Using an USB thumb drive
3
Push the card into the slot using your finger until you feel the card lock and hear an
audible system sound. This indicates that the card is properly seated within the slot.
Removing an SD/MMC card
1
Hold your handheld securely.
2
Release the card from the slot by using your thumb to push against the top of the
card, as if you were pushing it further into the slot (a). An audible system sound and a
click will signal that the card has been released.
3
Gently remove the card from the slot (b).
Using an USB thumb drive
Your Acer n300 supports USB host expansion. Via cradle or sync cable, you can access a
USB thumb drive directly from your n300.
Inserting an USB thumb drive - Through the Cradle
1
Connect the AC adapter cord to the DC-in jack at the back of the cradle.
2
Plug the AC adapter into any AC current outlet.
3
Insert the USB thumb drive into USB host port of Cradle.
Inserting an USB thumb drive - Through the 3-in-1 Sync
cable (optional accessory)
22
1
Plug the sync cable into the 26-pin I/O connector on the bottom of your handheld.
2
Plug the AC adapter into any AC current outlet.
3
Insert the USB thumb drive into USB host port of sync cable.
Appendix A: Regulati o n & s a f e t y n o t i c e s
FCC notice
Appendix A:
Regulation & safety notices
This appendix lists the general notices of your PDA.
FCC notice
This device has been tested and found to comply with the limits for a Class B digital
device pursuant to Part 15 of the FCC rules. These limits are designed to provide
reasonable protection against harmful interference in a residential installation. This
device generates, uses, and can radiate radio frequency energy and, if not installed
and used in accordance with the instructions, may cause harmful interference to radio
communications.
However, there is no guarantee that interference will not occur in a particular
installation. If this device does cause harmful interference to radio or television
reception, which can be determined by turning the device off and on, the user is
encouraged to try to correct the interference by one or more of the following
measures:
•
Reorient or relocate the receiving antenna.
•
Increase the separation between the device and receiver.
•
Connect the device into an outlet on a circuit different from that to which the
receiver is connected.
•
Consult the dealer or an experienced radio/television technician for help.
Notice: Shielded cables
All connections to other computing devices must be made using shielded cables to
maintain compliance with FCC regulations.
Notice: Peripheral devices
Only peripherals (input/output devices, terminals, printers, etc.) certified to comply
with the Class B limits may be attached to this equipment. Operation with noncertified peripherals is likely to result in interference to radio and TV reception.
23
Appendix A: Regulation & safety notices
Caution
Caution
Changes or modifications not expressly approved by the manufacturer could void the
user's authority, which is granted by the Federal Communications Commission, to
operate this computer.
Operation conditions
This device complies with Part 15 of the FCC Rules. Operation is subject to the
following two conditions: (1) this device may not cause harmful interference, and (2)
this device must accept any interference received, including interference that may
cause undesired operation.
Notice: Canadian users
This Class B digital apparatus complies with Canadian ICES-003.
Remarque à l’intention des utilisateurs canadiens
Cet appareil numerique de la classe B est conforme a la norme NMB-003 du Canada.
Declaration of Conformity for EU countries
Hereby, Acer, declares that this PDA series is in compliance with the essential
requirements and other relevant provisions of Directive 1999/5/EC. (Please visit http://
global.acer.com/products/pda/reg-pda/index.htm for complete documents.)
Compliant with Russian regulatory certification
24
Appendix A: Regulati o n & s a f e t y n o t i c e s
Important safety instructions
Important safety instructions
Read these instructions carefully. Save them for future reference.
1
Follow all warnings and instructions marked on the product.
2
Unplug this product from the wall outlet before cleaning. Do not use liquid
cleaners or aerosol cleaners. Use a water-moistened cloth for cleaning.
3
Do not use this product near water.
4
Do not place this product on an unstable cart, stand or table. If the product falls,
it could be seriously damaged.
5
This product should be operated from the type of power indicated on the
marking label. If you are not sure of the type of power available, consult your
dealer or local power company.
6
Do not allow anything to rest on the power cord. Do not locate this product
where people will walk on the cord.
7
If an extension cord is used with this product, make sure that the total ampere
rating of the equipment plugged into the extension cord does not exceed the
extension cord ampere rating. Also, make sure that the total rating of all products
plugged into the wall outlet does not exceed the fuse rating.
8
Never push objects of any kind into this product through cabinet slots as they may
touch dangerous voltage points or short-out parts that could result in a fire or
electric shock. Never spill liquid of any kind onto or into the product.
9
Do not attempt to service this product yourself, as opening or removing covers
may expose you to dangerous voltage points or other risks. Refer all servicing to
qualified service personnel.
10 Unplug this product from the wall outlet and refer servicing to qualified service
personnel under the following conditions:
a
When the power cord or plug is damaged or frayed.
b
If liquid has been spilled into the product.
c
If the product has been exposed to rain or water.
d
If the product does not operate normally when the operating instructions are
followed. Adjust only those controls that are covered by the operating instructions,
since improper adjustment of other controls may result in damage and will often
require extensive work by a qualified technician to restore the product to normal
condition.
e
If the product has been dropped or the case has been damaged.
f
If the product exhibits a distinct change in performance, indicating a need for service.
11 The Acer PDA uses a lithium battery.
Replace the battery with the same type as the product's battery we recommend in
the product specification list. Use of another battery may present a risk of fire or
explosion.
12 Warning! Batteries may explode if not handled properly. Do not disassemble or
dispose of them in fire. Keep them away from children and dispose of used
batteries promptly.
25
Appendix A: Regulation & safety notices
LCD pixel statement
13 To avoid hazard of unexpected electrical shock, use the AC adapter only when the
wall socket is properly grounded.
14 Do not use your PDA while exercising.
LCD pixel statement
The LCD unit is produced with high-precision manufacturing techniques. Nevertheless,
some pixels may occasionally misfire or appear as black or red dots. This has no effect
on the recorded image and does not constitute a malfunction.
Radio device regulatory notice
NOTE:
only.
Below regulatory information is for models with wireless LAN and/or Bluetooth®
General
This product complies with the radio frequency and safety standards of any country or
region in which it has been approved for wireless use. Depending on configurations,
this product may or may not contain wireless radio devices (such as wireless LAN and/
or Bluetooth® modules). Below information is for products with such devices.
European Union (EU)
This device complies with the essential requirements of the European Council
Directives listed below:
73/23/EEC Low Voltage Directive
•
EN 60950
89/336/EEC Electromagnetic Compatibility (EMC) Directive
•
EN 55022
•
EN 55024
•
EN 61000-3-2/-3
99/5/EC Radio & Telecommunications Terminal Equipment (R&TTE) Directive
26
•
Art.3.1a) EN 60950
•
Art.3.1b) EN 301 489 -1/-17
•
Art.3.2) EN 300 328-2
Appendix A: Regulati o n & s a f e t y n o t i c e s
List of applicable countries
List of applicable countries
EU member states as of May 2004 are: Belgium, Denmark, Germany, Greece, Spain,
France, Ireland, Italy, Luxembourg, the Netherlands, Austria, Portugal, Finland,
Sweden, United Kingdom Estonia, Latvia, Lithuania, Poland, Hungary, Czech Republic,
Slovak Republic, Slovenia, Cyprus and Malta. Usage allowed in the countries of
European Union, as well as Norway, Switzerland, Iceland and Liechtenstein. This
device must be used in strict accordance with the regulations and constraints in the
country of use. For further information, please contact local office in the country of
use.
The FCC RF safety requirement
The radiated output power of the wireless LAN Mini PCI Card and Bluetooth® card is
far below the FCC radio frequency exposure limits. Nevertheless, the Acer PDA shall be
used in such a manner that the potential for human contact during normal operation
is minimized as follows:
• An improper installation or unauthorized use may cause harmful interference
to radio communications. Also any tampering of the internal antenna will
void the FCC certification and your warranty.
• To comply with FCC RF exposure compliance requirements, a separation
distance of at least 20 cm (8 inches) must be maintained between this device
and any other antennas or transmitters.
Canada — Low-power license-exempt radio
communication devices (RSS-210)
a
Common information
Operation is subject to the following two conditions:
1. This device may not cause interference, and
2. This device must accept any interference, including interference that may
cause undesired operation of the device.
b
Operation in 2.4 GHz band
To prevent radio interference to the licensed service, this device is intended
to be operated indoors and installed outdoors is subject to licensing.
Exposure of humans to RF fields (RSS-102)
The Acer PDA employs low gain integral antennas that do not emit RF field in excess
of Health Canada limits for the general population; consult Safety Code 6, obtainable
from Health Canada's website at www.hc-sc.gc.ca/rpb.
27
Appendix A: Regulation & safety notices
Exposure of humans to RF fields (RSS-102)
28
Index
A
ActiveSync® 23
B
backlight 4, 11
Backup
opening 17
Restore function 18
C
command interface 15
device buttons 15
Today screen 15
copyright ii
E
expansion features 21
Acer versatile connector 21
attaching expansion sleeve
inserting CompactFlash card 21
removing CompactFlash card 22
H
handheld
guides v
maintenance vi
package contents vi
resetting vii
handheld features 1
audio 2
battery pack 2
install 11
connectivity 2
display 1
ergonomics 2
expansion 2
performance 1
handheld setup
connecting cradle 11
installing battery 10, 13
installing Microsoft ActiveSync software 11
initial synchronisation 13
S
system tour 3
bottom view 6, 7
front view 3
left view 4
top view 5
T
third-party applications
IA Album LE 20
1
2