1
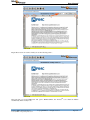
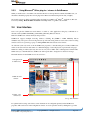
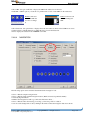
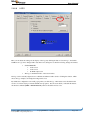
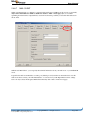
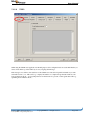
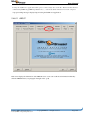
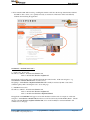
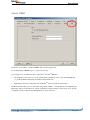
Table of contents
1
INTRODUCTION......................................................................................................................................... 3
2
THE SAFEBROWSER................................................................................................................................. 4
2.1
FUNCTION OVERVIEW .............................................................................................................................. 4
2.2
RECOMMENDED / MINIMAL REQUIRED CONFIGURATION.......................................................................... 4
2.3
INSTALLATION ......................................................................................................................................... 5
2.3.1
SafeBrowser installation ................................................................................................................. 5
2.3.2
Installation of the Adobe® AcrobatTM PDF Reader......................................................................... 6
2.3.3
Using Microsoft® Office plug-ins / viewers in SafeBrowser............................................................ 9
2.4
3
USER INTERFACE ..................................................................................................................................... 9
2.4.1
Navigation bar .............................................................................................................................. 10
2.4.2
Address bar ................................................................................................................................... 11
2.4.3
Main document.............................................................................................................................. 12
2.4.4
Status bar and Window bar........................................................................................................... 12
2.4.5
Logo and animation ...................................................................................................................... 12
2.4.6
Configuration Window (SafeBrowser properties)......................................................................... 13
2.4.6.1
HOME URL & TIME-OUT ...................................................................................................................... 14
2.4.6.2
SCREEN.................................................................................................................................................... 15
2.4.6.3
WEB-BROWSER...................................................................................................................................... 16
2.4.6.4
NAVIGATION.......................................................................................................................................... 17
2.4.6.5
ANIMATION ............................................................................................................................................ 18
2.4.6.6
LOGO........................................................................................................................................................ 19
2.4.6.7
MAIL-CLIENT ......................................................................................................................................... 20
2.4.6.8
EMAIL ...................................................................................................................................................... 22
2.4.6.9
PASSWORD & PROPERTIES................................................................................................................. 23
2.4.6.10
STARTUP & EXIT................................................................................................................................... 24
2.4.6.11
ABOUT..................................................................................................................................................... 25
2.4.6.12
RESTRICTIONS ...................................................................................................................................... 26
2.4.6.13
PLAYLIST................................................................................................................................................ 29
2.4.6.14
PRINT....................................................................................................................................................... 30
PRODUCT SUPPORT ............................................................................................................................... 31
Created by PIMC – http://www.pimc.be
Tested by PMTC – http://www.pmtctest.com
Copyright PIMC nv - All rights reserved
Page 2/31
1 Introduction
We thank you for buying SafeBrowser v2.1 and for your confidence you have in this product to manage and
protect your public Internet kiosk/computer.
SafeBrowser v2.1 runs on top of Microsoft® Internet ExplorerTM v6.0 and will provide a safe browsing
environment for usage in applications such as public Internet/information kiosks.
SafeBrowser v2.1:
- prevents intended and accidental damage of PC software and - settings in unsupervised environments (e.g.
disabling the right mouse function and key combinations such as [CTRL+ALT+DEL], [ALT+TAB],
[ALT+F4], Windows-button, etc.).
- can restrict surfing to pre-selected web pages or URLs (e.g. such as restricting users to browse online library
catalogues only) and bans IP-addresses.
- supports printing HTML- or Acrobat PDF pages
- has an integrated spamming restricted email-client. The integrated email-client allows users to send mails only
to those mail-addresses which are defined as “mail to: -links” on web pages (this is to avoid e.g. mail
spamming from the internet computer/kiosk)
- is customisable with your own company logo
- supports an automatic return to a defined home URL when no user activity is detected
- can start an automatic play list (show case of successive web pages) when there in no user activity. This feature
can be used for POI (Point Of Information) kiosks to show (commercial) information when there is no user
activity.
SafeBrowser is a dedicated kiosk browser. This means the computer will reboot after manually starting the
SafeBrowser program in Microsoft® WindowsTM NT, 2000 or XP, in order to activate the keyboard- and PCprotection. After the reboot of the computer, SafeBrowser will start automatically. The application can be closed
with a (defined or not) password. SafeBrowser doesn’t allow users to download files, use the right mousefunction or other WindowsTM shortcuts. If SafeBrowser is used with Time-Tracs, the reservation system will take
care of the reboot at the beginning and end of a reservation.
This manual explains how to install, configure and use SafeBrowser v2.1. The SafeBrowser application and its
configuration (properties) will be explained further on in this manual.
Created by PIMC – http://www.pimc.be
Tested by PMTC – http://www.pmtctest.com
Copyright PIMC nv - All rights reserved
Page 3/31
2 The SafeBrowser
2.1
Function Overview
SafeBrowser v.2.1 supports the following functions :
Controlled Browsing
- Hide the URL address-bar so users can’t see or enter/edit URLs
- Disable the URL address-bar so users can’t enter/edit URLs
- Enable the URL-address-bar so users can enter/edit URLs for surfing
- Allow or restrict free surfing for users
- Define allowed or restricted URLs for users
- Multiple web-pages and windows
Printing control
- Enable/disable printing of HTML / Acrobat PDF-files for users
- Define on which URLs users can print/can’t print
Email
- Integrated spamming-restricted mail-client which allows users to send mails only to these mail-addresses
which are defined as “mail to: -links” on web pages (this to avoid e.g. mail spamming from the internet
computer/kiosk)
Protection of the program and the WindowsTM system
- Password protected configuration (properties)
- Password protected application exit
- Enable/disable shortcut keys for password protected application exit or configuration properties
- Enable/disable taking over the Windows Shell when starting-up the computer
- Settings to enable or disable automatic computer shut-down when closing the SafeBrowser application
Point Of Information (POI) Kiosk functions
- Automatic return to a defined Home URL after a predefined time-out
- Automatic start of a customisable play-list with preselected web pages after a predefined time-out
Customisation of the browser interface
- Enable / disable navigation buttons (back, forward, refresh, home, exit)
- Hide/show status bar
- Customisable layout such as outer border, background colour, company logo
- Customisable animation when loading page
2.2
Recommended / Minimal required configuration
To run SafeBrowser smoothly, we suggest using the following (minimal) computer configuration :
PII 333Mhz Compatible PC with 64 MB RAM
Minimal screen resolution : 800 x 600
Microsoft® WindowsTM 98, NT 4.0 w/ SP6a, 2000, XP
Microsoft® Internet ExplorerTM v6.0
Installed plug-ins for Microsoft® Internet ExplorerTM v6.0 (e.g. Macromedia Shockwave/Flash, WindowsTM
Media Player, WindowsTM Audio)
Adobe® Acrobat ReaderTM v5.0.5 or higher
Created by PIMC – http://www.pimc.be
Tested by PMTC – http://www.pmtctest.com
Copyright PIMC nv - All rights reserved
Page 4/31
When the public Internet kiosk with SafeBrowser is left unattended in public locations or booths, we suggest a
permanent internet-connection (LAN, T1, Cable, ADSL, …) instead of a PSTN-modem Internet connection.
2.3
2.3.1
Installation
SafeBrowser installation
Before installing SafeBrowser, make sure you have properly installed Microsoft® Internet ExplorerTM v6.0 and
the necessary plug-ins.
To install SafeBrowser, insert the CD-ROM in your CD/DVD-ROM drive and follow the instructions on your
screen. If the autorun does not start automatically, run the SafeBrowser setup on the CD-ROM.
When starting the SafeBrowser for the first time on a WindowsTM NT, WindowsTM 2000 or WindowsTM XP
computer, the following login screen will appear :
In this screen, you will have to define the username and password needed for your WindowsTM logon.
Since SafeBrowser v2.1 is a dedicated kiosk browser, the computer will reboot after manually starting the
SafeBrowser program in Microsoft® WindowsTM NT, 2000 or XP, in order to activate the keyboard- and PCprotection. The keyboard protection will disable keys such as CTRL, ALT, TAB, Windows Button, F11, …
After the reboot of the computer, SafeBrowser will start automatically and use these settings for an automated
WindowsTM logon.
Note again that this only has to be done in WindowsTM NT, 2000 and XP. After completing the information,
click on ‘APPLY’. This will store the information for further logins from SafeBrowser. Click ‘EXIT’ to leave
the login screen. You get the choice of returning to your WindowsTM desktop or starting SafeBrowser.
When the SafeBrowser starts for the first time after installation, you will also need to enter your serial code.
Your serial code consists of 12 characters. Note that this serial code is case sensitive.
In the SafeBrowser application, the first user interaction (mouse click, hit) will setup the final preparations for
the SafeBrowser environment and the program will prompt you to reboot the computer. After this reboot, your
computer will automatically log in (using the username , password and domainname you set in the “Set Login”
here above) and SafeBrowser will be started automatically.
Created by PIMC – http://www.pimc.be
Tested by PMTC – http://www.pmtctest.com
Copyright PIMC nv - All rights reserved
Page 5/31
2.3.2
Installation of the Adobe® AcrobatTM PDF Reader
SafeBrowser supports the opening and reading of AcrobatTM PDF files. Be sure to have installed properly the
AcrobatTM PDF Reader version 5.0.5 (or higher) on your computer.
Before opening an AcrobatTM PDF file in SafeBrowser the first time, be sure you accepted the Adobe®
AcrobatTM license agreement.
We suggest a screen resolution of 1024 x 768 pixels (or higher) for viewing AcrobatTM
SafeBrowser.
PDF-documents in
Start SafeBrowser and open a PDF-document. For optimal security, you should see the following :
Security Zone
Note the text “Restricted for security reason !!!” in the security zone. The security zone (see red marked area
in the screen capture above) should hide the following AcrobatTM toolbar :
The toolbar must be hidden to avoid the user from clicking (or moving over) these AcrobatTM tools. Otherwise
the browsing window with the PDF-document will be closed by SafeBrowser.
However, when you open a PDF-document and you do see some AcrobatTM tools (as shown in the next screen
capture), you must hide them by dragging and dropping the tools in the security zone.
Created by PIMC – http://www.pimc.be
Tested by PMTC – http://www.pmtctest.com
Copyright PIMC nv - All rights reserved
Page 6/31
To drag and drop a tool in the security zone, left click with your mouse on the vertical bar (Tool Handler) of a
tool, hold down your left mouse button and drag the tool into the security zone. Release the left mouse button
and you will see that the tool has disappeared in the security zone. Repeat this action for each AcrobatTM tool
you still see in your PDF-document.
Tool Handler
Created by PIMC – http://www.pimc.be
Tested by PMTC – http://www.pmtctest.com
Copyright PIMC nv - All rights reserved
Page 7/31
Repeat these actions for each tool until you see the following screen :
The next time you start SafeBrowser and open a PDF-document, the AcrobatTM tools should be hidden
automatically in the security zone.
Created by PIMC – http://www.pimc.be
Tested by PMTC – http://www.pmtctest.com
Copyright PIMC nv - All rights reserved
Page 8/31
2.3.3
Using Microsoft® Office plug-ins / viewers in SafeBrowser
When you enable users to view Microsoft® WordTM, ExcelTM or PowerpointTM documents in SafeBrowser, you
should have installed properly these viewer plug-ins for Microsoft® Internet ExplorerTM v6.0 (or higher).
We strongly suggest to disable or hide the Office Assistant in your Microsoft® OfficeTM -applications. This can
be done by clicking “Hide the Office Assistant” in the Help menu of e.g. Microsoft® WordTM.
2.4
User Interface
Users can’t quit the SafeBrowser environment or switch to other applications using key combinations or
shortcuts such as [CTRL+ALT+DEL], [ALT+TAB], [ALT+F4], Windows-button, …
Therefore SafeBrowser activates the keyboard-protection.
SafeBrowser supports multiple browsing windows. Clicking the [SHIFT + LEFT MOUSE] buttons
simultaneously, will open a new browsing window. Up till 12 browsing windows can be active. New browsing
windows can also be opened by pop-ups or clicking HTML-links that activate a new window.
An ‘idle time’ (time-out) can be set in the SafeBrowser properties, so that after this period of time, SafeBrowser
will close all active windows and returns to a defined homepage or starts the play list of preselected web pages.
When free surfing is enabled (allowed), the user can only surf to URLs with a valid/registered domain name.
When users try to enter IP-addresses, SafeBrowser will respond with a “navigation not allowed” message.
The main interface for the SafeBrowser looks as follows :
1. Navigation bar
2. Address bar
3. Main browser
window
4. Status - and
window bar
5. Logo and animation
For optimal safe browsing, each of these screen elements can be configured separately in the SafeBrowser
properties. This can be done in the configuration window. You can open this screen by clicking the logo in the
Created by PIMC – http://www.pimc.be
Tested by PMTC – http://www.pmtctest.com
Copyright PIMC nv - All rights reserved
Page 9/31
top right or by pressing the keys [SHIFT + RIGHT MOUSE]. To prevent unauthorized users from accessing the
SafeBrowser configuration (properties), we strongly suggest protecting this function with a password.
The default shortcut keys are :
• [SHIFT + RIGHT MOUSE] : Open configuration window (SafeBrowser properties) or exit the application
• [SHIFT + LEFT MOUSE] : Open a new browsing window (max. 12 browsing windows can be opened in
SafeBrowser v2.1)
Both functions can be disabled / enabled separately by settings in the SafeBrowser properties.
2.4.1
Navigation bar
The complete navigation bar has 9 buttons, each of them can be shown / hidden separately (see paragraph
“navigation” p. 17). Only the About-button can’t be hidden.
BACK
FORWARD
a user can click the BACK-button to go to a previous HTML-page
a user can click the FORWARD-button to go to the next HTML-page after
pressing the BACK-button
STOP
a user can click the STOP-button to stop loading the actual HTML-page
REFRESH
a user can click the REFRESH-button to reload the actual HTML-page
HOME
a user can click the HOME-button to go back to the defined homepage
EXIT
the EXIT-button can be clicked to exit SafeBrowser. We STRONGLY suggest ot
define a password to quit SafeBrowser (see paragraph “Password and
Properties” p. 23). We suggest disabling (hiding) the exit-button for users. When
the exit-button is hidden, SafeBrowser can still be quitted by pressing [SHIFT +
RMOUSE], after which the exit-password will be asked
ABOUT
a user can click the ABOUT-button to see the SafeBrowser “about-information”
Created by PIMC – http://www.pimc.be
Tested by PMTC – http://www.pmtctest.com
Copyright PIMC nv - All rights reserved
Page 10/31
PLAYLIST
PRINT
the PLAYLIST-button can be activated or deactivated in the SafeBrowser
properties. We strongly suggest to deactivate this button for users. The
PLAYLIST-button can be activated by the kiosk administrator to add HTML-pages
to the play list when surfing (see paragraph “Play list” p. 29)
the user can click the PRINT-button to print the active HTML- and Acrobat PDFpages. The PRINT-button will be automatically enabled or disabled, depending on
the website (URL) the user is visiting. When printing a website or URL is disabled
in the SafeBrowser properties, the PRINT-button will be disabled for the user when
he/she visits this URL (see paragraph “Restrictions” p. 26 and “Print” p. 30)
By default, SafeBrowser will show the following buttons :
BACK
FORWARD
STOP
REFRESH
HOME
EXIT
ABOUT
PRINT
However, we suggest to show only the following buttons when the SafeBrowser computer is left unattended in a
public location :
BACK
FORWARD
STOP
REFRESH
HOME
ABOUT
PRINT
2.4.2
Address bar
If not hidden for the user, the address bar in the top left of the screen displays the current URL. This bar can be
enabled or disabled for browsing purposes. This means you can allow or forbid the user to click the URL
(address) to manually edit or change it.
When users are allowed to enter URL addresses, SafeBrowser will only allow URL addresses with a valid and
known domain name. Entering an IP-address (e.g. 178.987.345.324) won’t be allowed.
Created by PIMC – http://www.pimc.be
Tested by PMTC – http://www.pmtctest.com
Copyright PIMC nv - All rights reserved
Page 11/31
2.4.3
Main document
The main browser window is the actual display of the website. However, the functionality in the screen is
restricted for the user :
• [RIGHT MOUSE] is disabled, so users can’t download files or copy HTML-content.
• SafeBrowser will not allow communication/dialog boxes, pop-ups or other functions of other applications or
programs.
• SafeBrowser will not allow users to download or install files.
• Most plug-ins supported by Microsoft ® will be supported by SafeBrowser v.2.1. However we suggest not to
install the Apple® QuickTimeTM plug-in under Microsoft ® Internet ExplorerTM in order to avoid violation
errors in SafeBrowser. We refer to the FAQ (Frequently Asked Questions) on the SafeBrowser website
(http://www.mysafebrowser.com) for a list of the supported plug-ins.
2.4.4
Status bar and Window bar
At the bottom of the SafeBrowser screen, you can see the status of the Main document (e.g. loading, done, …).
Here, you can also browse through the different ‘sites’ (windows browser) by using the Window bar. Each
separately opened site will be displayed in its own window.
2.4.5
Logo and animation
The SafeBrowser can display any logo (.BMP file) and/or animation (.AVI file) in the top right of the screen.
The animation (.AVI file) will play as long as a website is loading.
The actual display of the logo and the animation can be customised to your personal needs and requirements.
Created by PIMC – http://www.pimc.be
Tested by PMTC – http://www.pmtctest.com
Copyright PIMC nv - All rights reserved
Page 12/31
2.4.6
Configuration Window (SafeBrowser properties)
The configuration of your SafeBrowser is done through the SafeBrowser properties. These SafeBrowser
properties can be opened by pressing [SHIFT + RIGHT MOUSE] and/or clicking the logo in the top right of the
screen, after which SafeBrowser prompts for entering the properties password (see paragraph “Password and
Properties” p. 23).
The Properties window looks as follows :
Each tab (function) within the SafeBrowser Properties will be described further in this manual.
Created by PIMC – http://www.pimc.be
Tested by PMTC – http://www.pmtctest.com
Copyright PIMC nv - All rights reserved
Page 13/31
2.4.6.1
HOME URL & TIME-OUT
In this screen, you can customise 2 options :
• Home URL : here you enter the URL or website that will be shown upon starting the SafeBrowser application.
This home URL will also be shown when user input is detected (clicking a mouse button, touching the
screen, pressing a key on the keyboard, …) during the “Play list” mode (see paragraph “Play list” p. 29).
The home URL will also be displayed when a user clicks the HOME-button :
• Time-out : this setting determines the time period after which the application returns to the specified home
URL when there is no user activity. A time-out will automatically clear the history of visited pages in order
to provide the next user a clean SafeBrowser environment. Setting the Time-out to 0 will never allow a
Time-out but will also never clean the system for a next user !
Created by PIMC – http://www.pimc.be
Tested by PMTC – http://www.pmtctest.com
Copyright PIMC nv - All rights reserved
Page 14/31
Note :
When configuring SafeBrowser, please pay attention to the fact that the ‘Home URL’ and ‘Playlist’ timers
influence each other according to the following rules :
- Timer home URL (x) > Timer Playlist (y) : the Playlist will start after ‘idling’ for y minutes and will clean all
windows/history. This will override the Time-out since an active playlist is set.
- Timer home URL (x) = Timer Playlist (y) : this setting is impossible and you will get a warning from the
SafeBrowser.
- Timer home URL (x) < Timer Playlist (y) : the home URL will be shown after x minutes of no user activity.
If no interaction happens before the Playlist timer, this one will start after y minutes.
Briefly, we can say that when a playlist is activated, the playlist always has priority over the home URL.
2.4.6.2
SCREEN
This tab enables you to change the background colour of the SafeBrowser application. This background is the
frame in which the SafeBrowser displays the web content (navigation bar, logo background, border, …).
Created by PIMC – http://www.pimc.be
Tested by PMTC – http://www.pmtctest.com
Copyright PIMC nv - All rights reserved
Page 15/31
The ‘border’ setting enables you to set the background border of the application. A few examples of border
settings :
BORDER 15 :
2.4.6.3
BORDER 0 :
WEB-BROWSER
The tab “Web-browser” allows you to set the following 4 options :
Created by PIMC – http://www.pimc.be
Tested by PMTC – http://www.pmtctest.com
Copyright PIMC nv - All rights reserved
Page 16/31
• Show URL : this option will hide or display the URL in the address bar for the user.
• Edit URL : with this option, you can allow or prohibit users to edit or enter URL’s in the address bar.
Enabled : The user can
select and change the
URL
Disabled : The user
can see the URL but
not select or change
it.
• Show Status bar : this option hides or displays the status bar at the bottom left of the SafeBrowser screen.
• Status bar Font : with this function you define the font colour for the Status bar.
• Bold : displays the status bar font in ‘BOLD’ text format
2.4.6.4
NAVIGATION
The following options can be enabled / disabled under the “Navigation”-tab :
• Show or hide the complete navigation bar
• Show or hide the single standard navigation buttons (Back, Forward, Stop, Refresh, Home)
• Vertically align the buttons
• Enhance the navigation bar with e.g. a 3D border, flat button effect, …
• Show or hide the ‘hint’ when resting (or moving) your mouse pointer on a button
• You can set the background colour by clicking in the window where the navigation buttons are shown.
Created by PIMC – http://www.pimc.be
Tested by PMTC – http://www.pmtctest.com
Copyright PIMC nv - All rights reserved
Page 17/31
The 3 function buttons : EXIT, PLAYLIST and ABOUT can be enabled / disabled respectively in the tabs
“STARTUP & EXIT”, “ABOUT” and “PLAYLIST”.
2.4.6.5
ANIMATION
This screen displays the animation options. An AVI-animation can be played when a website is loading.
By clicking the button “Custom Animation”, the default animation can be changed with a customised one, taking
into account the following settings and formats :
• AVI file format
• Transparent background colour
• Opaque background colour
• Recommended size is less then 5% of screen surface. A warning will be displayed if the
animation size exceeds this limit.
The animation itself can be vertically aligned, shown or hidden and enhanced with a border.
You can also make the animation transparent in order to integrate it into the SafeBrowser background colour you
have chosen. Clicking the window, which shows the example, can set this background colour.
Created by PIMC – http://www.pimc.be
Tested by PMTC – http://www.pmtctest.com
Copyright PIMC nv - All rights reserved
Page 18/31
2.4.6.6
LOGO
Here you can adjust the settings for the display of the logo. By clicking the button “Custom Logo”, the default
SafeBrowser logo can be changed with a customised one, taking into account the following settings and formats:
•
•
Standard BMP-file
• 24-bit colour
• 32-bit colour
• No RLE compression
The logo is smaller then 20% of the screen surface.
The logo can be vertically aligned, shown or hidden and enhanced with a border. Clicking the window, which
shows the logo example, can change the background colour.
By default, the configuration screen will pop-up when you click the logo. This feature can be disabled in this
screen to avoid users trying to enter the SafeBrowser properties. Note however that if you disable this feature,
the shortcut command [SHIFT + RIGHT MOUSE] cannot be disabled and vice versa.
Created by PIMC – http://www.pimc.be
Tested by PMTC – http://www.pmtctest.com
Copyright PIMC nv - All rights reserved
Page 19/31
2.4.6.7
MAIL-CLIENT
When your Internet kiosk or computer is connected with a mail server, SafeBrowser allows users to send mails,
only to these mail-addresses which are defined as “mail to: -links” on web pages (this to avoid mail
spamming from the internet computer/kiosk). Users will not have the possibility to add other mail addresses in
the To: field.
With the tab “Mail-Client”, you can specify the technical information about your mail server or your ADSL POP
server.
It specifies the mail server IP-address or name, port (default port is 25) and the account authorised to use this
mail server. Please contact your LAN Administrator or someone from your IT Department for these settings.
Users can only activate the integrated Mail-Client when they click ‘mail-to’ links in web pages.
Created by PIMC – http://www.pimc.be
Tested by PMTC – http://www.pmtctest.com
Copyright PIMC nv - All rights reserved
Page 20/31
The mail client also offers the possibility to specify a ‘Reply to Address’ :
• Reply to Address disabled : a ‘reply to address’ to the outgoing mail may be specified but is not
required
• Reply to Address enabled : a ‘reply to address’ MUST be specified or the SafeBrowser will not
send the mail. You will get a proper warning message in case no ‘reply to’ address has been
specified (see next screenshot).
For detailed information on e.g. mail servers, you can always contact your IT/ICT department or LAN
Administrator to provide you the information in order to set up the SafeBrowser mail-client.
Created by PIMC – http://www.pimc.be
Tested by PMTC – http://www.pmtctest.com
Copyright PIMC nv - All rights reserved
Page 21/31
2.4.6.8
EMAIL
When using the SafeBrowser application for E-mail purposes, this configuration tab can set the mail header you
want to insert in the top of the mail body of every outgoing mail message.
This message is not visible to the actual user of the SafeBrowser, but can hold specific information you want
each mail receiver to see. This can be e.g. company information or a simple message that the email was sent
from an interactive kiosk. A second important use for this header is to prevent or warn against abuse like e.g.
spamming from an Internet kiosk, …
Created by PIMC – http://www.pimc.be
Tested by PMTC – http://www.pmtctest.com
Copyright PIMC nv - All rights reserved
Page 22/31
2.4.6.9
PASSWORD & PROPERTIES
Within this tab, you can set the following 3 basic functions :
• Enable EXIT password. Prevents the user to exit the SafeBrowser application unless he/she knows the
password
• Enable PROPERTIES password. Prevents the user from opening the configuration screen (SafeBrowser
properties) unless he/she knows the password.
ATTENTION : Specify BOTH passwords. Leaving the PROPERTIES password open will still enable the
user to e.g. change the exit password, SafeBrowser settings, … PIMC can’t be held responsible for any
damage to the system or application when these additional security options and passwords are not set or
defined. Also make sure passwords are not ‘logical’ for the user to guess or find out.
• Activate or de-activate the short key [SHIFT+RIGHT MOUSE] to pop up the configuration screen. If you
disable the shortcut key, the logo-click cannot be disabled and vice versa.
Created by PIMC – http://www.pimc.be
Tested by PMTC – http://www.pmtctest.com
Copyright PIMC nv - All rights reserved
Page 23/31
2.4.6.10 STARTUP & EXIT
In the tab “Start-up and Exit”, you can define the following settings :
• Take over Windows : this will enable the SafeBrowser application to start up automatically and take over the
Windows environment when starting the PC. When SafeBrowser is used in a Time-Tracs environment this
option is not available because Time-Tracs will then take care of the automatic reboot at the beginning and end
of a reservation.
• Exit
• Enable or disable the short keys [SHIFT+RIGHT MOUSE] to exit the application.
• Show or hide the EXIT-button in the navigation bar.
Disabling the shortcut will always display the EXIT button in the navigation bar and vice versa.
•
Define PC actions when quitting SafeBrowser
• “Close program” will return to the standard Windows® Desktop
• NOTE : When you have selected the ‘Take over Windows’ feature, the PC will automatically
shutdown when you close the SafeBrowser application !
• “Shutdown system” will close SafeBrowser and shut down the PC
• “Reboot system” will close SafeBrowser and reboot the PC.
For systems with a long ‘up’-time like fair kiosks, … you can set a shutdown or reboot maintenance at certain
predefined times.
Created by PIMC – http://www.pimc.be
Tested by PMTC – http://www.pmtctest.com
Copyright PIMC nv - All rights reserved
Page 24/31
Leaving the SafeBrowser application will keep the security settings alive on the PC. This means that short key
combinations [CTRL+C], [CTRL+V], Windows-key, ... will remain disabled until you reboot the computer.
A proper warning message is displayed upon leaving the SafeBrowser application.
2.4.6.11 ABOUT
This screen displays the information of the ABOUT screen. Users can see this about information when they
click the ABOUT-button (see paragraph “Navigation bar” p.10).
Created by PIMC – http://www.pimc.be
Tested by PMTC – http://www.pmtctest.com
Copyright PIMC nv - All rights reserved
Page 25/31
2.4.6.12 RESTRICTIONS
The navigation within the SafeBrowser application can be restricted through this configuration tab, using the
following settings :
• Apply Restrictions : this will enable or disable the actual setting of restrictions and can be seen as the big
“ON/OFF button” (which mean that users can surf unrestricted when “Apply Restrictions” is not marked).
• Show Restriction Message : you can choose to display a ‘restriction message’ when the user navigates to a
restricted page. In this case the user will see the following message : “Restricted Access : navigation not
allowed !”. If this message is not enabled, the current page remains loaded and nothing will happen if the
user navigates to a restricted site.
• Restrict All :
• This will restrict ALL the navigation the user can do BUT :
• With the ‘Accept’ button you can manually insert certain web pages that can be accessed.
NOTE :
When “Restrict All” is active/enabled, ONLY the accepted pages or URL’s in the ‘restrictions’ list can be
accessed (Accept button). This list can be changed using the ‘Accept’, ‘Restrict’ and ‘Erase’ buttons.
When “Restrict All” is inactive/disabled, ALL pages can be accessed EXCEPT the restricted pages or
URL’s in the ‘restrictions’ list (Restrict button). This list can also be changed using the same buttons.
Note that the printing option can be separately enabled / disabled for each webpage or URL in the
Restrictions list. When the print option of a webpage or URL is enabled/marked, the PRINT-button will
be activated as soon as users visit this website. When the print option for a website or URL is
disabled/unmarked, the PRINT-button will be deactivated as soon as users visit this website.
• Restrict Local Drives : enables or disables the access the users have to the local drives on the computer.
Created by PIMC – http://www.pimc.be
Tested by PMTC – http://www.pmtctest.com
Copyright PIMC nv - All rights reserved
Page 26/31
• Allow / Restrict URL while browsing : enabling this checkbox will show the Accept / Restrict button behind
the URL in order to allow you to quickly and easily set restrictions. This button will be automatically
disabled when restarting the application.
EXAMPLES : RESTRICTING URL’s
1.) NOT setting ‘Restrict All’
We will also set Rule 1 : Exclude www.altavista.com
Rule 2 : Include www.altavista.com/financial
The application will set ALL pages valid but will check the restriction rules. If the user navigates to e.g.
www.altavista.com/index.htm then Rule 1 restricts access.
Navigating to www.altavista.com/financial/index.htm will normally be restricted by Rule 1, but will be
validated again by Rule 2 allowing the user to access this page.
2.) ENABLE ‘Restrict All’:
We will also set Rule 1 : Exclude www.altavista.com
Rule 2 : Include www.altavista.com/financial
Rule 3 : Exclude www.altavista.com/financial/banks
The application will RESTRICT all pages now but will check the restriction rules for exceptions. If the user
navigates to www.altavista.com/index.htm then the access will be restricted by default AND by Rule 1. Should
the user visit www.altavista.com/financial/index.htm, access would normally be restricted but Rule 2 will
validate access to the page.
Created by PIMC – http://www.pimc.be
Tested by PMTC – http://www.pmtctest.com
Copyright PIMC nv - All rights reserved
Page 27/31
However, if the visited URL is www.altavista.com/financial/banks/help.htm, then access will still be granted …
This is because the access was allowed from Rule2, making that the SafeBrowser does not check Rule3, which
makes it obsolete.
As shown in the examples, the order and precise definition of the restriction rules is very important. Make sure
no rules contradict and take caution when assembling the restrictions list.
EXAMPLES : RESTRICTING PRINT-functionality
3.) NOT setting ‘Restrict All’
We will also set
Rule 1 : Restrict www.cnn.com
Rule 2 : Allow www.cnn.com/weather
• Allow printing on this URL
Rule 3 : Allow www.cnn.com/weather/paris
• Restrict printing on this URL
The normal browsing restrictions are applicable, but pay attention to the printing privileges :
• Rule 2 allows both navigation and printing on the ‘/weather’ section of CNN
• Rule 3 allows surfing but NO printing on the /weather/paris section
• HOWEVER : Rule 2 will override rule 3 making printing possible on the /weather/paris section of the site !!
As shown in the examples, the order and precise definition of the restriction rules is very important. Make sure
no rules contradict and take caution when assembling the restrictions list.
Created by PIMC – http://www.pimc.be
Tested by PMTC – http://www.pmtctest.com
Copyright PIMC nv - All rights reserved
Page 28/31
2.4.6.13 PLAYLIST
As stated before, the application can enter a special mode called the ‘Play list’ mode. When this mode is active,
the SafeBrowser will navigate through a list of predefined URL’s. Like this, when no user activity is detected,
the kiosk will turn into a presentation system until a new user interaction is detected (e.g. click on the mouse,
hitting a key on the keyboard, …).
This ‘Play list’ mode will be interrupted by any mouse/keyboard action. The play list will interrupt and the
SafeBrowser returns to normal interaction mode (Note that this interruption also returns to the home URL if the
Home URL is defined). When no home URL is defined and user activity is detected, the last URL of the play list
will remain visible until the user navigates to the site he/she wishes to visit.
• Show Navigation button : this will show a button in the navigation bar allowing you to easily set up the pages
you wish to display in the ‘Play list’ mode. The button will not be hidden again the next time the
SafeBrowser application starts so make sure you turn it off after use to avoid users can change the play list
settings.
• Enable Play list : disables or enables the ‘Play list’ mode
• The required Time-out and screen interval can also be set if a play list is enabled.
The order of URL’s for the play list can be altered at any moment by using the buttons ‘Up’ or ‘Down’.
Individual play list entries can be deleted by using the ‘Erase’-button.
Created by PIMC – http://www.pimc.be
Tested by PMTC – http://www.pmtctest.com
Copyright PIMC nv - All rights reserved
Page 29/31
2.4.6.14 PRINT
In this tab you can enable or disable the PRINT-button in the navigation bar.
For normal printing of HTML-pages, no options are necessary.
Two settings need to be defined in order to print Adobe® AcrobatTM PDF files :
•
Acrobat Reader : the location of your Acrobat ReaderTM executable in order to open and print PDF files
(e.g. C:\Program Files\Adobe\Acrobat 5.0\Acrobat\AcroRd32.exe)
•
Printer Name : the name of the printer Acrobat ReaderTM will use to print the selected files.
NOTE: Sometimes when you’ve worked with setting restricted URL’s or setting a Playlist, showing/hiding the
Print button will not work. In this case open the Configuration window and press Cancel. Now if you open the
Configuration window again the show/hide Print button option will work.
Created by PIMC – http://www.pimc.be
Tested by PMTC – http://www.pmtctest.com
Copyright PIMC nv - All rights reserved
Page 30/31
3 Product Support
For Safebrowser product support, please contact:
PMC NV
Professional Interactive Media Centre NV
Wetenschapspark 5
B-3590 Diepenbeek, Belgium
http://www.mysafebrowser.com
Email: [email protected] (please mention your SafeBrowser serial number in your subject)
Created by PIMC – http://www.pimc.be
Tested by PMTC – http://www.pmtctest.com
Copyright PIMC nv - All rights reserved
Page 31/31