1
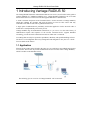
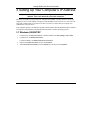
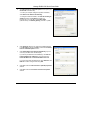
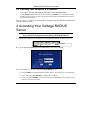
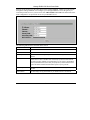
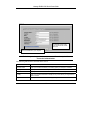
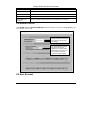
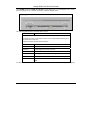
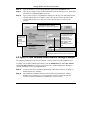
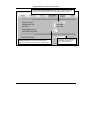
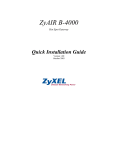
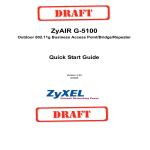
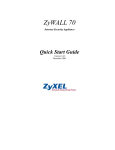
Vantage RADIUS 50
Quick Start Guide
Version 1.0
June 2004
Vantage RADIUS 50 Quick Start Guide
1 Introducing Vantage RADIUS 50
The Vantage RADIUS (Remote Authentication Dial-In User Service) 50 (referred to in this guide as
Vantage RADIUS) is a standalone RADIUS server. Vantage RADIUS maintains a list of accounts
that are allowed access a wireless network that supports IEEE 802.1x authentication.
A client’s username and password are forwarded from a wireless network to Vantage RADIUS,
which then validates the username and password against its own list. This ensures that only
individuals with valid accounts will be granted network access.
A single point of authentication is particularly useful when applied to wireless networks where a
mobile device could potentially access many servers.
Vantage RADIUS logs all authentication transactions, so you can to view the entire history of
authentication requests and responses. If the wireless networked device supports RADIUS
accounting, you can also track connection time and even which user is connected.
Accounting data can easily be exported to spreadsheets, databases, and specialized billing software.
The device’s web configurator allows easy management and configuration. See your User’s Guide
for more details on all features.
1.1 Application
Wireless clients connect to the WLAN in the same way you would access any authenticated wireless
Access Point. The wireless AP provides authentication for user accounts via the Vantage RADIUS,
which is invisible to the individual clients.
The following gives an overview of Vantage RADIUS’ role in a network.
1
Vantage RADIUS 50 Quick Start Guide
•
Wireless station A attempts to communicate with B over the wireless network via C.
•
C sends a “request identity” message to A for authentication.
•
A replies with identity information, including username and password.
•
C communicates with Vantage RADIUS, which checks the user information against its list
of valid accounts and determines whether or not to authenticate A.
•
A is authenticated and can communicate with B over the wireless network.
1.2 Required Information
You need the following information from your ISP or network administrator.
Vantage RADIUS Internet Account Information
Your Vantage RADIUS IP Address (if given): __________________
Your Vantage RADIUS IP Address Subnet Mask (if given): __________________
Your default gateway’s IP Address (if given): __________________
Your Primary DNS Server’s IP Address (if given): __________________
Your Secondary DNS Server’s IP Address (if given): __________________
2 Hardware
2.1 Rear Panel
LABEL
CONSOLE
DESCRIPTION
Only connect this port if your want to configure the RADIUS using the command line
interface; see your User’s Guide for details
Connect the 9-pin male end of the console cable to the console port of the RADIUS and
the other end to a serial port (COM1, COM2 or other COM port) on your computer. Your
computer should have a terminal emulation communications program (such as
HyperTerminal) set to VT100 terminal emulation, no parity, 8 data bits, 1 stop bit, no flow
control and 11500 bps port speed.
POWER 5VDC
Use your region’s power adaptor to connect to a power source. See the User’s Guide for
more information.
2
Vantage RADIUS 50 Quick Start Guide
Vantage RADIUS uses low voltage. Make sure you have the correct power
adapter before connecting to the device.
2.2 Front Panel
LABEL
DESCRIPTION
ETHERNET
10/100
Connect a computer or hub to this port with an Ethernet cable. This port is autonegotiating (can connect at 10 or 100Mbps) and auto-sensing (automatically adjusts to
straight-through or crossover Ethernet cable).
RESET
You only need to use this button if you’ve forgotten the device’s password. It returns the
device to the factory defaults (username is ‘admin’, password is ‘1234’, IP address
192.168.1.3 etc.).
2.3 LED Descriptions
LABEL
PWR
SYS
COLOR
STATUS
Green
On
Vantage RADIUS is receiving power.
Off
Vantage RADIUS is not receiving power.
On
Vantage RADIUS is online.
Blinking
Vantage RADIUS is restarting.
Off
Make sure that you have the correct power adaptor connected to the
device and plugged in to an appropriate power source. Check all cable
connections.
Green
DESCRIPTION
If the LED still does not turn on, you may have a hardware problem. In
this case, you should contact your local vendor.
ETHERNET
Amber
Green
On
Vantage RADIUS has established a 100Mbps network connection.
Blinking
Vantage RADIUS is transmitting or receiving data across the LAN Port.
Off
Vantage RADIUS doesn’t have a 100Mbps Ethernet connection.
On
Vantage RADIUS has established a 10Mbps network connection.
Blinking
Vantage RADIUS is transmitting or receiving data across the LAN Port.
Off
Vantage RADIUS doesn’t have a 10Mbps Ethernet connection.
3
Vantage RADIUS 50 Quick Start Guide
3 Setting Up Your Computer’s IP Address
Skip this section if your computer is already set up to accept a dynamic IP
address. This is the default for most new computers.
The device is already set up to assign your computer an IP address. Use this section to set up your
computer to receive an IP address or assign it a static IP address in the 192.168.1.4 to 192.168.1.254
range with a subnet mask of 255.255.255.0. This is necessary to ensure that your computer can
communicate with your device.
Your computer must have an Ethernet card and TCP/IP installed. TCP/IP should already be installed
on computers using Windows NT/2000/XP, Macintosh OS 7 and later operating systems.
3.1 Windows 2000/NT/XP
1.
2.
In Windows XP, click start, Control Panel. In Windows 2000/NT, click Start, Settings, Control Panel.
In Windows XP, click Network Connections.
In Windows 2000/NT, click Network and Dial-up Connections.
3.
Right-click Local Area Connection and then click Properties.
4.
Select Internet Protocol (TCP/IP) (under the General tab in Win XP) and click Properties.
4
Vantage RADIUS 50 Quick Start Guide
5.
The Internet Protocol TCP/IP Properties screen opens (the
General tab in Windows XP).
- To have your computer assigned a dynamic IP address,
click Obtain an IP address automatically.
-To configure a static IP address, click Use the following IP
Address and fill in the IP address (choose one
from192.168.1.2 to 192.168.1.254), Subnet mask
(255.255.255.0), and Default gateway (192.168.1.1) fields.
6.
Click Advanced. Remove any previously installed gateways
in the IP Settings tab and click OK to go back to the Internet
Protocol TCP/IP Properties screen.
7.
Click Obtain DNS server address automatically if you do
not know your DNS server IP address(es).
If you know your DNS server IP address(es), click Use the
following DNS server addresses, and type them in the
Preferred DNS server and Alternate DNS server fields.
If you have more than two DNS servers, click Advanced, the
DNS tab and then configure them using Add.
8.
Click OK to close the Internet Protocol (TCP/IP) Properties
window.
9.
Click OK to close the Local Area Connection Properties
window.
5
Vantage RADIUS 50 Quick Start Guide
3.2 Checking Your Computer’s IP Address
1.
In the computer, click Start, (All) Programs, Accessories and then Command Prompt.
2.
In the Command Prompt window, type "ipconfig" and then press ENTER. Your computer’s IP address
must be in the correct range (192.168.1.2 to 192.168.1.254) with subnet mask 255.255.255.0 in order to
communicate with the device.
Refer to your User’s Guide for detailed IP address configuration for other Windows and Macintosh
computer operating systems.
4 Accessing Your Vantage RADIUS
Server
This Guide shows you how to perform initial configuration only. See your
User’s Guide for background information on all RADIUS features.
1. Launch your web browser. Enter the device’s management IP address (default 192.168.1.3).
http://192.168.1.3
IP Address
2. Type the default Username (admin) and Password (1234) and click Login.
3. You should now see the web configurator MAIN MENU screen.
Click the HELP icon (located in the top right corner of most screens) to view online help.
Click a link under ADVANCED to configure device features.
Click a link under RADIUS to enter user accounts for authentication and configure for use
with your wireless access point.
6
Vantage RADIUS 50 Quick Start Guide
Click a link under MAINTENANCE to see system status, user information, upload
firmware and back up, or restore or upload a configuration file.
Click a link under MANAGEMENT to set up your Vantage RADIUS for remote access
and monitoring connections.
Click LOGOUT in the navigation panel when you have finished managing your device.
The device automatically logs you out if it is left idle for five minutes. If this occurs,
refresh your browser to display the Login screen again and then log back in.
Navigation panel
LOGOUT
4.1 Common Screen Command Buttons
The following table shows common command buttons found on many web configurator screens.
Apply
Click this button to save your changes back to the RADIUS.
Cancel
Click this button to begin configuring this screen afresh.
5 Configuring Your RADIUS Server
5.1 Network Configuration
7
Vantage RADIUS 50 Quick Start Guide
Wireless clients need to be in the same subnet as the Vantage RADIUS. Clients access the network
through the Vantage RADIUS. Now configure your Vantage RADIUS to access the gateway or
router that provides access to your network. Click ADVANCED and the IP in the main menu of the
Web Configurator to set up network access for your RADIUS server.
The following table describes the fields in this screen.
LABEL
DESCRIPTION
IP Address
Type an IP address in dotted decimal notation.
Netmask
Type the IP subnet mask of the RADIUS server in this field.
Gateway
Type the IP address of the gateway or router used to connect your RADIUS to the
network.
Primary DNS
DNS (Domain Name System) is for mapping a domain name to its corresponding IP
address and vice versa. The DNS server is extremely important because without it,
you must know the IP address of a machine before you can access it. The RADIUS
uses a system DNS server (in the order you specify here) to resolve domain names.
Type an IP address in dotted decimal notation if given to you by your ISP.
Secondary DNS
Type a backup DNS Server IP address in dotted decimal notation if given to you by
your ISP.
MAC Address
This field displays the physical address of your RADIUS server on the network.
8
Vantage RADIUS 50 Quick Start Guide
5.2 Secure Connections
Vantage Radius authenticates accounts using secure connections. This means that every time
information is sent across the network, the connection must come from a valid source and all
transmitted information is sent encrypted.
Currently there are two supported authentication protocols on the Vantage RADIUS. They are MD5
and PEAP.
MD5 (Message-Digest Algorithm 5)
MD5 authentication is the simplest one-way authentication method. The authentication server sends
a challenge to the wireless station. The wireless station ‘proves’ that it knows the password by
encrypting the password with the challenge and sends back the information. Password is not sent in
plain text.
PEAP (Protected Extensible Authentication Protocol)
Certificate authentication is used to establish a secure connection, then using simple username and
password methods through the secured connection to authenticate the clients, thus hiding client
identity.
Certificates
Certificates, also called digital Ids are used to authenticate network connections. Certificates are
based on public-private key pairs. A certificate contains the certificate owner’s identity and public
key. Certificates provide a way to exchange public keys for use in authentication.
A Certification Authority (CA) issues certificates and guarantees the identity of each certificate
owner. There are commercial certification authorities like CyberTrust or VeriSign and government
certification authorities
5.3 Trusted Root CA
A trusted Root CA is a special kind of certificate that does not require a CA to guarantee
identification. They are also called self-signed certificates and trust is based on knowledge of the
certificates origin. For example, you trust a certificate is from a valid source because you know the
issuer or you trust the service that you are subscribing to.
If you are using MD5 authentication, skip ahead to section 5.4 to set up your Vantage RADIUS for
use with your wireless AP. Otherwise click RADIUS in the main menu and then click ROOT CA
to set up a certificate for use with PEAP authentication.
This certificate is directly downloaded to a computer via an Ethernet connection during a
management session. Clients cannot download the certificate themselves. Therefore the certificate
must be transferred manually to each client wanting to use the network.
9
Vantage RADIUS 50 Quick Start Guide
All the fields in this screen
are required for the trusted
Root CA.
Click this hyperlink to download the
Root CA certificate to your computer.
Each time you change this screen, a new certificate is required for
successful authentication.
The following table describes the fields in this screen.
LABEL
DESCRIPTION
Common Name
Type up to 50 ASCII characters (not including spaces) to identify this certificate.
Country
Type up to 20 characters to identify the nation where the certificate owner is located.
State
Type up to 30 ASCII characters to identify your state, district or region.
Locality
Type up to 50 ASCII characters to identify the city or town where your organization’s
office is located.
Organization
Type up to 50 ASCII characters to identify your organizations name.
10
Vantage RADIUS 50 Quick Start Guide
LABEL
DESCRIPTION
Department
Type up to 50 ASCII characters to detail the department that is issuing the certificate.
Contact E-mail
Type a valid e-mail to contact your Certificate Authority.
Valid Days
Type a period in days that the certificate is valid for.
Download Root CA
Certificate
Click this hyperlink to download the Root CA Certificate to your computer.
5.4 RADIUS Server
Click RADIUS and then RADIUS SERVER in the main menu to set up your Vantage RADIUS for
use with your wireless AP.
The port settings are set by
default. Wireless Access Points
are required to use the same
port settings.
The shared secret is the WEP
Key used to access your
Wireless AP. Type the shared
secret used to connect to your
AP. See section 6.2 for an
example of wireless settings.
5.5 User Account
11
Vantage RADIUS 50 Quick Start Guide
Click RADIUS and then USER ACCOUNT to begin adding users to your RADIUS server. Each
person requiring access to the WLAN needs a username and password.
The following table describes the fields in this screen.
LABEL
DESCRIPTION
User Account List
The maximum number of configurable accounts is 200. Vantage RADIUS allows up to 50
connections at the same time.
Duplicate usernames and passwords are allowed.
Add New User
Click Add button to add a new user account.
No.
This is the index number of a user account.
User Name
The field displays the account user name.
Action
Change Password Click Change Password button to modify user’s password.
Select All
Click this button to mark all user accounts.
Delete
Select a check box next to the user(s) you want to remove and click
Delete.
To add a new user to your User Account List, click Add New User. The following screen displays.
12
Vantage RADIUS 50 Quick Start Guide
The following table describes the fields in this screen.
LABEL
User Name
DESCRIPTION
Type the wireless client’s username. The username can consist of up to
80 alphanumeric characters and is case sensitive.
Enter Password Type the password corresponding to the name above. The password
can consist of up to 80 alphanumeric characters and is case sensitive.
Confirm
Password
Type the password again for confirmation.
6 Setting Up Your Access Point (AP)
This section assumes knowledge of how to configure a management session on your AP. The
following examples use screenshots from ZyXEL’s ZyAIR G-3000. Actual screens and products
differ from the ones displayed. Please consult your AP’s User’s Guide before making the changes
below.
To avoid premature errors, make sure you first configure your access point
before configuring authentication settings and wireless clients.
6.1 ZyAIR G-3000 RADIUS Settings Example
The following example describes how to configure your AP’s RADIUS server settings for use with
a RADIUS server.
To set up your ZyAIR’s RADIUS server settings, click the WIRELESS link under ADVANCED
and then the RADIUS tab. The screen appears as shown.
Step 1.
Make sure your RADIUS servers are activated.
13
Vantage RADIUS 50 Quick Start Guide
Step 2.
Type the IP address of your Vantage RADIUS in the Server IP Address field.
Step 3.
Type the port numbers of the external authentication and accounting servers. The default
port numbers are 1812 and 1813 respectively.
Step 4.
Type a password (up to 31 alphanumeric characters) as the key to be shared between the
external authentication server and the wireless AP. The key must be the same on the
external authentication server and your wireless AP. The key is not sent over the
network.
1. Enable these fields to activate
authentication and accounting services.
3. Type the port number
of the RADIUS server.
The default port
numbers are shown.
You need not change
these values unless
your network
administrator instructs
you.
2. Enter the IP
address of the
RADIUS
server in
dotted decimal
notation.
4. Type a shared secret (password) used to
authenticate wireless clients with your wireless AP.
6.2 ZyAIR G-3000 Wireless Authentication Settings Example
The following example describes how to configure a wireless AP for use with a RADIUS server.
To change your ZyAIR’s authentication settings, click the WIRELESS link under ADVANCED
and then the 802.1x/WPA tab. Configure your wireless AP to enable authentication through an
external authentication server (Vantage RADIUS).
Step 5.
If your wireless client uses MD5 authentication, either choose static key exchange, or
disable dynamic key exchange.
Step 6.
The authentication database contains wireless station login information. Vantage
RADIUS is an external server. Use this drop-down list box to select the order the
wireless AP checks the databases to authenticate a wireless station.
14
Vantage RADIUS 50 Quick Start Guide
1. Select Authentication Required so that all wireless stations have to enter
usernames and passwords before access to the wired network is allowed.
2. If your AP uses MD5 authentication, then Dynamic
WEP Key Exchange must be disabled as MD5 uses
static keys. PEAP can use both dynamic and static keys.
15
3. Select the order of databases
your wireless AP checks for a
username and password.
Vantage RADIUS 50 Quick Start Guide
7 Troubleshooting
PROBLEM
CORRECTIVE ACTION
None of the LEDs turn
on when you turn on
the device.
Make sure that you have the correct power adaptor connected to the device and
plugged in to an appropriate power source. Check all cable connections.
Username or
password invalid
Check that you are using the correct username and password and that you have a valid
account. Note that the password is case sensitive.
My server won’t
authenticate my
account.
If your AP uses PEAP authentication, check that you have the correct CA ROOT
Certificate. Changes made to the RADIUS’ Server screen require a new certificate to be
downloaded.
If the LEDs still do not turn on, you may have a hardware problem. In this case, you
should contact your local vendor.
If your AP uses MD5 authentication, check that your wireless settings are set up to use
Static Wep Keys. Consult your Wireless AP’s user’s guide for more information.
The SYS LED
continuously blinks
The firmware may be corrupt (possible upgrade failure) and should be replaced.
16