1
Automatic Voic elPager
Di aler Sys tem
with
Ver i f i c a tion
Not just the next generation...it's
Unit*rI
Seeurity
Pnoducis,
ffi
rc
I
lnc.
t h e n ex t m i l l e n n i u m !
mH m,
mm,,ffi,
E Ej ffii
mlLlJlt4J
F:a
Kffi*ffffiffi#
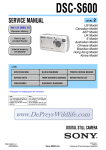
AutomaticVoice/PagerDialer
Versatile * Full-featured * Easy to Program
2-way Listen in Verification
O p e r a t e sw i t h a l l a l a r m s y s t e m s
I d e a l s t a n d - a l o n ed i a l e r
P r o v i d e s r e l i a b l e e m e r g e n c yn o t i f i c a t i o n 2 4 h o u r s a d a y
Owner's Manual and Operating Instructions
The Automatic Voice/PagerDialer System
For The Next Millennium
Congratulations!
Thank you for purchasingUnited SecurityProducts,Inc.'s Model AD-2001 - the "smartest",most comprehensive automaticvoice/pagersecurity dialer available.Representingan exciting new level of achievement,the
AD-2001 combinestechnologicallyadvancedfeatures,easeof programmingand reliable operationin a compact, unobtrusive dialer completely compatible with any security alarm system. Installation and hookup are
quick and easy, whether installedin conjunctionwith normally open, norrnally closed dry contact or voltage
activationsensors.The unit can also function as a stand-alonedevice,by simple connectionto an ordinary telephonejack. The keypadcover glideson and offfor addedattractiveness
and security.
How lt Works
The AD2001 dialer features busyJine and no-answer detection to ensure prompt transmission of up to 2 prerecorded messagesdelivered sequentially to as many as 4 standard
telephones,cellular phones, voice and/or numeric pagers.
Messages to both local and long-distance calls can be
transmitted. When activated, the dialer instantly begins
calling the numbers in sequence,delivering each message 1
to 3 times in a row, in accordancewith the preselected
n u m b e ro f d i a l i n ga t t e m p t s .
The AD-2001 is extensively programmable, offering personalized customization to fulfill virtually any residential or
business requirement. Plain-English prompts walk the user
through the process in a timely manner.
Programmingoptions abound,allowing the user to:
r
numbers.
Store up to 4 telephone/pager
r
Choose 1- 9 calling efforts for the numbers dialed.
o
Select 1-3 messagerepeats.
o
Record a variable combination (maximum: 3) of instructional outgoing messages(total elapsed time: 5l
seconds).
(dry contact or voltage activation) including momentary and
continuous activation for each).
Further individualize each channel by selecting the delay
times, telephone/pagernumbers to be dialed and the specific
outgoing messagesto be played.
Please Familiarize Yourself With These Instructions Before
Installation/Operation. This guide describes how to program
and operate the dialer. We strongly recommend that you read
the entire manual before attempting to use the unit.
To enhance ease of programming and operation, this guide
includes:
r
A ProgrammingSample/QuickSetup review on page 13
with a corresponding Program Planner.
o
A Blank Program Planner on page 14. One copy of this
Plannershouldbe kept in a safeplace by the end user.
A separatecopy should also be retained by the installer.
We are happy to provide a full measureof security reassurance and peaceof mind with the Model AD-2001. For information about other innovative United Security Products
equipment,call (800) 227-1592.
Program up to 2 separateinput channels with individually
enable/disable, entry/exit delay and activation options
(Normally Open (N.O.), Normally Closed (N.C.)
For TechnicalServiceAnd Support:Call (619) 591-6671i' Fax (619) 455-0036
E-mail usp @ix.netcom.com
Mondav - Fridav * 7:30 AM - 4:00 PM PST
THIS PACKAGE CONTAINS:
I ea.MODEL AD-2001
I ea.PHONE CABLE
1 ea.INSTRUCTION MANUAL
2 ea.lK RESISTORS
Section
Packagecontents.
PanelDisplays.....
InstallationHookups:Alarm Panel.
InstallationHookups:StandAlone
Programmingthe Dialer
Overview.
ProgrammingPhone/Pager
Numbers.
ProgrammingAuxiliary Information
Programming/Recording
OGMs.
ProgrammingChannels.
TestingYour System
OperatingYour System
Additional Features.
ProgrammingExample.
SampleProgramPlanner.
Blank ProgramPlanner.
Specifications.....
DialerAccessories
ImportantInformation
Pagenumber
..
3
4
5
6
1-Il
7
8
9
10
10-11
11
12
12
13
13
14
15
15
16
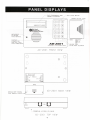
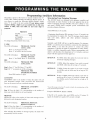
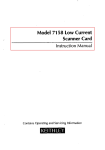
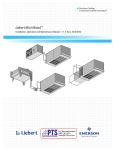
EASY PROGRAI!'MING TYITH
PROMPT LCD DISPLAY
-EASY
T O U C HK E Y P A D
SLIDING KEYPAD COVER
@
@@
@@@
@@@
@ @ @J
18 0 0 2 2 715 9 2
Unlted
8.cur!ty
ProductG,lnc.
MICROPHONE TO RECORD
VOICE MESSAGE
ilili
MODE _ PROGRAM
TEST
OPERATE
OFF
RECORD VOICE
PAUSE DIGIT (2SIDIGIT)
PLAYBACK
SPEAKERFOR
OGM AND z_ITAY
VOICE VERIFICATION
A D - 2 0 0 1 F R O N TV I E W
*
rN
CHANNELS
L IN E
AUX
OUT
B R E A K _ O F FP A N E L
FOR W]RINC INPUT--->
C
AD-2001 BACKVIEW
v
TEL
l2VDC
l-rrotr*ol
ACCESS
0N tsACK
AD-2001 TOP VIEW
4
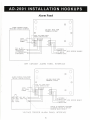
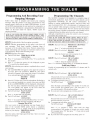
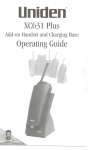
Alarm Panel
o
A L A R M C O N T R O LP A N E L
WITH DRY CONTACT OUTPUTS
,A
V
n
0
A D _ 2 0 0 1 R E A RV I E W
TERMINALACCESS
\/
-NOTE: AUX ALARM oUTPUT
RATING 12VDC/0.3A MAX
AUX PANEL
POWER
N.0. or N.C.
DRY CONTACTS
(MOMENTARY
or CONTINUOUS
ACTIVATION)
TNCOMTNG )
l$-ffi,'l*';"*'
S E I Z U R EH O O K U P
PH0NE LINEJ
D R Y C O N T A C TA L A R MP A N E LI N T E R F A C T
A L A R } I C O N T R O LP A N E L W I T H
V O L T A G ET R I G G E R O U T P U T S
fl
{'v')
AD-zool REARvlEw
TERMINALACCESS
-NOTE: AUX ALARM OUTPUT
R A T I N G1 2 V D C I 0 . 3 AM A X
AL]X PANEL
+
J
L
MOM TRIG: 1
CONT TRIG:
MIN +5VDC
MAX +28VDC
TNCOMTNG
l
P H O N EL I N Et l _ t N ns e t z u n u H o o K U P
H
o
u
s
E
rN
i
PHONELINE]
\---
-.-
-
INSTALL IK RESISTORS (SUPPLIED)
IF TRIGGER VOLTAGE IS APPLIED
THROUGII REI-{Y CONTACT
V O L T A G I T R I G G T RA L A R M P A N I L I N T T R F A C I
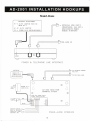
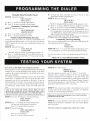
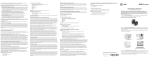
Stand Alone
OPTIONALACCESSORIES
AC-r: AC/DC ADAPTgR FgR USE
WITHPP-1
OPTIONAL LINE INPUT
(TELEPHONE,FAX, ETC.)
D I S C O N N E C T SW H E N
DIALER ACTIVATES
AC-lP: AC/DC ADAPTOR
PP-I:
P O W E RP A C K ( R E C H A R G E A B L E )
TEL LINE IN
OUT
IN
P O W E R& T E L E P H O N EL I N t I N T T R F A C T
+OPTIONAL
T O O P T I O N A LP H O N E ,
FAX, ETC.
TO TEL WALL JACK
o
12OVAC
60Hz
M O D E LA C _ 2
tzvDC/o.bA
A
A
AD-ZOOI REAR VIEW
T E R M I N A LA C C E S S
\z
A
\-/
@
.NOTE: AUX ALARM OUTPUT
RATING r2VDCI0.3A MAX
s-120
SIREN
S E N S O IRN P U T S :( p r , ,
D O O R& w I N D o w1 - " '
CONTACTS,TEMP lcH2
(.-"SENSORS, ETC.
S T A N D _ A L O N II N T E R F A C T
Overview
Please study this sectionthoroughly before beginning to program the dialer, referring to the SampleProgram
Planneron page 13. Then, selectfrom among the optionsfor eachfeature,listing each choice in pencil on the
blank ProgramPlanneron page 14. Once the dialer is correctly programmed,list eachchoice in ink. One copy
of the Plannershouldbe kept by the installer;one copy shouldremainwith the end user.
A look At The Keypad
G]rFl @
o
[-]l
@lEJ
tqll
JJ
.
t-tql
L&lltI4ti
')l
{i' j
a_l
CALLOUT FOR NUMERALS:
Pressthesekeys to enter telephonenumbersand other programminginformation as
specifiedin this manual.A maximum of 50 digits can be input in each phone/pager
location.
CALLOUT FOR P:
Pressthis key to programin a pause.Each "P" providesa 2-secondpause.
CALLOUT FOR R:
Pressthis key to record the combination of identification and directional outgoing
(OGMs).The total elapsedOGM time cannotexceed51 seconds.
messages
CALLOUT FOR M:
Pressthis key to changethe Mode of the dialer, in sequence:
PROGRAM TEST OPERATE OFF.
Once the unit has beenprogrammed,removingpower or placing the dialer in the OFF mode will not affect the
programming.
Etr' E
United
Sceurity
Products,
._,
Inc.
E E tr
tr Ei E
tr tr tr
,o'ffigffi"*6$'dffi$#lfri
Automatic
Voice/Pager
Dialer
STEP I
Apply powerto theunit.
TheLCD will read:
NOT PROGRAMMED
PRESSKEYPAD#1
STEP !
Pressl.
TheLCD will changeto read:
USPAD2OOIX.X
tIren..PROGRAM:
NUMBERS
then: SELECT:l-4
O(DONE)
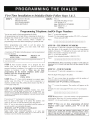
Programming TelephoneAnd/Or Pager Numbers
You are now ready to begin programming the dialer.
All programming can be input before connecting the dialer to a
telephoneline. Check the unit's LCD as you program numbers
in the dialer to ensure accuracy. Please complete all
programming instructions before attempting to operate the unit.
Before programming your dialer to call the police, fire
department or 9-l-l directly, you must check with these
agenciesfor their approval.
A maximum of 50 digits (including pauses)can be programmed
in at eachlocation.
*PROGRAM: NUMBERS
SELECT: 1-4
Press"*" to storethe sequence.
Example: To store numeric pager number 555-1212, a 4-second
Pauseand code 3456:
Press:
i@E}tr41
@@trr@@rc@@f_d
@ttr
STEP38 - TELEPHONENUMBERS
If you pressed"2" and wish to program in a telephonenumber.. .
Press the digits of the number to be dialed. For long-distance
numbers, first press "1" followed by the area code and then the
number.The number will appearon the LCD.
Press"*" to storethe sequence.
ExampIe: Store telephonenumber I -800-555-I 2 I 2 :
Press:
tElto|tl@r
trl
0l@Lc@@l@l@t
STEP L Press location number 1-4 to program the first
number. This can be any location 1-4. You do not have to
program locations in sequence.For example, you can program
numbers in locations 2 and 4. When you are done
programming
all the desired telephone and./or pager
numbers, press "Ott to exit this section.
The LCD will read:
PAGER
I(YES) 2(NO)
STEP 2 Press"1" if you wish to program in a numeric pager
number (step 3A). Press "2" if you wish to program in a
telephonenumber (step 3B), cellular phone numer (step 3B), or
a voice pager (step3C).
STEP34- NUMERIC PAGERS
NOTE: WHEN PROGRAMMING
NUMERICPAGERS.YOU MUST
PROGRAM
IN ONE OR MOREPAUSES.
EACH "P'' PROVIDES
A 2PAUSE,BEFORE
PROGRAMMING
IN A PAGER.CALL THE
SECOND
NUMBERTO DETERMINETHENUMBEROF2.SECONDPAUSESTO BE
PROGRAMMED
IN.
llyou pressed"l" to programin a numericpager...
Press the digits of the pager to be called. The numbers will
appearon the LCD, as will the following key designations.
Press"P" one or more times in accordancewith the number of
secondsneededto accommodatethe pager.
(Remember, each "Pt'provides a 2-secondpause).
Pressthe digits of the numeric pagercode.
NOTE: SOME PAGER SERVICESREQUIREA ..#.' SIGN FOR
OF THE NUMERICCODEOR AT THE END OF THE
SEPARATION
NUMERICCODEFORPROPER
TRANSMISSION.
REMEMBER/NOTE: Before programming your dialer to call the police,fire
department 0r 9-1-1 directly, you must check with these agenciesfor their
approval,
STEP3C -VOICE PAGERS
If you pressed"2" and wish to program in a voice pager...
Pressthe digits ofthe pagerto be called.
Press"P" one or more times in accordancewith the number of
secondsneededto accommodatethe pager.
(Remember each ttP" provides a 2-secondpause).
Press "*" to store the sequence.The number will appearon the
LCD.
Example: To storevoice pager 555-1212and a 4-secondpause:
Press:
tB@]Erlf@l
@li
@i-El
tErl
tr
t@r
STBP 4 Repeatstepsl-3 fbr eachnumberto be programmed
in
eachlocation.Selectanyof4 locationnumbers
in StepI
(SELECT:1-4)for eachnumberto be programmed.
STEP 5 When you are done programming all desired
telephone and/or pager numbers, press tt0" to exit this
section.
NOTE: IF YOU ENTER THE WRONG CHOICE,
REPEATEDLY AND RETURN TO THE "PROGRAM MODE'" THEN
SELECT THE SECTION TO CHANGE (*I" ACCEPT SECTION, *2"
FOR NEXT SECTION). THEN ENTER CORRECT INFORMATION.
Programming Auxiliary Information
The dialer is preset at the factory to typical telephone line (TLINE), PBX, Dialing Attempts and Message Repeat options. If
you choose to accept the following default prompts, simply
press "2" to scroll to the next section. If your phone system
requires dialing a digit to get an outside line or dial tone,
similar to PBX, then turn PBX on and enter digit to
program.
PRESETS
T-LINE................TONE
PBX......................OFF
A T T E M P T S. . . . . . . . . . . . . . 2
MESSAGE.... ..........2
To changethepresets,
follow thesesteps.
T-LINE
TheLCD will display:
PROGRAM: T-LINE
I(YES) 2(NO)
Press"1" to programT-LINE.
Press"2" to scrollto thenextsection.
TheLCD will display:
PROGRAM: T-LINE
I(TONE) 2(PULSE)
Press"1" for TONE.Press"2" for PULSE.
PBX
TheLCD will display:
PROGRAM: PBX
l(ON) 2(OFF)
Step1: Press"1" for ON. Press"2" for OFF.
Step2: If "1" is entered,
theLCD will display:
PROGRAM: PBX
ENTER PBX NUMBER
EnterPBX number(1 digit).
ATTEMPTS
ATTEMPTSrefersto the numberof timesthe dialerwitl call
each designatednumber.Both successfuland unsuccessful
(busyor no answer)call areconsidered
attempts.
TheLCD will display:
PROGRAM: ATTEMPTS
ENTER 1-9
Step 1: Pressthe digit (l-9) corresponding
to the numberof
timesyou wishthedialerto call eachnumber.
MESSAGE
MESSAGEref'ersto the numberof timeseachmessase
will be
deliveredto eachdesignated
number.
TheLCD will display:
PROGRAM: MESSAGE
REPEAT ENTER 1.3
Step 1: Pressthe digits (l-3) corresponding
to the numberof
timesyou wishthemessage(s)
to be delivered.
After selectingthe numberof message
repeats,the dialerwill
automatically
exit thissectlon.
Structuring Your OutgoingMessages
The AD-2001 dialer was designed with optimum versatility and
functionality in mind. Nowhere is this more apparent than in the
matrix of outgoing messages(OGMs). The user's ability to "mix
and match" OGMs allows complete system customization and
provides ultimate efficiency.
Total OGM time is 5l seconds.
A beginning identification (ID) messageof up ro l5 secondscan
be programmed in (option #4). Your ID message should clearly
state your name, address and other pertinent emergency
information.
Typically, each OGM will have a specific purpose.For insrance,
OGM 1 can alert the person notified to contact the fire department
while OGM 2 can alert the person to contact the police
department. Typically the dialer is programmed to notify famity,
friends or another responsible party. Before programming your
dialer to call the police, fire departmentor 9-l-1 directly, you must
check with these agenciesfor their approval.
OPTION #1
No OGM. Select this oprion if you do not wish to
record any outgoing messages.
OPTION #2
I OGM. Select this option if you wish to record
one OGM, which may be as long as 5l seconds.
OPTION #3
2 OGMs. Select this option if you wish to record
two OGMs, each of which may be as long as 25.5
seconds.
OPTION #4
ID plus 2 OGMs. Selectthis option if you wish to
record one ID of up to 15 secondsin length, and
two OGMs, each of which may be as long as 18
seconds.*
*lf your ID messageis less than l5 seconds in length, the rerraining
time will be
e v e n l yd i v i d e d a m o n g t h e O G M s .
Example:OPTION#4: ID plus 2 OGMs.
lf the ID is l0 seconds,
then eachOGM can be (51 minus l0
equals4l dividedby 2 equals)20.5seconds
in length.
Programming And Recording Your
Outgoing Messages
Programming The Channels
The AD-2001 is designedto be adaptableto a complete range of
personalizedapplications.Each of the two input channelscan be
programmed individually for full system customization. In
addition to setting enable/disableoptions, entry/exit delays and
type of activation (N.O., N.C., & momentary or continuous),each
user can specify which emergencymessageswill be deliveredand
which numbers will be dialed. The first channel activatedwill be
the priority channel.Numbers programmedto that channelwill be
completedbefore the dialer moves on to the next channel.
Although comprehensivein scope,the system is easy to prograrn.
Follow these steps to program and record your outgoing
messages.Skip this portion if you have programmed in only
numeric pagers,which rely on coded DTMF messages.As with
all AD-2001 programming,the unit need not be connectedto a
phone line when information is programmedin. Rememberthat
"OPT" on the LCD stands for option; "OGM" stands fbr
outgolng message.
NOTE: IF YOU ENTER THE WRONG CHOICE, PRESS "M" KEY
REPEATEDLY AND RETURN TO THE "PROGRAM I\{ODE'', THEN
SELECT THE SECTION TO CHANGE ('1'' ACCEPT SECTION, "2''
FOR NEXT SECTION). THEN ENTER CORRECT INFORMATION.
STEP
hrsf follow
these simnle stens
NOTE: IF YOU ENTER THE WRONG CHOICE, PRESS*M" KEY
REPEATEDLY AND RETURN TO THE *PROGRAM MODE'', THEN
SELECT THE SECTION TO CHANGE (*T" ACCEPT SECTION, "2"
FOR NEXT SECTION).THEN ENTER CORRECT INFORMATION.
I Decide which of the four options you pref'er.
STEP 2 Befbre programming in this option, write down all
your messages. Time them carefully, changing them if
necessaryto fit the alotted time frame. Practice saying them,
clearly enunciatingeach messagefor maximum clarity in case
of an emergency.Keep a final recording script.
STEP 3 Programyour option.
A) The LCD will read: PROGRAM: OGMS
1(YES) 2(NO)
B) Press"1" to program your OGMs. Press"2" to scroll to the
next section.
C) Press "1" to select the option (#1- #4) displayed or press
"2" to scroll to the desiredoption.
STEP 4 After selectingyour option as explainedabove,record
your message.
A) The word RECORD will appearin the upper left corner of
the LCD, above the instruction: PRESS R. The option
selectedwill appearin the upper right corner. For instance,
if you selectedoption #2, the LCD will read:
RECORD
OGMI
PRESS R
B) Speak6- l2 inches away from the microphone.Referring to
your script and speakingin a normal voice, press and hold
R (the word RECORDING will be displayed),releasingthe
key after you have completed enunciating your messages.
The word DONE will appear on the LCD when the
maximum allotted time has beenreached.
C) The LCD will read: PLAY OGM(S)
I(YES) 2(NO)
Pless"1" to play back your recording
D) The LCD will read: ACCEPT
r(YES) 2(NO)
Press" I " to acceptthe recordedOGM(s). Press"2" if you
wish to re-recordthe messages,beginningwith Step4.
Changing The OGMs
After your system is up and operating,you may changeone or
more of the recorded OGMs and/or choose a completely
different option. To do so, simply scroll to the programming
sectionon your display: PROGRAM: OGMS
1(YES) 2(NO)
Selectthe option, then begin again from Step 3 above to record
your new message(s).
STEP I TheLCO willread: PROGRAM: CHANNBLS
1(YES)2(NO)
Press"l" to beginprogramming
thechannels.
STEP 2 ttre LCO willread: SELECT:1OR 2
O(DONE)
Enterthechannelyou wishto program(l-2).
Enable/Disable
STEP 3 tne LCo will read: CH X: BNABLE
1(YES)2(NO)
("CH f' beingthechannelselected)
Press"l" to enablethechannel.
Press"2" to disablethechannel.
Exit/Entry Delays
Capableof programming up to a maximum of 3 minutes and 20
secondseach.
STEP 4 rne LCo will read: CH X: EXIT DELAY
I(YES) 2(NO)
Proceedwith A) if you wish to program an exit delay.
Proceedwith B) if you do not.
A) To program exit delay, press"1".
The LCD will read:
ENTER 0-199THEN
PRESS*
B)
Enter the digits correspondingto the number of secondsyou
wish to install. (For example, press "120" then press "*", if
you wish to install a 12O-second
exit delay).
Ifyou do not wish to program an exit delay, press"2".
STEP 5 tne LCo will read: CH X: ENTRY DELAY
1(YES) 2(NO)
Proceedwith A) if you wish to program an entry delay.
Proceedwith B) if you do not.
A) To program an entry delay, press"1".
The LCD will read:
ENTER 0-199 THEN
PRESS *
B)
10
Press "1" to program a delay. Then enter the digits
correspondingto the number of secondsyou wish to install.
(For example,press"90" then press"*", if you wish to install
a 90-seconddelay).
If you do not wish to program an entry delay, press"2".
Normally Open/Normally Closed
STEP 6 ttre LCO will read:
CHX: N.O./I{.C.
1(N.O.)2(N.C.)
A) Press"1" to selecta normallyopenchannel.
B) Press"2" to selecta normallyclosedchannel.
Momentary/Continuous
Activation
STEP 7 rne Lco will read:
CHX: MOIUUCONT
I(MOM) 2(CONT)
A) Press" 1" to selecta momentary
trigger.
"2" to selectcontinuous
B) Press
activation.
Numbers Dialed/Outgoing Messages
Followingthesestepsallowsyou to choosewhichOGM(s)will
be deliveredandwhichnumberswill be dialedfor eachchannel.
NOTE: Dialer LCD will only showprogrammed
numbersand
OGM options.
STEP 8 ttre LCO willread:
CH X: DIAL #X
r(YES)2(NO)
("Dial #X" beingthenumberin phone/pager
locationl-4)
A) Press"l" to dial phone/pager#X
to be dialedwhentheselectedchannelis activated.
Press"2" if you do not wishthis
numberto be dialed.
B)
Testyour slstem before an emergenc! occurs.
STEP 4 Ttre LCO will read:
SELECT: 1-2
3(BOTH) 0(DONE)
Selectthe channelyou wish to test (l-2). Press"3" to test both.
Channels.Once a channel is selected(or "all") the programmed
channel information will be displayed on the LCD. Verify data
accuracyas the LCD scrolls through by comparingthe infbrmation
displayed with that specified on your Program Planner.Listen to
your recordedmessage(s)to ensurethat the correct OGM (if programmed)is delivered.Press"0" to exit testing.
Do not neglectto review programmedinfbrmation and verify all
elementsof your systemthoroughly before relying on the dialer
to delivel the necessaryinformation to the desiredparties accurately and completely.
We strongly recommendtesting the system in test mode before
connecting to a telephone line. The test mode tests the stored
information, not the full functionality of the dialer. To test the
full functionality of the dialer. the unit must be testedin the operatemode. In the test mode. the dialer will not make more than
one attempt per number dialed or play any OGM more than
once.
NOTE: IF YOU ENTER THE WRONG CHOICE, PRESS*M" KEY
REPEATEDLY AND RETURN TO THE "PROGRAM MODE'" THEN
SELECT THE SECTION TO CHANGE ("I'' ACCEPT SECTION. "2"
FOR NEXT SECTION).THEN ENTER CORRECT INFORMATION.
STEP 1 Pressthe"M" Modekey until theLCD reads:
TEST: T-LINE
1(YES)2(NO)
"1"
2
Press
to
display
theT-Lineconfiguratron.
STEP
Thedatawill scrollthroughall selections.
Press"2" to scrollto thenextsection.
STEP 3 ttre LCP will read:
TEST: CHANNEL(S)
1(YES)2(NO)
Press"1" to testchannels.
Press"2" to scrollto thenextsection.
Continue the above procedure for each of the up to four
phone/pagernumbersprogrammedin.
STEP 9 the Lco will read:
CHX: OGMX
1(YES) 2(NO)
("OGM X'being the OGM recordedin OGM options#2 - #4)
A) Press "l" to deliver OGM X when the channel is activated.
Press"2" if you do not wish this OGM to be delivered.
B) Continue the above procedurefor each Channel/OGM. If you
have programmed in and recorded an ID messageas one of
your OGM options,this ID will be deliveredto all channels.It
will not appealin the Channeldisplay.
NOTE: ID AND OGM(S)WILL ONLY BE DELIVERED
TO TELEPHONE
NUMBERS.
CELLULAR
NUMBERS.
ANDVOICEPAGERS.
Completing The Programming
Once you have programmed in all dialing and OGM options for
eachchannel,the LCD will read:
ACCEPT
1(YES) 2(NO)
STEP 10 Press "1" to accept the Channel programming. Press
"2" to le-programol'to revert to previouslyprogrammedsetting.
You are now ready to review your programming and test the system.
PRESS "M'' TO EXIT PROGRAMMING MODE.
STEP 5 Now connect your dialer to the telephoneline you will
be using and test the system again, to determine if it functions
con'ectlyin an actuulemergencysituation.
Makesure you notitythe receivingpartyof your intentto call them,
and tell them it is iust a test
STEP 6 To test the operationof your entire system,set Mode to
OPERATE and proceed as explained in the next section: Operating Your System.
Test your system on a regular basis, at least once a week.
You are now ready to begin operatingyour system,relying on
the AD-2001 to work in conjunctionwith your alarm system
to provide 24-hou securityreassurance
and peaceof mind.
When in the operatingmode,the systemwill monitor both
enabledchannels,initiatingdialing whena valid alarmcondition
occurs.Upon activationthe dialerwill begincalling eachphone/
pagernumberselected,in sequence,
for the pre-selected
number
of attempts.During eachsuccessfulattempt,the voice message
will be delivered1,2, or 3 times,in accordance
with the option
selected(numeric messageswill only be delivered one time).
In unsuccessfulattempts,the dialer will move on to the next
phone/pager
numberafterreceiving8 busy or 8 rings without
an answer.The dialer will not allow voice messages
to be delivered to programmednumericpagerlocations.
If you senda messageto a phoneattachedto an answering
machine,it will considerthis a successful
attempt.Make sure
you designatethe maximumnumberof messagerepeatsto be sure
that a completemessagewill be left on the answeringmachine,
becausepart or all of your emergencymessagemay be "lost"
while the answeringmachinedeliversits greetingmessage.
Placingyour systemin OPERAIE can also be usedas a final
testof the full functionalityof eachchannel'sexit/entrydelay,
trigger, phonenumbersand
activation,momentary/continuous
OGM. Althoughservingas a test,this modereflectsactual
operation;thereforethe OGM(s) will not be heardthrough
your dialer's speakerbut only by eachparty called.
To begin operatingyour system,simply pressthe "M" Mode
key until the word OPERATEappearson the LCD. To disarm
the dialer,switch the modeof OFF by pressingthe samekey.
All programminginformation will be retained.
before startingthe dialing process.To de-activatethe dialer
during the entry wait period, simply press "Mtt to return to
the OFF Mode. Both exit and entry delay times can be
pre-selected
to rangefrom l-199 seconds.
Additional features
The dialer offers three innovative featuresthat enhancethe
utility of the entiresystem.
Listen-In
While receivingan OGM on a touch-tonephone,the called
partycanpress"1" to listenin to the activityat the otherend of
the line for one minute.Pressing"1" againrestartsthe minute
i n c r e m e n tp e r i o d a n d c a n b e r e p e a t e di n d e f i n i t e l y .W h e n
"1" is pressedthe OGM will stop playing and the listen in
periodwill start.
Two-Way
After the calledparty is listening-in,that party canpress"2" to
begina two-wayconversation
lastingfor one minute.This procedurealso can be repeatedindefinitely by pressing"2" againto
restartthe minute.Onceyou are in two-way modevou cannot
go back to Listen-In,
Remote Turn-Off
The calledparty can remotelyterminatethe activatedchannel
a n y t i m e d u r i n g t h e O G M b y p r e s s i n g" l " t h e n " # " t w i c e
within one second.The dialer will continueto monitor the
remainingchannel.Oncethe terminatedchannelis restored
to a non-alarmstate,it will re-arm.If in listen-in or two-way,
simply press"#" twice in one second,for remoteturn-off.
New Feature
SystemNotations
A new featurehasbeenaddedto the dialer,allowing you, the
user,to disablethe microphoneduringinitial setup.In locations
wherethe noiselevel is very high, the AD2000 andAD2001
dialersmy havedifficulty acceptingthe RTO (remoteturn-off)
c o m m a n dt h a t y o u . t h e p r i m a r yu s e r .m a y i s s u ev i a y o u r
telephonekeypad.As a resultof high ambientnoise,the dialer
may fail to recognizethe RTO sequenceduring the listen-in
period(or in the 2-way conversation
mode)and continuesto
dial other numberstoredin its memory.With the microphone
disabled,the dialerwould haveno problemrecognizingthe "#"
"#"sequenceto preventit from dialing other numbersregardless
of backgroundnoise.If, on the other hand,you decideto stay
o n t h e l i n e f o r 6 0 s e c o n d s t, h e m i c r o p h o n ec h a n n e lw i l l
re-activate
and allow you to listenin and decidethenif other
actionsneedto be taken basedon the audible information
received.But keepin mind that you may not succeedin sending
the RTO commandduring this time. After completingthe call,
the dialersimplycontinuesto dial othernumbersas manytimes
asprogrammed.
If programmedfor multipledialing,you should
be ableto breakthe sequence
by sendingthe RTO command
the next time you'recalledwithin 60 secondsafterpressing"1"
during the OGM cycle. Pleasereadthe manualfor standard
RTO operationand determinebeforehandif noiseis a problem
and decideto disablethe microphoneat installationtime, or if
it's bestto relocatethe dialer to a lessnoisy environment.
Here are a few explanationsto help you betterunderstandhow
yourAD-2001dialeroperates.For specificinformationon the
A D - 2 0 0 1u n i t a l o n e ,c a l l U n i t e d S e c u r i t yP r o d u c t sI,n c . ' s
C u s t o m e rS e r v i c eD e p a r t m e n td u r i n g n o r m a l b u s i n e s s
hours at 619) 597-6677.
Channel Activation
Eachof the dialer's two channelscan be activatedby any of
the following: a normally open dry contact,normally closed
dry contact or positive5-28VDC voltageactivation.
Undera momentaryactivation,a singleviolationof a channel
will causethe dialer to initiate deliveringall pre-selected
O G M s t o a l l p r o g r a m m e dn u m b e r sa s s o c i a t e dw i t h t h a t
channel.Undercontinuousactivation,thedialerwill initiatethe
process,terminatingit if/whenthe activatedchannelis retored
to a non-alarmstate.Once an alarm has occurredand all
attemptssatisfied,the dialer will continueto monitor any
remainingenabledchannel.Oncethe activatedchannelhas
beenrestoredto a non-alarmstate,it will thenbe rearmedand
ready for the next alarm.
Exit/Entry Delays
If a channelis activatedduring a pre-selectedexit delay,the
alarmconditionwill be ignoreduntil the delayhasexpired.If
an alarm occurs,the entry delay will causethe dialer to wait
lz
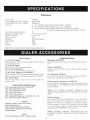
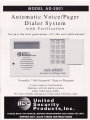
SampleProgram Planner
A D z O O 1P R O G R A MP L A N N E R
PROGRAM: NUMBERS
PAGER
NUMBER
YES
NO
(exclude
TELEPHONE NUMBER
PBX digit, include numeric
pager
lDaLe:1t/9/97
NAME OF PARTY TO BE REACHED
code)
John Johnsons house
2 3 4 5 6 18
3
34567agPP4455#
-Oa-
JOI^nSOn
S
OCAer
t
i4567nqPP55444
-on^
Joh^soi
s
Dooer
PB
PULSE
ON
OFF
ATTEMPTS
1 THROUGH 9
MESSAGE REPEAT
1 THROUGH 3
2
2
NUMBER
PROGRAM: OGMs
STYLE
OPTION
NO OGM
I
OGM
3
2 OGMs
ID + 2 OGMS
4
bLrOlOrV
f; e
Code
cooe
nO\\ - /L
P R O G R A M :T _ L I N E
TONE
|
' - ) f \ \ / \ \r-'
BRIEFLY DESCRIBE TYPE O!' VOICU MUSSAGE(S)
lD: My rome is Mory Smith ond
OGMl: Coil the policedeportment.
need hep.
0 G \ L 2 .l S l l 1 ! 9 1 { g
ENTRY DELAY
ProgrammingExamplefor Quick Setup
specific outgoing messages(OGMs).
Before programrningthe dialer, study the example shown on this page.
This "quick setup" example programs in one telephone number, two
numeric pa-qernumbers, two attempts, two repeats,an ID plus two
additional OGMs. and channels I and 2.
Once you understandthe setup. use the blank Program Planner on
page l4 to begin programming your dialer. We recommend ntaking
several blank copies of the Planner befble beginning the process. It
a l s oi s a d v i s a b l et o f i l l i n t h e P l a n n e ri n p e n c i li n i t i a l l y .
S T E P I P r e s s" l " .
STEP 7 Using a prepared script and speaking six-to-eight inches
from the dialer's miclophone on the front of the unit, press "R" when
you are ready to enunciateyour l5-second identification messageand
your two lS-second messages.Dialer autornatically prompts to next
OGM. Make OGMI a messagetelling the receiving pafty to call the
police department.Make OGM2 a messageto call the fire department.
STEP 8 Press"[" to play back all recordedmessages;press"l" again
STEP 2 When the LCD reads SELECT l-4, press "1" to install the
first phone number in location I press "2" to indicate no pageri tllen
*2345678" followed by
press, in sequence,(fictitious) phone number
processfbr that number.
the "i"' sign to store the pro-grannrin-e
WILL
ONLY
DIALER
LCD
to accept. (NOTE:
PROGRAMMED NUMBERS AND OGM OPTIONS).
STEP 9 Press"l" to PROGRAM CHANNELS.
SHOW
S T E P 1 0 P r e s s" l " t o p r o g r a m C h a n n e l l . P r e s s" l " t o E N A B L E .
Press "l" then enter "30" then press "*" for a 30-secondEXIT delayr
press "l" then enter "l5" then press "ri" fbr a l5-second entry delay.
Now press "2" for NORMALLY CLOSED and then " l " for MOMENTARY activation. Press "l" to select phone/pagernutnber I to be dialed. Press"l" again to selectphone/pagernunrber 3 to be dialed. Press
"2" to not selectphone/pagernumber 4 to be dialed. Press" l " to select
OGMI to be delivered and press "2" to not select OGM2 to be delivered.Press"1" to acceptthe channelconfiguration.
STEP 11 Press "2" to program Channel 2. Press "1" to ENABLE.
STEP 3 Press"3" to install the secondphone number in location 3:
press "l" to indicate numeric pager: then press'in sequence,
"3456789PP4455#" followed by thg "':'" si-sn.The first seven digits
representthe pager number dialed: each P standsfbr a 2-secondpausel
the next fbur digits followed by the # sign representthe pager code
and the ':' storesthe programmin-uprocessfbl that nurnber.
Now press "4" to install the third phone nurnber in location 4; press
"1" to indicate numeric pageri then press, in sequence,
"3456789PP5544#"fbllowed by the "'r"' sign.
STEP 5 At the PROGRAM: T-LINE prompt. press "1" to choose
tone: press "2" to indicate no PBX: press "2" to plogram in two dialing attempts per emergency number called: press "2" to program in
two messagerepeatsfbr each call.
S T E P 6 P r e s s" l " t o P R O G R A M O G M ( S ) . P r e s s" 2 " t h r e et i m e s t o
Press"2" twice to indicate no EXIT or ENTRY delay. Now press "1"
for NORMALLY OPEN and the "2" lbr CONTINUOUS activation.
Press"l" to selectphone/pagernumber 1 to be dialed. Press"2" to not
selectphone/pager3 to be dialed. Press"l" to selectphone/pagernumber 4 to be dialed. Pless "2" to not select OGMI to be delivered and
press"1" to selectOGM2 to be delivered. Press"l" to acceptthe channel configuration.
STEP 12 Press"0" to exit PROGRAM: CHANNELS.
Scroll to option #4; press"l" to program in an ID messageand two
Press "M" to exit programming mode.
STEP
4 Press"0" to exit PROGRAM NUMBERS.
13
Fill out this ProgramPlannerin pencil initially
ADzOOl PROGRAM PLANNER
(exclude
TELEPHONE NUMBER
PBX digit, include numeric
pager
NAME OF PARTY TO BE REACHED
code)
PROGRAM: T_LINE
PBX
PULSE
TONE
ON
ATTEMPTS
1 THROUGH 9
OFF
{ESSAGE REPEAT
I THROUGH
NUMBER
BRIEFLY DESCRIBE TYPE OF VOICE MESSAG
PROGRAM: CHANNELS
ENI
EXIT DELAY(SEC)
CH
YES
NO
YES NO
ENTRY DEI^AY(SEC }
NO
o-199
ACTIVATION
YES
NC
MOM
DIAL NUMBER
3
PLA
OGM
I
2
ADzOO1 PROGRAM PLANNER
PROGRAM: NUMBERS
PAGER
NUMBER
YES
(exclude
NO
TELEPHONE NUMBER
PBX digit, include numeric
pager
fD"t.,
NAME OF PARTY TO BE REACHED
code)
PROGRAM: TPBX
PULSE
TONE
ON
OFF
ATTEMPTS
THROUGH 9
MESSAGE REPEAT
1 THROUGH 3
NUMBER
OPTION
t
S'I'YI-F]
I'YPE
Ot.' VOI(]},, MESSA(;E{S}
NO OGM
1
4
BRIFJT'I-Y DESCRIIJE
---_l
OGM
2 OGMS
ID + 2 OGMS
After thoroughlytestingyour system,redo your ProgramPlannerin ink.
Onecopyshouldbe keptin a safeplaceby the enduser;onecopyshouldbe retainedby the installer.
Dimensions
Power source:
Current (OPERATE mode - standby):
Current (OPERATE mode - dialing):
Activation:
Max. digits fbr outgoing numbers:
Operating temperaturerange:
Dimensions(inches):
Weight (ounces):
Mounting:
CaseMaterial:
Color:
Warranty:
9-18VDC
28mAtypical.
l00mA max.
l) N.C.Activation:dialeractivates
whenan "open"is detected
whena "close"is detected
T N.O.Activation:dialeractivates
3) VoltageActivation:N.C.(appliedvoltage:Min. +5VDC,Max.+28VDC)
N.O. (lossof continuous
voltage:Min. 0VDC,Max. 0.25VDC)
50
-18ro 55 C (0 to 130F)
6x4x1.5in
l0 oz
Wall or Flat Surface
ABS
White
I Year
Note: Design and specificationssubjectto changewithout notice.
Power Source
AC-l: AC/DCAdaptor
Additional Options
Datalogger:AD-2001-DL
Plugs into regular I I0VAC outlet to provide the dialer with the
requiredprimary power.
AC-2: AC/DC Adaptor
I2VDC/0.5A for standalone with siren use.
PP-l: Power (Rechargeable)
Provides24 (est.)hours ofbackup standbypower.
AC-IP: AC/DC Adaptor For Use With PP-l
Plugs into regular I I0VAC outlet to provide the dialer with the
requiredprimary power and additionalinput for PP-l interface.
IR-l: Isolation Relay
Converts alann output voltage to N.C. to provide clean input
trigger to dialer.
Retainsin memorylog of alarmeventsfor later retrievaland review.
IndustriaUResidential Sensors
F20: TemperatureSupervisorySwitch <40 F
HTS: High TemperatureSwitch
LTS: Low TemperatureSwitch
CSS:Cold StorageSwitch
WLS: Water Level Sensor
RTS: AdjustableTemperatureController,N.O.,N.C.
PLS: PowerLossSensor(110VAC)
Sensors
Magnetic Contacts - Door and Window
Glass Break Detectors
Hold Up Buttons/Emergency Switches
Pressure Mats - Sealed and Under Carpet
Motion Detectors
Siren
S-120t2" Mini Siren,I2VDC @120mA typical
Wireless:AD-200I/W
Wireless version AD-2001 dialer includes wirelesspendant
transmitter.
24V Application: AD-2001/T
For this optionthe dialeris configuredto operateat 24VDC to
apply.
32VDCmax.All otherspecifications
Wirelessand 24Y Applications: AD-2001/WT'
The AD-2001/IV/Fincorporates
both the wirelessfeatureand
24VDCapplication.
SeeWIRELESSAND 24V APPLICATION
for furtherdetails.
NOTE: CALL UNITED SECURITY PRODUCTS FOR
ADDITIONAL INFORMATIONAND DEVICESNOT LISTED
HERE.
WirelessUpgrade:
AD-2001canbe upgraded
for wirelesslink-upwith
The standard
pendant,etc.,by inRF-activated
magcontacts,motionsensors,
RF assembly
stallinga new backcovercontaininga pre-tested
The receiveris connected
to the mainboard
andswivelantenna.
via a 4-pin interfaceconnectoralreadyincludedin the standard
configuration.
SeeWIRELESSfor furtherdetails.
NOTE: SYSTEMS ALREADY INSTALLED CAN BE
UPGRADED WITHOUT REPLACING OR RE-WIRING THE
DIALER.
Care And Precautions
LOCATION
with the manufacturer's instructions, may cause interference to
radio and television reception. It has been type tested and found
to comply with the limits for a Class 'B' computing device in
accordance with the specifications in Subpart B of FCC Rules
and Regulations (as outlined in the Code of Federal Regulation,
Title 47), which are designed to provide reasonable protection
against such interference in a residential installation.
Place the dialer on a flat level surface or mount the unit on the
wall, away from extreme cold or heat, direct sunlight, excessive
humidity and away from equipment that generate strong magnetic fields. Avoid placing near large metal objects and areas
that produce smoke, dust and mechanical vibrations.
CARE
User Instructions
If this equipment does cause interference to radio or television
reception, which can be determined by turning the equipment off,
then on, the user is encouraged to try to correct the interference
by one or more o[ the following measures:
Clean the housing with a soft cloth lightly moistened with
water or mild detergentsolution. Never use solvents such as
alcohol or thinner.Do not allow liquids to spill into the unit.
OPTIONAL BACKUP
To ensurecontinuousoperationduring power outages,hookup
to a 12VDC backup battery pack is recommended. (PP-1)
Available from United Security Products.
o
o
.
CAUTION
o
Do not use the dialer if a gas leak is suspectedor during light
ning.
Changes or modifications not expressly approved by United security Products,Inc. could void the user's authority to operatethe
equipment.
PROBLEMS
If liquid or a foreign object penetratesthe unit, disconnectir
immediately and contact your installer or other qualified technician.
Before calling USP, pleasemake sure...
o
.
.
Reorient or relocate radio or television.
Increasethe separationbetween the equipment and receiver.
Connect the equipment into a different outlet so that the
equipment and receiver are on different branch circuits.
Consult the dealer or an experienced radio/TV technician for
help.
You have read this manual and understand how to oDerate
t h ed i a l e r .
Your phone line is working.
You check out the entire system, including external hookup wiring and sensorsattached.
If you still have questionsor concerns,call our USP Technical
Service Department between the hours of 7:30 AM and 4:00
PM, PST, Monday through Friday.
Federal Communications Commission Radio And Television Interference Statement For A Class 'B' Device
This equipment generatesand uses radio frequency energy and
if not installed and used properly, that is, in strict accordance
United Security Products
Issue date: 4/27198
16