1
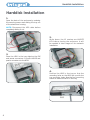
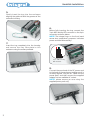
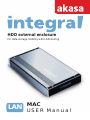
HDD external enclosure
for data-storage mobility with LAN sharing
LAN
MAC
USER Manual
English
AKASA Company notices
The information contained in this document is subject to change without notice.
All rights reserved. Reproduction, adaptation, or translation of this material is prohibited without prior written permission of AKASA,
except as allowed under copyright laws.
The only warranties for AKASA products and services are set forth in the express warranty statements accompanying such products and
services. Nothing herein should be construed as constituting an additional warranty. AKASA shall not be liable for technical or editorial
errors or omissions contained herein.
Copyright 2006 AKASA ASIA Corporation.
Acknowledgements
Microsoft, Windows, Windows NT and Windows XP are registered trademarks of Microsoft Corporation.
Mac and Apple are the registered trademarks of Apple Computer, Inc.
Adobe and Acrobat are trademarks of Adobe Systems Incorporation.
Netdisk, NDAS and XIMETA are trademarks of XIMETA Incorportion.
General Notice: Other product names used herein are for identification purposes only and may be trademarks of their respective owners.
AKASA disclaims any and all rights in those marks.
Copyright Statement
It is a criminal offence, under applicable copyright laws, to make unauthorized copies of copyright-protected material, including computer
programs, films, broadcasts and sound recordings. This equipment should not be used for such purposes.
Notice:The manufacture makes no warranty of any kind with regards to this material, including, but not limited to, the implied warranties
of merchantability and fitness for a particular product. The manufacture shall not be liable for errors contained herein or for incidental
consequential damages in connection with the furnishing, performance, or use of this material. Every effort has been made to ensure
that the information in this manual is accurate. The manufacture is not responsible for printing or clerical errors. Mention of third party
products is for information purposes only and constitutes neither an endorsement nor a recommendation. The manufacture assumes no
responsibility with regards to the performance of these products. This document contains proprietary information, which is protected by
copyright (see below). The information contained in this document is subject to change without notice.
Trademarks:
Microsoft is a registered trademark of Microsoft Corporation. Windows, Windows XP and the Windows 98 logo are trademarks of
Microsoft Corporation. MAC is a registered trademark of Apple Computer. NDAS® and XIMETATM are trademarks of XIMETA, Inc.All other
trademarks and product names used within this manual are the property of their respective companies and are hereby acknowledged.
Copyright: ©2006 all rights reserved. No part of this publication may be reproduced, transmitted, transcribed, stored in a retrieval system,
or translated into any language or computer language, in any form, by any means, without prior written consent of manufacture.
FCC Compliance Statement
This device complies with Part 15 of the FCC Rules. Operation is subject to the following two conditions:
1. This device may not cause harmful interference, and
2. This device must accept any interference received, including interference that may cause undesired operation.
FCC Warning Statement
This equipment has been tested and found to comply with the limits for a Class B digital device, pursuant to Part 15 of the FCC Rules.
These limits are designed to provide reasonable protection against harmful interference in a residential installation. This equipment
generates, uses and can emit radio frequency energy and, if not installed or used in accordance with the instructions, may cause
interference to radio communications. However, television reception interference can be determined by turning the equipment off and on.
The user is encouraged to correct the interference by one or more of the following measures:
• Reorient or relocate the receiving antenna
• Increase the separation between the equipment and the receiver
• Connect the equipment into an outlet different from that to which the receiver is connected
• Consult the dealer or an experienced radio/TV technician for help.
CAUTION
Changes or modifications not expressly approved by the party responsible for compliance could void the user’s authority to operate the
equipment.
Introduction
Congratulations on your purchase of the INTEGRAL LAN 3.5” hard disk enclosure. This User Manual is
intended to help you install the INTEGRAL LAN drive quickly and easily onto your Personal Computer or
Ethernet Network and begin using it immediately. INTEGRAL LAN drives are the perfect solution to your
network storage needs. Share documents, music, videos, and pictures with your family or co-workers through
your network. Simply connect the drive to your network, install our easy to use software and you’re up and
running. Say goodbye to confusing network setups and configurations. With its Key Code security features,
your data is kept private from unauthorized access.
The INTEGRAL LAN works in both network mode as well as a standalone USB mode. Take advantage of the
ultra fast USB 2.0 transfer rates by connecting the INTEGRAL LAN directly to your MAC's USB 2.0 port. With its
portability, ease of use, high performance, and extra capacity, the INTEGRAL LAN has you covered.
Package Contents
• INTEGRAL LAN enclosure
• USER Manual
• Software & Driver CD
• Power Adapter
• USB & Ethernet Cables
• Footstand
System Requirement
• Mac OS X 10.3 or greater
• 128 MB RAM (256 MB recommended)
• USB 1.1 Port (USB 2.0 recommended)
• CD-ROM drive for installation
• 100Base-T full duplex switch for NDAS mode
Features
• Support 3.5” IDE HDD (PATA)
• Shared network direct attached storage (NDAS) for your home or office
• Easy setup and installation
• Sleek & portable design
• USB 2.0 (USB 1.1 backwards compatible)
• Key Code security protection
• Driver supports OS X 10.3 or greater (Network Mode)
• OS 8.6 or later (USB Mode)
• Data transfer rates of:
▎Network mode: 100Mbit/sec
▎USB mode: 480Mbit/second
Harddisk Installation
Harddisk Installation
1.
Open the back of the enclosure by undoing
the securing screws and sliding the tray out
of the aluminium housing.
NOTE: Disconnect the LED cable before
completely sliding it out.
POWER
CONNECTOR
2.
IDE
CONNECTOR
Write down the ID number and WRITE
KEY before closing the enclosure. It will
be needed in later stages of the network
installation.
LED
CABLE
3.
Place the HDD in the tray aligning the IDE
and power connectors. Connect the IDE and
power connectors to the HDD.
4.
Position the HDD in the tray so that the
mounting holes on the HDD line up with the
tray mounting holes. Use the four mounting
screws to secure the HDD in the tray.
Harddisk Installation
5.
Gently insert the tray into the enclosure
aligning the guide rail with the grooves of the
enclosure housing.
6.
Before fully inserting the tray, connect the
3-pin HDD activity LED connector to the 4-pin
connector as shown below.
NOTE: The integral logo on the front bezel
serves two operational purposes: indicates
power and hard drive activity.
7.
Insert the tray completely into the housing
and secure the tray face plate to the
enclosure using the screws provided.
3-pin HDD activity
LED connector
8.
Connect the round end of the DC power cord
to the back of the enclosure, making sure it is
correctly aligned. Plug the AC cable into the
power pack, and then connect the supplied
adapter into an available AC socket.
NOTE: please ensure you are using the
supplied power pack only.
USB Connection
USB Mode Connection
Hardware installation
1. Connect your INTEGRAL LAN to the computer using the supplied USB cable
2. Switch on the power and your INTEGRAL LAN is ready to use.
CAUTION! Do not connect USB cable
and Ethernet cable at the same time.
Software installation
Mac OS 8.6
If you are using Mac OS 8.6, the software of Mass Storage Support 1.3.5 is required for
installation. You can download The USB Mass Storage Support 1.3.5 from the Apple Software
Updates web site Http://www.apple.com/support .
Mac OS9.0 or later
You don’t need to install this software if you have installed Mac OS 9.0 or above.
When you connect the INTEGRAL LAN into the USB port of the Mac computer, the mass storage
volume should appear on the desktop in a few seconds automatically.
Using the INTEGRAL LAN Device
After the first installation, you can connect or disconnect the INTEGRAL LAN device without powering
off the computer, please follow the steps when you want to do the above actions
Connecting the INTEGRAL LAN device
1. Connect one end (type B) of the USB cable into the USB port of your INTEGRAL LAN enclosure.
2. Connect the other end of the USB cable (type A) into any active USB port of the computer.
3. Plug the AC power cord to the INLET of your INTEGRAL LAN enclosure and turn on the power
switch. Your INTEGRAL LAN device is ready to use.
Disconnect the INTEGRAL LAN Device
When disconnecting your INTEGRAL LAN drive from
the computer, close all windows and quit all running
applications that are stored on the USB2.0 External
Drive and drag USB2.0 External Drive’s icon into “Trash”
to dismount it from the Desktop prior to unplugging
the USB2.0 External Drive from the USB port.
Network Connection
Network Connection Mode
Hardware installation
Connect INTEGRAL LAN to Network:
1. Connect one end of the included Ethernet cable to the Ethernet port on the INTEGRAL LAN
and the other to a switch or router. (100 Base-T).
2. Make sure the power adaptor connector is firmly attached to the INTEGRAL LAN and to a power
source.
3. Switch ON the INTEGRAL LAN.
INTEGRAL LAN
Ethernet Cable
CAUTION! Do not connect
USB cable and Ethernet
cable at the same time.
AC Power
Ethernet Switch
Computer 1
Laptop 1
Computer 2
Ethernet Switch Example
INTEGRAL LAN
Ethernet Cable
AC Power
Wired/Wireless
Ethernet Router
Computer 1
Laptop 1
Ethernet Router Setup Example
Wireless
Laptop 2
Network Connection
Software installation
Installation of NDAS software is necessary to use the INTEGRAL LAN as a network drive. Installation
ofthe software is simple and easy. Please insert the Installation CD into your CD-ROM drive and select
the Drivers folder.
STEP 1
Insert the INTEGRAL driver CD to your Mac.
STEP 2
Click on the INTEGRAL DRIVER icon on the
desktop and navigate to the the folder [p2l] and
then the folder [mac].
STEP 3
Select and click on the folder for your Mac OSX,
select the Tiger driver for Mac OSX version 10.4
or the Panther driver for Mac OSX version 10.3.
STEP 4
Double click on [NDAS Install package] to
launch the installation.
STEP 5
Welcome to the Akasa INTEGRAL LAN installer
Click Continue to start the installation.
Network Connection
STEP 6
Important
Please read the Important Information and Click
Continue.
STEP 7
Software License Agreement
Click Continue and Agree to proceed with the
installation or Disagree to cancel the installation.
STEP 8
Select Destination
Select a harddrive volume to install the software
and click Continue.
Network Connection
STEP 9
Installation Type
To perform a basic installation click Install.
STEP 10
Authenticate
Enter the name with the Administrator right and
password, then click OK.
STEP 11
Click Continue Installation followed by restart
if you are ready to restart the computer.
10
Network Connection
STEP 12
The NDAS utility is in Applications -> Utilities
folder.
STEP 13
Double click the NDAS utility to launch the
administration application.
STEP 14
Click on the new device icon on the top right
hand corner to register the new NDAS disk drive.
11
Network Connection
STEP 15
Type in the NDAS device name of your choice
Enter the ID and Write Key that come with the
INTEGRAL LAN. The ID and Write Key should
have been noted from Step 2 of the hard disk
installation.
STEP 16
After the device ID registration, the harddisk
model appears on the left hand side panel and is
available for configuration.
12
Network Connection
Managing the INTEGRAL LAN disk
Register/Unregister an INTEGRAL LAN enclosure
Click on the icon for
re g i s t e r i n g a n e w L A N
enclosure device
Click on the icon for unregistering
an already registered LAN enclosure
device
Accessing the INTEGRAL LAN disk
The INTEGRAL LAN disk can be accessed as read only
or read/write. In read only mode, any number of users
or applications can read from the disk. In Read/Write
mode, only one user or application can write to the
disk at a time.
To change from read only mode to read/write, click on
the menu in configuration and select read/write, and
vice versa for changing from read/write to read only
mode. The configuration menu allows unmounting of
the disk.
Note: The Write Key is required during device
registration for the read/write mode to work.
Sharing the INTEGRAL LAN on a Network
Once INTEGRAL LAN drive is connected to your network, it can be accessed from any computer on your LAN.
To share your INTEGRAL LAN device, you need:
• All computers and INTEGRAL LAN drive to be on the same LAN
• INTEGRAL LAN device connected via Ethernet Router
• NDAS device must be registered onto each computer
The INTEGRAL LAN can be shared by a mixed of Windows 2000/XP and Mac computers. Multiple computer
can have READ ONLY access simultaneously. WRITE ACCESS is assigned to one computer at a time and is
passed from one computer to another. The disk file system format must be formatted in FAT32. The NTFS
file system for windows 2000/XP is not a compatible file system for the Mac OS.
WARNING:
DO NOT perform disk operations (format, partition and chkdsk) when the INTEGRAL LAN drive are mounted
by multiple computers.
13
Disk Partition/Formatting
Disk Partition/Formatting
WARNING!!
Before you partition your hard disk, please be aware that this will destroy all your existing data on the drive, make
sure you have backup your computer! This step is usually required the first time you install a new hard drive, or if you
change the type of particular format or want to erase all data on your drive.
Partition under Mac OS
Mac OS 9.2 and earlier does not support creating partitions on an external drive. To do that, you would
need to purchase additional 3rd party software. Initializing is no problem on all Operating Systems.
Mac OS X (Tiger or Panther):
The Disk Utility is used to format and create partitions on your external disk.
1. Select “Disk Utilities” in the utilities folder
2. Choose your external drive and format it according to your requirement
14