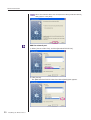
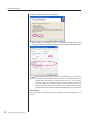
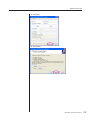
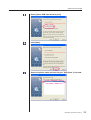
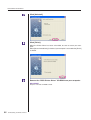
1
RISO Printer Driver
USER’S GUIDE
for EZ5/EZ3/EZ2 Series
Ms5412-06E
This document is intended for use by RISO, its authorized dealers and purchasers of the
equipment described herein. While every effort has been made to insure the accuracy of
information contained in this document, RISO, its authorized dealers and their employees shall not be held responsible for any inaccuracies it may contain.
ALL SPECIFICATIONS ARE SUBJECT TO CHANGE WITHOUT NOTICE.
The screens used in this manual are now under development. Therefore, they might be
different from the actual screens.
Reproduction or copying of this manual or any parts without permission is strictly prohibited.
Although every effort has been made to ensure that the contents of this manual are errorfree, please contact us if you notice any errors or other points which should be brought to the
company’s attention.
Copyright © 2008 RISO KAGAKU CORPORATION, JAPAN
● Windows® and Windows VistaTM are trademarks of Microsoft Corporation in the U.S.A. and other
countries.
● Product names and company names that are referenced in this guide are (registered) trademarks of
respective companies.
● The screens and content appearing in this manual may differ from the actual product.
● The screens and messages appear in procedures may differ depending on the type of computer and
application.
1
Preface
Welcome to the high-speed PC printing field presented by RISO printers through RISO Printer Drivers.
The RISO printers, which are designed to operate as a high-speed GDI printer, enable you to print
various documents you create on different computer platforms very speedily, only if an appropriate
RISO printer driver is installed in your computer.
The GDI printer, as you know, uses the bit-mapped image data developed on your PC monitor
screen as print data source, enabling you to print the exactly same image as of what you see on your
PC monitor screen in most cases. Besides, it requires no printer font to print document, thus relieving you of the restrictions on the use of fonts when you create documents on your PC.
The RISO printers can also operate as a network printer under various LAN environments, with an
additional network interface card embedded inside.
About the Guide Signs
The following advice signs are given to the descriptions which will help a user to avoid unexpected
troubles and obtain the optimum performance of this product.
• IMPORTANT !
Gives you helpful advice for trouble-free operation.
•
2
Preface
Gives you tips for more effective use of this product.
Procedure before printing
Before you use the printer at the first time, carry out the installation procedure below.
After installation, follow the basic operation procedure. Then, you can print out the documentation
data.
Installation (When the printer
is used at the first time)
Installing the Printer Driver
1. Preparing for the printer
Install the RISO Printer Driver into
your computer. ☞Page 8
Prepare for the printer and put
the print paper suitable for the
• Depending on the connecting
method, your computer needs to be
connected to the printer in advance.
original data to be printed out
onto the standard (multipurpose)
tray.
• For the preparation method for the
printer, read the user’s guide of the
RISO printer.
OS Support
This Printer Driver supports following OS:
Windows 2000/XP/Vista
Procedure before printing
3
Basic operation
USB Flash Drive
Printing
OK
2. Setting
3. Printing
4. Completion of printing
Open the data you want to print
out with your computer, select
your Printer Driver (or the USB
flash-via-Printer Driver) and make
settings for printing.
Open the [Print] dialog box on your
PC and click [OK]. The data is
transmitted to the printer or stored
in the *USB Flash Drive.
The printer receives the data and
makes master and prints out the
data.
To print from a *USB Flash Drive,
connect the USB Flash Drive to
your computer.
*Only EZ5 series has a feature of printing with USB Flash Drive.
4
*USB Flash Drive
Procedure before printing
To print from a USB Flash Drive,
connect the USB Flash Drive to
the printer.
Connecting Methods and Printer Driver types
The types of Printer Drivers are as follows:
Printer Driver
USB flash-via-Printer Driver
Choose the Printer Driver to install according to your environment.
■ The environment for being connected via cable
In the following environment, the Printer Driver should be used.
● When connected via USB cable ☞Page 9
USB cable
● When connected via network ☞Page 16
Network cable
Hub
■ The environment for not being connected via cable ☞Page 27
Save the data to the USB Flash Drive by using the USB flash-via-Printer
Driver. Connect the USB Flash Drive to the printer to print out the data.
USB Flash
Drive
• Even in the environment where the printer and your computer are
connected via cable, the data can be printed by using USB Flash
Drive.
• USB Flash Drive cannot be used for the EZ3/EZ2 series.
Connecting Methods and Printer Driver types
5
Table of Contents
Preface .......................................................................
Procedure before printing ...........................................
Connecting Methods and Printer Driver types ............
Table of Contents ........................................................
2
3
5
6
Installing the Printer Driver
■ USB Connection.............................................. 9
Installing the Printer Driver ......................................... 9
■ Network Connection ..................................... 16
Connecting with PC .................................................. 16
Installing the Printer Driver ....................................... 17
■ USB Flash Drive Output (only for EZ5 series) ... 27
About USB Flash Drive ............................................
Installing the USB flash-via-Printer Driver ................
Create a Folder .........................................................
Printing a test page ..................................................
27
27
33
34
Working with the Printer Driver
■ Changing the Printer Driver
Configuration ................................................ 37
■ Sending and Printing Data ........................... 42
■ Setting the Print Conditions ........................ 45
[Guide] Tab ............................................................... 46
[Image] Tab ............................................................... 54
[Extensions] Tab ....................................................... 57
■ Creating a RISORINC-format file ................. 60
Uninstalling the Printer Driver
■ Uninstall the Printer Driver .......................... 64
Manually installing / uninstalling the Printer Driver
For Windows 2000/XP
■ Manual installation ........................................ 68
In the case of connection via USB cable .................. 68
In the case of network connection /USB Flash Drive
output ....................................................................... 69
■ Manual uninstallation ................................... 70
For Windows Vista
■ Manual installation ........................................ 71
In the case of USB cable connection ........................ 71
In the case of network connection /USB Flash Drive
output ....................................................................... 72
6
Table of Contents
■ Manual uninstallation ................................... 73
Appendix
Troubleshooting Tips ................................................. 75
Error Message on PC’s Display ...................... 75
Operation Problems ....................................... 76
Table of Contents
7
Installing the
Printer Driver
The method of installing the Printer Driver using the installer is
described here.
■ USB Connection ........................................ 9
Installing the Printer Driver ..................... 9
■ Network Connection ................................ 16
Connecting with PC .............................. 16
Installing the Printer Driver ................... 17
■ USB Flash Drive Output (only for EZ5 series) ... 27
About USB Flash Drive ........................ 27
Installing the USB flash-via-Printer Driver ... 27
Create a Folder ..................................... 33
Printing a test page ............................... 34
8
Installing the Printer Driver
USB Connection
■ USB Connection
Installing the Printer Driver
This section describes how to install the Printer Driver for windows supporting
the Plug&Play installation when your computer and the RISO printer are connected via USB cable.
IMPORTANT!
• You are required to have the administrator’s privilege to install the printer driver
program in your computer.
• RISO Printer Driver system requirements:
For Windows 2000 ....... 128 MB of RAM or more
For WIndows XP .......... 192 MB of RAM or more
For Windows Vista ...... 512 MB of RAM or more
• This Printer Driver does not support server OS or printer sharing.
• Use a commercially available USB cable (Hi-speed USB, 3m or less).
For Windows Vista
To update the Printer Driver, change cable connections or reinstall a Printer
Driver of the same series, deletion of the driver package is required. Uninstall
the installed Printer Driver manually before new installation. "Manual
uninstallation" (Page 70)
Make sure that the printer is turned off and that the computer and
printer are not connected by a USB cable.
IMPORTANT!
At some point during the installation procedure (step 7/8) you will need to connect the
USB cable and turn the printer on.
Insert the [RISO Printer Driver] CD-ROM into your computer's CDROM drive.
The installer is started. When the installer is not started, double-click the
“SETUP.EXE” file in CD-ROM.
If the [User Account Control] dialog appears, click [Allow]. (For Windows Vista)
Installing the Printer Driver
9
USB Connection
Select your language from the drop-down list, then click [OK].
Click [Install].
Click [Next].
10
Installing the Printer Driver
USB Connection
Select [Connect with USB cable].
Click [Next].
The [USB Port Settings] dialog box appears.
Turn on the RISO printer.
Installing the Printer Driver
11
USB Connection
Connect the computer to the RISO printer with an USB cable (HiSpeed USB, 3 m or less).
Select the printer name you just connected.
12
Installing the Printer Driver
USB Connection
Click [Next].
When selected Printer Driver has already been installed in Windows 2000/
XP, [Installation Method] dialog appears. Click [Next].
Click [Next].
You can also change the name of the printer.
Installing the Printer Driver
13
USB Connection
Click [Install].
When the [Digital Signature Not Found] (for Windows 2000), [Windows Logo
Approval Test] (for Windows XP) or [Driver Source Not Found] (for Windows
Vista) dialog appears, continue with installation.
[Do you want to print a test page?] appears, then click [Yes].
Set A4/Letter paper in the printer beforehand.
Check the test print was properly printed and click [OK].
14
Installing the Printer Driver
USB Connection
Click [Display the ReadMe file].
The ReadMe file is opened. Be sure to read all the instructions and notes on it.
Click [Finish].
Be sure to restart the computer before using the Printer Driver. If you have
checked [Restart immediately], the computer will be shut down and restarted
when you click [Finish].
When [Found New Hardware Wizard] is displayed, click [Cancel].
Then remove the [RISO Printer Driver] CD-ROM from the CD-ROM
drive of your computer.
IMPORTANT!
Keep the removed CD-ROM at hand.
Installing the Printer Driver
15
Network Connection
■ Network Connection
Connecting with PC
Optional network interface card, “RISO Network Card” is required when connecting the computer to the RISO printer through network to use as a network printer.
In advance, connect the RISO printer to the network and configure printer
network settings (ex. IP address). For details, see RISO Network Card User's
Guide (contained in RISO Network Card SOFTWARE CD-ROM).
Use a commercially available Ethernet cable (10BASE-T or 100BASE-TX)
appropriate for your network environment.
IMPORTANT!
Use an Ethernet cable specified with category 5 or more.
■ When your RISO printer is connected with one PC
Network cable
Ethernet port for your RISO printer
■ When your RISO printer is connected on network
Hub
Network cable
Ethernet port for your RISO printer
16
Installing the Printer Driver
Network Connection
Installing the Printer Driver
This section describes how to install the RISO Printer Driver when the computer is connected to the RISO printer through network.
IMPORTANT!
• You are required to have the administrator’s privilege to install the Printer Driver
program in your computer.
• RISO Printer Driver system requirements:
Windows 2000 .... 128MB of RAM or more
Windows XP ........ 192MB of RAM or more
Windows Vista ..... 512MB of RAM or more
• This Printer Driver does not support server OS or printer sharing.
Insert the [RISO Printer Driver] CD-ROM into your computer's CDROM drive.
The installer is started. When the installer is not started, double-click the
“SETUP.EXE” file in CD-ROM.
If the [User Account Control] dialog appears, click [Allow]. (For Windows
Vista)
Select your language from the drop-down list, then click [OK].
Installing the Printer Driver
17
Network Connection
Click [Install].
Click [Next].
Select [Connect using another connection method].
18
Installing the Printer Driver
Network Connection
Click [Next].
Select the printer name you just connected.
Click [Next].
Installing the Printer Driver
19
Network Connection
When selected Printer Driver has already been installed, [Installation Method]
dialog appears. Click [Next].
Add the network port.
1) Select [Create a New Port], and then [Standard TCP/IP Port].
2) Click [Create].
The [Add Standard TCP/IP Printer Port Wizard] dialog box appears.
20
Installing the Printer Driver
Network Connection
3) Click [Next].
4) Enter the IP address of your printer.
Port name will be entered automatically.
5) Click [Next].
Installing the Printer Driver
21
Network Connection
6) Select the [Custom] and click [Settings].
7) Select [LPR] for [Protocol], input “lp” as the [Queue Name] under [LPR
port], and place a checkmark in the [LPR Byte Counting Enabled] checkbox.
This installation procedure assumes that the RISO printer is connected to
the network using the dedicated network interface card, RISO Network Card
(option). When connecting to a commercial print server etc. on the network,
refer to the instruction manual provided by the manufacturer. After the LPR
function is added, your computer requires restarting. Therefore, be sure to
store the necessary data in your computer before carrying out the operation.
Follow the instruction manual of Windows 2000/XP/Vista or Help for details.
IMPORTANT!
The images may not be printed properly if [LPR Byte Counting Enabled] is not selected.
22
Installing the Printer Driver
Network Connection
8) Click [OK].
9) Click [Next].
Installing the Printer Driver
23
Network Connection
10) Click [Finish].
Click [Next].
You can also change the name of the printer.
24
Installing the Printer Driver
Network Connection
Click [Install].
When the [Digital Signature Not Found] (for Windows 2000), [Windows Logo
Approval Test] (for Windows XP) or [Driver Source Not Found] (for Windows
Vista) dialog appears, continue with installation.
[Do you want to print a test page?] appears, then click [Yes].
Set A4/Letter paper in the printer beforehand.
Load paper with the short edge first.
Check the test print was properly printed and click [OK].
Installing the Printer Driver
25
Network Connection
Click [Display the ReadMe file].
The ReadMe file is opened. Be sure to read all the instructions and notes on it.
Click [Finish].
Be sure to restart the computer before using the Printer Driver. If you have
checked [Restart immediately], the computer will be shut down and restarted
when you click [Finish].
Then remove the [RISO Printer Driver] CD-ROM from the CD-ROM
drive of your computer.
IMPORTANT!
Keep the CD-ROM at hand.
26
Installing the Printer Driver
USB Flash Drive Output
■ USB Flash Drive Output (only for EZ5 series)
About USB Flash Drive
● Use USB Flash Drive of mass storage class. Depending on the type of
USB Flash Drive, the Printer Driver may not work properly.
● When connecting or removing USB Flash Drive, insert it or pull it out
slowly by using the correct method.
● When USB Flash Drive data is damaged by natural disaster or contingency, the data saved in the USB Flash Drive cannot be guaranteed. It is
recommended to back up important data with your computer with which
the data has been created.
Installing the USB flash-via-Printer Driver
This section describes how to install the USB flash-via-Printer Driver when
using a USB Flash Drive to print.
(Regarding the procedure for manual installation, see page 67.)
IMPORTANT!
• You are required to have the administrator’s privilege to install the Printer Driver
program in your computer.
• RISO Printer Driver system requirements:
For Windows 2000 ........128MB of RAM or more
For Windows XP ...........192MB of RAM or more
For Windows Vista ........512MB of RAM or more
• This Printer Driver does not support server OS or printer sharing.
Insert the [RISO Printer Driver] CD-ROM into your computer's
CD-ROM drive.
The installer is started. When the installer is not started, double-click the
“SETUP.EXE” file in CD-ROM.
If the [User Account Control] dialog appears, click on [Allow]. (For
Windows Vista)
Installing the Printer Driver
27
USB Flash Drive Output
Select your language from the drop-down list, then click [OK].
Click [Install].
Click [Next].
28
Installing the Printer Driver
USB Flash Drive Output
Select [Use a USB flash drive to print].
Click [Next].
Select the printer name that has the part "USB flash" at the end.
Installing the Printer Driver
29
USB Flash Drive Output
Click [Next].
When the selected Printer Driver is already installed, “Installation Method”
dialog box appears, click [Next].
30
Installing the Printer Driver
USB Flash Drive Output
Click [Next].
You can also change the printer name.
When changing the printer's name, we recommend to leave (USB flash) in
the name.
Click [Install].
When the [Digital Signature Not Found] (for Windows 2000), [Windows Logo
Approval Test] (for Windows XP) or [Driver Source Not Found] (for Windows
Vista) dialog appears, continue with installation.
The following message appears, click [OK].
Please refer to “Create a Folder” and “Printing a test page” for output of test
page on USB Flash Drive.
Installing the Printer Driver
31
USB Flash Drive Output
Click [Display the ReadMe file].
The ReadMe file is opened. Be sure to read all the instructions and notes on it.
Click [Finish].
Be sure to restart the computer before using the Printer Driver. If you have
checked [Restart immediately], the computer will be shut down and restarted
when you click [Finish].
Then remove the [RISO Printer Driver] CD-ROM from the CD-ROM
drive of your computer.
IMPORTANT!
Keep the removed CD-ROM at hand.
Next, create a dedicated folder in USB Flash Drive. (Go to the next page.)
32
Installing the Printer Driver
USB Flash Drive Output
Create a Folder
The procedure of creating a dedicated folder in USB Flash Drive is described
here.
IMPORTANT!
When printing by using USB Flash Drive, be sure to create a dedicated folder in USB
Flash Drive. Printing is disabled from the USB Flash Drive for which a dedicated folder
has not been created.
Instead of the following procedure, you can create a dedicated folder
by connecting USB Flash Drive to the printer.
Connect the USB Flash Drive to the computer.
Display the [Print] dialog box.
Open the original data to print on your computer, select [Print] from the [File]
menu.
Select the printer to which the Printer Driver has been installed.
Be sure to select the USB flash-via-Printer Driver.
Click [Properties].
Check that [USB print] has been selected in [Destination], and click
[Storage tag].
When a message appears, click [Yes].
The dedicated folder is created in the USB Flash Drive.
Installing the Printer Driver
33
USB Flash Drive Output
Click [OK].
Next, print a test page.
IMPORTANT!
When changing the name of the folders in USB Flash Drive or moving the original
data, use the RISO USB PRINT MANAGER.
For details, see the "RISO Utility Software User's Guide".
Printing a test page
This section describes the procedures for printing a test page by using the
USB flash-via-Printer Driver.
IMPORTANT!
Use the USB Flash Drive for which a dedicated folder (Page 32) has been created in
advance.
Open the print folder.
Click on the [Printers and Faxes] folder from [Start] menu to open the [Printers
and Faxes] folder.
Open the properties of the printer to which the USB flash-via-Printer
Driver has been installed.
Right-click the icon of the printer (USB flash), and select [Properties] from the
menu to be displayed.
Click [Print Test Page].
34
Installing the Printer Driver
USB Flash Drive Output
When a message appears, wait for a few seconds and click [OK].
The data of the test page is saved in USB Flash Drive.
Remove the USB Flash Drive from your computer, and connect it
to the printer.
On the touch panel of the printer, touch [USB Job List].
Select [Test page] of [1_usb_folder], and touch [Retrieve].
Test Page
Press the Start key.
Set A4/Letter paper in the printer beforehand.
A test page is printed.
Load paper with the short edge first.
Installing the Printer Driver
35
Working with the
Printer Driver
■ Changing the Printer Driver
Configuration ........................................... 37
■ Sending and Printing Data ..................... 42
■ Setting the Print Conditions ................... 45
[Guide] Tab ............................................ 46
[Image] Tab ........................................... 54
[Extensions] Tab ........................................... 57
■ Creating a RISORINC-format file ............ 60
36
Working with the Printer Driver
Changing the Printer Driver Configuration
■ Changing the Printer Driver Configuration
For customized use, register optional devices, frequently-used custom paper size, print color, and color information. If you do not change the Printer
Driver configuration, you will not be able to select the corresponding option
when specifying the print conditions of your print job.
The screen shots of the Printer Driver shown here are taken from
Printer Driver. (Not USB flash-via-Printer Driver)
Open the printer folder.
For Windows 2000/XP
Select [Settings]-[Printers and Faxes] from the [Start] menu and open the
[Printers and Faxes] folder.
For Windows Vista
Click on the [Start] icon-[Control Panel]-[Hardware & Sound]-[Printer] and
open the [Printer] folder.
Open the [Configuration] tab of the [Properties] dialog box.
Click the right-hand mouse key on the corresponding RISO printer icon in
the [Printers] folder and select [Properties] in the displayed menu. Then click
on [Configuration] in the [Properties] dialog box.
Optional device*
Color information*
Custom Paper Entry
Printer Color Entry
Working with the Printer Driver
37
Changing the Printer Driver Configuration
Select the optional devices with which your RISO printer is
equipped.
Mark the check boxes of the optional device concerned.
You cannot select this option without any optional devices connected.
Optional device*
Color information*
Custom Paper Entry
Printer Color Entry
* [Storage Memory] under [Optional device] and [Color information] do not
appear in the USB flash-via-Printer Driver.
Sorter*
Select the sorter which is connected to your RISO printer.
Job Separator
Select [On] if your RISO printer is equipped with the Job Separator.
Storage Memory* (USB flash-via-Printer Driver is not available)
Select [On] if your RISO printer is equipped with DM-128CF.
* This option is not available for EZ3/EZ2 series.
38
Working with the Printer Driver
Changing the Printer Driver Configuration
Register paper and colors when you needed.
Registering Custom Paper Size as Standard
You can register custom paper sizes as standard in the [Custom Paper List]
dialog box, which can be opened by clicking [Custom Paper Entry] in the
[Configuration] tab of the [Properties] dialog box. The custom paper sizes
can be named and displayed in the standard paper size list.
1) Click [Custom Paper Entry] to display the [Custom Paper List] dialog
box.
2) Click [Add].
The [Customer Paper - Add] dialog box appears.
3) Enter a custom paper size and name it.
The length of the name can be up to 30 characters.
If you wish to change the unit of length from “inch” to “mm”, click on the [▼]
bar next to the same box and highlight “mm”.
Height (Length)
Feed direction
Width
Paper
Working with the Printer Driver
39
Changing the Printer Driver Configuration
4) Click [OK].
The [Customer Paper - Add] dialog box is closed and the paper size name
which has just been registered is added to the [Custom Paper List] dialog
box.
You can save the information of your customer paper size as a Custom Paper Entry information file (.udp extension) by clicking [Save]. If you want to
register the custom paper size from the Custom Paper Entry information file,
click [Open] to select the file.
IMPORTANT!
Even if you use the paper types that are registered in the Custom Paper List, it may
not pass trough the machine depending on such factors as the paper quality, ambient conditions and storage conditions.
• Entry of the name and dimensions will help you when you select the paper
size.
• The registrable paper size varies with the printer you use. For details, see
the user’s guide of your printer.
• When changing the name and/or dimensions of a custom paper size, select the corresponding name from the list and click [Edit]. When deleting a
custom paper size, select the corresponding name from the list and click
[Delete].
Register the Print Colors
Register the all print colors which your RISO printer can provide.
The print colors registered are displayed in the Print Color drop-down list in
the [Guide] tab (See page 46).
1 Click [Print Color Entry] to open the [Print Color Entry] dialog box.
2 Select the colors you have on your RISO printer from the [Color List] in the
[Print Color Entry] dialog box, and click [Add].
3 Click [OK].
40
Working with the Printer Driver
Changing the Printer Driver Configuration
Color Information (Network Connection only)
Make your choice for auto detection of color information.
Check box selected
: Detection of the color information of the print
color mounted on the printer is made every time
you open the printer’s properties to reflect the in
formation on the [Color Label] for the Printer
Driver.
For printing process without opening the printer’s
properties, detection of color information is made
prior to printing process, and the data is output
with the print color mounted on the printer by
tem porarily reflecting the printer drive settings.
Check box not selected : Color information is updated only when you click
[Refresh] of the [Guide] tab.
Reference
You need to make an entry for this field when detection is made for the color
(colour) information of the cylinder (drum) mounted on the printer.
IP Address
Enter the IP address of your RISO printer which is connected.
Click [OK].
The new Printer Driver configuration is confirmed and the [Properties] dialog
box is closed.
Working with the Printer Driver
41
Sending and Printing Data
■ Sending and Printing Data
Follow the procedures given below to print out document data directly
on your RISO printer.
If the corresponding RISO Printer Driver has not been installed in your
computer yet, install it first, referring to the section “Installing the Printer
Driver” on page 8.
IMPORTANT!
• The maximum print area is different depending on the model of RISO printer.
If you want to know the maximum print area of your document, consult the
user’s guide of your RISO printer.
• For other limitations, also read the user’s guide of your RISO printer.
Turn on your RISO printer and load paper.
Load the proper paper to be printed.
Specify the print job in the [Print] dialog box.
Turn on your computer and start Windows.
Open the document file to be printed, select [Print] in the [File] menu to
open the [Print] dialog box.
Select a Printer Driver.
Select a Printer Driver that supports your printer from the [Printer Name] list.
To print from a USB Flash Drive, select [Printer Name (USB flash)] and
connect the USB Flash Drive to your computer. (Only for EZ5 series)
42
Working with the Printer Driver
Sending and Printing Data
Check print conditions.
• Specify the number of copies to be printed within the following
range : 1 to 9,999.
• Never fail to deselect the [Collate] box. If it is selected, the mastermaking operation will be repeated for every copy.
The displayed items in the [Print] dialog box vary depending on the application
software.
Remove the check mark for
[Collate].
IMPORTANT!
If you want to print a file consisting of several pages, and the file include different paper sizes or page directions, printing may fail when you choose [All]
for the paper range. Specify page numbers to print for those of same page size
or direction.
If you want to set additional print conditions for the current print job ;
Open the [Properties] dialog box by clicking [Properties] in the [Print] dialog
box.
Some printer settings are not available depending on access privileges.
[Guide] Tab (refer to page 46 for detailed settings)
IMPORTANT!
Settings of paper size and page direction
for this tab should be identical with those
in the application software to be used.
Working with the Printer Driver
43
Sending and Printing Data
[Image] Tab (refer to page 54 for detailed settings)
[Extensions] Tab (refer to page 57 for detailed settings)
If no settings are required, leave this tab
as “<Open>” or make no changes.
(Printing will be done according to the
setting of your RISO printer.)
If you want to customize settings, be
sure to refer to the user’s guide of your
RISO printer for the relevant section.
Start printing.
Click [OK] in the [Print] dialog box.
The selected document file data is then transmitted to your RISO printer and
printed out there as specified in the previous step.
When using a USB Flash Drive, data is output to the USB Flash Drive. Disconnect the USB Flash Drive from the computer, connect it to the printer and
print the data. For printing procedures, see the printer user's guide.
44
Working with the Printer Driver
Setting the Print Conditions
■ Setting the Print Conditions
You can set various print conditions over the tabs in the [Properties]
dialog box.
To open this dialog box, click [Properties] in the [Print] dialog box.
The operation here is common to Windows 2000/XP/Vista.
Some screen indications and tab names might be different.
Refer to the document of Windows and other associated applications for how to use the other tabs of this dialog box.
IMPORTANT!
Some Printer Driver settings are disabled by the settings.
Printer Driver
Print Only
Storage Only
USB print
(Manual)
USB print
(Auto process)
180-degree rotation
Enable
Disable
Disable
Enable
Program printing
Enable
Disable
Disable
Enable
Process
Enable
Disable
Disable
Enable
Sorter control
Enable
Disable
Disable
Enable
Job separator
Enable
Disable
Disable
Enable
Print speed
Printer Driver Settings
[Guide] Tab
[Extensions] Tab
USB flash-via-Printer Driver
Enable
Disable
Disable
Enable
Print density
Enable
Disable
Disable
Enable
Output the data after
initializing printer
Enable
Disable
Disable
Enable
Interval printing
Enable
Disable
Disable
Enable
Ink saving
Enable
Enable
Enable
Enable
Activate the Confidential
mode after job completes
Enable
Disable
Disable
Enable
ID print
Enable
Enable
Enable
Disable
Enable : Printer Driver's setting is active.
Disable : Printer Driver's setting is disabled (or cannot be set.) Set with printer'scontrol
panel when printing.
Only EZ5 series has a feature of printing with USB Flash Drive.
Working with the Printer Driver
45
Setting the Print Conditions
[Guide] Tab
1
2
3
4
5
6
7
8
Settings
1 Color
Print color
Refresh
2 Original
Size
Orientation
3 Paper
Output size
4 Layout
Page layout
Page order
Margin-plus
180-degree rotation
46
Working with the Printer Driver
5 Output
Number of Copies
Program printing
Process
Destination
Storage tag
6 Restore Default
7 Help
8 About...
Setting the Print Conditions
1 Color
Print color
When color information is acquired by executing [Refresh], the color that
has been set in the printer is automatically set, and the character of the color
name is displayed in blue. This operation is convenient for checking what
colored drum is currently set.
When the information has not been acquired, display the drop-down list by
clicking [▼], and manually select the color that has been set for the printer.
[Refresh] (Only in the case of network connection)
■ It is necessary to set [Color information] - [Reference] on the [Configuration] tab (Page 37).
When [Refresh] is clicked, the color information that has been set to the printer
is reflected on the Printer Driver. When the information is acquired, the character of the color name of the Printer Driver is displayed in blue.
IMPORTANT!
To appropriately update the ink color, the RISO Network Card monitoring tool
needs to be started in advance.
2 Orignal
Size
You can specify a desired paper size in either “Standard” or “Custom” box as
a frequently-used one. The factory-set paper size is “Standard: Letter 8 1/2
× 11 inch” or “A4 210 × 297mm”.
– Changing the standard paper size setting
When using any other standard size of paper than the displayed one, click
[▼] to display a list of paper sizes and select a desired one by highlighting it.
IMPORTANT!
When paper is fed with the long edge first, select the paper size whose name
contains the word “-R”.
Be sure to specify the same page direction which was set in the application
software used when creating the document data.
– Changing the custom paper size setting
When using any other custom-size paper than the displayed one, select
[custom] and enter its width and length in the boxes. If desired to change the
unit of length from “inch” to “mm”, click [▼] next the same box and highlight
[mm].
• The range of paper size you can specify here depends on the specifications of your RISO printer.
• You can name custom-size paper and register it in the list of standard
paper sizes. See “Registering Custom Paper Size as Standard” on page
39 for the registration procedure.
• In some application software, inputs in [Custom] column might be ignored.
In such a case, register the non-standard size paper. (See page 39)
Working with the Printer Driver
47
Setting the Print Conditions
Orientation
You are required to select the same page direction as of original document
data here. The factory-set page direction is “Portrait”.
When paper is fed with the wide edge first, however, the page direction specified here should be opposite to that of original document data, i.e. “Portrait”
to “Landscape” and “Landscape” to “Portrait”.
IMPORTANT!
Be sure to specify the same page direction which was set in the application
software used when creating the document data.
3 Paper
Output size
Select the paper size for printing.
If you do not use scaling, select [Same as original].
If you select paper size different from the original text, scaling will be done
from 50% to 200%.
4 Layout
Page layout
You can print the data of two or more pages on one sheet of paper.
Standard
: No Multi-up (single) or (plural) printing is conducted.
Multi-up (Single) : Print two or four copies of a single document on one
sheet of paper.
Multi-up (Plural) : Print two or four different text pages on one sheet of
paper.
Multi-Up (Single)
A
Multi-Up (Plural)
A A
A A
D
C
A B
B
A
C D
Page order
Set the order of the original. You can select when conducting multi-up printing.
2 in 1: Select from Ascending/Descending.
4 in 1: Select from Horizontal-Ascending/Vertical-Ascending/HorizontalDescending/Vertical-Descending.
48
Working with the Printer Driver
Setting the Print Conditions
Margin-plus
If you select this check box, printing will be done in a 95% scaling.
180-degree rotation
You can rotate print images by 180 degrees by activating this option. Select
the check box to activate it.
IMPORTANT!
This option is also available on the control panel of your RISO printer. Make
sure it is not activated on both sides at the same time. If it is, this option will be
canceled.
5 Output
Number of Copies
You can use this field to specify the number of copies if no field is prepared
for print quantity entry in your application software. When the number of
copies can be specified in the [Print] dialog box of the application software,
on the other hand, you can ignore this setting because it has no effect on
printing operation.
Program printing
Printing jobs are conducted in sets of copies. One set should contain at least
one page. By selecting program printing, you can click [Settings]. Click [Setting]
to open [Program printing] dialog box.
Copies
Sets
Reset
Job Separation
: Enter the value for number of pages per set to be printed.
: Enter the value for number of sets to be printed.
: Returns Copies and Sets to their defaults.
: When the Tape is selected, the tape is inserted into each
group. (Optional job separator should be mounted on
your RISO printer.)
Working with the Printer Driver
49
Setting the Print Conditions
Process
You can specify how to process your print jobs on your RISO printer, i.e. to
complete them without interruption or to interrupt them after a specified process step. By interrupting your print jobs, you can check print position and
quality with test prints before printing process or change the print job flow
according to your print requirements. Click on the [▼] bar and select a desired process flow from the displayed list. The available process flows are as
follows :
Full Auto:
To complete print jobs without operator involvement on your RISO printer.
No pause is made between master-making and printing processes until the
end of print jobs.
Semi-Auto (Print):
To interrupt print jobs before each master-making process, thus allowing
you to handle a stack of printed copies, especially for duplex printing. You
can view the page image on the LCD of the printer to check what you are
about to print.
Semi-Auto (Master):
To interrupt print jobs before each printing process, thus allowing you to
check a sample print.
Manual:
To interrupt print jobs before each process step, i.e. both master-making and
printing processes.
IMPORTANT!
• For the Printer Driver, [Process] is available only when you select [Print
Only]. (See Page 51) (The setting is not valid for [Storage Only].) For stored
data, set the [Process] mode from the printer display when the data is activated.
• For the USB flash-via-Printer Driver, master-making/printing is executed according to the [Process] setting made here when [Destination] (Page 51) is
set to [USB print (Auto process)]. For that reason, when [Semi-Auto (Print)]
or [Manual] is selected, master-making does not start automatically.
50
Working with the Printer Driver
Setting the Print Conditions
Destination
(For the Printer Driver)
■ The [Destination] is displayed only when your RISO printer is equipped
with the storage memory (DM-128CF).
When you install the Printer Driver, open the [Properties] dialog box, and
you can select the storage memory to be installed or not installed from the
[Configuration] tab. (See page 37)
Click [▼] to view the drop-down list and select the destination.
Print Only
Send the data to your RISO printer, and start printing in the auto process.
Stored data will be automatically erased after the print job is done.
Print & Storage*
The print job is processed and the data is stored in the printer. You can
reactivate the stored data on your RISO printer at anytime you like.
Storage Only*
Send the data to your RISO printer to be stored. You can reactivate the stored
data on your RISO printer at anytime you like.
* This option is not available for EZ3/EZ2 series.
(For the USB flash-via-Printer Driver )
Click [▼] to open the drop-down list, and set the destination.
USB print (Manual)
Data is output to the USB Flash Drive. A folder for storing the data in the USB
Flash Drive data can be selected.(Page 52)
USB print(Auto process)
Data is sent to the USB Flash Drive. It is printed according to the [Process]
setting. (A folder for storing the data in the USB Flash Drive cannot be selected. Data is stored in the [Auto process] folder.)
After a master-making, the data in the USB Flash Drive is automatically
deleted.
Working with the Printer Driver
51
Setting the Print Conditions
Storage tag
(For the Printer Driver)
Set additional information necessary for storing data. The information below
will be stored together with the document data. Such information can be
used to identify stored data.
Selecting [Print & Storage] or [Storage Only] for [Destination] enables you to
click [Storage Tag]. Click [Storage Tag] to open the [Storage Tag] dialog box.
(For the USB flash-via-Printer Driver)
Only for EZ5 series
Set any additional information needed to output to the USB Flash Drive. The
items set below are saved with the original data. This information is used to
identify the data to output. Clicking [Storage tag] opens the [USB print tag]
dialog.
Use an original file name:
Select the check box to automatically use an original file name for identification on the application software on which the document was created.
Job name:
Enter ID name if you want to have any name different from one specified on
the application software on which the document was created.
Owner name:
Input the name of the administrator of the data to be stored or output to the
USB Flash Drive. The default is the name of the user logged into the computer.
52
Working with the Printer Driver
Setting the Print Conditions
Folder:
Select a folder (1-6) to use for storing or printing from the USB Flash Drive.
Drive (Only for USB flash-via-Printer Driver):
Select the drive that the USB Flash Drive is connected to. The drive detected
as the USB Flash Drive appears in the drop-down list.
Display a message before deleting data:
Select the check box to display a confirmation message on the control panel
of your RISO printer before deleting stored data.
IMPORTANT!
You are not allowed to use the prohibited characters as follows for [Job name]
and [Owner Name].
Prohibited characters : \ / :, ; * ? ” < > l
With the Printer Driver for USB Flash Drive, when [USB print (Auto process)] is selected for [Destination](Page 51), the data is automatically deleted after printing is finished.
6 Restore Default
Returns the settings on this tab to the default settings.
This is also displayed on the [Image] and [Extensions] tabs.
7 Help
Displays help information.
This is also displayed on the [Image] and [Extensions] tabs.
8 [About...] button
Opens the [About...] dialog box, in which the version number of the Printer
Driver can be checked. In case you contact your service representative due
to function errors, check this version number beforehand.
This is also displayed on the [Image] and [Extensions] tabs.
Working with the Printer Driver
53
Setting the Print Conditions
[Image] Tab
1
2
Print image
3
4
Settings
1 Photo
3 Line
Grain-touch
Screen-covered
Frequency
Angle
2 Image type
Standard
Portrait
Group
1 Photo
Grain-touch
Screen-covered
Solid-look
4 Text Style
Bold
Slim
Off
You can select either of the following two styles in printing out photo images
in your document data. The print result of the selected style of photo images
is previewed on the screen.
Grain-touch:
Various tones of photo images are reproduced by changing the number of
dots in an area according to original density. The printed-out photo images
will have grain-touch appearance.
Screen-covered:
Various tones of photo images are reproduced by changing the size of dots
according to original density. The printed-out photo images will be covered
with a dot screen.
Though the wide range of tone levels in original photo images can be kept in
this style, their fineness will be lowered.
When you select [Screen-covered], you can set the screen-covered parameter.
54
Working with the Printer Driver
Setting the Print Conditions
Frequency
You can select the frequency of dots per inch (25.4 mm). You can select the
value from 38 to 200. The default value is 71.
Angle
You can select the angle of dot direction so as to make adjustments against
moire or other problems. You can select the value from 0 to 90. The default
value is 45.
2 Image type
Select the type of photo and set image finishing.
Standard
Clicking [Details] enables settings to be made for brightness and contrast.
Portrait
Use this setting for pictures of one or two individuals from the bust up. This
type of image processing is particularly good for printing photos of faces.
Group
This setting is for group photos that are over-exposed. This process is effective
for restoring facial features that have become washed out by a flash.
When either [Portrait] or [Group] is selected, the settings made for [Standard] are returned to their defaults.
Photo Image Adjustment
Clicking on the [Details] opens the [Photo Image Adjustment] dialog box.
Brightness
: The brightness of photo images can be adjusted
to 7 levels.
Contrast
: The contrast of the overall image can be adjusted to
7 levels.
Backlight correction : When a check mark is placed in the check box, back
light correction is applied to the image to make it
sharper.
Edge enhancement : When a check mark is placed in the check box, edge
enhancement is applied to the image to accent con
tours.
Tone smoothing
: This setting is available when [Screen-covered] is
selected for [Photo]. When a check mark is placed
in the check box, the tonal expressions used in
screen-covered processing are smooth.
Working with the Printer Driver
55
Setting the Print Conditions
3 Line
Specifies the expression method of the line (text).
Grain-touch
: This mode displays the color gradation. The bright color
is printed out in light tone and the dark color is printed
out in deep tone.
Screen-covered : The text sections are displayed with halftone dots. This
mode is unsuitable for small sized text.
Solid-look
: This mode makes all text solid-look. You can use this
mode to express the text clearly. The difference of each
text color cannot be expressed.
4 Text Style
You can adjust the thickness of text in this mode.
Bold : makes the text thicker and print out (to prevent patchy)
Slim : makes the text slimmer and print out (to prevent crushed lines)
Off : doesn’t adjust the text volume.
Print image:
56
Working with the Printer Driver
According to the settings of each [Image type], [Line] and [Text Style], the image of
the documentation data and print will be displayed.
The actual documentation data and prints are different from the displayed images.
Setting and Printing Conditions
[Extensions] Tab
1
2
3
4
5
6
7
8
1 Device
Sorter control*
Job separator
2 Print speed
3 Print density
4 Output the data after initializing printer
5 Interval printing
6 Ink saving
7 Activate the Confidential mode after job completes
8 ID print*
* This option is not available for EZ3/EZ2 series.
1 Device
• [Sorter Control] appears when [Sort] is selected for [Sorter] on the [Configuration] tab (Page 38).
• [Job Separator] is displayed when you select the check box of [Job Separator]
in the optional device concerned (See page 38).
Sorter control
The sort mode can be set for the sorter connected to the printer.
<Open> : Follow the present setting of your RISO printer.
NonSort : Prints are directly sotred in the nonsort tray of the sorter.
Sort
: Prints from multiple originals are sorted. Prints are sorted and
distributed one full set per bin.
Group : Prints are sorted in different bins by original.
Stack
: Prints are distributed one copy per bin, and this process is repeated.
For sorter features and operation, see the sorter user's guide.
Working with the Priter Driver
57
Setting and Printing Conditions
Job separator
You can activate the job separator on your RISO printer and select the timing of separation tape insertion.
<Open>
: Follow the present setting of your RISO printer.
OFF
: No separation tape inserted.
ON-Between Documents : Insert separation tapes per job.
ON-Between Pages : Insert separation tapes per page.
For the features and operations of the Job Separator, refer to the User’s
Guide of the Job Separator.
2 Print speed
You can select the print speed of your RISO printer. Click on the [▼] bar and
select a desired speed level from the displayed list. 5 levels of print speed
are available. The factory-set speed level is “<Open>”, which lets your RISO
printer operate at the speed level as specified on its own control panel.
3 Print density
You can select the print density on your RISO printer. Click on the [▼] bar
and select a desired density level from the displayed list. The factory-set
density level is “<Open>”, which lets your RISO printer print at the density
level as specified on its own control panel.
4 Output the data
after initializing
printer
Your RISO printer is initialized before receiving print data when this check
5 Interval printing
By allowing the printer to skip a paper feeding during printing, the ink has
box is selected. It is recommended to select this check box in most cases.
time to dry, preventing it from leaving marks on the back of the next sheet.
6 Ink saving
The ink saving function of the printer is activated when this check box is
selected. The volume of ink used for printing will be reduced compared
with normal operation.
In case of selecting "Ink saving mode" printing image might be lighter or
erased depending on darkness of the original image.
7 Activate the
Confidential
mode after job
completes
58
Working with the Priter Driver
You can prevent your confidential documents from being duplicated without
your knowledge by selecting this check box. When this check box is
selected, the remaining master is automatically replaced with a blank one
after all specified print jobs are finished.
Setting and Printing Conditions
8 ID print
This feature is available for EZ5 series only.
The data will be output as “ID print” when this check box is selected. For ID
print, the input of PIN code is required when printing the data from the printer.
Use this setting to print documents you do not want others to read, such as
confidential documents.
Though the job is sent to the printer, the master or prints are not made until
authorization is input from the printer's control panel.
IMPORTANT!
• With the Printer Driver for USB Flash Drive, placing a check mark in the
[USB print] check box automatically sets [USB print (Manual)] for
[Destination](Page 51). [USB print (Auto process)] cannot be selected.
• Before setting [ID print], make the authorization settings in the printer. For
details, see the printer user's guide.
ID
Input your ID Number registered with the printer.
IDs are allocated to each individual user in the range from 0 to 99.
For details, ask the administrator of the printer.
Working with the Priter Driver
59
Creating a RISORINC-format file
■ Creating a RISORINC-format file
It is necessary to create a RISORINC-format file before sending data via
FTP with RISO Network Card.
A RISORINC-format file can only be used with RISO printers.
All settings made in the Printer Driver are saved with the file.
IMPORTANT!
The procedure for creating RISORINC files differs when using the [Layout]
feature (Page 48). See "Creating RISORINC Files Using the Layout function"
(Page 62).
Open a document file and specify the print job in the [Print]
dialog box.
Select [Print] in the [File] menu to open the [Print] dialog box.
Confirm that [RISO...] is selected in the [Printer] field in the
[Print] dialog box.
The selected [RISO...] should correspond to the RISO printer model to which
your document file is to be transmitted. Otherwise, the transmitted document data may not be printed out correctly on the target RISO printer.
IMPORTANT!
• The RISORINC-type file should be created with the RISO Printer Driver corresponding to your RISO printer. If the Printer Driver does not correspond to
your RISO Printer Driver, the transmitted document may not be printed out
correctly.
• USB flash-via-Printer Driver cannot be used.
60
Working with the Priter Driver
Creating a RISORINC-format file
Output the document data to a file.
Select the corresponding check box, ex. [Print to file], and click [OK]. Then
specify the name and the destination for the RISORINC-format file to be
created in the displayed dialog box and click [OK] or [Save].
If the corresponding check box does not exist in the [Print] dialog box,
change the Printer Driver configuration.
Open the [Properties] dialog box from the [Printers] folder and select “File”
in the [Print to the following port] list in the [Details] or [Ports] tab. Then
open the [Print] dialog box and click [OK].
Mark the check box of the
[Print to file]
Working with the Priter Driver
61
Creating a RISORINC-format file
Creating RISORINC Files Using the Layout Feature
When using the [Layout] function (Page 48), files cannot be properly created in the usual way. Create
RISORINC files from a Local Port.
■ Adding a Local Port for RISORINC Files
1 Open [Printers and Faxes] or [Printer] from the Control Panel.
2 Select the RISO Printer Driver and open the properties.
3 Open the [Port] tab.
4 Click [Add Port].
5 Select [Local Port] and click [New Port].
6 The [Name Port] dialog box opens, therefore input the drive where to store the RISORINC
file (i.e., C:\) and the file name (i.e.,RISORINC.prn), and click [OK].
If “C:\RISO\RISORINC.prn” is input for [Port Name], the file named RISORINC.prn is saved in
the C drive.
■ Selecting a Local Port for RISORINC Files
1 Open [Printers and Faxes] or [Printer] from the Control Panel.
2 Select the RISO Printer Driver and open the properties.
3 Open the [Port] tab.
4 Place a check mark in the check box of the Local Port for RISORINC files that was added
under [Print Port], and [OK].
IMPORTANT!
After creating the RISORINC file using the [Layout] feature, restore the usual print port in the same
way you set the Local Port.
It is convenient to install two RISO Printer Drivers and register one for printer output and the other for
RISORINC Files.
■ Outputting RISORINC Files
1 Open the [Print] dialog box.
Open the original data to convert to RISORINC format, and select [Print] from the [File] menu.
2 Check print conditions.
Check that the RISO Printer Driver in which the Local Port has been selected for RISORINC
files appears in the [Printer Name] list.
3 Output to file.
Remove the check mark from the [Print to file] check box and click [OK]. The file is saved
under the name and drive set for the Local Port.
IMPORTANT!
• Remove the check mark from the [Print to file] check box. Data is automatically output to a file.
• To output other original data, either move or rename the currently saved RISORINC file.
If output as is, the saved file is overwritten.
62
Working with the Priter Driver
Uninstalling the
Printer Driver
The procedure of uninstalling the Printer Driver by using the
uninstaller is described here.
For Windows Vista
In the case of uninstallation using the uninstaller, the driver
package cannot be deleted. When the driver package needs
to be deleted, in such cases as for re-installation of the
Printer Driver, uninstall the Printer Driver manually.
■ Uninstall the Printer Driver ..................... 64
Uninstalling the printer driver
63
Uninstall the Printer Driver
■ Uninstall the Printer Driver
The procedure of uninstalling the Printer Driver is described here.
(Regarding the procedure of manual uninstallation, see Page 70.)
IMPORTANT!
To uninstall the Printer Driver, it is necessary to log on to Windows by the account with
the authority to change the system setting (administrator, etc.).
Insert the “RISO Printer Driver” CD-ROM into your computer.
The installer is started. When the installer is not started, double-click the
“SETUP.EXE” file in CD-ROM.
Select your language from the drop-down list, then click [OK].
Click [Uninstall].
64
Uninstalling the Printer Driver
Uninstall the Printer Driver
Click [Next].
Select the printer for which the Printer Driver needs to be
uninstalled.
Click [Next].
Uninstalling the Printer Driver
65
Uninstall the Printer Driver
Click [Uninstall].
Click [Finish].
When the Printer Driver has been uninstalled, be sure to restart your computer.
When [Restart immediately] is checked, your computer is restarted after [Finish]
is clicked.
Remove the “RISO Printer Driver” CD-ROM from your computer.
IMPORTANT!
Keep the removed CD-ROM at hand.
66
Uninstalling the Printer Driver
Manually installing / uninstalling
the Printer Driver
The procedure of installing / uninstalling the Printer Driver without using the installer / uninstaller is described here.
For Windows 2000/XP
■ Manual installation .................................. 68
In the case of connection via USB
cable ..................................................... 68
In the case of network connection
/USB Flash Drive output ....................... 69
■ Manual uninstallation .............................. 70
For Windows Vista
■ Manual installation .................................. 71
In the case of USB cable connection .... 71
In the case of network connection
/USB Flash Drive output ....................... 72
■ Manual uninstallation .............................. 73
Manually installing/uninstalling the Printer Driver
67
For Windows 2000 / XP
Manual installation
■ Manual installation
IMPORTANT!
• To install the Printer Driver, it is necessary to log on to Windows by the account with
the authority to change the system setting (administrator, etc.).
• To operate this Printer Driver, the following environment is required.
Memory:
For Windows 2000 ....... 128MB or larger
For Windows XP .......... 192MB or larger
• Server OS and printer sharing are not supported.
In the case of connection via USB cable
Turn the power of the printer on, and connect the USB cable to the
printer.
Start your computer, and insert the "RISO Printer Driver" CD-ROM
into your computer.
Connect the USB cable to your computer.
Install the Printer Driver according to the instructions on the [Found
New Hardware Wizard] window.
1 Select [Install from a list or specified location], and [Don't search. I will
choose the driver to install.], and then click [Next]. (For Windows XP)
Select the [Display a list of known drivers for this device so that I can choose
a specific driver], and then click [Next]. (For Windows 2000)
2 Click [Have Disk], and select the inf file of the driver to install.
3 Select the printer in use, and click [Next].
4 Complete the Wizard window.
Restart your computer.
Open the printer folder, and open the properties of the printer to
which the Printer Driver has been installed.
68
Manually installing / uninstalling the Printer Driver
Manual installation
Click [Print processor] of the [Details] tab.
Select [R34X8AP] from the list of print processors and [NT EMF
1.008] from the list of default data types, and click [OK].
Print the test page.
In the case of network connection /
USB Flash Drive output
Start [Add Printer Wizard]
Select [Local printer] and click [Next].
Create the port.
In the case of network connection:
Create TCP/IP port or LPR port.
In the case of USB Flash Drive output :
Create the local port (C:\RISO\RISORINC.prn, etc.).
Click [Have Disk], and select the inf file of the driver to install.
In the case of network connection:
[RISO Printer Driver]-[Win2000_XP]-[English]-RISODRV.inf
In the case of USB Flash Drive output :
[RISO Printer Driver]-[Win2000_XP]-[English]-[USB flash]RISODRV.inf
Select the printer in use and click [Next].
In the case of network connection, print the test page.
Restart your computer.
Manually installing / uninstalling the Printer Driver
69
Manual installation
■ Manual uninstallation
Delete the printer to uninstall from the printer folder.
From the menu of the printer folder, open [File] and then [Server
properties].
From the [Driver] tab, select the Printer Driver to uninstall, and
click [Delete].
70
Manually installing / uninstalling the Printer Driver
For Windows Vista
Manual installation
■ Manual installation
IMPORTANT!
• To install the Printer Driver, it is necessary to log on to Windows by the account with
the authority to change the system setting (administrator etc.).
• To operate this Printer Driver, the following environment is required.
Memory: 512MB or more
• Printer sharing is not supported.
In the case of USB cable connection
Turn the power of the printer on, and connect the USB cable to the
printer.
Start your computer.
Connect the USB cable to your computer.
In the [Found New Hardware] window, select [Locate and install
driver software] and then [Don't search online].
Select [I don't have the disk. Show me other options.], and then
[Browse my computer for driver software].
Insert the [RISO Printer Driver] CD-ROM into your computer.
In the [Browse] window, select the inf file of the driver to install.
Select the printer in use and click [Next].
Restart your computer.
Manually installing / uninstalling the Printer Driver
71
Manual installation
Open the printer folder, and open the properties of the printer to
which the Printer Driver has been installed.
Click [Print processor] of the [Details] tab.
Select [R34V8AP] from the list of print processors and [NT EMF
1.008] from the list of default data types, and click [OK].
Print the test page.
In the case of network connection /
USB Flash Drive output
Start [Add Printer Wizard].
Select [Local printer], and click [Next].
Create the port.
In the case of network connection:
Create TCP/IP port or LPR port.
In the case of USB Flash Drive output:
Create the local port (C: \RISO\RISORINC.prn, etc.).
IMPORTANT!
You cannot create the local port in the route of the startup drive.
Create any folder, and then create the local port in the folder.
Click [Have Disk], and select the inf file of the driver to install.
In the case of network connection:
[RISO Printer Driver]-[WinVista]-[English]-RISODRV. inf
In the case of USB Flash Drive output:
[RISO Printer Driver]-[WinVista]-[English]-[USB flash]-RISODRV. inf
Select the printer in use, and click [Next].
In the case of network connection, print the test page.
Restart your computer.
72
Manually installing / uninstalling the Printer Driver
Manual installation
■ Manual uninstallation
Delete the printer to uninstall from the printer folder.
From the menu that will be displayed by right-clicking on the margin of the printer folder, select [Run as administrator] and then
[Server properties].
From the [Driver] tab, select the Printer Driver to uninstall, and
click [Delete].
When the [Delete driver and package] dialog opens, select [Delete
driver and driver package] to delete the driver and driver package.
Manually installing / uninstalling the Printer Driver
73
Appendix
Troubleshooting Tips ..................................... 75
Error Message on PC’s Display ........... 75
Operation Problems ............................. 76
74 Appendix
Troubleshooting Tips
Error Message on PC’s Display
Take actions as given below if the following error messages appear in the PC’s display.
Message
The printer is not ready for printing.
(The device is not ready.)
Description and Action
❑ This message appears when your RISO printer requires
paper or it is not connected to your computer properly.
Action
Replenish paper or check your RISO printer and the
printer cable for poor connection, and then restart
printing.
❑ This message also appears when the memory of your RISO
printer becomes full during data transmission because the
size of the document data concerned is too large.
Action
Cannot print because an error is
found in the current printer settings.
Reduce the file size of the document data concerned
or increase the value of the [Timeout] setting in your
computer system, and then restart printing.
❑ This message appears if the printer settings (paper size,
print orientation, etc.) in the application software and the
Printer Driver do not match.
Action
Change the printer settings in the application software
to make them identical with those in the Printer Driver
or vice versa.
Appendix 75
Operation Problems
Check your system setup as given below if you encounter the following operation problems. Contact
your service representative for help if you cannot solve the problem.
No Printout __________________________________
Problem
Your RISO printer is not receiving
data from your computer even after
the print job finishes in the application
software.
Cause / Condition and Action
❑ Your computer is not securely connected to your RISO
printer.
Action
Connect the printer cable (or network cable) to both
your computer and your RISO printer securely.
❑ The [RISO...] Printer Driver is not selected.
Action
Select it and reprint.
❑ [Printing] is displayed as the printer status when you open
the [RISO...] printer monitor window.
Action
76 Appendix
Wait until the printer status display changes in the
[RISO...] printer monitor window.
Cause / Condition and Action
Problem
Your RISO printer cannot finish
processing the current document
data.
❑ The printer cable (or network cable) was removed just after a
print job started in the application software. ([Printing] is
displayed when you open the [RISO...] printer monitor
window in this case.)
Action
Reconnect the cable and cancel the current job in the
[RISO...] printer monitor window. Then turn off the
main power switch of your RISO printer. After approximately 10 seconds, turn it on again.
❑ [Pause] is displayed as the printer status when you open the
[RISO...] printer monitor window.
Action
Click on the [Restart] in the [Document] menu in the
[RISO...] printer monitor window.
❑ The printer settings (paper size, print orientation, etc.) in the
application software and in the Printer Driver do not match.
Action
Change the printer settings in the application software
to make them identical with those in the Printer Driver
or vice versa, and repeat the print job from the application software.
❑ The print job has been canceled before completion in the
application software on your computer.
Action
Your RISO printer won’t start making
master when the documentation data
is transmitted from your computer or
your RISO printer won’t start printing
after making master.
Turn off the main power switch of your RISO printer.
After approximately 10 seconds, turn it on again.
❑ If you set the [Process] to a setting other than “Full-auto”,
the process stops in operation in order to wait for instructions.
Action
Press Start key on your RISO printer. The next
process starts.
Appendix 77
Unexpected Print Result _______________________
Problem
Graphics cannot be printed properly.
Cause / Condition and Action
❑ The current [RISO...] printer driver was not selected as
active when editing graphics.
Action
Select the current [RISO...] Printer Driver and edit
graphics again because graphics may not be printed
properly if they are edited with another Printer Driver
selected.
❑ The specified custom paper size was so large that unexpected margins were assigned on a page.
Action
Images are reduced unexpectedly.
❑ Do you use the Printer Driver corresponding to your RISO
printer?
Action
Some fonts cannot be printed properly.
If the name of your RISO printer is different from the
model name of your Printer Driver, the document data
cannot be printed out correctly.
❑ The [Use Printer Font] option is selected in the application
software.
Action
The page image is not centered or is
clipped at an edge.
Select another paper size or specify the custom paper
size within the valid range.
Cancel the [Use Printer Font] option in the application
software.
❑ The paper size setting in the application software is not
identical with that in the Printer Driver.
Action
Make both paper size setting identical.
❑ The print area specified in the application software is beyond
the maximum print area of your RISO printer.
Action
Increase the border margins in the application software to contain the page image within the printable
area of your RISO printer.
❑ There is something wrong with the Print cylinder (drum) in
your RISO printer.
Action
78 Appendix
Check your RISO printer, referring to the dedicated
user’s guide.
Unexpected Action ___________________________
Problem
Cause / Condition and Action
Your RISO printer repeats the mastermaking process for each copy of the
identical page.
❑ The [Collate] check box is selected in the [Print] dialog box in
the application software.
Your RISO printer does not operate
as specified in the [Sorter control]
option in the Printer Driver.
❑ The finishing job specified in the [Sorter control] option is not
available for the current combination of your RISO printer
and an optional sorter.
Action
Action
Your RISO printer cannot print at the
speed specified in the [Printspeed]
option in the Printer Driver.
Refer to the dedicated user’s guides of your RISO
printer and the optional sorter.
❑ The print speed remains constant when a certain mode is
selected in the [Sorter control] option in the Printer Driver, for
your RISO printer which is equipped with a certain type of
optional sorter.
Action
Original data cannot be output to the
USB Flash Drive.
(EZ5 series)
Cancel the current print job on your computer and turn
off the main power switch of your RISO printer. After
approximately 10 seconds, turn it on again. Always
cancel the [Collate Copies] or [Collate] option in the
[Print] dialog box when starting a print job.
Refer to the corresponding page for detailed description about the [Sorter control] option.
(Page 57)
❑ Are you using the Printer Driver for USB Flash Drive?
There are two types of Printer Drivers. To output to a USB
Flash Drive, install the USB flash-via-Printer Driver. Data
cannot be output to a USB Flash Drive using an ordinary
Printer Driver. (Page 27)
❑ Are you using a USB Flash Drive formatted for RISO folders?
Create a folder just for RISO files in the USB Flash Drive.
(Page 33)
Appendix 79
Unable to Specify Settings _____________________
Problem
Cause / Condition and Action
A name cannot be entered in the
dialog box to register the custom
paper size.
❑ The name is too long for the corresponding field.
A desired value cannot be entered in
the corresponding fields to register
the custom paper size.
❑ The value does not fall within the range.
The custom paper size cannot be
registered in the [RISO...] printer
driver.
❑ The relevant dialog box was not closed correctly.
The specified custom paper size
cannot be selected in the application
software.
❑ [Custom] is not selected in the [Paper Size] option in the
[Properties] dialog box of the Printer Driver.
Action
Action
Action
Action
Valid range of the length is 30 characters.
Enter the value within the valid ranges into the relevant fields.
Add the desired custom paper size in the relevant
dialog box ([Custom Paper List] once more, and then
click [OK] or [Save] before closing the dialog box.
(Page 39)
Select [Custom] in the [Paper Size] option.
❑ [Paper Size: Custom] cannot be selected in the [Printer
Setup] dialog box in the application software.
Action
80 Appendix
Specify a standard paper size which is larger than the
specified custom one.