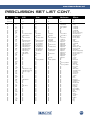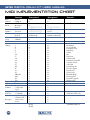
1
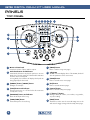
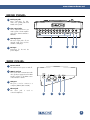
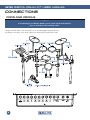
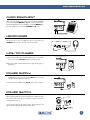
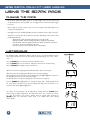
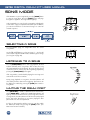
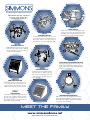
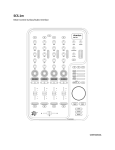
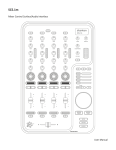
The First Name in Electronic Drums.
SD7PK
Electronic Drum Kit
user manual
www.simmonsdrums.net
FCC Statements
1. Caution: Changes or modifications to this unit not expressly approved by the party responsible for compliance could void
the user’s authority to operate the equipment.
2. Note: This equipment has been tested and found to comply with the limits for a Class B digital device, pursuant to Part 15 of the FCC Rules.
These limits are designed to provide reasonable protection against harmful interference in a residential installation. This equipment generates,
uses, and can radiate radio frequency energy and, if not installed and used in accordance with the instructions, may cause harmful interference
to radio communications. However, there is no guarantee that interference will not occur in a particular installation. If this equipment does cause harmful
interference to radio or television reception, which can be determined by turning the equipment off and on, the user is encouraged to
try to correct the interference by one or more of the following measures:
•Reorient or relocate the receiving antenna.
•Increase the separation between the equipment and receiver.
•Connect the equipment into an outlet on a different circuit.
•Consult an experienced radio/TV technician for help.
www.simmonsdrums.net
Congratulations!
… on your purchase of Simmons’ SD7PK Electronic Drum Kit. To get the most enjoyment from
this kit, we recommend that you skim through this manual at least once, then refer back to it
to learn more about specific functions.
Taking Care of your digital
drum kit
Location
• To avoid deformation, discoloration, or more serious damage, do not expose the unit to
direct sunlight, high temperature sources, or excessive humidity.
Power Supply
• Turn the power switch OFF when the SD7PK is not in use.
• The AC adapter should be unplugged from the AC outlet if the SD7PK is not to be used for
an extended period of time.
• Avoid plugging the AC adapter into an AC outlet that is also powering high-consumption
appliances such as electric heaters or televisions. Also avoid using multi plug adapters since
these can reduce sound quality, cause operation errors and result in possible damage.
• To avoid damage, turn OFF the SD7PK’s power switch and all related devices prior to
connecting or disconnecting cables.
Handling and Transport
• Never apply excessive force to controls, connectors, and other parts.
• Unplug cables by gripping the plug firmly. Do not pull on the cable.
• Disconnect all cables before moving the module.
• Physical shocks caused by dropping, bumping, or placing heavy objects on the module
can result in scratches and more serious damage.
Cleaning
• Clean the module with a dry, soft cloth.
• A slightly damp cloth may be used to remove stubborn grime and dirt.
• Never use cleaners such as alcohol or thinner.
• To avoid discoloration, do not place vinyl objects on top of module.
Electrical Interference
• The module contains digital circuitry and may cause interference if placed too close to
radio or television receivers. If this occurs, move the SD7PK further away from the affected
equipment.
Service and Modification
• There are no user serviceable parts in the drum module.
• Do not attempt to open the drum module or make any change in the circuits or parts of the
unit. This would void the warranty.
1
The First Name in Electronic Drums.
SD7PK digital drum kit User manual
SD7PK Setup
Set up your SD7PK kit following the included assembly instruction sheet.
2
The First Name in Electronic Drums.
www.simmonsdrums.net
Table of Contents
Panels Top Panel
Rear Panel
Side Panel
Connections Pads and Pedals
Audio Equipment
Headphones
MP3/CD Player
Power Supply
Power Switch
Using the SD7PK Pads Playing the Pads
Metronome
Kit Mode Selecting a Drum Kit
Global Reverb
Voice Mode Selecting the Drum Voice
Adjusting Pad Level
Adjusting Pad Pan
Adjusting Pad Tuning
Saving User Kits
Utility Menu Pad Sensitivity (Gain)
Rim Sensitivity
Crosstalk
Curve
Splash Sensitivity
Local Mode
Saving Trigger Settings
Restoring the Factory Preset
Song Mode Selecting a Song
Listening to a Song
Muting the Drum Part
Accompaniment Volume
Drum Volume
Song Source
Song Tempo
MIDI and USB MIDI Connection
USB Connection
Local Mode
MIDI Channels
Voice List Drum Kit List Song List General MIDI Voice List Percussion Set List MIDI Implementation Chart 4
4
5
5
6
6
7
7
7
7
7
8
8
8
9
9
9
10
10
11
11
11
11
12
12
12
12
13
13
13
13
13
14
14
14
14
15
15
15
15
16
16
16
16
16
18
20
20
21
22
24
3
The First Name in Electronic Drums.
SD7PK digital drum kit User manual
Panels
Top Panel
5
6
7
8
9
10
11
4
12
3
13
2
1
7 [SONG] button
1 Master volume knob
Controls the volume of phone and line outputs.
2
Enters or switches Song menu pages.
Pad select buttons and indicators
In Kit Mode, the buttons can play the pad voices. In Voice
Mode, they select the pad to be edited and the indicators
show the current selected pad.
In Song Mode, the indicators will display which pads are
being played by the drum track.
8 3-digit LED
This LED is the main display device of the SD7PK, which will
show the parameters of the current menu.
9 [VOICE] button
Enters or switches Voice menu pages.
3 [TEMPO+] button, [TEMPO-] button
10 [KIT] button
4 [CLICK] button and indicator
11 [UTILITY] button
Enters or switches Kit menu pages.
Changes current tempo.
Turns the metronome on or off and selects the metronome
sound (click or voice).
5
[DRUM OFF] button and indicator
Mutes the drum part of the Song.
6 [START/STOP] button
Starts and stops the selected Song.
Enters or switches Utility menu pages.
12 [+] button, [-] button
Changes values (kit number, voice number, song number,
etc.) when editing.
13 [SAVE] button
This button is used to save the current kit settings in a user kit
and saves the trigger settings under the Utility menu pages.
4
The First Name in Electronic Drums.
www.simmonsdrums.net
Rear panel
14 Pad input jacks
Input connections for kick,
snare, tom, cymbal pads and
Hi-Hat control pedal.
15 Line output jacks
Stereo output connection to an
audio system or drum amplifier
such as the Simmons DA50 or
DA200S.
16 AUX input jack
This stereo input jack is for an
external sound source such as
an MP3 or CD player.
14
17 DC input
Connection for the DC 9V
power adapter.
15
16
17
side panel
18
Power switch
This switch turns the power on and off.
19
MIDI in and out
These ports allow communication with
other products equipped with a MIDI
interface. Please see the MIDI section
of this manual for details.
20 USB port
This port is used to connect to a
computer. (MIDI In/Out via USB)
21
Phone jack
This stereo jack is
connect headphones.
used
to
18
19
20
21
5
The First Name in Electronic Drums.
SD7PK digital drum kit User manual
connections
Pads and Pedals
CAUTION!
To avoid damage, turn OFF the SD7PK’s power switch and all related devices
prior to connecting or disconnecting cables.
Using the provided cables, connect each pad to its corresponding trigger input jack, following
the marking on the cables. Secure all the cables to the stand using the provided Velcro strips.
6
The First Name in Electronic Drums.
www.simmonsdrums.net
Audio Equipment
When using an amplifier such as the Simmons DA50 or DA200S,
connect the Output L/MONO and R jacks on the rear panel to the
input of the amplifier. For mono playback, use the L/MONO jack;
for stereo playback, connect both L/MONO and R jacks.
headphones
An optional set of stereo headphones can be connected to the
PHONES jack located on the side of the drum module.
MP3/cd player
1. Connect the audio output of an MP3/CD player or other audio
source to the stereo AUX IN TRS jack on the rear panel.
2. The input signal is mixed with the drum signal, allowing you to
play along.
power supply
Note: Make sure the power is switched OFF when connecting
the drum module with external devices.
Connect the power adapter to the DC IN jack on the rear panel.
Power Switch
After confirming that all connections have been completed, rotate
the volume knob to the left (to its minimum volume level) before
switching the power on.
Set the power switch to the “ON” position. The kit indicator will
light up and the display will show kit number 001.
7
The First Name in Electronic Drums.
SD7PK digital drum kit User manual
using the SD7PK pads
Playing the pads
• All the drum pads and cymbal pads use a single trigger sensor for the whole pad,
except the dual zone snare pad that uses one trigger for the head and another trigger
for the rim.
• All the pads are velocity sensitive. Some voices can change sounds depending on the
velocity level (striking force).
• The trigger area of the cymbal pads (Ride, Crash or Hi-Hat) is near the edge of the pad.
• Similar to an acoustic drum kit, the Hi-Hat sound varies depending on the position of the
pedal (Hi-Hat Control):
• Open Hi-Hat: Strike the Hi-Hat pad without pressing the pedal
• Half Open Hi-Hat: Strike the Hi-Hat pad with the pedal pressed half-way
• Closed Hi-Hat: Strike the Hi-Hat pad with the pedal pressed all the way down
• Foot Close: Press the pedal all the way down
• Splash: Step fully on the pedal and release it immediately
metronome
The SD7PK includes a Metronome feature with two types of sounds: Click (Bell sound on
the first beat, and Click sound on the other beats) or Vocal Counting (“one”, “two”, “three”,
“four”, …).
Press the [CLICK] button to start the metronome with Click sound.
Press the [CLICK] button a second time to change the metronome to Vocal Counting.
Press the [CLICK] button again to stop the metronome.
While the metronome is playing, the Beat indicator flashes at the current tempo.
While the metronome is playing, the LED shows the current time signature.
The time signature of the metronome can be changed using the [+] and [-] buttons. There are
five available options: 2/4, 3/4, 4/4, 5/4 and 6/8.
The SD7PK returns to the previous display when the metronome is stopped.
Press the [TEMPO +] or [T -] buttons to change the tempo (30 — 280). The LED shows
the current tempo and returns to the previous display after about 2 seconds if there is no
operation of the Tempo [+] and [-] buttons.
The volume of the metronome can be adjusted by holding down the [CLICK] button
and pressing the [+] or [-] buttons. The LED shows “Cxx” (xx = metronome volume:
0 — 16), and returns to the previous display about 2 seconds after releasing the
[CLICK] button. The metronome volume resets to its default value when turning
off the SD7PK.
8
The First Name in Electronic Drums.
www.simmonsdrums.net
Kit Mode
If the SD7PK is not yet in Kit Mode, press the [KIT] button to enter
the Kit Mode. The Kit indicator will light up.
In the Kit Mode, you can select the Drum or Percussion Kit to play.
You can also turn on or off the Reverb effect.
Selecting a drum kit
In the Kit Number page, the 3-digit LED shows the current
kit number. Use the [+] and [-] buttons to select any kit (1 — 50,
looped) as the current kit.
The SD7PK includes 20 factory preset kits (1 — 20) and 30 User kits
(21 — 50). See Kit List on page 20.
NOTE: In Kit Mode, you can use the Pad Select buttons to
play the voices associated with the pads of the currently
selected Kit.
Global reverb
When the SD7PK is in the Kit Number page, press the [KIT]
button again to access the Global Reverb page.
In the Global Reverb page, the LED shows the current Reverb
status (“roN” for Reverb On or “roF” for Reverb Off).
It can be turned On or Off using the [+] or [-] buttons.
Press the [KIT] button again to return to the Kit Number page.
9
The First Name in Electronic Drums.
SD7PK digital drum kit User manual
Voice Mode
If the SD7PK is not yet in Voice Mode, press the [VOICE] button
to enter the Voice Menu. The Voice indicator lights up. Now the
[VOICE] button will page through the Voice Menu.
In the Voice Mode, you can select the voice for each pad and
adjust the level, pan and tuning of the pad.
The current pad to be edited can be selected either by pressing its
[Pad Select] button, or by striking the pad itself. The Pad Select
indicator lights up to show which pad is currently selected.
Note: While editing voice number, level, pan and tuning,
you can also preview the result of the current settings
by pressing the [Pad Select] button to play the edited voice.
selecting the drum voice
In the Voice Number page, the 3-digit LED shows the current
voice number for the selected pad. Use the [+] and [-] buttons
to select any voice (1 — 300, looped) for the current pad. The
SD7PK includes 300 voices sorted by category (Kick, Snare,
Tom, Cymbal, Hi-Hat, Percussions). Each category includes a
variety of acoustic, electric and effects voices.
(See Voice List on pages 18-19.)
Note: The voices for the snare head and rim are set
independently. When the snare pad is selected, press
the [RIM] button to select the snare rim (or strike the rim
of the snare pad).
The voices for the Hi-Hat (Open, Half, Closed, Foot and
Splash) are selected together as a single voice number
(voices # 237 — 252) which will contain all variations.
10
The First Name in Electronic Drums.
www.simmonsdrums.net
adjusting pad level
Press the [VOICE] button until the LED display shows “Lxx”.
(xx = Level value: 0 — 32). Use the [+] and [-] buttons to adjust the
level of the current pad.
adjusting pad pan
Press the [VOICE] button until the LED display shows “Pxx”. (xx =
Pan value: -8 — +8). Use the [+] and [-] buttons to adjust the pan
of the current pad.
adjusting pad tuning
Press the [VOICE] button until the LED display shows “txx”.
(xx = Tuning value: -8 — +8). Use the [+] and [-] buttons to adjust
the tuning of the current pad.
saving user kits
Make sure you save your customized kit; otherwise, your changes
will be lost when you select another kit or turn off the SD7PK.
Kits 001 — 020 are factory presets. Customized kits can be saved
in User kits 021 — 050.
User kits store all the Voice settings (Voice number, Level, Pan and
Tuning) for all the pads.
To save your customized kit to one of the User kits:
1. Press the [SAVE] button. The kit number flashes on the LED.
2. Use the [+] or [-] buttons to set the User kit number
(021 — 050). The kit number will still be flashing.
3.Press the [SAVE] button again. The kit number stops flashing
and the SD7PK returns to Kit Mode.
Note: To cancel the save operation while the LED is flashing,
press the [KIT] or [VOICE] button.
11
The First Name in Electronic Drums.
SD7PK digital drum kit User manual
Utility menu
Press the [UTILITY] button to enter the Utility Mode. Now the
[UTILITY] button will page through the Utility menu.
In the Utility Mode, you can adjust the trigger parameters (gain,
crosstalk, curve) for each pad, as well as the rim sensitivity of the
snare pad and the splash sensitivity of the Hi-Hat control pedal.
Those parameters are common to all kits.
The current pad to be adjusted can be selected either by pressing
its Pad Select button, or by striking the pad itself. The Pad Select
indicator lights up to show which pad is currently selected.
Pad sensitivity (gain)
In the Trigger Gain page, the first digit of LED will display letter
‘E’, which is followed by the gain value (1—16, not looped).
Greater gain will allow you to trigger a signal even if you strike a
pad lightly.
rim sensitivity
In the Rim Sensitivity page, rim sensitivity of the dual trigger snare
pad can be adjusted to balance the head-rim velocities. The
lowest digit will show the rim sensitivity level (1—8) of current pad
with letters ‘rE’ displayed on the first two digits of the LED. A bar
will be shown instead of the sensitivity level if rim triggering is
not supported by the currently selected pad (any other pad than
the snare).
crosstalk
In the Trigger Crosstalk page, the last 2 digits will show the
crosstalk value (1—16) of the current pad with a letter ‘o’ displayed
on the first digit of the LED. Hitting one pad may trigger the sound
from another pad unintentionally. This effect can be eliminated
by setting this parameter to a higher value on the pad that
is mistriggering.
12
The First Name in Electronic Drums.
www.simmonsdrums.net
curve
In the Velocity Curve page, the curve setting allows you to
control the relationship between the velocity (striking force) and
loudness (the dynamic curve). The last digit will show the curve
number (1—6) of the current pad with letters ‘CU’ displayed
on the first two digits of the LED.
splash sensitivity
In the Splash Sensitivity page, this setting controls the sensitivity of
the foot splash. The data ranges from -4 to 4 with ‘F’ displayed on
the first digit of LED.
local mode
In Local Control page, the LED shows the local control mode.
Local ON is the default function mode (‘LoN’). The internal link
between pad triggers and the sound generator will be broken
when selecting Local OFF (‘LoF’). For more details regarding the
Local Mode, please see the MIDI /USB section of this manual.
Note: Local Control Mode always returns to Off when
powering up the SD7PK.
saving trigger settings
After adjusting the trigger settings (gain, snare rim sensitivity,
crosstalk, curve, splash sensitivity), you can save them into
memory. While in the Utility Mode, press the [SAVE] button to
store all trigger settings.
Note:
1. If you turn off the power without saving, you will lose
the trigger setting changes you have just made.
2. These parameters affect all kits.
restoring the factory preset
Restoring the factory preset can be implemented by holding down
both [TEMPO+] and [TEMPO-] when the SD7PK is powered
up. This function will replace the current settings of the following
parameters by their default preset values:
• All user kits (including Volume, Voice, Pan, Reverb, and
Tuning setting)
• Utility parameters (including Gain, Crosstalk, Curve and
Splash sensitivity)
13
The First Name in Electronic Drums.
SD7PK digital drum kit User manual
Song Mode
If the SD7PK is not yet in Song Mode, press the [SONG] button
to enter the Song Menu. Now the [SONG] button will page
through the Song Menu. The Song indicator lights up.
In the Song Mode, you can select the song number, and adjust the
volume of the song’s accompaniment and drum part. In addition,
you can select whether to use the internal songs or to control an
external sequencer.
Selecting a song
In Song Number page, the 3-digit LED shows the current
Song number.
Use the [+] and [-] buttons to select any Song (1 — 50, looped)
as the current Song. The SD7PK includes 50 factory preset Songs.
(see Song list on page 20).
listening to a song
Press the [START/STOP] button to start Song playback. The beat
indicator will flash at the song tempo. After count-in, the Song
will start playback from the beginning. The Song will stop when it
reaches the end. You can also stop the Song during playback by
pressing the [START/STOP] button again.
If the Song number is switched while playing, the new Song won’t
start until the end of the current bar.
During Song playback in Song menu, the Pad indicators will
show which pads the drum track is triggering. This function can
be disabled or enabled by pressing the [KICK] button while in
Song Mode.
Muting the drum part
Press [DRUM OFF] to enable or disable the drum mute function.
When [DRUM OFF] is enabled, the DRUM OFF indicator will
light up, and the drum track from the current Song will be muted.
In Song Mode, the Pad indicators will still show the pads played
by the drum track. This allows you to practice playing the drum
part with the rest of the accompaniment.
To help you play together with the Song, you can also enable
the Metronome function by pressing the [CLICK] button. (See
Metronome function for details.)
14
The First Name in Electronic Drums.
www.simmonsdrums.net
Accompaniment volume
Press the [SONG] button until the LED display shows “Axx”
(xx = accompaniment volume, 0 — 32).
Use the [+] and [-] buttons to adjust the song’s accompaniment volume (all instruments except
the drum part). It will be restored to default value on the next power on.
drum volume
Press the [SONG] button until the LED display shows “dxx”
(xx = drums part volume, 0 — 32).
Use the [+] and [-] buttons to adjust the song’s drum volume. It will be restored to default
value at the next power on.
song source
In song source selection page, the LED will show the current selected song source.
There are two choices: “LoC” for local machine (50 internal songs, default setting) or “EtN”
for controlling an external sequencer connected to the MIDI Out of the SD7PK using MIDI
Clock. See the MIDI section of the manual for details.
Use the [+] and [-] to select the song source. The song will stop immediately when switching
the song’s source.
When External is selected, press [START/STOP] to start or stop the external sequencer with
corresponding MIDI real-time messages. The internal song will not playback.
NOTE: If external sequencer is selected as current song source, the menu pages of
song number, accompaniment volume and drum volume will be not selectable.
song tempo
Press the [TEMPO+] or [TEMPO-] buttons to display the current tempo.
Use [TEMPO+] and [TEMPO-] buttons to adjust the tempo.
Press both [TEMPO+] and [TEMPO-] buttons at the same time to reset
the current tempo to its default value for the current song. (This function is not available when
external song is selected.)
If there’s no operation, SD7PK will return to the previous menu page automatically
after 2 seconds.
15
The First Name in Electronic Drums.
SD7PK digital drum kit User manual
MIDI and USB
MIDI stands for Musical Instrument Digital Interface. This world-wide standard communication
interface enables electronic musical instruments and computers to communicate so that
data can pass between them. This exchange of information creates a system of MIDI
instruments and devices that offer far greater versatility and control than is available with
isolated instruments. Whether you interface with computers, sequencers, expanders or other
controllers, your musical horizons will be greatly enhanced.
MIDI connection
MIDI IN: This terminal receives MIDI data from an external MIDI device.
MIDI OUT: This terminal transmits data from this instrument to other MIDI devices.
usb connection
The USB connector allows you to connect the SD7PK directly to your computer. It can be
connected without driver installation under the Windows XP & MAC OSX environment. The
SD7PK will be recognized as “USB Audio device” to receive and transmit MIDI messages
through a single USB cable. USB is used only for MIDI messages (MIDI via USB).
NOTE: When the USB is connected to a computer, all MIDI messages will be
received and transmitted via USB.
local mode
From a MIDI point of view, the SD7PK is composed of two “devices”:
• A controller transmitting data: the pads and Hi-Hat control pedal (via an internal trigger
to MIDI converter).
• A sound generator receiving MIDI data (the sound module).
In normal operation (Local ON, default mode), those two devices are connected together
internally, allowing the pads to play the voices from the sound module without any external
connection. When setting Local mode to Local OFF mode in the Utility menu, this internal
link is disconnected. The sound module receives MIDI messages via MIDI input only, not
from the pads. However, the pad trigger data is still sent to the MIDI Output, therefore
looping externally the MIDI Out of the SD7PK back to its MIDI In will enable the pads
to play the voices from the sound module. Local OFF mode is intended to be used when
both the MIDI input and output (or the USB port) of the SD7PK are connected to a MIDI
sequencer with Soft Thru function (which loops the MIDI data received from the MIDI output
back to the MIDI input). This prevents doubling or flanging effect when playing the pads
(caused by the sound generator receiving the same MIDI data both directly from the pads
and back through the sequencer).
MIDI channels
The SD7PK transmission channel is fixed to Channel 10 (Drums and Percussion channel).
The SD7PK will output MIDI codes generated by the triggers when hitting the pads or
stepping on the Hi-Hat control pedal (Program Change, Note On/Off, and Foot Control
messages). Song playback data and metronome notes are not transmitted.
The MIDI system in the SD7PK has 16 reception channels numbered from 1-16. Each channel
is responsible for a voice. When receiving MIDI information from an external device, the
active channel is determined by the control message. Channel 10 is reserved for the Drums.
Channels 9 and 16 can be used for additional Percussion sounds. (See Percussion Set list
pages 22-23.)
All other channels (1-8, 11-15) can be used to access the 128 General MIDI instruments and
sounds included in the sound module (GM standard). These are the same instruments that are
used to create the accompaniment for the internal Song player.
16
The First Name in Electronic Drums.
www.simmonsdrums.net
Using the SD7PK as a General MIDI sound module
Connecting an external keyboard or sequencer to the MIDI Input
allows you to use the SD7PK as a multi-timbral sound module to play
various instrument parts in addition to your drums (for instance, Piano
on Channel 1, Bass on Channel 2, Strings on Channel 3, etc).
The voices on each MIDI channel are selected using MIDI Program
Change messages. (See the General MIDI Voice list page 21.)
NOTE: For more information on received MIDI messages,
see the MIDI implementation chart.
Using the SD7PK to control a sequencer
In Song Mode, the song source can be set to External, allowing the
SD7PK to control the playback of an external sequencer.
MIDI clock (0xF8) is sent out automatically at the current tempo,
and Start and Stop Real-Time Commands (0xFA, 0xFC) will be sent
when pressing the [Start/Stop] button.
1. Connect the MIDI Out of the SD7PK to the MIDI In of your
sequencer. If you are using a software sequencer on a computer,
you can simply connect the USB port of the SD7PK to a USB port
of your computer using a single USB A-B cable.
2. Setup your sequencer to respond to MIDI Clock Sync.
3. Press the [Start/Stop] button to start the sequence from the
top.
4. Press the [Start/Stop] button again to stop the sequence
Note: You can adjust the tempo of your sequencer using
the [TEMPO] buttons on the SD7PK.
Using a sequencer to record your SD7PK
drum performance
Using the MIDI In/Out or USB connections with a MIDI sequencer
allows you to record your performance on the SD7PK pads and
play it back with the same voices.
1. Connect the MIDI Out of the SD7PK to the MIDI In of your
sequencer, and the MIDI Out of your sequencer to the MIDI In of
the SD7PK. If you are using a software sequencer on a computer,
you can simply connect the USB port of the SD7PK to a USB port
of your computer using a single USB A-B cable.
2. Setup the active track of your sequencer on Channel 10.
3. Activate RECORD on your sequencer.
4. Play the pads of your SD7PK.
5. Stop recording.
6. Locate your sequencer to the start of the recording.
7. Play back the recorded sequence.
8. The SD7PK will play the same voices that were used during
recording.
Notes:
1. T o maintain the same voice parameters (level, pan, tuning), you
should select the same Kit for playback as the Kit that was active
when recording.
2. T o capture and correctly reproduce the timing of your performance,
make sure that the Quantize function of your sequencer is
turned off.
3. If your sequencer has a Soft-Thru feature, you should set the
SD7PK to “Local Off” mode in the Utility menu. If your sequencer
does not have a Soft-Thru feature, you should leave the SD7PK in
its “Local On” default mode.
17
The First Name in Electronic Drums.
SD7PK digital drum kit User manual
Voice List
#
Name
Acoustic Bass Drum
1
2
3
4
5
6
7
8
9
10
11
12
13
14
15
16
17
18
Standard Acoustic Kick 1
Standard Acoustic Kick 2
Rock Acoustic Kick 1
Rock Acoustic Kick 2
Jazz Acoustic Kick 1
Jazz Acoustic Kick 2
26” Large Acoustic Kick 20” Funk Acoustic Kick
20” Hip Hop Acoustic Kick
20” Tight Acoustic Kick
24” Loose Acoustic Kick
20” Small Acoustic Kick
22” 1971Kick
20” Deep Kick
‘90’s Kick
Metal Kick
Orchestra Bass Drum
Bass Drum Roll
Electronic Bass Drum
19
20
21
22
23
24
25
26
27
28
29
30
31
32
33
34
35
36
37
House Kick 1
House Kick 2
House Kick 3
TR808 Kick
TR909 Kick
Space Kick
Filter Kick
Reverse Kick
Techno Kick
Voice Kick
Low Fi Kick
Junkyard Kick
Disco Kick
Industrial Kick
Cartoon Kick
Simmons Kick 1
Simmons Kick 2
Simmons Kick 3
Simmons Kick 4
#
#
Name
Acoustic Snare Drum
38
39
40
41
42
43
44
45
46
47
48
49
50
51
52
53
54
55
56
57
58
59
60
61
62
63
64
65
66
67
68
69
70
71
72
73
74
75
76
77
78
79
Snare Edge w/Rim
Standard Snare
Snare Cross Stick
12” Snare
Rock Snare 1
Rock Snare 1 Edge
Rock Snare 2
Small Room Snare
Large Room Snare
Jazz Snare 1
Jazz Snare Brush Edge
Jazz Snare Brush
Jazz Snare 2
Jazz Piccolo Snare
Big Band Snare
Deep Fusion Snare
Effect Snare 1
Effect Snare 2
Hip Hop Snare
‘60’s Snare Edge
‘60’s Snare
506 Snare
506 Snare 2
506 Low Snare
506 Low Snare 2
‘69 Snare
Pong Snare
Filter Snare
Wood Snare 1
Wood Snare 2
Deep Maple Snare
Studio Snare
Distant Power Snare
Crackless Snare
Gunshot Snare 1
Gunshot Snare 2
Metal Snare
Brush Swirl Snare
Brush Strike Snare
Brush Edge Snare
Light Brush Snare
Light Long Brush Snare
Name
Electronic Snare Drum
80
81
82
83
84
85
86
87
88
89
90
91
92
93
94
95
96
97
98
99
100
101
102
House Snare
House Clap
House Effect Snare
Techno Snare
Dance Beat snare
Staccato Snare
TR808 Snare
TR909 Snare
Electric Snare
Reverse Snare
Junkyard Snare
Junkyard EFX
Noise Snare
Jing Snare
Guak Snare
Voice 1
Voice 2
Cartoon Punch
Simmons Snare 1
Simmons Snare 2
Simmons Snare 3
Simmons Snare 4
Simmons Clap
18
The First Name in Electronic Drums.
#
Name
Acoustic Tom
103
104
105
106
107
108
109
110
111
112
113
114
115
116
117
118
119
120
121
122
123
124
125
126
127
128
129
130
131
132
133
134
135
136
137
138
139
140
141
142
143
144
145
Open Tom 1
Open Tom 2
Open Tom 3
Open Tom 4
Open Tom 5
Rock Tom 1
Rock Tom 2
Rock Tom 3
Rock Tom 4
Big Tom 1
Big Tom 2
Big Tom 3
Big Tom 4
Big Tom 5
Power Tom 1
Power Tom 2
Power Tom 3
Power Tom 4
Funk Tom 1
Funk Tom 2
Funk Tom 3
Fusion Tom 1
Fusion Tom 2
Fusion Tom 3
‘69 Tom 1
‘69 Tom 2
‘69 Tom 3
‘71 Tom 1
‘71 Tom 2
‘71 Tom 3
Vintage Tom 1
Vintage Tom 2
Vintage Tom 3
Hip Hop Tom 1
Hip Hop Tom 2
Hip Hop Tom 3
Hip Hop Tom 4
Hip Hop Tom 5
Hip Hop Tom 6
Brush Tom 1
Brush Tom 2
Brush Tom 3
Brush Tom 4
www.simmonsdrums.net
#
Name
Electric Tom
146
147
148
149
150
151
152
153
154
155
156
157
158
159
160
161
162
163
164
165
166
167
168
169
170
171
172
173
174
175
176
177
178
179
180
181
182
183
184
185
186
187
188
189
190
191
192
193
TR808 Tom 1
TR808 Tom 2
TR808 Tom 3
TR808 Tom 4
TR808 Tom 5
TR808 Tom 6
Electric 1 Tom 1
Electric 1 Tom 2
Electric 1 Tom 3
Electric 1 Tom 4
Electric 2 Tom 1
Electric 2 Tom 2
Electric 2 Tom 3
Electric 2 Tom 4
Electric 3 Tom 1
Electric 3 Tom 2
Electric 3 Tom 3
TR909 Tom 1
TR909 Tom 2
TR909 Tom 3
Spike Jr
Spike
Look At Da Birdie
Junkyard 1
Junkyard 2
Junkyard 3
Noise Tom 1
Noise Tom 2
Noise Tom 3
Voice Tom 1
Voice Tom 2
Voice Tom 3
Submarine Tom 1
Submarine Tom 2
Submarine Tom 3
Simmons V1 Tom 1
Simmons V1 Tom 2
Simmons V1 Tom 3
Simmons V2 Tom 1
Simmons V2 Tom 2
Simmons V2 Tom 3
Simmons V3 Tom 1
Simmons V3 Tom 2
Simmons V3 Tom 3
Simmons V4 Tom 1
Simmons V4 Tom 2
Simmons V4 Tom 3
Simmons Bend Tom
#
Cymbal
194
195
196
197
198
199
200
201
202
203
204
205
206
207
208
209
210
211
212
213
214
215
216
217
218
219
220
221
222
223
224
225
226
227
228
229
230
231
232
233
234
235
236
#
Name
Standard 20” Ride
Standard 22” Ride
Standard Ride Bell
Rock Ride
Ride Edge
Rock Bell
Dry Ride
Dry Ride Bell
Rivet Ride
Vintage Ride
‘60’s Ride
Clean Pop Ride
Pop Ride Edge
Light Flat Ride
Flat Ride
Junkyard Break
Junkyard Metal
Junkyard Spring
Industrial Short
Industrial Long
Glass China
Standard Crash
China 1
Splash
Crystal Crash
China 2
China Low
Orchestra Hit
Orchestra Cymbals
Gong 1
Gong 2
Water Gong
Reverse Cymbal
TR808 Cymbal 1
TR808 Cymbal 2
TR808 Cymbal 3
TR909 Cymbal 1
Junkyard Cymbal 1
Junkyard Cymbal 2
Cymbal Effect 1
Cymbal Effect 2
Laser Ray
Drive By
Name
Hi-Hat
237
238
239
240
241
242
243
244
245
246
247
248
249
250
251
252
Standard Hats 1
Standard Hats 2
Quick Hats
Rock Hats
Pop Hats
Brush Hats
‘60’s Hats
Mini Hats
House Hats
TR808 Hats
TR909 Hats
Cartoon Hats
Voice Hats
Junkyard Hats
Noise Hats
Bass Hats
#
Name
Percussion
253
254
255
256
257
258
259
260
261
262
263
264
265
266
267
268
269
270
271
272
273
274
275
276
277
278
279
280
281
282
283
284
285
286
287
288
289
290
291
292
293
294
295
296
297
298
299
300
Metronome Bell
Metronome Click
Scratch
Scratch Push
DJ EFX
HiQ Zap
Ding Bell
Finger Snaps
Standard Clap
Tambourine
Vibraslap
Agogo Low
Agogo High
Bell Tree
Bongo High
Bongo Low
Shaker
Conga Slap Low
Conga Slap High
Elect Conga Low
Open Conga
Conga Slap
Cowbell
Timbale Hi
Timbale Low
Timpani High
Timpani Low
Open Tabla High
Open Tabla Low
Slap Tabla
Mute Tabla slap
Cabasa
Maracas
Short Whistle
Guiro Short
Guiro Long
Claves
Woodblock
Cuica Muted
Cuica Open
Triangle Muted
Triangle Open
Sleigh Bells
Wind Chimes
Castanets
Surdo Muted
Surdo Open
Lotus Drum
19
The First Name in Electronic Drums.
SD7PK digital drum kit User manual
Drum Kit list
#
Preset Kit
#
Preset Kit
#
Preset Kit
#
Preset Kit
Factory Preset Kits
Factory Preset Kits
User Programmable Kits
User Programmable Kits
1
2
3
4
5
6
7
8
9
10
11 12 13 14 15 16 17 18 19 20 21 22 23 24 25 26 27 28 29 30 31 32 33 34 35 36 37 38 39 40 41 42 43 44 45 46 47 48 49 50 Rock
Standard 1
Room
Standard 2
Hip-hop
Electronic
808
House
Fusion
Brush
‘60’s
Simmons 1
Simmons 2
Funk
Jazz Latin
Percussions
Metal
Orchestral
Studio
Junkyard
User 1 - ‘70’s
User 2 - Latin Percussion
User 3 - Tablas
User 4 - DJ EFX
User 5 - 909
User 6 - Industry
User 7 - Cartoon
User 8 - Voice
User 9 - Simmons 3
User 10 - Simmons 4
#
(User 11 - Rock)
(User 12 - Standard 1)
(User 13 - Room)
(User 14 - Standard 2)
(User 15 - Hip-Hop)
(User 16 - Electronic)
(User 17 - 808)
(User 18 - House)
(User 19 - Fusion)
(User 20 - Brush)
(User 21 - 60’s)
(User 22 - Simmons 1)
(User 23 - Simmons 2)
(User 24 - Funk)
(User 25 - Jazz Latin)
(User 26 - Percussions)
(User 27 - Metal)
(User 28 - Orchestral)
(User 29 - Studio)
(User 30 - Junkyard)
Name
Song List
#
Name
1
2
3
4
5
6
7
8
9
10
11
12
13
14
Funk 1
Fusion 1
Latin Jazz
Dance
Big Band
Slow Fusion
Samba
Modern Jazz
Country
Reggae
Salsa
Bluegrass
Mambo
Beguine
#
15
16
17
18
19
20
21
22
23
24
25
26
27
28
Name
Drum ‘n Bass
Jazz
Bossa
Pop
Rock ‘n Roll 1
House
Hip Hop
6/8 Ballad
Ballad 1
Boogie
Punk
Rock ‘n Roll 2
Metal
16 Beat
#
Name
#
Name
29
30
31
32
33
34
35
36
37
38
39
40
41
42
Rhumba
Shuffle
Swing
Blues 1
Blues 2
Fusion2
Funk 2
Acid Fusion
Folk Pop
Latin
Ballad 2
Disco
8 Beat
Funk 3
43
44
45
46
47
48
49
50
Slow Rock
R&B 1
R&B 2
6/8 R&B
Pop Rock
Hard Rock
Pop Ballad
New Age
20
The First Name in Electronic Drums.
www.simmonsdrums.net
General MIDI voice list
ENSEMBLE
049 String Ensemble 1 050 String Ensemble 2 051 Synth Strings 1 052 Synth Strings 2 053 Choir “Aahs” 054 Voice “Oohs” 055 Synth Voice 056 Orchestra Hit SYNTH PAD
089 Pad 1 (new age) 090 Pad 2 (warm) 091 Pad 3 (polysynth) 092 Pad 4 (choir) 093 Pad 5 (bowed) 094 Pad 6 (metallic) 095 Pad 7 (halo) 096 Pad 8 (sweep) CHROMATIC PERCUSSION
009 Celesta 010 Glockenspiel 011 Music box 012 Vibraphone 013 Marimba 014 Xylophone 015 Tubular Bells 016 Dulcimer BRASS
057 058 059 060 061 062 063 064 Trumpet Trombone Tuba Muted Trumpet French Horn Brass Section Synth Brass 1 Synth Brass 2 SYNTH EFFECT
097 FX 1 (rain) 098 FX 2 (soundtrack) 099 FX 3 (crystal) 100 FX 4 (atmosphere) 101 FX 5 (brightness) 102 FX 6 (goblins) 103 FX 7 (echoes) 104 FX 8 (sci-fi)
ORGAN
017 Drawbar Organ 018 Percussive Organ 019 Rock Organ 020 Church Organ 021 Reed Organ 022 Accordion 023 Harmonica 024 Tango Accordion REED
065 066 067 068 069 070 071 072 Soprano Sax Alto Sax Tenor Sax Baritone Sax Oboe English Horn Bassoon Clarinet ETHNIC
105 Sitar 106 Banjo 107 Shamisen 108 Koto 109 Kalimba 110 Bagpipe 111 Fiddle 112 Shanai GUITAR
025 Acoustic Nylon Guitar 026 Acoustic Steel Guitar 027 Electric Jazz Guitar 028 Electric Clean Guitar 029 Electric Muted Guitar 030 Overdriven Guitar 031 Distortion Guitar 032 Guitar Harmonics PIPE
073 074 075 076 077 078 079 080 Piccolo Flute Recorder Pan Flute Bottle Blow Shakuhachi Whistle Ocarina PERCUSSIVE
113 Tinkle Bell 114 Agogo 115 Steel Drums 116 Woodblock 117 Taiko Drum 118 Melodic Tom 119 Synth Drum 120 Reverse Cymbal BASS
033 034 035 036 037 038 039 040 SYNTH LEAD
081 Lead 1 (square) 082
Lead 2 (sawtooth) 083 Lead 3 (caliope lead) 084 Lead 4 (chiff lead) 085
Lead 5 (charang) 086 Lead 6 (voice) 087 Lead 7 (fifths) 088 Lead 8 (bass + lead) SOUND EFFECT
121 Guitar Fret Noise 122 Breath Noise 123 Seashore 124 Bird Tweet 125 Telephone Ring 126 Helicopter 127 Applause 128 Gunshot PIANO
001 002 003 004
005
006 007 008 Acoustic Grand Piano Bright Acoustic Piano Electric Grand Piano Honky-Tonk Piano Electric Piano 1 Electric Piano 2 Harpsichord Clavichord Acoustic Bass Electric Bass (finger) Electric Bass (pick) Fretless Bass Slap Bass 1 Slap Bass 2 Synth Bass 1 Synth Bass 2 STRINGS
041 Violin 042 Viola 043 Cello 044 Contrabass 045 Tremolo Strings 046 Pizzicato Strings 047 Orchestral Harp 048 Timpani 21
The First Name in Electronic Drums.
SD7PK digital drum kit User manual
Percussion Set list
#
Key
Standard
Room
Rock
Electronic
Ch 10 PC
Ch 9,16 PC
1
1,5
2
9
3
17,18
4
25
27
28
29
30
31
32
33
34
35
36
37
38
39
40
41
42
43
44
45
46
47
48
49
50
51
52
53
54
55
56
57
58
59
60
61
62
63
64
65
66
67
68
69
70
71
72
73
74
75
76
77
78
79
80
81
82
83
84
85
86
87
High Q
Slap
Scratch Push
Scratch Pull
Sticks
Square Click
Metronome Click
Metronome Bell
Acoustic Bass Drum
Bass Drum 1 Side Stick Acoustic Snare Hand Clap Hard Snare Drum
Low Floor Tom Closed Hi-Hat High Floor Tom Pedal Hi-Hat
Low Tom Open Hi-Hat Low-Mid Tom Hi-Mid Tom Crash Cymbal 1 High Tom Ride Cymbal 1 Chinese Cymbal Ride Bell Tambourine Splash Cymbal
Cowbell Crash Cymbal 2
Vibraslap Ride Cymbal 2
Hi Bongo Low Bongo Mute Hi Conga Open Hi Conga Low Conga High Timbale Low Timbale High Agogo Low Agogo Cabasa Maracas Short Whistle Long Whistle Short Guiro Long Guiro Claves Hi Wood Block Low Wood Block Mute Cuica Open Cuica Mute Triangle Open Triangle Shaker
Jingle Bell
Belltree
Castanets
Mute Surdo
Open Surdo
D
D
D
D
D
D
D
D
D
D
D
D
D
D
D
D
D
D
D
D
D
D
D
D
D#1
E 1
F 1
F#1
G 1
G#1
A 1
A#1
B 1
C 2
C#2
D 2
D#2
E 2
F 2
F#2
G 2
G#2
A 2
A#2
B 2
C 3
C#3
D 3
D#3
E 3
F 3
F#3
G 3
G#3
A 3
A#3
B 3
C 4
C#4
D 4
D#4
E 4
F 4
F#4
G 4
G#4
A 4
A#4
B 4
C 5
C#5
D 5
D#5
E 5
F 5
F#5
G 5
G#5
A 5
A#5
B 5
C 6
C#6
D 6
D#6
Bass Drum 2
Rock Kick Drum
D
Snare Drum 2
D
Hard Snare Drum
Room Low Tom 2
Closed Hi-Hat 2
Room Low Tom 1
Pedal Hi-Hat 2
Room Mid Tom 2
Open Hi-Hat 2
Room Mid Tom 1
Room Hi Tom 2
D
Room Hi Tom 1
Ride Cymbal 2 Chinese Cymbal 2
Ride Bell 2
D
Splash Cymbal 2
Cowbell 2
D
D
D
D
D
D
D
D
D
D
D
D
D
D
D
D
D
D
D
D
D
D
D
D
D
D
D
D
D
D
D
22
The First Name in Electronic Drums.
Acoustic Bass Drum 2
Rock Kick Drum
D
Acoustic Snare 2
D
Acoustic Snare 3
Rock Low Tom 2
Closed Hi-Hat 2
Rock Low Tom 1
Pedal Hi-Hat 2
Rock Mid Tom 2
Open Hi-Hat 2
Rock Mid Tom 1
Rock Hi Tom 2
D
Rock Hi Tom 1
Ride Cymbal 2 Chinese Cymbal 2
Ride Bell 2
D
Splash Cymbal 2
Cowbell 2
D
D
D
D
D
D
D
D
D
D
D
D
D
D
D
D
D
D
D
D
D
D
D
D
D
D
D
D
D
D
D
Acoustic Bass Drum
El Kick Drum
D
Hard Snare Drum
D
Electric Snare
El Low Tom 2
Closed Hi-Hat 3
El Low Tom 1
Pedal Hi-Hat 3
El Mid Tom 2
Open Hi-Hat 3
El Mid Tom 1
El Hi Tom 2
D
El Hi Tom 1
D
D
D
D
D
D
D
D
D
D
D
D
D
D
D
D
D
D
D
D
D
D
D
D
D
D
D
D
D
D
D
D
D
D
D
D
D
www.simmonsdrums.net
Percussion Set list cont.
#
Key
808
Jazz
Brush
Orchestra
Effects
Ch 10 PC
Ch 9,16 PC
5
26
6
33
7
41
8
49
N/A
57
27
28
29
30
31
32
33
34
35
36
37
38
39
40
41
42
43
44
45
46
47
48
49
50
51
52
53
54
55
56
57
58
59
60
61
62
63
64
65
66
67
68
69
70
71
72
73
74
75
76
77
78
79
80
81
82
83
84
85
86
87
D
D
D
D
D
D
D
D
D
D
D
D
D
D
D
D
D
D
D
D
D
D
D
D
Closed Hi-Hat 2
Pedal Hi-Hat
Open Hi-Hat 2
Ride Cymbal 1
D
D
D
D
Concert BD 2
Concert BD 1
D
Concert SD
Castanets
Concert SD
Timpani F
Timpani F#
Timpani G
Timpani G#
Timpani A
Timpani A#
Timpani B
Timpani C
Timpani C#
Timpani D
Timpani D#
Timpani E
Timpani F
D
D
D
Concert Cymbal 2
D
Concert Cymbal 1
D
D
D
D
D
D
D
D
D
D
D
D
D
D
D
D
D
D
D
D
D
D
D
D
D
D
D
D
Buzz
Gong
Scratch FX1
Scratch FX2
Scratch FX3
Scratch FX4
Gtr.Cut Noise
Gtr.Cut Noise 2 (up)
Muted Dist.Gtr. 1
Muted Dist.Gtr. 2
Dist.Gtr. Slide 1
Dist.Gtr. Slide 2
High Q
Slap
Scratch Push
Scratch Pull
Sticks
Square Click
Metronome Click
Metronome Bell
Guitar Slide
Gtr.Cut Noise1(down)
Gtr.Cut Noise 2 (up)
Gtr.Cut Noise 3
Key Click
Laugh
Scream
Punch
Heart Beat
Footstep1
Footstep2
Applause
Door Creak
Door Slam
Scratch
Wind Chine
Car Engine start
Car Break
Car Pass By
Gun Shot
Crickets
Train
Noise
Helicopter
Industrial Noise
Gun Shot
Machine Gun
Laser Gun
Explosion
Dog Bark
Horse Gallop
Birds Chirping
Rain
Thunder
Wind
Sea Shore
Stream
Bubbles
Cat
Bird
Dog
D#1
E 1
F 1
F#1
G 1
G#1
A 1
A#1
B 1
C 2
C#2
D 2
D#2
E 2
F 2
F#2
G 2
G#2
A 2
A#2
B 2
C 3
C#3
D 3
D#3
E 3
F 3
F#3
G 3
G#3
A 3
A#3
B 3
C 4
C#4
D 4
D#4
E 4
F 4
F#4
G 4
G#4
A 4
A#4
B 4
C 5
C#5
D 5
D#5
E 5
F 5
F#5
G 5
G#5
A 5
A#5
B 5
C 6
C#6
D 6
D#6
Acoustic Bass Drum 2
808 Kick Drum
D
808 Snare Drum
D
Hard Snare Drum
808 Low Tom 2
808 Closed Hi-Hat
808 Low Tom 1
808 Pedal Hi-Hat 808 Mid Tom 2
808 Open Hi-Hat 808 Mid Tom 1
808 Hi Tom 2
808 Cymbal
808 Hi Tom 1
D
D
D
D
D
D
D
D
D
D
D
808 Mute Hi Conga 808 Open Hi Conga 808 Low Conga D
D
D
D
D
808 Maracas
D
D
D
D
808 Claves
D
D
D
D
D
D
D
D
D
D
D
D
Jazz Kick 2
Jazz Kick 1
D
Jazz Snare Drum
D
Hard Snare Drum
Jazz Low Tom 2
Closed Hi-Hat 2
Jazz Low Tom 1
Pedal Hi-Hat 2
Jazz Mid Tom 2
Open Hi-Hat 2
Jazz Mid Tom 1
Jazz Hi Tom 2
D
Jazz Tom 1
D
D
D
D
Splash Cymbal 3
D
D
D
D
D
D
D
D
D
D
D
D
D
D
D
D
D
D
D
D
D
D
D
D
D
D
D
D
D
D
D
D
Jazz Kick 2
Jazz Kick 1
D
Jazz Snare Drum
Hand Clap
Brush Slap
Brush Low Tom 2
D
Brush Low Tom 1
D
Brush Mid Tom 2
D
Brush Mid Tom 1
Brush Hi Tom 2
D
Brush Hi Tom 1
D
D
Rivet Ride
D
Splash Cymbal 3
D
D
D
D
D
D
D
D
D
D
D
D
D
D
D
D
D
D
D
D
D
D
D
D
D
D
D
D
D
D
D
D
23
The First Name in Electronic Drums.
SD7PK digital drum kit User manual
midi implementation chart
Function
Basic Default
Channel Changed
Default
Mode Messages
Altered
Note
Number: True voice
Velocity Note on
Note off
After Key’s
Touch Channel’s
Pitch Bend
Control 0
Change 1
4
5
6
7
10
11
64
65
66
67
80
81
91
93
100, 101
120
121
123
Program Change
System Exclusive
System : Song Position
Common : Song Select
: Tune
System : Clock
Real Time
: Commands
Aux : Local ON/OFF
: All Notes OFF
Messages
: Active Sense
: Reset
Transmitted
Recognized
10 ch
X
X
X
**************
0–127
**************
0 (99H, V=1–127)
0 (99H,V=0)
X
X
X
X
X
0
X
X
X
X
X
X
X
X
X
X
X
X
X
X
X
X
X
0
X
X
X
X
0
0
X
X
0
X
1–16
X
X
X
**************
0–127
0–127
0 (9nH,V=1-127)
0 (8nH or 9nH,V=0)
X
X
0
0
0
0
0
0
0
0
0
0
0
0
0
0
0
0
0
0
0
0
0
0
0
X
X
X
X
X
X
X
X
X
0: YES X: NO
Remarks
Bank Select
Modulation
Foot Controller
Portamento Time
Data Entry
Volume
Pan
Expression
Sustain Pedal
Portamento ON/OFF
Sostenuto Pedal
Soft Pedal
Reverb Program
Chorus Program
Reverb Level
Chorus Level
RPN LSB, MSB*
All Sound OFF
Reset All Controller
All Notes OFF
START and STOP only
* Valid RPN # 0,1,2
24
The First Name in Electronic Drums.
One (1) Year Limited Warranty
Subject to the limitations set forth below, Simmons® hereby represents and warrants that the components of this product shall be free from defects
in workmanship and materials, including implied warranties of merchantability or fitness for a particular purpose, subject to normal use and service,
for one (1) year to the original owner from the date of purchase.
Retailer and manufacturer shall not be liable for damages based upon inconvenience, loss of use of product, loss of time, interrupted operation
or commercial loss or any other incidental or consequential damages including but not limited to lost profits, downtime, goodwill, damage to or
replacement of equipment and property, and any costs of recovering, reprogramming, or reproducing any program or data stored in equipment
that is used with Simmons® products. This guarantee gives you specific legal rights: you may have other legal rights which vary from state
to state. Some states do not allow limitations on how long an implied warranty lasts, so the above limitation may not apply to you.
Simmons
P.O. Box 5111
Thousand Oaks, CA 91359-5111
All trademarks and registered trademarks mentioned herein are recognized as the property of their respective holders.
Made in China 0904-8344.01
The First Name in Electronic Drums.
Full-featured drum kits, advanced
practice pads, hybrid kits,
versatile amps and more.
SDHB2
HYBRID DRUM KIT
Expand your acoustic drum kit with digital sounds.
Includes two 9” pro pads, two piezo triggers, and all
the cables you need. Module includes 300 voices,
20 present kits, 30 user kits and USB connectivity.
SD9K
ELECTRONIC DRUM SET
Sleek-looking module includes 725 voices, 40
preset kits, and room for an additional 59 user
kits. Includes dual-zone snare drum pad, plus
three dual-zone, choke-able cymbals and Hi-Hat.
SD7PK
ELECTRONIC DRUM SET
High-quality pads and toms for pro feel. Sturdy
frame and rack clamps enhances durability.
Module includes 300 voices, 20 preset kits, 30
user kits, and USB connectivity.
SDMK4
DIGITAL MULTI PAD ELECTRONIC DRUM SET
Ideal for practicing and recording on the go, this
AC/DC powered digital drum multi-pad gives you 7
velocity-sensitive pads. Discover new rhythms with its
1000-note recording feature.
SD5K
ELECTRONIC DRUM SET
Versatile and easy to set up. Features sensitive
drum pads that are durable, responsive
and accurate. Sound module sports 237
sounds, 22 preset kits and storage for
10 user kit settings.
DA200S
200W STEREO DRUM AMP
A 200-Watt, stereo drum amp featuring a 12”
sub-woofer and a pair of mid-range and hifrequency speakers. The 3-band EQ and 20 20kHz frequency response ensure great sound.
DA50
50W DRUM AMP
Heavy-duty 10” speaker and 2” tweeter provide
deep bass tones, accurate reproduction of snare
and toms, and cymbals that cut through crystal
clear. Features stereo and aux inputs. Turn the
dimpled knobs with your drumstick!
SD1
ELECTRONIC DRUM PRACTICE PAD
With 65 pad sounds and 24 rhythms, this advanced
practice pad allows drummers to expand their skill set
with a wide variety of rhythms. The ideal tool for building
your speed, accuracy and timing.
Meet The Family
www.simmonsdrums.net
All products from our Spring 2009 line.