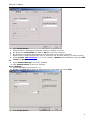
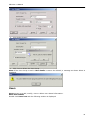
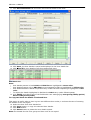
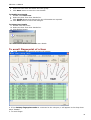
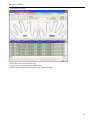
1
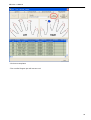
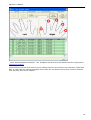
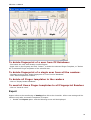
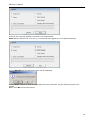
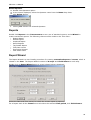
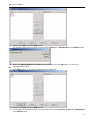
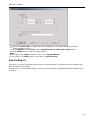
PRO Lite
Version 1.0
User Manual
Copyright © 2011 XPR
PRO Lite 1.0 Manual
Table of Contents
Technical Details 4
Overview 5
Installation 6
System Requirements 6
Check Hardware Installation 6
Tree Folder Settings 7
Network 7
Time Zones 9
Holidays 12
User Groups 14
Users 16
Export 24
Import 25
Operators Settings 27
Reports 29
Report Wizard 29
Events Report 33
Graphical Report 36
Saved Report 37
Tag Details Report 37
First/Last Event Report 38
Evacuation Report 40
Last Reader Used Report 40
Menu Bar Operation 42
Configuration 42
Sequential Tags 42
Global System Parameters 44
Communication 46
Fingerprint readers 49
Search 50
Backup 51
Disable Alarm 54
Settings Records 54
Time Zones Settings Report 54
2
PRO Lite 1.0 Manual
User Groups Settings Report 55
Reader Groups Settings Report 55
User Details Report 56
Holidays Report 57
User Group with (APB) Settings Report 58
Door Controllers with (APB) Settings Report 58
Online/Offline mode 59
Text Settings 60
Help 61
Contents 61
Registration 61
Instructions on Changing of Languages 64
Trouble Shooting 65
Glossary 66
3
PRO Lite 1.0 Manual
Technical Details
1.
o
o
o
o
2.
3.
PRO Lite Software will function using the Operating systems listed below.
Windows 98 SE/2000
Windows XP Professional
Windows XP Home Edition
Windows 7
Communication using RS 232 cable is fine up to 15 meters.
For online communication between O2LA and the PRO Lite software the following Modems are
recommended.
Modems
U.S Robotics Message Modem (V.92)
D-Link DFM 562 E++ (V 92)
D-Link DFM 560 ES (V 90)
ZyXEL Omni 56k (V 90)
LANCER 56 k
Warning: Ideally the same ITU Version V92 or V90 compatible Modems should be used on both sides
or it could create problems.
4
PRO Lite 1.0 Manual
Overview
TM
The Microsoft® Windows based PRO Lite can manage up to 50 registered O2La units installed in
different locations. PRO Lite has three functions easy & user-friendly programming, real-time
monitoring and reporting. Using normal Windows techniques (dialog boxes, drop-down menus, etc)
programming has been made so user-friendly that even novices can program the O2LA system in a
few minutes.
Key Features
o
o
o
o
o
o
o
o
o
o
Manage 50 registered O2LA units.
Online Monitoring /Controlling/Programming.
Generate customised reports.
Image and other details of User can be displayed on computer screen.
Menu driven operation (with dialog boxes and drop downs).
Extension Unit diagnostics status.
Programming and setting of Network, Time zone , User Group , Sequential Cards, Users,
Holidays, Communication, Events and Operators etc.
Import and Export of data from the Controller.
Menu operation for Configuration, Reports, Backup.
Help menu for online support.
5
PRO Lite 1.0 Manual
Installation
System Requirements
o
o
o
o
Windows 98 SE/ 2000 / XP Professional / Home Edition/ Win 7.
64 MB RAM, preferred 128 and above.
60 MB Hard disk free space.
RS 232 Serial (Com) Port or USB Port with USB – RS 232 Converter (Cable).
Check Hardware Installation
1.
2.
3.
4.
5.
Check the wiring to the O2LA.
Check if the controller (i.e. O2LA) is powered on.
Check if the controller (i.e. O2LA) is connected to PC.
Connect the controller (i.e. O2LA) to PC.via RJ12-RS232 cable.
Use an USB-RS232 converter (cable) in absence of Serial Port. It provides flexibility for using any
serial devices also. The software will automatically detect the way of communication when it is
connected.
Note: In case of any difficulty, please refer to the hardware manual for detailed information on the
O2LA system or consult your installer.
6
PRO Lite 1.0 Manual
Tree Folder Settings
Network
Network
"Network" menu is for programming the Controller. Network menu consists of two sub options i.e
Free access and O2LA.
Free Access (Door)
Free Access provides access without need for code or card. It can be programmed only for 1
entrance e.g. car park in the O2LA system.
In Free Access, one access point is configured and the time schedule for Free Access is defined in
Time Zone03 -> Free Access (Time) option.
Note:
o Free Access granted is for every day of the week, including weekends and holidays.
o Free Access is linked to the default Time zone 03(Free Access time).
Warning:
o Only one door can be configured for Free Access in the O2LA / EW network.
o Free access should never be used for doors giving access to secure areas and doors
configured with Mantrap.
1. Double click the Free Access (Door) icon.
Or
2. Right click on the Free Access (Door) icon and click Open.
3. Click the Modify button.
4. Select the Door Controller (the Controllers selected in Controllers tab ->Global system parameters
screen are displayed for selection).
5. Select the Door.
6. Click the Save button to set the Free Access (Door) settings.
O2LA
Here Settings of O2LA can be done. O2LA has three sub options under it, which are Door1, Door 2
and Auxiliary Outputs.
Door 1 Settings
1. Expand the O2LA menu (click on "+").
2. Double click Door 1 Sub option or right click Door 1 sub option and click View.
7
PRO Lite 1.0 Manual
3.
4.
5.
6.
7.
8.
Click Modify button.
Enter the Door 1 Description (name by which you identify the door).
By default the ControllerNo for O2LA is 00 and cannot be changed.
By default the Controller Description is given as O2LA, which can be changed.
Select Latch or Pulse mode for the door, if pulse then set the door timing (1 to 240 seconds).
Check Enable Anti-passbackif it is to be enabled (Reader 2 automatically becomes OUT
reader for Door1).
Or
9. Check Enable Mantrap if it is to be enabled.
10. Click Update button to save the settings.
Door 2 Settings
11. Expand the O2LA menu (click on "+").
12. Double click Door 2 Sub option or right click Door 2 sub option and click View.
3. Click Modify button.
8
PRO Lite 1.0 Manual
4. Enter the Door 2 Description (name by which you identify the door).
5. Select Latch or Pulse mode for the door, if pulse then set the door timing (1 to 240 seconds).
Note:If Door1 is Anti-passback enabled, then the Latch or Pulse mode selected here is for theOut
reader of Door 1.
6. Click Update button to save the settings.
Auxiliarry Outputs settings
9. Expand the O2LA menu (click on "+").
10. Double click Aux1/Aux2 sub option or right click Aux1/Aux2 sub option and click View.
3. Click Modify button.
4. Enter the 3rd Output Description (name of the 3rd Output).
5. Select Latch or Pulse mode for the 3rd Output, if pulse then set the timing (1 to 240 seconds).
6. Enter the 4th Output description (name of the 4th Output).
7. Select Latch or Pulse mode for the 3rd Output, if pulse then set the timing (1 to 240 seconds).
8. Click Update button to save the settings.
Note: The Settings for other Extension Units in Network menu can be done as explained for
O2LA controller.
Time Zones
Through Time zone, you can define time schedule, so that each user is granted access at particular
time slab on each day of the week.
Click (+) Time Zone and the folder expands, displaying 2 default Time Zones: "Never" and
"Always".
Never (00): Access denied at all periods and all days.
Always (01):Full Access, 24 hrs, 7 days a week, throughout the Year.
Priority (02): Time zone (02) linked to Priority alarm is User definable.
Free access time (03): Time zone (03) linked to Free access is User definable.
Note:
o Time zones Never (00), and Always (01) cannot be modified or erased.
o Time zones Priority (02), and Free Access time (03) can be modified but cannot be erased.
Double click on either of the default Time Zones and a similar screen shown below is displayed.
9
PRO Lite 1.0 Manual
Create a Time Zone
1. Right click the “Time Zone” on the tree structure and then click “new”.
Or
2. Click (+) Time zones and double click on either of the default Time zones "Never" or
"Always".
3. In the Time Zone main screen displayed, click New button.
4. Enter a Description for the Time Zone.
5. Enter the Start time and End time for one or all the Periods of a day as required.
Note: The Time Zone is taken on a 24 hrs scale.
6. If the Time period entered for a day is to be copied for the following days, check the square
box corresponding to the following days.
7. Click Save button, the Time Zone created is saved and added to the Time Zone main menu.
Modify Time Zone
Note: The default Time Zones i.e. Never and Always cannot be modified.
7. Click (+) Time Zones and double click on the Time Zone to be modified.
8. In the screen displayed, click Modify button.
9. Change the Description and time set for each period and each day as required.
10. Click Update button to save the changes done in the Time Zone.
Delete a Time Zone
11. Click (+) Time Zones and double click on the Time Zone to be deleted.
12. In the Screen displayed, Click on Delete button, a message as shown below is displayed.
3. Click Yes to Delete the Time Zone.
Note: If the Time Zone is assigned to a User Group, it cannot be deleted a message as shown in
10
PRO Lite 1.0 Manual
figure below is displayed.
Priority
Priority time zone enables time schedules to be defined for triggering of Priority alarm for Door open
too long event.
o If the Door open too long event occurs within the Time zone 02, Output T5 will be triggered.
o If the Door open too long event occurs out side the Time zone 02 Output T4 will be triggered.
Note:
By connecting suitable warning devices to Outputs T4 and T5, appropriate signals can be
sent out. For example, a voice-messaging unit can be connected to Output T5 and a siren to
Output T4, and Time Zone 02 programmed for office hours. Then, during office hours, a Door Open
Too Long event will trigger a voice message and outside office hours, the same event will trigger an
alarm.
To define Time Schedule for triggering of Priority alarm
1. Double click on Priority Time zone and click New button.
Or
2. Right click on Priority Time zone and click Modify button.
Note: To clear any previously defined time schedules for the Priority alarm, click Reset button.
3. Change the description and set the times for each period and each day, as required.
4. Clicking on the empty square box to the right of each day will duplicate the Start and End time
information from the previous day.
5. Click the Update button to save the changes done in the Priority Time Zone.
Free access (Time)
Free access (Time) enables time schedules to be defined for the Free access door to be open.
11
PRO Lite 1.0 Manual
To define Time Schedule for Free access door
1. Double click on Free Access (time) Time Zone and click Modify button.
Or
2. Right click on Free Access (time) Time Zone and click Modify.
Note: To clear any previously defined time schedule for Free access, click Reset button.
3. Change the description and set the time for each period and each day as required.
4. Clicking on the empty square box to the right of each line will duplicate the Start and End time
information from the previous day.
5. Click the Update button to save the changes.
Holidays
List of Holidays in a Year are entered under the Holidays menu.
A maximum of 64 Holidays can be entered for a year.
New year is a default Holiday that is already entered and can be modified but cannot be deleted.
Note:
Holidays entered are automatically carried forward each year and Care must be taken to ensure that
holidays, whose date changes from year to year, are re-entered annually.
User will be given access on a Holiday, if linked to a User group containing the Time Schedule in
which holiday timings is defined.
Entering Holidays
1. Expand Holiday menu (click on "+").
2. Double click on New Year (Default Holiday), displays Holiday entry screen.
12
PRO Lite 1.0 Manual
3. Click New button.
4. Enter the name or Description of the Holiday.
5. Click
button in the date field and immaterial of the Year select the date from drop down
calendar.
6. Enter the Comments for the Holiday in Comments text box.
7. Click Save, the folder icon with the Holiday name gets automatically added under the
Holidays menu.
Modify Holidays
3. Expand Holiday menu (click on "+").
4. Double click on the Holiday icon, whose Holiday details is to be modified.
3. Click Modify button.
4. Make necessary changes (as explained in steps 4 – 6 under Entering Holidays heading).
5. Click Update button to save the Modifications.
Delete Holidays
13
PRO Lite 1.0 Manual
5. Expand Holiday menu (click on "+").
6. Double click on the Holiday icon, whose Holiday details is to be deleted.
3. Click Delete button.
4. Click Yes to delete the Holiday.
User Groups
Through this option, User group can be defined to which a Reader Group and Time zone is to be
assigned. User Group determines where and when a User’s Card or Code will be valid (to a group of
doors within the time schedule).
Click (+) User Group and the folder expand to display 2 default (Predefined) User Groups:
"Nowhere" and "Everywhere".
1. "00" User Group is pre-defined for ‘Nowhere’ = No access to the entire system.
2. "01" User Group is pre-defined for ‘Everywhere’ = Full access to the entire system.
Note:
User Groups 02 to 99 can be defined.
User Group Every where overwrites the conditions like Antipassback and Mantrap.
Create User Group
1. Right click the “User Group” on the tree structure and then click “new”.
Or
2. Click (+) User Group and double click on either of the default User Groups "Nowhere" or "Every
where".
14
PRO Lite 1.0 Manual
3. Click New button.
4. Enter a description for the User Group.
5. Select appropriate Reader group and Time zone.
6. Check Enable Antipassback checkbox.
Note: For Antipassback feature to function, it has to be set for the appropriate Controllers in
Network menu and enabled in User Group menu.
7. Select either Real or Timed antipassback (with timing from 1 to 30 minutes)
8. Click Save and the User Group icon gets added into the folder.
Note: User Group No is auto generated on Saving a User Group.
Modify User Group
1. Expand User Group menu (click on "+").
2. Double click on the User Group icon, whose User Group details is to be modified.
3. Click Modify button
4. Make necessary changes (as explained in steps 3 – 6 of Creating User Groups).
5. Click Update button to save the Modifications.
Delete User Groups
3. Expand User Group menu (click on "+").
4. Double click on the User Group icon, whose User Group details is to be deleted.
15
PRO Lite 1.0 Manual
3. Click delete button.
4. Click Yes to delete the User Group.
Note: If the User Group is used in User details it cannot be deleted, a message as shown below is
displayed.
Users
Users screen is to add, modify, view or delete user related information.
Enter User Details
Double click Users icon and the following window is displayed:
16
PRO Lite 1.0 Manual
1.
2.
3.
4.
5.
Click New and click on General tab.
Enter the user’s names in the text boxes provided.
Select the User Group (all created User Groups will be listed).
Select User Type (Code or Tag ).
Enter or select the User code / Tag number (generated through Sequential card programming
screen).
Note: If cards or key fobs are un-numbered, they can still be assigned. Make sure that PRO Lite is
On-line and the cursor is in the code or tag window, and present the card or key fob on either of
the readers of the O2LA controller. The number will be read and automatically entered. These
numbers cannot be modified.
6. Click "Add" to browse and select the picture of the User.
Note: Before adding the picture into the User details screen, the Picture of the User has to be
saved in the system:
o Scan the Picture of the User.
o Using an Image editing tool, set the Picture size to 23mm (Width) x 28mm (Height).
o Set the Pixels of the Image as 69 x 85, Resolution as 30.
o Save the Image with a .JPEG extension.
It is very important that for the User Picture to be seen on the Online-monitoring screen when the
User is granted access or denied access, the scanned picture should be set for the size, pixels and
the resolution specified above.
7. Check Enable Validity period checkbox and specify the validity period for the User code/Tag
to be active.
8. Check Enable Priority Code checkbox to assign the User code as a Priority code.
9. Check Duress code checkbox to assign the User code as a Duress code.
10. Click Contact Details tab and enter the Contact details of the User.
17
PRO Lite 1.0 Manual
11. Click Personal Details tab and enter the Personal details of the User.
12. Click Save, the User details is saved and displayed in the User details list.
13. Click View All to view details of all the programmed users.
User Details List
Note:
o User details present in both O2LA and PRO Lite are highlighted in Green color.
o User details present only in PRO Lite but not exported to O2LA is highlighted in Yellow color.
o User details deleted in O2LA and present only in PRO Lite after Importing is highlighted in Red
color.
o To export the details highlighted in Red back to O2LA carry outthe followingsteps
14. click Modify and change any of the fieldsunder user settings (eg: user group,validity period,
duress code,priority code)
To Copy and Paste the details of selected User
This option is useful when a User is given two different User codes, it reduces the time of entering
the details of the user again.
15. Select the User from User details list.
16. Click Copy button, to copy the selected User details.
17. Click New button.
18. Click Paste button to paste the User details copied.
Note: The details like the User group and User code is not copied.
18
PRO Lite 1.0 Manual
5. Enter the User code and select the User group.
6. Click Save button to save the User details.
To Modify User Details
7. Double click Users icon.
8. Select the User from User details list.
9. Click Modify button and change the user information as required.
10. Click Save button to save the changes.
To Delete User Details
11. Double click Users icon.
12. Select the User from User details list.
13. Click Delete button.
4. Click Yes to delete the selected User details.
To enroll Fingerprint of a User
5. Click Fingerprint tab and this window will appear:
2. If the desktop fingerprint reader is connected to the usb port, it will appear in the drop down
Menu "Reader".
3. To enroll finger:
19
PRO Lite 1.0 Manual
- First Select the User
- Place the cursor on the finger tip
- Right click on the mouse and select Enroll
- Present the corresponding finger on the Desktop Reader
20
PRO Lite 1.0 Manual
- After enrollment the fingertip becomes blue with percentage of enrollment success given beside.
The same procedure can be done with the other fingers (10 at most) and they will all correspond to
the same user code (wiegand code, given on the top of the window)
21
PRO Lite 1.0 Manual
- Click save templates
- The enrolled fingers tips will become red
22
PRO Lite 1.0 Manual
- Click "Send templates to Reader". The Templates will be sent to all readers that are configured in
Fingerprint Readers
The enrollment can be done also from the readers that are connected to the controllers (O2LA and
EW). In that case the Fingerprint Reader from which the enrollment will be done must be selected
from the drop down menu "Reader".
23
PRO Lite 1.0 Manual
To delete fingerprint of a user from PC Database:
- First select the user with already enrolled fingers.
- Right click on the fingertip and click "Delete", to delete the selected Finger Template, or "Delete
All" to delete all Finger templates of the selected User.
To delete fingerprint of a single user from all the readers:
- Complete previous step "delete fingerprint of a user from PC Database"
- Click "Send templates to readers"
To delete all Finger templates in the readers
- Click on "Empty Reader database"
To send all Users Finger templates to all Fingerprint Readers
- Click on "Send all users"
Export
Export refers to the transferring of Settings from PC to the Controller. All the new settings will be
effective only after successful completion of export.
1. Double click Export option and the following screen will be displayed.
24
PRO Lite 1.0 Manual
Click EXPORT and the following screen will be displayed
Click YES button to transfer the settings from PC to Controller.
Note:Press NO to exit from Export option
After Successful Export, click Exit to come out of Export option.
Warning:
During the process of export, if too many online events are occurring it could result an error, hence
try to do the export process when minimum online events are occurring.
The events occurred during the process of Export will not be displayed on the Online monitoring
screen, but will be available in the events list after the export is complete.
Import
Import function refers to the transmitting of Settings and / or Events from the O2LA controller to
the PC.
st
Note: It is recommended to Import daily while 1 time login, to get all the previous details of
events that happened.
1.Double click Import option to display the following screen.
25
PRO Lite 1.0 Manual
2.Check the required Settings or Events to be downloaded.
Note: Ensure that the PC is on-line (i.e connected and logged on to the O2LA controller)
4.click IMPORT and the following screen will be displayed
5.Click YES to import to start receiving data from the Controller and the following screen will
appear.
Note: Click No to exit from Import
26
PRO Lite 1.0 Manual
6.After successful Import, Click Exit to come out of Import option.
Warning:
During the process of import, if too many online events are occurring it could result an error, hence
try to do the import process when minimum online events are occurring.
The events occurred during the process of Import will not be displayed on the Online monitoring
screen, but will be available in the events list after the import is complete.
Operators Settings
The PRO Lite gives a lot of flexibility to its users (i.e. PRO Lite users or Operators, as opposed to
system users) different degrees of rights for different features.
Operators are personnel who are given different access rights to screens different functions in the
PRO Lite software and assigned access to selected O2LA units only. The Administrator can create
up to 10 of these Operators.
Warning:Operator rights pertaining to the PRO Lite do not, in any way, affect the rights for the
Administrator and Engineer in the O2LA.
Tip:It is advised that the Administrator creates an Operator name and password for himself or
herself, giving access to the screens which he / she uses for daily operation. Logging in as an
Administrator (which is a very powerful position) is done only when access to screens of a higher
security is required.
1. Double click on Operator and the Operator Settings screen is displayed as below:
2. Click New button to expand the screen.
27
PRO Lite 1.0 Manual
3. Enter the Operator Name (not more than 20 characters).
4. Provide Password (minimum 5 and maximum 15 characters).
5. Re-enter the password to Confirm.
Warning:The password entered is case sensitive.
6. Select the O2LA units, which the Operator can access.
7. Select the language. This option ensures that when an Operator logs in, all the menus are in
the language selected for that particular operator.
Tip: This is a powerful feature because, on the same PRO Lite installation, Operator A logging in will
have menus in one language and Operator B logging in will have menus in a different language.
6. Set the Access Rights for each screen.
o No Access: No access for the Operator for the corresponding screen.
o View Only: Operator can only View the corresponding screen and no modifications can be
done.
o View/Modify: Operator can View and Modify the corresponding screen.
Note: Operators screen specifies access rights only to the PRO Lite software. The O2LA
programming rights are specified in the O2LA itself.
8. Click Save to save the New Operator Settings. As a security precaution, Operators’ names are
not displayed in the Tree menu.
Modify Operator
9. Double click Operators option.
10. In the screen displayed, select the Operator name from the Name drop down.
11. Click Modify button and modify the settings as required.
12. Click Change password button to change the Operator’s password.
13. Click Update button to Update the modifications.
28
PRO Lite 1.0 Manual
Delete Operator
14. Double click Operators option.
15. In the screen displayed, select the Operator name from the Name drop down.
16. Click Delete button.
4. Clicking Yes deletes the selected Operator.
Reports
Double click Reports in the Tree structure to see a set of standard reports, and a Wizard to
create customized reports. The following choices will be visible in the Tree menu:
o Report Wizard
o Events Report
o Graphical Report
o Saved Reports
o Tag Details Report
o First/Last events
o Evacuation Reports
o Last reader used
Report Wizard
The Report Wizard is a user-friendly procedure for creating customizedreports of events, which is
related to the User. The Report Wizard consists of 6 steps with Finish button in each step.
Double click on Report Wizard option a screen shown below is displayed.
Select the Date and Time period, for which the events report is required.
For a Report with all the events occurred within the selected Time period, click Finish button.
29
PRO Lite 1.0 Manual
Enter the Report name to be displayed in the Report and click Ok button, to view the
Corresponding report.
Or
1. Click Next button, a screen as shown below is displayed.
2. Select the User groups and click Add button.
3. For a Report with all the events for the selected User groups and Time period, Click Finish
button.
4. Enter the report name to be displayed in the Report and click Ok button, to view the
Corresponding report.
Or
5. Click Next button, a screen as shown below is displayed.
30
PRO Lite 1.0 Manual
6. Select the Users and click Add button.
7. For a Report with all the events for the selected Users and Time period, Click Finish button.
8. Enter the report name to be displayed in the Report and click Ok button, to view the
Corresponding report.
Or
9. Click Next button, a screen as shown below is displayed.
10. Select the Doors and click Add button.
11. For a report with all the events corresponding to the selected Doors, Users and Time period,
click Finish button.
31
PRO Lite 1.0 Manual
12. Enter the report name to be displayed in the Report and click Ok button, to view the
Corresponding report.
Or
13. Click Next button, a screen as shown below is displayed.
14. Select the Events of which a Report is required and click Finish button.
15. Enter the report name to be displayed in the Report and click Ok button, to view the
Corresponding report.
Or
16. Click Next button, a screen as shown below is displayed.
32
PRO Lite 1.0 Manual
17. Select the Sort order, in which the events displayed in the Report have to be sorted.
18. Enter the Report name.
19. If the Report is to be saved, select Check the box for saving the report option.
20. Click Finish button to view the Final report.]
Note:
At any stage, click Cancel button to come out of Report Wizard.
At any stage, click Back button to get back to previous step.
Events Report
This option is used to generate Events report of selected type of events occurred on a particular
date or between two dates.
Double click on Events Report option, a screen as shown below is displayed listing all Possible type
of Events.
33
PRO Lite 1.0 Manual
1. Select On Date
radio button.
2. Select the Date of which the Events report is required.
Or
3. Select Date between radio button.
4. Select the From and To date between which the Events report is required.
5. From the Events list, select the type of Events.
6. Click Add button.
Or
7. Click Add all button to add all the Events present under Events list to Selected Events list.
8. Click Remove button to remove a selected Event from the Selected Events list.
9. Click Remove all button to remove all the events from the Selected Events list.
10. Click Ok button, Events Report for the selections made is displayed. A sample events report is
shown below.
34
PRO Lite 1.0 Manual
11. Click Export to Excel button, Events Report for the selections made is displayed on an excel
sheet.
Note:
The password to edit the Excel sheet is “admin”.The password can also be changed using the
password change option given in MS Excel.
For the Report to be displayed on an Excel sheet, MS Excel should be Installed in your system.
12. Click Exit button to come out of Events Report option.
35
PRO Lite 1.0 Manual
Graphical Report
This option is used to generate a Graphical report of Total number of Users in selected User Groups.
Double click on graphical report option, a screen as shown in figure below is displayed.
1.
o
o
o
o
2.
3.
o
o
o
o
o
o
4.
5.
Select the User Group range between which the Graphical report is required.
Upto 25 User Groups
26 to 50 User Groups
51 to 75 User Groups
76 to 100 User Groups
Based on the User Group range selected, the User Groups are displayed for selection.
Select the Chart type to generate the Graphical report.
2d Combination chart
2d Bar chart
2d Line chart
2d Area chart
2d Step chart
2d Pie chart
Select the User Groups for which the Graphical report is required.
Based on the User Groups selected, the User Group No and Total Users in selected User
Group will be displayed.
6. Click Print button to take a Print out of the Graphical report generated.
7. Click Exit button to come out of Graphical report option.
A Graphical report generated using 2d Pie chart is shown below.
36
PRO Lite 1.0 Manual
Saved Report
This option lists out all the Reports Generated and Saved in Report Wizard option. The report
selected can be Edited, Deleted or Viewed.
1.
2.
3.
4.
5.
Select the Report from drop down.
Click Open button to view the selected Report.
Click Edit button to change the parameters selected for Report generation.
Click Delete button to delete the selected Report.
Click Exit button to come out of Saved Reports option.
Tag Details Report
Through this option you can generate Tag details reports for the Categories listed in the figure
below.
Double click on Tag Details Report option, a screen as shown below is displayed.
37
PRO Lite 1.0 Manual
1. Select the Category of which the Tag details report is required.
2. Click Ok button, the corresponding Tag details report is displayed. A sample of Tag details
report is shown below.
First/Last Event Report
The First/Last Event Report displays the time difference between First and Last user used his tag on
any reader.
This can be used in many cases to calculate how long user was in the building.
This does not cover night shift!
38
PRO Lite 1.0 Manual
1.
2.
3.
4.
A
Click buttons at month title to select month.
Drag mouse from start date to end date.
Select from list box user wanted on report or "All" for report on all users.
Click Report button to view the First/Last Event Report.
Sample of the First/Last Event Report is shown below.
39
PRO Lite 1.0 Manual
Evacuation Report
Evacuation report is report grouped by door (reader) showing the last entry (or exit) of each key
holder.
In this way can be assumed key holders current location.
For each key holder is displayed emergency related data:
o
o
o
o
o
o
o
Name
Blood group
Time of last entry
Office phone
Mobile phone
Allergies
Emergency contact number, person and address
This report does not necessarily contain correct, up-to date information.
Key Holders can tail-gate through open doors, give keys to other people and various
practices which make it unwise for anyone to rely totally on this report
Last Reader Used Report
The Last Reader Used Report displays the Users with last event on specific reader.
Report can help finding out who is at this moment anywhere in building (Parts protected with
readers)
40
PRO Lite 1.0 Manual
1.
2.
3.
A
Click "All" button to select all readers.
Click "None" to clear selection.
Click "Report" button to view the Last Reader Used Report.
Sample of the Last Reader Used Report is shown below.
41
PRO Lite 1.0 Manual
Menu Bar Operation
Configuration
Through this option the Company details and other details that has to be displayed in the Reports is
to be entered.
Click Configuration on File menu and the following screen is displayed:
1.
2.
3.
4.
5.
Click Add button and select the Company Logo from the path saved.
To Remove the Company logo added, Click Remove button.
Enter the Company name and Address.
Enter the details like Report Verified by and Report Summary to be displayed in the report.
By checking the checkbox corresponding to the details entered, select the details to be
displayed in the Report.
6. Click Save button to save the Configuration details entered.
Sequential Tags
Through this option, Tag numbers can be generated sequentially. It Saves time and effort of
entering hundreds of numbers manually. The numbers generated here can be assigned to Users in
User details screen (Users Option).
Click Sequential tags on File menu and the following screen is displayed.
42
PRO Lite 1.0 Manual
To Generate a Set of Tags
1. Click New button.
2. Enter the number of Tags to be generated.
3. Enter the Starting number of the Tags to be generated.
4. Click Save button, the set of tags are generated and listed in a table.
Tag numbers list
5. If the set of tags are already present, message as "Created 0 Tags " is displayed.
Note: A maximum of 1000 tags can be generated.
6. Click Hide all to hide the Tag number list.
7. Click View all to view the Tag number list.
To Delete Tag numbers
8. In the Tag numbers list, Click and select the Tag numbers to be deleted.
2. To select all the Tag numbers, click on
Select all checkbox.
3. Click Delete button, a message as shown below is displayed.
43
PRO Lite 1.0 Manual
4. Click Yes to Delete.
Note: The tag numbers whose status is active (assigned to an User) cannot be deleted.
Global System Parameters
A number of options for configuring the system to suit individual preferences are given on this
screen.
There are four tabs follows in details:
Communication Settings
Here the selections of Communication mode, Communication Port, Export Reminder and Online
Printing can be done.
1. Select the Communication mode (RS232 or Modem) for communication between O2LA and PC.
2. Select the Communication port.
Note: O2LA Pro automatically recognizes all the Communication Ports existing in the Computer
and displays them for selection.
3. If you select Modem for Communication, enter the Telephone number.
4. Select the type of dialing i.e Pulse or Tone.
Note: Enter the Telephone number based on the Communication type.
5. Select the type of Export Reminder.
Note: Based on the type of Export Reminder selected, the User is reminded to export the data
changes (Add, Modify or Delete in User groups, Reader groups, Time zones etc) from PRO Lite to
O2LA Controller.
a. Remind Always: Any changes made in the data, the User is immediately reminded to export
the data.
b. Don’t Remind today: Any changes made in the data on a day, the User is not reminded that
particular day to export the data.
c. Don’t Remind till next Start up: Any changes made in the data, the User is not reminded till
the next Start up to export the Data.
d. Never Remind: Any changes made in the data, the User is never reminded to export the data.
6. For Online Printing, check Enable Online Printout and select the set of events to be printed
in each Interval.
44
PRO Lite 1.0 Manual
Note: A maximum of 500 events can be printed in each Interval and The PC is to be connected to a
Printer for Online Printing.
7. Click Save to save the User defined Communication settings.
8. Click Sample button to view the Default Communication settings.
Backup Settings
This option refers to how frequently certain precautionary steps need to be automatically done e.g.
Database backup, Events download, etc.
9. Click Backup tab.
2. In Enable Automatic Backup list box, select the O2LA units whose database is to be backed
up.
Note: Back up of the currently loaded O2LA database will not be taken.
3. Click Add button and select the path for the currently loaded O2LA database backup file.
Note: C:\O2LADBBackup is the default path set for the database backup. This can be changed if
required.
4. Select the frequency of the backup by clicking on the appropriate button.
Day: Database backup is taken automatically when date changes.
Weekly: Database backup is taken automatically after every seven days.
Monthly: Database backup is taken automatically on the change of each month.
5. For events download of currently loaded O2LA (Importing), check enable automatic download
of events and select the interval.
6. Click the Save button to save the Backup settings.
7. Click the Sample button to view the Default Backup settings.
Synchronization Settings
Through this screen Date and Time Synchronization from O2LA to PC and vice versa, the PRO
Lite Startup language selection can be done.
45
PRO Lite 1.0 Manual
8. Check Enable date and time Synchronization checkbox.
9. Select O2LA to PC radio button ( ), for Synchronization between O2LA to PC.
In this case the Date and Time displayed in the master unit (O2LA), is displayed in the PRO Lite
software screen.
3. Select PC to O2LA radio button ( ), for Synchronization between PC to O2LA.
4. Select the Synchronize Interval type as Day, Weekly, Monthly or Every Start up.
5. Based on the Synchronize Interval type selected, select the Interval.
6. Select the Language in which the login screen at Startup is to be displayed.
For eg: for Startup language selection as French, in the next Start up, the login screen shown
below will be displayed.
7. Click Save button to save the Synchronization settings.
8. Click Sample button to view the Default Synchronize settings.
Communication
This Option is mainly to Dial up the number for Modem type of Communication.
Note: The Communication between O2LA and PC can be in three different types.
46
PRO Lite 1.0 Manual
Type 1
PRO Lite <-> O2LA
Type 2
PRO Lite<-> MODEM <-> DPBX<-> MODEM <-> O2LA
Type 3
PRO Lite<-> MODEM<-> DPBX<-> PSTN<-> DPBX<-> MODEM<-> O2LA
Under Type 3 communication there can arise three different situations, as explained below:
Situation 1: The PC is dialed through a DPBX central telephone line and O2LA has a standard PSTN
line.
Situation 2: The PC is dialed through a standard PSTN line and O2LA has a DPBX central telephone
line having, for example, the extension number 215.
Situation 3: The PC and O2LA have both a DPBX central telephone line.
PSTN -> Public Switch telephone network.
DPBX -> Digital Private Branch Exchange.
1.Click Communication option on File menu and the following screen is displayed:
2.Click OK to display the following screen
3.Click OK and Select the Mode of Communication as Modem.
47
PRO Lite 1.0 Manual
4.Select the Communication Port.
Note: PRO Lite automatically recognizes all the Communication Ports existing in the Computer and
displays them for selection.
5.Enter the Telephone Number.
Note:
o If the form of communication is of Type 2, enter the direct telephone number as shown in the
figure below:
o
If the mode of communication is of Type 3: Situation 1, enter the telephone number as shown
in the figure below:
o
If the form of communication is of Type 3: Situation 2, enter the telephone number as shown
in the figure below (not forgetting the extension number attributed to the O2LA central
telephone line).
48
PRO Lite 1.0 Manual
o
If the form of communication is of Type 3: Situation 3, enter the telephone number as shown
in the figure below (not forgetting the extension number attributed to the O2LA central
telephone line).
Tip:
Each comma induces a time delay of 1 second.
Enter the number of comma’s based on the time delay required.
4. Click the Dial button for starting Communications.
Warning: The number is dialed according to the configured mode “Tone” or “Pulse”. The
configuration modes are set in the Global system parameters -> Communication tab.
5. When communication with the O2LA is established, the following message screen will
appear.
Note: Due to traffic in telephone lines & EPBX connection might not establish, please try again.
5. Click Disconnect button to disconnect the Modem connection.
Fingerprint readers
With this Menu the Fingerprint readers connected in the network are configured.
49
PRO Lite 1.0 Manual
1. In the communication channel select the type of Communication of the Fingerprint Readers
(Serial or TCP/IP). "Disable" means there are no Fingerprint Readers in the System.
2. If Serial Communication is selected select the com port number where Fingerprint readers are
connected. The Com Port Number where the Fingerprint Readers are connected MUST be
different from the Com Port Number where the Controller(O2LA) is connected. If TCP/IP is
selected enter the IP address of the TCP/IP Converter of the Fingerprint Readers. The IP
address MUST be different from the IP address of O2LA Converter (if used).
3. Put a name of the Reader and press "Enter".
4. Put the Serial Number of the Fingerprint Reader, which is attached to the Reader and written in
the manual (if the serial number is with"-", ex."03-02-11-210", type "030211210") and press
"Enter".
5. Select the type of the reader and press "Enter"
6. Select the operation mode: Finger, Finger or Code, Finger and Code and press "Enter". Some
Fingerprint readers do not have keypad, so PIN Codes can not be used.
7. Click "Save" for configuration to be saved in the software
8. Click "Setup" for sending the configuration to the selected fingerprint reader.
Search
Through Search option you can conduct search on a number of parameters, and get a list of
Information. For example, it is possible to quickly identify all Users who have A+ve blood group. The
Output information to be listed is also selectable.
50
PRO Lite 1.0 Manual
1.
2.
3.
4.
In Look in Selection box, click the button ( ) and select the parameter for Search.
For the Parameter selected, Enter the text to be searched.
For the Search Parameter, select the details to be displayed in the Search Result table.
Click Search button to view the Search result.
Backup
Backup menu is provided with three options listed below:
o Manual Backup
o Restore database
o Clear Events Database
Manual Backup
This option allows a manual backup (make a copy) of the database of the selected O2LA units in
selected Backup location.
Note: If no O2LA is registered, a manual backup cannot be done.
1. Click Backup menu and select Manual Backup option.
2. Select the O2LA units of which the database backup is to be taken.
Note:
All the used O2LA units are displayed for selection.
Back up of a Currently selected O2LA PRO Lite database is not possible when in use, hence backups
can only be done for registered O2LA’s, which are not currently running on the PRO Lite.
3. Click Select Backup Location button.
51
PRO Lite 1.0 Manual
3.
4.
5.
6.
Browse and select the path for Backup of the PRO Lite database of selected O2LA units.
Check Backup with date option for backing up the database with date in the filename.
Click the Backup now button to create a backup in the selected path.
Click the Exit button to quit the Manual Backup option.
Restore Database
In the event of a database getting corrupted (or necessity to revert back to old database), the
required database can be selected from the previously saved location and Restored.
This option restores a selected database into the PRO Lite database of selected O2LA.
Note: If no O2LA is registered, Restore database cannot be done.
2. Click Backup menu and select Restore Database option.
2.
3.
4.
5.
Click the Select button and choose a database to be restored.
Select the O2LA of which the database is to be replaced.
Click the Restore button. to restore the chosen Database.
Click the Exit button to quit the Restore Database option.
Clear Event Database
The Clear Events Database option clears all events from the database of currently loaded O2LA.
Note: If no O2LA is registered, Clear events database cannot be done.
6. Click the Backup menu and select the Clear Event Database option, a message shown below is
displayed.
52
PRO Lite 1.0 Manual
2. Click Yes to take a Backup.
3. Select the currently in use O2LA database.
4. Click select Backup location button.
5. Browse and select the path for Backup of the PRO Lite database of selected O2LA.
6. Check Backup with date option for backing up the database with date in the filename.
7. Click the Backup now button to create a backup in the selected path.
Note: PRO Lite software temporarily goes offline during the Backup database process of currently in
use O2LA.
8. Clicking No clears all the events in the Currently in use O2LA database.
53
PRO Lite 1.0 Manual
Disable Alarm
This option is to disable(Off) the Output 4 (T4) triggered. Disable alarm will be enabled only when
the PC is connected to O2LA.
Note: The Output 4 (T4) can also be disabled in O2LA by entering the Master code.
Settings Records
This menu gives a list of options in PRO T&A, of which the Settings Reports can be viewed and
printed.
If you want to reinstall the software, a Hard copy of all the Settings can be taken and re entered
in the same way.
The options in Settings Records menu are listed below:
o Reader Groups
o Time Zones
o Holidays
o User Groups
o User Details
o Antipassback
o User Groups
o Door Controllers
Time Zones Settings Report
This option lists out a report displaying all the Time Schedules created with details like Time zone
no, Description, Day and Period with Start and End time.
A sample of the Time zone report is displayed below.
1. Click the buttons , , to navigate between the pages and select the page to be printed.
2. Click Print (
) button, to take a print out.
54
PRO Lite 1.0 Manual
3. Click
button to come out of the Report.
User Groups Settings Report
This option lists out a report displaying all the User groups with details created in User Group
option.
A sample of User group report is displayed below:
1. Click the buttons , , to navigate between the pages and select the page to be printed.
2. Click Print (
) button, to take a print out.
3. Click
button to come out of the Report.
Reader Groups Settings Report
This option lists out a report displaying all the Reader groups with details created in Reader
Group option.
A sample of Reader group report is displayed below:
55
PRO Lite 1.0 Manual
1. Click the buttons , , to navigate between the pages and select the page to be printed.
2. Click Print (
) button, to take a print out.
3. Click
button to come out of the Report.
User Details Report
This option lists out a report displaying all the Users with details, created inUsers option.
A sample of User Details report is displayed below:
56
PRO Lite 1.0 Manual
1. Click the buttons , , to navigate between the pages and select the page to be printed.
2. Click Print (
) button, to take a print out.
3. Click
button to come out of the Report.
Holidays Report
This option lists out a report displaying all the Holidaysentered in Holidays option.
A sample of Holidays report is displayed below:
1. Click the buttons , , to navigate between the pages and select the page to be printed.
57
PRO Lite 1.0 Manual
2. Click Print (
) button, to take a print out.
3. Click
button to come out of the Report.
User Group with (APB) Settings Report
This option lists out a Report displaying all the User groups with Antipassback feature enabled.
A sample of User Group with (APB) Settings report is displayed below:
1. Click the buttons , , to navigate between the pages and select the page to be printed.
2. Click Print (
) button, to take a print out.
3. Click
button to come out of the Report.
Door Controllers with (APB) Settings Report
This option lists out a Report displaying the door Controllers that are Antipassback enabled.
A sample of the report is displayed below:
58
PRO Lite 1.0 Manual
1. Click the buttons , , to navigate between the pages and select the page to be printed.
2. Click Print (
) button, to take a print out.
3. Click
button to come out of the Report.
Online/Offline mode
PRO Lite is in Online mode when there is communication between PRO Lite and O2LA.
PRO Lite is in Offline mode if there is no communication between PRO Lite and O2LA. However, each
of them can function independently.
On the Pro Lite main screen click on the Go Online option to switch to Online operation mode.
Online Communication is indicated on the Pro Lite main screen as shown below:
Note:If the Registration details entered for the connected O2LA are incorrect or not entered, the
message below is displayed and you cannot work in Online mode.
On the PRO Lite main screen, Click Go Offline to switch to Offline mode of operation. Offline
communication is indicated on the ACCESS SOFT main screen as shown below:
PRO Lite in Online mode
PRO Lite is in Online mode when there is Communication between the connected O2LA Controller and
its corresponding database loaded in PRO Lite software.
When the PRO Lite software is in Online mode, and an event occurs, an online monitoring screen is
displayed listing the events as they occur.
59
PRO Lite 1.0 Manual
Online Monitoring
On the PRO Lite main screen click the Display Events option. The Online Monitoring screen, with a
list of events, is displayed as shown below.
Each O2LA Date and Time should be synchronized with PRO Lite:
1. If there is Date and Time difference between O2LA and PRO Lite.
2. If the PC Date and Time is changed.
PRO Lite provides a special feature, which is that the Photograph of each user granted access or
denied access can be viewed on Online monitoring screen.
Note: For the Picture of the User to appear on the Online monitoring screen, the scanned picture
should be set for the following size given below using an Image editing tool .
Photo size: 23mm (Width) x 28 mm (Height)
Pixels: 69 x 85
Resolution: 30
Image type: JPEG
Note: Scanned images can be edited using an Image editing tool like Photo Shop or Corel Draw to
achieve the above specifications.
Text Settings
This menu is used to change the font style & color in the Tree structure.
Select "Text Settings" in the Menu bar and the following screen will be displayed.
60
PRO Lite 1.0 Manual
o
o
o
o
o
To make bold or italic, Check on the respective check box.
To change the font, Click "Show Font", select the font from the Pop up menu that displays
the font styles and click "Ok".
To change the font color, Click "Show Color", select the color from the Pop up menu and click
"Ok".
Click "Save" to save the changes.
To obtain the Default font style,Click on the "Default Settings"
Help
Contents
Click Online Help option or press F1 shortcut key to view help file.
Registration
A PRO Lite software CD is sent free with every O2LA shipped out of the factory. O2LA and the PRO
Lite, in this situation, function entirely independently. Both can be programmed separately.
However, there is no data transfer between O2LA and the PRO Lite.
In order that data transfer can take place between O2LA and the PRO software, the two have to be
“linked” together, but only after registration with a Registration Code. The Registration Code
accompanies the O2LA or can be procured from the Distributor.
Note: All supplies from the factory contain both the O2LA and the PRO CD. O2LA can be bought
either with or without a Registration Code.
PRO Lite Registering O2LA Controller
1. Click the Help menu and select the Registration option, as displayed below.
61
PRO Lite 1.0 Manual
2. Click New button
3. Enter the name of the O2LA to be registered.
Note:
Here the O2LA unit can be named by the location where it is installed.
O2LA Name should be Unique.
First Character of O2LA name should be an alphabet.
4. Enter the name of the Company.
5. Click the Retrieve button to obtain the Serial Number of the O2LA connected to the PRO
Lite.
Note: If more than one O2LA is connected to computer, the software will first check for the O2LA
connected on respective com port
Or
Enter the O2LA Serial number written on the O2LA controller to be registered.
6. Click the Save button to store the Registration details.
Note: A new O2LA registered will automatically be assigned to the Administrator.
7. Click the Exit button to quit the Registration Form.
Modify Registration details of an O2LA Controller
The registration details entered for a O2LA Controller can be modified.
Note:Only Administrator is given the rights to modify the Registration details.
1. Select the Name of O2LA whose registration details is to be modified.
2. Click Modify button. and change the required details.
Note:If the O2LA is currently in use it cannot be modified. A message as shown below is displayed.
3. Click Update button to save the modifications done.
Delete Registration details of an O2LA Controller
Note:Only Administrator is given the rights to delete the Registration details.
4. Select the O2LA Controller whose registration details is to be deleted.
5. Click Delete button.
62
PRO Lite 1.0 Manual
6. Clicking Yes, deletes the Registration details of the selected O2LA Controller.
Note:
If the O2LA is currently in use it cannot be deleted, a message as shown below is displayed.
If the O2LA is assigned to some Operator(s), it cannot be deleted, a message shown below is
displayed.
63
PRO Lite 1.0 Manual
Instructions on Changing of Languages
The
o
o
1.
2.
PRO Lite software currently supports the following languages:
English
French
Default language of the Software is English.
Login session comes in the language specified in the Global Setting Parameters -> Sync /
Language settings.
3. Language of PRO Lite Software for each Operator can be set in Operators settings menu.
Note:
Certain message boxes displayed in the PRO Lite software depends on the Operating system
language. For example if English is selected as the language for PRO Lite Software and
Operating system is set as French, then some messages in PRO Lite software will be in French
language.
64
PRO Lite 1.0 Manual
Trouble Shooting
Message box
Problem
Com port may
not be available
or may be used
by some other
software.
Solution
If Comp port not
available, USB
Port with USB –
RS 232 Converter
(Cable) is to be
used for
Communication.
If Comp port is
used by some
other software,
close the
Software and
then start O2LA
Pro software.
This message
box appears if
the Holiday
data exported
to O2LA is 365
days ago.
Click Yes and
export the
Holiday data to
O2LA
Controller.
Registration
code in the
Registration
form not
entered or in
correct.
Enter the Unique
Registration
code given for
the O2LA
product.
65
PRO Lite 1.0 Manual
Glossary
Anti Passback
A feature that prevents a user from giving his or her code/tag to someone else to use. A user code/
tag must be used to enter then used to exit before it can be reused to enter again. This feature
requires one Reader for entry and a second Reader for exit.
Real Antipassback
A valid and authorized user is granted access at the ‘IN’ reader and cannot re-use the code/tag to
regain entry into the zone until the same card has been used to leave the area.
Timed Antipassback
A valid and authorized user is granted access at the ‘IN’ reader and subsequently cannot re-use
the code/tag to regain entry into the zone until a pre-set time period has elapsed.
Mantrap
The Mantrap function can be used for an area having two doors. This function is used to prevent a
door opening while another door is open. It is a special configuration where one door must be closed
before another door can open as in an "airlock" situation.
Priority codes
Priority codes are the codes with more rights. The PRO T&A allows for programming of up to 10
Priority codes at memory location from 990 to 999 for using in case of emergency situations. These
Priority codes are given "FULL" access as it is granted "Always Access" at any reader.
The Priority codes can be used in emergency situations such as:
o Communication problem with O2LA.
o System failure or power supply interruption to the O2LA.
These Priority codes are for Security Maintenance personnel or for Administrator.
Note: Programmed settings of Anti-Passback or Mantrap for the O2LA are disabled for these
codes.
Duress Code
Duress codes are intended for use in situations where a user is forcefully and unlawfully compelled
to open a door by an aggressor, for example. In such a situation a user can employ a duress code
instead of their personal code to gain access. Unknown to the aggressor, use of the duress code
activates Output T4, which can be connected to a silent alarm (e.g. an auto dialer).
Free Access
A special programming feature to enable 1 door in the system to remain open for 2 preset time
periods without need for card/tag validation. Useful, for example, to keep a parking lot gate open
during the start and close of office hours.
Readers
Readers are slave units that operate with the controller. They can be either a keypad or proximity
reader with 26-bit Wiegand protocol. XPR’s proximity readers read only EM4002 formatted cards. If
other readers are used, then specifications need to be checked for compatibility.
RS232
A common type of computer interface for serial data transmission over distances of less than 15
meters or 50 feet. Employs a standard 9-pin D-type connector. The O2LA system uses the RS232
interface to connect to a computer, printer or modem.
Tag
66
PRO Lite 1.0 Manual
A Tag can be card or key fob with an embedded IC encoded with a number that can then be sensed
by a reader. XPR’s MULTIX range of readers can read tags compatible with EM4002 format.
67