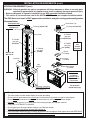
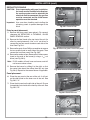
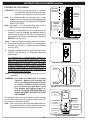
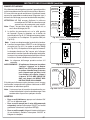
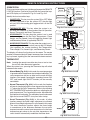
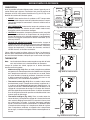
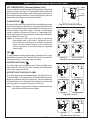
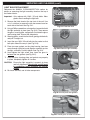
1
INSTALLATION &
OWNER’S MANUAL
Direct Vent Inserts:
D1-25 Series
D1-30 Series
D1-36 Series
DESIGN CERTIFIED
to
Vented Gas Fireplace Heater
ANSI Z21.88-2009
CSA 2.33-2009
D1 DIRECT VENT INSERTS
WARNING
WARNING
If the information in this manual is not
followed exactly, a fire or explosion
may result, causing property damage,
personal injury, or loss of life.
HOT GLASS WILL
CAUSE BURNS.
DO NOT TOUCH GLASS
UNTIL COOLED.
Do not store or use gasoline or other
flammable vapors and liquids in the
vicinity of this or any other appliance.
NEVER ALLOW CHILDREN
TO TOUCH GLASS.
WHAT TO DO IF YOU SMELL GAS:
• Open a window.
IMPORTANT: READ THESE INSTRUCTIONS
CAREFULLY BEFORE STARTING
INSTALLATION OR USE.
• Do not try to light any appliance.
• Do not touch any electrical switch; do
not use any phone in the building.
• Immediately call the gas supplier
from a neighbor’s phone. Follow gas
supplier’s instructions.
• If you cannot reach the gas supplier,
call the fire department.
This appliance may be installed in an
aftermarket, permanently located,
manufactured home (USA only) or mobile
home, where not prohibited by local codes.
Installation and service must be performed
by a qualified professional installer,
service agency, or the gas supplier.
This appliance is only for use with the type
of gas indicated on the rating plate. This
appliance is not convertible for use with other
gases, unless a certified kit is used.
INSTALLER:
Leave this manual with the appliance.
CONSUMER:
Retain this manual for future reference.
12-051
Robert H. Peterson Co. • 14724 East Proctor Avenue • City of Industry, CA 91746
REV 4 - 1505060750
1
L-A2-344
INSTALLATION ET
MODE D'EMPLOI
Direct Vent Inserts:
D1-25 Série
D1-30 Série
D1-36 Série
CONCEPTION CERTIFIÉE
à
Réchauffeur exhalé
de cheminée de gaz
ANSI Z21.88-2009
CSA 2.33-2009
D1 INSERTS À ÉVACUATION DIRECTE
AVERTISSEMENT
AVERTISSEMENT
Si l’information en ce manuel n’est pas suivie
exactement, une incendie ou une explosion
peut résulter, entraînant des dégats
matériels, des blessures, ou la perte de la vie.
UNA SURFACE VITRÉE
CHAUDE PEUT CAUSER
DES BRÛLURES.
LAISSER REFROIDIR LA
SURFACE VITRÉE AVANT
D'Y TOUCHER.
NE PERMETTEZ JAMAIS À
UN ENFANT DE TOUCHER LA
SURFACE VITRÉE.
Ne stockez pas ou n’employez pas l’essence
ou d’autres vapeurs et liquides inflammables
à proximité de ceci ou d’aucun autre appareil.
CE QUI À FAIRE SI VOUS SENTEZ LE GAZ:
• Ouvrez une fenêtre.
• N’essayez pas de n’allumer aucun appareil.
• Ne touchez aucun commutateur
électrique; n’utilisez aucun téléphone
dans le bâtiment.
• Appelez immédiatement le fournisseur
de gaz du téléphone du voisin. Suivez
les instructions du fournisseur de gaz.
• Si vous ne pouvez pas atteindre
le fournisseur de gaz, appelez le
département de feu.
IMPORTANT: L I S E Z C E S I N S T RU C T I O N S
SOIGNEUSEMENT AVANT DE
COMMENCER L'INSTALLATION OU
L'UTILISATION.
Cet appareil peut être installé dans un marché des
accessoires, une maison de manière permanente
située et manufacturée (Etats-Unis seulement)
ou une caravane résidentielle, où non interdit par
des codes locaux.
L’installation et le service doivent être assurés
par un installateur qualifié et professionnel,
l’agence de service, ou le fournisseur de gaz.
Cet appareil sert seulement avec le type de gaz
indiqué de la plaque de contrôle. Cet appareil
n'est pas convertible pour l'usage avec d'autres
gaz, à moins qu'un kit certifié soit employé.
INSTALLATEUR :
Laissez ce manuel avec l'appareil.
CONSOMMATEUR:
Maintenez ce manuel pour la future référence.
12-051
Robert H. Peterson Co. • 14724 East Proctor Avenue • City of Industry, CA 91746
REV 4 - 1505060750
2
L-A2-344
TABLE OF CONTENTS
USE, CARE, & SERVICE
GETTING STARTED
IMPORTANT PRE-INSTALLATION AND SAFETY
INFORMATION .............................................................. 5
LIGHTING INSTRUCTIONS ......................................37
FOR YOUR SAFETY READ BEFORE LIGHTING......37
INTERMITTENT PILOT MODE AND STANDING PILOT MODE.............................................................37
LISTING AND CODE APPROVALS ............................. 6
LISTING ................................................................... 6
CODE REQUIREMENTS ........................................... 6
COMMONWEALTH OF MASSACHUSETTS REQUIREMENTS ..................................................................... 6
REMOTE LIGHTING...............................................39
SPECIFICATIONS AND DIMENSIONS ....................... 7
REMOTE OPERATING INSTRUCTIONS ..................43
MINIMUM CLEARANCES TO COMBUSTIBLES ...12
ORIENTATION ........................................................43
TOOLS REQUIRED .....................................................12
THERMOSTAT ........................................................43
REPLACEMENT PARTS LIST ....................................13
SET TEMPERATURE (Thermostat Modes Only).........45
INSTALLATION REQUIREMENTS ...........................20
FLAME HEIGHT.....................................................45
FIREPLACE REQUIREMENTS ................................20
FAN ........................................................................45
GAS PRESSURE REQUIREMENTS ..........................21
ACCENT LIGHT (AUX) ...........................................45
VENTING REQUIREMENTS ....................................21
ACCENT LIGHT ONLY (NO FLAME) .......................45
MANUAL LIGHTING...............................................41
SHUTTING DOWN..................................................41
SECONDARY (REAR) BURNER ...............................47
INSTALLATION
TEMPERATURE INDICATOR (˚F or ˚C) ...................47
INSTALLATION ...........................................................23
KEY LOCK .............................................................47
BEFORE YOU BEGIN .............................................23
OPERATING DURING A POWER OUTAGE .............47
GAS SUPPLY SETUP ..............................................23
SERVICING AND CLEANING ...................................49
ELECTRICAL SETUP ..............................................23
ANNUAL CLEAN / INSPECTION .............................49
VENTING ...............................................................24
GLASS PANEL REMOVAL AND MAINTENANCE ......50
DIRECT VENT INSERT ...........................................26
PILOT BURNER CHECK/ADJUSTMENT .................50
INSTALL BATTERIES ..............................................27
AIR SHUTTER ADJUSTMENT .................................51
FIRST TIME PILOT/BURNER LIGHTING TEST........28
BATTERY REPLACEMENT ......................................53
GAS PRESSURE TEST .............................................28
SYNCHRONIZE REMOTE SYSTEM ..........................53
REFRACTORY PANELS ...........................................29
LIGHT BULB REPLACEMENT ................................54
GLOWING EMBERS ...............................................31
FAN ASSEMBLY CLEANING ....................................55
25" LOG SET ..........................................................32
FUEL CONVERSION KITS ......................................55
30" LOG SET ..........................................................33
TROUBLESHOOTING ................................................56
36" LOG SET ..........................................................34
WARRANTY .................................................................58
GLASS PANEL.........................................................35
INITIAL AIR SHUTTER ADJUSTMENT ....................35
SURROUND AND BARRIER SCREEN ......................35
IMPORTANT SAFETY INFORMATION
Congratulations on your purchase of an R. H. Peterson Co. Real Fyre direct vent insert. Made with pride in
America, your new insert complies with national safety standards and when installed per these instructions and
used as intended it will provide warmth and comfort to your home for many years.
Due to the extreme heat output of the insert, there is a risk of burns if care is not taken in the operation of
the unit. PLEASE READ THE SAFETY AND OPERATON INFORMATION AND WARNINGS IN THIS MANUAL
BEFORE USING YOUR INSERT. Be aware that glass panels and other surfaces get extremely HOT and can
cause burns if touched. Factory-provided barrier screens help to reduce the risk of serious burns as they can
prevent direct contact with the glass. However, barrier screens still retain heat and must not be touched. The
insert glass and surrounding material will remain HOT for a period of time after the unit is turned off, so caution
should be used at all times.
Refer to all safety information and warnings provided in this manual.
REV 4 - 1505060750
3
L-A2-344
L'INFORMATION IMPORTANTE DE PRÉINSTALLATION ET DE SÛRETÉ
AVERTISSEMENT!
A. Lisez toutes les instructions. Ne pas installer ou utiliser cet appareil sans avoir lu et compris ce manuel. Ne pas
suivre les instructions de ce manuel annulera la garantie et peut être dangereuse.
B. Le non respect de ces instructions d'installation se traduira par un appareil mal installé et fonctionne, ce qui annulera
sa garantie. Toute modification apportée à cet appareil et / ou de ses contrôles de fonctionnement est dangereux.
C. Instructions à la terre électrique - Cet appareil est équipé d'un à trois broches (mise à la terre) pour vous protéger
contre les chocs électriques et doit être branchée directement dans une prise à trois broches prise. Ne pas couper
ou enlever la broche de terre de cette fiche.
D. Ne pas placer les pièces conformément à ce manuel ou de l'échec d'utiliser seulement les pièces approuvées pour
cet appareil peut entraîner des dommages matériels ou des blessures corporelles.
E. Installation, maintenance et de réparation doit être effectuée par un technicien de service professionnel qualifié.
F.
Un inspecteur en bâtiment local devriez revoir vos plans avant l'installation.
G. Une mauvaise installation, de réglage, la modification, un service ou d'entretien peut causer des blessures ou des
dommages matériels. Reportez-vous à ce manuel. Pour de l'aide ou des renseignements supplémentaires, consultez
un installateur qualifié, une agence de service ou le fournisseur de gaz.
H. Une mauvaise installation ou l'utilisation de cet appareil peut causer des blessures graves ou la mort du feu, des
brûlures, une explosion ou intoxication au monoxyde de carbone.
I.
Soyez extrêmement prudent lors de la manipulation de ce produit et ses accessoires car ils ont des bords tranchants
qui peuvent causer des blessures.
J.
Il est recommandé que les détecteurs de fumée sont installés dans la maison. Si possible, installez un détecteur
dans un couloir adjacent à la salle (pour éviter une fausse alarme de la chaleur de l'appareil). Cependant, vous
devez suivre les exigences du code local.
K. Toute modification ou altération peut annuler la garantie, la certification et les annonces de cet appareil.
L.
Dispositions pour la combustion adéquate et l'air de ventilation doit être maintenue.
M. Dégagements d'accessibilité adéquats pour l'entretien et doit être prévu.
N. Un dégagement suffisant autour des ouvertures d'air dans la chambre de combustion doit être maintenue.
O. Un appareil au gaz ne doit pas être raccordé à un conduit de cheminée desservant un autre appareil de combustion
séparée à combustible solide.
P.
Ne pas utiliser cet appareil si une pièce a été sous l'eau. Appelez immédiatement un technicien de service qualifié
pour inspecter l'appareil et pour remplacer toute pièce du système de contrôle et de contrôle du gaz qui a été sous
l'eau.
Q. En raison des températures élevées, l'appareil doit être placé hors de la circulation et loin des meubles et des rideaux.
R. Hot en cours de fonctionnement. Enfants et adultes doivent être avertis des dangers de la température de surface
élevée et devrait rester à l'écart pour éviter les brûlures ou l'inflammation des vêtements.
S. Les jeunes enfants doivent être surveillés quand ils sont dans la même pièce que l'appareil. Tout-petits, les
jeunes enfants et d'autres peuvent être sensibles à des brûlures de contact accidentel. Une barrière physique est
recommandé s'il ya des individus à risque dans la maison. Pour restreindre l'accès à une cheminée ou un poêle,
installer une barrière de sécurité pour garder les tout-petits, les jeunes enfants et d'autres personnes à risque hors
de la salle et à l'écart des surfaces chaudes.
T.
Les vêtements ou autres matériaux inflammables ne doivent pas être placés sur ou près de l'appareil. Ne placez
jamais les combustibles solides, liquides inflammables, ou des objets étrangers dans cet appareil.
U. Tout écran ou grille de protection pour l'entretien d'un appareil doit être remplacé avant de faire fonctionner l'appareil.
V.
Installation et réparation doit être effectuée par un technicien qualifié. L'appareil doit être inspecté avant son
utilisation et au moins annuellement par une personne un service professionnel. Un nettoyage plus fréquent peut
être nécessaire en raison des peluches provenant des tapis, literie, etc. Il est impératif que les compartiments de
contrôle, les brûleurs et les passages de circulation d'air de l'appareil être maintenu propre.
W. Seulement trousse de garniture (s) fournie par le fabricant doivent être utilisées dans l'installation de cet appareil.
Ouvertures de secours projets ne doivent pas être couverts ou bloqués. Panneaux de garniture ou entoure ne doit
pas sceller les ouvertures de ventilation dans la cheminée.
CONSERVER CES INSTRUCTIONS
4
IMPORTANT PRE-INSTALLATION AND SAFETY INFORMATION
WARNING!
A. Read all instructions. Do not install or operate this appliance without first reading and understanding this
manual. Failure to follow the instructions in this manual will void the warranty and may be dangerous.
B. Failure to follow these installation instructions will result in an improperly installed and operating appliance,
voiding its warranty. Any change to this appliance and/or its operating controls is dangerous.
C. Electrical Grounding Instructions - This appliance is equipped with a three-prong (grounding) plug for your
protection against shock hazard and should be plugged directly into a properly grounded three-prong
receptacle. Do not cut or remove the grounding prong from this plug.
D. Failure to position the parts in accordance with this manual or failure to use only parts specifically approved
with this appliance may result in property damage or personal injury.
E. Installation, service, and repair must be done by a qualified professional service technician.
F.
A local building inspector should review your plans prior to installation.
G. Improper installation, adjustment, alteration, service or maintenance can cause injury or property damage.
Refer to this manual. For assistance or additional information consult a qualified installer, service agency or
the gas supplier.
H. Incorrect installation or use of this appliance can cause serious injury or death from fire, burns, explosion
or carbon monoxide poisoning.
I.
Use extreme caution whenever handling this product and its accessories as they have sharp edges that can
cause personal injury.
J. It is recommended that smoke detectors are installed in the home. If possible, install a detector in a hallway
adjacent to the room (to prevent a false alarm from the heat of the appliance). However, you must follow the
requirements of the local code.
K. Any modification or alteration may void the warranty, certification and listings of this appliance.
L. Provisions for adequate combustion and ventilation air must be maintained.
M. Adequate accessibility clearances for servicing and proper operation must be provided.
N. Adequate clearance around air openings into the combustion chamber must be maintained.
O. A gas appliance must not be connected to a chimney flue serving a separate solid-fuel burning appliance.
P. Do not use this appliance if any part has been under water. Immediately call a qualified service technician
to inspect the appliance and to replace any part of the control system and any gas control which has been
under water.
Q. Due to high temperatures, the appliance should be located out of traffic and away from furniture and draperies.
R. Hot while in operation. Children and adults should be alerted to the hazards of high surface temperature and
should stay away to avoid burns or clothing ignition.
S. Young children should be carefully supervised when they are in the same room as the appliance. Toddlers,
young children and others may be susceptible to accidental contact burns. A physical barrier is recommended
if there are at-risk individuals in the house. To restrict access to a fireplace or stove, install an adjustable safety
gate to keep toddlers, young children and other at risk individuals out of the room and away from hot surfaces.
T. Clothing or other flammable material should not be placed on or near the appliance. Never place solid fuels,
flammable liquids, or foreign objects into this appliance.
U. Any safety screen or guard removed for servicing an appliance must be replaced prior to operating the appliance.
V. Installation and repair should be done by a qualified service person. The appliance should be inspected before
use and at least annually by a professional service person. More frequent cleaning may be required due to
excessive lint from carpeting, bedding material, et cetera. It is imperative that control compartments, burners
and circulating air passageways of the appliance be kept clean.
W. Only trim kit(s) supplied by the manufacturer shall be used in the installation of this appliance. Draft relief
openings must not be covered or blocked. Trim panels or surrounds must not seal ventilation openings in
the fireplace.
SAVE THESE INSTRUCTIONS
5
LISTING AND CODE APPROVALS
LISTING
This direct vent insert has been certified to:
VENTED GAS FIREPLACE HEATER ANSI Z21.88-2009, CSA 2.33-2009
It has been certified for use with either natural or propane gas, and is approved for installation in bedrooms and
aftermarket manufactured (mobile) homes.
CODE REQUIREMENTS
A. The installation must conform with local codes or, in the absence of local codes, with the National Fuel Gas
Code, ANSI Z223.1/NFPA 54, or the Natural Gas and Propane Installation Code, CSA B149.1.
B. Ensure clearances are in accordance with local installation codes and the requirements of the gas supplier.
Dégagement conforme aux codes d’installation locaux et aux exigences du foumisseunde gaz.
C. A manufactured home (USA only) or mobile home OEM installation must conform with the Manufactured
Home Construction and Safety Standard, Title 24 CFR, Part 3280, or, when such a standard is not applicable,
the Standard for Manufactured Home Installations, ANSI/NCSBCS A225.1, or Standard for Gas Equipped
Recreational Vehicles and Mobile Housing, CSA Z240.4.
D. The appliance, when installed, must be electrically grounded in accordance with local codes or, in the
absence of local codes, with the National Electrical Code, ANSI/NFPA 70, or the Canadian Electrical Code,
CSA C22.1.
E. To comply with certification, and building code acceptances, and for safe operation and proper performance
of this appliance, use ONLY Peterson parts and accessories. Use of other controls, parts, and accessories
that are not designed for use with Real Fyre direct vent inserts is prohibited and will void all warranties,
certifications, and building code approvals, and may cause property damage, personal injury, or loss of life.
COMMONWEALTH OF MASSACHUSETTS REQUIREMENTS
This appliance is approved for installation in the state of Massachusetts subject to the following requirements:
A. Install this appliance in accordance with 248 C.M.R., the Rules and Regulations Governing Plumbers and
Gas Fitters.
B. The installer or service agent must be a plumber or gas fitter licensed in the Commonwealth of Massachusetts.
C. The flexible gas line connector used must not exceed 36 inches (92 centimeters) in length.
D. The individual manual shut-off must be a T-handle type valve, listed and approved by the state of Massachusetts.
6
SPECIFICATIONS AND DIMENSIONS
Description
Dimension
D1-25
D1-30
D1-36
A.
Rear Width
17"
17 3/8"
19 5/8"
B.
Front Width
29"
31 1/2"
34 1/2"
1/4"
17 1/4"
1/4"
C.
Unit Depth
13
16
D.
Vent Depth
6 1/2"
9 1/2"
9 1/2"
E.
Rear Height
15 1/2"
18 1/8"
21 3/8"
F.
Front Height
18 1/2"
21 1/2"
25"
Table 1 - Product Dimensions
A
C
D
B
Fig. 7-1 Top View
F
E
Fig. 7-2 Side View
7
SPECIFICATIONS AND DIMENSIONS (cont.)
A
B
C
D
E
Surround 3-sided, small
34 3/8"
22"
4 1/2"
4 3/4"
1 1/2"
Surround 3-sided, medium
37 3/8" 25 1/4"
7 3/4"
6 1/4"
1 1/2"
Surround 3-sided, large
40 3/8"
28"
10 1/2"
7 3/4"
1 1/2"
Surround 4-sided, small
34 3/8"
27"
4 3/4"
4 3/4"
1 1/2"
Surround 4-sided, medium
37 3/8"
30"
6 1/4"
6 1/4"
1 1/2"
Surround 3-sided, small
38 3/8"
25"
4 3/4"
4 1/2"
1 1/2"
Surround 3-sided, medium
41 3/8"
28"
6 1/4"
7 1/2"
1 1/2"
Surround 3-sided, large
44 3/8"
31"
7 3/4"
10 1/2"
1 1/2"
Surround 4-sided, small
38 3/8"
30"
4 3/4"
4 3/4"
1 1/2"
Surround 4-sided, medium
41 3/8"
33"
6 1/4"
6 1/4"
1 1/2"
Surround 3-sided, small
43 3/8"
29"
5"
5 3/4"
1 1/2"
Surround 3-sided, medium
45 3/8"
32"
8"
6 3/4"
1 1/2"
Surround 3-sided, large
49 3/8"
35"
11"
8 3/4"
1 1/2"
Surround 4-sided, small
43 3/8"
33"
4 1/2"
5 3/4"
1 1/2"
Surround 4-sided, medium
45 3/8"
36"
6"
6 3/4"
1 1/2"
Description
D1-25
D1-30
D1-36
Table 2 - Surround Kit Dimensions
E
A
A
C
C
B
B
C
D
D
Fig. 8-1 Front View (3 sided surround model)
D
D
Fig. 8-2 Front View (4 sided surround model)
8
Fig. 8-3
Side View
SPECIFICATIONS AND DIMENSIONS (cont.)
TO DETERMINE THE APPROPRIATE SURROUND FOR YOUR SETUP* :
Recommended surround
F max
G max
32 3/8"
21"
D1-25
Surround 3-sided, small
3/8"
24 1/4"
Surround 3-sided, medium
35
Surround 3-sided, large
38 3/8"
Surround 4-sided, small
32
3/8"
19 3/4"
Surround 4-sided, medium
35 3/8"
24 1/4"
Surround 3-sided, small
36 3/8"
24"
Surround 3-sided, medium
39 3/8"
27"
Surround 3-sided, large
42 3/8"
30"
Surround 4-sided, small
36 3/8"
24 1/4"
Surround 4-sided, medium
39 3/8"
25 3/4"
41 3/8"
28"
43
3/8"
31"
47
3/8"
34"
Surround 4-sided, small
41
3/8"
27 1/2"
Surround 4-sided, medium
43 3/8"
27"
D1-30
D1-36
Surround 3-sided, small
Surround 3-sided, medium
Surround 3-sided, large
29"
Table 3 - Recommended Surround (based upon fireplace opening, see Fig. 9-1)
F
(gap in fireplace)
G
Insert
Fig. 9-1 Insert in Fireplace Opening
* To complete your insert installation, a matching metal surround
is required to cover the gap between the insert and your existing
fireplace opening. Available in a black finish, choose from three
fixed, non-adjustable 3-sided sizes. If your fireplace opening is
raised and flush with the wall; you may choose from two fixed
dimension 4-sided surrounds. Consult Table 3 for assistance.
• F x G represents fireplace opening
• Shaded area represents gap created
• Surround is designed to overlay fireplace opening a
minimum of 1"
9
SPECIFICATIONS AND DIMENSIONS (cont.)
Dimension
Description
A.
D1-25
D1-30
D1-36
30"
34"
37"
Front Width
1/2"
22 1/2"
B.
Rear Width
20"
20
C.
Depth
15"
181/2"
191/2"
D.
Height
19"
22"
25 1/2"
A
D
B
Table 4 - Minimum Fireplace Dimensions
C
Fig. 10-1 Minimum Fireplace Dimensions
Natural Gas
Model
Propane Gas
Orifice Size
BTU
Rating
Front
Orifice Size
Rear
BTU
Rating
Front
Rear
D1-25
(0-2000 FT) *
25,000
#42
-
20,000
#55
-
D1-30
(0-2000 FT) *
32,000
#50
#45
31,000
#57
#55
D1-36
(0-2000 FT) *
38,000
#48
#43
36,000
#57
#54
Table 5 - BTU Ratings and Orifice Sizes
* For elevations above 2,000 feet, the BTU rate of the unit is reduced by
4% for each additional 1,000 feet. To install the unit above an elevation of
2,000 feet, you must use proper orifices based on the de-rated BTU.
Remote Control
Supply voltage
4.5 V
(three 1.5 V AAA batteries)
Ambient temperature ratings
32 - 122 °F (0-50 °C)
Radio frequency
315 MHz
Receiver
Supply voltage
6.0 V
(four 1.5 V AA batteries)
Ambient temperature ratings
32 - 140 °F (0-60 °C)
Radio frequency
315 MHz
Fan Control Module
Supply voltage/frequency
120 V / 60 Hz
Ambient temperature ratings
32 - 140 °F (0-60 °C)
Output voltage/frequency/current
120 V / 60 Hz / 5 A
Aux switched output
120 V / 60 Hz / 2 A
Fan speed output
120 V / 60 Hz / 1 A
Table 6 - Technical Data Specifications
10
SPECIFICATIONS AND DIMENSIONS (cont.)
D1-25 WIRING DIAGRAM
SPARK ELECTRODE
PILOT (NAT/LP)
SENSE ELECTRODE
GROUND WIRE
PILOT TUBE
VALVE
(NAT/LP)
PROFLAME
FCM CONTROL
MODULE
BURNER
PROFLAME
DFC BOARD
WIRE EXT.
SWITCH PILOT FLAME MODULE
PROFLAME
RECEIVER
ON/OFF SWITCH
PROFLAME
WIRE HARNESS
PROFLAME
WIRE HARNESS
Fig. 11-1
D1-30 & D1-36 WIRING DIAGRAM
SPARK ELECTRODE
PILOT (NAT/LP)
SENSE ELECTRODE
GROUND WIRE
PILOT TUBE
VALVE
SPLIT
FLOW
VALVE
(NAT/LP)
PROFLAME
FCM CONTROL
MODULE
GAS TUBE
REAR BURNER
PROFLAME
DFC BOARD
GAS TUBE
FRONT BURNER
SWITCH PILOT FLAME MODULE
PROFLAME
RECEIVER
WIRE EXT.
ON/OFF SWITCH
PROFLAME
WIRE HARNESS
PROFLAME
WIRE HARNESS
Fig. 11-2
11
MINIMUM
CLEARANCES
TO COMBUSTIBLES
SPECIFICATIONS
AND DIMENSIONS
(cont.)
All minimum clearances from surfaces to combustible construction must be met, and maintained at all times. The
clearances shown below include any adjacent walls, spacers, standoffs, and any projections such as shelves,
window sills, or fireplace mantels. Any finishing on the mantel must be heat resistant.
Dimension
Description
D1-25
D1-30
D1-36
31"
36"
40"
B. Clearance required
from center of glass to
combustibles
22 1/2"
22 1/2"
22 1/2"
C. Clearance needed from
bottom of insert to 12"
mantel
37"
42"
46"
A. Clearance needed
from bottom of insert to
combustibles or 8" mantel
Table 7 - Minimum Clearances to Combustibles
Mantel - 12" Depth
12"
Combustible Trim or Mantel Depth of 8" or less
8"
B
C
C
A
A
FRONT VIEW
SIDE VIEW
Fig. 12-1 Minimum Clearances
TOOLS REQUIRED
The following are the minimum tools required for the installation of your direct vent insert. Additional tools may
be required for your individual installation.
• 2 man crew recommended
• hi temp. sealant
• rope
• cordless drill
• measuring tape
• drill bits and drivers
• marker
• Phillips screwdriver
• appropriate tools for gas supply
and electrical install
•
• reciprocating saw
• tin snip / hacksaw
5/
16"
& 7/16" nut drivers
• utility knife
12
REPLACEMENT PARTS LIST
D1-25 MODELS
18
1
22
10
20
17
5
12
11
14
8
16
75˚F
9
13
15
24
4
23
2
Your direct vent insert is
shipped in 4 boxes:
•
•
•
•
6
Insert
Refractory panels
Surround
Log set
Replacement parts can be
ordered from your local
Real Fyre dealer.
IMPORTANT
Remove all packing
material (including any
protective coatings) and
discard prior to use.
SHARP
EDGES
USE CAUTION
Robert H. Peterson Co. • 14724 East Proctor Avenue, • City of Industry, CA 91746
13
REPLACEMENT PARTS LIST (cont.)
D1-25 MODELS
Item Description
Part No.
Qty.
1.
Control valve (Nat)
D1-30-701
1
or
Control valve (LP)
D1-30-702
1
2.
Burner assembly
D1-25-703
1
3.
Burner orifice (Nat)*
3001-42-1
1
or
Burner orifice (LP)*
3001-55-1
1
4.
Pilot assembly (Nat/LP)
D1-25-705
1
5.
Fan assembly
D1-30-706
1
6.
Grate
D1-25-707
1
7.
Light bulb assy *
(120 V / 25 watt bulb & gaskets)
D1-30-708
1
8.
Glass panel assembly
D1-25-900
1
9.
Fine mesh barrier screen
D1-25-913F
1
10.
On/Off switch
SW-9
1
11.
Lintel
D1-25-902
1
12.
Spring door latch
D1-30-910
1
13.
Remote transmitter
D1-30-709
1
14.
Remote receiver kit
D1-30-711
1
15.
Air flow screen
D1-25-710
1
16.
Support leg (set of 4)
D1-30-911
1
17.
Fan control module
D1-30-713
1
18.
DFC board
D1-30-714
1
19.
Wire harness kit*
D1-30-715
1
20.
Vent adapter plate
D1-25-912
1
21.
Wire hook*
D1-30-717
1
22.
Air restrictor
D1-25-916
1
23.
Glowing embers
EM-10
1
24.
Bryte coals
EMV-1
1
* Not shown
14
REPLACEMENT PARTS LIST (cont.)
D1-30 & D1-36 MODELS
21
1
25
19
12
23
20
7
14
13
16
10
18
75˚F
15
11
3
17
27
6
26
2
Your direct vent insert is
shipped in 4 boxes:
•
•
•
•
8
Insert
Refractory panels
Surround
Log set
Replacement parts can be
ordered from your local
Real Fyre dealer.
D1-30 model shown
IMPORTANT
Remove all packing
material (including any
protective coatings) and
discard prior to use.
SHARP
EDGES
USE CAUTION
Robert H. Peterson Co. • 14724 East Proctor Avenue, • City of Industry, CA 91746
15
REPLACEMENT PARTS LIST (cont.)
Item Description
D1-30
Part No.
Qty.
D1-36
Part No.
Qty.
1.
Control valve (Nat)
D1-30-701
1
D1-30-701
1
or
Control valve (LP)
D1-30-702
1
D1-30-702
1
2.
Front burner assembly
D1-30-703
1
D1-36-703
1
3.
Rear burner assembly
D1-30-704
1
D1-36-704
1
4.
Front burner orifice (Nat)*
3001-50-1
1
3001-48-1
1
or
Front burner orifice (LP)*
3001-57-1
1
3001-57-1
1
5.
Rear burner orifice (Nat)*
3001-45-1
1
3001-43-1
1
or
Rear burner orifice (LP)*
3001-55-1
1
3001-54-1
1
6.
Pilot assembly (Nat/LP)
D1-30-705
1
D1-30-705
1
7.
Fan assembly
D1-30-706
1
D1-30-706
1
8.
Grate
D1-30-707
1
D1-36-707
1
9.
Light bulb assy *
(120 V / 25 watt bulb & gaskets)
D1-30-708
1
D1-30-708
1
10.
Glass panel assembly
D1-30-900
1
D1-36-900
1
11.
Fine mesh barrier screen
D1-30-913F
1
D1-36-913F
1
12.
On/Off switch
SW-9
1
SW-9
1
13.
Lintel
D1-30-902
1
D1-36-902
1
14.
Spring door latch
D1-30-910
1
D1-30-910
1
15.
Remote transmitter
D1-30-709
1
D1-30-709
1
16.
Remote receiver kit
D1-30-711
1
D1-30-711
1
17.
Ember screen
D1-30-710
1
D1-30-710
1
18.
Support leg (set of 4)
D1-30-911
1
D1-30-911
1
19.
Valve split flow
D1-30-712
1
D1-30-712
1
20.
Fan control module
D1-30-713
1
D1-30-713
1
21.
DFC board
D1-30-714
1
D1-30-714
1
22.
Wire harness kit*
D1-30-715
1
D1-30-715
1
23.
Vent adapter plate
D1-30-912
1
D1-30-912
1
24.
Wire hook*
D1-30-717
1
D1-30-717
1
25.
Air restrictor
D1-25-916
1
D1-25-916
1
26.
Glowing embers
EM-10
2
EM-10
2
27.
Bryte coals
EMV-1
1
EMV-1
2
* Not shown
16
REPLACEMENT PARTS LIST (cont.)
D1-25-2(A,S) Log Sets
Burnt American Oak Burnt Split American Oak
Item Description
Part No.
Qty.
Part No.
Qty.
1.
Rear log
D1AL-17BR
1
D1AL-17BR
1
2.
Front logs
D1AL-10BF
1
D1SL-10BF
1
3.
Middle top log
D1AL-9TC
1
D1AL-9TC
1
4.
Right top log
D1AL-11TR
1
D1SL-11TR
1
5.
Left top log
D1AL-10TL
1
D1SL-10TL
1
3
5
4
2
Burnt American Oak
Log Set Shown
1
D1-30-2(A,S) Log Sets
Burnt American Oak Burnt Split American Oak
Item Description
Part No.
Qty.
Part No.
Qty.
1.
Rear log
D1AL-18BR
1
D1SL-18BR
1
2.
Front logs
D1AL-12BF
1
D1SL-12BF
1
3.
Middle top log
D1AL-11T
1
D1SL-11T
1
4.
Right top log
D1AL-18T
1
D1SL-18T
1
5.
Left top log
D1AL-13T
1
D1SL-13T
1
3
4
5
2
Burnt American Oak
Log Set Shown
1
17
REPLACEMENT PARTS LIST (cont.)
D1-36-2(A,S) Log Sets
Burnt American Oak Burnt Split American Oak
Item Description
Part No.
Qty.
Part No.
Qty.
D1AL-21BRL
1
D1SL-21BRL
1
1.
Rear log
2.
Front logs
D1AL-13BF
1
D1SL-13BF
1
3.
Middle log
D1AL-11T
1
D1AL-11T
1
4.
Right top log
D1AL-18T
1
D1SL-18T
1
5.
Middle top log
D1AL-13T
1
D1SL-13T
1
6.
Left top log
D1AL-10T
1
D1SL-10T
1
3
4
5
6
2
Burnt American Oak
Log Set Shown
1
D1-25
Part No.
Item Description
1.
or
2.
or
3.
or
4.
or
5.
6.
7.
Left panel (Boston brick)
Left panel (Herringbone)
Right panel (Boston brick)
Right panel (Herringbone)
Rear panel (Boston brick)
Rear panel (Herringbone)
Top panel (Boston brick)
Top panel (Herringbone)
Left floor panel
Right floor panel
Front floor panel
D1-25-800
D1-25-801
D1-25-802
D1-25-803
D1-25-804
D1-25-805
D1-25-806
D1-25-807
D1-25-808
D1-25-809
D1-25-810
D1-30
Part No.
Qty.
1
1
1
1
1
1
1
1
1
1
1
Qty.
D1-30-800
D1-30-801
D1-30-802
D1-30-803
D1-30-804
D1-30-805
D1-30-806
D1-30-807
D1-30-808
D1-30-809
D1-30-810
4
1
1
1
1
1
1
1
1
1
1
1
D1-36
Part No.
D1-36-800
D1-36-801
D1-36-802
D1-36-803
D1-36-804
D1-36-805
D1-36-806
D1-36-807
D1-30-808
D1-30-809
D1-36-810
2
3
7
Boston brick panels shown
18
1
1
1
1
1
1
1
1
1
1
1
6
5
1
Qty.
REPLACEMENT PARTS LIST (cont.)
Item Description
D1-25
Part No.
Qty.
D1-30
Part No.
Qty.
D1-36
Part No.
Qty.
1.
3 sided surround, small
D1-25-908
1
D1-30-908
1
D1-36-908
1
or
3 sided surround, medium
D1-25-909
1
D1-30-909
1
D1-36-909
1
or
3 sided surround, large
D1-25-905
1
D1-30-905
1
D1-36-905
1
2.
4 sided surround, small
D1-25-907
1
D1-30-907
1
D1-36-907
1
or
4 sided surround, medium
D1-25-906
1
D1-30-906
1
D1-36-906
1
3.
Eyebrow
D1-25-901
1
D1-30-901
1
D1-36-901
1
3
1
19
2
INSTALLATION REQUIREMENTS
Installation must be done by a qualified professional service technician.
Prior to installation ensure that all specifications, dimensions, and minimum clearances stated in this
manual are observed. You must read all warnings and safety information, and understand all of the
information in this manual. All of these installation requirements must be observed and met.
FIREPLACE REQUIREMENTS
A. This appliance must be vented directly to the outside in accordance with the current edition of the National
Fuel Gas Code (NFPA 54 in U.S.A. and CAN/CSA B149.1 in Canada) and must never be attached to a
chimney serving a separate solid fuel burning appliance. This appliance is designed to be installed into an
existing masonry fireplace (built to UBC 37 or ULC S628 standards) or factory built solid fuel, wood, burning
fireplace (listed to UL 127 or ULC S610) only. All exhaust gases must be vented outside the structure.
Combustion air is drawn from outside the structure.
B. Cutting any sheet metal parts of the fireplace in which the gas fireplace insert is to be installed is prohibited,
with the exception of the firebox floor. The metal firebox floor may be removed/altered to allow additional
room for installation of the insert. Note: a minimum 2" clearance is required between the fireplace floor and
the insert. The clearance may be provided by lowering the firebox floor, placing bricks, etc. See Fig. 20-2.
C. If the factory-built fireplace has no gas access hole(s) provided, an access hole of 1.5 in (37.5 mm) or less
may be drilled through the lower sides or bottom of the firebox in a proper workmanship like manner. This
access hole must be plugged with non-combustible insulation after the gas supply line has been installed.
Si le foyer préfabriqué ne comporte pas d’orifices d’amenée du gaz, un orifice d’au plus 37,5 mm (1,5 po)
peut être pratiqué, selon les règles de l’art, dans la partie inférieure des parois ou au fond de la chambre
de combustion. Cet orifice doit être obturé au moyen d’isolant incombustible une fois la conduite de gaz
en place.
D. The fireplace flue damper must be removed for installation of the gas fireplace insert.
E. The fireplace and fireplace chimney must be completely clean. Brush and vacuum all interior surfaces so
that no embers, soot, or loose combustion deposits can be drawn into the heat circulation fan and blown
into the living area. The fireplace and fireplace chimney must be in good working order and constructed of
non-combustible materials. Inspect chimney clean-outs for proper fit and seal. If any portion of the chimney
system shows signs of structural or mechanical weaknesses, the faulty portion must be repaired or replaced
prior to installing this appliance.
F. Refractory panels, glass panels, screen rails, screen mesh and log grates may be removed from the fireplace
(as needed) before installing the gas fireplace insert. Smoke shelves, shields and baffles may be removed
if attached by mechanical fasteners. Any parts that are removed must be retained for later reinstallation to
restore the fireplace to its original operating condition. The removal of any part must not alter the integrity
of the outer shell of the pre-fab fireplace cabinet in any way. If any parts are removed (or altered) from the
existing fireplace, a Warning Label (see Fig. 20-1 below) must be affixed inside the fireplace firebox. The
label must be visible upon removal of the direct vent insert.
Pre-fab
fireplace
Insert resting
at new
lowered level
(i.e. lowering of
floor, placing
bricks, etc.)
WARNING
THIS FIREPLACE HAS BEEN ALTERED
TO ACCOMODATE A FIREPLACE INSERT
AND SHOULD BE INSPECTED BY A QUALIFIED PERSON
PRIOR TO RE-USE AS A CONVENTIONAL FIREPLACE.
Fig. 20-1 Fireplace Warning Label
Min. 2"
clearance
Fireplace
floor
Combustible
floor
Fig. 20-2 Pre-fab fireplace floor height adjustment
20
INSTALLATION REQUIREMENTS (cont.)
GAS PRESSURE REQUIREMENTS
A. The appliance and its appliance main gas valve must be disconnected from the gas supply piping system
during any pressure testing of that system at test pressures in excess of 1/2 psi (3.5 kPa).
The appliance must be isolated from the gas supply piping system by closing its equipment shutoff valve
during any pressure testing of the gas supply piping system at test pressures equal to or less than 1/2 psi
(3.5 kPa).
Fuel Type
Minimum
Normal
Maximum
Natural
5" w.c.
7" w.c.
10.5" w.c.
Propane
10.5" w.c.
11" w.c.
13"w.c.
Table 8 - Inlet Gas Supply Pressure
Fuel Type
Low
High
Natural
1.7" w.c.
3.5" w.c.
Propane
6.4" w.c.
10" w.c.
Table 9 - Manifold Gas Supply Pressure
VENTING REQUIREMENTS
• Installation must be done by a qualified professional service technician.
• This appliance is designed for installation into an existing masonry or factorybuilt solid fuel burning fireplace.
• DO NOT make modifications to the system. DO NOT substitute or add
components other than those sold and/or approved by RHP.
• It is imperative that the appliance be installed EXACTLY as instructed in
this manual.
• It is imperative that the appliance be installed using only the following
RHP approved direct-vent flex kit (see Fig. 21-1):
Simpson Dura Vent
Co-Linear Kit w/ Flex: Kit w/ high-wind termination cap and two 3" x 35'
flexible vent pipes - #46DVA-CL33
Simpson Dura Vent
#46DVA-CL33
Fig. 21-1
RHP approved venting kit
Incorrect Installation Methods
DO NOT use any of these methods, techniques, or products when installing the RHP Direct Vent
Insert System. Doing so may result in a malfunctioning appliance and may render it inoperable.
DO NOT INSTALL
USING SHORT
STACK METHOD
(offset
shown for
clarity)
DO NOT VENT PIPES
OUT REAR WALL
(offset
shown for
clarity)
REAR
WALL
DO NOT RUN PIPES
HORIZONTALLY
(offset
shown for
clarity)
DO NOT CRIMP DO NOT USE A
OR RUPTURE
CORRUGATED
PIPES
CHIMNEY LINER
DO NOT USE A
SHROUD
DO NOT
USE THESE
PRODUCTS ON
PIPES:
NO
horizontal
run
• Milpack
• Sealant/Silicone
(red or black)
MAY CAUSE
OVERHEATING
21
INSTALLATION REQUIREMENTS (cont.)
VENTING REQUIREMENTS (cont.)
WARNING: Failure to position the parts in accordance with these diagrams or failure to use only parts
specifically approved with this appliance may result in property damage or personal injury.
• Below are diagrams of a generic installation for the RHP approved installation method.
• This section is just an overview, refer to the INSTALLATION section for complete installation details.
The RHP direct vent insert is ONLY approved for installation using the venting system configuration
illustrated below:
Termination Cap
Termination Cap
(Simpson Dura Vent
#46DVA-CL33)
Flashing (sealant OK)
Insulation
3" Flexible
vent pipe
(Exhaust)
3" Flexible
vent pipe
(Exhaust)
Max. Ht. 40'
Min. Ht. 10'
Flashing (sealant OK)
3" Flexible
vent pipe
(Intake)
3" Flexible
vent pipe
(Intake)
DO NOT
use
sealant
on pipes
Screws
( included)
Clamps
( included)
Insulation
Vent
Adapter
Vent adapter
( included)
Air restrictor
Required for
installation
(exhaust side) if
length of vent run
is 20' or more
Insulation in fireplace:
ash trap, gas line access, holes,
any air openings, etc.
•
•
•
•
•
•
•
•
•
D1-30 shown
(model may vary)
This appliance must use its own separate vent system.
The vent system must be vented directly to outside of building.
Ensure exhaust pipe connects to exhaust port of termination cap and exhaust port of vent adapter.
Ensure intake pipe connects to intake port of termination cap and intake port of vent adapter.
DO NOT crimp, rupture, or collapse pipes when routing through any fireplace contours.
Keep pipes as STRAIGHT as possible.
Ensure pipes pass through fireplace damper area. Remove damper.
Carefully read all instructions included with venting kit.
Each installation requires burner air shutter adjustment to ensure optimal flame appearance (see SERVICING
AND CLEANING - AIR SHUTTER ADJUSTMENT section for details).
22
INSTALLATION
INSTALLATION MUST BE DONE BY A QUALIFIED
PROFESSIONAL SERVICE TECHNICIAN.
Important: All requirements in the INSTALLATION
REQUIREMENTS section must be observed and
met, prior to proceeding with installation.
WARNING: Failure to position the parts in accordance with
these diagrams or failure to use only parts
specifically approved with this appliance may
result in property damage or personal injury.
Gas
supply
Shut-off valve
(not included, recommended)
Fireplace
floor
Maintain clearance
for direct vent insert
BEFORE YOU BEGIN
Confirm the fireplace accommodates the unit and that all
dimensions are met. Reference the SPECIFICATIONS AND
DIMENSIONS section.
Ensure the fireplace hearth remains clear to allow for the unit to
be installed without any obstructions. This includes all electrical
and gas supply installations in the fireplace.
All plumbing/wiring must be routed along the rear and/or
sides of the unit, NEVER ABOVE OR BELOW.
If required, non-combustible material (such as bricks) may be
placed on the fireplace floor to elevate the unit to the appropriate
location in the fireplace.
Fig. 23-1 Route gas supply
120VAC (15 AMP minimum) GFCI
GROUNDED 3-wire receptacle
GAS SUPPLY SETUP
A left-side install is shown here, as the unit's valve is located
on the left side. Your individual installation may vary. Observe
all local codes.
1. Route the gas supply into the left side of the fireplace.
2. It is recommended that a gas shut-off valve (not included)
be attached to the gas supply stub. Use a pipe compound
resistant to all gasses. See Fig 23-1.
Note: A 3/ 8" C.S.A. stainless steel flex connector (not
included) will be required. The flex will be connected
at a later time, when the insert is ready to be
installed.
Maintain clearance
for direct vent insert
Fig. 23-2 Install electrical (receptacle)
120VAC (15 AMP minimum) GFCI
GROUNDED 3-wire receptacle
ELECTRICAL SETUP
A 120VAC (15 AMP minimum) Ground Fault Circuit
Interrupter (GFCI) GROUNDED 3-wire receptacle (not
included) is required within the vicinity of the fireplace to provide
power to the unit. A left-side install is shown here, as the unit's
power supply cord is located on the left side. Your individual
installation may vary. Observe all local codes.
1. Wire the receptacle into the left side of the fireplace (see
Fig 23-2).
• Verify proper polarity of the receptacle.
• If an extension cord is used, ensure it is a 3-wire
GROUNDED cord. DO NOT use 2-prong adapters.
• DO NOT TAMPER WITH THE EXTENSION CORD OR
THE INSERT POWER-SUPPLY CORD.
3-wire GROUNDED
cord from unit
(reference only, DO NOT
connect cord at this time)
Fig. 23-3 Electrical setup detail
DO NOT SLIDE IN THE INSERT, OR CONNECT IT TO THE GAS AND ELECTRICAL AT THIS TIME.
23
INSTALLATION (cont.)
VENTING
Refer to the VENTING REQUIREMENTS section for
important information regarding the vent system and the
venting kit approved for installation with your unit. Observe
all codes.
1. Remove the fireplace damper (to allow for proper
clearance of the flexible vent pipes).
Be sure to:
A. Remove damper
B. Preset insert to
ensure fit
Then:
C. Measure
vent run
Measure
vent pipe
length
2. Preset the insert in the fireplace to ensure a proper fit.
3. Measure from the top of the chimney down to the
location that the top of the insert / vent adapter will
rest when installed (see Fig. 24-1).
4. Stretch the vent pipes to the measured length. Or, if
necessary, cut the pipes to the measured length using
snips or a hacksaw. See Fig. 24-2, D.
Note: Each 1 foot of pipe can be stretched to a length of
3 feet. It is highly recommended that you DO NOT
fully stretch the pipes, to allow for any adjustments
during installation and/or future maintenance.
5. Mark each end of one pipe. This is the exhaust. See
Fig. 24-2, E.
Note: If the pipe is marked w/ arrows (indicating air
flow direction): up arrow is exhaust, down arrow
is intake.
(unit shown in place for clarity)
Fig. 24-1 Prepare fireplace & measure pipe length
D. Stretch/cut
pipes to length
G
E. Mark ends of
exhaust pipe
F.
E
Route pipes
through chimney
D
G. Connect pipes
to termination
E
6. Carefully route the pipes through the chimney (see
Fig. 24-2,F.
F
Important: When routing pipes keep them as straight
as possible, ensure they pass through
damper area, and DO NOT crimp, rupture,
or collapse them.
Note: Rope and a weight may be temporarily attached
to the pipes to assist in routing them down the
chimney.
7. Connect the termination cap to the pipes as instructed
in the manufacturer instruction (see Fig. 24-2, G, and
Fig. 24-3.
Important: Ensure the marked / up arrow pipe is
connected to the exhaust port on the cap.
8. Pack tightly insulation (not included) around the pipes
inside the top of the chimney area (prevents moisture
and wind from entering chimney). See Fig. 24-4,H.
9. Place the termination cap assembly in position atop
the chimney. Permanently attach using sealant and
screws (as appropriate for setup). See Fig. 24 -4, I.
Important: A tight connection must be made between
the gas fireplace insert flue collar and the
fireplace chimney.
Fig. 24-2 Prepare, route, & connect pipes
RHP approved kit:
Simpson Dura Vent
#46DVA-CL33
G
Exhaust
(marked / up arrow)
Intake
Fig. 24-3 Termination cap install detail
I
Install cap
H
Pack tightly
insulation
(use sealant &
screws as need
to permanently
attach)
You are now done outside.
Fig. 24-4 Insulate chimney top & install cap
24
INSTALLATION (cont.)
10. Remove the vent adapter from the top of the insert.
Unfasten the two hex bolts using a 7/16" nut driver and
slide the adapter out (see Fig. 25-1, J). Retain the bolts
for future install.
J
Vent
adapter
Hex bolts
11. Remove any excess slack in the pipes. Then attach the
pipes to the vent adapter using only the four provided #10
x 3/4" screws, flat washers, and a Phillips screwdriver.
Further secure with the supplied pipe clamps. See
Fig. 25-2, K.
Important: Ensure the marked / up arrow pipe is
connected to the exhaust port on the insert.
The vent adapter is permanently marked,
see Fig. 25-2.
12. Pack tightly insulation (not included) in fireplace around
pipes at damper area (inside bottom of chimney), ash
trap, gas line access, holes, and any air openings, etc.
See Fig. 25-3, L.
Fig. 25-1 Remove vent adapter
EXHAUST
(marked /
up arrow)
Air Restrictor (if applicable)
INTAKE
The air restrictor must be installed into the insert if the
length of the vent run is 20' or more. This will ensure proper
air flow and optimal flame appearance, and prevent on/off
cycling of the burner system.
K
To install, insert the restrictor (flat side down) into the
exhaust opening found on the top of the insert as shown
in Fig. 25-4, M.
Fig. 25-2 Install vent adapter
Important: Ensure the air restrictor is fully pushed down
into the hole so that it will not interfere with
the later install of the vent adapter.
CAUTION: The exhaust opening is the left hole found
on the top of the insert.
L
Pack tightly
insulation
(as needed)
Fig. 25-3 Insulate chimney and fireplace
M
Exhaust
Air restrictor
Required for
installation
(exhaust side) if
length of vent run
is 20' or more
Fig. 25-4 Install air restrictor (if applicable)
25
INSTALLATION (cont.)
DIRECT VENT INSERT
1. Carefully slide the direct vent insert just inside of the
fireplace opening, still allowing for access to the interior
of the fireplace (see Fig. 26-1, A). Ensure the insert is
properly supported during this entire process.
A
2. MAKE SURE THE FIREPLACE GAS SUPPLY IS
TURNED OFF.
3. Connect a 3/8" C.S.A. stainless steel flex connector (not
included) to the gas valve on the left side of the insert.
Tighten securely. Then connect the open end of the flex
connector to the previously plumbed gas supply / shut-off
valve (see Fig. 26-2, B). Use a pipe compound resistant
to all gasses on all male connections except brass to
brass connections.
4. LEAK TEST: Turn on the fireplace gas supply, open
the shut-off valve, and test at all connections for leaks
using an appropriate soapy water solution. If bubbles
appear, a leak is present. Turn off the gas and tighten
at all connections. Repeat until no leaks are present. If
a leak persists, turn off the gas supply and contact the
local gas company or dealer. NEVER USE A FLAME
TO CHECK FOR LEAKS.
5. Connect the power supply cord coming from the left
side of the unit to the previously wired 120VAC (15 AMP
minimum) GFCI GROUNDED 3-wire receptacle (see
Fig. 26-2, C).
WARNING: Electrical Grounding Instructions - This
appliance is equipped with a three-prong
(grounding) plug for your protection against
shock hazard and should be plugged
directly into a properly grounded threeprong receptacle. Do not cut or remove the
grounding prong from this plug.
6. Slide the vent adapter into the top of the direct vent insert
as shown in Fig. 26-3, D. Simultaneously slide the direct
vent insert fully into the fireplace. The supplied wire hook
can be used to assist in pulling the vent adapter forward
into the insert. Fasten the vent adapter using the two hex
bolts and a 7/16" nut driver.
Fig. 26-1 Slightly slide in unit
Connect flex connector
B
C
Connect
power supply
Receptacle
MUST be:
120VAC (15 AMP
minimum) GFCI
GROUNDED 3-wire
Fig. 26-2 Make gas & electrical connections
Install
vent
adapter
while
sliding in
insert
D
D1-30
shown
Fig. 26-3 Fully slide-in unit / install vent adapter
Important: When sliding in the unit, ensure all plumbing/
wiring is routed along the rear and/or sides
of the unit, NEVER ABOVE OR BELOW.
7. The unit has four adjustable legs for leveling purposes.
Adjust each leg as needed to level the unit. Ensure each
leg rests on the fireplace floor. Use a Phillips screwdriver
to loosen a leg, move it to the required height, and then
re-tighten the screw. See Fig. 26-4, E.
8. The adjustable legs have 5/16" holes. The holes on the
two front legs (only) are for the purpose of fastening the
unit down in the fireplace. Using appropriate mounting
hardware for your fireplace construction, secure the two
front legs into the floor.
26
All 4 legs
MUST rest on
fireplace floor
Adjust legs
as needed
E
Fig. 26-4 Use adjustable legs to level (as needed)
INSTALLATION (cont.)
INSTALL BATTERIES
Ensure all control/remote system components are in the
OFF position prior to installing any batteries.
Remote transmitter:
The remote transmitter requires 3 AAA batteries (included)
to operate.
Remove lid
for battery
access
1. Locate the remote transmitter, remove the lid (found
on rear), and properly insert the batteries as marked.
Re-secure the lid. See Fig. 27-1.
Remote receiver:
Fig. 27-1 Install transmitter batteries
The remote receiver requires 4 AA batteries (included)
to operate. Turn off gas to the unit. Locate the receiver
on the control box, which is located on the left side of the
unit (see Fig. 27-2).
(Direct
vent
insert)
2. Slide the 3-position switch on the receiver to the ON
position, then remove the switch. Unfasten the plastic
plate using a Phillips screwdriver. See Fig. 27-3.
Remove the battery lid (push in tabs) and properly
insert the batteries as marked (see Fig. 27-4). Resecure the lid, the plate, and the switch.
ON
Remote
receiver
REMOTE
PRG
OFF
Fig. 27-2 Control box (left side of unit)
ON
Move to ON
position, then
remove
REMOTE
A
Unscrew,
then remove
plate
PRG
OFF
B
Fig. 27-3 Remove switch and plate
for battery access
Battery lid
Fig. 27-4 Install receiver batteries
27
INSTALLATION (cont.)
FIRST TIME PILOT/BURNER LIGHTING TEST
The insert comes with the glass panel pre-installed. Prior to
testing the pilot, the panel must be removed (wear gloves).
This is required to purge the gas line of air and to inspect the pilot
lighting spark. For removal reference the SERVICING & CLEANING,
GLASS PANEL REMOVAL section.
CAUTION: Begin with all control/remote system components
in the OFF position.
(Direct
vent
insert)
Standing
pilot toggle
switch
ON/OFF
switch
REMOTE
PRG
Fig. 28-1 Control box (left side of unit)
REMOTE
PRG
OFF
4. Re-install the glass panel per the INSTALLATION, GLASS
PANEL section.
ON
3. Allow adequate time for the air in the gas-line to purge. The
control system will stop sparking after 30 seconds if the pilot
does not light. After a 30 second delay the control system will
start sparking again for 30 seconds more. If the pilot does
not light after the third 30 second spark event, the system
will enter "Lock-Out" mode. To unlock from "Lock-Out" mode,
slide the receiver switch to OFF, wait 1 minute and slide
back to REMOTE. Repeat this sequence until the pilot flame
lights and the pilot is burning steadily. After you inspect the
spark and the pilot lights, turn OFF the standing pilot switch.
If the pilot fails to light after several attempts at the sequence
above, turn all control/remote system components to OFF and
refer to the TROUBLESHOOTING section for further details.
OFF
2. Locate the standing pilot toggle switch on the control box
(Fig. 28-1). Flip switch to the ON position (Fig. 28-3). You will
hear a series of clicks and after a few seconds, you will hear
sparking at the pilot spark electrode.
Remote
receiver
ON
1. The control box is on the left side of the unit. Locate the
remote receiver on the control box (see Fig. 28-1). Slide the
3-position switch on the receiver to the REMOTE position
(see Fig. 28-2).
Gas Valve
Fig. 28-2 Remote receiver detail
Standing pilot
toggle switch
ON
ON/OFF
switch
ON (I)
WARNING: DO NOT IGNITE MAIN BURNERS WITH GLASS
PANEL REMOVED.
5. Locate the ON/OFF switch that is currently coming out of the
control box (see Fig. 28-1). Switch it to the ON (I) position
(see Fig. 28-4).
6. Slide the receiver switch to the ON position. All burners
should ignite. At this time with burners on, perform the gas
pressure test as instructed in the following section.
Initial operation will produce an odor and some smoke due to
lubricants used in the manufacturing process. This is normal and
will cease after at least 30 minutes of operation. Keep the house
well ventilated during this process.
OFF
Fig. 28-3
Inlet
pressure
tap
OFF (O)
Fig. 28-4
Outlet
pressure
tap
GAS PRESSURE TEST
7. With burners on, check the gas pressure to ensure all
requirements are met. Reference Fig. 28-5 for pressure
tap locations, and the GAS PRESSURE REQUIREMENTS
section for details.
8. Turn all control/remote system components to OFF.
Fig. 28-5 Gas valve detail
28
INSTALLATION (cont.)
REFRACTORY PANELS
CAUTION: Prior to proceeding with panel installation,
the insert must be installed in the fireplace,
the venting system must be attached, the
electrical must be connected, the gas line
must be connected, and the initial burner
operation must be checked.
D1-30
shown
Unscrew
Important: Use care when handling and installing the
refractory panels to prevent damage to the
finish.
Fig. 29-1 Remove lintel
Prior to panel placement:
1. Remove the glass panel (wear gloves). For removal
reference the SERVICING & CLEANING, GLASS
PANEL REMOVAL section.
Remove
2. Remove the lintel found at the top front of the unit (to
allow for panel placement). Use a 5/16" nut driver to
remove the two hex screws found on each side of the
lintel. See Fig. 29-1.
3. Remove the grate. Use a Phillips screwdriver to remove
the two screws found on each side of the grate. Then
remove the front floor panel. See Fig. 29-2.
Fig. 29-2 Remove grate & front floor panel
4. Remove the ember screen. Remove the 2/4 hex screws
found on the ends of the burner(s) using a 5/16" nut
driver (see Fig. 29-3).
Note: D1-25 models will only have one burner, and will
not have an ember screen.
5. Remove the burner by sliding it to the right, so that
the venturi tube clears the orifice, then fully out (see
Fig. 29-4). Repeat for the second burner if applicable.
Fig. 29-3 Remove screen & hex scews
Panel placement:
6. Place the rear panel at the rear of the unit. It will rest
on the shelf found on the lower rear of the unit. See
Fig. 29-5, "A".
7. Place the left panel on the left side of the unit. Ensure
it completely rests inside of the front lip of the unit. See
Fig. 29-5, "B".
Fig. 29-4 Remove burner
A
B
Rest on shelf
Fig. 29-5 Place rear panel, left panel
29
INSTALLATION (cont.)
8. Place the top panel into the unit as shown in Fig. 30-1,
"C". It will be supported by the left panel.
9. Place the right panel on the right side of the unit.
Ensure it completely rests inside of the front lip of the
unit. See Fig. 30-2, "D".
10. Re-install the lintel at the top front of the unit. Use the
two existing hex screws and a 5/16" nut driver. See
Fig. 30-3, "E".
11. Re-install the burner(s) and ember screen (if applicable).
Use the existing hex screws and a 5/16" nut driver for
the burner. See Fig. 30-4, "F" and "G".
C
Insert left corner, then
raise panel into place
Fig. 30-1 Place top panel
12. Re-install the front floor panel at the front of the unit
floor. Ensure it completely rests inside of the front lip
of the unit. See Fig. 30-4, "H".
D
13. Re-install the grate in between the front burner and
front floor panel. Use the two existing screws and a
Phillips screwdriver. See Fig. 30-5, "I".
14. Install the left and right floor panels on each side of the
burner assembly. See Fig. 30-5, "J" and "K".
Fig. 30-2 Place right panel
E
Align
Screw
Fig. 30-3 Install lintel
F
G
H
Fig. 30-4 Install burner(s), screen, front floor panel
J
K
I
Fig. 30-5 Grate, left/right floor panel
30
INSTALLATION (cont.)
GLOWING EMBERS
Separate embers and
place as shown here
D1-25 Models:
1. Separate the glowing embers into small pieces and
evenly place them along the burner ports as shown
in Fig. 31-1.
2. Separate the bryte coals into small pieces and evenly
place them along the very front of the burner / glowing
embers as shown in Fig. 31-2.
CAUTION: The embers must be placed as shown. DO
NOT add any additional embers for this
installation. Any additional embers will cause
unsafe operation.
Fig. 31-1 D1-25: Place glowing embers
D1-30/36 Models:
Important: Prior to placing the glowing embers, ensure
the ember screen that rests in between the
front and rear burner is properly positioned.
See Fig. 31-3 for details.
1. Separate the glowing embers into small pieces and
evenly place them along the burner ports as shown
in Fig. 31-4.
Fig. 31-2 D1-25: Place bryte coals
For D1-30/36 models, the bryte coals are not placed
until after the logs are installed.
CAUTION: The embers must be placed as shown. DO
NOT add any additional embers for this
installation. Any additional embers will cause
unsafe operation.
Center screen
around 2 holes
Fig. 31-3 D1-30/36: Proper screen position
Separate embers and
place as shown here
Fig. 31-4 D1-30/36: Place glowing embers
31
INSTALLATION (cont.)
25" LOG SET
You must position and maintain the log layout as shown here to ensure proper operation of the direct
vent insert. Incorrect log installation could cause flame impingement and improper combustion, resulting
in soot and/or excessive by-products of combustion.
Note: Each log is numbered (on the log bottom) to aid in placement. Burnt American Oak log set shown here.
Important: HANDLE LOGS WITH CARE AT ALL TIMES.
1
2A
Place the rear log (log #1) as shown. The bottom
of the log has two holes that align with two pegs
found on the burner.
Place the right front log (log #2A) as shown. The
bottom of the log has two holes that align with
two pegs found on the burner.
3
2B
Place the left front log (log #2B) as shown. The
bottom of the log has two holes that align with
two pegs found on the burner.
Place the middle top log (log #3) as shown. The
rear log has a notch to aid in positioning the top log.
4
5
Place the right top log (log #4) as shown. The rear
log has a notch to aid in positioning the top log.
Place the left top log (log #5) as shown. The middle
top log has a notch to aid in positioning the left
top log.
Periodically check the positioning of the logs to ensure proper log placement.
32
INSTALLATION (cont.)
30" LOG SET
You must position and maintain the log layout as shown here to ensure proper operation of the direct
vent insert. Incorrect log installation could cause flame impingement and improper combustion, resulting
in soot and/or excessive by-products of combustion.
Note: Each log is numbered (on the log bottom) to aid in placement. Burnt American Oak log set shown here.
Important: HANDLE LOGS WITH CARE AT ALL TIMES.
1
2A
Place the rear log (log #1) as shown. The bottom
of the log has two holes that align with two pegs
found on the rear burner.
Place the right front log (log #2A) as shown. The
bottom of the log has two holes that align with
two pegs found on the front burner.
3
2B
Place the left front log (log #2B) as shown. The
bottom of the log has two holes that align with
two pegs found on the front burner.
Place the middle top log (log #3) as shown. The
rear log has a notch to aid in positioning the top log.
4
5
Place the right top log (log #4) as shown.
Place the left top log (log #5) as shown. The middle
top log has a notch to aid in positioning the left top log.
Separate the bryte coals into small pieces and
evenly place them in the area shown above.
Periodically check the positioning of the logs to ensure proper log placement.
33
INSTALLATION (cont.)
36" LOG SET
You must position and maintain the log layout as shown here to ensure proper operation of the direct
vent insert. Incorrect log installation could cause flame impingement and improper combustion, resulting
in soot and/or excessive by-products of combustion.
Note: Each log is numbered (on the log bottom) to aid in placement. Burnt American Oak log set shown here.
Important: HANDLE LOGS WITH CARE AT ALL TIMES.
1
2B
Place the rear log (log #1) as shown. The bottom
of the log has two holes that align with two pegs
found on the rear burner.
2A
Place the front right log (#2A) followed by the front
left log (#2B) as shown. The bottoms of each log
have two holes that align with two pegs found on
the front burner.
4
3
Place the middle log (log #3) as shown. The rear
log has a notch to aid in positioning the log.
Place the right top log (log #4) as shown.
5
6
Place the middle top log (log #5) as shown.
Place the left top log (log #6) as shown.
Separate the bryte coals into small pieces and
evenly place them in the area shown above.
Periodically check the positioning of the logs to ensure proper log placement.
34
INSTALLATION (cont.)
GLASS PANEL
When handling the glass panel, be sure to wear clean
non-marking gloves to ensure a clean finish and avoid any
fingerprints.
Important: When installing the glass panel, ensure that
no media, objects, or debris exist along the
bottom of the unit that may obstruct/damage
the glass panel. See Fig. 35-1.
1. The bottom of the glass panel has two tabs. Insert the
tabs into the two slots found on the bottom of the unit.
See Fig. 35-1, "A".
When inserting
ensure bottom area
is clear of any
media/objects/debris!
D1-30 shown
A
Fig. 35-1 Insert glass panel bottom
2. With the bottom of the panel in place, rotate the panel
upward until it closes. Then pull the spring latches (found
on the top of the unit) out and over the two tabs found on
the top of the panel. See Fig. 35-2, "B".
B
INITIAL AIR SHUTTER ADJUSTMENT
Each installation requires burner air shutter adjustment to
ensure optimal flame appearance. Refer to the SERVICING
AND CLEANING - AIR SHUTTER ADJUSTMENT section for
details.
Important: For D1-30 and D1-36 models, only the rear
burner requires adjustment.
Fig. 35-2 Secure glass panel
SURROUND AND BARRIER SCREEN
When handling the surround and barrier screen components,
be sure to wear clean non-marking gloves to ensure a clean
finish and avoid any fingerprints.
C
1. Slide the unit a few inches forward in the fireplace (to
assist in the surround installation).
2. The rear of the surround has 4 hooks. Insert the hooks
into the four slots found on the front of the unit. Ensure the
surround firmly rests down in place. See Fig. 35-3, "C".
Note: The ON/OFF switch on the unit must be installed
during the installation of the surround. Disconnect
the switch from its wires, route the wires through the
hole found on the left side-panel of the surround,
reconnect the wires, and snap the switch into place.
See Fig. 35-3, "D".
3-sided model
shown
D
(rear view)
Fig. 35-3 Install surround and switch
35
INSTALLATION (cont.)
3. Install the eyebrow as shown in Fig. 36-1, "E". The
eyebrow has 3 tabs that install into the 3 hems located
underneath the top side of the surround.
4. Similar to the surround, the fine mesh barrier screen
has side hooks. Carefully insert the hooks into the same
slots that the surround rests in. Ensure the screen firmly
rests down in place. See Fig. 36-2, "F".
E
5. Slide the unit back into the fireplace.
Prior to lighting and operating your unit, you
must read and understand the following sections:
Fig. 36-1 Install eyebrow
• LIGHTING INSTRUCTIONS
• REMOTE OPERATING INSTRUCTIONS
screen
(Surround
& eyebrow
removed for
clarity)
F
Fig. 36-2 Install fine mesh barrier screen
36
LIGHTING INSTRUCTIONS
FOR YOUR SAFETY READ BEFORE LIGHTING
WARNING: If you do not follow these
instructions exactly, a fire
or explosion may result
causing property damage,
personal injury or loss of life.
WARNING: The glass panel and other surfaces of this
appliance get extremely HOT and can cause
burns if touched. Carefully read, understand, and
follow the lighting and operation instructions,
and use caution at all times.
A. This appliance is equipped with an ignition device that automatically lights the pilot. DO NOT attempt to
light the pilot by hand.
B. BEFORE OPERATING, smell all around the appliance area for gas. Be sure to smell next to the floor
because some gas is heavier than air and will settle on the floor.
WHAT TO DO IF YOU SMELL GAS
• Do not light any appliance.
• Do not touch any electric switch; do not use any phone in your building.
• Immediately call your gas supplier from a neighbor's phone. Follow the gas supplier's instructions.
If you cannot reach your gas supplier, call the fire department.
C. Use only the supplied standing pilot toggle switch or the control/remote system components to light the
pilot. This valve will not operate if the pilot is not lit and stable.
D. Do not use this appliance if any part has been under water. Immediately call a qualified service technician
to inspect the appliance and to replace any part of the control system and any gas control which has been
under water. Attempted operation may result in fire or explosion resulting in property damage, personal
injury or loss of life.
Initial operation will produce an odor and some smoke due
to lubricants used in the manufacturing process. This is
normal and will cease after at least 30 minutes of operation.
Keep the house well ventilated during this process.
(Surround,
left panel)
INTERMITTENT PILOT MODE AND STANDING
PILOT MODE
Standing
pilot toggle
switch
PRG
OFF
Intermittent Pilot Mode: This default mode turns the pilot
light off when the appliance is not functioning and only lights
the pilot automatically when the main burners are turned on.
REMOTE
Note: Access to the standing pilot toggle switch requires
removal of the surround. The switch is located on
the control box. (The control box is on the left side
of the unit.)
ON
This appliance is equipped with an electronic ignition system
that first lights a pilot then uses the pilot to ignite the main
burners. By default, the pilot is in "Intermittent Pilot" mode,
and will only light and remain on while the main burners
are operating. The pilot can be set to the "Standing Pilot"
mode, allowing the pilot to remain on indefinitely.
(Direct
vent
insert)
Fig. 37-1 Control box (left side, behind surround)
Standing pilot
toggle switch
ON
Standing Pilot Mode: If the standing pilot switch is toggled
on, the pilot will ignite and remain on as long as the switch
is in the ON position.
Note: It is recommended that the "Standing Pilot" mode
be used during the winter months when external
temperatures fall below 50°F.
OFF
Fig. 37-2
37
INSTRUCTIONS D'ALLUMAGE
POUR VOTRE SÉCURITÉ LISEZ AVANT D'ALLUMER
AVERTISSEMENT: Si vous ne suivez pas ces instructions à la lettre, un incendie ou une explosion
entraînant des dommages matériels, des blessures ou des pertes de vie.
A. Cet appareil est équipé d'un dispositif d'allumage qui allume automatiquement la veilleuse. NE PAS essayer
d'allumer la veilleuse manuellement.
B. AVANT DE FAIRE FONCTIONNER, sentez autour de l'appareil pour le gaz. Assurez-vous de sentir près
du plancher, car certains gaz sont plus lourds que l'air et se déposent sur le sol.
QUE FAIRE SI UNE ODEUR DE GAZ
• Ne pas allumer l'appareil.
• Ne touchez à aucun interrupteur électrique; n'utilisez aucun téléphone dans votre bâtiment.
• Appelez immédiatement votre fournisseur de gaz à partir du téléphone d'un voisin. Suivez les instructions
du fournisseur de gaz. Si vous ne pouvez joindre votre fournisseur de gaz, appeler les pompiers.
C. Utilisez uniquement le commutateur à bascule fourni veilleuse permanente ou la commande / composants
du système à distance pour allumer la veilleuse. Cette vanne ne fonctionne pas si le pilote n'est pas allumé
et stable.
D. Ne pas utiliser cet appareil si une partie quelconque a été submergée. Appelez immédiatement un technicien
de service qualifié pour inspecter l'appareil et pour remplacer toute pièce du système de contrôle et toute
commande de gaz qui a été sous l'eau. Tentative d'opération peut entraîner un incendie ou une explosion
entraînant des dommages matériels, des blessures ou des pertes de vie.
Mise en service produira une odeur et de la fumée grâce aux lubrifiants utilisés dans le processus de
fabrication. Ceci est normal et cessera après au moins 30 minutes de fonctionnement. Garder la maison
bien aérée pendant ce processus.
MODE PILOTE ET MODE INTERMITTENT
VEILLEUSE PERMANENTE
Cet appareil est équipé d'un système d'allumage électronique
qui allume un premier pilote utilise ensuite le pilote pour
allumer les brûleurs principaux. Par défaut, le pilote est
en "veilleuse intermittente" mode, et ne s'allume et reste
allumé pendant que les brûleurs principaux fonctionnent.
Le pilote peut être réglé sur le "Pilot permanent" mode, ce
qui permet au pilote de rester indéfiniment.
PRG
Note: Il est recommandé que le "pilote permanent" mode
être utilisé pendant les mois d'hiver lorsque les
températures extérieures tombent en dessous de
50°F.
OFF
Permanent en mode pilote: Si l'interrupteur de veilleuse
permanente est basculé sur la veilleuse s'allume et reste
allumé tant que le commutateur est en position ON.
Interrupteur
à bascule
pilote
permanent
REMOTE
Mode de pilote intermittent: Ce mode par défaut devient
le pilote s'allume coupe lorsque l'appareil ne fonctionne pas
et ne s'allume que le pilote automatiquement lorsque les
brûleurs principaux sont allumés.
(Insert de
ventilation
directe)
ON
Note: L'accès à l'interrupteur à bascule veilleuse
permanente exige le retrait de la bordure.
L'interrupteur se trouve sur le boîtier de commande.
(Le boîtier de commande est sur le côté gauche
de l'appareil.)
(Surround,
panneau de
gauche)
Fig. 38-1 Boîtier de commande (côté gauche,
derrière surround)
Interrupteur à bascule
pilote permanent
ON
OFF
Fig. 38-2
38
LIGHTING INSTRUCTIONS (cont.)
REMOTE LIGHTING
CAUTION: DO NOT attempt to light the pilot by hand. DO
NOT operate this appliance without the glass
panel installed.
Note: If the remote does not function, and batteries with
an adequate power level are installed, refer to the
SYNCHRONIZE REMOTE SYSTEM section.
Note: Steps 1 and 2 may not be required if previously done
during an earlier lighting.
(Surround,
left panel)
(Direct
vent
insert)
ON/OFF switch
(installed on left
side of surround)
REMOTE
OFF
PRG
Note: Access to the receiver requires removal of the
surround.
Fig. 39-1 Control box (left side, behind surround)
ON
2. Locate the ON/OFF switch on the left side of the
surround (see Fig. 39-1). Switch it to the ON (I) position
(see Fig. 39-3).
PRG
If the pilot fails to light after several tries, turn all control/
remote system components to OFF and contact a qualified
professional service technician.
Fig. 39-2 Remote receiver detail
ON (I)
o
WARNING: If the pilot fails to light, the system will
"lockout." Press the ON/OFF button on
the remote transmitter to turn OFF the
system. Allow five (5) minutes for any gas
in the unit to dissipate, then repeat step
3 above. IF YOU SMELL GAS, SEE STEP
B AT THE BEGINNING OF THE LIGHTING
INSTRUCTIONS.
OFF
Note: The ignition sequence will take approximately 3-5
seconds.
REMOTE
3. Locate the remote transmitter and press the ON/OFF
button (see Fig. 39-4). The ignition sequence will begin.
The remote receiver will emit an audible "beep"; then
the igniter will begin to spark. After the pilot lights
and is established, the valve will automatically open
and the burner will light. The burner will initially light
to full flame. Adjust it to the desired setting with the
remote transmitter. See the REMOTE OPERATING
INSTRUCTIONS section for details.
Remote
receiver
ON
1. The control box is on the left side of the unit. Locate the
remote receiver on the control box (see Fig. 39-1). Slide
the 3-position switch on the receiver to the REMOTE
position (see Fig. 39-2).
OFF (O)
Fig. 39-3 ON/OFF switch detail
Blue LCD
display
Note: It is normal for condensation to form on the inside of
the glass panel during start-up. This condensation
will disappear within a few minutes.
75˚F
ON/OFF
key
Thermostat
selection key
UP/DOWN
selection key
Mode
selection key
Fig. 39-4 Remote transmitter detail
39
INSTRUCTIONS D'ALLUMAGE (continu)
DISTANCE DE L'ÉCLAIRAGE
ATTENTION: NE PAS essayer d'allumer la veilleuse
manuellement. NE PAS faire fonctionner cet
appareil sans le panneau de verre installé.
Note: Si la télécommande ne fonctionne pas, et des
batteries avec un niveau de puissance adéquate sont
installés, reportez-vous à la section SYNCHRONIZE
REMOTE SYSTEM.
Note: Les étapes 1 et 2 ne peuvent être tenus si elle a
déjà fait au cours d'un éclairage plus tôt.
(Insert à
ventilation
directe)
Interrupteur
ON/OFF
(installé sur le
côté gauche de la
bordure)
récepteur de la
télécommande
ON
REMOTE
PRG
OFF
1. Le boîtier de commande est sur le côté gauche de
l'appareil. Placez le récepteur de télécommande du
boîtier de commande (voir Fig. 40-1). Faites glisser le
commutateur à 3 positions sur le récepteur à la position
REMOTE (voir Fig. 40-2).
(Surround,
panneau de
gauche)
Fig. 40-1 Boîtier de commande (côté
gauche, derrière surround)
Note: L'accès au récepteur exige le retrait de la bordure.
ON
2. Localisez le commutateur ON / OFF sur le côté gauche
du cadre (voir Fig. 40-1). Le mettre en position ON (I)
(voir Fig. 40-3).
REMOTE
PRG
Le récepteur de la télécommande émettra un
«bip» sonore, puis l'allumeur commence à susciter.
Après les veilleuses et est établie, la vanne s'ouvre
automatiquement et le brûleur s'allume. Le brûleur
s'allume initialement à pleine flamme. Réglez-le à
la position désirée avec la télécommande. Voir la
section INSTRUCTIONS DE FONCTIONNEMENT A
DISTANCE pour plus de détails.
Fig. 40-2 Détail récepteur à distance
ON (I)
Si le pilote ne s'allume pas après plusieurs essais, tournez
tout contrôle / composants du système à distance sur OFF
et contactez un technicien qualifié.
Note: Il est normal que la formation de condensation sur
la face intérieure de la vitre lors du démarrage. Cette
condensation dissapear en quelques minutes.
o
Note: La séquence d'allumage prendra environ 3-5
secondes.
WARNING: Si le pilote ne s'allume pas, le système
"lock-out." Appuyez sur le bouton ON/
OFF sur la télécommande pour éteindre
le système. Attendez cinq (5) minutes
pour n'importe quel gaz dans l'unité
à se dissiper, puis répéter l'étape 3 cidessus. S'IL YA UNE ODEUR DE GAZ, voir
étape b AU DÉBUT DES INSTRUCTIONS
D'ALLUMAGE.
OFF
3. Localisez la télécommande et appuyez sur le bouton
ON/OFF (voir Fig. 40-4). La séquence d'allumage
commencera.
OFF (O)
Fig. 40-3 ON/OFF commutateur de détail
Écran LCD
bleu
Touche de
sélection
thermostat
Touche de
sélection de
mode
75˚F
Touche
ON/OFF
HAUT/BAS
touche de
sélection
Fig. 40-4 Détail télécommande
40
LIGHTING INSTRUCTIONS (cont.)
MANUAL LIGHTING
If the remote transmitter is misplaced or lost, the appliance
can be turned on manually as instructed below. Please
note that the fan and accent light will not be accessible in
manual mode. (Refer to remote lighting for full functionality.)
CAUTION: DO NOT attempt to light the pilot by hand. DO
NOT operate this appliance without the glass
panel installed.
Note: Step 1 may not be required if previously done during
an earlier lighting.
(Surround,
left panel)
(Direct
vent
insert)
ON/OFF switch
(installed on left
side of surround)
REMOTE
OFF
PRG
Note: Access to the receiver requires removal of the
surround.
Receiver
ON
1. The control box is on the left side of the unit. Locate
the receiver on the control box (see Fig. 41-1). Slide
the 3-position switch on the receiver to the ON position
(see Fig. 41-2).
Fig. 41-1 Control box (left side, behind surround)
ON
2. Locate the ON/OFF switch on the left side of the
surround (see Fig. 41-1). Switch it to the ON (I) position
(see Fig. 41-3). The ignition sequence will begin.
REMOTE
The receiver will emit an audible "beep"; then the
igniter will begin to spark. After the pilot lights and is
established, the valve will automatically open and the
burner will light. The burner will initially light to full flame.
PRG
OFF
Note: The ignition sequence will take approximately 3-5
seconds.
If the pilot fails to light after several tries, turn all control/
remote system components to OFF and contact a qualified
professional service technician.
Note: It is normal for condensation to form on the inside of
the glass panel during start-up. This condensation
will disappear within a few minutes.
SHUTTING DOWN
• For a remote shut down, press the ON/OFF button
on the remote transmitter.
• For a manual shutdown (or if your remote is lost),
switch the ON/OFF switch on the left side of the
surround to the OFF (O) position.
• For a complete shutdown, turn off the remote
transmitter (if applicable), turn off the ON/OFF switch,
and turn off the receiver.
41
Fig. 41-2 Receiver detail
ON (I)
o
WARNING: If the pilot fails to light, the system will
"lockout." Press the ON/OFF switch to
OFF (O) to turn OFF the system. Allow
five (5) minutes for any gas in the unit
to dissipate, then repeat step 3 above.
IF YOU SMELL GAS, SEE STEP B AT
THE BEGINNING OF THE LIGHTING
INSTRUCTIONS.
OFF (O)
Fig. 41-3 ON/OFF switch detail
INSTRUCTIONS D'ALLUMAGE (continu)
MANUEL ÉCLAIRAGE
Si la télécommande est égarée ou perdue, l'appareil peut être
activé manuellement en suivant les instructions ci-dessous.
S'il vous plaît noter que le ventilateur et la lumière d'accent
ne sera pas accessible en mode manuel. (Reportez-vous à
distance de l'éclairage pour une fonctionnalité complète.)
ATTENTION: NE PAS essayer d'allumer la veilleuse
manuellement. NE PAS faire fonctionner cet
appareil sans le panneau de verre installé.
Interrupteur
ON / OFF
(installé sur le
côté gauche de
surround)
récepteur
REMOTE
OFF
PRG
1. Le boîtier de commande est sur le côté gauche
de l'appareil. Placez le récepteur sur le boîtier de
commande (voir Fig. 42-1). Faites glisser le commutateur
à 3 positions sur le récepteur à la position ON (voir
Fig. 42-2).
(Insert à
ventilation
directe)
ON
Note: Étape 1 ne peut être exigé s'il a déjà été fait au
cours d'un éclairage plus tôt.
(Surround,
panneau de
gauche)
Fig. 42-1 Boîtier de commande (côté
gauche, derrière surround)
Note: L'accès au récepteur exige le retrait de la bordure.
ON
2. Localisez le commutateur ON/OFF sur le côté gauche
du cadre (voir Fig. 42-1). Le mettre en position ON (I)
(voir Fig. 42-3). La séquence d'allumage commencera.
REMOTE
PRG
OFF
Le récepteur émettra un "bip" sonore, puis l'allumeur
commence à susciter. Après les veilleuses et est établie,
la vanne s'ouvre automatiquement et le brûleur s'allume.
Le brûleur s'allume initialement à pleine flamme.
Note: La séquence d'allumage prendra environ 3-5
secondes.
Si le pilote ne s'allume pas après plusieurs essais, tournez
tout contrôle / composants du système à distance sur OFF
et contactez un technicien qualifié.
Note: Il est normal que la formation de condensation sur
la face intérieure de la vitre lors du démarrage. Cette
condensation disparaît en quelques minutes.
ARRÊTER
• Pour un arrêt à distance, appuyez sur le bouton ON/
OFF sur la télécommande.
• Pour un arrêt manuel (ou si votre télécommande
est perdue), mettez l'interrupteur ON/OFF sur le côté
gauche de la bordure à la position OFF (O).
• Pour un arrêt complet, éteignez l'émetteur à distance
(le cas échéant), éteindre l'interrupteur ON/OFF et
éteignez le récepteur.
42
Fig. 42-2 récepteur détail
ON (I)
o
AVERTISSEMENT: Si le pilote ne s'allume pas, le système
"lock-out." Appuyez sur le bouton
ON/OFF sur OFF (O) pour désactiver
le système. Attendez cinq (5) minutes
pour n'importe quel gaz dans l'unité
à se dissiper, puis répéter l'étape 3
ci-dessus. S'IL YA UNE ODEUR DE
GAZ, voir étape b AU DÉBUT DES
INSTRUCTIONS D'ALLUMAGE.
OFF (O)
Fig. 42-3 ON/OFF commutateur de détail
REMOTE OPERATING INSTRUCTIONS
ORIENTATION
Prior to remote transmitter use, light the appliance per the REMOTE
LIGHTING section. Familiarize yourself with the transmitter keys
and LCD display, as illustrated in Fig. 43-1 and Fig. 43-2.
Blue LCD
display
75˚F
ON/OFF
key
Thermostat
selection key
Identify the four transmitter keys:
• ON/OFF KEY: This key turns the system ON or OFF. When
this key is pressed to turn the system OFF, the pilot light
will stay ON if the standing pilot toggle switch is in the ON
position.
• THERMOSTAT KEY: This key, when the system is on,
will allow the selection of three modes: Manual Operation,
Normal Thermostat and Smart Thermostat.
• UP/DOWN KEY: This key, when the system is on, is used
to increase/decrease the Set Point Temperatures, Flame
Height, and Fan Speed. It also will toggle the Accent Light
and Secondary Burner (if applicable) ON/OFF.
• MODE SELECTION KEY: This key, when the system is on, is
used to toggle between the various icons on the LCD display
(that represent the remote functions): Set Temperature,
Flame Height, Fan, Accent Light, and Secondary Burner.
UP/DOWN
selection key
Mode
selection key
Fig. 43-1 Remote transmitter detail
Child safety lock-out
Low battery alarm
Transmission
Thermostat
OFF/ON/SMART
Room
Temperature
Set Point
Temperature/Level/State
Only functional for
D1-30/36 models
Main Burner
Secondary
Burner
Fan
Aux (Accent Light)
Fig. 43-2 LCD display detail
The display will show all active icons on the screen. The remote
receiver (in the control box) will "beep" once every time a transmitter
key is pressed, signaling that the command has been received.
THERMOSTAT
Note: Locating the remote transmitter too close or too far from
the unit will affect thermostat operation.
OFF
When the system is on, pressing the Thermostat key will switch
between three modes:
• Manual Mode (Fig. 43-3): In this mode, the room temperature
is ignored and the fireplace can be turned on indefinitely. The
room temperature rise has no effect on this mode. All other
functions (fan speed, flame height, secondary burner ON/
OFF, and accent light ON/OFF controls) will be manually
controllable.
• Normal Thermostat (Fig. 43-4): In this mode, the fireplace
will remain functioning until the room temperature increases
1°F above the Set Point Temperature. Refer to the following
SET TEMPERATURE section for details on adjusting the set
point temperature. The flame height can be adjusted while
the fireplace is functioning. The secondary burner and accent
light can be turned ON/OFF at any time after startup.
• Smart Thermostat (Fig. 43-5): In this mode, all other
functions except the flame height adjustment are allowed.
Manual flame height adjustment is not allowed in this mode.
The smart thermostat function adjusts the flame height
in accordance to the difference between the set point
temperature and the actual room temperature. As the room
temperature gets closer to the set point temperature, the
smart function automatically modulates the flame down.
Fig. 43-3 Manual mode
ON
Fig. 43-4 Normal thermostat
SMART
Fig. 43-5 Smart thermostat
43
MODE D'EMPLOI À DISTANCE
ORIENTATION
Avant la première utilisation télécommande, allumez l'appareil pour la
section d'éclairage à distance. Familiarisez-vous avec les touches de
l'émetteur et l'écran LCD, comme illustré dans la Fig. 44-1 Et Fig. 44-2.
Identifier les touches de l'émetteur quatre:
•
•
ON/OFF: Cette touche allume le système ou OFF. Lorsque cette
touche est enfoncée pour mettre le système hors tension, le voyant
reste allumé lorsque le commutateur à bascule veilleuse est en
position ON.
KEY THERMOSTAT: Cette touche, lorsque le système est sous
tension, permettra à la sélection de trois modes: mode manuel,
thermostat normal et thermostat intelligent.
• HAUT/BAS: Cette touche, lorsque le système est activé, est utilisé
pour augmenter/diminuer les températures de consigne Point,
hauteur des flammes, et la vitesse du ventilateur. Il sera également
basculer l'éclairage d'accentuation et brûleur secondaire (le cas
échéant) ON/OFF.
•
TOUCHE DE SÉLECTION MODE: Cette touche, lorsque le
système est activé, est utilisé pour basculer entre les différentes
icônes sur l'écran LCD (qui représentent les fonctions à distance):
réglage de température, la hauteur des flammes, ventilateur,
lumière d'accent, et le brûleur secondaire.
Écran LCD
bleu
75˚F
Touche
ON/OFF
Touche de
sélection
thermostat
HAUT/BAS
touche de
sélection
Touche de
sélection de
mode
Fig. 44-1 Détail télécommande
Sécurité des enfants lock-out
Alarme de batterie faible
Transmission
Thermostat
OFF/ON/SMART
Température
ambiante
Régler la température
de point / niveau / état
Seulement fonctionnelle
pour D1-30/36 modèles
Brûleur principal
Secondaire
brûleur
Fan
Aux (Lampe d'appoint)
Fig. 44-2 Écran LCD détail
L'écran affichera toutes les icônes actives sur l'écran. Le récepteur à
distance (dans le boîtier de commande) émet un "bip" une fois à chaque
fois une touche de l'émetteur, indiquant que la commande a été reçue.
THERMOSTAT
Note:
Localisation de la télécommande trop près ou trop loin de l'unité
aura une incidence sur le fonctionnement du thermostat.
OFF
Lorsque le système est allumé, appuyer sur la touche thermostat
basculer entre trois modes:
•
•
•
Mode manuel (Fig. 44-3): Dans ce mode, la température ambiante
est ignorée et la cheminée peut être activé indéfiniment. L'élévation
de la température ambiante n'a aucun effet sur ce mode. Toutes
les autres fonctions (vitesse du ventilateur, hauteur de la flamme,
le brûleur secondaire ON/OFF, et la lumière d'accent sur les
contrôles/OFF) sera contrôlable manuellement.
Thermostat normale (fig. 44-4): Dans ce mode, le foyer restera
fonctionnement jusqu'à la température ambiante augmente de 1°
C au dessus de la température de consigne. Reportez-vous à la
section suivante SET TEMPERATURE pour plus de détails sur le
réglage de la température de consigne. La hauteur des flammes
peut être réglée lorsque le foyer fonctionne. Le brûleur secondaire
et un éclairage d'accentuation peut être activée/désactivée à tout
moment après le démarrage.
Thermostat intelligent (Fig. 44-5): Dans ce mode, toutes les
autres fonctions à l'exception du réglage de la hauteur de flamme
sont autorisés. Réglage manuel de la hauteur de la flamme n'est
pas autorisé dans ce mode. La fonction thermostat intelligent
ajuste la hauteur de la flamme conformément à la différence entre
la température de consigne et la température réelle de la pièce.
Que la température ambiante se rapproche de la température
de consigne, la fonction intelligente module automatiquement la
flamme.
Fig. 44-3 Le mode manuel
ON
Fig. 44-4 thermostat normal
SMART
Fig. 44-5 thermostat intelligent
44
REMOTE OPERATING INSTRUCTIONS (cont.)
SET TEMPERATURE (Thermostat Modes Only)
Room
Temp.
Press the Mode key until the large Set Temperature is displayed
(center of screen). See Fig. 45-1. Pressing the Up/Down key once
in this mode will increase/decrease the set temperature. Note that
the smaller temperature display in the top right corner is the room
temperature according to the remote transmitter.
Set
Temp.
FLAME HEIGHT
Six flame height levels are available. Press the Mode key to index
to the Flame Height icon. See Fig. 45-2. Pressing the Up/Down key
once will increase/decrease the flame height by 1 of 6 increments.
In Manual Mode, if the flame height is at Level 1 and the Down
button is pressed, all burners will turn off. In "Intermittent Pilot"
mode, the pilot light will also extinguish. In Standing Pilot Mode,
the pilot light will remain ON.
Note: In Thermostat mode, you will be able to reduce the
flame height down to the Level 1 setting but you will
not be able to turn the burner off. In Smart Thermostat
mode, the flame height function is not available for
manual adjustment, as the flame height is regulated
automatically.
Fig. 45-1 Set temperature detail
Flame off
Flame level 1
Flame level 5
Flame level Maximum
FAN
The fan speed can be adjusted through six speeds and off. Press
the Mode key to index to the Fan icon. See Fig. 45-3. Use the UP/
Down key to turn on, off or adjust the fan speed.
Fig. 45-2 Flame Height detail
ACCENT LIGHT (AUX)
The accent light can be turned on or off. Press the Mode key to
index to the Aux icon. See Fig. 45-4. Pressing the Up/Down key
will turn the accent light on/off.
ACCENT LIGHT ONLY (NO FLAME)
The accent light can be used independently (with the burners off).
Turn on the light as instructed above. In Manual Mode, press the
Mode key to index to the Flame Height icon. Press the Down key
until the burners turn off. (When the flame height is at Level 1 and
the Down button is pressed, all burners will turn off).
Fan off
Fan level 1
Fan level 5
Fan level Maximum
Note: This option is only available in Manual Mode and will not
be available in the Thermostat Modes.
Fig. 45-3 Fan detail
Light OFF
Light ON
Fig. 45-4 Accent light detail
45
MODE D'EMPLOI À DISTANCE (continu)
TEMPÉRATURE (modes du thermostat uniquement)
Température
ambiante
Appuyez sur la touche Mode jusqu'à ce que la température
réglée est affichée grande (au centre de l'écran). Voir Fig. 46-1.
En appuyant sur la touche Haut / Bas fois dans ce mode pour
augmenter / diminuer la température de consigne. Notez que
l'affichage de température plus faible dans le coin en haut à droite
est la température ambiante en fonction de la télécommande.
HAUTEUR DE LA FLAMME
Réglage
de la
température
Fig. 46-1 Réglez la température de détails
Six niveaux de hauteur de flamme sont disponibles. Appuyez
sur la touche Mode pour l'indice de l'icône de la hauteur des
flammes. Voir Fig. 46-2. En appuyant sur la touche Haut/Bas
fois pour augmenter/diminuer la hauteur de la flamme par 1
de 6 incréments. En mode manuel, si la hauteur de la flamme
est au niveau 1 et la touche Bas est pressée, tous les brûleurs
s'éteignent. Dans "Pilot intermittent", le voyant lumineux s'éteint
également. En mode pilote permanent, le voyant restera allumé.
Note: En mode thermostat, vous serez en mesure de réduire
la hauteur de la flamme vers le niveau 1 paramètre,
mais vous ne serez pas en mesure d'éteindre le
brûleur. En mode thermostat intelligent, la fonction de la
hauteur de flamme n'est pas disponible pour le réglage
manuel, comme la hauteur de la flamme est réglée
automatiquement.
VENTILATEUR
La vitesse du ventilateur peut être réglé au moyen de six vitesses
et en dehors. Appuyez sur la touche Mode pour l'indice de l'icône
du ventilateur. Voir Fig. 46-3. Utilisez la touche Haut/Bas pour
allumer, éteindre ou régler la vitesse du ventilateur.
Flamme arrêt
1 niveau de la flamme
Niveau 5 de la flamme
Niveau maximal
de la flamme
Fig. 46-2 Hauteur de la flamme détail
ÉCLAIRAGE D'ACCENTUATION (AUX)
L'éclairage d'accentuation peut être activée ou désactivée.
Appuyez sur la touche Mode pour l'indice de l'icône Aux. Voir
Fig. 46-4. En appuyant sur la touche Haut/Bas vont allumer la
lumière accent marche/arrêt.
ventilateur à l'arrêt
Niveau de ventilation 1
Niveau 5 Fan
Niveau maximum du
ventilateur
ÉCLAIRAGE D'ACCENTUATION UNIQUEMENT (pas de
flamme)
L'éclairage d'accentuation peut être utilisé indépendamment (avec
l'arrêt des brûleurs). Allumez la lumière, comme indiqué ci-dessus.
En mode manuel, appuyez sur la touche Mode pour l'indice de
l'icône de la hauteur des flammes. Appuyez sur la touche Bas
jusqu'à ce que les brûleurs s'éteignent. (Lorsque la hauteur de
la flamme est au niveau 1 et la touche Bas est pressée, tous les
brûleurs s'éteignent).
Fig. 46-3 Fan détail
Note: Cette option est disponible uniquement en mode manuel
et ne sera pas disponible dans les modes du thermostat.
Lumière éteinte
Lumière sur
Fig. 46-4 Détail un éclairage d'accentuation
46
REMOTE OPERATING INSTRUCTIONS (cont.)
SECONDARY (REAR) BURNER
The secondary (rear) burner can be turned on or off. Press the
Mode key to index to the Secondary Burner icon. See Fig. 47-1.
Pressing the Up/Down key will turn the secondary burner on/off.
The flame level will not change when you turn the secondary
burner on or off. (The flame level can only be changed in the
Flame Height mode.)
Note: This function is not applicable for D1-25 models as they
only have one burner. Although the remote will still display
the function, it will have no effect on D1-25 operation.
Burner OFF
Burner ON
Fig. 47-1 Secondary burner detail
TEMPERATURE INDICATOR (˚F or ˚C)
The temperature can be displayed in ˚F or ˚C. With the appliance
and remote transmitter off, simultaneously press the Mode key
and Thermostat key. The LCD display will alternate between °F
and °C. See Fig. 47-2.
KEY LOCK
Fahrenheit
To prevent unsafe operation of the appliance, a Key Lock function
is provided with this remote control system. To activate the key
lock function, first press (and hold) the Up key, then (while still
holding) press the Mode key. A lock icon will appear on the screen
(see Fig. 47-3). To deactivate, repeat this process.
Celsius
Fig. 47-2 Temperature indicator detail
During key lock mode, none of the keys will function. You must
deactivate the system before you can use the remote transmitter.
OPERATING DURING A POWER OUTAGE
If the AC power is interrupted during a power outage, this system
utilizes the batteries (installed in the remote receiver) as back-up
batteries. During the power outage the appliance will function,
with the exception of the Fan and Accent Light features (which
are dependent on 110VAC power).
47
Fig. 47-3 Key lock mode
MODE D'EMPLOI À DISTANCE (continu)
SECONDAIRE (REAR) BRÛLEUR
Le secondaire (arrière) du brûleur peut être allumé ou éteint.
Appuyez sur la touche Mode pour l'indice de l'icône du brûleur
secondaire. Voir Fig. 48-1. En appuyant sur la touche Haut/Bas
vont allumer le brûleur secondaire on / off. La hauteur des flammes
ne changera pas lorsque vous allumez le brûleur secondaire ou
désactiver. (La hauteur des flammes ne peuvent être modifiés
dans le mode de la hauteur des flammes.)
Note: Cette fonction n'est pas applicable pour D1-25 modèles
car ils ont un seul brûleur. Bien que la télécommande ne
fait toujours afficher la fonction , il n'aura aucun effet
sur la D1-25 fonctionnement.
Brûleur OFF
Brûleur allumé
Fig. 48-1 Détail brûleur secondaire
INDICATEUR DE TEMPÉRATURE (˚F or ˚C)
La température peut être affichée en ˚F ou ˚C. Avec l'appareil et
l'émetteur hors tension à distance, appuyez simultanément sur la
touche Mode et la clé du thermostat. L'écran LCD alterne entre
°F et °C. Voir Fig. 48-2.
KEY LOCK
Fahrenheit
Celsius
Fig. 48-2 Détail indicateur de température
Pour éviter un fonctionnement dangereux de l'appareil, une
fonction de verrouillage des touches est fourni avec ce système
de contrôle à distance. Pour activer la fonction de verrouillage des
touches, appuyez d'abord sur (et maintenez) le bouton Monter,
puis (tout en tenant toujours) appuyer sur la touche Mode. Une
icône de verrouillage apparaît sur l'écran (voir Fig. 48-3). Pour le
désactiver, répétez ce processus.
En mode de verrouillage des touches, aucune des touches
fonctionnent. Vous devez désactiver le système avant de pouvoir
utiliser la télécommande.
FONCTIONNEMENT PENDANT UNE PANNE DE
COURANT
Si l'alimentation est interrompue pendant une panne de courant, ce
système utilise des piles (installées dans le récepteur distant) backup batteries. Lors de la panne de courant l'appareil fonctionnera,
à l'exception du ventilateur et des caractéristiques de lumière
d'appoint (qui dépendent de la puissance 110VAC).
48
Fig. 48-3 Mode de verrouillage des touches
SERVICING AND CLEANING
The appliance, the fireplace, and the installation must be inspected annually. The appliance requires annual
maintenance by a qualified professional service technician. Refer to these instructions for details. Performing these
procedures will ensure proper operation, appearance, and safety.
WARNING: Turn off the gas and electrical power (when instructed) to the fireplace and allow it to completely cool prior
to servicing or cleaning of the appliance.
CAUTION: Label all wires prior to disconnection when servicing controls. Wiring errors can cause improper and dangerous
operation.
Au moment de l’entretien des commandes, étiquetez tous les fils avant de les débrancher. Des erreurs de
câblage peuvent entraîner un fonctionnement inadéquat et dangereux.
• Wear appropriate gloves and safety glasses during any servicing or cleaning. When handling the surround and
screen components, and glass panel, be sure to wear clean non-marking gloves to ensure a clean finish and avoid
any fingerprints.
• DO NOT use substitute materials when replacing any components of the appliance.
• Verify proper operation after servicing.
S’assurer que l’appareil fonctionne adéquatement une fois l’entretien terminé.
• DO NOT clean when hot.
ANNUAL CLEAN / INSPECTION
The following should only be performed annually by a qualified professional service technician:
1. When the unit is cool, remove the screen and surround/eyebrow pieces from the appliance (wear gloves). Be sure
to first disconnect the ON/OFF switch located on the left side-panel of the surround.
2. Remove the glass panel (wear gloves). Inspect it thoroughly for any damage to the glass, gasket, or overall assembly.
Replace if necessary. Clean the glass to remove any build-up (which is a by-product of combustion). Reference the
GLASS PANEL REMOVAL AND MAINTENANCE section for details.
3. Carefully remove the logs and glowing embers. Use latex gloves and handle with care! Inspect the logs. Chalking
on the logs is normal. If excessive soot is present, reference the AIR SHUTTER ADJUSTMENT section, and ensure
proper log placement when replacing. Do Not attempt to brush or vacuum the logs.
Store on a soft surface and in a safe location for future reinstallation.
4. Inspect the burner and pilot assembly for any debris/blockages. Vacuum the firebox floor of the appliance, then use
a compressed air duster (commonly available at a office supply store) to blow through all of the burner ports and the
pilot assembly area.
5. Remove the insert from the fireplace and remove the rear panel (fan assembly attached). Vacuum the fan assembly.
See the FAN ASSEMBLY CLEANING section for details. Re-install fan assembly and insert.
6. Check that the control box (left side of unit) and all appliance openings are clean and clear of any debris/blockages.
The flow of combustion and ventilation air must not be obstructed.
7. Inspect the condition of any wiring for melting or damage. Refer to the wiring diagram in the SPECIFICATIONS AND
DIMENSIONS section of this manual for overall orientation.
8. Check that the area around the appliance is kept clear and free from combustible materials, gasoline, and other
flammable vapors and liquids.
9. Examine the entire vent system and termination for signs of blockage, obstruction, or dislocation of vent components.
Reference the INSTALLATION section for re-installation details if required.
10. Carefully replace the logs, embers, glass panel, screen, and surround/eyebrow pieces as instructed in the INSTALLATION
section of this manual.
Remove screen and surround/eyebrow pieces
Remove glass panel
Inspect and clean
Remove embers and logs
Inspect logs for excessive soot
Inspect burner and pilot area
Vacuum firebox floor
Blow out ports with compressed air duster
Remove
rear panel &
vacuum fan
assembly
Inspect controls, openings,
wiring, and vent system
Fig. 49-1 Annual clean / inspection firebox overview
49
D1-30
shown
SERVICING AND CLEANING (cont.)
GLASS PANEL REMOVAL AND MAINTENANCE
A
WARNING: DO NOT operate the appliance with the glass panel
removed, cracked or broken. Replacement of the
glass panel must be done by a qualified professional
service technician.
Ne pas utiliser l’appareil si le panneau frontal en verre
n’est pas en place, est craqué ou brisé. Confiez le
remplacement du panneau à un technicien agréé.
• When handling the glass panel, be sure to wear clean
non-marking gloves to ensure a clean finish and avoid any
fingerprints.
• The glass panel of this appliance must only be replaced as a
complete assembly provided by the manufacturer. DO NOT
replace the glass separately.
B
D1-30
shown
C
• DO NOT abuse the glass panel by striking it or slamming it
shut. Handle with extreme care!
Fig. 50-1 Remove glass panel to clean
• DO NOT use abrasive cleaners on the glass.
• DO NOT touch the glass panel when HOT!
To remove the glass panel:
Flame sensor
Pull the spring latches (found on the top of the unit) outward and
up over the two tabs found on the top of the panel. Then slowly
rotate the panel downward and out of the tabs found on the bottom
of the unit. See Fig. 50-1, "A-C".
To replace the glass panel, reference the INSTALLATION, GLASS
PANEL section. When inserting ensure that no media, objects, or
debris exist along the bottom of the unit!
To clean the glass panel:
Clean the glass periodically to remove any build-ups caused by
lint, dust, and/or combustion. It is recommended that the glass be
cleaned 2-3 times during each heating season, depending on use
and environment conditions.
Fig. 50-2 Proper pilot flame appearance
Clean using a non-abrasive glass cleaner and a clean lint-free cloth.
Contact your local dealer if a glass panel replacement is required.
PILOT BURNER CHECK/ADJUSTMENT
The following should only be performed annually by a qualified
professional service technician. Service requires the gas and
electrical power to be on. Reference the ANNUAL CLEAN/
INSPECTION section for details on accessing the pilot.
Check the pilot system for proper flame size and appearance (see
Fig. 50-2). The pilot adjustment screw is located on the center of
the gas valve (see Fig. 50-3). Using a small flat head screwdriver,
adjust the pilot screw to properly size the flames. Turning the screw
clockwise will lower the flames, and turning it counterclockwise
will raise them. Be careful not to back the screw out of its threads.
The 3 flames should be of large and equal size. The center flame
should directly hit, fully engulf, and pass the flame sensor.
Test at all connections for leaks using an appropriate soapy water
solution. Be sure to properly re-install all appliance components.
50
Pilot
adjustment
screw
Fig. 50-3 Pilot screw on valve location
SERVICING AND CLEANING (cont.)
AIR SHUTTER ADJUSTMENT
The following should only be performed, if required, by a qualified
professional service technician. Service requires the gas and
electrical power to be on.
The air shutters regulate the amount of primary air the burners
receive, which affects flame appearance. The air shutters are
preset at the factory based upon the gas the appliance is designed
to burn. However, certain conditions may require air shutter field
adjustment for proper combustion and flame presentation.
Air Shutter Factory Settings
D1-25: Burner
D1-30: Front burner
D1-30: Rear burner
D1-36: Front burner
D1-36: Rear burner
Nat.
1/4"
open
PULL to open
Adjustment
handle
PUSH to close
L.P.
9/16"
open
Fig. 51-1 Air shutter adjustment handle
Fully open Fully open
1/8"
open
5/16"
open
Fully open Fully open
1/4"
open
1/2"
open
The appliance should burn for approximately 15 minutes.
By this time, the flames should be blue at the base and a
combination of blue/yellow at the body and tips. Adjust the air
shutter as needed.
CAUTION: Excessive sooting will occur when the air shutter(s)
are closed too much. Lifting of the flame from the
burner will occur when the air shutter(s) are open
too much. Adjust accordingly.
Fig. 51-2 Proper flame appearance
Air Shutter Adjustment Handle
D1-25 burners, and D1-30/36 rear burners are equipped with a
wire handle to easily adjust the air shutter.
The air shutter adjustment handle is located at the bottom front
of the unit. To gain access, remove the fine mesh barrier screen.
If a 4 piece surround is installed, it must be removed.
Note: 3 piece surrounds do not require removal.
1. Ignite the burner.
2. Using needle nose pliers, gently grab the adjustment handle,
and push/pull the wire as needed. Pull to open, push to close.
See Fig. 51-1.
More air will result in shorter flames and less color, less air
will result in bigger flames and more color.
Note: Make minimal adjustments. Very small changes result in
major changes in flame appearance.
3. Observe the flames. Repeat the adjustment process until
the proper flame is achieved.
4. Be sure to properly re-install all appliance components.
Remove
B
Air Shutter Adjustment via Burner Removal
Note: It is not recommended to adjust D1-30/36 front burners
(to maintain proper operation).
A
1. Completely shut down the burner. Allow the appliance to
completely cool.
Fig. 51-3 Remove screen & floor panels
51
SERVICING AND CLEANING (cont.)
2. An air shutter is located beneath each burner. Reference
the ANNUAL CLEAN/INSPECTION section for details on
accessing the front/rear burner. Rear burner shown here.
D
3. Remove the ember screen (if applicable) and left and right
floor panels. See figure on previous page, "A" and "B".
4. Remove the grate. Then remove the 2 hex screws found
on the ends of the rear burner using a 5/16" nut driver.
See Fig. 52-1, "C" and "D".
5. Remove burner by sliding it to the right, so that the venturi
tube clears the orifice, then fully out. See Fig. 52-2, "E".
Note: When removing a burner with a wire adjustment
handle, be sure the handle comes out with the burner.
C
Fig. 52-1 Remove grate & burner hex screws
E
6. Use a 1/4" nut driver to loosen the air shutter screw, and
adjust as needed. Be certain to re-tighten the screw when
done. See Fig. 52-3.
More air will result in shorter flames and less color, less
air will result in bigger flames and more color.
Note: Make adjustments in 1/8" increments. Very small
changes result in major changes in flame appearance.
Fig. 52-2 Remove burner
Note: Do not completely tighten the screw on burners
equipped with a wire adjustment handle, as doing so
will prevent the wire handle from functioning.
7. Repeat this process for the front burner, if applicable/
required. Then properly replace the burner(s).
Note: When replacing a burner with a wire adjustment
handle, you will need to first place the wire into the
hole found on the bottom front of the unit, then rotate
the burner into place (see Fig. 52-4).
(Loosen screw)
Adjust as
needed
Fig. 52-3 Adjust air shutter
8. Ignite the burner and observe the flames. If required, repeat
the adjustment process until the proper flame is achieved.
9. Be sure to properly re-install all appliance components.
Fig. 52-4 Replace burner & wire handle (select burners)
Fig. 52-5 Proper flame appearance
52
SERVICING AND CLEANING (cont.)
BATTERY REPLACEMENT
Ensure all control/remote system components are in the
OFF position prior to any battery replacements.
Note: Remote system syncing may be required after any
battery replacements. See section below if needed.
Remote transmitter:
Remove lid
for battery
access
The remote transmitter requires 3 AAA batteries to operate.
Locate the transmitter, remove the lid (found on rear), and
properly insert new batteries as marked. Re-secure the lid.
See Fig. 53-1.
Fig. 53-1 Transmitter battery replacement
Remote receiver:
The remote receiver requires 4 AA batteries to operate.
Turn off gas to the unit. Locate the receiver on the control
box, which is located on the left side of the unit (see Fig.
53-2).
(Surround,
left panel)
(Direct
vent
insert)
Note: Access to the receiver requires removal of the screen
and surround/eyebrow pieces.
Remote
receiver
ON
Slide the 3-position switch on the receiver to the ON position,
then remove the switch. Unfasten the plastic plate using a
Phillips screwdriver. See Fig. 53-3. Remove the battery lid
(push in tabs) and properly insert new batteries as marked
(see Fig. 53-4). Re-secure the lid, the plate, and the switch.
Be sure to properly re-install all appliance components.
REMOTE
PRG
OFF
SYNCHRONIZE REMOTE SYSTEM
The remote system is synchronized at the manufacturer.
However, should the remote transmitter and receiver require
to be synced, follow the procedure below.
Fig. 53-2 Receiver location (left side, control box)
Note: Access to the receiver requires removal of the
screen and surround/eyebrow pieces.
A
PRG
3. Locate the PRG key on the receiver (reference Fig.
53-3). Use the tip of a pen or a wire clip to push the
PRG button. The receiver will beep 3 times indicating
that it is ready to synchronize with the remote transmitter.
(PRG key)
Unscrew,
then remove
plate
OFF
2. Slide the 3-position switch on the receiver to the REMOTE
position.
REMOTE
Move to ON
position, then
remove
ON
1. Locate the receiver on the control box, which is located
on the left side of the unit (see Fig. 53-2).
B
Fig. 53-3 Remove switch and plate
for battery access
4. Push the ON/OFF key on the remote transmitter. The
receiver will beep 4 times to indicate that the transmitter's
command is accepted and set to the particular code of
the transmitter. The system is now initialized.
5. Be sure to properly re-install all appliance components.
Battery lid
Fig. 53-4 Receiver battery replacement
53
SERVICING AND CLEANING (cont.)
LIGHT BULB REPLACEMENT
Reference the ANNUAL CLEAN/INSPECTION section for
details on accessing the light assembly, found on the top of
the firebox interior.
Important: Only replace with 120V / 25 watt bulbs. Wear
gloves when handling the light bulb.
Unscrew
1. Remove the lintel found at the top front of the unit. Use
a 5/16" nut driver to remove the two hex screws found on
each side of the lintel. See Fig. 54-1.
Fig. 54-1 Remove lintel
2. Using a Phillips screwdriver, unfasten the 4 screws that hold
the light assembly in place (see Fig. 54-2). Then remove
the glass, housing plate, and gaskets. Set aside the glass
and housing plate. Discard the old gaskets.
3. Wearing gloves, reach into the fixture, gently grab the bulb,
and pull it straight out.
4. Insert the new 120V / 25 watt bulb into the socket so that
both pins slide all the way in (see Fig. 54-3).
5. Place two new gaskets on the plate housing, feed one
screw through a pilot hole, and align the assembly up into
the light assembly. Partially tighten. See Fig. 54-4.
Fig. 54-2 Remove light assembly
6. Hand tighten the right screw, then insert the glass in
between the two gaskets (see Fig. 54-5).
7. Once the glass, housing plate, and gaskets are properly
in place, completely tighten all 4 screws.
CAUTION: Ensure the light assembly is properly in place
and fully tightened. Failure to do so will result
in combustion fumes escaping the interior
firebox.
Fig. 54-3 Install new bulb
8. Re-install the lintel, and all other components.
Fig. 54-4 Install plate and gaskets
Fig. 54-5 Install glass & fasten all screws
54
SERVICING AND CLEANING (cont.)
FAN ASSEMBLY CLEANING
(rear of direct vent insert)
The fan assembly MUST be cleaned annually to remove
lint, dust, and any debris / build up. It is mounted to the rear
of the insert.
Note: Removal of the insert first requires removal of the
screen and surround/eyebrow pieces.
1. Remove the insert from the fireplace.
2. Remove the 4 securing hex screws and the rear panel
(fan assembly attached) using a 5/16" nut driver or
equivalent. See Fig. 55-1.
3. Slightly lift the panel up, then pull the panel and fan
assembly out of the unit (see Fig. 55-2 and 55-3).
only remove
indicated screws
Fig. 55-1 Unfasten rear panel
4. Vacuum the fan assembly, ensuring to remove all debris
/ build-up.
5. Re-install the fan assembly by first dropping in the bottom
of the panel, then lifting up into place (see Fig. 55-4).
Use the screws to re-fasten the panel.
6. Re-install the insert.
CAUTION: Ensure all interior components of the insert
(i.e. decorative media, panels) remain in
their proper position after re-installing the
insert (due to movement). Adjust if needed.
7. Be sure to properly re-install all appliance components.
Fig. 55-2 Lift panel for removal
FUEL CONVERSION KITS
Vacuum
entire fan
assembly
A certified kit is available from the manufacturer to convert
your appliance from natural gas to L.P. or vice versa. Contact
your dealer for ordering information.
CK-31-NAT(25,30,36)-2
CK-31-LP(25,30,36)-2
L.P. to Nat. Conversion Kit
Nat. to L.P. Conversion Kit
Follow the instructions provided with the kit when converting.
Fig. 55-3 Remove panel / fan assembly & clean
B
A
Fig. 55-4 Re-install detail
55
TROUBLESHOOTING
If you have trouble with your unit, please use this list to identify the problem. By trying one or more of the solutions
to the possible cause, you should be able to solve the problem. If this list does not cover your present problem,
or if you have other technical difficulties with your unit, please contact your local dealer or visit our web site at
www.rhpeterson.com.
SYMPTOM
Soot (black coating)
forms on glass panel,
logs, or refractory
panels
Whistling coming
from insert
A change in flame
appearance or burner
operation
PROBABLE CAUSE
CORRECTIVE ACTION
1.
Improper log or ember 1.
placement
Reference the LOG SET and GLOWING EMBERS sections
for proper placement.
2.
Improper air shutter setting
2.
Reference the AIR SHUTTER ADJUSTMENT section to
properly adjust.
3.
Not enough combustion air
3.
Check venting system for proper air flow / venting.
1.
Normal operating noise
1.
Lower the flame to reduce the operating noise. (Lowering the
flame will reduce the heat output of the appliance.)
2.
Obstructed orifice opening, 2.
or flashback
If noise is excessive, have a qualified professional service
technician check the burners and the pilot orifices.
3.
Flex line over-bent.
3.
Straighten bends in flex line or replace if whistling still occurs.
1.
Change in gas pressure
1.
Contact the gas supplier to check gas pressure.
2.
Improper log or ember 2.
placement
Reference the LOG SET and GLOWING EMBERS sections
for proper placement.
1.
Low gas pressure
Contact the gas supplier to check gas pressure.
2.
The flame height is set to the 2.
lowest setting
Use remote transmitter to change flame height as desired
(see REMOTE OPERATING section).
3.
Blocked burner ports
3.
Contact a qualified professional service technician.
4.
Faulty valve
4.
Contact a qualified professional service technician.
1.
Gas not reaching appliance
Low flame
2.
1.
1.
Improper venting system 2.
setup
Main burner turns on,
then goes out
Main burner turns
on, then flame
lifts off of burner
until it completely
extinguishes
Check the gas supply and gas shut-off valve.
Check venting system to ensure that the intake vent pipe
coming from the termination connects to the intake port on the
appliance below, and that the exhaust vent pipe coming from
the termination connects to the exhaust port on the appliance.
Contact a qualified professional service technician.
3.
Pilot flame is not engulfing
3.
the sensor
1.
Long venting system or cold 1.
weather
Establish a proper air flow by operating the pilot (only) for
approximately 10 minutes. For models vented 20' or more
ensure the air restrictor is installed and the air shutter is
adjusted.
1.
Improper air shutter setting
1.
Reference the AIR SHUTTER ADJUSTMENT section to
properly adjust.
(Cycle repeats every
15 seconds)
Contact a qualified professional service technician.
Flame is blue and
lifting off of burner
-orFlame is yellow and
causing sooting
56
TROUBLESHOOTING (cont.)
SYMPTOM
The main burner
does not light and the
igniter is sparking
PROBABLE CAUSE
CORRECTIVE ACTION
1.
Gas is not reaching the 1.
appliance
2.
Air in gas line
2.
Purge gas line of air (contact a qualified professional service
technician if required).
3.
ON/OFF switch on surround 3.
is in off position
Refer to LIGHTING INSTRUCTIONS section regarding proper
lighting.
1.
Gas is not reaching the 1.
appliance
Check the gas supply and gas shut-off valve.
2.
Appliance is not receiving 2.
power
Check/replace batteries in remote receiver and remote
transmitter (see BATTERY REPLACEMENT section).
Check that power supply cord is properly plugged in. Check
building circuit breaker. Check control module power switch
to ensure power is on (Refer to the wiring diagram in the
SPECIFICATIONS AND DIMENSIONS section of this manual
for module appearance and location).
3.
ON/OFF switch on surround 3.
is in off position
Refer to LIGHTING INSTRUCTIONS section regarding proper
lighting.
4.
The unit is in Thermostat or 4.
Smart Thermostat mode
Use remote transmitter to change mode as desired (see
REMOTE OPERATING section).
1.
See previous causes / actions
1.
above.
See previous causes / actions above.
2.
Pilot bracket is grounding
2.
with burner
Bend bracket away from burner to prevent contact.
1.
Appliance is not receiving 1.
power
2.
Bulb has burned out
1.
Appliance is not receiving 1.
power
Check that power supply cord is properly plugged in. Check
building circuit breaker. Check control module power switch
to ensure power is on (Refer to the wiring diagram in the
SPECIFICATIONS AND DIMENSIONS section of this manual
for module appearance and location).
1.
Receiver batteries are dead
1.
Check/replace batteries in remote receiver (see BATTERY
REPLACEMENT section).
2.
Remote system is not synced 2.
See SYNCHRONIZE REMOTE SYSTEM section to sync.
3.
System is in lock-out mode
Disconnect power supply cord for 5 minutes to reset. Then
plug back in, and perform sync (see SYNCHRONIZE REMOTE
SYSTEM section).
Nothing happens
when the appliance is
turned on/off
No spark at pilot
Light does not work
2.
Fan does not work
Remote receiver does
not respond to remote
transmitter
3.
57
Check the gas supply and gas shut-off valve.
Check that power supply cord is properly plugged in. Check
building circuit breaker. Check control module power switch
to ensure power is on (Refer to the wiring diagram in the
SPECIFICATIONS AND DIMENSIONS section of this manual
for module appearance and location).
Replace bulb (see LIGHT BULB REPLACEMENT section).
WARRANTY
PETERSON REALFYRE DIRECT-VENT GAS APPLIANCE INSERT
LIMITED WARRANTY
Robert H. Peterson Co. (“RHP”) warrants your Realfyre direct-vent gas insert (“insert”) to be free from defects in materials and
workmanship.
The insert body and firebox are WARRANTED as long as you own them (lifetime).
Peterson burner assemblies are WARRANTED for TEN (10) YEARS.
Peterson ceramic glass panel is WARRANTED for FIVE (5) YEARS (thermal breakage only).
Peterson gas logs, glass, gems, and nuggets are WARRANTED for FIVE (5) YEARS.
Peterson electrical and gas components, igniters, remote controls and all other components are covered by a ONE (1) YEAR
Limited Warranty (excluding batteries, light bulbs and venting components supplied by others).
A COPY OF YOUR SALES SLIP FOR PROOF OF PURCHASE IS REQUIRED
This warranty applies to the original purchaser for products which are installed in the United States or Canada and which are operated and maintained
as intended for single family residential usage. This warranty is valid only with proof of purchase, shall commence on the date of purchase, and shall
terminate (both as to original and any replacement products) on the anniversary date of the original purchase of the product stated on the above schedules.
This warranty covers defects in material and workmanship. This warranty does not cover parts which become defective as a result of negligence, misuse,
use not in compliance with the Owner’s Manual/Installation Instructions, accidental damage, improper handling, improper storage, improper installation,
lack of required routine maintenance (as specified in the Owner’s Manual/Installation Instructions), electrical damage, local gas impurities or failure to
protect against combustibles. Product must be installed (and gas must be connected) as specified in the Owner’s Manual/Installation Instructions by
a qualified professional installer. Modifications to products which are not specifically authorized will void this warranty. Accessories, parts, valves,
remotes, etc. when used must be Peterson products or this warranty is void. Warrantied items will be repaired or replaced at Peterson’s sole discretion.
This warranty does not apply to rust, corrosion, oxidation, or discoloration unless the affected part becomes inoperable.
This warranty does not cover labor or labor related charges, except as provided by separate specific written programs from the Peterson Co. All repair
work must be performed by a qualified professional service person and requires prior approval of Peterson.
Peterson may require the defective product or part to be returned to the factory to determine the cause of failure. Peterson will pay freight charges if
the product or part is determined to be defective. This warranty does not cover breakage in shipment from our (Independent) distributor to its customer
if the damage is determined to have occurred during that shipment.
This warranty specifically excludes liability for indirect, incidental, or consequential damages. Some states and provinces do not allow the exclusion
or limitation of incidental or consequential damages, so the above exclusion may not apply to you. This warranty gives you specified legal rights, and
you may have other rights that vary from state to state or province.
For additional information regarding this warranty, or to place a warranty claim, contact the R. H. Peterson dealer where the product was purchased.
TO REGISTER YOUR PRODUCT ONLINE GO TO: WWW.RHPETERSON.COM,
AND CLICK ON PRODUCT REGISTRATION. THANK YOU FOR YOUR PURCHASE.
Quality Check
Burner Orifices Nat.
Date:_________________
L.P.
Leak Test: ___________ Model#:
___________________
Front:
____ ____
Burn Test: ___________ Serial#:
___________________
Rear:
____ ____
Gas Type:
Nat. / L.P.
Air Shutter: ___________________
Inspector:
___________________
Robert H. Peterson Co. • 14724 East Proctor Avenue • City of Industry, CA 91746
58