1
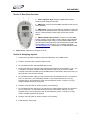
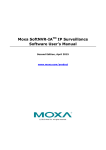
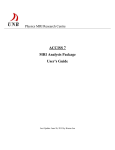
DMX Partner
USER MANUAL
Version 1.0 24-004-1631
Elation Professional · Los Angeles, Ca 90058 · www.elationlighting.com
DMX PARTNER
Table of contents
1. General Introduction..........................................................................................................3
2. Safety Information & Maintenance...................................................................................3
3. Information Notice.............................................................................................................4
4. Front Panel Overview........................................................................................................5
5. Rear Panel Overview.........................................................................................................6
6. Assigning Joystick............................................................................................................6
7. Recording Chases.............................................................................................................7
8. Editing Chases.................................................................................................................7-8
8a. Adding steps to an existing chase
8b. Deleting chase steps
8c. Deleting chases
9. Recording Shows.............................................................................................................8
10. Editing Shows................................................................................................................9-10
10a. Adding steps to an existing show
10b. Deleting show steps
10c. Deleting shows
11. Strobe Function..............................................................................................................10
12. Chase Playback..............................................................................................................11
12a. Sequencing chase playback
12b. Mixed chase playback
13. Show Playback...............................................................................................................12
13a. Sequencing show playback
13b. Mixed show playback
14. Strobe Playback.............................................................................................................12
15. Audio / Manual...............................................................................................................13
15a. Activating audio mode
15b. Activating manual mode
16. Send & Receive...........................................................................................................13-14
16a. Transfer from Master to Slave
16b. Transfer from Master to PC or laptop
16c. Transfer from PC or laptop to Slave
17. Blackout Setup..............................................................................................................15
18. Erase all Memory..........................................................................................................15
2
DMX PARTNER
Section 1: General introduction
Thank you for purchasing the Elation DMX Partner. This unit is a professional DMX recorder and
playback device with high performance and advanced capabilities. This device was designed to
accept information from any universal DMX controller availible on the market today. Any group of
scenes that have been programmed into a universal DMX controller can simply be downloaded into
the DMX Partner for easy playback. In many cases, the DMX Partner is pre-programmed at the
factory when sold in system packages. This unit is made up of two control sections - one part for
effect lighting and the other for playback of dimmers and moving lights. The two parts run completely
independent of one another allowing you more flexibility when playing back chases and shows or
turning effects on and off.
Every unit has been thoroughly tested and carefully packed before shipment. Unpack the shipping
carton and inspect thoroughly saving the carton and all packing materials for possible use later.
Check carefully and make sure your product is not damaged and that no included accessory is
missing. If your product appears to be damaged or missing something, please do not use it- contact
our customer support staff at (800) 322.6337 ext-401 for instructions on what to do.
Section: 2 Safety Information & Maintenance
Please read through this manual carefully and thoroughly, as it gives important information regarding
safety, use and maintenance. Keep this manual with the unit for possible future reference. Please
read all instructions prior to mounting, and operating your DMX Partner. To protect against fire,
electric shock and injury to persons, please follow the safety precautions listed below and observe all
warnings in this manual and warnings printed on the console. The following rules give important
information regarding safety during operation and maintenance for long term use. If you have any
questions regarding operation of this console, please contact our customer support staff at (800) 3226337 ext-401.
•
•
•
•
•
•
•
•
•
•
•
•
•
•
•
•
•
•
Use only a source of AC power that complies with local building and electrical codes
and has both overload and ground-fault protection.
To reduce the risk of fire or electrical shock, do not expose this unit to rain or high
levels of moisture. Do not use this unit near water.
Do not operate this unit if the ambient temperature exceeds 45°C.
Refer any service operation not described in this manual to a qualified technician.
Do not dismantle or modify this unit as there are no user serviceable parts inside. Refer
all service related issues to a qualified technician.
Use this unit only as described.
Handle this unit carefully. Any strong shock or vibration may result in malfunction.
Do not operate this unit when front face panel is removed.
Any damaged or crimped AC cable should be replaced immediately. Protect the power
supply cable from being walked on or pinched.
Do not allow children to play with this unit.
Keep these instructions for future use.
Heed all warnings.
Follow all instructions.
Clean only with dry cloth.
Do not install near any heat sources such as heaters, stoves, amplifiers or any other
heat generating apparatus.
Only use attachments and accessories specified by Elation Professional.
Unplug this unit during lighting storms or when unused for long periods of time.
In order to keep your DMX Partner in good working condition, please follow these
simple steps for safety and maintenance.
3
DMX PARTNER
Section: 3 Information Notice
Product Modification Warning:
Elation Professional products are designed and manufactured to meet the requirements of United
States and International safety regulations. Modifications to the product could affect safety and render
the product non-compliant to relevant safety standards.
Updates & Changes:
Information and specifications in this manual are subject to change without notice. Elation
Professional assumes no responsibility or liability for any errors or inaccuracies that may appear in
this manual.
Copyright:
© 2004 Elation Professional
All rights reserved. No part of this manual may be reproduced, in any form or by any means, without
permission in writing from Elation Professional.
It is of great benefit to keep this user manual for future reference.
4
DMX PARTNER
Section 4: Front Panel Overview
1. 1-4 Chase Buttons- used to store and playback
chases. Up to 99 steps can be stored into each chase
button. Chases can be played back in one of two
modes- sequential or mixed. A chase will incorporate
the same hold and fade time for each step.
2. 1-2 Show Buttons- used to store and playback
shows. Up to 99 steps can be stored into each show
button. Shows can be played back in one of two modessequential or mixed. However, unlike chases, shows
can incorporate different hold and fade times for each
step.
3. 5-8 Chase Buttons- used to store and playback
chases. Up to 99 steps can be stored into each chase
button. Chases can be played back in one of two
modes- sequential or mixed. A chase will incorporate
the same hold and fade time for each step.
4. Joystick- used to control Pan & Tilt movement of a
moving light on the fly.
5. Send Button- used to send memory data file to
another DMX Partner or PC. (See Section 16 for
additional data transfer information).
6. Fade Button- used to adjust chase or show fade times. When selected, a chase or show fade time
can be changed with the UP/Down buttons.
7. Receive Button- used to receive a memory data file from another DMX Partner or PC. (See Section
16 for additional data transfer information).
8. Speed Button- to adjust chase or show hold times. When selected, a chase or show hold time can
be changed with the UP/Down buttons.
9. Display- display’s chase/show times and current operation mode.
10. Record Button- used to record chase and show steps. Also used to engage record mode.
11. Mode Button- used to select between DMX, Audio or Manual operation modes.
12. Delete Button- used to delete chase and show steps when in record or record edit modes.
13. Blackout Button- used to blackout all selected chases and shows.
14. Pan/Tilt Button- used when assigning joystick to fixtures and to select assigned fixture or fixtures for
joystick control.
15. Strobe Button- quick access strobe effect during chase or show playback. Any selected chase or
show will incorporate a strobe effect when this button is selected.
16. Up/Down Buttons- these button are used to increase or decrease chase and show step and fade
times. Also used when in record edit mode to increase or decrease selected chase or show step.
5
DMX PARTNER
Section 5: Rear Panel Overview
1. Power Supply DC Input- plug the supplied 9 DC-1000mA
minimum power supply into this input.
2. DMX Input- connect a universal DMX controller into this input for
scene uploading.
3. DMX Output- connect to moving lights or dimmers for chase and
show playback of uploaded scenes. This output works in conjunction
with the 1-8 chase buttons, strobe button and the two (2) show
buttons.
4. DB9 Pin RS-232 input connector- connect to a another DMX
Partner, lap top or PC to transfer or load a data file. Use a standard
RS-232 serial lap link type cable to connect between DMX Partner
and other device. Must use Elation RS-232 software to transfer data
between DMX Partner and lap top or PC- software availible at
www.elationlighting.com . (See section 10 for additonal data transfer
information).
5. Power switch- switches the units power on or off.
Section 6: Assigning Joystick
1. Connect from your DMX controllers output to the DMX input of your DMX Partner.
2. Press the “Pan/Tilt“ button so that its LED turns ON.
3. On your DMX Controller, adjust all DMX values to zero.
4. Press and hold down the “Record“ button and simultaneously press chase buttons 1, 6, 8,1, 6, 8
in sequence. As a result, the Record LED will illuminate. (Note: if you do not have a DMX
controller connected to the DMX input of the DMX Partner as described in the previous step, you
will not be able to access Record mode).
5. On your DMX Controller, adjust your Pan channel to any value between 30-127. For example- If
Pan is on channel # 1, you would adjust channel 1 to any value betwen 30-127. (It is very
important that you do not adjust any other channel during this process. In doing so you may
assign unwanted channels to the joystick).
6. Press the “Pan/Tilt“ button to confirm and save your Pan setting.
7. On your DMX Controller, adjust your Tilt channel to any value between 128-255. For example- If
Tilt is on channel # 2, you would adjust channel 2 to any value betwen 128-255. (It is very
important that you do not adjust any other channel during this process. In doing so, you may
assign unwanted channels to the joystick).
8. Press the “Pan/Tilt“ button to confirm and save your Tilt setting.
9. Press “Blackout“ twice to exit.
6
DMX PARTNER
Section 7: Recording Chases
1. Connect from your DMX controllers output to the DMX input of your DMX Partner. (When
programming moving lights, it is recommended that you pre program scenes into your DMX controller
before recording chases into the DMX Partner. If your programming conventional dimmers, you can
record them in real time using your controllers dimmer channels).
2. Press and hold down the “Record“ button and simultaneously press chase buttons 1, 6, 8,1, 6, 8 in
sequence. As a result, the Record LED will illuminate. (Note: if you do not have a DMX controller
connected to the DMX input of the DMX Partner as described in the previous step, you will not be
able to access Record mode).
3. Select the Chase button 1-8 that you want to record into. Once selected, the chase LED will
continually flash and the LCD will display the current chase step- “CH:00“.
4. From your DMX controller, select the scene or maually adjust the channels you want included into
your first chase step.
5. To record the step, press “Record“. All eight chase LED’s will momentarily flash and the LCD will
display the next chase step confirming that your step has been recorded.
6. Repeat steps 4 & 5 up to 99 times per chase.
7. Press “BLACK-OUT“ twice to exit record mode.
Section 8: Editing Chases
8a. Adding steps to an existing chase
1. Press and hold down the “Record“ button and simultaneously press chase buttons 1, 6, 8,1, 6, 8 in
sequence. As a result, the Record LED will illuminate. (Note: if you do not have a DMX controller
connected to the DMX input of the DMX Partner as described in the previous step, you will not be
able to access the Record mode).
2. Select the chase 1-8 you want to edit. The chase LED will flash and the LCD will display the total
amount of chase steps included into the selected chase- “CH:xx“.
3. To view the previously recorded steps, press the same chase button, both chase and record LED’s
will be lit. Use the “Up/Down“ buttons to scroll to the step you would like to add a new step after.
Once you find the step, press the same chase button again so that the chase LED is flashing. (You
must exit this preview mode before you can record or add the new step).
4. From your DMX controller, select the scene to be added or adjust the dimmer channels to your
desired setting.
5. To record the new step, press “Record“. All eight chase LED’s will momentarily flash and the LCD
will display the new chase step confirming that your step has been recorded.
6. Repeat steps 3 – 5 to add additional chase steps.
7. Press “BLACK-OUT“ twice to exit record mode.
7
DMX PARTNER
8b. Deleting chase steps
1. Press and hold down the “Record“ button and simultaneously press chase buttons 1, 6, 8,1, 6, 8 in
sequence. As a result, the Record LED will illuminate. (Note: if you do not have a DMX controller
connected to the DMX input of the DMX Partner as described in the previous step, you will not
be able to access the Record mode).
2. Select the chase 1-8 you want to delete. The chase LED will flash and the LCD will display the total
amount of chase steps included into the selected chase- “CH:xx“.
3. To view the previously recorded steps, press the same chase button, both chase and record LED’s
will be lit. Use the “Up/Down“ buttons to scroll to the step you would like to delete. Once you find the
step, press the same chase button again so that the chase LED is flashing. (You must exit this
preview mode before you can delete the step).
4. Press the “DELETE“ button. All eight chase LED’s will momentarily flash and the LCD will display
the previous chase step confirming that the step was deleted.
5. Repeat steps 3 & 4 to delete additional chase steps.
6. Press “BLACK-OUT“ twice to exit record mode.
8c. Deleting chases
1. Press and hold down the “Record“ button and simultaneously press chase buttons 1, 6, 8,1, 6, 8 in
sequence. As a result, the Record LED will illuminate. (Note: if you do not have a DMX controller
connected to the DMX input of the DMX Partner as described in the previous step, you will not
be able to access the Record mode).
2. Press and hold down the “Delete“ button, then press the Chase button 1-8 you want to delete. All
eight chase LED’s will momentarily flash and the chase button you selected will not be lit anymore
confirming that the chase has been deleted.
3. Repeat step 2 to delete additional chases.
4. Press “BLACK-OUT“ twice to exit record mode.
Section 9: Recording Shows
1. Connect from your DMX controllers output to the DMX input of your DMX Partner. (When
programming moving lights, it is recommended that you pre program scenes into your DMX controller
before recording chases into the DMX Partner).
2. Press and hold down the “Record“ button and simultaneously press chase buttons 1, 6, 8,1, 6, 8 in
sequence. As a result, the record LED will illuminate. (Note: if you do not have a DMX controller
connected to the DMX input of the DMX Partner as described in the previous step, you will not
be able to access the Record mode).
3. Select the Show button 1 or 2 that you want to record into. Once selected, the show LED will
continually flash and the LCD will display the current show step- “SH:00“.
4. From your DMX controller, select the scene or manually adjust the channels you want included into
your first show step.
8
DMX PARTNER
Recording Shows (Cont.)
5. Adjust the steps hold time by pressing the “SPEED“ button. Next, use the “UP/DOWN“ buttons to
select the hold time ranging from 0.1 (one tenth of a second) to 10:00 (ten minutes).
6. Adjust the steps fade time by pressing the “FADE“ button. Next, use the “UP/DOWN“ buttons to
select the fade time ranging from 0.1 (one tenth of a second) to 10:00 (ten minutes).
7. To record the step, press “Record“. All eight chase LED’s will momentarily flash and the LCD will
display the next show step confirming that your step has been recorded.
8. Repeat steps 4-7 up to 99 times per show.
9. Press “BLACK-OUT“ twice to exit record mode.
Section 10: Editing Shows
10a. Adding steps to an existing show
1. Press and hold down the “Record“ button and simultaneously press chase buttons 1, 6, 8,1, 6, 8 in
sequence. As a result, the Record LED will illuminate. (Note: if you do not have a DMX controller
connected to the DMX input of the DMX Partner as described in the previous step, you will not
be able to access the Record mode).
2. Select the show you want to edit by pressing show button 1 or 2. The show LED will continually
flash and the LCD will display the total amount of show steps included into the selected show“SH:xx“.
3. To view the previously recorded steps, press the same show button, both show and record LED’s
will be lit. Use the “UP/DOWN“ buttons to scroll to the step you would like to add a new step after.
Once you find the step, press the same show button again so that the show LED is flashing. (You
must exit preview mode before you can record or add the new step).
4. From your DMX controller, select the scene to be added or manully adjust the channels to your
desired setting.
5. Adjust the steps hold time by pressing the “SPEED“ button. Next, use the “UP/DOWN“ buttons to
select the hold time ranging from 0.1 (one tenth of a second) to 10:00 (ten minutes).
6. Adjust the steps fade time by pressing the “FADE“ button. Next, use the “UP/DOWN“ buttons to
select the fade time ranging from 0.1 (one tenth of a second) to 10:00 (ten minutes).
7. To record the new step, press “Record“. All eight chase LED’s will momentarily flash and the LCD
will display the new show step confirming that your step has been recorded.
8. Repeat steps 3 -5 to add additional show steps.
9. Press “BLACK-OUT“ twice to exit record mode.
9
DMX PARTNER
10b. Deleting show steps
1. Press and hold down the “Record“ button and simultaneously press chase buttons 1, 6, 8,1, 6, 8 in
sequence. As a result, the Record LED will illuminate. (Note: if you do not have a DMX controller
connected to the DMX input of the DMX Partner as described in the previous step, you will not
be able to access the Record mode).
2. Select show you want to edit by pressing show buttons 1 or 2. The show LED will continually flash
and the LCD will display the total amount of show steps included into the selected show- “SH:xx“.
3. To view the previously recorded steps, press the same show button, both show and record LED’s
will be lit. Use the “UP/DOWN“ buttons to scroll to the step you would like to delete. Once you find the
step, press the same show button again so that the show LED is flashing. (You must exit preview
mode before you can delete the step).
4. Press the “DELETE“ button. All eight chase LED’s will momentarily flash and the LCD will display
the previous show step confirming that the step has been deleted.
5. Repeat steps 3 & 4 to delete additional steps.
6. Press “BLACK-OUT“ twice to exit record mode.
10c. Deleting Shows
1. Press and hold down the “Record“ button and simultaneously press chase buttons 1, 6, 8,1, 6, 8 in
sequence. As a result, the Record LED will illuminate. (Note: if you do not have a DMX controller
connected to the DMX input of the DMX Partner as described in the previous step, you will not
be able to access the Record mode).
2. Press and hold down the “Delete“ button, then press the show button 1 or 2 you want to delete. All
eight chase LED’s will momentarily flash and the show button you selected will not be lit anymore
confirming that the show has been deleted.
3. Repeat step 2 to delete additional shows.
4. Press “BLACK-OUT“ twice to exit record mode.
Section 11: Strobe Function Assign
1. Press and hold down the “Record“ button and simultaneously press chase buttons 1, 6, 8,1, 6, 8 in
sequence. As a result, the Record LED will illuminate. (Note: if you do not have a DMX controller
connected to the DMX input of the DMX Partner as described in the previous step, you will not
be able to access the Record mode).
2. From your DMX controller, select a pre programmed strobe scene, or manually set your strobe or
shutter channel to strobe at the flash rate that you desired. (It is important that you set the scene
exactly the way you want it played back as it will override any chase or show when selected).
3. Press the “STROBE“ button to record and store the scene. All eight chase LED’s will flash
momentarily confirming that the strobe scene was saved.
4. To exit, press “BLACK-OUT“ twice.
10
DMX PARTNER
Section 12: Chase Playback
Chases can be played back in two modes- “Sequence“ or “Mix“. Sequence mode allows for chases to
be played back one at a time. All eight chases can be selected at one time. However, the chase with
the flashing LED is the only active chase running at the given time. Once that chase has finished, the
next selected chase will automatically begin to run and it’s LED will begin to flash until it finishes. This
sequence mode will automatically loop all selected chases. Mix mode allows up to eight chases to be
played back at any one time. This mode allows for the highest values to take effect over a given
channel. For example, if one chase contains a value of 126 for channel 2 and another chase contains
a value of 246 for channel 2 then the chase containing the value of 246 will take precedence because
it is a higher value.
12a. Sequencing Chase Playback
1. Press the chase buttons, 1-8, that you wish playback. The active chase LED flash continuously
and the LCD will display the selected chase number followed by the sequencing chase steps- “C18:1-99“. (Note: if more than one chase was selected, the chases will continue to sequence from one
to the next in the order they were selected).
2. Press the “SPEED“ button to adjust the chase rate. Use the “UP/DOWN“ buttons to set the chase
rate ranging from 0.1 (one tenth of a second) to 10:00 (ten minutes).
3. Press the “FADE“ button to adjust the chase fade time. Use the “UP/DOWN“ buttons to set the
fade time ranging from 0.1 (one tenth of a second) to 10:00 (ten minutes).
4. To disengage a chase, press the chase button that you wish to switch off. The chase button LED
will turn off confirming that it will no longer be included in the sequence.
12b. Mixed Chase Playback
1. Press and hold down any recorded chase button 1-8, then select other chases you want included
in your mixed chase playback. All selected chases will then flash continuously indicating that they are
part of the mixed chase playback.
2. Press the “SPEED“ button to adjust the chase rate. Use the “UP/DOWN“ buttons to set the chase
rate ranging from 0.1 (one tenth of a second) to 10:00 (ten minutes).
3. Press the “FADE“ button to adjust the chase fade time. Use the “UP/DOWN“ buttons to set the
fade time ranging from 0.1 (one tenth of a second) to 10:00 (ten minutes).
4. Press any chase button twice to exit mixed chase playback mode.
11
DMX PARTNER
Section 13: Show Playback
Shows can be played back in two modes- “Sequence“ or “Mix“. Sequence mode allows for shows to
be played back one at a time. Both shows can be selected at one time. However, the show with the
flashing LED is the only active show running at the given time. Once that show has finished, the next
selected show will automatically begin to run and it’s LED will begin to flash until it finishes. This
sequence mode will automatically loop both shows continuously. Mix mode allows both shows to be
played back at any one time. This mode allows for the highest values to take effect over a given
channel. For example, if one show contains a value of 161 for channel 3 and the other show contains
a value of 223 for channel 3 then the show containing the value of 223 will take precedence because
it is a higher value. This mode works very well with moving lights.
13a. Sequencing show playback
1. Press show buttons 1 & 2. The active show LED will flash continuously and the LCD will display
the selected show number followed by the sequencing show steps- “S1-2:1-99“. (Note: in this mode
the shows will continue to loop from one to the other. Speed and Fade buttons do not have any effect
in show playback as speed and fade times were recorded in show record mode).
2. To disengage a show, press the show button you wish to turn off. The show button LED will turn
off confirming that it will no longer be included in the sequence.
13b. Mix show playback
1. Press and hold down either recorded show button 1 or 2, then press the other show button and
release both simultaneously. Both show LED’s will then flash continuously indicating that they are in
mix show playback mode.
2. To exit this mode, press either show button twice.
Section 14: Strobe Playback
Selecting the strobe button will activate the strobe scene and override any chase or show that was
running.
1. Press the “STROBE“ button when effect is desired.
2. Press the “STROBE“ button again when you want the strobe effect switched OFF. (Any selected
chases or shows that were running prior to selecting the strobe function will resume playback).
12
DMX PARTNER
Section 15: Audio / Manual
When running chases or shows, you can select between running them in audio or manual modes.
15a. Activating Audio Mode
1. While playing chases or shows back, press the “RECORD“ button. An indicator light will illuminate
in the LCD next to the AUDIO silk screen. This confirms you are in audio or sound active mode. Your
chases and shows will now be triggered to sound via an internal microphone in the DMX Partner.
2. To exit audio mode, press the “RECORD“ button twice. Your chases and shows will now return to
the default speed and fade times.
15b. Activating manual mode
1. While playing chases or shows back, press the “RECORD“ button twice. An indicator light will
illuminate in the LCD next to the MANUAL silk screen. This confirms you are in manual mode. Your
chases and shows can now be triggered manually by using the “UP/DOWN“ buttons. The UP button
will advance your chase or show one step each time it is pressed and the DOWN button will go back
one step each time it is pressed.
2. To exit manual mode, press the “RECORD“ button once. Your chases and shows will now return
to the default speed and fade times.
Section 16: Send & Receive
Send and Receive are two functions used when wanting to transfer data from one DMX Partner to
another or from a DMX Partner to your PC or laptop via our RS232 software program availible on our
website at www.elationlighting.com .
16a. Transfer data from a master DMX Partner to a slave DMX Partner.
1. Using a 9 pin serial lap link cable, connect from the RS232 connector on the rear of your master
unit (unit that contains the programs) into the RS232 connector on the rear of your slave unit (unit that
contains nothing or something you wish to overwrite).
2. On your master unit, press and hold down the “SEND“ button and simultaneously press chase
buttons 1, 6, 8, 1, 6, 8 in sequence. As a result, the send LED will illuminate and the LCD will display
“SEnd“ indicating it is ready to send information.
3. On your slave unit, press and hold down the “RECEIVE“ button and simultaneously press chase
buttons 1, 6, 8, 1, 6, 8 in sequence. As a result, the receive LED will illuminate and the LCD will
display “IN“ and is now ready to receive information.
4. Press “SEND“ on your master unit and the information will begin to transfer to your slave unit.
Once complete, the LCD on both your master and slave units will display “END“ indicating that the
transfer is complete.
5. Press “BLACK-OUT“ to exit.
13
DMX PARTNER
Send & Receive (Cont.)
16b. Transfer data from a DMX Partner to a PC or laptop. (NOTE- You must first
install our RS232 software before doing anything else. The software is availible at
www.elationlighting.com in the downloads section or DMX Partner product page.
1. Using a 9 pin serial lap link cable, connect from the RS232 connector on the rear of your master
unit and into the serial port of your PC or laptop.
2. In your PC or laptop, open the RS232 program, set the Baud transfer rate to 38400 and select the
com port associated with your serial port. Every computer is different- if you don’t know which com
port it is, select com port 1 and go to step 3. If the transfer doesn’t go through, select com port 2 and
repeat steps 3 & 4.
3. On your DMX Partner, press and hold down the “SEND“ button and simultaneously press chase
buttons 1, 6, 8, 1, 6, 8 in sequence. As a result, the send LED will illuminate and the LCD will display
“SEnd“ indicating it is ready to send information.
4. On your PC or laptop, select the “RECEIVE“ button from the RS232 program. As a result, the
program will notify you that it is receiving a new file.
5. Once complete, the LCD on your DMX Partner will display “END“ indicating that the transfer is
complete.
6. Press “BLACK-OUT“ to exit.
16c. Transfer data from your PC or laptop into a DMX Partner. (NOTE- You must
first install our RS232 software before doing anything else. The software is
availible at www.elationlighting.com) in the downloads section.
1. Using a 9 pin serial lap link cable, connect from the RS232 connector on the rear of your master
unit and into the serial port of your PC or laptop.
2. In your PC or laptop, open the RS232 program, set the Baud transfer rate to 38400 and select the
com port associated with your serial port. Every computer is different- if you don’t know which com
port it is, select com port 1 and go to step 3. If the transfer doesn’t go through, select com port 2 and
repeat steps 3 & 4.
3. On your DMX Partner, press and hold down the “RECEIVE“ button and simultaneously press
chase buttons 1, 6, 8, 1, 6, 8 in sequence. As a result, the receive LED will illuminate and the LCD will
display “IN“ indicating it is ready to receive information.
4. On your PC or laptop, select the “SEND“ button from the RS232 program and select the file that
you wish to transfer into the DMX Partner.
5. As a result, the program will notify you that it is sending the selected file and the DMX Partner will
also display a receiving track in its LCD.
6. Once complete, the LCD on your DMX Partner will display “END“ indicating that the transfer is
complete.
7. Press “BLACK-OUT“ to exit.
14
DMX PARTNER
Section 17: Blackout Setup
This feature allows you to set your DMX Partner to activate or deactivate black out on power up.
Deactivating allows you to automatically begin playback of chases and shows on power up.
1. Flip the power switch to the “OFF“ position.
2. Press and hold the “FADE“ and “SHOW 2“ buttons simultaneously and flip the power switch to the
“ON“ position. As a result, the LCD will display “Y-BO“ or “N-BO“ depending on the current active
setting.
3. If you wish to have blackout active on power up, press the “FADE“ button so the LCD display’s “NBO“. If you wish to deactivated black out on power up, press the “FADE“ button so the LCD display’s
“Y-BO“.
4. To confirm your blackout setting, press the “BLACK-OUT“ button.
Section 18: Erase All Memory
Use this function only if you wish to completely erase all chases and shows currently stored in your
DMX Partner.
1. Flip the power switch to the “OFF“ position.
2. Press and hold the “RECORD“, “SPEED“, “SHOW 1“ and “BLACK-OUT“ buttons and
simultaneously flip the power switch to the “ON“ position. All memory will now be erased.
15