1
PSIM
Public Safety Incident Management
Mobile Client from Med-Media, Inc
User Manual
Copyright © 2004-2006 Med-Media, Inc. All rights reserved
PSIM User Manual Version 1.0
Table of Contents
_____________________________________________________________________________
PSIM Overview .................................................................................................... 1
Incident Management Solutions Overview ......................................................... 1
Command and Control – PSIM........................................................................... 1
Data Warehousing and Disaster Recovery......................................................... 2
Triage Module..................................................................................................... 3
Resource Management ...................................................................................... 3
Wireless Networks.............................................................................................. 3
Evacuating Tracking ........................................................................................... 4
Reunification System Overview .......................................................................... 4
System Requirements......................................................................................... 5
Installing PSIM..................................................................................................... 5
Getting Started .................................................................................................... 6
Menu Bar.............................................................................................................. 7
Session tab ....................................................................................................... 10
Triage tab .......................................................................................................... 12
Treatment tab ................................................................................................... 16
Transport tab .................................................................................................... 20
Offsite tab ......................................................................................................... 23
Patient Movement............................................................................................. 24
PSIM: WebCUR ................................................................................................. 25
Commander Portal ........................................................................................... 26
Creating a New Incident................................................................................... 27
Reports.............................................................................................................. 29
Revisions and Versions................................................................................... 30
Public Safety Incident Management User Manual
PSIM Solutions Overview
_______________________________________________________
Incident Management Overview
Why use a different solution for everyday and large-scale events. Why not use products, everyday that
scale to meet the critical incident.
Following the NIMS (National Incident Management System) Med-Media has combined its everyday
proven chubby-client and WebCUR data warehousing technology into the next evolution in incident
management.
These next generation tools manage your everyday business of providing care and can immediately be
used for any large scale or out of the ordinary event.
The chubby client keeps your information up to date and automatically compensates for your level of
connectivity. Utilizing SSL (secure socket layer) encrypted, Internet connections over readily available
local methods, provides redundancy and cost efficiency.
Building a system is as simple as adding modules. Each Module is integrated into WebCUR, providing
interoperability, share-ability and scalability. Using portal and Ajax technology creates a platform window
into your operations and brings standalone applications into one location.
Command and Control: PSIM
The command and control portal provides the incident commander with an overall view of an incident.
The portal system works internally when offline from the Internet. When online, additional dynamic
resources are available pertinent to the incident such as hospital status, bed availability and human and
-1-
Public Safety Incident Management User Manual
physical resources currently being utilized. By having this information immediately available, the incident
commander or unified command team is able to match needs with resources.
Data Warehousing & Disaster Recovery:
Med-Media’s Public Safety Portal is a web-based solution for data warehousing and report generation in
addition to a significant feature set of productivity tools that allow for more efficient operation of your
organization. The WebCUR Public Safety Portal is based on Med-Media’s WebCUR platform.
From a data collection perspective, the Public Safety Portal integrates Med-Media Incident Management
clients, and provides a Web-based means for public safety personnel and administrators as well as
offering possibilities for next generation PSIM thin clients.
Through the ability to archive data via the Portal or your personal data center website, WebCUR will
provide full reporting capabilities to authorized clients and over time, will provide the ability for electronic
reporting instead of the labor-intensive paper process. The client to server communications is done via
standards based, 128-bit SSL and the web based application client is accessible from any standards based
web client.
Data backups and disaster recovery are significant issues for responding units that are not equipped to
be data centers. The simple ability to be able to store critical data on a remote web site via a secure
Internet connection will provide important backup and disaster recovery functionality to these remote
operations
The WebCUR Public Safety Portal also offers a valuable set of office management tools to assist in the
operation of your organization. Schedule your crew rosters, share discussions online with fellow company
members, manage tasks in a shared environment more effectively than ever, and synchronize all of these
operations with your PDA for use away from the station.
Differentiators
Med-Media’s solution allows for a standardized method for collecting data for reporting without the
costs associated with maintaining a system locally. The portal permits the user to certify individual
access to their data, and also permits the individual user to generate customized reports without having
to create reports via a database or spreadsheet application. Oversight by administration or other
surveillance agencies is easily accomplished.
The Virtual Office
•
•
•
•
•
•
Shared Calendar application for crew and shift scheduling
Message Board Capability for shared group communications
Groupware task management capability for managing work items as your organization
Shared storage capability for important data files
PDA Synchronization
Real-Time chat room capabilities via a standard web browser
-2-
Public Safety Incident Management User Manual
•
Text pager connectivity
Triage Module:
The triage module of the Public Safety Incident Management system is designed to quickly collect the
data of multiple patients on a mobile computer. Information such as triage tag information, age, sex,
patient condition, chief complaint, vital signs, corresponding times, transporting agency and pertinent
comments may be transmitted to the command console to determine resources needed. The system
updates and refreshes automatically.
Resource Management:
Human and physical resources matched to the need and delivered in a timely manner are necessary to
effectively manage an incident. Caches of equipment and supplies may be tracked by a single bar code or
RFID. Human resources of individuals in public safety, emergency management and government may
also need to be managed during a large event. Combinations of human resources and equipment caches
in the form of strike teams, surge teams and the like must be matched to the need. By having the
information in a central data repository for an emergency management agency, the response to an
incident and resources available to an incident are already known. This type of a resource management
system works independent, loosely tied or fully integrated with CAD systems.
Wireless Networks:
Communication infrastructure is also critical for the successful management of incidents by law
enforcement agencies, fire departments, EMS providers, emergency management, disaster relief and
public health agencies. Traditional voice communications via radio are marginal but in many cases nonfunctional in the event of natural or man-made disasters. The benefit of a system capable of two-way
communication between wireless enabled devices provides a means for instant contact by verbal, written
-3-
Public Safety Incident Management User Manual
and video means.
Wireless mesh networks are ideal for public safety, disaster relief and public health needs. A mesh
network forms itself automatically, heals itself instantaneously, and allows users to move about freely
while staying connected. And because the Med-Media, Inc. system is compatible with existing systems
and commercial off-the-shelf (COTS) hardware and software, a fully functional field deployable wireless
network can be mobilized quickly, easily and affordably.
Evacuating Tracking:
Utilizing various types of personal identification technology, the individual or animal is tracked during
evacuation from a facility. Facilities with a known population are scanned as they enter and exit the
building. If the need for evacuation occurs, the individuals in the facility are identified and accounted for
during the evacuation process. If the evacuation is not temporary, the next step of the system is to track
their temporary shelter.
The system utilizes our centralized data repository WebCUR to track evacuees while they are placed into
temporary housing. The system also monitors availability of temporary housing and their capacity levels.
Reunification System Overview:
The broad impact of recent natural disasters to several major metropolitan areas of the United States has
exposed deficiencies in the current emergency plans to monitor the location of evacuees and reunify
them with family or friends. Animal shelter staff, veterinarians and rescue groups across the country
identified the same deficiencies for animal as well.
Utilizing various types of personal identification technology, the individual or animal identification device
would be scanned into the system as they were evacuated. In the event of injury, they are moved to the
triage system. Otherwise, they are tracked from point to point as they mobilized at different stages of
evacuation. Data on their location, condition, needs and messages are posted on an electronic system
that keeps other informed of their status. Messages from friends and family are sent to the evacuee via
email or other electronic means. The evacuee at their request can withhold information for public view.
-4-
Public Safety Incident Management User Manual
System Requirements
Hardware System: **PSIM is designed and tested for use with the Panasonic Toughbook
o
Pentium III or similar compatible processor with 256 megabytes of RAM.
o
15" or larger SVGA monitor with 1024x768 native screen resolution.
o
2 gigabyte or larger hard drive. Med-Media, Inc. recommends the addition of a 56k modem,
Internet access, back up system, and a laser or ink jet printer.
o
Symbol LS/DS 3408 Barcode Scanner
Operating System:
o
Microsoft Windows 2000, XP Professional or XP Tablet PC Edition operating system should be
installed on your computer.
o
Microsoft Inc. is no longer supporting Windows 95, 98 and Windows NT
Workstation, therefore limiting our ability to support issues with those operating
systems.
WARNING:
Important: Use of Software Product for High Risk Activities and Back-up: The Software is not fault-tolerant and is not
designed, manufactured or intended for use in conjunction with any activity requiring fail-safe performance, including, but not
limited to communication systems or direct life support machines, or other activities that directly affect risk of death or personal
injury ("High Risk Activities") in which the failure of the Software could lead directly to death, personal injury, or severe physical
or other damage. Med-Media and its licensors specifically disclaim any express or implied warranty of fitness for High Risk
Activities. Furthermore, local data that is lost due to theft or failure of any other system upon which or with which the software
operates is not the responsibility of Med-Media, Inc. Med-Media strongly recommends that license owners save their work
often and store data regularly to off-site WebCUR backup media.
Installing the Public Safety Incident Management Module
1. Turn on your computer and login as an Administrator user. Close all Windows programs prior
to installing the Med-Media PSIM application. Your computer screen resolution will need to be set
to a minimum of 1024x768 pixels.
2. Insert the Med-Media PSIM CD into the computers CD–ROM. The installation utility will
automatically load to the desktop. Select the PSIM option; then select the Install option button
to begin the process.
3. Med-Media, Inc. recommends using the default directories that are highlighted in the boxes
during installation. Simply choose the OK or the Yes button when prompted.
4. Contact the Med-Media Technical Support team between the hours or 10:00 am and 6:00 pm
(Eastern Time) Monday through Friday, if additional assistance is needed for the installation.
5. After the installation has been completed, remove the CD from the CD-ROM and place it back in
the jewel case for safe storage.
-5-
Public Safety Incident Management User Manual
Getting Started
Once the computer is on and Windows has finished loading, double click on the Med-Media PSIM icon
on your desktop to open the application. If the Med-Media PSIM icon is missing from the desktop, simply
place your cursor on the Start button. Click Start; select (All) Programs and then the Med-Media PSIM
icon.
**An INCIDENT MUST BE STARTED AND ACTIVE, before ANY patients can be sent up to the
server. Please see the section on CREATING A NEW INCIDENT
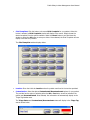
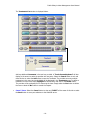
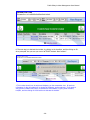
When the Med-Media PSIM icon is selected, the PSIM Home page (Sessions tab) will display to the
screen. This screen displays the Menu Bar options and Tab selections.
The Session tab is displayed below.
-6-
Public Safety Incident Management User Manual
Menu Bar
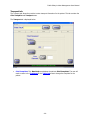
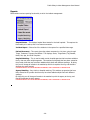
The Menu Bar contains the Control and Help menus.
•
Control Menu: the Control menu contains the Preferences and Exit sub menus.
o
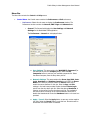
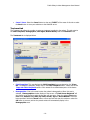
Preferences: Select this sub menu to display the Preferences window. The
Preferences window contains the General, EMS Triage and Advanced tabs.
General: The General tab displays the User Settings and Network
Settings for the Med-Media PSIM application.
The Preferences – General tab is displayed below.
User Settings: This area contains the WebCUR ID, Password (for
the WebCUR ID) and the Company boxes. Select the Get
Companies button to retrieve your available companies list. Select
the desired company from the drop down pick list.
Network Settings: This area contains the Server, App/Skin, AutoLogin, Heartbeat and Database Location boxes. Enter the Server
Name in the text box provided. Select the Secure check box to
enable the secure features for this site. Enter the App and Skin
settings in the text boxes provided. Select the desired Auto-Login
option from the drop down pick list. Select the desired Heartbeat, in
minutes, to the server from the drop down pick list. The application
will send a call to the Server at the interval selected. Select “0” to
disable the Heartbeat call. Enter the Database location in the text box
provided.
Apply / Cancel: Select the Apply button to save any entries made to
this area. Select the Cancel button to exit this box. No entries will be
saved when the Cancel button is selected.
-7-
Public Safety Incident Management User Manual
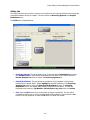
EMS Triage: The EMS Triage tab displays the Miscellaneous Settings for
the Med-Media PSIM application.
The Preferences – EMS Triage tab is displayed below.
Miscellaneous: This area contains the State of Residence for the
incident. Select the desired State from the drop down pick list.
Apply / Cancel: Select the Apply button to save any entries made to
this area. Select the Cancel button to exit this box. No entries will be
saved when the Cancel button is selected.
Advanced: The Advanced tab displays the Software Updates and Network
Diagnostic Settings for the Med Media PSIM application.
The Preferences – Advanced tab is displayed below.
-8-
Public Safety Incident Management User Manual
Software Updates: This area contains the Check for Updates and
Download/Install Updates option buttons. Select the Check for
Updates button once your connected to the server. When updates are
available, the user will be able to select the Download and Install
Updates button. The Update File window will allow the user to view
the download status for the update.
Network Diagnostic: This area contains the Ping Server, Server
Time, Client Alive and the Check User/PW boxes. Select the Ping
Server button to ping the server. This feature allows the user to
confirm they have a good connection to the server. Select the Server
Time box to display the time displaying on the WebCUR server. Select
the Client Alive button to confirm and refresh the connection to the
server. Select the Check User/PW (Password) button to confirm
connection using the user login and password.
Note: Information returning from your button selection will
return to the bottom of this box.
o
•
Apply / Cancel: Select the Apply button to save any entries made to
this area. Select the Cancel button to exit this box. No entries will be
saved when the Cancel button is selected.
Exit: Select this sub menu to exit and close the Med-Media PSIM application.
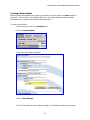
Help Menu: This menu contains the About sub menu. Select this sub menu to display the
current Version Build of the Med-Media PSIM application. Select the OK button to close this
box.
The Help – About PSIM box is displayed below.
-9-
Public Safety Incident Management User Manual
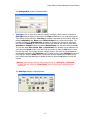
Session tab
The Session tab is the first screen that displays when the application is opened. This tab allows the
provider to login to an incident as well as gather provider and scene information for the incident. The
user can advance throughout the application by simply selecting the desired tab. The Session tab
contains the Exit, Login/Logout, Incident information, Providers Information and the
Messaging boxes.
The Session tab is displayed below.
•
Exit: Select this button to exit and close the Med-Media PSIM application.
•
Login / Logout: Enter your provider Name in the text box provided and select the Login
button. When this box is selected, a “Touch Screen Keyboard” displays to the screen to assist
with text entry. Select the Logout button to log out of the Med-Media PSIM application.
The Touch Screen Keyboard is displayed below.
- 10 -
Public Safety Incident Management User Manual
•
Incident Information: This area displays the information about the incident, such as the
Incident Name, Incident Description, the Date/Time the Incident was activated and the
Location of the Incident. Select the Refresh button to update the information displaying in this
area.
•
Providers Information: This area displays the provider information for the incident. Select the
Refresh button to update the information displaying in this area. The Providers list displays all
of the WebCUR ID’s, Responder Names, Organizations, computers IP Address and the
Last Time the computer interacted with the WebCUR server for the incident.
•
Messaging: This area displays the messaging area for the application. Select the Start Snap
Talk Communication button to begin a chat session for the incident. The computer will need to
have the “Snap Talk Software” installed prior to using this feature. Once in the chat room,
simply enter your text in the box provided and then select the party you wish to communicate
with.
- 11 -
Public Safety Incident Management User Manual
Triage tab
The Triage tab allows the provider to enter the initial triage information for the patient. The Triage tab
contains the Triage Tag area, Triage Status, Gender/Age, Chief Complaint, Location and the
Contaminated/Decontaninated boxes.
**All information MUST be entered on the Triage tab before a save can occur.
Therefore, you must have a tag #, triage status, sex, age, chief complaint, location, and
contamination level.
** The location will be saved and stored upon the first save in the Triage tab sector, or any
changes thereafter in the Triage tab only. This does NOT include opening from another tab.
The Triage tab is displayed below.
•
Triage Tag Number: This area displays the Triage Tag Number, current Triage Status and
the Contaminated/Decontaminated information for the patient. This area will display above
each tab as a reference for the provider, except the Session and Offsite tab.
- 12 -
Public Safety Incident Management User Manual
Select the Look Up button to search for a specific tag number. Simply enter the desired
Triage Tag Number in the text box provided and select the Look Up button. If this
Triage Tag Number matches a patient in the incidents database, the patient’s information
will automatically display to the tabs.
o
**This field can be used as a unique identifier using the bar code scanner (see
hardware requirements for recommended model) to either lookup or enter the
patient tag number using bar code enabled triage tags
**IMPORTANT: To get the tag number from the bar code scanner, YOU MUST
HAVE THE CURSOR IN THE TAG NUMBER FIELD! Otherwise it will scan the tag
number in the active text field (cursor is active in the text box), or it will not
do anything at all if not in a text box field.
Select the Show ALL button to display every Triage Tag Number in the incident. When
this button is selected, a Patient List window will display to the screen. This window
displays the Tag Numbers, Locations, Status, Genders, Last Names and the Sectors for
each patient in the incident. This window also contains the Send Patients to PSIM,
Edit Patient, Create New Triage Patient and the Close buttons.
o
The Patient List box is displayed below.
o
Send Patient to PSIM: Click this button after selecting the desired Tag Number to
send this patient information to the PSIM server.
o
Edit Patient: Click this button after selecting the desired Tag Number to modify the
record. Once selected, the patient information will automatically display to the tabs.
The provider will need to click on the Save button to save any changes. Double
clicking on the patient will accomplish the same functionality as this.
•
o
Create New Triage Patient: Click this button to start a New Triage Tag Number.
The provider can scan or manually enter the desired Triage Tag Number in the text
box provided.
o
Close: Click this button to close the Patient List box.
Triage Status: Select the desired Triage Status from the option buttons available. Only 1
status can be selected in this area. The provider has the ability to select the Immediate,
Delayed, Minor or the Morgue option. Once selected, the information will automatically display
to the Triage Tag Number area. Click on the Clock button to display the time the Status was
- 13 -
Public Safety Incident Management User Manual
choosen. Multiple triage status entries can be added by clicking on the status color bar at the top
right hand of the page:
Once you click on this, this will display an area where multiple triage status entries can be added:
**Note, ONLY ONE entry can be added for an initial triage status. After that there
can be a maximum of four entries. The fourth entry will always be overwritten with
the latest entry added. Upon Save, the entries will be saved in this order: First,
triage status regardless of time, followed by the time entered for each status
regardless of order entered or sector tab.
•
Gender / Age: Select the desired Gender for your patient. The provider has the option of
choosing either Female or the Male option. Enter the patients Age in the text box provided. A
Touch Screen Keyboard will display to the screen to assist the provider when this box is
selected. The user can also use the Age Quick Keys for entering the age. These keys allow the
user to increase or decrease the age intervals by 1 or 10. Select the appropriate Year, Months
or Days option button for the age entered.
- 14 -
Public Safety Incident Management User Manual
•
Chief Compliant: Click this button to choose a Chief Complaint for your patient. When this
button is selected, a Chief Complaint window will display to the screen. Simply choose the
desired complaint from the options available. Select the Cancel button to exit and close this
window or select the OK button to save your choice. Once selected, the Chief Complaint will now
display in the text box provided.
The Chief Complaint window displays below.
•
Location: Enter the initial site Location where the patient was found in the text box provided.
•
Contamination: Select the desired Contaminated/Decontaminated options for your patient.
The provider has the option of selecting either the No or Yes button as well as indicate if the
patient was Decontaminated. Once selected, the information will automatically display to the
Triage Tag Number area.
The Triage Status and Conntaminate/Decontaminate status will display in the Triage Tag
area as shown below.
- 15 -
Public Safety Incident Management User Manual
•
Cancel / Save: Select the Cancel button to clear and “RESET” all the areas of this tab or select
the Save button to save your selections to the WebCUR server.
Treatment tab
The Treatment tab allows the provider to enter any treatment provided to the patient. This tab contains
the Chief Complaint, Demographics, Vital Signs, Medical History and the Treatment areas.
The Treatment tab is displayed below.
•
Chief Complaint: This area displays the Chief Complaint that was selected on the Triage
tab. To change the complaint, simply click on the Chief Complaint button. Please refer to the
Triage tab-Chief Complaint section of this manual for a detailed description of this button.
•
Demographics: Click in this area to enter the patient’s demographics. When this area is
selected, a Demographics window displays to the screen. A “Touch Screen Keyboard” will
also display to the screen to assist the provider with text entry. Enter the patients First name,
Last name, Address, City, State, Zip Code, Gender, Age and Phone Number is the text
boxes provided. Select the Cancel button to close and exit and close this window or select the
OK button to save any entries. Any saved entries will automatically display in the
Demographics area.
- 16 -
Public Safety Incident Management User Manual
The Demographics window is displayed below.
•
Vital Signs: Click in this area to enter the patient’s Vital Signs. When this area is selected, a
Vital Signs window displays to the screen. The Time box defaults to your computers regional
Time settings. Simply select the Time Keys to increase or decrease the time interval. Enter the
patients Respiratory rate, Pulse rate and Blood Pressure in the text boxes provided. The
provider can select the Vital Sign Keys to increase or decrease the intervals for each active
area. Select the Method for how the Blood Pressure was obtained; the user can select either
Auscultate or Palpated. Select the patients Mental Status from the option buttons available.
The user can select Alert, Verbal, Pain or Unconscious. Only 1 status can be selected in this
area. Select the Cancel button to exit and close this window or select the Add button to save
the vital sign trend. The provider can enter multiple trends in this area. Any trends Added will
automatically displayed in the Vital Signs area. To delete a trend, simply highlight the desired
trend and then click the Delete button. The provider will be prompted prior to removing the
trend. Simply select the Yes button to delete the trend or select the No button to cancel the
request.
Warning: Each vital sign area has value parameters set for a Minimum and Maximum
number. The user will get an “Invalid Entry” warning if the entry is outside these set
parameters.
The Vital Signs window is displayed below.
- 17 -
Public Safety Incident Management User Manual
•
Medical History: Click in this area to enter the patient’s Past Medical History. When this area is
selected, a Past Medical History window will display to the screen. A “Touch Screen
Keyboard” will also display to the screen to assist the provider with text entry. Enter the
patients Past Medical History (PMH), Allergies and Medications (Meds) in the text boxes
provided. Select the Cancel button to exit and close this window or select the OK button to save
the entries. Any history added will automatically displayed in the Medical History area.
The Past Medical History window is displayed below.
•
Treatments: Click in this area to enter any Treatments administered to your patient. When this
area is selected, a Treatments window will display to the screen.
The Treatments window is displayed below.
The Time box defaults to your computers regional Time settings. Simply select the Time Keys
to increase or decrease the time interval for the treatment. To enter a Treatment, simply select
the “Click for Treatment List” button. Once selected, a Treatments List window will display
to the screen. The provider has the ability to search for the desired treatment by advancing
through the items using the Arrowed keys or by selecting the Beginning Letter of the
treatment. Once the Treatment has been chosen, click on the Add button to save the item to
the Treatment box. Select the Cancel button to exit and close this window.
- 18 -
Public Safety Incident Management User Manual
The Treatments List window is displayed below.
Add any additional Comments in the text box provided. A “Touch Screen Keyboard” will also
display to the screen to assist the provider with text entry. Select the Cancel button to exit and
close this box or select the Add button to save the Treatment. The provider can enter multiple
treatments in this area. Any trends Added will be displayed in the Treatments area. To delete a
treatment from this area, simply highlight the desired entry and click on the Delete button.
The provider will be prompted prior to removing the item. Simply select the Yes button to delete
the item or select the No button to cancel the request.
•
Cancel / Save: Select the Cancel button to clear and “RESET” all the areas of this tab or select
the Save button to save your selections to the WebCUR server.
- 19 -
Public Safety Incident Management User Manual
Transport tab
The Transport tab allows the provider to enter transport information for the patient. This tab contains the
Chief Complaint and Transport areas.
The Transport tab is displayed below.
•
Chief Complaint: This Read-Only area displays the patients Chief Complaint. The user will
need to return to the Treatment or the Triage tab areas to change the complaint for the
patient.
- 20 -
Public Safety Incident Management User Manual
•
Transport: This area allows the provider to select the transporting Unit as well as the
Destination location for the patient. This area contains the Transport Agency and the
Destination boxes.
o
Transport Agency: Click this button to choose the transporting Unit for your patient. When
this button is selected, a Transport Agency window displays to the screen. Select the
desired transporting agency from the list provided. The provider has the ability to search for
the desired agency by advancing through the list using the Arrowed keys or by selecting the
Beginning Letter of the Agency. Once the agency is chosen, select the OK button to add
them to the Transport box or select the Cancel button to exit and close this window. The
provider also has the ability to enter a Unit ID Number in the text box, once the Unit has
benn selected.
The Transport Agency window is displayed below.
- 21 -
Public Safety Incident Management User Manual
o
Destination: Click this button to choose the receiving Destination for your patient. When
this button is selected, a Receiving Agency window displays to the screen. Select the
desired receiving agency from the list provided. The provider has the ability to search for the
desired agency by advancing through the list using the Arrowed keys or by selecting the
Beginning Letter of the Agency. Once the agency is chosen, select the OK button to add
them to the Destination box or select the Cancel button to exit and close this window.
The Destination window is displayed below.
Once the agency has been added to the Destination box, click on the Clock to display the
Time that the patient departed the scene of the incident. The user also has the option to
manully enter the time in the text box provided.
•
Cancel / Save: Select the Cancel button to clear and “RESET” all the areas of this tab or select
the Save button to save your selections to the WebCUR server.
- 22 -
Public Safety Incident Management User Manual
Offsite tab
The Offsite tab allows the provider to view the current status for the receiving facilities as well as provide
a Hospital breakdown during the incident. This tab contains the Receiving Agencies and Hospital
Breakdown areas.
The Offsite tab is displayed below.
•
Receiving Agencies: This area displays a list of receiving agency Destinations along with a
total Patient Count for each patient transported from the scene of the incident. Select the
Refresh Hospital List button to refresh the Receiving Agencies list.
•
Hospital Breakdown: This area allows the provider to see a breakdown of the patients
transported to a specific facility. Simply highlight the desired Destination in the Receiving
Agencies list and then select the View Hospital Breakdown button. The Hospital
Breakdown box will now display “All” patients transported to that facility. This box will
breakdown each patient by Tag Number, Patients Name, Age, Sex and current Status.
•
Exit: Select the Exit button when you are ready to close the application. The user will be
prompted to confirm prior to closing the Med-Media PSIM application. Simply select the Yes
button to exit the application or select the No button to cancel the request.
- 23 -
Public Safety Incident Management User Manual
Patient Movement:
Patient movement is one of the major functionalities of PSIM. The ability to view a patients movement
from Initial Triage, to Treatment, to Transport, to Offsite is important. This is important from both the
local client perspective, but becomes very important on PSIM: WebCUR. From the PSIM client
standpoint, this is accomplished based upon user actions. Below is the PSIM Patient Movement Matrix,
which describes what actions will move a patient through the various Sectors/Tabs in the system.
PSIM Patient Movement Matrix
Sector Tab
Open & Cancel
Open & Save
Save w/
Destination,
Transfer Agency,
Time Departed
Triage
No record created
Triage
Offsite
Treatment
Treatment
Treatment
Offsite
Transport
Transport
Transport
Offsite
Offsite
N/A
N/A
Offsite
Rules/Assumptions
* A patient’s location is determined by the save button of the tab they are on, or if canceled, the location
of the tab where the patient is opened (not on the tab where canceled)
* Once a patient is saved in Triage, they can not be edited in Triage, but the information can still be
viewed
* A patient is considered Offsite regardless of tab, if the patient is saved with the following information:
completed destination, transfer agency, and time departed. It will therefore override any tab the patient
is saved on.
Examples:
* If you save a patient in Triage, it is considered in Triage
* If you save it in Treatment, is it in Treatment
* If you go back and it was saved in Transport previously, and then you opened it in Treatment and
saved, it will now be in Treatment (unless Destination, Transfer Agency, and Time Departed is
completed)
* If you open a new patient, and then fill out the required Triage information, and then proceed to the
other tabs and save on Treatment or Transport, it will be on either Treatment or Transport
- 24 -
Public Safety Incident Management User Manual
PSIM: WebCUR
PSIM: WebCUR is the central data repository for the incident information. This is where overall incident
information can be viewed, such as creating a new incident, reports, and patient breakdown information.
To access WebCUR: PSIM, you must first login on the main screen by entering your username and
password provided and then click Login:
- 25 -
Public Safety Incident Management User Manual
Commander Portal
Once you are logged in, you are taken to the PSIM: WebCUR portal view, which contains the current
incident information, as well as the Triage, Treatment, Transport, and Offsite breakdown.
The Triage, Treatment, and Transport sector breakdowns, display the summary count for patients in that
sector, as well as the Triage status breakdown of Immediate, Delayed, Minor, and Deceased. When in
“minimized” view, it will only display the overall count, and Triage status breakdown. However, you can
expand this by clicking on the “+” button:
Once you click on the “+” button, it will then display the patients in that sector. It displays Tag, Sex,
Age, Status, Complaint, and Time. You can then view the patient report by clicking on the tag number.
You can then also minimize this view by clicking on the “-“ button.
- 26 -
Public Safety Incident Management User Manual
Creating a New Incident
Before the PSIM client software can connect to any incident, first there must be an active incident to
connect to. This is all done in the WebCUR: PSIM view. An incident contains the general incident
information such as incident name, date activated and location.
To create a new incident
1. On the menu bar, click on the Incident option
2. Click on Create Incident
3. Then enter the incident information
4. Click on Save Changes
5. This will then take you to the Incident List page. It will display all incidents in the system.
- 27 -
Public Safety Incident Management User Manual
6. The next step is to Activate the incident, by clicking on the checkbox, and the clicking on OK
when prompted “Are you sure you want to ACTIVATE incident: New Incident”.
**This incident should now be active and displaying on the commander view. All previous
information for the old incident will no longer be displaying, such as patients. If you want to
view previous incident data, simply re-activate the old incidents, by going under Incident,
List/Edit, and the clicking on the check box to Activate the incident.
- 28 -
Public Safety Incident Management User Manual
Reports
PSIM contains various reporting functionality to aid in the incident management.
Hospital Status – This displays hospital divert status for the local hospitals. This requires the
functionality to be active, and a live internet connection.
Incident Report – Gives a list of the incidents in the system for a specified date range.
Patient Movement – This report shows the patient movement in a list view, going through
Triage, Treatment, Transport and Offsite. This displays, Sector, Triage Status, Tag Number,
Name, Sex, Age, and Chief Complaint.
Hospital Matching – This is used to match certain hospital agencies that have been added on
the fly, that may have multiple agencies. This matches up hospitals that have been entered at
the provider level that may have been added multiple times with different spellings. By doing
this you will change all records to be matched up with the hospital at the top, and therefore
eliminate the other hospital.
PLEASE BE ABSOLUTELY SURE BEFORE PROCEEDING, THIS IS POTENTIALLY DESTRUCTIVE!
Agency Matching – Very similar to Hospital matching, This matches up agencies that have
been entered at the provider level that may have been added multiple times with different
spellings.
By doing this you will change all records to be matched up with the agency at the top, and
therefore eliminate the other agency.
PLEASE BE ABSOLUTELY SURE BEFORE PROCEEDING, THIS IS POTENTIALLY DESTRUCTIVE!
d
- 29 -
Revisions
________________________________________________________________
Content and Screen shots
11-24-06
MAP
PSIM 1 Version Build
______________________________________________________
Version 1.0.0
11-24-06
MAP