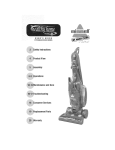
1
1697, 8804 SERIES
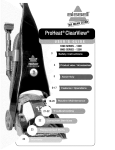
SafetyInstructions
ProductView/ Accessories
Features/ Operations
ConsumerServices
Replacement
Parts
ug310-5944
1697
207.indd
1
2/20/07
3:03:11
PM
for buyinga BISSELLPowerSteamer
We're glad you purchased
we know
about
complete,
floor
high-tech
Your PowerSteamer
year warranty.
Consumer
receive
is well
Services department,
leader
homecare
Everything
of this
system.
it with a knowledgeable,
so, should
onededicated
you ever have a problem,
you'll
assistance.
invented
in the design,
products
cleaner.
made, and we back it with a limited
We also stand behind
My great-grandfather
deep
into the design and construction
home cleaning
fast, considerate
a global
a BISSELL PowerSteamer
care went
the floor sweeper
manufacture,
in 1876. Today, BISSELL is
and service of high quality
like your PowerSteamer.
Thanks again, from all of us at BISSELL.
Mark J. Bissell
President and Chief Executive Officer
2
ug310-5944
www.bissell.com
1697
207.indd
2
800.237.7691
2/20/07
3:03:13
PM
IMPORTANTSAFETYINSTRUCTIONS
Whenusbgan eleckicalappliance, basic precautions
should be observed,induding the following:
•
•
•
•
•
•
•
:_eadall instructionsbeforeusingyour
DOWERSTEAMER
®
/k WARNING:
To
reduce
tile
risk
offire,electricshock,or injury:
• Do not immerse.
•
•
•
•
Do not point attachment nozzleat peopleor animals
Keepappliance on a level surface.
Turnoff all controls before unplugging.
Unplug before attachingthe TurboBrush_
Beextra careful when cleaning stairs.
Closeattentionis necessary
whenusedbyor nearchildren.
WARNING:The Power Cordon this productcontains
lead, a chemicalknown to the State of Californiato
cause birth defectsor other reproductiveharm.
Wash hand after handling.
Useonly on surfaces moistenedby cleaning process.
Always connectto a properlygroundedoutlet.
SeeGroundingInstructions.
Unplugfrom outletwhen not inuse and before
conductingmaintenanceor troubleshooting.
• Do not leave machinewhen it is plugged in.
• Donotservicemachinewhenit is pluggedin.
• Do not use with damaged cord or plug.
GROUNDING
INSTRUCTIONS
• If applianceis not working as it should,has been
dropped,damaged,left outdoors,or droppedinto
water, haveit repairedat an authorizedServiceCenter.
• Use indoors only.
• Do not pull or carry by cord, use cord as a handle,
close door on cord, pull cord around sharp corners
or edges, run appliance over cord, or expose cord
to heatedsurfaces.
This appliance must be connected to a grounded
wiring system. If it should malfunction or break
down, grounding provides a safe path of least
resistance for electrical current, reducing the risk of
electrical shock. The cord for this appliance has an
equipment-grounding conductor and a grounding
plug. It must only be plugged into an outlet that is
• Do not carry the appliance while in use.
• Do not unplug by pulling on cord. Unplugbygrasping
the plug,notthecord.
• Donothandleplugor appliance
wilh wethands.
properly
installed and grounded
in accordance
SAVETHESE
INSTRUCTIONS.
Grounded
• Donotputany objectintoapplianceopenings,usewith
blockedopening,or restrictairflow.
• Do not expose hair,loose clothing, fingers or body
parts to openings or moving parts.
• Do not pick up hot or burningobjects.
WARNING:
Improper
• Do not pick up flammable or combustiblematerials
(lighterfluid, gasoline, kerosene,etc.) or use in the
presence of explosive liquids or vapor.
• Donotuseappliance
inanenclosed
spacefilledw_ vapors
givenoffbyoilbasepaint,paintlhinna;,
somemolhprodirg
substances,
flammable
dust,orotherexplosive
ortoxicvapors.
• Donotpickuptoxicmaterial(chlorine
bleach,ammonia,
draincleaner,gasoline,
etc.).
• Do not modifythe 3-prong groundedplug.
• Do not allow to be used as a toy.
connection
of theequipment-grounding
conductorcanresultin a riskofelectrical
shock.Checkwitha qualifiedelectrician
or
servicepersonif youaren'tsureiftheoutlet
isproperlygrounded.
DONOTMODIFYTHE
PLUG.If itwill notfit theoutlet,havea
properoutletinstalled
bya qualified
electrician.
Thisapplianceis designed
for
useona nominal120-voltcircuit,andhasa
grounding
attachmentplugthatlookslike
the plug inthedrawingabove.Makecertain
thattheappliance
isconnected
to anoutlet
havingthesameconfiguration
as theplug.
Noplug adaptershouldbeusedwiththis
appliance.
• Do not use for any purpose other than describedin
this User's Guide.
• Do notoperatethe applianceunlessthe beltdooris
securelyassembledinthe leca'don
provided.
• Useonlymanufacturer's
recommended
attachments.
• Useonly cleaningproductsformulatedbyBISSELLfor
use inthis applianceto preventinternalcomponent
damage.Seethe cleaningfluid sectionof this guide.
• Keepopenings free of dust, lint, hair,etc.
with
all local codes and ordinances.
_his
modelis for householdusesonly.
Bi_E{[
www.bissell.com
ug310-5944
1697
207.indd
800.237.7691
3
2/20/07
3:03:13
PM
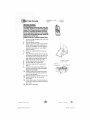
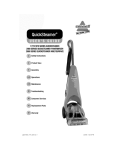
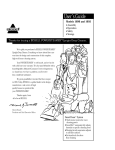
TurboBrush®
Storage
_
#
(Select Models)
II
I
_
l
Flow Indicator
SmartMix®
Switch.._
pD
'o_t_frten_h_
(Filter Inside)
i_j
y
_
"_-------Lower
_
Optional Accessories:
Handle
rN_oozi2Belt
Access Doolr
Window
These items are availablefor purchasewith your model. To order replacementparts or additional tools or
formulas, please referto page 19.
3" ToughStainBrush
4" Upholstery
Tool
PreTreat
Wand
TurboBrush
®
HardFloorTool
SprayingCreviceTool
MeshToolBag
4.
ug310-5944
www.bissell.com
1697
207.indd
4
_
(bagonly)
800.237.7691
2/20/07
3:03:14
PM
Keep plenty of genuine BISSELL
Advanced Cleaning Formulas on hand
so you can clean whenever it fits your
schedule.Always use genuine BISSELL
deep cleaning formulas. Non-BISSELL
cleaning solutions may harm the
machine and will void the warranty.
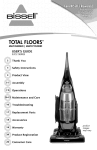
--
Upper Handle
ToolCaddy
QuickRelease
Stain
Brush Storage
_
2-in-1 water
tank,,,
Nuts
4" Upholstery
ToolStorage
(SelectModels)
FlexHose
BISSELLFormulas:
48 oz,BISSELL
FiberCleansing
Formulawith
ScotchgardM
Protector
48 oz. BISSELL 48 oz.BISSELL 48 oz,BBSELL48 oz.BBSELL 43 oz.BBSELL 32 oz,
Multi Allergen PetOdorand%11 Natural
Orange Lavender
E,%ence
3XOoncerTtrated
BISSELL
Removal
Removal Formula
Extract
Pormula Formula
%th
FiberCleansing HardFloor
Pormuld
Mwith
withScotchgard w_hSc/stchgard
MScstchgard
_
Formula
%th
Solutions
Scotchgard
Protector
Protector
Protector
Scotchgard
_
Formula
Protector
Protector
800.237.7691
www.bissell.com
TM
ug310-5944
1697
207.indd
TM
TM
TM
TM
22 oz,
BISSELL
ToughStain
Pre
CbanerTM
TM
5
2/20/07
5
3:03:15
PM
to Use this Guide
This user's guide has been designed to help you
get the utmost satisfaction from your BISSELL
PowerSteamer. You'll find assembly and operating instructions, safety precautions, as well as
maintenance and troubleshooting instructions.
Please read this guide thoroughly before
assembling your deep cleaner.
WARNING:
Do not plug in your
cleaner until you have
completely assembledit per
the following instructions
and are familiar with all
instructionsand operating
procedures.
Payparticularattentionto the productdiagram,assembly
instructions,andpart names.Locateand organizeall parts
beforeassembly.Familiarizeyourselfwith the partsand
wherethey go. Followingthis user'sguidewill greatly
enhanceyour abilityto getthe most performancefrom your
BISSELLPowerSteamerfor many years.
YourPowerSteamercomesin three,easy to
assemblecomponents:
UpperHandle
LowerHandle
ToolCaddy
The only thing you will needto assembleyour cleaner is
a Phillips head(_'_ screwdriver.
w_
3,
1.
Slide upper handleonto lower handle.
2.
Feedbundled power cord through tool caddy from
caddy'sflat side.
3.
4.
Align upperhandle holesand tool caddy holes.
Placehex nut into backof tool caddyand hold in
place.Insertbolt from front to backturning into the
hex nut until snug. Donot overtighten. Repeatfor
the secondbolt andhex nut.
5.
Insert2 screwsinto lower 2 holes.Turnuntil snug.
6.
Snaptools into storageon the tool caddy.
7.
Wrap power cord and flex hose as shown in
figure 7.
4,
PowerSteamerassemblyis now complete.
6
ug310-5944
www.bissell.com
1697
207.indd
6
800.237.7691
2/20/07
3:03:24
PM
Special Features of Your BISSELL PowerSteamer
YourBISSELLPowerSteameris a homecleaning
systemthat usesa combinationofhottap water,
BISSELLadvancedcleaningformulaandsuction
to safelycleancarpetsand upholstery.
DirtLifter_ PowerBrush
TheDirtLifferPowerBrushisdesignedto
enhancecleaningperformance.Thebristle
patternsafelyliftsoutthe deepdowndirt while
gentlygroomingcarpetfibers.Thefloating
suspensionself-adjuststo all carpetheights.
Whenthe poweris ON( I ) andthe machineis
in the uprightposition,yourcarpet is protected
becausethe brushesare liftedup offthe carpet.
SmartMix®
TheSmartMixfeatureautomaticallymixeshot
tap water with the BISSELLadvancedcleaning
formula.Simplychooseoneof the 3 settings
(hightraffic,normal,or water only)andthe
PowerSteamerwill adjustthe rightamountof
cleaningsolutionto mixwith the water tofit
yourcleaningneed.
SmartMixbottle
Havinga separatesolutiontank from the
water tank allows no waste of formula.
Becausethe water and solutionare stored
separately,they are not mixed until youare
readyto clean.Whenyour cleaningjob is
finished,the formula can be storedreadyto
use in yourmachinefor the nexttime!
2-in-1 water tank
Our2-in-1watertank systemisdesignedwitha
heavydutybladderinsidefor cleanwater.Asyou
clean,the cleanwaterin the bladderwill empty
andmixwith thecleaningformula.Dirtywater
pulledoutofyourcarpetswill collectaroundthe
outsideof the bladdersothatcleananddirty
waterare alwayskeptseparate.Thisallowsthe
userto maximizetank space,yetonlycarryone
tank toandfromthe sinkfor emptyingandfilling.
www.bissell.com
800.237.7691
iiii_ i
ug310-5944
1697207.indd
7
2/20/07
3:03:25
PM
Features of Your BISSELL PowerSteamer
Flow indicator
Thisislocatedonthe machinebase.It spins
whenthe triggeris pressedto indicatethat the
machineisapplyingcleaningsolutionto the
carpetandwill stopspinningwhenthe SmartMix
tankor Bladderneedsto berefilled,or whenthe
triggeris released.
Note: Flowindicatordoesnot spinwhen
sprayingthroughthe attachmenthose.
flow qaica_or
ReadyToolsdial
Thisprovideseither floor cleaningor above
the floor cleaningwith the flip of a switch. If
choosingabovefloor cleaningfor upholstery,
stairs,or alongthe baseboards,choosethe
attachmentappropriatefor the job. Attach tool
to the hose,and youare readyto go!
1.
2.
3.
4.
5.
8
ug310-5944
Plan activities to give your carpet time to dry.
Move furniture to another area if cleaning an
entire room (optional).
Thoroughlyvacuumarea with a dry vacuum
cleaner beforedeep cleaning.
Planyourcleaningrouteto leavean exitpath.It is best
to begincleaninginthe cornerfa_est fromyourexit.
Pretreating(optional)
Note:Prebeal_ngis recommended
toimprove
cleaningeffectiveness
for heavilysoiledcarpetin
hightrafficareassuchas enkywaysandhallways.
A. SpraytheBlSSELL
ToughStainPre-'_eat
formula
ontoheavytrafficareas,soiledareas,or stains.
B. Allowto penetratefor at least3 minutes.
C. Followingthe instructionsbelow,cleanas
normal,usingthe BISSELLPowerSteamer
machineon the high traffic setting.
www,bissell,corn
1697
207.indd
ATTENTION:
SomeBerbercarpetshavea
tendencyto fuzz with wear.
Repeatedstrokesin the same
areawith an ordinaryvacuum
or deepcleanermay aggravate
this condition.Pleasesee Stain
Removalinstructionson page 14.
800.237.7691
8
2/20/07
3:03:26
PM
Fill the 2-in-1 water tank
I:',I,I:L
1.
Releasethe handle and lay the machinehandle
back to access the Tank.
2.
Removethe tank from the base of the machine by
lifting the tank carry handle.
3.
Carrylikea bucketto the sink.Rotatethehandle
forwardto unlatchthe lid.Liftoff andsetthe lid aside.
4.
Fill up the bladderwith clean hot tap water.
*Do not boil or microwavewater as it can
5.
6.
destroythe bladder.
Replacethe top of the tank by matchingthe lid
and tank edges. Handlemust be in the forward
position in orderto replace lid. Rotatethe handle
to the carrying position to latch the lid.
Note:Rememberto securethe lid andtestto
makesureit is securebeforepickingupthe tank.
Placetank into machinebase,seatingfirmly in place.
Rotatetank handleback into latchedposition.Bring
machinehandleback into uprightposition.
Fill the SmartMix/formulatank
1.
2a.
Liftthe formulatank upandout of the machinebase.
Fill the formula tank byfirst unscrewingthe cap
and insert.Alwaysuse genuineBISSELLformulas
to maximizecleaningandfor thesafetyof your
machine.Fillformulaup to the line andreplacethe
cap and insert.Placeformulatank into the slot inthe
back of the machinefor a snugfit.
2b. If usingthe BISSELL3XConcentratedFiberCleansing
Formula:Add3 capfuls of 3X ConcentratedFiber
!
Cleansingformulato the formulatank, andthen fill I_
with warm water to the line.
IZBWARNING:
Note: ff bottleleaks,checkfor properpositioning
of redgrommentandstraw insert.
www.bissell.com
TOReducethe Riskd Fireand
ElectricShockdueto internal
componentdamage,useonly
BISSELLcleaningfluidsintended
for usewiththe deepdeaner.
800.237.7691
ii
ug310-5944
1697
207.indd
9
2/20/07
3:03:27
PM
Choosethe SmartMixsetting
Simplychooseoneof the 3 settings
• HighTraffic
• Normal
• WaterRinse
andthe PowerSteamer
will adjustthe right
amountof cleaningsolutionto mixwith the
heatedwater tofit yourcleaningneed,
NOTE:Whenyourcleaningjob is finished,
the formulacan bestoredreadytouse in
yourmachineforthe nexttime!
/
SmartMix Dial
Set ReadyToolsdial
J ReadyToolsDial
Set ready tools dial to the floor cleaning setting.
i_'j
,
Powerswitch
1.
Plug into a proper outlet and turn the power
switch to the ON( I ) position.The switch is
foundon the back of the handle.
Cleaningstrokes
1.
Whilepressingthe trigger,make one slow forward
wet pass andanotherone back. Letthe formula
andDirtLifter PowerBrushdo the work for you.
Caution:Donot ovenNet.Takecare not to run
overlooseobjects or edgesof arearugs. Stalling
brushmay result in prematurebelt failure.
2.
3.
10
ug310-5944
Releasethetriggerandmake oneslow forwardand
backwardpassoverthesameareato removeany
residualdirtywater,andaidin drying.Repeatcleaning
passesuntilsolutionbeingpulledupappearsclean.
Continuepasseswithout pressingthethggeruntilyou
can'tseeany morewater beingpulledup.
NOTE: Both the SmartMix tank and the
clean water tank must have liquid in them
in order for the machine to spray. If one
tank is empty the machine will not apply
cleaning solution or water.
Aftercleaning,you may wantto turn theSmartMix
dialto rinseto giveyourcarpetinga finalwateronly
rinse.Thiswill ensurethoroughremovalof embedded
dirt loosenedbythedeepcleaningformula.BISSELL
deepcleaningformulascontainan anti-resoiling
agentthat helpsyourcarpetsrepeldirt andkeeps
themlookinggoodlonger
www.bissell.com
1697
207.indd
10
A WARNING:
To reduce the risk of fire,
electric shock or injury,
unplug from the outlet
before servicing.
800.237.7691
2/20/07
3:03:28
PM
_peration
EmptyThe 2-in-1 water tank
1.
2.
3.
4.
5.
Removethe 2-in-1water tank fromthe baseusing
the tank carryhandle.Carrythetank likea bucketto
a utilitysinkor outsidewhereyouwill disposeofthe
collectionwater Removethetop of thetank by rotating
thehandleforwardto unlatchlid andliftinglid off tank.
Emptycollection water from bottomof tank.
NOTE: You may notice hair & debris deposits
on the carpet or in the tank that were
loosened by the cleaning action (especially
with newer carpets that have never been
deep cleaned before). This debris should be
picked up and thrown away.
After each use, removeand rinse the lint screen
locatedon the tank lid.
1,
3,
Refill the tank in tank by referencing"Fill the 2-in1 water tank" on page 9. Rememberto securethe
top of the tank by rotatingthe handle and test to
make sure it is secure before picking up.
Return2-in-1 water tank to the machine.
NOTE:Always check the level of cleaning
formula in the SmartMix tank at the same
time, and refill as needed.
Rinse (optional)
Rinsing is an optional step that can be done
during the cleaning process by switching to the
water rinse setting,
or it can be done after the
carpeted area has been cleaned.
1.
Simply choosethe water rinse setting on the
SmartMixdial, and follow the same path as you
did for cleaning,taking care to do a forward (wet)
stroke by depressing the trigger, a backward (wet)
stroke, and a forwardand backward (dry)stroke,
releasingthe trigger. Continuethis until the water
you see coming up the nozzle is clear.
1,
/ WARNING:
To reducethe risk of fire,
electric shock or injury,
unplug from the outlet
before servicing.
www.bissell,com
11
800.237.7691
/
ii
ug310-5944
1697
207.indd
11
2/20/07
3:03:29
PM
iintenanceand care
Machinestorage
Onceyourcleaningiscomplete,makesurethe
2-in-1watertank isemptiedandrinsedout.Put
the unitaway in a closetor basementfor the next
use.TheSmartMixtank can remainfilledand
readyto go (storewith machinesetto wateronly
setting),or it cansimplybeemptiedbackintothe
formulabottleif that ismoreconvenient.
Note:Storecleanerin a protected,dryarea.
Sincethisproductuseswater,it mustnotbe
storedwherethereisa dangeroffreezing.
Freezingwill damageinternalcomponents
andvoidthewarranty.
A WARNING:
To reducethe risk of fire,
electric shock or injury,
unplug from the outlet
before servicing.
Machine Care
For best results, a few simple steps can assure
your machine is well maintained after your
cleaning is complete.
1.
2.
3.
4.
5.
6.
7.
12
ug310-5944
Turnpower switch OFF( 0 ). Unplug the machine
andwrap the power cord.
After emptyingthe 2-in-1 water tank, rinse it out
at a faucet with runninghot tap water, taking care
to clean underneaththe heavyduty bladder,and
all around it. Clean out lint trap.
Replacethe 2-in-1 water tank on the machine.
Cleanoutthe flow indicatorfilter each time it is used
to ensurebest cleaningperformance.Unscrewthe
flow indicatorcap, lift out the red rotorandwhite
filter.Rinseall _ree partswith water.Replacethe
filter and rotor.Replacethe flow indicatorcap.Turn
until snug,do notover-'tighten.
Any loose hair or debris can be pulledfrom the
brush roll if desired and thrown away.
Wipe the machine's exteriorwith a soft cloth.
After carpet is dry,vacuum again to remove
hair and fuzz.
www.bissell.com
1697
207.Jndd
12
3. \,_
©
800.237.7691
2/20/07
3:03:29
PM
Maintenance and care
Your PowerSteamer machine comes equipped
with a hose and at least one attachment for
cleaning stairs, upholstery, and more.
1.
Important!If usingto clean Upholstery,check
UpholsteryTags.
A, Checkmanufacturer'stag beforecleaning.
"W" or "WS" on the tag meansyou can
use your PowerSteamer.If the tag is coded
with an "X" or an "S" (with a diagonalstripe
throughit), or says"Dry CleanOnly",do not
proceedwith any deepcleaningmachine.Do
not use on velvet or silk. If manufacturer's
tag is missingor not coded,check with your
furnituredealer.
B. Checkforcolorfastness
inan inconspicuous
place.
C. If possible,check upholsterystuffing.Colored
stuffingmay bleedthroughfabricwhenwet.
D. Planactivitiesto allowupholsterytime todry.
E. Vacuumthoroughlyto pickup loosedebrisand
pethair.Usea vacuumwith a brushattachment
anda crevicetool to cleaninfabricfolds.
2.
Follow the instructions on page 9 for filling the
2-in-1 water tank and the formula tank.
3.
Setreadytoolsdial to thetoolsor pretreatsetting.This
will allowsprayanddivertthesuctionto the hose.
SetSmartMix dial to normal.
4.
5.
6.
7.
8.
9.
10.
11.
Manufacturer's
tag
Z WARNING:
To reducethe risk of
injury, be extra careful
when cleaning stairs.
Make sure machine is
secure and level.
Attach the cleaning tool to the end of the hose.
Plug in and turn on the power switch.
Clean by pressingthe trigger to spray solution
onto the area to be cleaned.Slowly move the tool
back and forth over the soiled surface. Release
the trigger to suction soiled water. Continueto
clean in the area, working in small sections, until
no more dirt can be removed.Rinse(optional) and
suction as needed. Caution:Do no overwet.
Whencleaning is complete,removeand rinse
tools in clean, runningwater.
Coil hose around the tool caddy.
Empty2-in-1 water tank and rinse out, following
the instructionson page 11.
Return readytools dial to floor cleaning.
0
www.bissell,com
800.237.7691
iiii_ i
ug310-5944
1697207.indd
13
2/20/07
3:03:30
PM
A WARNING:
Toreducethe risk of fire
and electricshock due to
internalcomponentdamage,
useonly BISSELLcleaning
fluids intendedfor use with
the deep cleaner, NonBISSELLcleaningsolutions
may harm the machineand
voidthe warranty,
ianing Fluid Section
Cleaning fluid section
KeepplentyofgenuineBISSELLFiberCleansing
Formula
TM on handsoyoucancleanandprotect
wheneverit fits yourschedule.Alwaysuse
genuineBISSELLdeepcleaningformulas.
48 oz.BISSELL
FiberCleansing
Formula
%I7Sc/stchgard
Piotector
item # 0710
TM
TM
48 oz.BISSELL
MultiAllergenRemoval
Formula
withScotchgard
Protector
item # 0720
TM
TM
48 oz.BISSELL
PetOdorandSoilRemoval
FormulawithScotchgard
Protector
item # 0730
TM
TM
48 oz.BISSELL
43 oz.BISSELL
3X
NaturalOrange
Conce_Ttrated
Rber
ExtractFormulawith
Cleansng
Formula
%th
Scotchgard ProtectorScotdTgardProtector
item # 0740
item # 0716
TM
TM
Stainremoval
Do not delay! Attending to an accident soon after
it occurs ensures the chances for full removal.
Leavingit for an extended period
of time may
cause it to set and become permanent.
1.
2.
3.
4.
5.
6.
7.
14
ug310-5944
Blot up liquidswith an absorbentcloth or paper
towels. Whitematerialsare recommendedbecause
certain dyes may bleed and make the stainworse.
6ently scrape up any semi-solids with a spoon or
spatula. Do not use a knife or other utensil with
sharp edges becauseit could damage the carpet
or upholstery.
If the area has dried,removethe remaining
semi-solids and residuewith a sweeperor vacuum.
Besure to test any spot removalformulasin an
inconspicuousarea first. This is importantas some
dyes and materialscould be damagedor discolored
bycleaningsolvents.If such a change shouldoccur,
try a different solutionor call a professional.
If cleaning on Berbercarpeting, gently run your
machineover a hiddenarea. If no fuzzing occurs,
continue cleaning in soiled area.
Usingthe BISSELLTough Stain PreCleaner,spray
evenly over soiled area. Do not overwet.Wait 3-5
minutes.Gentlywork the solution by blotting area
with a clean,damp, color safe cloth.
Cleanusing either the floor cleaning,or tools or
pretreat setting on the readytools dial.
www,bissell,com
1697
207.indd
14
800.237.7691
2/20/07
3:03:30
PM
Hard FloorCleaning
....
Hardfloorcleaning
Your PowerSteamer model may have come with
a hard floor attachment and Hard Floor Solutions
Formula. If not, these products are available for
purchase by contacting the BISSELLConsumer
Services department by phone or on the website.
The hard floor tool provides effective cleaning for
linoleum, vinyl, and tile floors.
Caution:Do not use on unsealed hardwood floors.
1.
5.
Vacuumor Sweepthoroughlyto pick up any loose
debris and pet hair.
Move any furniture, if needed.
Emptyany carpet cleaning formula back into the
BISSELLbottle if stored in the formula tank. Fill
formulatank with BISSELLHard Floor Solutions,
availableat many retailers, or contact BISSELL
ConsumerServices.
Fillthe 2-in-1 water tank with hot tapwater and
setaside.
Attachthe hard floortool onto thefloor nozzlewith
6.
7.
the longtab to the right sideof thefloor nozzle.First
attachleft side(shorttab) catchingtabover nozzle
edge.Gentlybendlongtab (right side)outwardto
easilysnap overedgeof clear nozzleon left.
Setthe readytools dial to floor cleaning.
Setthe SmartMixdial to normalclean.
2.
3.
4.
8.
9.
10.
11.
12.
13.
14.
Plug into an outlet and turn the power switch
ON(I).
Slowlymovethe machineforwardand backover
barefloor surfaceone time while pressingtrigger.
Caution:Do not overwet.
Hard Floor
CleaningTool
Repeatthe motion without pressingthe trigger.
This allows the hard floor tool to squeegeeand
suction up the dirty water.
Allow approximately30 minutesfor floors to dry.
Removehard floor tool and rinse and dry
before storing.
If any formula remains in the formula tank, pour
it back into the Hard FloorSolutions bottle for use
the next time.
Rinseout the formula tank.
www.bissell.com
ug310-5944
BottomFrontEdge
of FloorNozzle
1697207.indd
800.237.7691
15
2/20/07
3:03:37
PM
RNING:
iubleshooting
Reduced spray or no spray.
PossibleCause
1. Bladdermay be empty.
2. SmartMixtank may be empty.
3. The filter may be clogged.
4. Tanksmay not be seated properly.
5. Pumpmay havelost prime.
6. The pump beltmay be broken.
insert
Screwdriver
Bade Here
16
ug310-5944
www,bissell,com
1697
207.indd
16
Remedies
Refillbladderwi1_hottap water.
2. Fillwi1_BISSELL
FiberCleansing
Formulaforcleaning.
3. Cleanout flow indicatorfilter,
page12.
4. TurnpowerOFF(0); remove&
reseattanks.
5. TurnpowerOFF(0); after 1
minuteturn ONandpress
Trigger.
6,
Turnthe machineOFF(0) and unplug
from the outlet.Tocheck if a pump
belt has broken,you will needa flat
headscrewdriver.Insertthe blade
endinto the lower slot of the belt
access door to releasethe lower
snap. If necessary,insert the blade
endinto the upperslot to releasethe
uppersnap.Examinethe belt for
breakage.Youshould be able to
see the pump belt looped aroundthe
motorshaft. If it is brokenor missing,
pleasereferto ReplacementPartson
page 19 before calling Consumer
Services.Completeinstallation
instructionswill accompanythe
replacementbelt.
1,
800.237.7691
2/20/07
3:03:39
PM
DirtLifter PowerBrush does not turn.
Possible
Cause
1. The Brush Belt or Pump Belt
is off or broken.
Remedies
Turnthe machineOFF(0) and unplug
from the outlet,Tocheck if the brush
belt or pump belt has broken,you
will need a flat head screwdriver.
Insertthe bladeend into the lower
slot of the belt accessdoor to release
the lower snap, If necessary,insert
the blade end into the upperslot to
releasethe uppersnap. Examinethe
beltfor breakage.If broken,please
referto Replacement
Partson page 19
beforecalling ConsumerServices.
Completeinstallation instructions
will accompanythe replacementbelt,
Cleaner not picking up solution.
PossibleCauses
Remedies
1. Readytools dial may be on the
wrong settingfor the cleaningjob.
1. Set readytools dial to either or
tools or pretreatfloor cleaning,
2. Nozzlewindow may not be
properlyattached.
2, Pressdown firmly on the black
oval gasket at the top window to
makesure the two tabs on the
back of the nozzle window are
snappedinto the mating slots in
the main housing,
3. 2-in-1 water tank lid is not properlyinstalled.
4. 2-in-1 water tank is not properlyseated.
3. Re-installlid;referto page9.
4. 2-in-1 water tank must be firmly
seated to func'don;removeand
reseat2-in-1 water tank,
5. Poortoolposi'don,
(Handheldattachmentsonly).
5. Adjustangle;applymore
downwardpressure.
6. 2-in-1watertank haspickedup
maximumdirty water.
6. Empty2-in-1 water tank, refer to
page 11.
Other Maintenanceor Service not includedabove shouldbe performedby an
authorizedservicerepresentative.
Thankyoufor selecting a BISSELLproduct.
If youshouldhappento needassistanceduringassemblyor operations,
call1-800-237-7691
lPleasedo notreturnthis productto the storeJ
www.bissell,com
ug310-5944
1697207.indd
800.237.7691
17
2/20/07
3:03:39
PM
;SELLConsumerServices
For information about repairs or replacement parts, or questions about your warranty, call:
BISSELLConsumerServices
1-800-237-7691
Monday - Friday
Saturday
8 a.m.
9 a.m.
10 p.m. EST
8 p.m. EST
Or writs:
BISSELLHOMECARE,
INC
POBox3606
GrandRapidsMI 49501
A_N: ConsumerServices
Or visitthe BISSELLwebsite- www,bissell,com
WhencontactingBISSELL,havemodelnumberof unit available.
Pleaserecordyour ModelNumber:
Pleaserecordyour PurchaseDate:
NOTE:Pleasekeepyouroriginalsalesreceipt.It providesproofof dateof purchasein the event
ofa warrantyclaim.See"About YourWarranty"on page20 for details.
18
www.bissell.com
ug310-5944
1697
207.indd
18
800.237.7691
2/20/07
3:03:39
PM
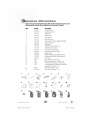
Replacement parts - BISSELLPowerSteamer
Belowa listof commonreplacementparts.Whilenotall of thesepartsmay havecome
with yourspecificmachine,all are availabletoyoufor purchase,if desired.
Item
2
3
4
5
6
7
8
9
10
11
12
13
14
15
16
17
18
19
20
21
Part No.
210-9201
203-6655
310-1252
214-9131
214-9142
215-9155
015-9043
015-4439
015-9041
210-1785
210-1795
555-6503
214-9871
210-4052
215-0628
015-0621
213-3501
710A
720A
730A
0716
22
23
0484
222-0400
1
2
Part Name
4" SmallAreaTool
SprayingCreviceTool
TurboBrush
®
HardFloorTool
PreTreat
Wand
ToughStainBrush
TankAssemblyCompletedncludes
lidassembly)
TankLidAssembly
TankBottom
SmartMix® Tank(IncludesCap)
SmartMix® CapAssembly
FlowIndicatorCapAssembly
FloorNozzleWindowandGasket
WindowGasket
Replacement
PumpBelt (WithInstructions)
Replacement
Belt Brush(WithInstructions)
LintScreen
FiberCleansingFormula 48 oz
Multi-AllergenRemovaF
MFormula48 oz
PetOdorandSoilRemovaF
_ Formula48 oz
3x Concentrated
FiberCleansingFormulawith
Scotchgard
TM
Protector43 oz.
HardFloorSolutions 32 oz
ToughStainPreCleaneF
_ 22 oz
TM
TM
3
4
6
7
10
12 _
o
15
16
22
23
<-.*_-.......
11
17
18
www.bissell.com
2O
21
800.237.7691
ii
ug310-5944
1697
207.indd
19
2/20/07
3:03:40
PM
- BISSELL PowerSteamer
This warranty givesyou specific legal rights, and you may also have otner rtcqts wntcn may vary from state
to state. If you need additional instruction regarding this warranty or nave auesttonsregardingwhat it may
cover, pleasecontact BISSELLConsumer Servicesby E-mail,telephone, or regular mal as describec below.
LimitedOne YearWarranty
Subjectto the *EXCEPTIONSAND EXCLUSIONSidentified below, upon receipt of the product BISSELL
Homecare, Inc. will repair or replace (with new or remanufacturedcomponents or products), at BISSELL's
option, free of charge from the date of purchase by the original purchaser,for one year any defective or
malfunctioning part.
See information below on "If your BISSELLproduct should require service".
This warrantyappliesto productusedfor personal,and not commercialor rentalservice.This warrantydoes not
applyto fans or routinemaintenancecomponentssuch asfilters, belts,or brushes.Damageor malfunctioncaused
by negligence,abuse,neglect,unauthorizedrepair,or any other use not in accordancewith the User'sGuideis not
covered.
If yourBISSELLproductshouldrequireservice:
Contact BISSELLConsumer Services to locate a BISSELLAuthorized Service Center in your area.
If you need informationabout repairs or replacement parts, or if you have questions about your warranty,
contact BISSELLConsumer Services.
Website or E-mail:
www.bissell.com
Usethe "Customer Services" tab.
Or Call:
BISSELLConsumer Services
1-800-237-7691
Monday - Friday8 a.rn. - 10 p.m. ET
Saturday 9 a.rn. - 8 p.m. ET
Or write:
BlSSELLHomecare Inc.
PO Box 3606
Grand Rapids MI 49501
ATTN:Consumer Services
BISSELLHOMECARE,
INC,IS NOTLIABLEFORINCIDENTAL
OR
CONSEQUENTIAL
DAMAGESOFANYNATURE
ASSOCIATED
WITHTHE
USEOFTHISPRODUCT,
BISSELL'SLIABILITY
WILLNOTEXCEED
THE
PURCHASE
PRICEOFTHEPRODUCT,
Some states do not allow the exclusionor limitation of incidentalor consequentialdamages, so the above
limitation or exclusionmay not apply to you.
*EXCEPTIONS
AND EXCLUSIONS
FROMTHETERMSOFTHE LIMITEDWARRANTY
THISWARRANTY
ISEXCLUSIVE
ANDIN LIEUOFANYOTHERWARRANTIES
EITHER
ORALORWRITTEN,
ANYIMPLIEDWARRANTIES
WHICHMAYARISEBYOPERATION
OFLAW,INCLUDING
THEIMPLIEDWARRANTIES
OFMERCHANTABILITY
AND
FITNESS
FORA PARTICULAR
PURPOSE,
ARELIMITED
TOTHEONEYEARDURATION
FROMTHEDATEOFPURCHASE
ASDESCRIBED
ABOVE,
@2007 BISSELLHomecare, Inc
Grand Rapids,Michigan
All rights reserved.
Part Number 310-5944
Rev 02/07
Visit our website at:
www.bisselLcom
Scotchgard is a trademark of 3M
20
ug310-5944
www.bissell.com
1697
207.indd
20
800.237.7691
2/20/07
3:03:47
PM