1
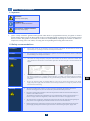
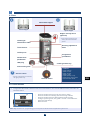
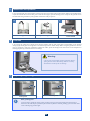
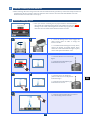
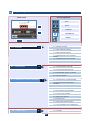
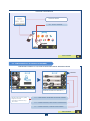
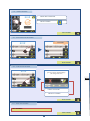
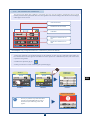
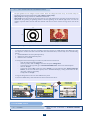
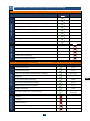
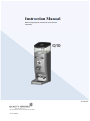
Instruction Manual Before using this grinder, read the user and connection instructions. Q10 Q10 09109100 Espresso coffee machine manufacturer since 1952 Ver.23-10/2013 0. Table of contents 1. Safety recommendations 1.1 Symbols. . . . . . . . . . . . . . . . . . . . . . . . . . . . . . . . . . . . . . . . . . . . . . . . 1.2 Safety recommendations . . . . . . . . . . . . . . . . . . . . . . . . . . . . . . . . . . . 2 2 2-3 2. General view 4 2.1 View . . . . . . . . . . . . . . . . . . . . . . . . . . . . . . . . . . . . . . . . . . . . . . . . . . . 4 2.2 Touch screen . . . . . . . . . . . . . . . . . . . . . . . . . . . . . . . . . . . . . . . . . . . . 4 3. Installation and operation 5 4. First use 5 5. Adjusting the grinder 5 6. External cleaning of the machine 6 7. Internal cleaning cycle 6 8. Programming: general diagram 7 8 8.1 Counters . . . . . . . . . . . . . . . . . . . . . . . . . . . . . . . . . . . . . . . . . . . . . . . 8.1.1 8.1.2 8.1.3 8.1.4 8.1.5 8.1.6 Serving totalizer . . . . . . . . . . . . . . . . . . . . . . . . . . . . . . . 8 Double servings served . . . . . . . . . . . . . . . . . . . . . . . . . . . . 8 Single servings served . . . . . . . . . . . . . . . . . . . . . . . . . . 8 Remaining servings until change of blades . . . . . . . . . . . . . . 8 Remaining servings until performing cleaning cycle . . . . . . . . . .8 Zeroing partial counters . . . . . . . . . . . . . . . . . . . . . . 8 8.2 Configuration . . . . . . . . . . . . . . . . . . . . . . . . . . . . . . . . . . . . . .. . . . . . 8.2.1 8.2.2 8.2.3 8.2.4 Adjusting single dose time . . . . . . . . . . . . . . . . . . . . . . . . . . . . 8 Adjusting double dose time . . . . . . . . . . . . . . . . . . . . . . . . . . . . .8 Pre-grinding, Instant and Manual grinding . . . . . . . . . . . . . . . . . 8 Select language . . . . . . . . . . . . . . . . . . . . . . . . . . . . . . . . . . 9 8.3 Configuration: technical staff. . . . . . . . . . . . . . . . . . . . . . . . . . . . . . . 8.3.1 8.3.2 8.3.3 8.3.4 8.3.5 8.3.6 8.3.7 8.3.8 8.3.9 8.3.10 8.3.11 8 9 No. of servings until cleaning alarm warning . . . . . . . . . . . . . . . .9 No. of servings until change of blades alarm warning. . . . . . . . .9 Time elapsed between main screen and screensaver . . . 9 Change password . . . . . . . . . . . . . . . . . . . . . . . . . . . . . . . . . . . 10 Block dose adjustment for user . . . . . . . . . . . . . . . . . . 10 Load factory settings . . . . . . . . . . . . . . . . . . . . . . . . . . 10 Zero Total Counter . . . . . . . . . . . . . . . . . . . . . . . . . . . . . . 10 Intensive Test . . . . . . . . . . . . . . . . . . . . . . . . . . . . . . . . . . . . 11 Zero counter for change of blades warning. . . . . . . . . . . . . . . . 11 USB / Configuration / Screensaver . . . . . . . . . . . . . . . . . . . . 12 Load images onto the grinder . . . . . . . . . . . . . . . . . . . . . . . . . . 13 8.4 Cleaning cycle . . . . . . . . . . . . . . . . . . . . . . . . . . . . . . . . . . . . . . . . . . . . .13 9. Data for loading configuration and factory data 14 10. Identification and contact 15 15 10.1 Contact address . . . . . . . . . . . . . . . . . . . . . . . . . . . . . . . . . . . . . . . 16 1. Safety recommendations 1.1 Symbols ! i WARNING This may cause injury. INFORMATION Important or useful information. ELECTRICAL HAZARD DANGER This may cause injury. Q10 is a fully automatic grinder which grinds coffee beans in programmed instant, pre-grind or manual instant mode. Simply insert the filter holder in the corresponding guide to obtain one or two freshly ground doses of coffee. The grinder's versatility also allows for independently adjusting the amount of coffees we require for serving one or two coffee, accessing the corresponding menu using the touch screen. 1.2 Safety recommendations Installation This machine should only be installed by authorised technical personnel. The manufacturer declines all responsibility for any damage caused due to inadequate installation. Location We recommend the machine is installed in a spacious area, free from airstreams and on a solid base. Avoid installing it on a damp or hot surface. Electric connection Check that the voltage, frequency and power characteristics of the electric connection coincide with those described on the machine's characteristics plate. The characteristics plate can be found below the hopper. The machine must be installed according to the country's current electric regulation. You must ensure the electric installation has a reliable earthed connection, according to the aforementioned standards. The company declines all responsibility for any possible damage caused by a faulty installation or earth connection. Handling Do not use extension cables or multiple adaptors of any type to connect the machine to the power supply. The power supply cable should never be wound up, it should be as straight as possible in order to avoid it from overheating. All internal handling of the machine, except for operations specifically described in this manual related to cleaning processes, must be carried out by authorised technical personnel. Preventive cleaning and maintenance tasks must be performed within the intervals indicated by the machine or the technical service. The manufacturer declines all responsibility for any possible damage caused to the machine due to a failure to comply with these obligations, as well as those due to incorrect or inappropriate use. All of the machine's components, including the connection cable, must be replaced with original spare parts, which can be supplied by the authorised technical service or the manufacturer. Before performing any maintenance operation, ensure the machine is disconnected from the electric power supply by using the installation's general switch or disconnecting the power supply cable. 17 GB Install the grinder on a solid base The machine shall only be used by adults. Children do not acknowledge the hazards involved in machine, due to which they should not be in contact with them and should not be allowed to use them. People with reduced physical, sensory or mental capacities, or inexperienced people, should not use this machine without supervision person qualified for this purpose. Do not use this machine outdoors, unless it is protected from external elements (air, rain, fog, etc.) The machine should not be exposed to water sprays or steam. Do not touch the machine with wet, damp or bare feet, or with wet or damp hands. The machine should not be used for grinding products other than those described in this manual. Important advice ! ! 18 General view 2. 2.1View i i Removable hopper Closed hopper Open hopper Hopper security micro (optional) - Upon removing the hopper, the security micro disconnects the grinder. Coffee type identification label Grinding adjustment knob Touch Screen Coffee press Single-dose pushbutton Double-dose pushbutton USB plug Coffee grounds tray Filter holder guide Features: i DDDGG General switch - General on/off switch. Located under the coffee grounds tray. General switch Height: 610 mm. Width: 193 mm. Depth: 391 mm. Weight: 16 Kg. Hoper capacity: 1.5 Kg. Power supply: 230 V, 50 Hz. Nominal Power: 525 W 2.2 Touch screen The grinder is fitted with a resistant touch screen with which we can access the different menus, which allow for functions such as: COUNTERS CONFIGURATION CLEANING - Check the number of doses used for one and two coffees. Check the number of remaining doses until change of blades. Check the number of doses remaining before brush cleaning. Configure operating mode, “Pre-grind” o “Instant” o “Manual Grind”. Adjust the coffee dosage Other functions. Note: Refer to Section 8 – programming, for a description on all the menus and functions of the screen. 19 GB 3. Installation and operation Once unpackaged, place the machine in the chosen place, for which a plug socket with an efficient grounding will be required. Connect the network cable, place coffee in the hopper, open the closing sector and press the general switch located under the grounds tray. The grinder will now be ready to operate. a. b. Fill with coffee beans 4. c. Open closing sector Press switch First use To request the coffee dose, simply insert the filter holder until the end of the guide corresponding to the desired dosage (right-hand guide for single dose and left-hand guide for double dose). When using the grinder for the first time or whenever it has been completely emptied of coffee, press the dosage lever three times so the dispenser is filled appropriately, and obtain the correct dosage. ! Warning: - Do not pour ground coffee into the coffee bean hopper. - If the grinder is used continuously, allow to rest every 30 minutes to avoid is from overheating. 5. Adjusting the grinding point Coarser point Finer point i Note: grinding point - To appreciate a significant change in the grinding point, you must at least fully turn the knob once. Never turn the knob to finer (clockwise) more than one full turn without grinding, given that this could cause a blockage of ground coffee. 20 External cleaning of the machine 6. Before cleaning, disconnect the general switch located underneath the grounds tray. Clean with a damp cloth. Do not use detergent, abrasive products, alcohol or dissolvent. Use a brush to clean the coffee from hidden areas. The machine cannot be cleaned with a water spray. Internal cleaning cycle 7. This cycle consists of cleaning the two pipes within the coffee distributor, using the brush supplied with the grinder. The grinder will show the “CLEAN” message on the screen, indicating that the number of programmed coffee doses has been exceeded and the machine must be cleaned. CLEAN 2 1 1 – Close the closing sector of the hopper and make several doses of coffee to empty the interior of coffee. 2 – In models fitted with hopper security micro, remove the hopper. In models without micro, release the screw which holds the hopper in place, remove and open the distributor cover. 3 4 3 – Press the brush icon as seen in the figure. 4 – Push the brush through the pipe indicated on the screen. CLEAN 5 6 5 – Press the arrow to change the position of the selector to the position indicated in fig. 6. 6 – Push the brush through the pipe indicated on the screen. 7 7 – Push the icon located in the top corner to zero the cleaning counter and exit. 21 GB Programming 8. Screen symbols Main menu 1 - EXIT - BACK - FORWARD - INFORMATION - CONFIRM 4 2-3 8.1 8.2 8.3 - COUNTERS - CONFIGURATION 1 2 - CONFIGURATION: TECHNICAL PERSONNEL 8.4 - CLEANING CYCLE 3 4 22 - 8.1.1 SERVING TOTALIZER - 8.1.2 DOUBLE SERVINGS SERVED - 8.1.3 SINGLE SERVINGS SERVED - 8.1.4 REMAINING DOSES UNTIL CHANGING BLADES - 8.1.5 REMAINING DOSES UNTIL CLEANING - 8.1.6 ZERO PARTIAL COUNTERS - 8.2.1 ADJUSTING SINGLE DOSE TIME - 8.2.2 ADJUSTING DOUBLE DOSE TIME - 8.2.3 PRE-GRINDING, INSTANT. OR MANUAL - 8.2.4 SELECT LANGUAGE - 8.3.1 SERVINGS UNTIL CLEANING WARNING - 8.3.2 SERVINGS UNTIL BLADE CHANGE WARNING - 8.3.3 TIME BETWEEN MAIN SCREENS. - 8.3.4 CHANGE PASSWORD - 8.3.5 BLOCK USER DOSE ADJUSTMENT - 8.3.6 LOAD FACTORY SETTINGS - 8.3.7 ZERO TOTAL COUNTER - 8.3.8 INTENSIVE TEST - 8.3.9 ZERO BLADE CHANGE COUNTER - 8.3.10 USB / CONFIGURATION / SCREENSAVER - 8.4.1 CLEANING 8.1 COUNTERS - Shows the number of servings done, the doses remaining until blade change and the servings remaining until cleaning the grinder. We can also zero the partial counters. - 8.1.1 - SERVINGS REMAINING UNTIL BLADE CHANGE - 8.1.2 - SINGLE SERVINGS SERVED - 8.1.3 - DOUBLE SERVINGS SERVED= 2X5=10 SERVINGS - 8.1.4 - SERVING TOTALIZER PRESS TO ZERO - 8.1.5 - ZERO COUNTERS - 8.1.6 - SERVINGS REMAINING UNTIL CLEANING NEXT SCREEN 8.2 CONFIGURATION ADJUSTING DOSE TIME AND OPERATING MODE - On this screen, the user can modify to his discretion the time used to grind doses for one or two coffees, and choose the operating mode; Pre-grinding, Instant or manual grinding. GB - Pre-grinding: dispenses one previous ground dose and grinds for the next demand. Instant: the coffee is ground just when it is demanded. Manual: coffee is ground continuously while the micro remains pressed. - 8.2.1 - INCREASE OR REDUCE SINGLE DOSE - 8.2.2 - INCREASE OR REDUCE DOUBLE DOSE - 8.2.3 - SELECT BETWEEN PRE-GRINDING, INSTANT, OR MANUAL GRINDING. NEXT SCREEN 23 LANGUAGE CONFIGURATION PROGRAM VERSION - 8.2.4 - SELECT LANGUAGE NEXT SCREEN 8.3 CONFIGURATION: TECHNICAL PERSONNEL CONFIGURING CLEANING CYCLE, BLADE CHANGE AND INTERVAL BETWEEN SCREENS - INCREASE OR REDUCE BY PRESSING +/- INSERT PASSWORD “1234” The two main screens, Quality Espresso icon and screensaver, alternate every 10 seconds. CONFIRM - 8.3.3 - CHANGE INTERVAL TIME BETWEEN THE TWO MAIN SCREENS - 8.3.2 - CHANGE SERVINGS, BLADE CHANGE ALARM WARNING - 8.3.1 - CHANGE SERVINGS, CLEANING ALARM WARNING NEXT SCREEN 24 8.3.4 – CHANGE PASSWORD - INSERT NEW PASSWORD - PRESS CONFIRM NEXT SCREEN 8.3.5 – BLOCK USER DOSE ADJUSTMENT BLOCKED NEXT SCREEN 8.3.6 – LOAD FACTORY SETTINGS ¿Revert to Factory default settings? (All change will be lost) GB - PRESS TO DISCARD - PRESS TO CONFIRM NEXT SCREEN 8.3.7 – ZERO TOTAL COUNTER NOT AVAILABLE NEXT SCREEN 25 8.3.8 – INTENSIVE TEST With this menu option, users can activate an intensive verification in the grinder. This test consists on continuously opening each of the traps of the coffee channels every 5 seconds, with the traps closed, grinding coffee for 1 second. This option checks all mobile and visible elements of the grinder. STARTING TEST PERFORMING TEST EXIT i The test continues indefinitely until the exit button is pressed NEXT SCREEN 8.3.9 – ZEROING BLADE CHANGE COUNTER Once the grinder has reached the programmed number of servings for the blade change, proceed as follows to zero the counter. UNBLOCK ZERO PROGRAMMED SERVINGS SERVINGS REMAINING UNTIL BLADE CHANGE i EXIT The maximum number of servings permitted before changing the blades has been set at 150,000. NEXT SCREEN 26 8.3.10 – USB / CONFIGURATION / SCREENSAVER - The Q10 has been fitted with a USB port, with which users can copy the grinder's configuration data to a USB memory stick and then upload this data onto other grinders. We can also change either of the two main images which appear on the screen. - CONFIGURATION - SCREENSAVER PICTURES - CONFIRM - MOVE DATA FROM USB TO Q10 - MOVE DATA FROM Q10 TO USB For example: Copy configuration data from a USB memory stick to the Grinder. - 1. Select the operation to be performed (fig.1). In this example, we will copy the configuration data which we have obtained from another grinder and which has been copied onto a USB memory stick, and will be then copied onto our grinder. - 2. Confirm the operation (fig. 2) - 3. Lastly, we will view a screen confirming the operation (fig.3) SELECT CONFIRM OPERATION CONFIRMED GB FIGURE 1. FIGURE 2. FIGURE 3. USB NOT DETECTED i - If we try to perform any of the described operation and the USB memory stick is not detected, the following screen will appear. 27 8.3.11 – USB / LOADING IMAGES ON THE GRINDER'S SCREEN The Q10 grinder has two images as main screens. These two images alternate every 10 seconds. They are identified with the following file names: Q10_1.bmp and Q10_2.bmp. Q10_1.bmp: This image provides no additional information. Q10_2.bmp: At the bottom left of the image there is a bar that indicates the operating mode which has been selected for the grinder; pre-grinding, instant or manual grinding. At the bottom right users can view the number of partial coffees served until that moment and the icon of the current serving can be seen in the centre. - 320 240 Q10_2.bmp Q10_1.bmp For example: Copy two images from a USB memory stick to the Q10 Grinder - 1. Copy the two images or only one, according to the user's request, to a USB memory stick. Make sure that the respective names of the files coincide with those described above, and that they are in the following format: Standard BMP file extension (bitmap format) Dimensions of the image 320x240 pixels Maximum size of 262 kB. - To change the format of the image we wish to use, follow these instructions: Open the image using Microsoft Office. At the top menu, click on “Image” and select the option “Change Size” In the boxes on the right side, go to “Customised Width x Size” and choose 320x240 pixels. Click on “Accept” In the menu option “File” choose the option “Export”, go to the right side box “Export in this file format”, of the two fold-down options, select “Windows Bitmap” (*. bmp) and rename the file using Q10_1.bmp or Q10_2.bmp Lastly, click on “Accept” - 2. Copy the Image file into the root of the USB memory stick. 3. Insert the USB memory stick and follow the instructions shown below. SELECT CONFIRM OPERATION CONFIRMED 8.4 CLEANING CYCLE REFER TO PAG. 6, SECTION– 7 “INTERIOR CLEANING CYCLE” 8.4.1 – CLEANING 28 9. Data saved when loading factory configuration and settings DATA SAVED TO Q10_RD.cfg SETTING Saves Does not Save 1 coffee dose time CONFIGURATION 2 coffees dose time Conf.: Pre-Grinding/Instant/Man. Grinding Language No. of coffees until cleaning No. of coffees until blade change Interval between screensavers Change password COFFEE COUNTER Block dose timer for 1 and 2 coffees 1 Coffee 2 Coffees Partial totalizer Counter until cleaning Counter until blade change FACTORY DATA CONFIGURATION SETTING Refresh 1 coffee dose time 2,50” 2 coffees dose time 3,80” Conf.: Pre-Grinding/Instant/Man. Grinding Language INSTANT Spanish No. of coffees until cleaning 1000 No. of coffees until blade change 150 K Interval between screensavers 0,10” Change password 1234 Without blocking Block dose timer for 1 and 2 coffees COFFEE COUNTER Value 1 Coffee 2 Coffees Partial totaliser Counter until cleaning Counter until blade change 29 9 GB 10. Guarantee conditions All components of the machine are guaranteed for 12 months (from installation) against any defect that affects correct operation. The GUARANTEE exclusively covers replacement of parts with manufacturing defects. Under no circumstances does it imply complete replacement of the machine. This guarantee does not cover, rubber or plastic components or electrical parts that cause damage or affect the operation of other components, due to fluctuations in the main voltage supply or parts that are worn out by normal use. Any machines that may have been manipulated by unauthorized personnel or those with indications of incorrect use, will forfeit all conditions of this GUARANTEE. Only authorized TECHNICAL SERVICES are able to offer guaranteed repairs using ORIGINAL parts. Any labour, travel and lodging costs for the repair of any product are at the user’s expense. 11. Contact information Contact address Quality Espresso S.A. Espresso coffee machine manufacturer since 1952 Motores, 1-9 08040 Barcelona Tel. +93 223 12 00 Fax +93 223 20 17 Export Tel. +34 933 946 305 Export Fax +34 933 322 111 www.qualityespresso.net e-mail:[email protected] The manufacturer reserves the right to introduce, without prior notice, all technical improvements derived from its constant research into this model. 30