1
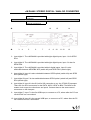
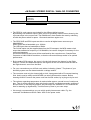
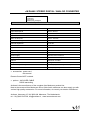
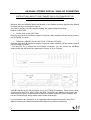
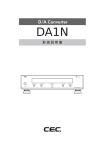
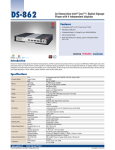
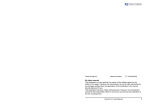
DA468
INSTRUCTION MANUAL
vM DA468 STEREO DIGITAL / ANALOG CONVERTER
vM INSTRUCTION MANUAL
Thank you for having bought this Van Medevoort product. We wish you many happy
listening hours. The manufacturer accepts no responsibility for any misunderstanding
and/or misinterpretation or the consequences arising there from due to this
instruction manual not being read correctly and followed properly.
THE MANUAL
It is essential to consult this manual before operating your Van Medevoort product.
The numbers in the pictures correspond to the features of this product.
This manual contains everything you need to know to connect this product in
addition to various user options. We kindly ask you to read this manual thoroughly
before powering up the unit.
WARNINGS
- Never touch the power cord and/or the unit with moist or wet hands.
- Never expose the unit to rain or moisture.
- Never remove the casing. There are no user-serviceable parts inside.
- Do not poke or put anything inside the unit.
POWER
Every Van Medevoort product is optimized for your country’s electrical standards.
e.g. 230V-50Hz or 115V-60Hz. This cannot be changed. Please check that your
product is set to the correct voltage setting BEFORE connecting to an AC power
outlet. Any faulty connection will invalidate the warranty.
COPYRIGHT
In some countries it may be necessary for you to pay a fee for recording and/or
playing music. Please check with your country’s laws and regulations.
1
vM DA468 STEREO DIGITAL / ANALOG CONVERTER
BEFORE GETTING STARTED
IN GENERAL
When using your Van Medevoort product make sure that the following is observed:
- The cooling air vents are not covered
- The air can move freely around the product
- The product is sited on a vibration-free surface
- The product is not exposed to (very) high temperatures, cold, moist or dusty
environments
- Do not expose the product to direct sunlight
- Do not expose the product to electrostatic discharges
- Never put any type of object directly on top of the product
When in doubt do consult your Van Medevoort dealer. If any object and/or water
and/or moisture should find its way into the unit, always disconnect the power cord
by its plug, never by the cord itself.
When leaving for extended periods, e.g. holidays, we strongly recommend that you
unplug all audio equipment. This is also advisable when there is a thunderstorm or
lightning.
CONNECTING
Before actually making any connections, always disconnect the power cord from the
wall socket by its plug, never by the cord itself, or switch the product OFF.
Always connect one source at a time and make sure that the output Left & Right
channels are not interchanged.
Make sure that the plug is fitted correctly. Otherwise, hum and/or noise may be
apparent.
DO NOT forget to read the respective manuals of the products you wish to connect
to this product, BEFORE connecting.
POSITIONING
If this product is being used at the same time as e.g. a Computer and/or a TV-tuner,
you may experience various anomalies. When this is the case, please follow these
instructions:
- Position the product as far away as possible from this type of item
- Make sure that the tuner interconnect is detached as far away as possible
from all radio and/or TV power cords.
- Usually these anomalies occur when a 300 Ohms cable is used. We advise
you to change to a well shielded 75 Ohms cable.
2
vM DA468 STEREO DIGITAL / ANALOG CONVERTER
Controls
Precautions
Connections
Maintenance and advice
Technical Specifications
Î
1
2
1. ON / OFF. Power switch.
LED indication control. Fully red when switched ON, 50% red when in STANDBY mode
(selected with the Remote Control).
Above the LED you will find the Infra Red sensor for the Remote Control.
The functions are “stand-by”, mute and input selection.
The Remote Control handset is NOT supplied. Choose a learnable.
The RC codes can you download from our website.
Contact your dealer for more info.
2. 1 - 8. Source selector indicators with LED indication.
These 8 push buttons correspond with the inputs on the backside of the amplifier. The
LED’s will go into flickering mode when the signal is switched to MUTE (can only be
selected with a learnable Remote Control).
Inputs 3, 4 and 5 are also switchable between two connectors on the back, to create
extra input connection possibilities.
3
vM DA468 STEREO DIGITAL / ANALOG CONVERTER
Controls
Precautions
Connections
Maintenance and advice
Technical Specifications
• ONLY connect the converter to a (professionally installed) wall socket with earth or
ground and the corresponding voltage setting, as indicated on the back. Any faulty
connection will invalidate the warranty.
• If it is necessary to replace the fuses, use only fuse(s) with the exact same value. The
fuse holders are positioned inside the amplifier and should only be replaced by an
authorized Van Medevoort Service Center. There are no user serviceable parts inside.
• The correct order for ON/OFF switching of the various products is as follows:
On: always first the source, then the pre-amplifier, followed by the power amplifier.
Off: always first the power amplifier, then the pre-amplifier, followed by the source.
• With the Q-Link connection switch ON the DAC first (to produce the MCK) and second
the transport.
• To prevent damage to your loudspeakers it is advisable, both at switching ON and OFF to
turn the volume control fully to the left. Fully anti-clockwise sets the volume at its lowest
level. The same applies when changing sources.
• Do make sure that there is always enough ventilation around the converter in order for it
to remain at its desirable temperature level.
•
Do not put any magnetic devices near or on top of the converter, e.g. floppy disks. This
can cause irreparable damage to such devices.
•
If you experience any problems, always contact your nearest authorized Van Medevoort
dealer or distributor.
4
vM DA468 STEREO DIGITAL / ANALOG CONVERTER
Controls
Precautions
Connections
Maintenance and advice
Technical Specifications
Î
Î
16
3
4
5
6
7
8
15
9
10
14
11 12
13
3. Input digital 1. The vM DA468 is provided with eight digital inputs, input 1 is for SPDif
RCA.
4. Input digital 2. The vM DA468 is provided with eight digital inputs, input 2 is also for
SPDif RCA.
5. Input digital 3. The vM DA468 is provided with six digital inputs, input 3 is also
switchable between AES/EBU XLR (switch left) and SPDif RCA (switch right).
6. Input digital 4. Input 4 is also switchable between SPDif optical (switch left) and SPDif
RCA (switch right).
7. Input digital 5 Input 5 is also switchable between SPDif optical (switch left) and SPDif
RCA (switch right).
8. Input digital 6. Input 6 is the Q-Link for I2S connection to e.g. the CT460 CD transport.
There are four RCA connectors for the DATA, MCK, LRCK en BCK. The MCK is the
master clock output, the other three are inputs. Connect these to the same named
connectors on the transport.
9. Input digital 7. Input 7 is the first USB input, to connect to a PC, where after the PC can
use this DAC as a soundcard.
10. Input digital 8. Input 8 is the second USB input, to connect to a PC, where after the PC
can use this DAC as a soundcard.
5
vM DA468 STEREO DIGITAL / ANALOG CONVERTER
11. Output digital. Digital SPDif optical output, send through the signal of the USB or SPDif
input which is switched on.
12. Output digital. Digital output RCA coaxial SPDif, send through the signal of the USB or
SPDif input which is switched on.
13. IEC Power Chassis Connector. To be connected with the proper wall socket, which
must be earthed or grounded. Every Van Medevoort product is optimized for your
country’s electrical standards. e.g. 230V-50Hz or 115V-60Hz. This cannot be changed.
Please check that your product is set to the correct voltage setting BEFORE connecting
to an AC power outlet. Any faulty connection will invalidate the warranty.
14. RS232 I/O. This connection is not standard, but optional, and can be used in domotica
and home automation systems to remote control the converter.
15. Outputs analog. These analog XLR balanced outputs go to the balanced inputs of the
stereo (pre) amplifier. The right one is for the left channel, the left one is for the right
channel. Seen from the back of the converter.
16. Outputs analog. these analog RCA outputs go to the RCA inputs of the stereo (pre)
amplifier. The top one is for the left channel, the bottom one for the right channel.
6
vM DA468 STEREO DIGITAL / ANALOG CONVERTER
Controls
Precautions
Connections
Maintenance and advice
Technical Specifications
• The SPDif in- and outputs are clocked for the different digital sources.
By switching over between inputs, there can be a synchrony moment occur where by the
converter stays in the mute mode. The DA468 can in that situation be reset by switching
off with the power switch for aprox. 10 seconds and then again to on.
• The SPDif XLR and RCA inputs are able to receive all digital stereo sources up to
24bit/200kHz.
SPDif optical has a bandwidth up to 100kHz.
The USB inputs have a bandwidth to 50kHz.
The Q-Link inputs use the supplied data from the CD transport, the MCK master clock
output has standard a frequency of 16.9344MHz, but can be changed if necessary for the
connected transport.
All formats offered at the inputs will be transfered by the a-synchronous Sample Rate
Converter to 24bit/192kHz resolution, so that the converters always works in an optimal
performance.
• By the analog RCA outputs, the upper is for the Left channel, the bottom for the Right
channel. For the XLR balanced outputs, the Right is for the Left channel and the Left for
the Right channel, seen from the back.
• For your convenience you will find a red sticker, indicating “phase”. The phase of your
electricity system can be determined with a voltage seeker.
• The converter must only be cleaned with a cloth, impregnated with a Ph-neutral cleaning
fluid. And it must be mildly moist! NEVER use strong fluids and/or erasers. Before
cleaning ALWAYS remove the power cord from its wall socket, by its plug not by its cord.
• The optimum operating temperature is reached after approx. several hours of continuous
play. Then it will be possible to start enjoying the superb van Medevoort audio qualities of
this converter. In the stand-by position, only the amps are switched off. This reduced the
time for warming up significantly. Test this warm up time in your own setup.
• We strongly recommend that you use a high quality Interconnect cable. E.g. the
renowned van Medevoort Silver Cable. Also for the power cords.
7
vM DA468 STEREO DIGITAL / ANALOG CONVERTER
Controls
Precautions
Connections
Maintenance and advice
Technical Specifications
input SPDif RCA / XLR
24 bit / 192 kHz 75 Ohms / 110 Ohms
input SPDif optical
24 bit / 96 kHz
input Q-Link
16 bit / 44.1 kHz
input USB
16 bit / 48 kHz
SRC on all inputs
24 bit / 192 kHz
bandwidth analog
0,1 Hz – 100 kHz
channel separation
>110 dB
distortion
< 0,0018 %
signal / noise ratio
> 126 dB
output impedance
< 50 Ohms
output voltage nom.
2.3 Volt
power supply
230-240 Volt / 50-60 Hz
dissipated power
10/25 Watt stand-by/on
cabinet
aluminium en steel
weight
9,0 kg
dimensions (incl. feet)
434x88(102)x390 mm (W x H x L)
finish
black (satin), frontplate: silver / black
• accessoires: power cord
this manual
Remote Control NOT included.
• options: vM SILVER CABLE
RS232 aansluiting
Audioart is the manufacturer of the complete Van Medevoort product line.
Next to the renowned Van Medevoort Silver Cable Audio cables we can also supply you with
various high quality accessories. For more information, do consult your dealer or distributor.
Audioart, Herenweg 15, NL-3602 AM Maarssen, The Netherlands.
tel. +31(0)346 59 02 90, [email protected] , www.vanmedevoort.com
8
vM DA468 STEREO DIGITAL / ANALOG CONVERTER
INSTRUCTION LEAFLET FOR CONNECTING A CD-TRANSPORT VIA
MULTI-LINK ON THE vM DA468 CONVERTER.
Because there are different Multi-Link formats on the market we have upgraded the DA468
to switch the correct settings for input 6.
You have to do this only once when installing, the system keeps this setting.
Default is vM CT460.
• Q-Link (I2S) for the vM CT460:
Keep the input knob 1 pressed for approx 5 seconds, while switching ON the mains power of
the vM DA468 converter.
• SuperLink (16Bit/RJ) for the CEC TL1N, TL3N and TL51X(R)*:
Keep the input knob 2 pressed for approx 5 seconds, while switching ON the mains power of
the vM DA468 converter.
* For the CEC TL51 models with the Sub-D9 connection, you can correct the Left/Right
setting inside the vM DA468 by replacing the jumper JP10 to ‘inverted’.
Input 6 is the Q-Link for I2S connection to e.g. the CT460 CD transport. There are four RCA
connectors for the DATA, MCK, LRCK and BCK. The MCK is the Master Clock output, the
other three are inputs. Connect these to the same named connectors of the transport and
use four identical high quality cables (same model and length).
If you experience any problems, or for upgrading older models (from before June 2011)
always contact your nearest authorized Van Medevoort retailer or distributor.
9