1
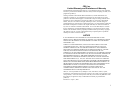
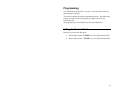
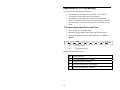
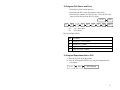
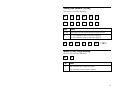
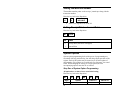
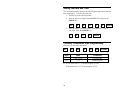
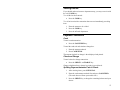
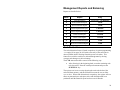
ER-180 Electronic Cash Register Programming & Operation Manual © 2010, CRS, Inc. M-ER180 Version 1.4 All specifications are object to change without notice. CRS, Inc. Limited Warranty and Disclaimers of Warranty This manual has been developed by CRS, Inc. It is intended for the use of its customers and service personnel and should be read in its entirety before attempting to install, use or program the product(s). Nothing contained in this manual shall be deemed to be, and this manual does not constitute, a warranty of, or representation with respect to, the product or any of the products to which this manual applies. This manual is subject to change without notice and CRS, Inc. has no obligation to provide any updates or corrections to this manual. Further, CRS, Inc. also reserves the right, without prior notice, to make changes in equipment design or components as it deems appropriate. No representation is made that this manual is complete or accurate in all respects and CRS, Inc. shall not be liable for any errors or omissions contained in this manual. In no event shall CRS, Inc. be liable for any incidental or consequential damages relating to or arising out of the use of this manual. This document contains proprietary information that is protected by copyright. All rights are reserved. No part of this document may be photocopied or reproduced without prior written consent of CRS, Inc. NOTICE IF ANY WARRANTY IS EXTENDED TO YOU WITH REGARD TO THE PRODUCT(S) TO WHICH THIS MANUAL APPLIES, IT IS A WARRANTY FROM THE ENTITY OR INDIVIDUAL FROM WHOM YOU DIRECTLY PURCHASED THE PRODUCT(S). SUBJECT TO THE FOREGOING, UNLESS YOU ARE A DIRECT END USER CUSTOMER OF CRS, INC., CRS, INC. DOES NOT EXTEND TO YOU ANY EXPRESS WARRANTY OR ANY IMPLIED WARRANTY AND EXPRESSLY DISCLAIMS ANY IMPLIED WARRANTY OF MERCHANTABILITY, FITNESS FOR USE, OR FITNESS FOR ANY PARTICULAR PURPOSE, OR ANY WARRANTY OF NON-INFRINGEMENT OF INTELLECTUAL PROPERTY RIGHTS IN CONNECTION WITH THE PRODUCT(S) OR ANY SOFTWARE, DRIVERS, OR PROGRAMMING PRODUCT, WHETHER EMBEDDED IN PRODUCT(S) OR PROVIDED AS A SEPARATE PROGRAM, OR USED IN CONJUNCTION WITH THIS/THESE PRODUCT(S). CRS, INC. SPECIFICALLY DOES NOT WARRANT THAT THE OPERATION OF ANY DRIVERS, SOFTWARE, OR PROGRAMMING PRODUCTS LICENSED HEREUNDER, WHETHER EMBEDDED IN PRODUCTS OR PROVIDED AS SEPARATE PROGRAMS, SHALL BE UNINTERRUPTED OR ERROR FREE OR THAT FUNCTIONS CONTAINED IN SUCH DRIVERS, SOFTWARE OR PROGRAMMING PRODUCTS SHALL OPERATE IN COMBINATION(S) WHICH MAY BE SELECTED FOR USE BY YOU OR OTHERWISE MEET YOUR REQUIREMENTS. CRS, Inc. is not responsible for any damages or loss, either direct, indirect, special, incidental or consequential, which you may experience as a result of your purchase or use of the product(s). Your sole remedy in the event that you encounter any difficulties with the product(s) is against the entity or individual from whom you purchased the product(s). Revision 2.0 - April 1, 2005 3 WARNING - U.S. THIS EQUIPMENT GENERATES, USES AND CAN RADIATE RADIO FREQUENCY ENERGY, AND IF NOT INSTALLED AND USED IN ACCORDANCE WITH THE INSTRUCTIONS MANUAL, MAY CAUSE INTERFERENCE TO RADIO COMMUNICATIONS. IT HAS BEEN TESTED AND FOUND TO COMPLY WITH THE LIMITS FOR A CLASS A COMPUTING DEVICE PURSUANT TO SUBPART J OF PART 15 OF FCC RULES WHICH ARE DESIGNED TO PROVIDE REASONABLE PROTECTION AGAINST SUCH INTERFERENCE WHEN OPERATED IN A COMMERCIAL ENVIRONMENT. OPERATIONS OF THE EQUIPMENT IN A RESIDENTIAL AREA IS LIKELY TO CAUSE INTERFERENCE IN WHICH CASE THE USER, AT HIS OWN EXPENSE, WILL BE REQUIRED TO TAKE WHATEVER MEASURES MAY BE REQUIRED TO CORRECT THE INTERFERENCE. NOTICE - CANADA THIS APPARATUS COMPLIES WITH THE CLASS “A” LIMITS FOR RADIO INTERFERENCE AS SPECIFIED IN THE CANADIAN DEPARTMENT OF COMMUNICATIONS RADIO INTERFERENCE REGULATIONS. CET APPAREIL EST CONFORME AUX NORMES CLASS “A” D’INTERFERENCE RADIO TEL QUE SPECIFIER PAR MINISTRE CANADIEN DES COMMUNICATIONS DANS LES REGLEMENTS D’INTERFERENCE RADIO. ATTENTION The product that you have purchased may contain a battery that may be recyclable. At the end of its useful life, under various state and local laws, it may be illegal to dispose of the battery into the municipal waste system. Check with your local solid waste officials for details concerning recycling options or proper disposal. 4 Table of Contents Initial Set-up Instructions 7 Unpack the Cash Register 7 Load Paper 7 For Receipt Only 8 For Journal Only 8 Replacing the Ink Roller 8 Clear Random Access Memory (RAM) and Initialize Cash Register 9 Tax Rate Programming 9 Entering a Straight Percentage Tax Rate 9 Department Status 10 To Program Department Status 10 ER-180 Features Mode Key Display Keyboard Calculator Functions Examples: Key Functions Programming Setting the Decimal Point Department & PLU Programming To Program Department Status and Price To Program PLU Status and Price To Program Department link to PLU Tax Programming Entering a Straight Percentage Tax Rate Formulating a Tax Table Entering the Tax Table Setting the Percent (%) Key Minus (-) Key Programming Setting the Machine Number Setting Receipt Print or Journal Print System Options Step One of System Option Programming Step Two of System Option Programming Setting the Date and Time Currency Conversion Rate Programming 11 11 11 12 12 12 13 15 15 16 16 17 17 18 18 19 20 21 21 22 22 22 22 23 24 24 5 Operation Examples No Sale Non Add (Reference) Number Entries Department Entries Multiple Item Department Entry Single Item Department Entry Minus () Key Operation Percent Discount Operation (%) Refund Procedure Voiding Entries Payment Procedures Cash Check and Charge Splitting Payment between Cash & Check Tax Shift Procedure Received On Account (RA) Operation Paid Out (PO) Operation Management Reports and Balancing Cash Declaration Sample Financial Report System Balancing Equations Maintenance Specifications Dimensions Drawer Mode Key Keyboard Printer Display Power 6 25 25 25 25 25 26 26 26 26 27 27 27 27 27 28 28 28 29 29 30 31 31 32 32 32 32 32 32 32 32 Initial Set-up Instructions The following instructions aid in the initial set-up of the ER-180 Electronic Cash Register. Unpack the Cash Register 1. Un-box and unwrap the cash register. 2. The following items should be included in the box: 1 roll of register paper 2 REG keys & 2 “C” keys 1 take-up spindle (for journal tape) Install Batteries 1. Install the 3 batteries in the compartment behind the printer assembly Load Paper 1. Cut or tear the end of the register tape evenly to insure proper feeding through the printer. 2. Place paper roll in paper compartment, with leading edge of roll towards the rear of the register, and feed the end of the roll into the printer through the paper guide. 3. Press the FEED key until the paper begins to advance through the printer. If the paper refuses to feed through the printer, make certain the end of the tape is square and that it is routed properly. 7 For Receipt Only FEED 1. Pass paper through the receipt window of printer cover. Replace over printer compartment. For Journal Only 2. Route paper over the top of the paper guide and insert in the slot of the take-up spool. 3. Press the FEED key to wind paper securely on the spool. 4. Replace printer cover. Replacing the Ink Roller Ink rollers are disposable, and should not be re-inked. Re-inking can cause damage to the printer. To replace the Ink Roller: 1. Remove the old roller by lifting straight up on the lever located on the left side of the printer. 2. Place the new roller in position (handle to the left) and snap it into place by pressing it straight down. 8 Lever 2 3 4 5 6 5 6 1 1 2 3 3 4 4 5 6 2 1 Clear Random Access Memory (RAM) and Initialize Cash Register 1. Before plugging register in, place key lock in the S position. 2. Connect the AC plug into a power outlet while pressing the 00 keys. 3. RAM is now cleared of all memory and the register prints a line of decimals (). NOTE: This is a one time only procedure to be performed after the battery is first installed. DO NOT CLEAR RAM ONCE THE REGISTER IS PROGRAMMED OR ALL PROGRAMS AND TOTALS WILL BE ERASED. Tax Rate Programming The ER-180 may be programmed to tax items at either a straight percentage tax rate, or a tax table. Entering a Straight Percentage Tax Rate The ER-180 will accept a 5 digit tax rate, with the decimal point fixed at three places (00.000). If your area taxes goods based on a straight percentage, enter the rate in the following manner. 1. Place the key lock in the P position. 2. Press 1 and then enter the five digit tax rate. 3. Press TAX. 9 Examples: 1 0 5 0 0 0 TAX 0 TAX Enter 05000 for 5% Tax Rate 1 0 6 5 0 Enter 06500 for 6.5% Tax Rate Department Status You have the following department options: Departments can be taxable or non-taxable. Tax is added automatically when taxable items are registered. Departments can be single item. Single items departments finalize immediately after an item is registered and are typically used for popular one-item transactions, such as a ticket or a soft drink. To Program Department Status 1. Place the key lock in the P position. 2. Determine the department status digit from the chart below. 3. Enter the department status digit and press a Department key. Department Status Digit Values: 10 0 Normal Department; Non-Taxable 1 Normal Department; Taxable 2 Single Item Department; Non-Taxable 3 Single Item Department; Taxable ER-180 Features Mode Key Turn the key lock to the desired position: OFF Move the switch to OFF to . No operations can take place when in the off position. REG Move the switch to R (Register) for normal registrations. X Move the switch to X to read mode for financial and Cash In Drawer reports. Totals are NOT reset to zero. Z Move the switch to Z to reset financial and Cash In Drawer reports. All totals return to zero. PGM Move the switch to P to program the register. Display The operator display features a nine place digital display providing the operator with information while operating the cash register. During operations, the display will show the following symbol or messages. 1 2 3 4 5 6 .7 8 CLOSEd : Indicates the clerk is logged off C : Indicates the amount displayed is due in change to the customer. = : Indicates the amount displayed is the amount due total. - : Indicates the amount displayed is a negative amount. E : Indicates an error condition. Press C key to clear. S : Indicates the amount displayed is a subtotal. P : Indicates an printer error condition. Press CLEAR key to clear. E Lo : Indicates Low Battery E REP : Indicates memory is full. Issue Z reports. 11 Keyboard X/TIME FEED CLEAR PLU RETURN 7 8 9 4 5 6 1 2 3 0 00 . VOID CLERK TAX (X) RCPT ON/OFF C/CONV - -% +% 1 5 9 13 2 6 10 14 3 7 11 15 4 8 12 16 NO CALC SALE RA PO (+) (-) CHECK CHARGE SUBTOTAL CASH/TEND (=) Calculator Functions Press CALC to enter calculator mode: Use the RA as the plus key (to add). Use the PO as the minus key (to subtract). Use the X/TIME as the multiply key. Use the CASH/TEND as the = (equal) key. Examples: Calculation Key Sequence 10 + 20 = 30 CALC, 1, 0, RA, 2, 0, CASH 100 – 20 = 80 CALC, 1, 0, 0, PO, 2, 0, CASH 100 – 20 + 50 = 130 CALC, 1, 0, 0, PO, 2, 0, RA, 5, 0, CASH 12 Key Functions FEED Advances paper in printer. 0 - 9, 00 Numeric keypad for entering amounts. DPT1-16 These keys classify the items sold and retain the quantities and amounts in their own memories. X/TIME Used for multiplication entry (X), or to refund sales amounts for merchandise returns. PO Used to register money Paid Out of the cash drawer. RA Registers amounts Received on Account. CLERK To log in/out for clerk 1,2,3,4 PLU To register PLU entries RETURN To allow for the return of merchandise Registers dollar amount markdowns, or coupons tendered. -%,+% Used to register percentage discount on items or the sale total. A set rate may be programmed, or variable rates entered when no automatic rate is set. The decimal is set at two places (00.00). VOID For voiding entries before a sale is finalized. CLEAR Clears incorrect entries made on the numeric keys, or silences the error tone after entry errors. TAX Used to program the tax rate in P mode. Also reverses the tax status when pressed after the amount, and before the department key. (Nontaxable department add tax, taxable department forgive tax, this item only.) NO SALE Used to print a reference number (#) on the receipt or journal, or to open the cash drawer outside of a sale (No Sale). CHECK Check tender key. Keeps a separate total from cash sales. CHARGE Charge tender key. Keeps a separate total from cash sales. 13 SUBTOTAL Display the transaction subtotal, including tax. CASH/TEND Finalizes sales paid in cash and calculates change due. RCPT ON/OFF To toggle receipt on and off status. C/CONV 14 To use currency conversion function Programming See “Initial Set-up Instructions” on page 7 when only basic setup and programming is required. This section contains all register programming options. Read this entire section carefully in order to program you register to best fit your individual needs. All programming is done with the key lock in the P position. Setting the Decimal Point Place the key lock in the P position. Enter 0 and press the X/TIME key for 2-digit decimal (0.00). Enter 1 and press the X/TIME key for 0-digit decimal (000.). 15 Department & PLU Programming You have the following department options: Departments can be taxable or non-taxable. Tax is added automatically when taxable items are registered. Departments can be single item. Single items departments finalize immediately after an item is registered and are typically used for popular one-item transactions, such as a ticket or a soft drink. To Program Department Status and Price 1. Place the key lock in the P position. 2. Determine the department status digit from the chart below. 3. Enter the department price and status digit and press DPT1 to DPT16 N1 N2 N3 N4 N5 N1 ~ N7 : Preset price N8 : Department Status N6 Department Status Digit Values: N8 Department Status 16 0 Normal Department; Non-Taxable 1 Normal Department; Taxable 2 Single Item Department; Non-Taxable 3 Single Item Department; Taxable N7 N8 DPT To Program PLU Status and Price 1. Place the key lock in the P position. 2. Determine the PLU status digit from the chart below. 3. Enter the PLU number press the PLU key. Enter the Price and status (N1-N8) and press the PLU key again. 1 TO 100 N1 N3 N2 N1 ~ N4 N5 N6 N7 N8 PLU PLU N7 : Preset price N8 : PLU Status PLU Status Digit Values: N8 PLU Status 0 Normal PLU; Non-Taxable 1 Normal PLU; Taxable 2 Single Item PLU; Non-Taxable 3 Single Item PLU; Taxable To Program Department link to PLU 1. Place the key lock in the P position. 2. Enter the PLU number and PLU key and press Department key to be linked. 1 TO 100 PLU DEPT(Linked) 17 Tax Programming The ER-180 may be programmed to tax items at either a straight percentage tax rate, or on based on a tax table. Entering a Straight Percentage Tax Rate The ER-180 will accept a 5 digit tax rate, with the decimal point fixed at three places (00.000). If your area taxes goods based on a straight percentage, enter the rate in the following manner. 1. Place the key lock in the P position. 2. Press 1 and then enter the five digit tax rate. 3. Press TAX. Examples: 1 0 5 0 0 0 TAX 0 TAX Enter 05000 for 5% Tax Rate 1 0 6 5 0 Enter 06500 for 6.5% Tax Rate 18 Formulating a Tax Table In some locales where taxes do not follow straight percentage rates, it is necessary to enter the tax table. Before beginning tax table programming, obtain a local tax chart and determine tax breaks for your area. Determine the lowest amount to be taxed, and the amount of tax that is added at that point (some areas add .05 at the first breakpoint). Next determine the tax break points by checking the chart for the highest amount allowed before each penny of tax is added. The difference between the high amounts (before each penny is added) determine the tax break point. As break points are determined, a pattern will appear. Once the pattern has developed, it is repeated for all remaining amounts. However, the first few break points will not fit this pattern. They are referred to as nonrepeat breaks. The ER-180 allows for 20 breakpoints to establish repeated tax break pattern. The following example is for an Illinois 4% tax. TAX AMOUNT RANGE BREAK POINT 0 .00 - .12 First taxable amount = .13 1 .13 - .31 19 Difference between .12 & .31 2 .32 - .54 23 Difference between .31 & .54 3 .55 - .81 27 Difference between .54 & .81 4 .82 - 1.08 27 Difference between .81 & 1.08 5 1.09 - 1.37 29 Difference between 1.08 & 1.37 6 1.38 - 1.62 25 Repeating breakpoints begin 7 1.63 - 1.87 25 8 1.88 - 2.12 25 9 2.13 - 2.37 25 10 2.38 COMMENTS Pattern established 19 Entering the Tax Table Before beginning, you must evaluate your tax table as shown in the example for the 4% Illinois tax table above. Should you make a mistake in entering the break points, depress the C key to clear and re-enter the table from the beginning. Place the key lock in the P position. 1 3 TAX LOWEST AMOUNT CHARGED TAX 1 TAX AMOUNT OF FIRST TAX ADDED 1 9 TAX FIRST NON-REPEAT TAX BREAK 2 3 TAX NEXT NON-REPEAT TAX BREAK 2 7 TAX NEXT NON-REPEAT TAX BREAK 2 7 TAX NEXT NON-REPEAT TAX BREAK 2 9 TAX LAST NON-REPEAT TAX BREAK CHECK SIGNALS END OF NON-REPEAT, 2 5 TAX REPEAT BREAKPOINT 2 5 TAX REPEAT BREAKPOINT 2 5 TAX REPEAT BREAKPOINT 2 5 TAX REPEAT BREAKPOINT CASH EXITS TAX TABLE PROGRAMMING CAUTION: PRESSING THE CASH KEY ANY OTHER TIME IN PROGRAM MODE WILL ERASE ALL TAX PROGRAMMING. 20 Setting the Percent (%) Key Place the key lock in the P position. N1 N2 N3 N4 N5 -% N1 N2 N3 N4 N5 +% Digit Value N1-N4 Percentage rate with decimal fixed at two places (00.00). N5 0 = Tax calculated after % discount is applied. 1 = Tax calculate before % discount is applied. 1 0 0 0 0 % = 10% Minus (-) Key Programming Place the key lock in the P position. N1 N1 Value 0 Tax calculated after coupon is applied. 1 Tax calculated before coupon is applied. 21 Setting the Machine Number The machine number prints on the receipt / journal tape along side the transaction number. Place the key lock in the P position. N1 N2 NO SALE Enter a two-digit ID # for N1 & N2 Setting Receipt Print or Journal Print Place the key lock in the P position. N1 SUB TOTAL N1 Value 0 Receipt Print (advances extra paper) 1 Journal Print System Options System option programming deals with aspects of programming not associated with any particular key, but with the general operation of the register. Each of the options may be turned on or off in this phase of programming. Five options are set with each five digit entry, for a total of ten. When changing the setting of a single option, the four accompanying options must also be re-entered. Step One of System Option Programming All options have a value of zero as an initial setting. Place the key lock in the P position. N1 N2 N3 N4 N5 RA Digit Option Value = 0 VALUE = 1 N1 CASH DECLARATION NOT COMPULSORY 22 COMPULSORY N2 SKIP ZERO TOTALS FOR REPORTS NO SKIP SKIP N3 DUPLICATE Z REPORTS NO DUPLICATE DUPLICATE N4 TOTAL REFUNDS & VOIDS TO PRINT ON REPORTS PRINT NOT PRINT N5 SUBTOTAL TO PRINT PRINT NOT PRINT Step Two of System Option Programming Place the key lock in the P position. N1 Digit N2 N3 N4 Option N5 PO Value = 0 VALUE = 1 N1 GRAND TOTAL TO PRINT PRINT NOT PRINT N2 GRAND TOTAL TO RESET WITH Z REPORT NOT RESET RESET N3 Z COUNTER TO RESET WITH Z REPORT NOT RESET RESET N4 TRANSACTION NUMBER TO RESET WITH Z REPORT NOT RESET RESET N5 PRINT DATE ON RECEIPT (JOURNAL) PRINT NOT PRINT 23 Setting the Date and Time The clock automatically advances the date and prints the current date and time on the paper. To set the date and time: 1. Turn the key lock to the X position. 2. Enter the date in six-digit format (MM DD YY) and press the CHECK key. M M D D Y Y CHECK 3. Enter the time in four-digit military time format (i.e. 15:00 is 3:00 PM). Press the CHECK key. 1 5 0 0 CHECK Currency Conversion Rate Programming Place the key lock in the P position. N1 N2 N3 N4 N5 N6 C/CONV Digit Value Comments N1~N5 0.000 - 99.999 Conversion Rate N6 0~5 Decimal Position Ex. If conversion rate is 1.3720, then program 137204. If conversion rate is 13.72, then program 13722. 24 Operation Examples Note: Set the key lock set to REG position. This section provides examples of transactions in the register mode. When an error occurs, press the CLEAR key. Error conditions may be caused by incorrect entries or keys pressed in the wrong sequence. Clerk Log On/Off The display will read “CLOSEd” until a clerk is logged on. To log on a clerk: Enter the clerk number (1-4) and press the “CLERK” key. To log off, enter “0” and press the “CLERK” key. The “CLOSEd” message displays No Sale The no sale function opens the cash drawer outside of a sale. The no sale activity counter on the financial report is incremented. To perform a no sale: Press NO SALE key Non Add (Reference) Number Entries Reference numbers up to seven-digits in length can be recorded on the receipt/journal. The entry can be made prior to any operation in the register mode. This number will not add to any totals or counters. To enter a reference number Enter a 1-7 digit number and press NO SALE key Department Entries Multiple Item Department Entry 1. Enter the quantity of items with the same price, press the X/TIME key. 2. Enter the item price and press the department key. 25 Single Item Department Entry Single item departments automatically finalize the sale on CASH after the department entry. If items have been entered to a regular department as first entry in a sales transaction, and an entry is made into the single item department, it will not finalize the sale automatically but act as a normal department. Enter the amount, press the single item department. Minus () Key Operation You may deduct a coupon or markdown using the Minus key. Enter the amount to be deducted and pressing the minus key. Percent Discount Operation (%) The percentage discount key may be used to either apply a discount to a single item (item discount) or to an entire sale (subtotal discount). The discount rate may be preprogrammed. When applying an item discount, enter the percentage rate and press the % key. The register will now re-display the amount due, less the discount amount. Refund Procedure You can refund sales. The department and sale totals are reduced by the appropriate amount. 1. Press the RETURN key. 2. Enter the amount to be refunded press the related department key. 3. Continue to make transaction entries or finalize the sale. 26 Voiding Entries If you should make an incorrect department entry you may correct it with the void (VOID) key. To void the last item entered: Press the VOID key. To void an item inside a transaction that was not immediately preceding item: 1. Enter the amount to be voided. 2. Press the VOID key. 3. Press the affected department. Payment Procedures Cash To total a cash transaction: Press the CASH/TEND key. To total the cash sale and calculate change due: 1. Enter the amount tendered. 2. Press CASH/TEND. The amount due back in change is then displayed and printed. Check and Charge To total a check or charge transaction: Press the CHECK or CHARGE key. Change calculation from a charge key tender is not allowed. Splitting Payment between Cash & Check 1. After entering items, press SUBTOTAL. 2. Enter the cash amount tendered first and press CASH/TEND. (The cash drawer will not open at this time.) 3. Press the CHECK key to charge the remaining balance and open drawer. 27 Tax Shift Procedure The TAX key us used to reverse the tax status of a single department entry. That is, to make what would normally be a taxable entry nontaxable, or a non- taxable entry taxable. It may also used to exempt an entire sale from tax. To reverse the tax status of an individual item: 1. Enter the price of the item 2. Press TAX, 3. Press the department key. To exempt an entire sale from tax: 1. Register all items. 2. Press SUBTOTAL. 3. Press TAX. 4. Press CASH/TEND or CHECK or CHARGE to finalize. Received On Account (RA) Operation Use the RA key to record money added to the cash drawer. Enter the amount received and press the RA key. Paid Out (PO) Operation Use the PO key to record money removed from the cash drawer. 28 Enter the amount paid out and press the PO key. Management Reports and Balancing Reports are detailed below: Mode Report Entry X Cash Declaration $ AMOUNT - SUBTOTAL X Read Financial Report CASH Z Reset Financial Report CASH X Read Department Report CHARGE Z Reset Department Report CHARGE X Read Clerk Report CLERK Z Reset Clerk Report CLERK X Read Z2 Financial Report VOID Z Reset Z2 Financial Report VOID Cash Declaration The cash declaration feature (if made compulsory in option programming – see option N1 on page 20) will enforce the entry of the total cash-indrawer (C.I.D.) before allowing financial reports to be taken. This feature does not allow cashiers to mislead management by altering overages and shortages to their advantage. The C.I.D. amount should be entered in the following way: After allowing for the beginning bank, count the remaining cash to be deposited. Enter the cash deposit amount and press the SUBTOTAL key. The register now issues a receipt showing the total cash declared, the cash total from memory, and the difference between the two as either over or short. When cash declaration is compulsory, the register will not allow any transactions to take place after cash declaration has been performed until the financial report has been reset in Z mode. 29 Sample Financial Report 01-13-10 11-33 4 Z 3●20TX 0●00% 0●00 58●69*1 0●00RF 4●00VD 58●69*2 008 # 32●59CA 32●59CH 26●10CG 10●00RA 20●00PO 22●59AT 004 NS ●●●●●●●● 190770●43*3 06401 1 30 DATE/TIME Z COUNTER, MODE TAX TOTAL % DISCOUNT TOTAL (COUPONS/MARKDOWNS) NET SALES TOTAL REFUND TOTAL VOID TOTAL GROSS SALES TOTAL CUSTOMER COUNT CASH TOTAL CHECK TOTAL CHARGE TOTAL RECEIVED ON ACCOUNT PAID OUT CASH DECLARED NO SALE COUNTER GRAND TOTAL TRANSACTION N0/MACHINE N0/CLERK NO System Balancing Equations NET SALES TOTAL = DEPARTMENT TOTALS + TAX % DISCOUNT TOTAL () COUPON / MARKDOWN TOTAL GROSS SALES = NET SALES TOTAL + REFUNDS + () COUPON / MARKDOWN TOTAL + % DISCOUNTS NEW GRAND TOTAL = TODAYS GROSS SALES + PREVIOUS GRAND TOTAL Maintenance 1. Avoid excess dust and extreme temperatures. 2. Be certain that AC cord is inserted firmly in the outlet, and that cord poses no danger of accidental tripping. 3. Use no chemicals or abrasives while cleaning cabinet or keyboard. 4. Do not pull or hold paper while the register is printing. SAFETY NOTICE The socket-outlet shall be installed near the equipment and shall be easily accessible. 31 Specifications Dimensions REG. SIZE (SM DRAWER) NET WEIGHT (SM DRAWER) 12.8W 16.54L 8.86H 10 lb. 36 oz. (5 kg) Drawer SIZE WEIGHT 12.8W 16.54L 3.74H 6 lb. 84 oz. (3.3 kg) Mode Key LOCK SWITCH POSITIONS RECEIPT ON / OFF ROTTERY 5 (OFF, REG, X, Z, PGM) NONE (PROGRAMMABLE) Keyboard TYPE NUMBER OF KEYS KEYSTROKE BUFFER RUBBER CONTACT TYPE 48 15 Printer MODEL # STATIONS PAPER COPY PRINT SPEED M42V ONE SINGLE PLY (57.5 mm or 40 mm) NONE 2.2 LINES per SECOND Display TYPE CAPACITY SYMBOLS VFD 8 DIGITS 5 (E, C, -, =, S) Power INPUT 120V AC ±10%, 60 Hz CONSUMPTION MEMORY BACK-UP BATTERY STANDBY : 2W, MAX : 8W 60 DAYS MSLithium, 3.0V 11mAh (MS920S) 32