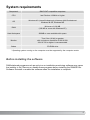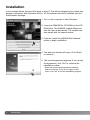
1
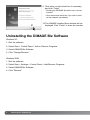
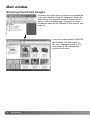
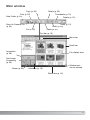
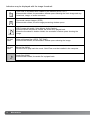
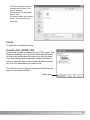
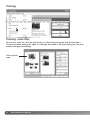
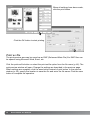
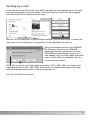
Biz Software
E
INSTRUCTION MANUAL
9222-7301-11 SY-A308/ME-0308
Using this manual
Thank you for purchasing this product. This software allows users to share comments
about an image (JPEG, BMP, and TIFF). Please read this instruction manual thoroughly
before using the software.
This instruction manual does not provide instruction in the basic operation of personal
computers, or the basic operation of Windows operating systems; refer to the manuals
supplied with the computer.
The examples in this manual use Windows XP. The appearance of the screens may differ
from the examples when using other Windows operating systems.
Every precaution has been taken to ensure the accuracy of this material. Minolta is not
responsible for any loss or damage caused by the use of this software.
This instruction manual may not be copied either in part or in its entirety without the prior
permission of Minolta.
Minolta, The essentials of imaging, and DiMAGE are trademarks or registered trademarks
of Minolta Co., Ltd. Microsoft and Windows are registered trademarks of Microsoft
Corporation in the United States and other countries. The official name of Windows is
Microsoft Windows Operating System. Pentium is a registered trademark of Intel
Corporation. IBM and IBM-PC/AT are trademarks of International Business Machines
Corporation US. All other brand and product names are trademarks or registered trademarks of their respective owners.
2
USING THIS
MANUAL
/ TABLE
OF CONTENTS
Table of contents
System requirements .............................................................................................................................5
Installation ...........................................................................................................................................6
Uninstalling the DiMAGE Biz Software ..................................................................................................8
Starting up ...........................................................................................................................................9
Quitting
...........................................................................................................................................9
Main window.........................................................................................................................................10
Showing thumbnail images......................................................................................................10
Main window ............................................................................................................................11
Opening camera images .........................................................................................................13
Changing the display format....................................................................................................15
Sorting the files........................................................................................................................16
Renaming files.........................................................................................................................17
Resizing files ...........................................................................................................................18
Validation .................................................................................................................................19
Editing files ..............................................................................................................................20
Folder search for comments....................................................................................................21
Creating new folders................................................................................................................22
Accessing other windows ........................................................................................................23
Printing a thumbnail index .......................................................................................................24
Creating camera files...............................................................................................................26
Help .........................................................................................................................................27
Annotation window ...............................................................................................................................28
Opening the annotation window ..............................................................................................28
Annotation window ..................................................................................................................29
Creating .mdm files..................................................................................................................31
Opening a main image.....................................................................................................31
Rotating the main image..................................................................................................32
Viewing the main image...................................................................................................33
Adding text comments .....................................................................................................34
Adding audio comments ..................................................................................................36
Adding image comments .................................................................................................37
Adding nested comments ................................................................................................38
3
Viewing .mdm files...................................................................................................................39
Reviewing audio and image comments ...........................................................................39
View date and user name ................................................................................................40
Editing .mdm files ....................................................................................................................41
Editing a comment ...........................................................................................................41
Deleting a comment .........................................................................................................42
Deleting a nested comment .............................................................................................42
Undo/cut/copy/paste/Searching comments ..........................................................................................43
After editing an .mdm file.........................................................................................................44
Saving .mdm files.............................................................................................................44
Printing.............................................................................................................................46
Sending by e-mail ............................................................................................................49
Help menu........................................................................................................................50
Quit / Information link.......................................................................................................51
Color matching ........................................................................................................................52
sRGB ...............................................................................................................................53
Original Color Space........................................................................................................53
AdobeRGB.......................................................................................................................53
About ICC profiles............................................................................................................55
Viewer window......................................................................................................................................56
Opening the viewer window.....................................................................................................56
Viewer window.........................................................................................................................57
Using cursor tools....................................................................................................................58
Zoom commands.....................................................................................................................59
Rotating an image ...................................................................................................................60
Copying an image....................................................................................................................61
Tool bar / Status bar ................................................................................................................61
Help .........................................................................................................................................61
Saving an image......................................................................................................................62
Printing an image ....................................................................................................................63
Closing / Quitting .....................................................................................................................64
Text window .........................................................................................................................................65
Opening the text window .........................................................................................................65
Text window .............................................................................................................................66
Editing images .........................................................................................................................67
Text image processing..........................................................................................................................68
Processing the entire image....................................................................................................68
Using perspective control ........................................................................................................70
4
TABLE
OF CONTENTS
/ SYSTEM
REQUIREMENTS
System requirements
Computers*
IBM PC/AT compatible computers
CPU
Intel Pentium 133MHz or higher
OS
Windows XP (Home/Professional), Windows 2000 Professional
Windows 98 SE, Windows ME
RAM
Minimum of 128 MB
(256 MB or more with Windows XP)
Hard disk space
200MB or more available disk space
Monitor
True Color (24 bit) or greater
with a minimum resolution of 800 X 600.
1024 X 768 or higher is recommended.
Others
CD-ROM drive
* Operating system running on the computer must be supported by the computer vendor.
Before installing the software
RAM-stationed programs such as anti-virus or installation-monitoring software may cause
the installer to fail. Remove or disable these programs before installing the DiMAGE Biz
Software. Reinstall or enable the software when the installation is complete.
5
Installation
In the example below, the hard disk drive is drive E. The letters designating the drives vary
between computers. With Windows 2000 or XP, the software should be installed with the
Administrator privilege.
1. Turn on the computer to start Windows.
2. Insert the DiMAGE Biz CD-ROM into the CDROM drive. The DiMAGE Installer Menu window will open automatically. The installer window varies with the camera model.
3. Click the “Install the DiMAGE Biz Software”
button to begin installation.
3
4. The welcome window will open. Click “Next>”
to continue.
5. The license agreement appears. If you accept
the agreement, click “Yes” to continue the
installation routine.
4
6
INSTALLATION
• Read the entire license agreement carefully
before continuing. If you do not agree to the
terms, click “No” to exit the installation program.
6. Enter the license key number supplied with
the software.
6
7. To install the software in the default location
- E:\Program Files\DiMAGE Biz Software,
click “Next>.” To install the software in a different location, click the browse button to
display the folder selection window. Specify
the directory in which to install the software.
7
8. The name of the default program folder is
displayed. To install the software icons in this
folder, click “Next>.” Installation will begin.
• To install the software icons in another folder,
select one of the folders listed in the existingfolders box below. Click “Next>” to begin installation.
8
7
9. Click either or both check box if necessary,
and click “Finish.”
• Reading the README file before use is recommended.
• Click the second check box if you wish to start
up the software immediately.
9
10.The DiMAGE Installer Menu window will be
displayed. Click “Finish” to close the window.
Uninstalling the DiMAGE Biz Software
Windows XP:
1. Quit the software.
2. Select Start > Control Panel > Add or Remove Programs.
3. Select DiMAGE Biz Software.
4. Click “Change/Remove.”
Windows 2000:
1. Quit the software.
2. Select Start > Settings > Control Panel > Add/Remove Programs.
3. Select DiMAGE Biz Software.
4. Click “Remove.”
8
INSTALLATION / STARTING
UP
Starting up
Select the DiMAGE Biz Software from the DiMAGE Biz Software folder in the programs
option of the start menu to start the application and open the main window.
If DiMAGE Biz files (.mdm)
have been linked to DiMAGE
Biz, double-clicking an .mdm
file starts the application and
opens the annotation window
(p. 28).
Quitting
To quit the software, select the quit
option from the file menu or click the
close [X] button in the upper right corner of the main window.
9
Main window
Showing thumbnail images
All image and audio files in a folder can be displayed
in the main window. Using the folder tree, select the
folder where the images are stored; thumbnails are
shown in the file display area. To show the image
thumbnails taken by the DiMAGE Xt Biz camera, see
page 13.
This is the main window of DiMAGE
Biz Software. The annotation (p.
28), text image-processing (p. 65),
and viewer (p. 56) windows are
accessed from here.
10
MAIN WINDOW
Main window
Copy (p. 20)
Delete (p. 20)
Print (p. 25)
New Folder (p. 22)
Thumbnails (p. 15)
Details (p. 15)
Icons (p. 15)
Undo (p. 20)
Save As Camera File
(p. 24)
Cut (p. 20)
Paste (p. 20)
Tool bar (p. 16)
Menu bar
Scroll bar
Annotation
(p. 28)
File display area
Text Image
Processing
(p. 65)
Viewer (p. 56)
Window size
can be resized.
Validation (p. 19)
Status bar (p. 16)
11
Indicators may be displayed with the image thumbnail.
.mdm files or annotated files created by the camera (JPEG, TIFF)
When double-clicked, the annotation window opens showing the main image and any
linked text, image, or audio comments.
Text-mode camera images (JPEG)
When double-clicked, the text image-processing window opens.
JPEG image with audio (Voice Memo, Audio Caption)
When the audio indicator is clicked, the audio file is played back.
When the thumbnail is double-clicked, the annotation window opens showing the
image.
No indicator
Other still-image files (JPEG, TIFF, BMP)
When double-clicked, the annotation window opens showing the image.
No indicator
Movie files (MOV)
Double-click to play back the movie. QuickTime must be installed in the computer.
Audio files (WAV)
When double-clicked, the audio file is played back.
12
MAIN WINDOW
Opening camera images
Follow the procedure below to show thumbnail images taken by DiMAGE Xt Biz camera.
1. Connect the camera to the computer. See the DiMAGE Xt instruction manual.
2. Select My Computer > Removable Disk > DCIM
> 10xMLT18 in the main window folder tree. The
images in the selected folder on the camera’s
memory card are displayed.
3. If annotation images are in the folder, a message
asking to created an .mdm file will appear. Click
OK to create the .mdm file.
4. Select a folder in the computer to store the
.mdm files, and click the save button.
13
When annotation images are made with the camera, ANNxxxx folders are created in the
same folder as the original file on the memory card.
PICT0001.JPG
Removable
disk
DCIM
100MLT18
For more on folder and file organization
and names, see the DiMAGE Xt instruction manual.
PICT0002.WAV
PICT0003.JPG
PICT0004.TIF
Annotation folder of the original
file PICT0001.JPG.
ANN0001
ANN0001.WAV
ANN0002.WAV
ANN0001.TXT
Annotation folder of the original
file PICT0004.TIF.
ANN0004
ANN0001.WAV
ANN0004.TXT
14
MAIN WINDOW
Changing the display format
The contents of a folder can be displayed as thumbnail images, icons, or in a list with file
data. To change the display format, simply press the appropriate button located in the tool
bar. The display can be changed by selecting the same options from the view menu.
Thumbnails
Icons
Details
Thumbnails
Icons
Thumbnails size can be adjusted
with the thumbnail-preferences
option.
Details
15
Tool bar and status bar can be
hidden or shown.
To display the date and image
size information with the thumbnails.
Updates the folders and files.
Sorting the files
Files can be sorted by date, name, extension, or attributes in ascending or descending
order. Simply select the appropriate options from the sort menu.
16
MAIN WINDOW
Renaming files
To rename a single file, click on the file name and enter a new name. The file extension is
attached automatically.
To rename multiple files at once, select the files to
be renamed; press and hold the control key and
click on each file. To deselect a file, click on the file
a second time while holding the control key.
Select the rename-all option from the tools menu.
The rename-all window opens.
Enter a new file name up to ten characters, and
the first serial number up to five digits.
Click the rename button to change the file names
of the selected images. Click the quit button to
cancel the operation.
17
Resizing files
To resize single or multiple files, select the files to be resized; press and hold the control
key and click on each file. To deselect a file, click on the file a second time while holding
the control key. Only JPEG, BMP, or TIFF image can be resized.
Select the resize-all option from the tools menu.
The the image-size window opens.
Enter the new width and height in the text boxes.
Only one value needs to be entered; the other
value will adjust automatically to keep the image
proportions unchanged. The dimensions must be
between 8 and 3840 pixels.
Select bilinear or bicubic interpolation. Bilinear creates standard image quality. Bicubic provides higher quality but may take longer to resize.
Click the OK button to change the image size of
the selected images. Click the cancel button to
cancel the operation.
18
MAIN WINDOW
Select the folder to save the resized images. Click the
select button to complete the operation. A new folder can
also be created in this window.
New-folder button
Validation
JPEG images taken by a DiMAGE Xt Biz digital camera can be checked to see if they
have been revised or modified.
Select the files to be validated. Single or multiple files can be selected.
Click on the validation button or select the
data-validation option from the validation menu.
• One of the following tags appears by the
image:
Data has not been modified.
Data has been modified.
Cannot confirm if data has been modified
or not.
To delete the validation tag, select the cleartag option from the validation menu.
19
Editing files
Copy
Delete
Undo
Cut
Paste
Undo Cut -
Copy -
Paste -
Delete Rename -
Select all -
20
To cancel the last operation.
To remove the selected file or folder and save it on the clipboard. The
linked files (thumbnail files, audio
tracks, etc.) are also removed.
To copy the selected file or folder
to the clipboard. The linked files
(thumbnail files, audio tracks, etc.)
are also copied.
To paste the file or folder from the
clipboard to the cursor position.
See page 22 to create a new folder.
To delete the selected file or folder. The linked files (thumbnail files, audio
tracks, etc.) are also deleted.
To change the name of the selected file or folder. The file name can also be
changed by clicking on it to place the cursor. Do not change the extension
(.mdm, etc.); it is attached automatically. The linked file names (thumbnail
files, audio tracks, etc.) are also changed.
To select all the images displayed in the file display area of the main window.
MAIN WINDOW
Folder search for comments
A search for text, dates, or user names can be
made in the comments of .mdm files in the selected folder.
Select comment-search option from the edit menu.
Enter the word(s) for the search and
click the search button.
.mdm files whose comments match
the search parameters are listed
here.
Click the close [X] button it the upper
right corner to close the search window.
21
Creating new folders
New folders can be created to store images. Click on the location for the new folder. In this example, the new folder is placed
in My Documents.
Create new folder
Click the new-folder button on
the tool bar or select the newfolder option from the file menu.
The new folder is created in the
specified location.
The folder name can be changed with the keyboard.
22
MAIN WINDOW
Accessing other windows
Three other windows can be accessed from the main window. The annotation window (p.
28) allows text, image, or audio comments to be added to an image file. Images of text or
illustrations can be adjusted in the text image-processing window (p. 65). Images can be
previewed in the viewer window (p. 56). Refer to the corresponding section for details.
To open the viewer window
To open the annotation window
To open the text image-processing window
Annotation window
Viewer window
Text image-processing window
23
Printing a thumbnail index
An index print of images in the main window can be printed. Click the print button in the tool bar, or select the print
option from the file menu.
Print preview
Select the numbers of row and column.
Select to print page numbers and
image information.
Font can be changed.
Printer settings can
be changed.
24
MAIN WINDOW
When all the settings have been made,
click the print button.
Click the OK button to start printing.
25
Creating camera files
Any JPEG, TIFF, or BMP image can be saved in a camera compatible format so they can
be annotated in the camera. To save single or multiple files, select the files to be saved;
press and hold the control key and click on each file. To deselect a file, click on the file a
second time while holding the control key. Movie, audio, and .mdm files cannot be converted.
Save as camera file
Click on the save-as-camera-file button on the tool bar or
select the save-as-camera-file option from the file menu.
When the lower display appears, select the file to be
saved, change the name if necessary, and click the save
button. The file name must consist of “PICT” followed by a
four-digit serial number.
Folder location
File name
File type (JPEG only)
The camera resizes the image to one of
the four camera image sizes automatically. White pixels are added to the edge
of an image to make the proportion 4:3.
26
MAIN WINDOW
Help
Help:
To display the help window.
Version:
To display the DiMAGE Biz
Software version.
If the license key option is selected, the license key window opens.
User Name: User name entered in this window can be shown with the comments in the
annotation window. See page 40 for details.
License key: License key number is displayed.
Website:
To access to the DiMAGE Biz website.
27
Annotation window
Opening the annotation window
To open the annotation window, select an image in the main window and click the annotation button or select the view-comment option from the file menu. Double-clicking on an
image without a text image-processing indicator also opens the annotation window.
Main image
Comment display area
If an .mdm file is opened, any linked text, audio, or image comments appear in the comment display area. If another type of file is opened, nothing appears in the comment display area.
28
ANNOTATION WINDOW
Annotation window
Font (p. 35)
Paste (p. 43)
Enlarge (p. 33)
Area marquee (p. 34)
Cut (p. 43)
Grab (p. 34)
Copy (p. 43)
Zoom (p. 33)
Undo (p. 43)
Menu bar
Reduce (p. 33)
Tool bar (p. 33)
Title text box (p. 32)
Comment display
area
Main
image
Image comment
(p. 37)
Text comment (p.
34)
Audio comment
(p.36)
Status bar
(p. 33)
Comment text box (p. 34)
Comment check box (p. 41)
Window can be
resized.
Window can be resized.
29
If the displayed image is an .mdm file, moving
the mouse cursor over the main image highlights any linked comments.
Moving the mouse cursor over the comment
display area shows the linked image area in
the main image.
Click a comment to enlarge the linked image
area in the main image. Click the zoom button
to switch between the enlarged and full-image
display.
If the image comment is double-clicked, the
annotation image will be opened in the viewer
window (p. 56).
30
ANNOTATION WINDOW / CREATING .MDM
FILES
CREATING .mdm files
Opening a main image
.mdm file is an image file with linked text, audio, and image comments created in the
annotation window. The following image formats can be opened in the annotation window:
JPEG image (Exif 2.1 and 2.2, 24-bit JFIF)
BMP image (8, 16, and 24 bit)
TIFF image (Exif 2.1 and 2.2, non-compressed 24-bit RGB)
The image size cannot exceed 3840 x 3840 pixels.
Open -
Import Image -
To open a new image file or .mdm
file. When selected, the open dialog box appears. Select the file and
click the Open button.
A second image can be added to
the main image. When selected,
the image-selection window will
open. Select the file and click the
open button.
31
Pasting an image from the Clipboard
You can load an image from another application using copy and paste functions. First,
select the original image or an area of the image and use the application’s copy command
to save it on the clipboard. Next, activate the DiMAGE Biz Software annotation window.
Click the paste button in the tool bar or select the paste option from the edit menu to load
the image into the main image display area.
File name
The file name is used as the default title for the
image. A new title can be entered in the title text
box up to 64 characters in length. Any title
entered will not change the original image file
name.
Rotating the main image
Main image can be rotated 90˚ clockwise or counterclockwise each time the option is
selected.
32
CREATING .MDM
FILES
Viewing the main image
Reduce
Enlarge
Zoom
Reduce -
To reduce the image by 10% each
time the button is clicked.
Enlarge -
To magnify the image by 10%
each time the button is clicked.
Zoom -
To zoom into the selected area of
the image. Click again to display
the entire image area.
Tool bar and status bar are hidden if unchecked.
33
Adding text comments
Area marquee
Grab
1. Click the desired area marquee from the
tool bar, or select the area-marquee from
the area-marquee option in the view menu.
• If necessary, enlarge the image and use the
grab button or select the grab tool from the
area-marquee option.
2. Click and drag the mouse to place a red marquee over
the area to be described with a comment.
• To change the defined area, click and drag the mouse again;
the previous marquee is canceled.
• To select the entire image, reduce the image size and drag
the mouse from outside the image using square.
3. Click text tab. Click on the comment text box to place
the cursor and enter a comment.
• Up to 512 characters can be used for each comment.
• The clear button deletes all text in the comment text box and
the red marquee in the image.
2
4. Click the add button to add the comment to the comment display area.
3
4
34
CREATING .MDM
FILES
5. Repeat steps one through four
to add additional comments.
• Up to 256 comments can be
added to an image.
If necessary, fonts can be changed. Click the
font button in the tool bar, or select the font
option from the view menu. The font window
appears. Change the font, style, size etc. and
click the OK button to complete the operation.
35
Adding audio comments
1. Following steps one and two on page 34, select the area
on the main image to be described with a comment with
one of the area-marquee tools.
2. Click audio tab and select the audio file to be added to
the comment list.
1
Click this button to move down to the previous folder
level.
3. Click the add button to
attach the audio comment.
2
3
Audio tracks of up to 10 minutes can be recorded. Click
the record button to start
recording. Click stop to end.
Click the play button to play
back a recorded track. If the
recorded audio is fine, click
the OK button to create the
new audio file.
Selected audio
can be played
back.
36
CREATING .MDM
4. Repeat steps one
through three to add
additional comments.
FILES
Your computer system must have a microphone and the necessary hardware to record
and play back sound.
Adding image comments
1. Following steps one and two on page 34, select the area
on the main image to be described with a comment with
one of the area-marquee tools.
2. Click image tab and select the image file to be added.
• The image size cannot exceed 3840 x 3840 pixels.
1
Click this button to move down to the previous folder
level. The preview window shows selected files.
3. Click the add button to attach the image comment.
2
3
4. Repeat steps one through three to add additional comments.
Preview window
37
Adding nested comments
A nested comment can be attached to existing comments. Up to eight nested layers can
be made.
1. Click the check box of the comment to which the nested comment is to be added.
2. Enter the text comment or locate
the audio or image file to be used
as the nested comment.
1
2
3
3
3. Click the add button or
select the add option from
the comment menu to
complete the operation.
Nested comment
38
CREATING .MDM
FILES
/ VIEWING .MDM
FILES
Viewing .mdm files
Reviewing audio and image comments
To play back audio comments or view image
comments, double-click on the comment.
Image comments are displayed in the viewer
window (p. 56).
Audio and image comments can also be
reviewed by clicking the comment check box,
and then selecting the audio/image-playback
option from the comment menu.
39
View date and user name
The data comment was created and the registered user
name can be viewed. Select the date-and-user-name option
in the view menu.
The user name must be registered to be
viewed. Select the license key option from the
help menu in the main window, and enter the
user name in the dialog box. See page 27 for
details.
40
VIEWING .MDM
FILES
/ EDITING .MDM
FILES
Editing .mdm files
Editing a comment
1. Click the check box of the comment to be
edited.
• To uncheck the check box, click it again.
2
2. Click the edit button to change the selected
comment.
• Instead of using the edit button, place the cursor
on the comment and right click to select the comment text.
1
3. Edit the text.
4. After editing the text, click the end-edit button
to complete the operation.
4
• Clicking another comment also ends the edit
operation.
3
41
Deleting a comment
1. Click the check box of the comment to be deleted.
• To uncheck the check box, click it
again.
1
2
2. Click the delete button or select the
delete option from the comment
menu; a confirmation screen
appears.
2
3. Click the OK button to delete the
comment.
3
Deleting a nested comment
If a comment has nested comments, the nested comments will also be deleted. A confirmation screen is displayed before the delete operation is executed.
42
EDITING .MDM
FILES
Undo / cut / copy / paste / Searching comments
Cut (p. 43)
Copy (p. 43)
Paste (p. 43)
Undo Cut Copy Paste -
Undo (p. 43)
To cancel the last operation.
To remove the main image or text and save
it on the clipboard.
To copy the main image or text to the clipboard.
To paste the main image or text from the
clipboard to the cursor position.
Searching comments
Text, dates, or user names can be searched in the comments of the .mdm file displayed in
the annotation window.
Select the comment-search option from the edit menu.
Enter the word(s) for the search and click the next button to view the first result; the result
is highlighted in the comment list box. Continue to click the next button to view the following results. Click the quit button to end the search.
Case sensitive searches can be
made and the direction can be
changed.
43
After editing an .mdm file
Saving .mdm files
Save
To save the .mdm file overwriting the old data, click the save button or select the save
option from the file menu. When the save command is used with an existing .mdm file, a
warning to replace the file will appear. Click the OK button to save changes to the file.
Save as
To save the .mdm file under a different name or in a different folder, select the save-as
option from the file menu.
In the save-as window, specify the location to save the file and enter the file name. Click
the save button to complete the operation.
44
AFTER
EDITING AN .MDM FILE
• The text in the title text box is
used for the file name. This
can be changed.
• The extension for annotated
files is .mdm.
• To prevent others from editing
the file, click the read-only
check box.
Close
To close the annotation window.
Create web (HTML) file
To save the created comments as an HTML (Hyper Text
Markup Language) file. Click the create-web-file button,
or select the create-web-file option from the file menu.
The select-folder window appears. Select the folder in
which to save the files. A new folder can also be created. Click the select button to save the file.
The html file and all required image and audio files are
saved in the selected folder.
New folder
45
Printing
Printing .mdm files
To print the .mdm file, click the print button or select the print option from the file menu.
The print-preview window will open. As changes are made to the print dialog box, the print
preview changes accordingly.
Print preview
area
46
AFTER
EDITING AN .MDM FILE
Print preview area
Check the comments to be printed.
Unchecked comments are not printed.
Click the desired
settings.
To view the pages to be
printed.
A header and footer can be
entered in the text boxes. The
header is centered at the top of
the page. The footer is printed in
the lower left corner.
The font can be specified.
Printer settings can be changed.
47
When all settings have been made,
click the print button.
Click the OK button to start printing.
Print as file
The print-preview area can be saved as an EMF (Enhanced Meta File) file. EMF files can
be opened using Microsoft Word, Excel, etc.
Click the print-as-file button or select the print-as-file option from the file menu (p. 46). The
print-preview window will open. Change the settings as described in the previous page.
When settings are complete, click the save button instead of print button. In the save-as
window (p. 45), specify the location to save the file and enter the file name. Click the save
button to complete the operation.
48
AFTER
EDITING AN .MDM FILE
Sending by e-mail
.mdm files can be sent by e-mail. Only MAPI compatible e-mail applications can be used
and must be installed on your computer. This allows mail to be sent from other applications. Microsoft Outlook Express can be used.
With the file to be sent open in the annotation window, click the mail button, or select the
mail option from the file menu; the computer’s e-mail application will start up.
When the recipient does not have DiMAGE
Biz Software, check this box; DiMAGE
Messenger Reader is attached to the mail.
DiMAGE Messenger Reader allows you to
view images, copy the main image, play back
audio, and print the file. However, new comments cannot be added.
When this is checked, the main image is resized to 1024 x 768 (XGA), and image comments are resized to 640 x 480 (VGA). White pixels are added to the edge of an image
with non-standard dimensions to make the proportion 4:3.
Click the OK button to continue.
49
The MAPI-compatible e-mail
application will start up. The
.mdm file is attached automatically.
Enter the address, subject, main
text etc. and send the e-mail. Do
not quit the DiMAGE Biz
Software before sending the
mail; it may cause an error.
Refer to the instruction manual
of the e-mail application about
operation.
Help menu
50
AFTER
EDITING AN .MDM FILE
Help -
To display the help window.
Version -
To display the DiMAGE Biz
Software version.
Quit / Information link
2
1
3
1
1. Quit -
To close the DiMAGE Biz Software.
2. Recent files - To select files opened recently in the application.
3. Info Link -
To access the DiMAGE Biz website.
51
Color matching
Each output device (monitor or printer) defines color and contrast differently. To ensure
accurate reproduction, the output color space must be defined. Color matching is used for
professional color management. It is not needed for normal personal use.
1. Select the color-preferences option from the file
menu to open the color-preferences window.
2. Click the color-matching-on check box to activate
color matching.
3. Select the appropriate color
space from the drop-down
menu.
52
COLOR
MATCHING
sRGB
For standard images captured with a digital camera. This color space reflects the average
PC monitor characteristics. It is widely used, and is considered to be the standard for
multi-media and the internet. sRGB is not suitable for professional prepress applications
because of its narrow reproduction range.
Original Color Space
This color space is recommended for images captured with a Minolta DiMAGE 7 or 5 digital camera. Use the sRGB color space for other Minolta camera models (ie. DiMAGE 7i,
DiMAGE Xi, etc.). The DiMAGE Biz Software, monitor, and printer interprets the color as
sRGB for reproduction purposes, but does not convert the original camera color space.
AdobeRGB
The extensive color range makes this color space ideal for prepress use. However, the
range is so great that it includes many colors that cannot be reproduced with a four-color
printing process. AdobeRGB color-mode images captured with a Minolta digital camera
such as the DiMAGE 7Hi should be opened with this color space.
4. To use a monitor profile,
click the display profile
check box. Click the load
button to locate the profile.
53
5. Select the profile and
click the open button to
load the profile. The
profile name will be displayed in the color-preference window.
6. To use a printer profile, click
the printer profile check box.
Click the load button to
locate the profile.
7. Select the profile and
click the open button to
load the profile. The
profile name will be displayed in the color-preference window.
• Profiles can be found in the following locations:
Windows XP: [Windows] - [system32] - [spool] - [drivers] - [color]
Windows 2000: [WINNT] - [system32] - [spool] - [drivers] - [color]
54
COLOR
MATCHING
8. Click the OK button to complete the operation.
About ICC profiles
ICC profiles for a specific monitor or printer are available from the manufacturer. These
may be downloaded from the manufacturer’s web site. See the instruction manual of the
specific device on how to install the ICC profile.
The following generic monitor and printer profiles are supplied with the DiMAGE Biz
Software.
Monitor profiles:
Std_Monitor.icc For average monitors*
sRGB_Monitor.icc
For Windows sRGB monitors
Printer profiles:
Std_DyeSublimation.icc For dye-sublimation printers*
Std_InkJet.iccFor inkjet printers*
Std_SilverHalide.icc
For silver-halide dye-transfer printers*
Std_ColorLBP.icc For color-laser printers
sRGB_Printer.icc For printers which use sRGB color space
DL2200RGB.icm For magicolor 2200 DeskLaser
dl6100rgb.icmFor magicolor 6100 DeskLaser
* Designed for generic monitors and printers.
55
Viewer Window
Opening the viewer window
The viewer window is for viewing images. To open the viewer window, select an image in
the main window and click the viewer button or select the view-image option from the file
menu. The image size cannot exceed 3840 x 3840 pixels.
56
VIEWER WINDOW
Viewer window
Magnifier (p. 58)
Reduce (p. 59)
Print (p. 63)
Close (p. 64)
Fit to window (p. 59)
Rotate (p. 60)
Actual size (p. 59)
Save (p. 62)
Area marquee (p. 58)
Enlarge (p. 59)
Grab (p. 58)
Tool bar (p. 61)
Menu bar
Display area
Scroll bar
Status bar
(p. 61)
Window size can be
adjusted.
57
Using cursor tools
Area marquee
Magnifier
Grab
The mouse cursor can be changed to one of three
tools: area marquee, magnifier, and grab. Click the
appropriate button on the tool bar, or select the cursor option from the view menu.
Area marquee
Part of the image can be selected for copying. Click and drag
the marquee to define the area. The marquee can be adjusted or moved with the mouse. To select the entire image, use
select-all option in the edit menu (p. 61).
Magnifier
Click on the image to enlarge. Click while pressing the shift
key to reduce the image size.
Grab
To scroll the image when the image is larger than the display
area, click and drag the image with the grab cursor. Scroll
bars can also be used.
58
VIEWER WINDOW
Zoom commands
Enlarge
Actual size
Fit to window
Reduce
Enlarge / Reduce button
Click the enlarge or reduce button on the tool bar or select
enlarge or reduce from the zoom option in the view menu, to
change the size of the displayed image. The image is
enlarged or reduced every time the button is clicked.
Fit to window
Click the fit-to-window button on the tool bar, or select the fitto-window from the zoom option in the view menu. The image
is enlarged or reduced automatically to fit the window size.
59
Actual size
Click the actual-size button on the tool bar, or select the actual-size option from the zoom
option in the view menu. The image is displayed based on its pixel dimensions and the
monitor resolution.
Manual magnification
The degree of magnification can be selected from the manual-magnification option in the
zoom option in the view menu. The image size can be selected from 25%, 50%, 75%,
100%, 200%, and 400%.
Rotating an image
Rotate counterclockwise
Rotate clockwise
The image can be rotated 90˚ clockwise or counterclockwise each time the rotate button
on the tool bar is clicked, or the rotate option is selected from the tools menu.
60
VIEWER WINDOW
Copying an image
Copying an area of the image
To copy part of the image, select the area using the area marquee (p. 58), and select the
copy option from the edit menu to place the data on the clipboard. The data can then be
pasted into another application.
Copying the entire image
Select the select-all option from the edit menu; the entire image will be selected. Then,
select the copy option from the edit menu to place the data on the clipboard. The data can
then be pasted into another application.
Tool bar / Status bar
Tool bar and status bar can be shown or hidden. Simply select
the appropriate option in the view menu.
Help
Help option opens the help window. Version option displays
the DiMAGE Biz Software version.
61
Saving an image
Save
Save
To save an image file overwriting the original file, click the save button on the tool bar, or
select the save option from the file menu. When the save command is used with an existing image file, a warning to replace the file will appear. Click the OK button to save
changes to the file.
Save as
To save an image file in a different name or different folder, select the save-as option from
the file menu.
In the save-as window, specify
the location where you wish to
save the file, enter the file
name, and select the file type.
Click the save button to complete the operation.
When saving JPEG files, the
compression rate can be
adjusted.
62
VIEWER WINDOW
Printing an image
1. Click the print button or select the print option from the
file menu.
2. Set the print size. Choose
either radio button:
Resolution: Enter one of the
three values;, the other two
values change automatically.
Size to page: The image is
resized to fit to the paper size
automatically.
3. Image information can be
shown or hidden. The font can
be changed.
Print preview
4. When all the settings are
made, click the print button.
Printer settings can be changed.
63
5. Click the OK button to start printing.
Closing / Quitting
To close the viewer window, click the close button or select
the close option from the file menu.
To quit DiMAGE Biz Software, select the quit option from the file menu.
64
VIEWER WINDOW / TEXT WINDOW
Text Window
Opening the text window
To open the text window, select the image in the main window and click the text button or
select the text image-processing option from the file menu. Double-clicking on an image
with the text-mode indicator in the main window also opens the text window. The image
size must be between 8 x 8 pixels and 3840 x 3840 pixels.
65
Text window
Magnifier (p. 58)
Reduce (p. 59)
Print (p. 63)
Close (p. 64)
Fit to window (p. 59)
Rotate (p. 60)
Actual size (p. 59)
Save (p. 62)
Adjust box (p. 68)
Enlarge (p. 59)
Grab (p. 58)
Area marquee (p. 58)
Menu bar
Display area
Tool bar (p. 61)
Basic apply
button (p. 68)
Advanced
apply button
(p. 68)
Rubber
band (p.
70)
Perspective
control (p. 70)
Scroll bar
Undo button (p. 69)
Status bar (p. 61)
Adjust box (p. 68)
66
TEXT WINDOW
Window size can be
adjusted.
Editing images
The following editing operations are the same as those in the viewer mode. See pages 56
- 63 for details.
Magnifier (p. 58)
Print (p. 63)
Close (p. 64)
Reduce (p. 59)
Fit to window (p. 59)
Rotate (p. 60)
Actual size (p. 59)
Save (p. 62)
Area marquee (p. 58)
Enlarge (p. 59)
Grab (p. 58)
See page 68.
67
TEXT IMAGE PROCESSING
Images of text, line art, or photographs on white backgrounds are low in contrast making the background gray and muddy and the black letters and lines smokey. Text image
processing improves the appearance and legibility of images of two-dimensional art.
If the adjust box in hidden, click the adjust-box button or
select the adjust-box option from the view menu.
Adjust box
Processing the entire image
To apply image processing to the entire
image:
1. Confirm the perspective-control check
box is unchecked.
2
2. Select the appropriate processing mode
and click the corresponding apply button. See the next page.
2
1
68
TEXT
IMAGE PROCESSING
Basic
For images of black text on a white background. This is not appropriate for images with
small characters, fine detail, photographs, or continuous-tone illustrations.
Advanced, text/line art
For images of black text and line art on a white background. This is not appropriate for
images with photographs or continuous-tone illustrations.
Advanced, continuous tone
For images of photographs or continuous-tone illustrations on a white background.
When the apply button is clicked, the
result of the processing can be seen
in the image immediately. If the result
is not satisfactory, click the undo button or select the undo option from the
edit menu.
The effect of the apply button is additive. Each time an apply button is
clicked, processing is applied to the
current image. The more the processing is applied, the stronger the results
will be. The undo button can only cancel the last processing operation.
When the text image processing is complete, save or print the image. The operations are
the same as those in the viewer window. See page 62 or 63 for details.
69
Using perspective control
Images of artwork taken with an angle can be straightened using the perspective-control
function. It is effective when the picture-taking angle is within 45° from perpendicular.
Perspective control may not be effective with images that use exposure or color-saturation
compensation, or incorrect white balance. Uneven illumination, reflections, or overexposure with flash or other light sources may also prevent the function from being effective.
1
2
1. Check the perspective-control check box.
2. Adjust the rubber band so that it lines up with the horizontal and vertical image elements. Click and drag on the black squares at the corner of the rubber band to adjust
the shape. The area outside the rubber band will be deleted when processing is
applied
70
TEXT
IMAGE PROCESSING
3. Select the appropriate processing mode in the adjust box and click the corresponding
apply button. See pages 68 and 69 for details.
3
3
When the apply button is clicked, the result of the processing can be seen in the image
immediately. If the result is not satisfactory, click the undo button or select the undo option
from the edit menu.
The effect of the apply button is additive. Each time an apply button is clicked, processing
is applied to the current image. The more the processing is applied, the stronger the
results will be. The undo button can only cancel the last processing operation.
When the processing is complete, save or print the image. The operations are the same
as those in the viewer window. See page 62 or 63 for details.
71
We offer support for our digital products 24 hours per day on
www.minoltasupport.com.
Camera know-how, image composition, digital image editing: discover more about Minolta’s new internet world and visit
www.minoltaphotoworld.com
©2003 Minolta Co., Ltd. under the Berne Convention and the Universal Copyright Convention.
Printed in Germany
9222-7301-11 SY-A308/ME-0308