1
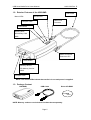
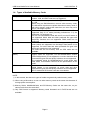
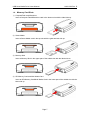
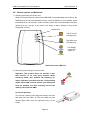
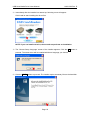
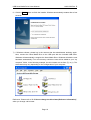
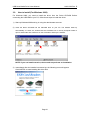
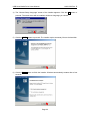
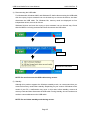
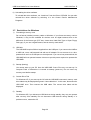
Universal Serial Bus Interface Hexa Media Drive USB HMD Model YD-8V14 Users Manual <PN 149313-02 Rev. D> Copyright © 2002 Y-E Data, Inc. All Rights Reserved. September 2002 USB Hexa Media Drive Users Manual 149313-02 Rev. D Important instructions for use of the Hexa Media Drive (HMD) Caution Prohibition z z z z z z Before connecting the USB HMD to your PC, read through this manual. The driver software may have to be installed in advance. When connecting/disconnecting the USB cable of the USB HMD or turning on/off your PC, remove all memory cards. This product is precision equipment. So do not drop the product, give a strong impact to it, or install it in locations exposed to heavy vibrations; doing so may cause the product breakdown. Do not disassemble or modify the product. Disassembly or modification may cause a breakdown, fire, or electric shock. Do not use or store the product in wet locations. The entry of liquid into the product may result in a breakdown, fire, or electric shock. Do not insert any memory cards other than specified ones. The insertion of a metal piece such as a coin or clip may lead to a breakdown, fire, or electric shock. Do not remove the memory card from the product when its access LED lamp is lit. This product is designed to be used for general electric equipment. Do not use it for equipment requiring exceptional quality or reliability, particularly when the breakdown or malfunction of this product may jeopardize life or health (such as aerospace equipment, atomic power control systems, traffic-related equipment, transportation equipment, industrial robot, combustion equipment, various safety devices, and life-support system). It is prohibited by the copyright law to reproduce the whole or part of this software and User’s Manual and rent the software, without permission of the copyright holder. We bear no liability for any pecuniary losses and lost profits resulting from use of the software included with this product, and any claims from third parties. This software cannot be used on other than specified equipment. The specifications of this software are subject to change without notice. We assume no responsibility for any breakdown and damage caused by misuse, troubles from other equipment, undue repairs or modifications. If this product should have any defect attributable to manufacture, we will exchange it with a new one, but cannot take on any more responsibility. Illustrative pictures in this manual may differ from the PC’s actual screens. Apple, Mac and Macintosh are trademark of Apple Computer. CompactFlash is a trademark of SanDisk Corporation. IBM is a trademark of IBM Corporation. Microsoft Windows is a trademark of Microsoft Corporation. MultiMediaCard is a trademark of Infineon Technologies AG and licensed MultiMediaCard Association. SD Logo is a trademark. SONY and Memory Stick are trademark of SONY Corporation. SmartMedia is a trademark of Toshiba Corporation. Y-E Data is a trademark of YE DATA INC. All other trademarks are the property of their respective owners and are hereby acknowledged. Page 2 USB Hexa Media Drive Users Manual 149313-02 Rev. D Table of Contents 1. 2. 3. 4. 5. OVERVIEW ................................................................ ................................................................................................ ............................................................................... ............................................... 4 1.1. FEATURES OF THE USB HMD................................................................................. 4 1.2. EXTERIOR FEATURES OF THE USB HMD ............................................................... 5 1.3. PACKAGE CONTENT ................................................................................................. 5 1.4. TYPES OF AVAILABLE MEMORY CARDS ................................................................... 6 1.5. MEMORY CARD SLOTS ............................................................................................. 7 1.6. SUPPORTED OSS ...................................................................................................... 8 MACINTOSH ................................................................ ................................................................................................ ............................................................................ ............................................ 9 2.1. HOW TO INSTALL (FOR MAC OS X VER.10.1.2 OR GREATER).................................. 9 2.2. HOW TO INSTALL (FOR MAC OS 8.6, 9.0, 9.1 AND 9.2) ......................................... 10 2.3. HOW TO UNINSTALL THE DRIVER SOFTWARE ......................................................... 12 2.4. HOW TO OPERATE ON MACINTOSH ........................................................................ 13 2.5. RESTRICTIONS FOR MACINTOSH ............................................................................ 15 WINDOWS ................................................................ ................................................................................................ .............................................................................. .............................................. 17 3.1. HOW TO INSTALL (FOR WINDOWS XP) .................................................................. 17 3.2. HOW TO INSTALL (FOR WINDOWS 2000)................................................................ 21 3.3. HOW TO INSTALL (FOR WINDOWS ME) .................................................................. 24 3.4. HOW TO INSTALL (FOR WINDOWS 98 AND WINDOWS 98 SE)................................ 27 3.5. HOW TO CHANGE THE DRIVE LETTER (REFERENCE INFORMATION) ...................... 30 3.6. HOW TO OPERATE ON WINDOWS ............................................................................ 33 3.7. RESTRICTIONS FOR WINDOWS ............................................................................... 36 SPECIFICATIONS ................................................................ ................................................................................................ .................................................................. .................................. 38 4.1. OPERATING TEMPERATURE RANGE ....................................................................... 38 4.2. OPERATING HUMIDITY RANGE .............................................................................. 38 4.3. POSITION DURING OPERATION .............................................................................. 38 4.4. USB SPECIFICATIONS ............................................................................................ 38 4.5. ELECTRICAL SPECIFICATIONS................................................................................ 38 4.6. SUPPORTED MEMORY CARDS ................................................................................ 38 ABOUT INQUIRIES ................................................................ ............................................................................................... ............................................................... 38 Page 3 USB Hexa Media Drive Users Manual 149313-02 Rev. D 1. Overview The USB Hexa Media Drive (HMD) is a multi-format memory card reader/writer for the Universal Serial Bus (USB) interface, which allows you to use six types of memory cards with a single device. To use the HMD, your computer must have a USB port, your OS must support USB, and the software for the USB HMD must be installed. 1.1. Features of the USB HMD 1) With this single device, you can use the following six of memory cards available on the market now. 1. SmartMedia 2. CompactFlash 3. Microdrive 4. Memory Stick 5. SD Memory Card 6. MultiMediaCard 2) The newly-developed Y-E Data dedicated IC allows high-speed access to memory cards. Error detection and correction capability has been integrated into the dedicated IC, which makes the HMD highly reliable for data read/write operations without garbled data. 3) The newly-adopted mount indication LEDs allow you to easily determine whether you can remove a media card. The LEDs prevent failures due to removing media during operation by mistake. 4) The newly-developed multi-format memory card connector allows you to insert all the types of media cards mentioned above without any adaptors, and the device is able to maintain a very compact design. 5) The industry standards, USB Mass Storage Class and Multi Logical Unit Number (MultiLUN), are supported. Therefore, when you use the latest OSs, Windows Me and Windows XP, the need for installing separate driver software is eliminated. You can immediately start using this product by simply connecting the USB cable. 6) For Windows 98, Windows 2000, and Macintosh OS, using the attached drivers, you can immediately use this product after a simple setup. 7) This product is compact and lightweight and requires no AC adaptor, which makes it ideal for a mobile environment. 8) The USB cable is the industry standard USB mini-B connector, which can be detached from the main body. Page 4 USB Hexa Media Drive Users Manual 149313-02 Rev. D 1.2. Exterior Features of the USB HMD Mount LEDs USB Cable Access LED USB mini B Compact Flash Connector Smart Media Memory Stick SD Memory Card MMC USB A Connector Connect to PC. Smart Media Memory Stick or SD Memory Card or MMC Compact Flash NOTE: The mount LEDs indicate that media is in use and power is supplied. 1.3. Package Content USB HMD USB Cable Driver CD-ROM NOTE: Memory cards are not included. Purchase them separately. Page 5 USB Hexa Media Drive Users Manual 149313-02 Rev. D 1.4. Types of Available Memory Cards Memory Card CompactFlash Microdrive SmartMedia Memory Stick MultiMediaCard (MMC) SD Memory Card Support DOS-formatted memory cards are supported. I/O cards such as modem, LAN, and PHS cards are not supported. We have checked the operation of IBM Type II Microdrives of up to 1 GB. When using an IBM Microdrive, remove other memory cards. The Microdrive requires more power than other memory cards, if with other memory cards at the same time, an error may occur due to a shortage of power. DOS-formatted memory cards between 2 MB and 128 MB are supported. Only 3.3 V cards (including indicated as 3 V) are supported. 5 V cards are not. You can use SmartMedia cards with an ID, but the ID feature is not supported. Music data and other protected file types with anti-piracy functions are not supported. ROM cards are not supported. Sticks between 4 MB and 128 MB are supported. Magic Gate cards (white) are supported, but the Magic Gate feature is not supported, so music data and other protected file types with anti-piracy functions are not supported. I/O cards that are not memory such as GPS cards are not available. Cards between 16 M and 64 M are supported. Keitaide-Music support cards are supported, but the Keitaide-Music feature (UDAC-MB protocol) is not supported, so music data and other protected file types with anti-piracy functions are not supported. The read/write speed for MultiMediaCard is much slower than other cards. This limitation comes from the specifications of the cards. Cards between 8 MB and 512 MB are available. The Secure Digital feature is not supported, so music data and other protected file types with anti-piracy functions are not supported. SD I/O cards and SD Combo cards are not available. NOTE: 1) In this manual, the above six types of media are generically called memory cards. 2) When using a Microdrive, do not use other memory cards at the same time because of its large power consumption. 3) Memory Sticks, MultiMediaCards, and SD Memory Cards use the same slot, so you cannot use them at the same time. 4) Only DOS format is supported. Memory cards formatted not in DOS format are not available. Page 6 USB Hexa Media Drive Users Manual 1.5. 149313-02 Rev. D Memory Card Slots 1) CompactFlash and Microdrive Insert a Compact Flash/Microdrive card in the bottom slot with the label side up. 2) Smart Media Insert a Smart Media card in the top slot with the gold terminal side up. 3) Memory Stick Insert a Memory Stick in the upper part of the middle slot with the label side up. 4) SD Memory Card and Multi Media Card Insert an SD Memory Card/Multi Media Card in the lower part of the middle slot with the label side up. Page 7 USB Hexa Media Drive Users Manual 149313-02 Rev. D 1.6. Supported OSs PC Macintosh OS Mac OS X (Ver. 10.1.2 or greater) Windows Mac OS 8.6 Mac OS 9.0 Mac OS 9.0.4 Mac OS 9.1 Mac OS 9.2 Windows XP Windows 2000 Windows Millennium Edition (Me) Windows 98 Windows 98 Second Edition (SE) Driver Software This product works with the standard driver in OS X. Install the driver software from the CD-ROM. Page 9 This product works with the standard driver in Windows. Windows XP Service Pack 1 After installation, Install the drive label driver from the CDROM to use this product with the special drive labels. Windows 2000 Service Pack 3 After installation, Install the driver software from the CDROM. This product works with the standard driver in Windows. Install the icon driver from the CD-ROM to use this product with the special icons. Install the driver software from the CD-ROM. 17 10 21 24 27 NOTE: 1) According to information from Apple Computer, Mac OS 9.0.2 and 9.0.3 do not start up if USB devices are connected before starting up the OS. Upgrade to Mac OS 9.0.4 or greater. For more information, see Article Number 25139 of Tech Info Library of Apple Computer. http://docs.info.apple.com/article.html?artnum=25139 (Registration with the Apple homepage to access this document, registration is free.) 2) Mac OS 8.1 and 8.5 are not supported. Upgrade to Mac OS 8.6 or greater before using this product. 3) Windows 95 is not supported. 4) The Hexa Media Drive will not operate properly under OS X Ver.10.0 – Ver.10.1.1. OS X Ver.10.1.2 or greater is required. 5) For the latest information on the HMD, see our Web site, http://www.yedata.com/support/. 6) We cannot guarantee operation for Macs with add-in USB port cards. 7) We cannot guarantee operation for PCs that have had OS upgrades. 8) Installation of the driver software before Windows2000 Service Pack 3 is possible. However, when using in the optimal environment, we recommend you to install Windows 2000 SP 3. If Windows 2000 SP 3 is installed, please install driver software from driver attached CD-ROM again. Page 8 USB Hexa Media Drive Users Manual 149313-02 Rev. D 2. Macintosh 2.1. How to install (For Mac OS X Ver.10.1.2 or greater) Installation of drivers for OS X is not required. This product works with the standard drivers built into OS X. 1) With the power of your Mac on, connect the HMD using the included USB cable to a USB port on your Mac. 2) Insert a media card into the Hexa Media Drive. After a few seconds a new “removable media” icon will appear in the Finder. You may insert multiple cards simultaneously into the various Hexa Media Drive Slots. Double click a removable media icon to access the files on the cards. NOTE: In OS X, when you insert multiple cards, the icons will all appear “removable media” icons. The Hexa Media Drive will not operate properly under OS X Ver.10.0 – Ver.10.1.1. OS X Ver.10.1.2 or greater is required. Please be sure to update your Mac to Ver.10.1.2 or greater. You can check your OS version by clicking the Apple logo in the upper left hand corner of your screen and select “About This Mac”. It will display your current version. Insertion of the memory card which recorded the photograph with the digital camera may start image capture software automatically. For information about how to use image capture, see your Macintosh manual. Page 9 USB Hexa Media Drive Users Manual 149313-02 Rev. D 2.2. How to install (For Mac OS 8.6, 9.0, 9.1 and 9.2) You need to install the driver before connecting the Hexa Media Drive (HMD) to your Mac. Follow these steps to install the driver. 1) Insert the Hexa Media Drive Driver CD-ROM into your Macintosh. You must restart your computer after installation, so close all application programs before installation. 2) The CD-ROM window should open automatically. If it does not, double-click the CDROM icon to open it. 3) Double-click the USB HMD Installer icon to start installation. 4) Click the Continue button to continue installation. Page 10 USB Hexa Media Drive Users Manual 149313-02 Rev. D 5) The version information, license agreement, and other data are displayed. Read them and click the Continue button. 6) Confirm the installation location (change it as necessary). Click the Install button to start installation. 7) A warning message, saying that you must restart your computer after installation, appears. Click Continue to continue installation. Page 11 USB Hexa Media Drive Users Manual 149313-02 Rev. D 8) Installation is now complete. Click Restart to restart your computer. 9) After restart, connect the attached USB cable between the HMD and a USB port of your Macintosh. 10) When you insert a memory card into the HMD, its corresponding drive icon appears in your Finder, which indicates that you can access it. Double-click the icon to display files on the memory card. Icon Corresponding Memory Card Compact Flash Microdrive SmartMedia Memory Stick SD media Card Multi Media Card 2.3. How to uninstall the driver software To uninstall the driver software, turn off two files, "Y-E Data USB Driver" and "Y-E Data Storage shim" using the Extension Manager of the control panel. Page 12 USB Hexa Media Drive Users Manual 149313-02 Rev. D 2.4. How to operate on Macintosh 1) Inserting (mounting) a memory card When you insert a memory card into the USB HMD, its corresponding mount LED on the HMD lights up and its corresponding memory card icon appears on your desktop, which indicates that you can access it. Insert a memory card in the correct orientation at proper speed as far as it will go. If you insert it too slowly or stop it halfway, it may not be recognized correctly. Access LED untitled untitled untitled untitled NOTE: Do not insert any memory cards while the access LED is lit. 2) Removing (unmounting) a memory cards Important: This product does not provide a door lock function or an auto eject function. When removing media, first, perform the following unmount operation and check that the corresponding media mount LED turns off and its icon disappears from the desktop, and then manually pull out the memory card from the HMD. Un-mount operation To un-mount a memory card, drag the memory card icon and drop onto the Trash, or click the media icon and choose [Eject Disk] from the [Special] menu of the Finder. Page 13 The CF mount LED lights up. The SM mount LED lights up. The SD/MS mount LED lights up. USB Hexa Media Drive Users Manual 149313-02 Rev. D When you un-mount a memory card, its corresponding mount LED turns off and the memory card icon disappears from your desktop. If you do not perform the un-mount operation and just remove memory card media, your computer may hang or data on the memory card may be lost. NOTE: Do not remove any memory cards or perform the un-mount operation when the access LED is lit. 3) Connecting/disconnecting the USB cable. You can connect the USB cable any time you want provided that you remove all memory cards before connection. Before removing the USB cable, un-mount all memory cards following the description in 2). If you do not un-mount a memory card and just disconnect the USB cable, your computer may hang or data on the media may be lost. 4) Sleep. Although this product supports the Mac's sleep function, we recommend that you unmount all memory cards before sleep. Depending on the version of your Mac OS or the model of your Mac, a malfunction may occur. In this case, before sleep, perform unmount operation and then disconnect the USB cable. During sleep, do not insert/remove media or connect/disconnect the USB cable. Especially for Mac notebooks, if you connect/disconnect the USB cable during sleep, they wake up automatically, which causes unexpected battery consumption or the startup of the hard disk. Therefore, before you carry them, be sure to un-mount all media and then disconnect the USB cable. Page 14 USB Hexa Media Drive Users Manual 149313-02 Rev. D 2.5. Restrictions for Macintosh 1) Format Do not initialize (format) memory cards on your Mac. Memory cards initialized on your Mac may not be available for devices such as digital cameras. It is best to format memory cards in your digital camera or digital device. 2) Ejecting a memory card. This product does not provide auto eject function. When removing a memory card, first perform the un-mount operation and then pull it out of the HMD manually. 3) Un-mounting two or more memory cards. If you try to un-mount two or more memory cards at a time, some of them may not be un-mounted and remain mounted. It is best to un-mount each card one at a time. 4) Connecting the USB cable. Do not connect the USB cable with a CompactFlash card or Microdrive inserted in the HMD. It may not be recognized by the Mac OS correctly, and may not operate properly. Before connecting the USB cable, remove all memory cards from the HMD. 5) Microdrive. When using an IBM Microdrive, remove other memory cards. Because Microdrive requires more power than other memory cards, if it is used with other memory cards at the same time, an error may occur due to a shortage of power. 6) Startup. You cannot start up your Macintosh from a memory card. Do not start or restart the Mac OS with any memory cards inserted. The OS may not recognize correctly. Depending on the state of memory cards, your Mac may hang during the startup of the OS. 7) USB hub. If you use a USB hub, use a self-powered hub with an AC adaptor. The USB HMD requires 500 mA supplied from the USB port. For a bus-powered hub without an AC adaptor, it will not operate due to shortage of power. 8) USB port Connect the USB HMD to a USB port on your Macintosh. Do not connect it to a USB port on the keyboard. It will not operate due to shortage of power. Page 15 USB Hexa Media Drive Users Manual 149313-02 Rev. D 9) Access LED. When access is in process or the access LED is lit, do not perform the un-mount operation, sleep operation, and connection/disconnection of memory cards. 10) Using two or more devices. If you connect two or more USB devices (except for keyboard and mouse) to a single computer, the USB HMD may not operate normally depending on the USB devices you use at the same time. 11) Recommended operating environment. To use USB devices in the most stable environment, we recommend Mac OS 9.0.4 or greater. The USB HMD may not operate with a USB port on an add-in card. 12) Recovery from error. If your Macintosh hangs, reset it. For information about how to reset, see your Macintosh manual. Page 16 USB Hexa Media Drive Users Manual 149313-02 Rev. D 3. Windows 3.1. How to Install (For Windows XP) The Hexa Media Drive does not require to use with Windows XP. The Hexa Media Drive can be simply plugged in and will be recognized by the OS automatically. However, the various card types will appear as a generic “removable drive” icon. We have included a drive label utility that will install custom drive labels that will make it easier to differentiate the various cards easily. Please follow the following instructions to install the custom drive labels. 1) Start up Windows XP and log in using the administrator account. 2) Insert the Driver CD-ROM into the CD-ROM drive on your PC. The installer starts up automatically. If it does not, double-click the CD-ROM icon in the My Computer folder to open it and double-click Install.exe on the CD-ROM to start up the installer. Page 17 USB Hexa Media Drive Users Manual 149313-02 Rev. D 3) Immediately after the installer has started up, following menu will appear. Click Install to start installing the driver files. NOTE: If you run Install.exe twice, the second run performs un-installation. 4) The ‘Choose Setup Language’ screen of the installer appears. Click the OK button to proceed. The same driver will be installed whichever language you choose. 5) Click the NEXT> button to proceed. The installer copies necessary files to the hard disk. Page 18 USB Hexa Media Drive Users Manual 149313-02 Rev. D 6) Click the Finish button to finish the installer. Windows automatically restarts after a few seconds. 7) If Windows reboots, please log in the account that has administrator authority again. Next, connect the Hexa Media Drive to the USB port with the included USB cable. Windows will automatically recognize the Hexa Media Drive. Windows will add the new hardware automatically. Four new memory card drive icons will be added to your “my computer” folder. In the following example, the drive letters are set from (F:) to (I:). The drive letters may vary depending on the configuration of your computer. Reference: Please refer to "3.5. How to change the drive letter(Reference information)", when you change a drive letter. Page 19 USB Hexa Media Drive Users Manual 149313-02 Rev. D 8) If a memory card is inserted and a corresponding icon is double-clicked, a window will open and you will be able to access the contents of the card. Icon Corresponding Memory Card Compact Flash Microdrive SmartMedia Memory Stick SD media Card Multi Media Card : In the case of use OS before Windows XP SP1, for icon, the left figure is displayed. 9) If a memory card is inserted that has a set volume label, the volume label will be displayed as the drive label. This works the same as a CD-ROM drive. For example, when a Compact Flash is inserted with the volume label “TestData”, the icon and drive label will display as follows: Page 20 USB Hexa Media Drive Users Manual 3.2. 149313-02 Rev. D How to install (For Windows 2000) For Windows 2000, you need to install the driver from the Driver CD-ROM. Before connecting the USB HMD to your PC, follow these steps to install the driver. 1) Start up Windows 2000 and log in using the administrator account. 2) Insert the Driver CD-ROM into the CD-ROM drive on your PC. The installer starts up automatically. If it does not, double-click the CD-ROM icon in the My Computer folder to open it and double-click Install.exe on the CD-ROM to start up the installer. NOTE: If you run Install.exe twice, the second run performs un-installation. 3) Immediately after the installer has started up, the following menu will appear. Click INSTALL to start installing the driver files. Page 21 USB Hexa Media Drive Users Manual 149313-02 Rev. D 4) The ‘Choose Setup Language’ screen of the installer appears. Click the OK button to proceed. The same driver will be installed, whichever language you choose. 5) Click the NEXT> button to proceed. The installer copies necessary files to the hard disk. 6) Click the Finish button to finish the installer. Windows automatically restarts after a few seconds. Page 22 USB Hexa Media Drive Users Manual 149313-02 Rev. D 7) When Windows has restarted, log in using the administrator account again. Then, connect HMD to a USB port on your PC with the attached USB cable. The USB HMD is automatically recognized by Windows, and it is added as new hardware. When the installation is complete, four new memory card drive icons are added in the My Computer folder. In the following example, (E:) through (H:) are assigned as drive letters. Note that drive letters may differ depending on your PC environment. Reference: Please refer to "3.5. How to change the drive letter(Reference information)", when you change a drive letter. 8) When you insert a memory card and double-click its corresponding icon, files on the memory card are displayed, which indicates that you can access them. Icon Corresponding Memory Card Compact Flash Microdrive SmartMedia Memory Stick SD media Card Multi Media Card Page 23 USB Hexa Media Drive Users Manual 149313-02 Rev. D 3.3. How to install (For Windows Me) For Windows Millennium Edition (Me), the HMD works with the Microsoft's driver software that is included in the OS as standard. Install the icon driver from the attached Driver CDROM. This driver changes the icons to those corresponding to individual memory cards, in order to use this product more easily. Follow these steps to install the icon driver from the attached Driver CD-ROM. 1) Start up Windows Me. 2) Insert the Driver CD-ROM into the CD-ROM drive on your PC. The installer starts up automatically. If it does not, double-click the CD-ROM icon in the My Computer folder to open it and double-click Install.exe on the CD-ROM to start up the installer. NOTE: If you run Install.exe twice, the second run performs un-installation. 3) Immediately after the installer has started up, the following menu will appear. Click INSTALL to start installing the driver files. Page 24 USB Hexa Media Drive Users Manual 149313-02 Rev. D 4) The ‘Choose Setup Language’ screen of the installer appears. Click the OK button to proceed. The same driver will be installed, whichever language you choose. 5) Click the NEXT> button to proceed. The installer copies necessary files to the hard disk. 6) Click the Finish button to finish the installer. Windows automatically restarts after a few seconds. Page 25 USB Hexa Media Drive Users Manual 149313-02 Rev. D 7) When Windows has restarted, connect HMD to a USB port on your PC with the attached USB cable. The USB HMD is automatically recognized by Windows, and it is added as new hardware. When the installation is complete, four new memory card drive icons are added in the My Computer folder. In the following example, (E:) through (H:) are assigned as drive letters. Note that the drive letters may differ depending on your PC environment. NOTE: If you do not install the icon driver, all the four icons are the Removable Disk icons. In this case, in alphabetical order of the drive letter, the icons correspond to Compact Flash, SmartMedia, Memory Stick, and SD Memory Card, respectively. 8) When you insert a memory card and double-click its corresponding icon, files on the memory card are displayed, which indicates that you can access them. Icon Corresponding Memory Card Compact Flash Microdrive SmartMedia Memory Stick SD media Card Multi Media Card Page 26 USB Hexa Media Drive Users Manual 149313-02 Rev. D 3.4. How to install (For Windows 98 and Windows 98 SE) For Windows 98 and Windows 98 Second Edition (SE), you need to install the driver from the Driver CD-ROM. Before connecting the USB HMD to your PC, follow these steps to install the driver. 1) Start up Windows 98. 2) Insert the Driver CD-ROM into the CD-ROM drive on your PC. The installer starts up automatically. If it does not, double-click the CD-ROM icon in the My Computer folder to open it and double-click Install.exe on the CD-ROM to start up the installer. NOTE: If you run Install.exe twice, the second run performs un-installation. 3) Immediately after the installer has started up, the following menu will appear. Click INSTALL to start installing the driver files. Page 27 USB Hexa Media Drive Users Manual 149313-02 Rev. D 4) The ‘Choose Setup Language’ screen of the installer appears. Click the OK button to proceed. The same driver will be installed whichever language you choose. 5) Click the NEXT> button to proceed. The installer copies necessary files to the hard disk. 6) Click the Finish button to finish the installer. Windows automatically restarts after a few seconds. Page 28 USB Hexa Media Drive Users Manual 149313-02 Rev. D 7) When Windows has restarted, connect HMD to a USB port on your PC with the attached USB cable. The USB HMD is automatically recognized by Windows, and it is added as new hardware. When the installation is complete, four new memory card drive icons (Removable Disk) are added in the My Computer folder. In the following example, (E:) through (H:) are assigned as drive letters. Note that the drive letters may differ depending on your PC environment. 8) When you insert a memory card and double-click its corresponding icon, files on the memory card are displayed, which indicates that you can access them. Icon Corresponding Memory Card Compact Flash Microdrive SmartMedia Memory Stick SD media Card Multi Media Card Page 29 USB Hexa Media Drive Users Manual 149313-02 Rev. D 3.5. How to change the drive letter (Reference information) Installing the HMD may change the drive letters (E, F, etc.) of the CD-ROM drive and other drives. In this case, you can change the drive letters of the memory card reader/writers by setting in the Computer Management menu. The procedure for changing the drive letter is described below. 1) In the Control Panel, double-click on the Administrative Tools icon to open it. 2) In the Administrative Tools, double-click on the Computer Management icon to open it. 3) Select the Disk Management in the Storage folder, and the information about the disks will be shown at the right. Page 30 USB Hexa Media Drive Users Manual 149313-02 Rev. D 4) Right-click on the disk of which the drives letter you want to change, and in the displayed menu, select and click on [Change Drive Letter and Path…]. Right-click 5) The following window for changing the drive letter will be displayed. Click on [Change…]. 6) In the following window for editing, set a desired drive letter and click on the [OK] button. In this example, the drive letter of the CompactFlash card drive is set to J. Page 31 USB Hexa Media Drive Users Manual 149313-02 Rev. D 7) The following confirmation dialog box will appear. Click on the [Yes] button. 8) When the My Computer is opened, the change is reflected. In the following example, the CompactFlash and SmartMedia card drives are set to J and K, respectively. Page 32 USB Hexa Media Drive Users Manual 149313-02 Rev. D 3.6. How to operate on Windows This section describes how to operate the HMD with Windows, using Windows XP as an example. For other OSs, the screens may differ, but basic operation is the same. 1) Inserting (mounting) a memory card When you insert a memory card into the USB HMD, its corresponding mount LED on the HMD lights up, which indicates that you can access it. Insert a memory card in the correct orientation at proper speed as far as it will go. If you insert it too slowly or stop it halfway, it may not be recognized correctly. Access Lamp CompactFlash Drive The CF mount LED lights up. Smart Media Drive The SM mount LED lights up. Memory Stick Drive SD Card Drive NOTE: Do not insert any memory cards while the access LED is lit. Page 33 The SD/MS mount LED lights up. USB Hexa Media Drive Users Manual 149313-02 Rev. D 2) Removing (ejecting) a memory card [Important] This product does not provide door lock function or auto eject function. To remove media safely, we recommend that you perform the following eject operation and then pull out the memory card. Especially for Windows 2000 and Windows XP, unexpected errors may occur, so we strongly recommend performing the eject operation. Eject operation Before performing the eject operation, check the access LED to ensure that the card is not being accessed. Perform the eject operation by right-clicking the memory card icon you want to remove in My Computer and selecting Eject from the displayed menu. When the eject operation is complete, its corresponding mount LED turns off. After the mount LED turns off, pull out the memory card with your fingers. NOTE: Administrator privileges are required to Eject menu on Windows 2000 and Windows XP. You can allow non-administrator accounts to execute Eject menu by using Local Security Policy. Mount LED turns off Right click Left click Pull out memory card. [Important] For Windows 2000 and Windows XP, if you do not perform the eject operation and just remove a memory card, the blue screen may appear or data on the memory card may be lost. For Windows 98 and Windows Me, you can simply pull out memory cards unless they are being accessed. NOTE: Do not perform memory card eject operation while the access LED is lit. 3) Connecting the USB cable You can connect the USB cable any time you want. Before connecting the USB cable, remove all memory cards from the HMD. Page 34 USB Hexa Media Drive Users Manual 149313-02 Rev. D 4) Disconnecting the USB cable For Windows Me, Windows 2000, and Windows XP, before disconnecting the USB cable, click the Unplug or Eject Hardware icon on the task tray to remove the device, and then disconnect the USB cable. For Windows Me, memory cards are displayed as four independent drives; remove all of them. Windows 98 does not have the Unplug or Eject Hardware icon on the task tray. Check that the HMD is not being accessed and then disconnect the USB cable. Click Click Disconnect USB cable. NOTE: Do not disconnect the USB cable during access. 5) Standby Although this product supports the Windows standby mode, we recommend that you remove all memory cards before standby. Depending on your version of Windows or the model of your PC, a malfunction may occur. In this case, before standby, remove all memory cards and then disconnect the USB cable. During standby, do not insert/remove media or connect/disconnect the USB cable. NOTE: Do not initiate standby mode during access. Page 35 USB Hexa Media Drive Users Manual 149313-02 Rev. D 6) Uninstalling the driver software. To uninstall the driver software, run “Install.exe” from the Driver CD-ROM. You can also uninstall the driver software by selecting it in the Control Panel's Add/Remove Programs. 3.7. Restrictions for Windows 1) Formatting a memory card Do not format (initialize) memory cards on Windows. If you format a memory card on Windows, it may not be available for devices such as digital cameras due to the difference of the format type (FAT size, cluster size, Hard Disk Type or Super Floppy Disk type). If you use a digital camera, format memory cards with it. 2) USB hub The USB HMD requires 500 mA supplied from the USB port. If you connect the HMD to a USB hub, use a self-powered hub with an AC adaptor. Do not connect it to a buspowered hub such as a USB port on the keyboard. If you use a bus-powered hub, the USB HMD will not operate because it does not provide power required to operate the USB HMD. 3) Startup (booting). You cannot start up your PC from the USB HMD. Some PCs may not start up if a Compact Flash or Microdrive is inserted at startup (power-on). Do not insert any memory card before startup. 4) Custom Drive Tool For Windows XP, if you start up the OS with the USB HMD connected, memory card drive labels may be displayed as generic “removable drive”. In this case, disconnect the USB HMD once. Then connect the USB cable. The correct drive labels will be displayed. 5) Standby For Windows XP, if you disconnect USB devices during standby, they may not operate after recovery from standby. Do not disconnect USB devices during standby. If a problem occurs, restart the OS. Page 36 USB Hexa Media Drive Users Manual 6) 149313-02 Rev. D Inserting/pulling out a memory card. Before inserting/pulling out a memory card, be sure to check that the access LED is not lit. If copy looks complete on the Windows screen, access may be in process due to the cache of the OS. When a card is being accessed and the access LED is lit, do not insert another card. 7) Microdrive. When using an IBM Microdrive, remove other memory cards. Because Microdrive requires larger power than other memory cards, if it is used with other memory cards at the same time, an error may occur due to shortage of power. 8) Auto play of Windows XP For Windows XP, if you insert a memory card that contains photo data used with a digital camera, the Auto Play menu may appear. To enable/disable Auto Play, right-click the media card drive icon in My Computer and use the Auto Play menu that appear. For more information on Auto Play, see your Windows XP manual. 9) Using two or more devices. If you connect two or more USB devices (except for keyboard and mouse) to a single computer, the USB HMD may not operate normally depending on USB devices you use at the same time. 10) Recommended operating environment. We recommend that PCs use Windows 98 Second Edition or greater, and that it has been preinstalled by a PC. Self-made PCs, PCs upgraded by methods other than those specified by the PC manufacturer, and PCs on which you installed the OS by yourself may not work with the HMD. The USB HMD may not operate for an expanded USB port, for example, on an add-in card. For PCs on which Windows 95 or Windows 3.1 were preinstalled, we cannot guarantee appropriate operation. Page 37 USB Hexa Media Drive Users Manual 149313-02 Rev. D 4. Specifications 4.1. Operating Temperature Range During operation : 5 to 40°C (41 to 104°F) Not during operation : -30 to 60°C (-22 to 140°F) 4.2. Operating Humidity Range 30 to 80% RH: No condensation 4.3. Position during Operation Use this product in a horizontal position (with the access LED and the mount LED up). 4.4. USB Specifications USB Spec : Complying with Ver 1.1 Transmission rate : 12 M Bps (Full Speed Device) 4.5. Electrical Specifications Power supply voltage : DC 4.4 V to 5.25 V (supplied from USB port) Current consumption : 500 mA (MAX) (except for when using Microdrive) For use with Limited power source. 4.6. Supported Memory Cards The following memory cards (sticks) are supported. For more information, see section 1.4on page 6. 1) Compact Flash Type I and Type II 2) Microdrive: 340 MB and 1 GB 3) Smart Media (3.3V Type): Up to 128 MB 4) Memory Stick: Up to 128 MB 5) SD Memory Card: Up to 512 MB 6) Multi Media Card: Up to 64 MB 5. About inquiries Inquiries should be directed to the store from which you purchased the product or any store that is provided on the package. Page 38