1
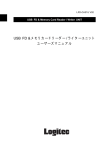
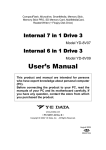
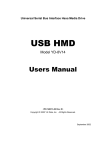
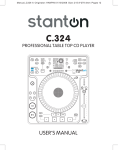
Universal Serial Bus Interface External Floppy Disk Drive Unit “SNAP-ON” Color Cover Model & Standard Model USB FDD Installation Guide For USB FDD Driver CD-ROM P/N 139060-02 Rev. D Copyright © 1999-2002 Y-E Data, Inc. All Rights Reserved. USB FDD Installation Guide Rev. D Important instructions for use of the USB Floppy Drive (FDD) Caution Prohibition z z z z z z Before connecting the USB FDD to your PC, read through this manual. The driver software may have to be installed in advance. Remove all diskettes from the USB FDD, before connecting/disconnecting the USB cable or turning on/off your PC. This product is precision equipment. Do not drop the product, give it a strong impact, or install it in locations exposed to heavy vibrations; doing so may cause product breakdown. Do not disassemble or modify the product. Disassembly or modification may cause a breakdown, fire, or electric shock. Do not use or store the product in wet locations. The entry of liquid into the product may result in a breakdown, fire, or electric shock. Do not insert any object other than a floppy diskette into the USB FDD. The insertion of metal objects such as coins or paper clips may lead to a breakdown, fire, or electric shock. Do not remove the floppy diskette from the product when its access LED lamp is lit. This product is designed to be used for general electric equipment. Do not use it for equipment requiring exceptional quality or reliability, particularly when the breakdown or malfunction of this product may jeopardize life or health (such as aerospace equipment, atomic power control systems, traffic-related equipment, transportation equipment, industrial robot, combustion equipment, various safety devices, and life-support system). It is prohibited by the copyright law to reproduce the whole or part of this software and User’s Manual and rent the software, without permission of the copyright holder. We bear no liability for any pecuniary losses and lost profits resulting from use of the software included with this product, and any claims from third parties. This software cannot be used on other than specified equipment. The specifications of this software are subject to change without notice. We assume no responsibility for any breakdown and damage caused by misuse, troubles from other equipment, undue repairs or modifications. If this product should have any defect attributable to manufacture, we will exchange it with a new one, but cannot take on any more responsibility. Illustrative pictures in this manual may differ from the PC’s actual screens. Apple, Mac and Macintosh are trademarks of Apple Computer, Inc. Microsoft Windows is a trademark of Microsoft Corporation. Y-E Data is a trademark of YE DATA INC. All other trademarks are the property of their respective owners and are hereby acknowledged. Page 2 December 2002 USB FDD Installation Guide Rev. D Index 1. Introduction ................................................................ ................................................................................................ ............................................................................... ............................................... 4 1.1. 1.2. 1.3. 1.4. 1.5. 1.6. 2. Mac OS X (Version 10.2 and 10.1 or later)................................ later) ................................................................ ................................................................ 7 2.1. 2.2. 2.3. 3. Features of the USB FDD ............................................................................................ 4 Working Environment .................................................................................................. 4 Part Names of “SNAP-ON“ Color Cover Model .......................................................... 5 Part Names of Standard Model ................................................................................... 5 Package Contents ......................................................................................................... 5 Overview of Driver Installation ................................................................................... 6 Installation.................................................................................................................... 7 Operating & Connecting the USB FDD ...................................................................... 7 Restrictions ................................................................................................................... 8 Mac OS 9.x and Mac OS 8.6 ................................................................ ...................................................................................... ...................................................... 8 3.1. Installation.................................................................................................................... 8 3.1.1. 3.1.2. 3.2. 3.3. 3.4. 3.5. 4. Installation.................................................................................................................. 14 How to Unplug the USB Cable .................................................................................. 14 Windows 98 and Windows 98 Second Edition Edition................................ ......................................................... ......................................................... 15 7.1. 7.2. 8. 9. Installation.................................................................................................................. 13 How to Unplug the USB Cable .................................................................................. 13 Windows Millennium Edition (Me) ................................................................ ......................................................................... ......................................... 14 6.1. 6.2. 7. Installation.................................................................................................................. 12 How to Unplug the USB Cable .................................................................................. 12 Windows 2000 2000................................ ................................................................ ................................................................................................ .......................................................................... .......................................... 13 5.1. 5.2. 6. Manual Install and Uninstall ...................................................................................... 9 Operating & Connecting the USB FDD .................................................................... 10 Restrictions ................................................................................................................. 10 PACE Anti-Piracy’s USB Floppy Enabler ................................................................. 11 Windows XP XP................................ ................................................................ ................................................................................................ ............................................................................. ............................................. 12 4.1. 4.2. 5. Mac OS 9.x....................................................................................................... 8 Mac OS 8.6....................................................................................................... 9 USB FDD Driver Installation .................................................................................... 15 Optional setting to use USB FDD as drive letter A: ................................................ 17 Restrictions for Windows ................................................................ ........................................................................................ ........................................................ 19 Windows CE (Except for Windows CE.NET) .......................................................... .......................................................... 20 9.1. 9.2. 9.3. 9.4. Installing with the Windows CE Service .................................................................. 20 To install using an Internet connection directly to your Handheld PC: ................. 22 Formatting a Diskette ................................................................................................ 23 Restrictions ................................................................................................................. 24 10. Changing the Color Cover ................................................................ ....................................................................................... ....................................................... 25 10.1. How to Remove the Cover .......................................................................................... 25 10.2. How to Attach the Cover ............................................................................................ 25 11. Specifications................................ Specifications ................................................................ ................................................................................................ ........................................................................... ........................................... 26 11.1. 11.2. 11.3. 11.4. Temperature Range .................................................................................................... 26 Humidity Range.......................................................................................................... 26 Operating Position...................................................................................................... 26 Supported Diskette Types (3.5 inch) ......................................................................... 26 12. Support ................................................................ ................................................................................................ .................................................................................... .................................................... 26 12.1. Contact Your Distributor ............................................................................................ 26 12.2. Contact the Manufacturer.......................................................................................... 26 Page 3 December 2002 USB FDD Installation Guide Rev. D 1. Introduction The USB FDD is a slim type floppy disk drive (FDD) with a Universal Serial Bus (USB) interface. The USB FDD plugs into the USB port of your personal computer (PC). To use the USB FDD, you need a personal computer with a USB port, an operating system that supports USB, and the USB FDD driver software. This guide tells you how to install the USB FDD driver software. 1.1. Features of the USB FDD 1) Supports dynamic “plug-and-play”, plugging and unplugging the USB FDD without restarting your computer. 2) Supports Macintosh, Windows XP, Windows 2000, Windows Me, Windows 98 and Windows CE computers. 3) Works without any additional AC adapter, so you can use it anywhere. 4) Changes to your favorite color by swapping the color cover. (Only for “SNAP-ON” Color Cover Model.) 1.2. Working Environment Macintosh Mac OS X 10.2 Mac OS X 10.1 or higher Mac OS 9.x Mac OS 8.6 Windows Windows XP Windows 2000 Windows Millennium Edition (Me) Windows 98 Windows 98 Second Edition (SE) Windows CE 2.11 (Handheld/PC Pro 3.0) Windows CE 3.0 (Handheld/PC 2000) (Pocket/PC 2002) (Except for Windows CE.NET.) Windows CE Works with standard builtin driver of OS X. iMac Power Mac G3 / G4 Power Book G3 / G4 iBook Works with standard builtin driver of Windows. Supported processor types: ARM, MIPS and SH4. Note: 1) The USB FDD driver for Macintosh does not support Mac OS 8.1 and Mac OS 8.5. If your iMac has Mac OS 8.1 or Mac OS 8.5, please update to Mac OS 8.6 or later. More information about updating your iMac is available on the web at http://www.info.apple.com/support/downloads.html (You may need to register at the Apple web site to access this page; registration is free.) 2) According to Apple Computer, Inc., some Macintosh computers with Mac OS 9.0.2 or 9.0.3 may stop responding when certain Universal Serial Bus (USB) devices are connected. Please update to Mac OS 9.0.4 or later. More information about this problem is available on the web at http://docs.info.apple.com/article.html?artnum=25139. Page 4 December 2002 USB FDD Installation Guide Rev. D 1.3. Part Names of “SNAP-ON“ SNAP-ON“ Color Cover Model Cover Latch “SNAP-ON” Color Cover (Changeable) In-Use LED USB Cable Eject Button USB Connector to PC or Mac 1.4. Part Names of Standard Model USB Cable In Use LED Eject Button USB Connector to PC or Mac 1.5. Package Contents USB FDD Unit Driver CD-ROM “SNAP-ON” SNAP-ON” Color Covers Or Only for “SNAP-ON” SNAP-ON” Color Cover Model Page 5 December 2002 USB FDD Installation Guide Rev. D 1.6. Overview of Driver Installation Operating System Mac OS X 10.2 Mac OS X 10.1 or later & Mac OS 9.0 Mac OS 9.0.4 Mac OS 9.1 Mac OS 9.2 Refer to: Description Page 7 Connecting a USB triggers software setup. setup & 1) USB FDD works with the Mac OS standard Page 8 built-in driver. Therefore, no additional driver installation is necessary. 2) Just plug your USB FDD into your Macintosh. Mac OS will detect the USB FDD. 3) Connect the USB FDD to your Macintosh and insert a formatted diskette into the USB FDD. A removable disk icon will appear on the desktop. Mac OS 8.6 Page 8 Software must be set up before USB connection. 1) Run “USB FDD Installer” located in the driver CD-ROM. 2) Upon completion of installing the driver, restart your Macintosh. 3) Connect the USB FDD to your Macintosh and insert a formatted diskette into the USB FDD. A diskette icon will appear on the desktop. Windows XP Page 12 Connecting the USB FDD triggers software & & setup. setup Windows 2000 Page 13 1) USB FDD works with the Windows standard & & built-in driver. Therefore, no additional driver Windows Me Page 14 installation is necessary. 2) Just plug your USB FDD into your PC. Windows will detect the USB FDD and install the necessary drivers automatically. 3) A new 3½ Floppy disk icon will appear in the “My Computer” folder. Windows 98 Page 15 Software must be set up before USB connection. Windows 98 SE 1) Run “USBFDD.exe” located in the driver CDROM. 2) Upon completion of installing the driver, restart your PC. 3) Connect the USB FDD to your PC. Windows will detect the USB FDD and install the necessary drivers automatically. 4) A new 3½ Floppy disk icon will appear in the “My Computer” folder. Windows CE Page 20 Software must be set up before USB connection. (Except for Windows 1) Connect your Handheld PC to your host CE.NET) Windows PC with the Windows CE Service software and cable. 2) Place the USB FDD driver CD in the CD-ROM drive connected to the host Windows PC. 3) Run the Setup program located in the WINCE folder of the driver CD-ROM. 4) Connect the USB FDD to your Handheld PC and insert a formatted diskette into the USB FDD. The diskette can be access as “Storage Storage Card” Card folder in the “My Handheld PC”. Page 6 December 2002 USB FDD Installation Guide Rev. D 2. Mac OS X (Version 10.2 and 10.1 or later) 2.1. Installation The USB FDD works with the standard “USB Mass Storage Support” driver that is built in to Mac OS X. Therefore, no additional driver is necessary. 1) Start up Mac OS X. 2) Plug your USB FDD into the USB port of your Macintosh. When you insert a formatted floppy diskette into the USB FDD, a floppy disk icon (10.2) or a removable disk icon (10.1) will appear on the Macintosh desktop. The diskette can now be accessed. 2.2. Operating & Connecting the USB FDD 1) Insert a Floppy Diskette Insert a formatted floppy diskette into the USB FDD; a floppy disk icon (10.2) or a removable disk icon (10.1) will appear on the desktop. The diskette can now be accessed. Mac OS X (10.2) Mac OS X (10.1) NOTE: If you are using the MS-DOS Formatted diskette, Mac OS X 10.2 takes about 60 seconds to appear icon, Mac OS X 10.1 takes about 30 seconds to appear icon. 2) Ejecting a Floppy Diskette (IMPORTANT) Drag the floppy disk icon on to the trashcan. The trashcan icon will change to an eject icon. Then drop the floppy disk icon. Or single click the floppy diskette icon and select [Eject] from the Finder [Special] menu. After that, push the eject button of USB FDD unit to eject the floppy diskette. Do not remove the floppy diskette excepted as outlined above. If you remove the floppy diskette without following the Eject procedure above, Mac OS may become unstable, and the contents of diskette may be damaged. Page 7 December 2002 USB FDD Installation Guide Rev. D 3) Connecting the USB FDD The USB FDD is designed for Hot-Plug. You may plug in the USB FDD at any time. 4) Disconnecting the USB FDD Before you unplug the USB FDD, be sure that any floppy diskettes have been ejected as outlined in step 2) above. Do not unplug the USB FDD during sleep mode. This may cause errors when resuming your Macintosh. If sleep mode does not seem to work correctly, try unplugging the USB FDD before entering sleep mode. 2.3. Restrictions 1) Mac OS X 10.2 takes about 60 seconds to mount DOS-formatted media, Mac OS X 10.1 takes about 30 seconds to mount DOS-formatted media, A Mac-formatted media can be mounted in about 10 seconds. 2) Under Mac OS X, it is impossible to format (initialize) to Mac-standard 1.4 MB, because the OS does not have the appropriate menu. 3) Mac-formatted media formatted on Mac OS 9.x and 8.x are readable and writable, but desktop folders and other hidden files become visible. (This problem may be fixed in Mac OS 10.1.1 and later.) 4) We recommend you format your floppy diskettes using Mac OS 9.x or 8.x. 3. Mac OS 9.x and Mac OS 8.6 3.1. Installation 3.1.1. Mac OS 9.x Your PC has Mac OS 9.0 or later, the USB FDD works with the “USB Mass Storage Support” driver, a Mac OS standard driver made by Apple Computer. In this case, it is not necessary to install the USB FDD driver from the driver CD-ROM. 1) After your Macintosh restarted, plug the USB FDD into the USB port of your Macintosh. 2) Insert a formatted floppy diskette into the USB FDD. A floppy icon will appear on the Macintosh desktop. Page 8 December 2002 USB FDD Installation Guide Rev. D 3.1.2. Mac OS 8.6 You must first install the USB FDD driver software on your Macintosh before you use the USB FDD. Do not connect the USB FDD until you have installed the driver files. 1) Insert the USB FDD driver CD-ROM into your Macintosh. 2) A CD-ROM window will open automatically. If it doesn’t open, double click the CD-ROM icon on the desktop. 3) Double click the USB-FDD installer icon that appears in the CD-ROM window. 4) When installation of the USB FDD driver has completed, restart your Macintosh. 5) After your Macintosh restarted, plug the USB FDD into the USB port of your Macintosh. 6) Insert a formatted floppy diskette into the USB FDD. A floppy icon will appear on the Macintosh desktop. Floppy icon 3.2. Manual Install and Uninstall Uninstall To perform a manual install, please use the following instructions: 1) Copy the file named “YE USB-FDU” and “YE USB-FDU Shim” to the Extensions folder in the System folder. 2) After copying the file, restart your Macintosh. 3) After your Macintosh has restarted, plug the USB FDD into the USB port of your Macintosh. To perform a manual uninstall, please use an Extensions manager and stop the driver files “YE USB-FDU” and “YE USB-FDU Shim” in a System Folder. Page 9 December 2002 USB FDD Installation Guide Rev. D 3.3. Operating & Connecting the USB FDD 1) Insert a Floppy Diskette. Insert a formatted floppy diskette into the USB FDD. A floppy diskette icon will appear on the desktop of your Macintosh. If the diskette has not been formatted yet, an initialize dialog box will appear instead. 2) Ejecting a Floppy Diskette (IMPORTANT) Drag the floppy diskette icon to the trash-can. Or single click the floppy diskette icon and select [Eject] from the Finder [Special] menu. Note: If the floppy diskette is removed from the USB FDD unexpectedly, the operating system may become unstable, and the diskette contents may be damaged. Do not remove the floppy diskette except as outlined above! 3) Connecting the USB FDD The USB FDD is designed for Hot-Plug. You may plug in the USB FDD at any time. 4) Disconnecting the USB FDD Before you unplug the USB FDD, be sure that any floppy diskettes have been ejected as outlined in step 2) above. Do not unplug the USB FDD during sleep mode. If sleep mode does not seem to work correctly, try unplugging the USB FDD before entering sleep mode. 3.4. Restrictions 1) 2DD 800KB Mac format diskettes are not supported. 2) ProDos (Apple-II) format is not supported. Do not select this menu on the initialize dialog box. 3) There is no function for Auto-Eject. The floppy diskette must be ejected manually. 4) You cannot start up the Macintosh from the USB FDD. 5) This driver is designed only for use with this USB FDD. It cannot be used for other USB-FDD devices. Page 10 December 2002 USB FDD Installation Guide Rev. D 6) Some application programs use more than one installation floppy diskette. Application installers sometimes require the use of the auto-eject feature to switch diskettes. In such cases, the diskette change mechanisms will not work with the USB FDD. 7) Floppy diskettes formatted manually to avoid illegal duplication cannot be installed. Some CD-ROM software may have these types of floppy diskettes. 8) Be sure to use a self-powered USB hub with AC adapter, if you use a USB hub. 9) Do not connect the USB FDD to the USB port on the keyboard. 10) Reset your Macintosh, if your Macintosh freezes or hangs up. 11) The USB FDD is a precision machine adjusted by the manufacturer. Do not drop, strike, shock, or crush the USB FDD; otherwise the USB FDD may break. 12) When in sleep mode, do not remove the floppy diskette from the USB FDD or unplug the USB FDD from your Macintosh. We strongly recommend to eject any floppy diskette, as described in section 3.3 above, and then unplug the USB FDD, before entering sleep mode. This is the best way to protect the data on your diskettes. 3.5. PACE Anti-Piracy’ Anti-Piracy’s USB Floppy Enabler This USB FDD and driver supports PACE Anti-Piracy’s USB Floppy Enabler Ver 2.0 or later. The USB Floppy Enabler is a special driver needed to install software that uses diskette-based copy protection or key diskettes. Please refer to PACE Anti-Piracy web site at http://www.paceap.com for more information. Follow this procedure to install the PACE USB Floppy Enabler. 1) Install the USB FDD driver from the driver CD-ROM if you have not yet done so. Install the USB FDD driver, even if you have been using the built-in Mac OS driver. 2) Insert the USB FDD driver CD-ROM into your Macintosh. 3) Open the PACE ANTI-PIRACY folder. 4) Double click the USB Floppy Enabler Installer icon to begin installation. Note: If you boot your Macintosh while a diskette is inserted in the USB FDD, the USB Floppy Enabler will not recognize the USB FDD, and a warning message will appear on the screen. If this happens, drag the diskette icon on your desktop to the trash, eject the diskette from the USB FDD, and then reinsert the diskette. Note: When you don’ don’t use software protected by PACE Interlock, Interlock, for example, you may disable the USB Floppy Enabler using the Control Panel Extension Manager. Note: The standard “USB Mass Storage Support” Support” driver that is built in to Mac OS 9.x does not support PACE Anti-Piracy’ Anti-Piracy’s USB Floppy Enabler. Page 11 December 2002 USB FDD Installation Guide Rev. D 4. Windows XP 4.1. Installation The USB FDD works with the Windows XP standard built-in driver made by Microsoft Corporation. Therefore, no additional driver is necessary. 1) Start up Windows XP. 2) Plug your USB FDD to your PC. Windows XP will detect the USB FDD and install the necessary driver files automatically. 3) A new 3½ Floppy disk icon will appear in the “My Computer” folder. In the figure below, the USB FDD can be accessed as Floppy drive B:. Floppy drive A: below is the built-in floppy drive of your PC. If your PC is a kind of “legacy free” PC, the USB FDD will work as Drive A:. USB FDD 4.2. How to Unplug the USB Cable 1) Click Eject Icon on the taskbar and click the “Safely remove USB Floppy” message. 2) Unplug the USB cable. Page 12 December 2002 USB FDD Installation Guide Rev. D 5. Windows 2000 5.1. Installation The USB FDD works with the Windows 2000 standard built-in driver made by Microsoft Corporation. Therefore, no additional driver is necessary. 1) Start up Windows 2000. 2) Plug your USB FDD to your PC. Windows 2000 will detect the USB FDD and install the necessary driver files automatically. 3) A new 3½ Floppy disk icon will appear in the “My Computer” folder. In the figure below, the USB FDD can be accessed as Floppy drive B:. Floppy drive A: below is the built-in floppy drive of your PC. If your PC is a kind of “legacy free” PC, the USB FDD will work as Drive A:. USB FDD 5.2. How to Unplug the USB Cable 1) Click Eject Icon on the taskbar and click the “Stop USB Floppy” message. 2) Click OK and then unplug the USB cable. Page 13 December 2002 USB FDD Installation Guide Rev. D 6. Windows Millennium Edition (Me) 6.1. Installation The USB FDD works with the Windows Me standard built-in driver made by Microsoft Corporation. Therefore, no additional driver is necessary. 1) Start up Windows Me. 2) Plug your USB FDD to your PC. Windows Me will detect the USB FDD and install the necessary driver files automatically. 3) A new 3½ Floppy disk icon will appear in the “My Computer” folder. In the figure below, the USB FDD can be accessed as Floppy drive E:. Floppy drive A: below is the built-in floppy drive of your PC. If your PC is a kind of “legacy free” PC, the USB FDD will work as Drive A:. USB FDD 6.2. How to Unplug the USB Cable 1) Click Eject Icon on the taskbar and click the “Stop USB Floppy” message. 2) Click OK button and then unplug the USB cable. Page 14 December 2002 USB FDD Installation Guide Rev. D 7. Windows 98 and Windows 98 Second Edition 7.1. USB FDD Driver Installation Note: Some new computers have a special version of the USB FDD driver already installed. In this case, do not install the USB FDD driver from the driver CD-ROM. 1) Boot up Windows 98. 2) Insert the USB FDD driver CD-ROM into the CD-ROM drive. 3) Run “USBFDD.exe” to install the driver software. 4) Click the Next > button to start installation of the driver files. Page 15 December 2002 USB FDD Installation Guide Rev. D 5) Click the Finish button to complete the installation. Windows will restart your computer with in a few seconds. 6) After re-starting Windows, plug your USB FDD to your PC. Windows will detect the USB FDD automatically. A new 3½ Floppy disk icon will appear in the “My Computer” folder. In the figure below, the USB FDD can be accessed as Floppy drive E:. Floppy drive A: below is the built-in floppy drive of your PC. USB FDD Page 16 December 2002 USB FDD Installation Guide Rev. D 7.2. Optional setting to use USB FDD as drive letter A: If you want to use USB FDD as Drive letter A:, disable the Standard Floppy Disk Controller. This is an optional setting for power users and it may not work on all PCs. If your PC does not work correctly please put back the original setting. Note: If you disable the Standard Standard Floppy Disk Controller, Controller, you can not access the built-in legacy FDD. If you need to use the legacy FDD, do not disable the Standard Standard Floppy Disk Controller. Controller. 1) Double click the “System” icon on the control panel. 2) Select Standard Floppy Disk Controller and click the Properties button in the Device Manager tab. Page 17 December 2002 USB FDD Installation Guide Rev. D 3) Check “Disable in this hardware profile” and click the OK button. 4) After re-starting your computer, the USB FDD should work as drive letter A:. Page 18 December 2002 USB FDD Installation Guide Rev. D 8. Restrictions for Windows 1) USB Hub If you plug the USB FDD into a USB hub, be sure to use a self-powered hub that includes an AC adapter. keyboard. Do not use bus-powered hubs, such as the USB port on a Bus-powered hubs do not supply enough power to operate the USB FDD. 2) Booting You cannot boot your computer from the USB FDD, unless your computer includes a special BIOS that supports this feature. Some recent notebook computers support booting from the USB FDD. For more details, please contact your distributor. 3) Virus Scan Software Some virus detect software assume a built-in floppy disk drive. When using such a software, the operating system may become slow or unstable. 4) Standby The USB FDD supports the standby mode of Windows 98 according to the PC99 Standard. However, if standby mode does not seem to work correctly, try unplugging the USB FDD before entering standby. 5) Alternate Driver for Windows Me We recommend you use the standard built-in driver made by Microsoft Corporation. But if you want use the USB FDD as drive letter A: on a PC that is not “legacy free”, you must install the USB FDD driver from the driver CD-ROM. To install the USB FDD driver from the CD-ROM, follow the instructions for Windows 98 (page 15). “USBFDD.exe” will automatically detect the Windows version and install the driver for Windows Me. 6) Initialization (Format) of a floppy disk on Windows XP Windows XP allows you to format (initialize) a floppy diskette only as 1.44MB media. Page 19 December 2002 USB FDD Installation Guide Rev. D 9. Windows CE (Except for Windows CE.NET) 9.1. Installing with the Windows CE Service When using the USB FDD with a Handheld PC, the driver software needs to be installed before connecting the USB FDD. Do not connect the USB FDD to your Handheld PC until you have installed the USB FDD driver software. Many Handheld PCs have a pre-installed USB FDD driver. In this case, it is not necessary to install the driver software. To check whether a driver for the USB FDD is installed or not, please refer to your Handheld PC manual If the driver is not pre-installed, the following message is displayed on the screen when connecting a USB FDD to the Handheld PC. Please click the X button and install the USB FDD driver. There are two ways to install the USB FDD driver. · Connect the Handheld PC to a host Windows PC with the Windows CE Service software and a cable. · Download the driver software via an Internet connection by dial-up from Handheld PC. The procedure below describes how to install the USB FDD drivers on your Handheld PC from a Host Windows PC. To do this, you will need to connect your Handheld PC to the Host Windows PC with the Windows CE Service software and a cable. Please refer to your Handheld PC manual about how to connect your handheld to the host. 1) Establish a partnership to transfer files from the Host Windows PC to your Handheld PC. Page 20 December 2002 USB FDD Installation Guide Rev. D 2) Insert the USB FDD driver CD-ROM in the CD-ROM drive of the Host Windows PC. 3) On the Host Windows PC, double click the CD-ROM icon in the “My Computer” folder. 4) Double click the WINCE folder in the CD-ROM, and then double click the Setup icon to start the Setup program. 5) When the “FlashBuster-U for Windows CE” dialog box appears, click the YES button. Page 21 December 2002 USB FDD Installation Guide Rev. D 6) The Setup program installs the USB FDD driver software on your Handheld PC. Please wait a while, as it takes a few minutes to install it. When the installation has completed normally, the following dialog box will appear. Click the OK button to terminate the Setup program. 7) Plug the USB FDD into the USB port of your Handheld PC. 8) Insert a formatted diskette in the USB FDD. The diskette can be accessed as “Storage Card” in the ”My Handheld PC” folder. Note: the “Storage Card” Card” folder will not appear unless a formatted diskette is inserted in the USB FDD. 9.2. To install using an Internet connection directly to your Handheld PC: Even if you have no Windows PC, you can download the driver file via an Internet connection, or copy the file from the driver CD-ROM to your Handheld PC with using a memory card, for example. 1) Check what kind of processor is built into your Handheld PC: ARM, MIPS or SH4. To check the processor type, open the Control Panel, double click the System icon, then click the Device tab. And note the Processor Type, as shown below (in this case, the Processor Type is ARM). Page 22 December 2002 USB FDD Installation Guide Rev. D 2) Download the appropriate software for your Handheld PC based on the Processor Type. Or copy the appropriate file from the CD-ROM using a memory card. Processor Location of Internet Driver CD-ROM ARM http://www.yedata.com/support/fbu_arm.cab ARM Folder fbu_arm.cab MIPS http://www.yedata.com/support/fbu_mips.cab MIPS Folder fbu_mips.cab SH4 http://www.yedata.com/support/fbu_sh4.cab SH4 Folder fbu_sh4.cab 3) Double click the downloaded file; the driver for USB FDD will install automatically. The installer will ask where to install the USBFDD.txt file; please click OK to install. After the install has finished, you can find USBFDD.txt on the Desktop; please read this file. 4) Connect the USB FDD to your Handheld PC and insert a formatted diskette into the USB FDD. The diskette can be accessed as the "Storage Card" folder by double clicking on the "My Handheld PC" icon. The computer will address the floppy disk as if it were a memory card, because that is the usual means of storage for a handheld PC. 9.3. Formatting a Diskette There is a format utility program, USBFDFMT, in the Windows folder of your Handheld PC. If you insert an unformatted diskette in the USB FDD, USBFDFMT will run automatically. Page 23 December 2002 USB FDD Installation Guide Rev. D 9.4. Restrictions 1) “Storage Card” folder The “Storage Card” folder will not appear if you merely plug in the USB FDD. The “Storage Card” folder will only appear after you have inserted a formatted diskette. 2) Access Speed Accessing the floppy is not so fast. Writing large files will take several minutes when running Windows CE 2.11. 3) USB Hub Windows CE 2.11 does not support a USB hub between the Handheld PC and the USB FDD. Plug the USB FDD directly in the USB port of your Handheld PC. 4) Suspend The USB FDD supports suspend mode. However, if suspend mode does not seem to work correctly, try unplugging the USB FDD before entering suspend. 5) Windows CE.NET. This driver does not correspond to Windows CE.NET. 6) Support This driver supports only one USB FDD. You cannot connect two USB FDD to your Handheld PC. Page 24 December 2002 USB FDD Installation Guide Rev. D 10. Changing the Color Cover Option: Only for “SNAP-ON” SNAP-ON” Color Cover Model Case Latch Color Cover Latch Latch Lock Guide Slot Fig. 1 Fig. 2 10.1. How to Remove the Cover The color cover is attached to the case using a latch, as shown in Fig. 1. 1) Work a paper clip, flathead screwdriver, or similar tool between the color cover and the case at the crevice, and lift up the latch to release it from the case. 2) Slide the color cover towards the front of the case, and remove. 10.2. How to Attach the Cover 1) Align the tabs inside the color cover with the guide slot, as shown in Fig. 2. 2) Slide the cover onto the case until the latch locks into place. Page 25 December 2002 USB FDD Installation Guide Rev. D 11. Specifications 11.1. Temperature Range Operating : 5~40°C (41~104°F) Non-operating : -40~60°C (-40~140°F) 11.2. Humidity Range 20~80% RH, no condensation 11.3. Operating Position Horizontal (eject button above diskette slot) 11.4. Supported Diskette Types (3.5 inch) Diskette 2HD 2DD Format 1.44 MB PC format 1.4 MB Mac format 1.7MB Microsoft DMF 1.25 MB DOS Format 1.21 MB DOS Format 720 KB PC Format 800 KB Mac Format 640 KB DOS Format Support Read / Write / Format Read / Write / Format Read Only Note Read / Write Read / Write Read / Write / Format Not supported Read / Write Windows Only Windows Only Macintosh Only Windows Only Windows Only Note: 1. DOS Format 1.25M / 1.21M / 640K are Japanese domestic MS-DOS versions. 2. Mac Format 2DD diskettes are not supported. 3. Windows XP allows you to format (initialize) a floppy diskette only as 1.44MB media 4. Diskettes formatted by Mac OS X cannot be recognized by other versions of Mac OS. We recommend that you format diskettes using Mac OS 9.x or 8.x. 12. Support 12.1. Contact Your Distributor The name, address, and web address of the distributor are listed on the top of the package box. 12.2. Contact the Manufacturer Name: Y-E Data, Inc. Web: http://www.yedata.com/support/ e-mail: [email protected] (English, Japanese) Page 26 December 2002