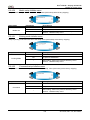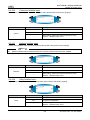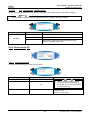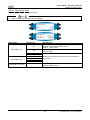
1
User’s Guide
Europe / Africa / Middle East only
Osprey 75/102/130
User’s Guide – Osprey 75/102/130
This page is intentionally left blank.
2
AP-75102, Rev. 2.0, 28/11/2007
User’s Guide – Osprey 75/102/130
COPYRIGHT NOTICE
COPYRIGHT © 2007 Mutoh Europe N.V. All rights reserved.
This document may not be reproduced by any means, in whole or in part, without written permission of the
copyright owner.
This document is furnished to support the Mutoh Osprey Inkjet printer series. In consideration of the
furnishing of the information contained in this document, the party to whom it is given assumes its custody
and control and agrees to the following:
The information here in contained is given in confidence, and any part there of shall not be copied or
reproduced without written consent of Mutoh Europe N.V.
This document or the contents here under in no circumstances shall be used in the manufacture or
reproduction of the article shown and the delivery of this document shall not constitute any right or license to
do so.
November 2007
Published: Mutoh Europe N.V., Archimedesstraat 13, B-8400 Oostende, BELGIUM
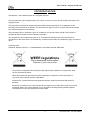
WEEE regulations
Environmental information
Disposal of your old product
Your product is designed and manufactured with high quality materials and components, which
can be recycled and reused.
When this crossed-out wheeled bin symbol is attached to a product it means the product is
covered by the European Directive 2002/96/EC
Please inform yourself about the local separate collection system for electrical and electronic
products.
Please act according to your local rules and do not dispose of your old products with your normal
household waste. The correct disposal of your old product will help prevent potential negative
consequences for the environment and human health.
3
AP-75102, Rev. 2.0, 28/11/2007
User’s Guide – Osprey 75/102/130
This page is intentionally left blank.
4
AP-75102, Rev. 2.0, 28/11/2007
User’s Guide – Osprey 75/102/130
Important Notice
This product has been tested and found to comply with the limits for a Class A digital device, pursuant to
Part 15 of FCC Rules. These limits are designed to provide reasonable protection against harmful
interference when the product is operated in a commercial environment.
This product generates, uses, and can radiate radio frequency energy and if not installed and used in
accordance with the this manual, may cause harmful interference to radio communications. Operation of this
product in a residential area is likely to cause harmful interference in which case the user will be required to
correct the interference at own expense.
1. Radio interference
This product generates weak radio signals and may interfere with television reception and utilities. If the
product does interfere with radio or TV reception, try following:
¾
¾
¾
¾
Change the direction of your radio and TV reception antenna or feeder.
Change the direction of the product
Move either the product or the receiving antenna so there is more distance between them.
Be sure that the product and the receiving antenna are on separate power lines.
2. Trademarks mentioned in this manual.
¾
¾
¾
¾
MUTOH, Osprey 75/102/130 PJ-2646NXE, MH-RTL are registered trademarks or product names of
MUTOH INDUSTRIES LTD.
Centronics and BiCentronics are registered trademarks or product names of Centronics Data
Computer Corporation.
Windows95, Windows98, Windows NT4.0, Windows2000, Windows XP, and MS-DOS are registered
trademarks or product names of Microsoft Corporation.
Other company and product names may be registered trademarks or product names.
•
Caution
No part of this product or publication may be reproduced, copied, or transmitted in any form or
by any means, except for personal use, without the permission of MUTOH EUROPE N.V.
•
The product and the contents of this publication may be changed without prior notification.
•
MUTOH EUROPE N.V. has made the best efforts to keep this publication free from error, but if
you find any uncertainties or misprints, please call us, or the shop where you bought this
equipment.
•
MUTOH EUROPE N.V. shall not be liable for any damages or troubles resulting from the use of
this equipment or this manual.
5
AP-75102, Rev. 2.0, 28/11/2007
User’s Guide – Osprey 75/102/130
This page is intentionally left blank.
6
AP-75102, Rev. 2.0, 28/11/2007
User’s Guide – Osprey 75/102/130
Warranty Limitations
1. MUTOH EUROPE N.V. warrants part repair or replacement as a sole measure only if a failure is found in
the system or in the materials and workmanship of the product the seller produced.
However, if the cause of failure is uncertain, action is decided after due mutual consultation.
2. The warranty shall not apply to any direct or indirect loss, or compensation for the loss due to the product
that has been subject to misuse, neglect, or improper alternation.
About This Manual
Section
1 Safety Instructions
2 Product Overview
3 Basic Installation
4 Handling the printer
5 Maintenance
6 Troubleshooting
7 Appendix
•
•
Contents
Explains types of warnings, cautions and warnings labelled on the printer for
both operators of the printer and maintenance personnel.
Explains the features, part names, and functions of the printer.
Explains the procedures needed before using the printer.
Explains how to handle the printer.
Explains daily maintenance of the printer.
Explains troubles that may occur when using the printer, and how to solve
them.
Explains the specifications, optional parts and supplies, installation
procedures for optional parts, and user support for this printer.
Notes
"Safety Instructions" through "Basic Installation" must be read before using the printer.
Read "Handling the printer" through "Appendix" as necessary.
7
AP-75102, Rev. 2.0, 28/11/2007
User’s Guide – Osprey 75/102/130
This page is intentionally left blank.
8
AP-75102, Rev. 2.0, 28/11/2007
User’s Guide – Osprey 75/102/130
TABLE OF CONTENTS
1
SAFETY INSTRUCTIONS..........................................................................................11
1.1
1.2
1.3
1.4
1.5
2
PRODUCT OVERVIEW..............................................................................................23
2.1
2.2
2.3
2.4
3
USING MEDIA ........................................................................................................78
TESTPRINTING .......................................................................................................87
MEDIA FEED COMPENSATION (DISTANCE ADJUST) ...................................................93
PRINTING FLOW .....................................................................................................95
PRINTER MENU ........................................................................................................97
6.1
6.2
6.3
6.4
6.5
7
CLEANING THE PRINTER ..........................................................................................68
DONE BY AN AUTHORIZED MUTOH TECHNICIAN .........................................................76
PREPARATIONS BEFORE PRINTING .....................................................................77
5.1
5.2
5.3
5.4
6
SWITCHING THE PRINTER ON/OFF..........................................................................34
HANDLING AND INSTALLING MEDIA ............................................................................41
REFILLING THE INK AND JET WASH FLUID ..................................................................56
DISPOSAL OF WASTE FLUIDS ...................................................................................58
TRANSFER AND TRANSPORTATION ...........................................................................60
LONG-TERM STORAGE CLEANING .............................................................................62
PERIODICAL MAINTENANCE ..................................................................................67
4.1
4.2
5
FEATURES .............................................................................................................24
PARTS NAME AND FUNCTIONS .................................................................................25
IN-THE-BOX CONTENT ............................................................................................29
INSTALLATION REQUIREMENTS ................................................................................31
BASICS ......................................................................................................................33
3.1
3.2
3.3
3.4
3.5
3.6
4
INTRODUCTION ......................................................................................................12
WARNINGS, CAUTIONS AND NOTES ..........................................................................12
IMPORTANT SAFETY INSTRUCTIONS ..........................................................................12
WARNING LABELS...................................................................................................16
OPERATION LABELS ................................................................................................20
HOW TO WORK IN THE MENU .................................................................................100
OPERATION PANEL IN STANDBY MODE ...................................................................102
OPERATION PANEL DURING PRINTING .....................................................................107
OPERATIONS AFTER PRINTING ...............................................................................110
MENU OVERVIEW (1/5 – 5/5).................................................................................112
TROUBLESHOOTING .............................................................................................161
7.1
7.2
7.3
7.4
INTRODUCTION ....................................................................................................162
FAILURES AND MALFUNCTIONS OF THE PRINTER ......................................................163
ERROR MESSAGES ...............................................................................................168
WHEN MEDIA JAMS OCCUR ....................................................................................174
9
AP-75102, Rev. 2.0, 28/11/2007
User’s Guide – Osprey 75/102/130
This page is intentionally left blank
10
AP-75102, Rev. 2.0, 28/11/2007
User’s Guide – Osprey 75/102/130
Chapter 1: Safety Instructions
1 SAFETY INSTRUCTIONS
1.1
INTRODUCTION ......................................................................................................... 12
1.2
WARNINGS, CAUTIONS AND NOTES ............................................................................. 12
1.3
IMPORTANT SAFETY INSTRUCTIONS ............................................................................. 12
1.4
WARNING LABELS...................................................................................................... 16
1.4.1 Handling the warning labels ................................................................................ 16
1.4.2 Locations and types of warning labels ................................................................ 16
1.5
OPERATION LABELS ................................................................................................... 20
1.5.1 Handling notices ................................................................................................. 20
1.5.2 Label types and attaching positions .................................................................... 20
11
AP-75102, Rev. 2.0, 28/11/2007
User’s Guide – Osprey 75/102/130
Chapter 1: Safety Instructions
1.1 INTRODUCTION
This Item explains the meaning of safety terms for personnel operating this equipment, important safety
instructions and the positioning of the warning labels.
•
Important
Be sure to follow all instructions and warnings in this manual when installing the equipment.
1.2 WARNINGS, CAUTIONS AND NOTES
Safety terms in this manual and the contents of warning labels attached to the printer are categorized into three
types depending on the degree of risk (or the scale of accident).
Read the following explanations carefully, and follow the instructions in this manual.
Safety terms
Important
Caution
Notes
Details
Must be followed carefully to avoid death or serious bodily injury.
Must be observed to avoid bodily injury (moderate or light) or damage to your
equipment.
Contains important information and useful tips on the operation of your printer.
1.3 IMPORTANT SAFETY INSTRUCTIONS
General safety instructions that must be observed to use the equipment safely are explained below.
¾
Do not place the printer in the following areas. Doing so may result in the printer tipping or falling over and
causing injury.
•
•
•
Unstable surfaces.
Angled places.
Areas subject to vibration by other equipment.
¾
Do not stand on, or place heavy objects on your printer. Doing so may result in the printer tipping or falling
over and causing injury.
¾
Do not cover the ventilation hole of your printer with cloth, such as a blanket or a table cloth. Doing so
could obstruct the ventilation and cause fire.
¾
Do not place the printer in humid and dusty areas. Doing so may result in an electrical shock or fire.
¾
Do not use a damaged power cable. Doing so may result in an electrical shock or fire.
¾
Do not attempt to plug in electrical plugs with wet hands. Doing so may result in an electrical shock.
¾
Do not connect earth cables in the following areas.
• Gas pipes
Doing so may cause fire or an explosion.
• Earth terminals for telephone line or lightening rod
Doing so may cause a large flow of voltage if lightening occurs.
• Water pipes or faucets
If there is a plastic part in the pipe, the earth will not work properly.
¾
The ink used in the product contains an organic solvent (CYCLOHEXANONE). It is flammable and so an
open flame is prohibited in the area. In a dry environment, static electricity can cause ignition, so before
handling the ink, jet wash fluid or waste liquids, touch a metallic object first to remove static electricity from
your body. Do not come near materials having static electricity, and take appropriate measures against
static electricity.
¾
Do not insert or drop metal or inflammable objects into openings, such as ventilation outlets. This may
cause electrical shock or fire.
12
AP-75102, Rev. 2.0, 28/11/2007
User’s Guide – Osprey 75/102/130
Chapter 1: Safety Instructions
¾
Stop using your printer if a liquid has been spilled into it. This may cause an electrical shock or fire. Switch
the printer OFF as soon as possible, unplug the power cord, and contact your local MUTOH dealer.
¾
Be sure to use the attached cable. Otherwise, an electrical shock or fire may occur.
¾
Be sure to use the specified voltage (AC 100 V- 120 V or AC 220 V - 240 V). Otherwise, an electrical shock
or fire may occur.
¾
Use electricity directly from a power outlet (AC 100 V- 120 V or AC 220 V - 240 V). Do not put many loads
on one electrical output. Otherwise, heat may be generated and cause fire.
¾
Be sure to use an outlet with an earth terminal and use the terminal correctly. Otherwise, electrical shocks
or fire may occur.
¾
The inks used in this product contain an organic solvent (CYCLOHEXANONE). Make sure to follow the
industrial waste disposal laws and ordinances of your local governments.
It is necessary to install a local ventilation unit, push/pull type ventilation unit, or a total ventilation unit to
perform adequate ventilation.
¾
If ink or jet wash fluid has been swallowed, do not make the person throw up, but immediately call a doctor
and a poison management centre.
If there has been contact with eyes or inhalation, it may cause poisoning. Follow the cautions and
procedures labelled on the ink and jet wash bottles, and take action immediately.
¾
The waste fluid from the printer is a waste oil (waste ink) of industrial waste. Proper waste fluid disposal
according to industrial waste disposal laws and ordinances of your local governments are required.
¾
Follow the instructions below when handling the power cable.
•
•
•
•
¾
Follow the instructions below when handling the power plug. Otherwise, fire may occur.
•
•
¾
Do not modify the cable.
Do not put heavy objects on the cable.
Do not bend, twist, or pull the cord.
Do not wire the cable near equipment that generates heat.
Wipe away dust and any other residue before inserting the plug.
Ensure that the plug is firmly inserted as far as it can go.
When handling the foot switch, be aware of the following:
•
•
•
Do not place anything heavy on the foot switch.
Do not pull or bend the cable of the foot switch with force.
Do not place the foot switch near thermal devices.
¾
Be careful not to get your fingers caught in the lid when opening or closing the front cover and the
maintenance cover.
¾
The refilled ink or jet wash fluid should not exceed the upper limit (about 2 litres) of the main tank. If it
exceeds the upper limit, the ink will leak out and cause printer problems.
¾
When filling the main tank with ink, make sure not to make a mistake with the ink colour and the ink tube
colours.
¾
Filling the tank with the wrong colour ink can make the print head useless.
¾
During printing, do not touch the media guide. The media guide is hot, and may cause burns if touched.
¾
During the winding operation, make sure to keep hands and fingers off moving parts.
¾
Be careful when cutting roll media, incorrect handling can result in injury to the hands and fingers from the
razor blade.
•
•
¾
Do not use jet-wash fluid, thinner, benzene, alcohol, or other active agents except for the following parts.
Doing so may result a malfunction in the product.
•
•
¾
When holding the media, do not place fingers over the media cut groove.
Move the razor blade slowly along the media cut groove.
Inside the maintenance cover.
Print head surface.
Be careful not to spill water inside the printer. Doing so may result in a short circuit.
13
AP-75102, Rev. 2.0, 28/11/2007
User’s Guide – Osprey 75/102/130
Chapter 1: Safety Instructions
¾
Never open the covers fixed with screws. Doing so may result in an electrical shock or a malfunction of the
printer.
¾
Be careful when cleaning the print head, incorrect cleaning may result in clogging of the nozzles.
•
•
Do not touch the print head surface with bare hands.
Wipe out ink on the print head wiper every time when ink has been adhered to it.
¾
Do not tilt the printer, put it against a wall, or turn it upside down. Doing so may cause ink leakage inside
the printer. Also, movement after transport is not covered by the warranty.
¾
Have two or more people unpack and transport the printer.
¾
When lifting the printer out of the packing box, be sure to remove the vinyl cover first, then grab the holding
sides of the printer. Lifting the printer with the vinyl cover on may cause your hands to slip and as such
drop or damage the printer.
¾
Ensure that the plug has been disconnected from the power socket when it is not to be used for a long
time.
¾
Earth wires must be connected to wires or terminals that fulfil the conditions below.
•
•
Earth terminals of power socket.
Earth wires with copper morsel that is at least 650 mm under ground.
¾
When refilling ink or jet wash fluid, always wear the protective gloves supplied with the unit.
¾
The ink and jet wash fluid are poisonous. If skin contact occurs, wash with soap water and rinse well.
¾
Be sure to close the lid of the main tank tightly. If the lid is not tightly closed or loose, it will cause a defect
when purging, loading or unloading the ink.
¾
When performing the following work, always perform work with 2 people.
•
•
•
¾
Placement of the roll media.
Setting of the roll media.
Setting of the winding unit.
When performing the head cleaning:
•
•
Put on the gloves supplied with the printer.
Only use the print head wiper supplied with the printer. Otherwise the nozzle may become clogged.
¾
Immediately after printing, the media guide and the platen are very hot. Perform work after the media guide
and the platen have cooled off.
¾
When cleaning the waste fluid tray, always wear the protective gloves supplied with the unit.
¾
When cleaning the print head surface, always wear the protective gloves supplied with the unit.
¾
When performing cleaning for long-term storage, always wear the protective gloves supplied with the unit.
¾
Be sure to switch the printer OFF and unplug the power cord before cleaning.
¾
Keep the printer horizontally during transportation.
¾
Before installing options, always perform the following.
•
•
•
•
•
Switch OFF the printer.
Remove the power source plug from the outlet.
Remove all cables connected to the printer.
Failure to do so could result in damage to the printer or your computer.
Touch a metallic section of the product to remove any static electricity in your body. The electronic
components can be damaged from static electricity.
¾
When installing options, do not touch the elements on the circuit board. The elements on the boards can be
very hot, and can cause burns.
¾
Make sure that the distributed power cable is used. Use of a different power cable may result in electric
shock or fire.
14
AP-75102, Rev. 2.0, 28/11/2007
User’s Guide – Osprey 75/102/130
Chapter 1: Safety Instructions
¾
Be careful of the following when handling the power cable.
• Do not make any modifications to the power cable.
• Do not place anything heavy on the power cable.
• Do not bend, twist, or pull the power cable.
¾
Do not wire the power cable near an equipment that generates heat.
¾
After the print head cap is removed from the printer, move it into the accessory box. Discharge the waste
fluid from the print head cap enough so it would not spill.
¾
Keep the print head cap away from the dust and other contaminants; otherwise the print head may become
clogged.
¾
When opening/closing the maintenance cover, be careful not to get your fingers caught in the lid.
¾
Do not cut a poly-knit wiper over the print head cap. Otherwise the print head may become clogged with
lint.
¾
Be sure to remove pilling and lint on the cutting edge of poly-knit wiper. Otherwise the print head may
become clogged.
¾
When the cap sponges and the poly-knit wipers become dry, always replace them with new ones.
Otherwise the print head may become clogged.
¾
Keep the print head cap clean, otherwise the print head may become clogged.
¾
When switching the power OFF, always install the print head cap. Or the nozzle may become clogged.
¾
Carefully open/close the ink box cover to avoid finger pinching.
¾
Be sure not to pinch your fingers while opening and closing the front cover.
¾
When connecting the network interface, ensure the following precautions:
• Never touch the connection terminals.
• Do not connect different shaped cables
¾
¾
Wrong handling may cause an electric shock and/or fire.
Immediately after printing, the media guide and the platen are very hot. Perform work after the media guide
until the platen have cooled off.
¾
¾
When the sponge of the spitting box has been replaced, be careful for the waste fluid not to be spilled out.
If the waste fluid comes into contact with the grid roller, the surface of the grid roller will be damaged. And
the media feed function may be affected.
¾
Be sure to switch the printer OFF and unplug the power cord before cleaning.
¾
Do not use the jet-wash fluid, thinner, Benzene, alcohol, or other active agents except for the following
parts. Doing so may result a malfunction in the product.
• Inside the maintenance cover
• Print head surface
¾
Be careful not to spill water inside the printer. Doing so may result in a short circuit.
¾
Never open the covers fixed with screws. Doing so may result in an electrical shock or a malfunction in the
printer.
15
AP-75102, Rev. 2.0, 28/11/2007
User’s Guide – Osprey 75/102/130
Chapter 1: Safety Instructions
1.4 WARNING LABELS
The handling, attachment locations, and types of warning labels are explained below.
Warning labels are attached to areas where care should be paid. Read and understand the positions and
contents thoroughly before performing your work.
1.4.1 Handling the warning labels
Be sure to note the following when handling the warning labels.
•
•
•
Notes
Make sure that all warning labels can be recognized. If text or illustrations cannot be clearly seen,
clean the label.
When cleaning warning labels, use a cloth with water or neutral detergent. Do not use a solvent or
gasoline.
If a warning label has been damaged, lost, or cannot be recognized, replace the label.
When replacing warning labels, contact your MUTOH local dealer.
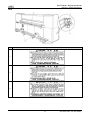
1.4.2 Locations and types of warning labels
The locations of warning labels are shown below.
Front
16
AP-75102, Rev. 2.0, 28/11/2007
User’s Guide – Osprey 75/102/130
Chapter 1: Safety Instructions
Back
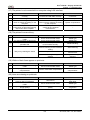
No.
Type
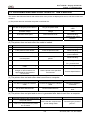
1
2
3
17
AP-75102, Rev. 2.0, 28/11/2007
User’s Guide – Osprey 75/102/130
Chapter 1: Safety Instructions
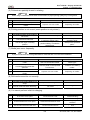
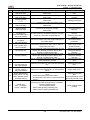
4
5
6
7
8
9
18
AP-75102, Rev. 2.0, 28/11/2007
User’s Guide – Osprey 75/102/130
Chapter 1: Safety Instructions
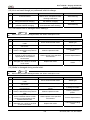
10
11
12
13
14
15
19
AP-75102, Rev. 2.0, 28/11/2007
User’s Guide – Osprey 75/102/130
Chapter 1: Safety Instructions
1.5 OPERATION LABELS
This Item describes the operation labels including their types and attaching positions.
The operation labels are attached on the product to provide the brief instructions for the important operations.
Learn the instructions and the attaching positions before operation.
1.5.1 Handling notices
•
•
•
•
Notes
Ensure that all the operation labels clearly can be read. If any part such as a character or an illustration
is not clear, clean off dirt from the label.
To clean off dirt from the operation labels, use cloths, water, or neutral detergent. Do not use organic
solvent or gasoline.
If the operation labels have been damaged, lost, or became unreadable for other reasons, replace them
with new ones.
For replacement, contact your local service centre (Refer to: "Product information service").
1.5.2 Label types and attaching positions
Front
20
AP-75102, Rev. 2.0, 28/11/2007
User’s Guide – Osprey 75/102/130
Chapter 1: Safety Instructions
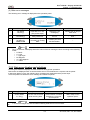
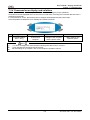
Back
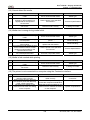
No.
Operation label type
1
2
21
AP-75102, Rev. 2.0, 28/11/2007
User’s Guide – Osprey 75/102/130
Chapter 1: Safety Instructions
This page is intentionally left blank
22
AP-75102, Rev. 2.0, 28/11/2007
User’s Guide – Osprey 75/102/130
Chapter 2: Product Overview
2 PRODUCT OVERVIEW
2.1
FEATURES ................................................................................................................ 24
2.2
PARTS NAME AND FUNCTIONS .................................................................................... 25
2.2.1 Front section ....................................................................................................... 25
2.2.2 Rear section........................................................................................................ 26
2.2.3 Operation panel .................................................................................................. 27
2.2.3.1 Operation Keys ............................................................................................ 27
2.3
IN-THE-BOX CONTENT ............................................................................................... 29
2.3.1 Packaging box of the main unit ........................................................................... 29
2.3.2 Accessories packaging box................................................................................. 29
2.3.3 Starterkit ............................................................................................................. 30
2.3.4 Core Brace Set ................................................................................................... 30
2.4
INSTALLATION REQUIREMENTS ................................................................................... 31
23
AP-75102, Rev. 2.0, 28/11/2007
User’s Guide – Osprey 75/102/130
Chapter 2: Product Overview
2.1 FEATURES
The different features of the printer are explained below.
(1) High speed output
With the newly designed high-speed print head.
•
•
•
The Osprey 75 enables printing up to the 1920 mm wide image.
The Osprey 102 enables printing up to the 2500 mm wide image.
The Osprey 130 enables printing up to the 3300 mm wide image.
(2) Outstanding weather resistance
With the specially developed solvent-type ink, the output product can last up to 3 years even without lamination.
Not only the delivery time is reduced, but the total cost is reduced as well.
(3) Wide variety of compatible media
The adjustable head height and the variable pressure with lever accept various types of sheets in the thickness
range of 0.08 to 1.0 mm, including Terpolin, cloth, and marking film.
(4) Vibrant Colour Reproduction
To reproduce clear and vibrant colours, the Osprey uses 6 colours. This model uses 2,000cc ink tanks, allowing
continuous operation, and raising productivity.
(5) Effective usage of media
A JOG feature is provided to allow settings of the printing position as required. Because printing can be
performed on media that has already been printed on, excess space can be used effectively.
24
AP-75102, Rev. 2.0, 28/11/2007
User’s Guide – Osprey 75/102/130
Chapter 2: Product Overview
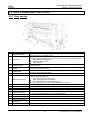
2.2 PARTS NAME AND FUNCTIONS
2.2.1 Front section
No.
Name
1
Operation panel
2
Front cover
3
Pressure roller
4
Platen
5
Media guide
6
Foot switch
7
Maintenance cover
8
9
10
11
Waste fluid valve
Stand
Winding unit
Cushioning roller
12
3-way cock cover
13
14
15
AC inlet
Interface connector
Foot switch connector
Network internet face
connector
Hard disk slot
16
17
Function
This panel is used to set operational conditions, the status of the printer, and other
functions. (Refer to : Operation panel)
This cover keeps the operator safe from the drive parts of the printer while it is
operating. Open and/or close the cover only when performing the following operations.
•
Media setting and replacement
•
Cleaning inside the printer
•
Media jamming
Set inside the front cover. This roller is used to press the media from above and keep it
flat when printing.
Set inside the front cover. There is an ink drying device built in. On the surface, there is
a cutter groove for paper cutting.
This is used to feed the media smoothly when setting the media and when printing.
There is an ink drying device built in.
This switch is used to raise and lower the pressure roller.
This cover protects the user from the internal components of the product. Opened
during the following conditions:
•
When switching the unit ON or OFF
•
When cleaning the print head surface.
•
When cleaning the print head inside the cover.
There is a waste fluid tray to collect waste fluid from the print head.
Opened when discharging waste fluid from the waste fluid tank. This is normally closed.
This stand is used to install the printer on a flat surface.
Winds and collects the printed media.
Used to guide the printed media to the winding unit.
Cover to protect operators from the internal mechanism of the product. Open when the
print head is cleaned. Normally this cover should be closed.
Insert the power cable plug.
Connector to connect Centronics Interface.
Connector to set foot switch cable.
Connector to connect Ethernet cable.
For attaching the optional hard disk. When the hard disk is not used, close the cover.
25
AP-75102, Rev. 2.0, 28/11/2007
User’s Guide – Osprey 75/102/130
Chapter 2: Product Overview
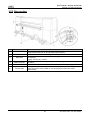
2.2.2 Rear section
No.
Name
1
Ink bottle cover
2
Tank tray
3
Main tank
4
Media feed slot
5
Feed unit
6
Tension roller
Function
Cover to protect operators from the internal mechanism of the product.
Opens/closes when the ink and jet wash liquid is filled in.
Used to hold the main tank to the product.
Tanks for ink and jet wash liquid. The following number of tanks should be set to
the tank tray.
Osprey 75/102/130 : 7 tanks
This is the media feed slot for placing the media during the media setting
procedure.
This is the device which sets the media, and feeds it to the printing position.
Set the printing intervals when perform printing by media feed compensation.
When the tension roller is lifted up, the feeding device feeds the media
automatically.
26
AP-75102, Rev. 2.0, 28/11/2007
User’s Guide – Osprey 75/102/130
Chapter 2: Product Overview
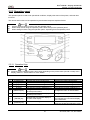
2.2.3 Operation panel
The operation panel is used to set operational conditions, displays the status of the printer, and sets other
functions.
The names and functions of the operation keys and status lamps are explained below.
Notes
See the sections below on how to use the operation panel.
When setup menus using the operation panel: “Menu setup on the operation panel”
When setting functions using the operation panel: “Operating from the operation panel”
•
•
•
2.2.3.1 Operation Keys
Notes
Some keys have multiple functions and names depending on the printer status (normal or setup menu
display). Refer to: "Printer status" for more details.
•
No.
1
2
3
4
5
Name
[POWER] key
[F1] key
[F2] key
[F3] key
[F4] key
6
[MENU ▲] key
7
[MENU ▼] key
8
[ENTER] key
9
[CANCEL] key
Normal
Switches the printer ON and OFF.
Executes the function assigned to F1.
Executes the function assigned to F2.
Executes the function assigned to F3.
Executes the function assigned to F4.
Changes the LCD monitor display to
the setup menu status.
Changes the LCD monitor display to
the setup menu status.
Changes the LCD monitor display to
the print mode display.
–
27
setup menu display
Switches the printer ON and OFF.
Executes the function assigned to F1.
Executes the function assigned to F2.
Executes the function assigned to F3.
Executes the function assigned to F4.
Changes the menu in reverse order.
Changes the menu in forward order.
Determines the new parameter value
and changes the LCD monitor display
to the next menu.
Cancels the new parameter value and
returns to the previous hierarchy menu.
AP-75102, Rev. 2.0, 28/11/2007
User’s Guide – Osprey 75/102/130
Chapter 2: Product Overview
(2) LCD monitor and status lamp
No.
10
11
Name
LCD
monitor
POWER
lamp
Colour
–
–
Green
ON
OFF
ERROR
lamp
Red
13
DATA
lamp
Orange
14
MEDIA
SET lamp
Orange
12
15
16
ROLL
lamp
SHEET
lamp
Status
Flashing
OFF
ON
Flashing
OFF
ON
OFF
Function
This monitor displays the operation status and error messages of
the printer.
The printer is ON.
The printer is OFF.
An error has occurred. The contents will be displayed on the LCD
monitor.
Either there is no error in the printer or the power is OFF.
The printer is receiving print data.
The printer is analyzing received data.
The printer is waiting to receive print data.
• The pressure roller is in the release position.
• Media has not been set.
• The pressure roller is in the secured position.
• The media has been set.
–
–
Disuse
–
–
Disuse
28
AP-75102, Rev. 2.0, 28/11/2007
User’s Guide – Osprey 75/102/130
Chapter 2: Product Overview
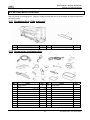
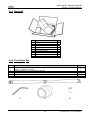
2.3 IN-THE-BOX CONTENT
After unpacking the packaging box, inspect to make sure that the unit is not damaged, and that all necessary
parts are present.
2.3.1 Packaging box of the main unit
No.
1
Name
Main unit, stand, winding unit
Qty
1 set
No.
2
Name
Media tube (for winding unit)
Qty
1
2.3.2 Accessories packaging box
No.
1
2
3
4
5
6
7
8
9
10
11
Name
Power cable
Foot switch
Media holder plate
Gloves
Funnel
Polyknit wiper
Print head wiper
Magnet sheet (white)
Panel cover
Magnet sheet (black)
Qty
4
No.
12
13
14
15
16
17
18
19
1
2
1 box
1
1 box
1
1
10
1
29
Name
Hand pump
Cap Sponge
Wash bottle
Screwdriver
Plastic spacer
Screw(for Plastic spacer)
Tray
Accessories box
Qty
1
6
1
1
2
2
1
1
AP-75102, Rev. 2.0, 28/11/2007
User’s Guide – Osprey 75/102/130
Chapter 2: Product Overview
2.3.3 Starterkit
No.
Name
Qty
1 ROHS HDD 7445 – 40 Gbyte
1
2 Spout 5l
2
3 CD Users Guide
1
4 CD getting started
1
5 User’s Guide Osprey
1
6 Dome Label Osprey
1
7 Box 440 ml cassettes
8
8 Operation manual (EU version)
1
9 Installation manual (EU version) 1
2.3.4 Core Brace Set
No°
1
2
3
4
5
Item
#
Media Core Brace
(Shaft + 3 spacers + screws)
Hexagon wrench 2 mm to tighten the spacers
Spacer media shaft diameter 74
Hex set screw M4x4
Instruction sheet
2
1
6
6
1
1
2
3
30
4
AP-75102, Rev. 2.0, 28/11/2007
User’s Guide – Osprey 75/102/130
Chapter 2: Product Overview
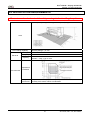
2.4 INSTALLATION REQUIREMENTS
Be sure to read and understand the safety warnings before handling the printer.
12.6m2 (146ft2) or larger. Frontage of 4.7m (15.7ft) or greater.
Area
Floor loading capability
Voltage
Frequency
Electrical
Capacity
Environmental
2940Pa (300kg/m2) or over
AC100V – 120V / AC220V – 240V ±10%
50/60Hz±1Hz
AC100V – 120V: 15A or more
AC220V – 240V: 7.5A or more
Operational
conditions
Storage
environment
Temperature: –10°C (14F) to 60°C (140F)
Humidity: 20% to 80% without condensation
31
AP-75102, Rev. 2.0, 28/11/2007
User’s Guide – Osprey 75/102/130
Chapter 2: Product Overview
This page is intentionally left blank
32
AP-75102, Rev. 2.0, 28/11/2007
User’s Guide – Osprey 75/102/130
Chapter 3: Basics
3 BASICS
3.1
SWITCHING THE PRINTER ON/OFF
34
3.1.1 Switching the power ON
34
3.1.2 Switching OFF the printer
37
3.2
41
HANDLING AND INSTALLING MEDIA
3.2.1 Installing roll media
42
3.2.2 Using the media core braces.
44
3.2.3 Loading roll media
45
3.2.4 Setting winding unit
50
3.2.5 Setting media type
52
3.2.6 Replacing roll media
53
3.3
REFILLING THE INK AND JET WASH FLUID
56
3.4
DISPOSAL OF WASTE FLUIDS
58
3.5
TRANSFER AND TRANSPORTATION
60
3.5.1 Transferring the printer
60
3.5.2 Transporting the printer
61
3.6
LONG-TERM STORAGE CLEANING
62
33
AP-75102, Rev. 2.0, 28/11/2007
User’s Guide – Osprey 75/102/130
Chapter 3: Basics
3.1 SWITCHING THE PRINTER ON/OFF
3.1.1 Switching the power ON
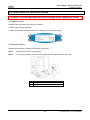
Be sure to read and understand the safety warnings before handling the printer.
The procedure consists of 2 parts.
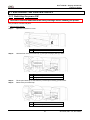
1. Start up the machine:
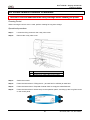
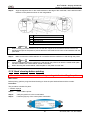
Step 1 :
Open the maintenance cover.
No.
1
Step 2 :
Name
maintenance cover
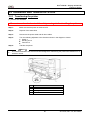
Hold the front of the print head cap (1) and put the purge plate (2) down.
No.
1
2
Name
Print head cap
purge plate
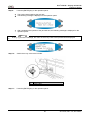
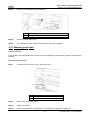
Step 3 :
Tilt the print head cap to eliminate the pooled liquid including jet-wash fluid.
Step 4 :
Remove the print head cap.
No.
1
Name
Print head cap
34
AP-75102, Rev. 2.0, 28/11/2007
User’s Guide – Osprey 75/102/130
Chapter 3: Basics
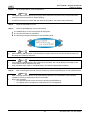
Step 5 :
Lift the purge plate to make it operational.
•
Notes
The purge plate must be placed on the purge stand whenever the power is ON, except when head
cleaning is performed. Refer to: “Head cleaning”
•
If waste fluid comes into contact with the inside of the product, the product may malfunction.
Step 6 :
Close the maintenance cover.
Step 7 :
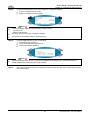
Press the [POWER] key on the control panel.
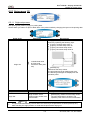
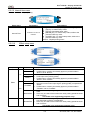
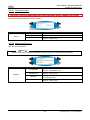
• The POWER lamp on the control panel will light green.
• The unit will initial start up operations.
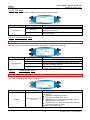
• The following message is displayed on the operation panel.
•
•
•
Notes
When switching ON the printer and the shelf life of a part comes to an end, the printer will notify it in
this stage of the start up sequence.
Notes
If there are any problems during the initial start-up operation, the unit will display a message on the
control panel, and the operation may stop.
If the operation stops, refer to "Troubleshooting", and take the appropriate measures.
Step 8 :
•
•
After confirming the removal of the print head cap, press the [ENTER] key on the operation panel.
Notes
After 3 seconds from the launch of the initial start-up operation, the initialization of the hard disk
installed in the unit is performed for about 10 seconds.
During this operation,
o The operation panel will not work even if pushing the [ENTER] key.
o The display will not change even if the parts’ life cycle is displayed.
35
AP-75102, Rev. 2.0, 28/11/2007
User’s Guide – Osprey 75/102/130
Chapter 3: Basics
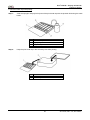
2. Store the head cap while printing:
Step 1 :
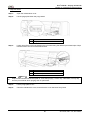
Soak the sponges and poly-knit wipers of the print head cap with the jet-wash fluid using the wash
bottle.
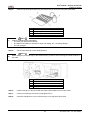
No.
1
2
3
4
Step 2 :
Name
Print head cap
Cap sponge
Poly-knit wiper
Wash bottle
Keep the print head cap in the accessory box while printing.
No.
1
2
Name
Print head cap
Accessory box
36
AP-75102, Rev. 2.0, 28/11/2007
User’s Guide – Osprey 75/102/130
Chapter 3: Basics
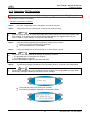
3.1.2 Switching OFF the printer
Be sure to read and understand the safety warnings before handling the printer.
The procedure consists out of 3 parts.
1. Start the “power down” sequence:
Step 1 :
Go to the “Testprinting” menu, and perform a nozzle check print.
Step 2 :
Verify if there are any missing dots, or if the printer is faint printing.
•
Notes
If printing quality declines, or if there are missing dots in the nozzle check print, the print heads need
to be cleaned. If you switch OFF the printer without head cleaning, the clogged nozzle may not
restore. Refer to: “Head cleaning" to perform a head cleaning.
Step 3 :
Verify the following regarding the operational condition of the product:
• There is no printing operation being performed.
• The control panel is in a normal status.
Step 4 :
Push the [POWER] key of the control panel, to switch OFF the printer.
•
•
Notes
The power is ON if the control panel displays the following conditions:
o The [POWER] key is in the pushed in condition
o The POWER lamp is lit (green).
Press the [POWER] key again to switch the power OFF.
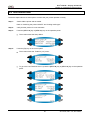
Step 5 :
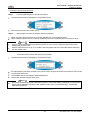
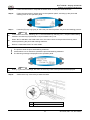
•
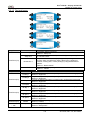
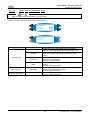
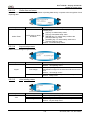
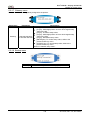
The following message is displayed on the operation panel for 3 seconds. See image below.
Notes
If pushing the [POWER] key on the operation panel by mistake, push the [POWER] key again while
the following message is displayed. See below for the message.
•
•
The printer will perform the power OFF operation.
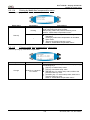
The following message is displayed on the operation panel:
37
AP-75102, Rev. 2.0, 28/11/2007
User’s Guide – Osprey 75/102/130
Chapter 3: Basics
2. Install the print head cap:
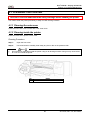
Step 1 :
Open the maintenance cover.
Step 2 :
Put the purge plate down.
No.
1
Step 3 :
Name
Purge plate
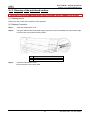
Cut a poly-knit wiper into three equal pieces, and place them on the cap sponges.
•
Notes
Place a piece of poly-knit wiper on the cap sponge as in the figure below so that the piece fits the
nozzle surface of the head.
•
Use the jet-wash fluid to wash the poly-knit wipers.
•
Replace the poly-knit wiper in the following cases:
o The poly-knit wiper has dried.
o Things such as ink clotting adhered to the poly-knit wiper.
o The poly-knit wiper is dirty with ink, etc.
o The poly-knit wiper has been used for a week. (Replace it once a week.)
•
If the cap sponge is too dirty or dry, replace it with a new one included in the box.
•
Be sure to re-attach the print head cap after the head cleaning.
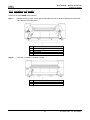
No.
1
2
3
Name
Print head cap
Poly-knit wiper
Cap sponge
38
AP-75102, Rev. 2.0, 28/11/2007
User’s Guide – Osprey 75/102/130
Chapter 3: Basics
Step 4 :
Soak the cap sponges and the poly-knit wipers with jet-wash fluid using the wash bottle.
No.
1
2
3
4
•
Notes
Clean the following parts periodically.
o The resin part of the print head cap.
o The sides of the head (i.e. the parts to which ink clotting, etc., can easily adhere)
o The cap sponges.
Step 5 :
•
Name
Print head cap
Cap sponge
Poly-knit wiper
Wash bottle
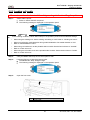
Set the print head cap on the waste fluid box.
Notes
When setting the print head cap on the waste fluid box, prevent it from touching the nozzle surface of
the head.
No.
1
2
3
4
Name
Waste fluid box
Print head cap
Print head
Purge plate
Step 6 :
Position the caps on the print head cap and the print heads in front of each other.
Step 7 :
Lift the print head cap and set the purge plate to fix it.
Step 8 :
Close the maintenance cover, ensure that the cover has been firmly fixed.
39
AP-75102, Rev. 2.0, 28/11/2007
User’s Guide – Osprey 75/102/130
Chapter 3: Basics
3. Finnish the power down sequence:
Step 1 :
Press the [ENTER] key on the operation panel.
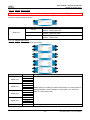
•
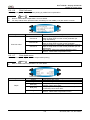
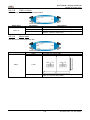
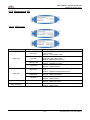
The following message is displayed on the operation panel:
•
See next step to select the correct choice.
Step 2 :
•
•
•
•
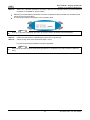
When media has been set, perform following operation:
When not raising the pressure lever, press the [ENTER] key on the operation panel.
When raising the pressure lever, press the [CANCEL] key on the operation panel or wait 10 seconds.
Notes
Ensure to raise the pressure lever when the product is not in use for a long time. Not doing so may
damage the pressure roller.
When the pressure lever is up, or no media is set, the system shift to the next step without displaying
the lever select menu.
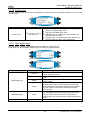
The product will now finish the power OFF operation:
•
The following message is displayed on the operation panel:
•
•
•
•
If the [ENTER] key has been pressed in the previous step, the product will send the media for 0.8m (2.6ft.).
The pressure roller rises.
The POWER lamp of the operation panel will fades out.
The product will automatically switch OFF.
•
Notes
If there are problems during the power OFF operation, the unit will display a message on the operation
panel, and the operation may stop. If the operation stops, refer to "Troubleshooting", and take the
appropriate measures.
40
AP-75102, Rev. 2.0, 28/11/2007
User’s Guide – Osprey 75/102/130
Chapter 3: Basics
3.2 HANDLING AND INSTALLING MEDIA
Be sure to read and understand the safety warnings before handling the printer.
The following describes the procedures for installing and setting roll media, setting types of media, and using
the winding unit.
The procedure required for media installation is shown in the following flow diagram.
Refer to the following items according to the model to be used before performing the operations.
1. Install the roll media on the scroller.
Refer to: “Placement of the roll media”
↓
2. Set the roll media to the product.
Refer to: “Loading roll media”
↓
3. When the winding unit is used, set the roll medial to the winding unit.
Refer to: “Setting winding unit”
↓
4. Set the media type.
Refer to: “Setting media type”
41
AP-75102, Rev. 2.0, 28/11/2007
User’s Guide – Osprey 75/102/130
Chapter 3: Basics
3.2.1 Installing roll media
Actions to do at the REAR of the machine:
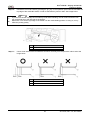
Step 1 :
Release the fixing levers on the right and left sides and set the distance between the feed units
wider than the roll media width.
No.
1
2
3
4
Step 2 :
Name
Feed unit (Left)
Feed unit (Right)
Roll media
Fixing lever
Place the roll media on the feed unit rails.
No.
1
2
Name
Feed unit rail
Roll media
42
AP-75102, Rev. 2.0, 28/11/2007
User’s Guide – Osprey 75/102/130
Chapter 3: Basics
Step 3 :
Raise the left side of roll media - seeing from the rear side - and place it over the feed unit media
support. Fix the fixing lever.
No.
1
2
3
Step 4 :
Set the other side of the roll media in the same way as step 3.
No.
1
2
3
Step 5 :
Name
Feed unit (Left)
Roll media
Fixing lever
Name
Feed unit (Right)
Roll media
Fixing lever
Release the right and left fixing levers of the feed units, move the roll media to the centre of the
unit and fix it with the fixing levers.
No.
1
2
3
4
Name
Feed unit (Left)
Feed unit (Right)
Roll media
Fixing lever
43
AP-75102, Rev. 2.0, 28/11/2007
User’s Guide – Osprey 75/102/130
Chapter 3: Basics
3.2.2 Using the media core braces.
Media core braces are developed to prevent the media cores to bend while printing. This could cause bad print
quality or paper slant.
From the moment the core is larger than 2050 mm, we recommend installing the brace. Do NOT install the
brace when the core is smaller than 2050 mm.
In the packaging box of the machine you will find two cores and two media core braces. There are already 3
spacers installed per brace with an outer diameter of 74 mm. In box 3/4 there are 6 spacers of 76 mm.
Please follow the instructions below to install and use the braces correctly.
Step 1 :
First check which spacer fits the best in the used core. If this one is not installed yet, remove the
installed one with a Hexagon Wrench 2 mm (in box 2/4) and install the correct one as shown below.
There is already a hole in the core in which the locking screw fits.
Step 2 :
Push the brace in the core. (Picture 1).
Be sure that the distance X is the same as Y (picture 2) and at least 75 mm.
No
1
2
3
4
5
Description
Roll Unit
Positioning Cone
Media Core Brace
Spacer
Core of minimum 2050 mm
44
AP-75102, Rev. 2.0, 28/11/2007
User’s Guide – Osprey 75/102/130
Chapter 3: Basics
3.2.3 Loading roll media
Be sure to read and understand the safety warnings before handling the printer.
Step 1 :
•
Switch ON the printer.
• Refer to “Switch ON/OFF the printer”
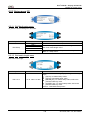
• The following message is displayed on the operation panel:
Notes
In the following conditions, follow "Menu setup on the operation panel" and set individual settings.
o
When using the winding unit: Set the winding unit setting to "ON" Refer to: “Winding unit menu”.
o
o
When not performing media detection during media initialization: Set media detection to "No".
Refer to: “Media detection menu”.
o
o
When using roll media such as the printable side is outside: Set the feed unit item to "Outside".
Refer to: “Feed unit menu”.
o
o
When using the roll media such as the printable side is inside: Set the feed unit item to "Inside".
Refer to: “Feed unit menu”.
Step 2 :
Verify the MEDIA SET lamp of the control panel is OFF.
Step 3 :
Press the [F2] key to raise the pressure roller.
• The MEDIA SET lamp will light orange.
• The following message is displayed on the operation panel:
Step 4 :
Open the front cover.
No.
1
Name
Front cover
45
AP-75102, Rev. 2.0, 28/11/2007
User’s Guide – Osprey 75/102/130
Chapter 3: Basics
Step 5 :
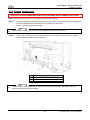
Install a media core brace in case you use media is wider than 2 meter. This to prevent the media
to bend.
Step 6 :
Lift up the tension roller at the backside of the product with your hand so the roll media is unwinded
automatically by the roll unit.
No.
1
2
Step 7 :
•
Name
Roll media
Tension roller
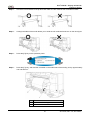
Insert the top of the media in the media feed slot after passing the roll media through the tension
roller system. See images below to see the path.
Notes
If there is a part not tightly wounded at the end of the roll media, wind it tightly again, then load it.
a. When using a roll media with the printable side on the outside of the roll.
No.
1
2
3
Name
Roll media
Tension roller system
Media feed slot
46
AP-75102, Rev. 2.0, 28/11/2007
User’s Guide – Osprey 75/102/130
Chapter 3: Basics
b. When using a roll media with the printable side on the inside of the roll.
•
Notes
Problems that occur due to usage of media with printable side inside are not guaranteed.
No.
1
2
3
Name
Roll media
Tension roller system
Media feed slot
Pull the roll media out for about 1 m from the front media feed slot, which is located inside the front
cover.
Step 8 :
No.
1
2
Step 9 :
•
Name
Front media feed slot
Roll media
Press the [F3] key on the control panel.
The following message is displayed on the operation panel:
47
AP-75102, Rev. 2.0, 28/11/2007
User’s Guide – Osprey 75/102/130
Chapter 3: Basics
Step 10 :
•
•
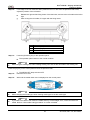
Rewind the roll media a little by pressing the [F1] key on the operation panel WHILE HOLDING the
top-edge of the media BY HAND, in order to eliminate any loose or slant. See image below.
Notes
If you do not hold the top edge of the media by hand while rewinding, the roll media will fall out from
the media feed slot to the rear side of the product.
Make sure not to set the right edge of the media over the media loading position. If doing so, it may
affect the printing quality.
No.
1
2
Step 11 :
Name
Roll media
Media loading position
Check if both sides of the roll media are at least 5 mm away from the pressure roller’s ends. See
image below.
No.
1
2
Name
Roll media
Pressure roller
48
AP-75102, Rev. 2.0, 28/11/2007
User’s Guide – Osprey 75/102/130
Chapter 3: Basics
Step 12 :
If one edge of the roll media has been positioned 5 mm or less from the pressure roller’s end,
adjust the position of the roll media:
•
•
Release the right and left fixing levers of the feed units, and move the roll media to the left or
right.
After moving the roll media, fix it again with the fixing levers.
No.
1
2
3
4
Step 13 :
Press the [CANCEL] key on the operation panel.
•
•
Name
Feed unit (Left)
Feed unit (Right)
Roll media
Fixing lever
The operation panel returns to the normal condition.
Notes
When using the winding unit, follow "Setting winding unit" and set the roll media to the winding unit.
Press the [F2] key on the control panel to lower the pressure roller.
Step 14 :
• The MEDIA SET lamp switches OFF.
Close the front cover.
Step 15 :
Wait until the media initial menu is displayed on the control panel.
•
•
Notes
When changing the media type, follow “Setting media type" to set the media type.
Notes
If you load a new tube of roll media, the media end may not be straight. If so, cut the end of the roll
media. Refer to: "Roll media cutting procedure" to cut the roll media.
49
AP-75102, Rev. 2.0, 28/11/2007
User’s Guide – Osprey 75/102/130
Chapter 3: Basics
3.2.4 Setting winding unit
Be sure to read and understand the safety warnings before handling the printer.
When using the winding unit, set it up according to the following procedure:
Step 1 :
•
Attach the media tube between the feed units of the winding unit, the same way you’ve attached
the roll media between the feed units of the unwinding unit at the rear.
Refer to: “Placement of the roll media”
Notes
When using the winding unit, always use the media tube attached to the product.
Step 2 :
Pull out the roll media (1) from the feed slot, and fix it with tape to the media tube so that the
leading edge is parallel with the media tube.
No.
1
2
3
•
Name
Roll media
Media tube
Cushioning roller
Notes
Install the media on the media tube so that the printing side faces outside. The media cannot be
wound if the printable side faces inside.
50
AP-75102, Rev. 2.0, 28/11/2007
User’s Guide – Osprey 75/102/130
Chapter 3: Basics
Step 3 :
Check the front and back of the product and make sure the media is free of wrinkles or slack.
Step 4 :
Cutting both sides of the media allows you to wind the roll media well as shown on the next figure.
Step 5 :
Press the [F3] key on the operation panel.
Step 6 :
Press the [F1] key, and wind the roll media on the media tube of the winding unit by approximately
one and half turn.
No.
1
2
Name
Media tube of winding unit
Roll media
51
AP-75102, Rev. 2.0, 28/11/2007
User’s Guide – Osprey 75/102/130
Chapter 3: Basics
3.2.5 Setting media type
Be sure to read and understand the safety warnings before handling the printer.
Step 1 :
•
Switch ON the printer.
Notes
Before setting the media type, verify the media is correctly installed and loaded. Refer to: “Loading roll
media” to load media.
Step 2 :
Press the keys on the control panel to change the settings.
• When changing the type of media: [F1] key
• When changing the setting of the winding unit: [F2] key
• When going over from media loading: [F3] key
• When changing the setting of feed unit: [F4] key
Setup items
Media type
Take-up OUT/IN/OFF
Key
F1
Parameters
User 1
User 2
User 3
User 4
User 5
User 6
User 7
User 8
User 9
User 10
User 11
User 12
User 13
User 14
User 15
User 16
Take-up OUT
Take-up IN
F2
Take-up Off
•
Lever Up/Down
F3
Send Out/In
F4
Lever Up
Lever Down
Send Out
Send In
Descriptions
Makes setting for media type used for test printing.
Sixteen settings of "User 1-16" can be set.
Refer to: “Menu setup on the operation panel”
Sets the operation of the winding unit.
• Take up OUT: Set when taking up the printable side
• outward
• Take up IN: Set when taking up the printable side
• inward
• Take up Off: Set when not using the winding unit
Switches between up and down motion of the pressure
lever. Use this when starting over from the media setup.
Sets the operation of the feed unit.
• Send Out: Set when using the roll media such as the
printable side is outside
• Send In: Set when using the roll media such as the
printable side is inside
Notes
Problems that occur due to usage of media with the printable side inside are not guaranteed.
52
AP-75102, Rev. 2.0, 28/11/2007
User’s Guide – Osprey 75/102/130
Chapter 3: Basics
Step 3 :
Press the [ENTER] key on the control panel.
•
•
•
The media type has been set.
The printer starts the media initialization.
Notes
In the media initial menu, the unit will move on to the media initial operation WITHOUT setting the
media type when :
o the [CANCEL] key of the control panel is pressed or
o Leaving the printer for 10 seconds without doing anything.
Step 4 :
Wait until the media initial operation has been finished and the printer is in normal status.
•
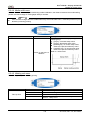
The media width is displayed on the operation panel for 5 seconds as shown below:
•
The setting media loading procedure has been completed.
3.2.6 Replacing roll media
Be sure to read and understand the safety warnings before handling the printer.
Replacement period
Replace roll media under the following conditions.
a. When the roll media loaded in the printer comes to an end
• The following message is displayed on the operation panel.
• If the media comes to an end while printing, the printer stops printing.
53
AP-75102, Rev. 2.0, 28/11/2007
User’s Guide – Osprey 75/102/130
Chapter 3: Basics
b. When you want to change the type of media
•
Notes
Do not repeat inserting or pulling out the roll media of the same type. Doing so may damage the paper
roll and cause idle operation.
Types
•
Notes
For types and details of roll media refer to: “Options/Supply list”
Replacement procedure
Step 1:
•
•
•
If the printer is switched ON, make
There is no printing operation being performed.
The control panel is in a normal status.
Make sure that the MEDIA SET lamp is lit (orange) on the operation panel.
Step 2:
Press the [F3] key on the operation panel.
The following message appears.
Step 3:
Press the [F3] key and wind up the roll media.
No.
1
Name
Roll media
54
AP-75102, Rev. 2.0, 28/11/2007
User’s Guide – Osprey 75/102/130
Chapter 3: Basics
Step 4:
Release the feed unit fixing lever at the rear right handed side. Remove the right feed unit from the
roll media, and set the roll media on the feed unit rails.
No.
1
2
3
Step 5:
Remove the roll media from the feed unit at the rear left, just as in the step 4.
No.
1
2
3
•
Name
Feed unit (Right)
Fixing lever
Roll media
Name
Feed unit (Left)
Fixing lever
Roll media
Notes
Refer to: "Media handling" for more details.
55
AP-75102, Rev. 2.0, 28/11/2007
User’s Guide – Osprey 75/102/130
Chapter 3: Basics
3.3 REFILLING THE INK AND JET WASH FLUID
Read the following information on when and how to refill the ink and the jet wash fluid.
(1) Refilling period
Refill the ink in the following cases
a. When the amount left in the main tank becomes low
• Printing will continue to be performed.
• Before the ink runs out, prepare the ink for refilling.
• The following message is displayed on the operation panel.
b. When the ink inside the main tank is run out
• Printing operation stops.
• Refill with new ink immediately.
• The following message is displayed on the operation panel.
•
Notes
When the ink runs out or is close to being empty, the colour of the ink that needs refilling will be
indicated as follows:
o
o
o
o
o
o
K: Black
C: Cyan
c: Light Cyan
M: Magenta
m: Light Magenta
Y: Yellow
•
After the message "Near End" has been displayed on the operation panel, about 6m2(66.7ft2) (When
"Quality" in the setup menu is set to 360×720dpi) of printing is possible, until the ink runs out.
•
Even when the "No Ink" is displayed at the control panel, there may be a small amount of ink left in the
main tank.
56
AP-75102, Rev. 2.0, 28/11/2007
User’s Guide – Osprey 75/102/130
Chapter 3: Basics
Refill the jet wash fluid when the following occurs.
a. When the jet wash fluid inside the main tank is run out
• Printing will continue to be performed.
• Refill the new jet wash fluid immediately.
• The following message is displayed on the operation panel.
(2) Types
•
Notes
Use MUTOH recommended ink only.
o
o
o
•
The printer is designed for use with genuine ink cartridges. If you do not use genuine products,
Print outs may become faint and the printer will not be able to detect the end of ink.
Problems caused by using ink other than the recommended will void the warranty.
Refer to the following for the types and details of ink and the ink jet wash fluid.
See “Options/Supply list”
(3) Refilling procedure
Follow the steps in "Filling the ink - jet wash fluid" to refill the ink.
•
Notes
If ink is refilled during printing, printing is resumed.
57
AP-75102, Rev. 2.0, 28/11/2007
User’s Guide – Osprey 75/102/130
Chapter 3: Basics
3.4 DISPOSAL OF WASTE FLUIDS
Be sure to read and understand the safety warnings before handling the printer.
(1) Disposal period
Dispose waste fluids during the following conditions:
a. After finishing printing operation
b. When the message "Waste Ink Tank Full" is displayed on the operation panel.
(2) Disposal method
Dispose the waste fluid according to the following procedure.
Step 1:
Verify that the printer is switched OFF.
Step 2:
Put an empty container such as a used supply ink bottle under the waste fluid valve.
No.
1
2
Name
Waste fluid valve
Empty container
58
AP-75102, Rev. 2.0, 28/11/2007
User’s Guide – Osprey 75/102/130
Chapter 3: Basics
Step 3:
Open the waste fluid valve, and transfer the waste fluid to the container.
Step 4:
Close the waste fluid valve securely.
Step 5:
Dispose the waste fluid as an industrial waste product.
59
AP-75102, Rev. 2.0, 28/11/2007
User’s Guide – Osprey 75/102/130
Chapter 3: Basics
3.5 TRANSFER AND TRANSPORTATION
3.5.1 Transferring the printer
(1) Before the transfer
Be sure to read and understand the safety warnings before handling the printer.
Step 1 :
Make sure that the printer is switched OFF.
Step 2 :
Dispose of the waste fluid.
Step 3 :
Disconnect the power cable and all other cables.
Step 4 :
Turn the following adjusters to the directions shown in the diagram to loosen.
• Stand: 4
• Winding unit: 2
• Feed unit: 2
Step 5 :
Transfer the printer.
•
Notes
The casters attached to the stand have been designed for transferring the printer short distances on a
surface in-house.
No.
1
2
3
4
Name
Adjuster
Stand
Winding unit
Feed unit
60
AP-75102, Rev. 2.0, 28/11/2007
User’s Guide – Osprey 75/102/130
Chapter 3: Basics
(2) After the transfer
Step 1 :
•
Notes
For more information on where to place the printer, refer to "Installation Manual".
Step 2 :
•
Perform nozzle checking to check if the printer head has clogged.
Notes
To perform the nozzle check, refer to "Nozzle Check".
Step 4 :
•
Connect the power cable and other cables.
Notes
For connecting cables, refer to:
“Connecting the power cable”
“Connecting the printer to your PC”
Step 3 :
•
After moving to the installation location, fix the product to the location.
Perform a fine adjustment of image quality.
Notes
To perform an adjustment of image quality, refer to "Alignment".
3.5.2 Transporting the printer
When you transport the printer, the printer should be repacked using the original box and packing materials, to
protect it from vibration or impact.
•
Notes
When you transport the printer, contact your local MUTOH dealer.
61
AP-75102, Rev. 2.0, 28/11/2007
User’s Guide – Osprey 75/102/130
Chapter 3: Basics
3.6 LONG-TERM STORAGE CLEANING
Be sure to read and understand the safety warnings before handling the printer.
Cleaning Period
When not using the unit for over 1 week, perform cleaning for long term storage.
Operational procedure
Step 1 :
Loosen the fixing screws for the 3-way valve cover.
Step 2 :
Remove the 3-way valve cover.
No.
1
2
Name
3-way valve cover
Screws to fix 3-way valve cover (2 pcs)
Step 3 :
Switch the unit ON.
Step 4 :
Follow the instructions in "Filling the ink - jet wash fluid" to refill the jet wash fluid.
Step 5 :
Follow the instructions in "Disposal of waste fluids" to empty the waste fluid tank.
Step 6 :
Follow the instructions in "Menu setup on the operation panel", and bring up the Long Save menu
on the control panel.
62
AP-75102, Rev. 2.0, 28/11/2007
User’s Guide – Osprey 75/102/130
Chapter 3: Basics
Step 7 :
•
Press the [F1] key to [F4] keys to select the print head to perform the long-term storage cleaning
process.
Notes
In the Long Save menu, selecting "ALL" is recommended. By selecting "ALL", the long-term storage
cleaning treatment is performed for all print heads one by one.
•
When "NO" is selected in the Long Save menu, the menu returns to the lower hierarchy without
performing the long term storage cleaning treatment.
•
Refer to "Long-term storage cleaning menu" for more details.
•
•
•
•
The printer starts the long-term storage cleaning treatment.
It takes about 25 minutes per colour of ink to operate the long-term storage cleaning treatment.
The following message is displayed on the operation panel.
Notes
In the [****] part of the message, the colour of the 3-way valve to be operated will be displayed.
Step 8 :
Switch the 3-way valve to the jet wash fluid side.
No.
1
Name
3-way valve
63
AP-75102, Rev. 2.0, 28/11/2007
User’s Guide – Osprey 75/102/130
Chapter 3: Basics
Press the [ENTER] key on the operation panel.
Step 9 :
•
•
•
The product starts washing the sub tank.
The following message is displayed on the operation panel.
•
After completing the injection of the jet wash fluid, the following message is displayed on the
operation panel.
Notes
In the [****] part of the message, the colour of the 3-way valve to be operated will be displayed.
Step 10 :
Switch the 3-way valve to the ink side.
No.
1
Step 11 :
Name
3-way valve
Press the [ENTER] key on the operation panel.
64
AP-75102, Rev. 2.0, 28/11/2007
User’s Guide – Osprey 75/102/130
Chapter 3: Basics
When "ALL" has been selected in Step 7 to 11 is repeated until the long-term storage cleaning
treatment has been completed for all print heads.
Step 12 :
•
•
•
When the long-term storage cleaning treatment has been completed for all print heads, the
operation panel returns to the normal status.
The following message is displayed on the operation panel.
Notes
In the [****] part of the message, the colour of finished long-term storage cleaning treatment will be
displayed.
Step 13 :
Follow the instructions in "Switching the power OFF" to power OFF.
Step 14 :
Attach the 3-way cock cover removed in the step 1 and step 2.
•
•
The long-term storage cleaning treatment is completed.
Notes
If the power is switched ON after the long-term storage cleaning treatment has been completed, the
printer starts the initial ink filling.
65
AP-75102, Rev. 2.0, 28/11/2007
User’s Guide – Osprey 75/102/130
Chapter 3: Basics
This page is intentionally left blank
66
AP-75102, Rev. 2.0, 28/11/2007
User’s Guide – Osprey 75/102/130
Chapter 4: Periodical maintenance
4 PERIODICAL MAINTENANCE
4.1
CLEANING THE PRINTER
68
4.1.1 Cleaning the outer case
68
4.1.2 Cleaning inside the printer
68
4.1.3 Cleaning of the print head surface
70
4.1.4 Replacing sponge for spitting box
71
4.1.5 Washing print head
72
4.2
DONE BY AN AUTHORIZED MUTOH TECHNICIAN
4.2.1 Replacing ink filter
76
76
67
AP-75102, Rev. 2.0, 28/11/2007
User’s Guide – Osprey 75/102/130
Chapter 4: Periodical Maintenance
4.1 CLEANING THE PRINTER
Be sure to read and understand the safety warnings before handling the printer.
You need to clean the printer periodically to keep it in best working condition.
4.1.1 Cleaning the outer case
Clean the outer case once a month with a soft, clean cloth.
4.1.2 Cleaning inside the printer
Clean the inside of the printer once a week.
Cleaning Procedure
Step 1 :
Open the front cover.
Step 2 :
Use a soft brush to carefully clean away any dust or dirt on the pressure roller.
•
Notes
Do not blow off media dust inside the printer using an air dusting machine. Doing so may cause noise
to occur from inside the printer.
No.
1
Name
Pressure roller
68
AP-75102, Rev. 2.0, 28/11/2007
User’s Guide – Osprey 75/102/130
Chapter 4: Periodical maintenance
Step 3 :
The platen and the media guide have to be cleaned with a soft damp cloth for any paper dust or
ink that has accumulated.
No.
1
2
Step 4 :
Name
Platen
Media guide
Soak the poly-knit wiper provided with the unit, and wipe off ink and other dirt from the waste fluid
tray.
No.
1
Name
Waste fluid tray
69
AP-75102, Rev. 2.0, 28/11/2007
User’s Guide – Osprey 75/102/130
Chapter 4: Periodical Maintenance
4.1.3 Cleaning of the print head surface
Be sure to read and understand the safety warnings before handling the printer.
(1) Cleaning period
Clean every day or after the completion of the operation.
(2) Cleaning Procedure
Step 1 :
Open the maintenance cover.
Step 2 :
Using the attached print head wiper, lightly wipe off the ink accumulated on the print head. Wipe
from the back of the printer toward yourself.
No.
1
2
Step 3 :
Name
Print head
Print head wiper
Close the maintenance cover.
Ensure that the cover is firmly fixed.
70
AP-75102, Rev. 2.0, 28/11/2007
User’s Guide – Osprey 75/102/130
Chapter 4: Periodical maintenance
4.1.4 Replacing sponge for spitting box
Be sure to read and understand the safety warnings before handling the printer.
Replace the sponge of the spitting box under the following conditions.
• When a sponge for spitting box hardened.
• When the media becomes dirty with the ink.
Types
Notes
For types and details of the sponge for spitting box, refer to “Options/Supply list”
Replacement procedure
Step 1 :
Power OFF the unit.
Step 2 :
Open the maintenance cover.
No.
1
Step 3 :
Name
Maintenance cover
Remove the four sponges of the spitting box with tweezers etc.
No.
1
2
Name
Sponge for spitting box
Tweezers
71
AP-75102, Rev. 2.0, 28/11/2007
User’s Guide – Osprey 75/102/130
Chapter 4: Periodical Maintenance
Step 4 :
Install four new sponges for the spitting box.
No.
1
2
Name
Flushing box
Sponge for flushing box
Step 5 :
Close the maintenance cover.
Step 6 :
The replacement of the sponge for flushing box has been completed.
4.1.5 Washing print head
Cleaning Period
If the condition of the print head does not recover when performing the head cleaning, perform the print head
washing.
Operational procedure
Step 1 :
Loosen the fixing screws for the 3-way valve cover.
No.
1
2
Name
3-way valve cover
Screws to fix 3-way valve cover (2 pcs)
Step 2 :
Remove the 3-way valve cover.
Step 3 :
Switch the unit ON.
Step 4 :
Follow the instructions in "Filling the ink - jet wash fluid" to refill the jet wash fluid.
72
AP-75102, Rev. 2.0, 28/11/2007
User’s Guide – Osprey 75/102/130
Chapter 4: Periodical maintenance
Step 5 :
Follow the instructions in "Disposal the waste fluids" to empty the waste fluid tank.
Step 6 :
Follow the instructions in "Menu setup on the operation panel", and bring up the print head
washing menu on the operation panel.
Step 7 :
Press the [F1] key to [F4] key to select the print head to perform the print head washing process.
Notes
In the Head wash menu, selecting "ALL" is recommended. By selecting "ALL", the print head washing
treatment successively is performed for all print heads one by one.
•
•
When "No" is selected in the Head wash menu, the menu returns to the previous hierarchy menu
without performing the print head washing treatment.
•
Refer to: “Head wash menu" for more details.
•
•
•
•
The product starts the print head washing treatment.
It takes about 5 to 10 minutes to operate the print head washing treatment.
The following message is displayed on the operation panel.
Notes
In the [****] part of the message, the colour of the 3-way valve to be operated will be displayed.
Step 8 :
Switch the 3-way valve to the jet wash fluid side.
No.
1
Name
3-way valve
73
AP-75102, Rev. 2.0, 28/11/2007
User’s Guide – Osprey 75/102/130
Chapter 4: Periodical Maintenance
Step 9 :
•
•
When pressing the [CANCEL] key during washing the print head;
o Washing print head is performed within 7 times: After washing the print head 7 times, the jet-wash
fluid is injected from the sub tank.
•
•
The product starts washing the print head.
The following message is displayed on the operation panel.
Notes
In the Print head washing treatment, washing print head is automatically repeated for 7 to 14 times.
•
•
Press the [ENTER] key on the operation panel.
After completed the injection of the jet wash fluid, the following message is displayed on the operation
panel.
Notes
In the [****] part of the message, the colour of the 3-way valve to be operated will be displayed.
Step 10 :
Switch the 3-way valve to the ink side.
No.
1
Step 11 :
Name
3-way valve
Press the [ENTER] key on the operation panel.
74
AP-75102, Rev. 2.0, 28/11/2007
User’s Guide – Osprey 75/102/130
Chapter 4: Periodical maintenance
Step 12 :
•
•
•
When "ALL" has been selected in the Step 5, Step 6 to 9 is repeated until the print head washing
treatment is completed for all print heads.
When the print head washing treatment has been completed for all print heads, the operation panel
returns to the normal condition.
The following message is displayed on the operation panel
Notes
In the [****] part of the message, the colour of the print head to be washed will be displayed.
Step 13 :
Follow the instructions in "Switching the power OFF" to power OFF.
Step 14 :
Set the 3-way valve cover removed in steps 1 and 2.
The print head washing treatment has been completed.
•
Notes
If the power ON after the print head washing treatment is completed, the product starts the initial ink
filling.
75
AP-75102, Rev. 2.0, 28/11/2007
User’s Guide – Osprey 75/102/130
Chapter 4: Periodical Maintenance
4.2 DONE BY AN AUTHORIZED MUTOH TECHNICIAN
4.2.1 Replacing ink filter
Replacement period
Replace the ink filter once a year.
Replacement procedure
The ink filters are replaced in a periodic inspection.
76
AP-75102, Rev. 2.0, 28/11/2007
User’s Guide – Osprey 75/102/130
Chapter 5: Preparations before printing
5 PREPARATIONS BEFORE PRINTING
5.1
USING MEDIA ........................................................................................................... 78
5.1.1 Media type .......................................................................................................... 78
5.1.2 Cautions on handling media ............................................................................... 78
5.1.3 Precaution on storing media ............................................................................... 79
5.1.4 The printing area................................................................................................. 79
5.1.5 Criteria for the media feed .................................................................................. 80
5.1.6 Media Feed Compensation (Distance Adjust)..................................................... 81
5.1.7 Installing media retainers .................................................................................... 83
5.1.8 Head cleaning before printing ............................................................................. 84
5.2
TESTPRINTING .......................................................................................................... 87
5.2.1 Setup List ............................................................................................................ 89
5.2.2 Nozzle Check...................................................................................................... 90
5.2.3 Alignment ............................................................................................................ 91
5.2.4 Palette................................................................................................................. 92
5.3
MEDIA FEED COMPENSATION (DISTANCE ADJUST) ...................................................... 93
5.4
PRINTING FLOW ........................................................................................................ 95
77
AP-75102, Rev. 2.0, 28/11/2007
User’s Guide – Osprey 75/102/130
Chapter 5: Preparations before printing
5.1 USING MEDIA
5.1.1 Media type
The type and quality of the media effects the printing results. Understand the description below and use the
appropriate media for your purpose.
•
•
•
•
Notes
For more information about the recommended media, contact your local MUTOH dealer.
Problems that occur due to use of non-recommended media are not guaranteed.
Notes
When using the recommended media, the setting values for the printing quality are set for each media
type.
When printing on media other than those specified, information regarding proper settings for the
media type and settings for the product can be found on the instructions for the media, or contact the
retailer of the media.
5.1.2 Cautions on handling media
•
Use the recommended media in an appropriate environment.
Be sure to read and understand the safety warnings before handling the printer.
Following are the temperature and humidity ranges appropriate for printing.
•
Do not use any of the following media.
o Media with crease, scar, tear, twist or media which tends to curl
o Welded media
•
The size of the recommended media can change at a fixed ratio according to the temperature changes of
the working environment. Before using the media, place the media in the working environment for at least
30 minutes, to have it match the temperature of the working area.
Printing before media is adjusted to the printing environment may cause media jams due to slippage or
creases. This also adversely affects the quality of printing.
•
•
Media has a printable side and a non-printable side. If you print on a non printable side, blurring or slight
touching may occur.
•
Do not touch the printable side of media. Moisture and/or oil from hands affect(s) the printing quality.
•
Do not leave the printer for a long time with media loaded. The media may curl resulting in misalignment of
media, media jams, or decreased printing quality. In practice, avoid this in winter, dry seasons, or during
final printing.
•
Do not lose the box or rapping bag for storing media.
78
AP-75102, Rev. 2.0, 28/11/2007
User’s Guide – Osprey 75/102/130
Chapter 5: Preparations before printing
5.1.3 Precaution on storing media
•
Notes
Store media away from high temperature, high humidity or direct sunlight.
•
Unused roll media must be removed from the scroller, rewound tightly, and stored in the original
wrapping bag and the box.
•
Do not wet media.
5.1.4 The printing area
Printing areas of each media with the printer are as shown below.
•
•
•
•
•
Notes
Printing margin C of the media feed direction is preset at the factory to 0mm as the initial value. To
change printing margin C, reset it by following the steps in "Menu setup on the operation panel".
Set the continuous printing item to "ON".
Refer to: “Joint printing menu”
Change the value in the continuous margin item.
Refer to: “Joint margin menu”
Printing margin A of the media feed direction becomes 0 mm automatically for following cases.
When the continuous printing has been set as "ON".
Refer to: “Joint printing menu”
79
AP-75102, Rev. 2.0, 28/11/2007
User’s Guide – Osprey 75/102/130
Chapter 5: Preparations before printing
5.1.5 Criteria for the media feed
The criteria for the media feed that can be used for this product are as follows.
Before using media, confirm the following evaluation items.
•
Notes
Among the following items, if following problems occurred, may not be warranted even if the
Maintenance contract has been concluded. (Repair may require expense.)
No.1 to 3, 6 to 8, 13, 14
•
Notes
Please refer to: "Menu setup on the operation panel" for details of the setup menu.
•
No.
1
2
3
4
5
6
7
Evaluation Item
Paper float, cockle,
friction
Anti static
Slant
Detect the end of
roll media.
Media sensor
Weight, Diameter,
Number of
rolling
Thickness
8
Rolling start of
cardboard
core
9
Condition of both
edges of
roll media
10
Roll direction
Evaluation Method
1. Set "High" for the print head height
menu of the operation panel.
2. Confirm the following operation.
• Perform no printing, media
feed only.
• Perform 4m printing by 200%
print.
1. Set following items for the Printing
mode menu of the operation panel.
• Printing quality:360dpi×180dpi
• Printing direction: Bi-direction
2. Perform a printing of one-roll
(min.20m).
1. Set following items for the Printing
mode menu on the operation
panel.
• Printing quality:360dpi×360dpi
• Printing direction: Uni-direction
2. Perform printing.
After Media setting, confirm the end of
roll media.
After Media setting, detect media.
Confirm media visually.
Confirm media visually.
Confirm media visually.
Confirm media visually.
Confirm media visually.
80
Criteria
• No Paper float, cockle, friction
• Or media should not make friction
with the print head nozzle.
No error printing, error feed, and
machine-stop.
Within 30m±0.1% with left/right edge of
the media as the baseline
No error for detection of the end of roll
media.
No error for media detection sensor.
• Max. 2600 mm
• External diameter: Max. 250 mm
• Weight: Max. 140kg
Within 0.08 mm-1.0 mm
• Media breakaway without
cardboard
• core lift
• No remains of adhesives on
media.
Align the edges equally.
Tolerance: +2.0 mm, -1.5 mm
• The printable side is outside.
• Printable side with inside will not
be guaranteed.
AP-75102, Rev. 2.0, 28/11/2007
User’s Guide – Osprey 75/102/130
Chapter 5: Preparations before printing
No.
11
Evaluation Item
Damage, wrinkle, stain,
foreign materials on
media
Evaluation Method
Confirm media visually.
12
Cardboard core I.D.
Confirm card board core visually.
13
Curl
Confirm media visually.
14
Scuffing
Confirm media visually.
Criteria
No damage, wrinkle, stain, and foreign
materials on media.
•
•
•
•
Diameter: 3". (tolerance:±3mm) •
Length: Max. 2640mm
Projection from the edge of roll
media:
o Right: Max. 25 mm
o Left: Max. 25 mm
• Full insertion of scroller to media
flange.
• No slipping
• No float by the curl when sticking
media to the media guide.
• No friction with the print head
nozzle during printing.
No scuffing on media surface and edge
face.
5.1.6 Media Feed Compensation (Distance Adjust)
Be sure to read and understand the safety warnings before handling the printer.
When used?
Depending on the thickness of the media, the media feed amount will have to change. If printing results show
following symptoms:
•
•
Overlapped printing images
White lines on printing image
Then, adjust the media feed compensation value with the following procedure.
Procedure:
Step 1:
•
•
Go to the ‘Media feed compensation’ menu on the operation panel by following "Menu setup on the
operation panel". See image below.
The ‘Media feed compensation’ menu is named ‘DistAdj.’ menu on the operation panel.
Refer to: “Printing by Media feed compensation menu” for more details about all the functions in the ‘Media
feed compensation’ menu.
81
AP-75102, Rev. 2.0, 28/11/2007
User’s Guide – Osprey 75/102/130
Chapter 5: Preparations before printing
Step 2:
Push the [F1] key on the operation panel to perform printing by media feed compensation.
Step 3:
When printing with media feed compensation has been finished, push the [CANCEL] key on the
operation panel.
Step 4:
Press the [F2] key of the control panel to change the media feed value.
Step 5:
Push the [F2] key or [F4] key on the operation panel to increase (+) or decrease (-) the media feed
value, using the print result, examples shown below.
No adjustment needed
Step 6:
•
Decrease media feed (-)
Increase media feed (+)
Push the [ENTER] key on the operation panel to save the adjusted value.
After setting, shift to the previous upper menu.
Step 7:
Repeat Step 2 to Step 7 until a good print result has been obtained.
82
AP-75102, Rev. 2.0, 28/11/2007
User’s Guide – Osprey 75/102/130
Chapter 5: Preparations before printing
5.1.7 Installing media retainers
Variations in quality and used conditions could cause the edges of the media to curl, resulting in damage to the
media by the print head surface. To prevent this, use the media retainers to reduce curling of the media.
Use the following procedure to install the media retainers.
Handling the media retainers:
When installing and removing the media retainer, handle it as shown in the figure below.
Mishandling the media retainer could result in bent metal parts that interfere with the print head.
No.
1
Name
Media retainer
Installing procedure:
Step 1:
Load the media so that the distance from the edge of the media to the media loading position is at
least 40 mm.
Refer to: “Loading roll media”
No.
1
2
Name
Roll media
Media loading position
83
AP-75102, Rev. 2.0, 28/11/2007
User’s Guide – Osprey 75/102/130
Chapter 5: Preparations before printing
Step 2:
Align the alignment line on the media retainers to the edge of the media with, and install the media
retainers on the platen as shown on the image below.
No.
1
2
3
4
•
Notes
When installing the media retainers, be sure that the magnet in the rear does not stick out from the
stainless steel part of the platen to prevent that the media retainers will come off and interfere with the
print head.
Step 3:
•
•
Name
Roll media
Media retainers
Alignment line
Platen
Make sure that the media retainers do not interfere with the media as it is fed through the printer.
Notes
If there is interference with the media as it is fed through the printer even after the media holder plate
has been installed, the media retainer should not be used.
When removing the media retainer, slide the plate on the platen for near side.
5.1.8 Head cleaning before printing
Be sure to read and understand the safety warnings before handling the printer.
When used?
Before printing, perform purge and head cleaning to clean the print head surfaces and the nozzles.
Procedure:
The procedure consists of 2 parts.
1. Perform a purge
Step 1 :
Switch ON the printer.
Step 2 :
Verify the product is in the normal status.
Step 3 :
Press the [F4] key of the control panel. See below.
84
AP-75102, Rev. 2.0, 28/11/2007
User’s Guide – Osprey 75/102/130
Chapter 5: Preparations before printing
Step 4 :
Press the following keys on the control panel to change the settings :
• [F1] key: changing the ink colour
• [F2] key: changing the purge Mode
Notes
•
The factory default settings (initial values) are set as follows.
o Ink Colour: All
o Purge mode: Normal
•
Normally, there is no need to change the settings.
•
For details on the settings, refer to "Head cleaning".
Step 5 :
•
Press the [ENTER] key on the control panel.
• The settings are confirmed.
• The unit will start the purge process.
• Following message appears:
Notes
When the [CANCEL] key on the control panel is pressed in the purge menu, the unit will return to
normal status without performing the purge process.
Step 6 :
Wait until the purge process is completed for all print heads and the control panel has returned to
the normal status.
85
AP-75102, Rev. 2.0, 28/11/2007
User’s Guide – Osprey 75/102/130
Chapter 5: Preparations before printing
2. Wipe the heads
Step 1 :
Open the maintenance cover.
Step 2 :
Put the purge plate down the purge stand.
No.
1
Step 3 :
Lightly wipe off the ink accumulated on the print head using the attached print head wiper. Wipe
from the back to the front of the head surface.
No.
1
2
•
Name
Purge plate
Name
Print head
Print head wiper
Notes
All print head surfaces should be wiped off, even after purging 1 colour only. Otherwise, ink may drip
from the print head at which purging was not performed.
Step 4 :
Lift the purge plate to fix it.
Step 5 :
Close the maintenance cover; ensure that the cover has been firmly fixed.
86
AP-75102, Rev. 2.0, 28/11/2007
User’s Guide – Osprey 75/102/130
Chapter 5: Preparations before printing
5.2 TESTPRINTING
Follow the steps below to do a test print to confirm that your printer operates correctly.
Step 1 :
Switch ON the printer and set media.
Refer to “Switching the printer ON/OFF” and “Setting media type”
Step 2 :
Verify that the product is in normal status.
Step 3 :
Press the [MENU▲] key or [MENU▼] key on the operation panel.
•
Step 4 :
The screen shows the Setup Menu:
Press the [F2] key on the control panel.
•
The screen shows the ‘TestPrint (1/4)’ menu:
•
To go to the next TestPrint menu’s, press the [MENU▲] key or [MENU▼] key on the operation
panel.
87
AP-75102, Rev. 2.0, 28/11/2007
User’s Guide – Osprey 75/102/130
Chapter 5: Preparations before printing
Step 5 :
Select an item among the following and press the appropriate key, from [F1] key to [F4] key.
Setup items
Parameters
Setup
SetupALL
Test Print (1/4)
Nozzle Chk 1
Nozzle Chk 2
Uni-Qlty 1
Uni-Qlty 2
Test Print (2/4)
Uni-Spd 1
Uni-Spd 2
Bi-Qlty 1
Bi-Qlty 2
Test Print (3/4)
Bi-Spd 1
Bi-Spd 2
Test Print (4/4)
Palette
Descriptions
Perform Setup List printing.
Refer to: “Setup List”
Perform Setup list, the User Paper list, and the Print Mode
list printing.
Refer to: “Setup List”
Perform Nozzle check 1 (horizontal line) pattern printing.
Refer to: “Nozzle Check”
Perform Nozzle check 2 (step line) pattern printing.
Use this function when it is difficult to check if there is any
clogging of nozzles, missing dots, or faint printing by using
Nozzle check 1 pattern.
Refer to: “Palette”
To print an adjust pattern in quality mode, unidirectionalsingle path.
Refer to: “Alignment”
To print an adjust pattern in quality mode, unidirectionaldouble path.
Refer to: “Alignment”
To print an adjust pattern in speed mode, unidirectionalsingle path.
Refer to: “Alignment”
To print an adjust pattern in speed mode, unidirectionaldouble path.
Refer to: “Alignment”
To print an adjust pattern in quality mode, Bidirectional-single
path.
Refer to: “Alignment”
To print an adjust pattern in quality mode, Bidirectionaldouble path.
Refer to: “Alignment”
To print an adjust pattern in speed mode, Bidirectional-single
path.
Refer to: “Alignment”
To print an adjust pattern in speed mode, Bidirectionaldouble path.
Refer to: “Alignment”
Perform Palette printing
Step 6 :
Printing the selected item.
Step 7 :
Wait until printing is finished and the printer has been returned to the normal status.
88
AP-75102, Rev. 2.0, 28/11/2007
User’s Guide – Osprey 75/102/130
Chapter 5: Preparations before printing
5.2.1 Setup List
Use this function to check the current status of the printer.
•
•
Notes
Only when “Setup ALL” is selected, User Paper list and Print mode list are printed.
For printing, refer to “Testprinting”.
89
AP-75102, Rev. 2.0, 28/11/2007
User’s Guide – Osprey 75/102/130
Chapter 5: Preparations before printing
5.2.2 Nozzle Check
Be sure to read and understand the safety warnings before handling the printer.
Use this function to check if there is any clogging of the nozzles, missing dots, or faint printing.
•
•
Notes
If printing quality declines, or if missing dots are evident after the nozzle check, the print heads need
to be cleaned.
Refer to: "Head cleaning" to perform head cleaning.
After finishing the head cleaning, perform the nozzle check again.
•
Notes
For printing, refer to “Testprinting”.
•
•
Nozzle Check 1
•
Nozzle Check 2
90
AP-75102, Rev. 2.0, 28/11/2007
User’s Guide – Osprey 75/102/130
Chapter 5: Preparations before printing
5.2.3 Alignment
Be sure to read and understand the safety warnings before handling the printer.
When used?
Use this function to adjust the print quality for best results.
Notes
The print quality of your printer is pre-adjusted when it is shipped. Use this function when the
installation environment of the printer or media type has been changed and print quality declines.
•
Notes
For printing, refer to “Testprinting”.
•
Procedure:
•
Switch ON the printer and set the media.
•
Print on adjustment pattern to adjust printing to align according to “Testprinting”.
•
Determine the line number (1 to 7) in which the printed line has the best quality. In image below, this is
line no. 4 for all heads (A to B).
•
Press either the [F2] key or [F4] key to select the number for the line chosen in the previous step.
(example below shows display for head A)
•
Press the [ENTER] key on the operation panel to register the “Head” setting value.
Repeat Steps 3 to 5 for heads B to F.
91
AP-75102, Rev. 2.0, 28/11/2007
User’s Guide – Osprey 75/102/130
Chapter 5: Preparations before printing
5.2.4 Palette
This is used when comparing the pen colour setting of the computer and the drawn colour of the product.
•
Notes
For printing, refer to “Testprinting”.
92
AP-75102, Rev. 2.0, 28/11/2007
User’s Guide – Osprey 75/102/130
Chapter 5: Preparations before printing
5.3 MEDIA FEED COMPENSATION (DISTANCE ADJUST)
Be sure to read and understand the safety warnings before handling the printer.
When used?
Depending on the thickness of the media, the media feed amount will have to change. If printing results show
following symptoms:
•
•
Overlapped printing images
White lines on printing image
Then, adjust the media feed compensation value with the following procedure.
Procedure:
Step 1 :
•
•
Go to the ‘Media feed compensation’ menu on the operation panel by following "Menu setup on the
operation panel". See image below.
The ‘Media feed compensation’ menu is named ‘DistAdj.’ menu on the operation panel.
Refer to: “Printing by Media feed compensation menu” for more details about all the functions in the ‘Media
feed compensation’ menu.
Step 2 :
Push the [F1] key on the operation panel to perform printing by media feed compensation.
Step 3 :
When printing with media feed compensation has been finished, push the [CANCEL] key on the
operation panel.
Step 4 :
Press the [F2] key of the control panel to change the media feed value.
93
AP-75102, Rev. 2.0, 28/11/2007
User’s Guide – Osprey 75/102/130
Chapter 5: Preparations before printing
Step 5 :
Push the [F2] key or [F4] key on the operation panel to increase (+) or decrease (-) the media feed
value, using the print result, examples shown below.
No adjustment needed
Step 6 :
•
Decrease media feed (-)
Increase media feed (+)
Push the [ENTER] key on the operation panel to save the adjusted value.
After setting, shift to the previous upper menu.
Step 7 :
Repeat Step 2 to Step 7 until a good print result has been obtained.
94
AP-75102, Rev. 2.0, 28/11/2007
User’s Guide – Osprey 75/102/130
Chapter 5: Preparations before printing
5.4 PRINTING FLOW
The following chart illustrates the procedure for drawing with the printer. Refer to each item as necessary.
1. Make the printing data
Make the printing data using application software (RIP).
↓
2. Switch ON the printer and load media into the printer.
Refer to: “Media handling”
Refer to: “Using media”
↓
3. Perform head cleaning before printing.
Refer to: “Head cleaning before printing”
↓
4. Make the preference setting for printing with the printer.
Refer to: “Menu setup on the operation panel”
↓
5. Start printing.
Refer to: “Operating from the operation panel”
↓
6. Perform after-printing operations.
Refer to: “Operations after printing”
•
Notes
Do not open the front cover during printing. Doing so may stop the printer to print.
Though the printer resumes printing after you close the front cover, the quality of printing cannot be
guaranteed.
95
AP-75102, Rev. 2.0, 28/11/2007
User’s Guide – Osprey 75/102/130
Chapter 5: Preparations before printing
This page is intentionally left blank
96
AP-75102, Rev. 2.0, 28/11/2007
User’s Guide – Osprey 75/102/130
Chapter 6: Printer menu
6 PRINTER MENU
6.1
HOW TO WORK IN THE MENU
6.1.1 Main screen
6.1.2 Menu screen
6.1.3 Changing between the screens
6.1.3.1 From the main menu to the menu screen
6.1.3.2 From the menu screen to the main screen.
100
100
100
101
101
101
6.2
OPERATION PANEL IN STANDBY MODE
6.2.1 [F1] – Cancel
6.2.2 [F2] - Operating the pressure rollers
6.2.3 [F3] – Winding the roll media
6.2.4 [F4] - Cleaning the heads
102
102
102
103
105
6.3
OPERATION PANEL DURING PRINTING
6.3.1 Parameter change
6.3.2 Heater
6.3.3 Media feed compensation
6.3.4 Changing Printing Mode
107
107
108
108
109
6.4
OPERATIONS AFTER PRINTING
6.4.1 Roll media cutting procedure
110
110
6.5
112
MENU OVERVIEW (1/5 – 5/5)
6.5.1 Setup menu 1/5
6.5.1.1 Origin setup menu
6.5.1.2 Test print menu
6.5.1.3 Media setup menu
6.5.1.4 Media type menu
6.5.1.5 User media menu
6.5.1.6 Ink Dry menu
6.5.1.7 Head Height menu
6.5.1.8 Stiff menu
6.5.1.9 Lever pressure menu
6.5.1.10 Platen heater menu
6.5.1.11 Drier menu
6.5.1.12 Prev. Stick menu
6.5.1.13 Media feed compensation menu
6.5.1.14 Printing by Media feed compensation menu
6.5.1.15 Change media feed compensation value menu
6.5.1.16 Print Unit menu
6.5.1.17 Print depth menu
6.5.1.18 Data size menu
6.5.1.19 PF size menu
6.5.1.20 CR size menu
6.5.1.21 Idle heat menu
6.5.1.22 Idle timeout menu
6.5.1.23 Media cut menu
97
114
114
115
116
116
117
118
118
119
119
119
120
120
121
122
122
123
123
124
124
125
125
126
126
AP-75102, Rev. 2.0, 28/11/2007
User’s Guide – Osprey 75/102/130
Chapter 6: Printer menu
6.5.1.24 Set review menu
127
6.5.2 Setup Menu 2/5
6.5.2.1 Printing mode menu
6.5.2.2 Printing mode setup menu
6.5.2.3 Printing quality menu
6.5.2.4 Interlace Setup menu
6.5.2.5 Priority menu
6.5.2.6 Printing direction menu
6.5.2.7 Repeat printing menu
6.5.2.8 Repeat times menu
6.5.2.9 Interval time menu
6.5.2.10 Effect setup menu
6.5.2.11 Command setup menu
6.5.2.12 Image resolution menu
6.5.2.13 Online time out menu
6.5.2.14 Layout setup menu
6.5.2.15 Joint printing menu
6.5.2.16 Joint margin menu
6.5.2.17 Function setup menu
6.5.2.18 CMY→K menu
6.5.2.19 Mirror menu
128
128
128
129
129
129
130
130
130
131
131
132
132
133
133
133
134
134
135
135
6.5.3 Setup menu 3/5
6.5.3.1 Roll Media setup menu
6.5.3.2 Roll media length menu
6.5.3.3 Centronics menu
6.5.3.4 Network setup menu
6.5.3.5 IP address menu
6.5.3.6 Subnet mask menu
6.5.3.7 Gateway menu
6.5.3.8 Backup menu
136
136
136
137
137
138
138
139
139
6.5.4 Setup menu 4/5
6.5.4.1 Utility menu
6.5.4.2 Error Display menu
6.5.4.3 Media detection menu
6.5.4.4 Media width menu
6.5.4.5 Winding unit menu
6.5.4.6 Feed unit menu
6.5.4.7 Negative pressure pump menu
6.5.4.8 Slant check menu
6.5.4.9 Flushing menu
6.5.4.10 Mode Print
6.5.4.11 File management setup menu
6.5.4.12 Write mode menu
6.5.4.13 Reprint menu
6.5.4.14 File delete menu
6.5.4.15 Re-name menu
6.5.4.16 Format menu
6.5.4.17 Free area menu
140
140
141
141
142
142
143
143
143
144
144
145
146
147
148
149
150
151
98
AP-75102, Rev. 2.0, 28/11/2007
User’s Guide – Osprey 75/102/130
Chapter 6: Printer menu
6.5.4.18
6.5.4.19
6.5.4.20
6.5.4.21
6.5.4.22
6.5.4.23
6.5.4.24
6.5.4.25
6.5.4.26
6.5.4.27
6.5.4.28
6.5.4.29
Initialize setup menu
All Initialize menu
Media setup Initialize menu
Printing mode initialize menu
Command setup Initialize menu
Layout setup Initialize menu
Function setup Initialize menu
Roll media setup Initialize menu
Centronics Initialize menu
Network Initialize menu
Utility Initialize menu
File management Initialize menu
6.5.5 Setup menu 5/5
6.5.5.1 Data dump menu
6.5.5.2 Head wash menu
6.5.5.3 Long-term storage cleaning menu
6.5.5.4 Maintenance status menu
6.5.5.5 Mode print menu
99
151
152
153
153
153
154
154
154
155
155
155
156
156
156
157
158
159
160
AP-75102, Rev. 2.0, 28/11/2007
User’s Guide – Osprey 75/102/130
Chapter 6: Printer menu
6.1 HOW TO WORK IN THE MENU
Please find below all necessary information on how to switch, select and cancel menu items.
6.1.1 Main screen
When powering ON the printer, it will (when no errors occur) start up in its main screen. The function of each
key is explained below.
No
1
2
3
4
5
6
7
Description
Displays the current status of the printer
Displays the function assigned to the [F1] key
Displays the function assigned to the [F2] key
Displays the function assigned to the [F3] key
Displays the function assigned to the [F4] key
Displays the currently set media type
Displays the approximate amount of remaining media in metre. However, the amount
is displayed only when either 3roll media 1” Roll media 2” or “Roll media 3” is selected
in the roll media setting menu.
Example
Ready to print
Cancel
Lever Up
Feed&Reel
Purge
User 1-8
30m
6.1.2 Menu screen
In the SetupMenu, changes can be made to the printer settings. The content displayed on the LCD monitor of
the operation panel is as follows
No
1
2
3
4
5
6
Description
Displays the setting menu name currently set
Displays the function assigned to the [F1] key
Displays the function assigned to the [F2] key
Displays the function assigned to the [F3] key
Displays the function assigned to the [F4] key
Displays the currently available functions of the [F1] key to the [F4] key or displays the
page status if there are multiple pages for the currently displayed setting menu.
100
Example
SetupMenu
OriginSet
TestPrint
MediaSet
SetReview
1/5
AP-75102, Rev. 2.0, 28/11/2007
User’s Guide – Osprey 75/102/130
Chapter 6: Printer menu
6.1.3 Changing between the screens
To change the printer status, follow the steps below.
6.1.3.1 From the main menu to the menu screen
Press either ▲ or ▼ on the operation panel when the printer is in the main screen to go to the menu screen.
6.1.3.2 From the menu screen to the main screen.
To switch from a menu screen to the main screen, following actions can be taken:
• Press the [CANCEL] key on the operation panel
• Leave the printer fro 3 minutes when the status is in the setting menu display.
101
AP-75102, Rev. 2.0, 28/11/2007
User’s Guide – Osprey 75/102/130
Chapter 6: Printer menu
6.2 OPERATION PANEL IN STANDBY MODE
This section describes functions operated on the operational panel when the printer is in the normal status.
6.2.1 [F1] – Cancel
When data is being received and you want to cancel this operation, press the [F1] key to cancel the transfer
Step 1 :
¾
Verify the following regarding the condition of the printer.
It is not currently printing
Status of the printer
Operation after the [F1] key is pressed
While printing
Stops printing and deletes data remaining in the printer.
While receiving/
converting
Deletes the data already received and converted, then deletes data from now on.
While waiting for the ink
drying time
Stops waiting for the ink drying time and discharges the media.
6.2.2 [F2] - Operating the pressure rollers
When you want to switch the up and down movement of the pressure rollers follow the steps below.
Step 1 :
¾
Press the [F4] key on the operation panel.
The printer works as follows.
Status of the printer
The pressure rollers have been lowered
The MEDIA SET lamp switches OFF.
The pressure rollers have been raised.
The MEDIA SET lamp switches ON (orange).
Operation after the [F4] key has been pressed
The pressure rollers are lifted
The MEDIA SET lamp will turn on (orange).
The pressure rollers are lowered.
The MEDIA SET lamp will turn off.
102
AP-75102, Rev. 2.0, 28/11/2007
User’s Guide – Osprey 75/102/130
Chapter 6: Printer menu
6.2.3 [F3] – Winding the roll media
Perform winding of the media according to the procedure below.
Step 1:
Verify that the printer is not printing
Step 2:
Press the [F3] key on the control panel. See below.
Step 3:
Press the appropriate key in the ‘Feed&Reel’ menu, press [F1] key to [F4] key or the down key to
shift to the second ‘Feed&Reel’ menu.
•
The printer works as follows:
Feed&Reel (1/2)
Feed&Reel (2/2)
Setup items
Parameters
F. Order
F. Reverse
Feed & Reel
Forward
Backward
R. Reverse
•
•
Descriptions
The winding unit rotates in
the advance direction.
The roll media will be wound
up by the winding unit.
The winding unit rotates in
the reverse direction.
The roll media will be
unrolled back out of the
winding unit.
Remarks
This function is displayed when
"ON" is selected in the Winding
unit menu.
Refer to: “Winding unit menu“
Feeds media forward.
This function is displayed when
the media is set.
Feeds media backward.
This function is displayed when
the media is set.
The feed unit rotates in the
reverse direction.
The roll media will be
unrolled back out of the
feed unit.
This function is displayed when
the pressure roller is up.
Notes
When selecting "R. Reverse" to rewind the roll media, not to over-rewind.
The scroller may come up from the winding unit and drop out.
Notes
The Operating directions of the winding unit and the roll media are shown below.
103
AP-75102, Rev. 2.0, 28/11/2007
User’s Guide – Osprey 75/102/130
Chapter 6: Printer menu
a. Front section
b. Rear section
104
AP-75102, Rev. 2.0, 28/11/2007
User’s Guide – Osprey 75/102/130
Chapter 6: Printer menu
6.2.4 [F4] - Cleaning the heads
Procedure:
Step 1:
Verify that the printer is at normal status.
Step 2:
Follow "Testprinting", and perform a nozzle check print.
Step 3:
Refer to the illustrations below to verify the condition of the print head.
a. Nozzle Check 1
b. Nozzle Check 2
105
AP-75102, Rev. 2.0, 28/11/2007
User’s Guide – Osprey 75/102/130
Chapter 6: Printer menu
Step 4:
•
•
Perform head cleaning according to "Head cleaning before printing".
Notes
For the settings on the purge menu, see table on the next page.
The < > in the table are default factory settings (initial values).
Setup items
Key name
Parameters
<All2>
All
Black
Ink colour
F1
Cyan
Light Cyan
Magenta
Light Magenta
Yellow
Economy
(All2 only)
<Normal>
Powerful
(All2 only)
Purge mode
F2
Continuous
–
Step 5:
•
Descriptions
The ink colour to be purged is selected.
• All2: Print head purge processes are
performed for each colour at the same
time. This item uses to stabilize condition of
the print head nozzle.
• All: Print head purge processes are
performed for each colour
• Other: Print head purge processes are
performed for the selected colour
The amount of ink discharged during the purge
process is selected.
• Economy: The ink is discharged less than
in the "Normal" mode.
• Normal: Recommended in this process.
• Powerful: The ink is discharged more than
in the "Normal" mode. Select when the print
head can not be recovered by performing
"Normal" mode.
• Continuous: Purge process is performed
individually for "Normal" mode.
[CANCEL] key: Finishes the purge process
when "Normal" mode is selected.
After head cleaning, perform nozzle check printing again, and check the condition of the head.
Notes
If the smearing or misprinting has not been solved after performing a cleaning one time, change the
ink colour and the purge mode to the following settings, then repeat the head cleaning.
o Ink colour: except "All2"
o Purge mode: "Normal"
•
If the smearing or misprinting has not been solved after performing a cleaning a few times, please
refer to: Troubleshooting", and take appropriate measures.
•
If printing problems are not corrected by increasing purge mode to "Powerful", clean off the print head
surface using a poly-knit wiper soaked in jet wash fluid, then perform head cleaning again.
106
AP-75102, Rev. 2.0, 28/11/2007
User’s Guide – Osprey 75/102/130
Chapter 6: Printer menu
6.3 OPERATION PANEL DURING PRINTING
When sending a file to your printer, following messages can be displayed.
6.3.1 Parameter change
Step 1 :
•
•
•
Verify that the printer is in the following operations.
Receiving data
Analysing data
Printing data
Step 2 :
Press the [F3] key on the operation panel to shift to the Parameter menu.
Step 3 :
Press the [F1] key or the [F4] key in the ‘Parameter’ menu on the operation panel.
•
The printer performs following operations:
Setup items
Parameters
Heater
Parameter
Dist Adj.
–
Step 4 :
Descriptions
Perform following operations.
• Checking heater temperature
• Setting each heater temperature
Change media feed compensation value.
•
[CANCEL] key: Returns to the normal status.
Adjust the parameters of the heaters or media feed. See below for further
explanation.
107
AP-75102, Rev. 2.0, 28/11/2007
User’s Guide – Osprey 75/102/130
Chapter 6: Printer menu
6.3.2 Heater
Checks and setups the heater temperature.
Setup items
Parameters
Temp Check
Platen
Heater
To check each heater temperature.
To change platen-heater temperature.
Drier
To change drier temperature.
Updateparam
Saves the set up parameter.
–
•
Descriptions
[CANCEL] key: Shifts to the previous hierarchy menu.
Notes
The changed parameters are available for the current printing, but the settings will be not saved. To
save the setting, be sure to perform the "Updateparam".
6.3.3 Media feed compensation
Changes the media feed compensation value.
Setup items
Parameters
Change
Dist Adj.
Updateparam
–
•
Descriptions
To change the media feed compensation value.
T o save the set up parameter.
[CANCEL] key: Shifts to the previous hierarchy menu.
Notes
The changed parameters are available for the current printing, but the settings will be not saved. To
save the settings, be sure to perform the "Updateparam".
108
AP-75102, Rev. 2.0, 28/11/2007
User’s Guide – Osprey 75/102/130
Chapter 6: Printer menu
6.3.4 Changing Printing Mode
When the product is at a normal condition, press the [ENTER]-key to change the setup of the Printing Mode.
Step 1:
Press the [ENTER] key on the control panel.
•
Step 2:
The printer will shift to the ‘Printing mode’ Setup menu.
Press the [F1] till [F4] keys to change Printing mode. See table below for further information.
Setup items
Key
name
Printing quality
InterLace Setup
Priority
F2
F3
Printing direction
Step 3:
F1
F4
Parameters
Descriptions
360dpi×180dpi
To set the printing quality to 360 dpi × 180 dpi
360dpi×360dpi
To set the printing quality to 360 dpi × 360 dpi
360dpi×720dpi
To set the printing quality to 360 dpi × 720 dpi
OFF
2 pass
Quality
preference
Speed
preference
To set the interlace method to OFF.
To set the interlace method to two path.
To set the priority to Quality preference.
To set the priority to Speed preference.
Uni Dir.
To set the printing direction to uni-direction.
Bi Dir.
To set the printing direction to bi-direction.
Press the [ENTER] key after completion of setup.
•
The setup has changed and the product shifts to the normal condition.
109
AP-75102, Rev. 2.0, 28/11/2007
User’s Guide – Osprey 75/102/130
Chapter 6: Printer menu
6.4 OPERATIONS AFTER PRINTING
6.4.1 Roll media cutting procedure
Be sure to read and understand the safety warnings before handling the printer.
After printing, the roll media will automatically advance to the media cut position.
The following message is displayed on the operation panel:
Cut the roll media according to the following procedures.
(1) When "Manual" has been selected in the media cut menu
Step 1:
Open the front cover.
Step 2:
Place a razor blade on the media cut groove on the platen, and cut the roll media.
Step 3:
Close the front cover.
Step 4:
•
Press the [ENTER] key of the control panel.
The unit enters the normal status.
110
AP-75102, Rev. 2.0, 28/11/2007
User’s Guide – Osprey 75/102/130
Chapter 6: Printer menu
(2) When "OFF" is selected in the media cut menu
Step 1:
•
•
•
Verify.
There is no printing operation being performed.
The control panel is in a normal status.
The control panel MEDIA SET lamp has to be unlit.
Step 2:
When altering the position where the roll media has to be cut, do so in the home position setup
menu in "Menu setup on the operation panel", and advance the roll media to the position that needs
to be cut.
Step 3:
Open the front cover.
Step 4:
Place a razor blade (3) on the media cut groove on the platen, and cut the roll media.
Step 5:
Close the front cover.
111
AP-75102, Rev. 2.0, 28/11/2007
User’s Guide – Osprey 75/102/130
Chapter 6: Printer menu
6.5 MENU OVERVIEW (1/5 – 5/5)
Follow the steps below to enter the menu settings.
Step 1 :
Make sure the printer is in the normal mode
Step 2 :
Press the [menu ▲] or [menu ▼] key
•
•
Notes
“Network menu” is displayed when the network interface board has been installed.
“File management” menu is displayed when the hard disk has been installed.
112
AP-75102, Rev. 2.0, 28/11/2007
User’s Guide – Osprey 75/102/130
Chapter 6: Printer menu
Setup items
Parameters
Origin Set
Test Print
Setup menu (1/5)
Media Set
Set Review
Print Mode
Command
Setup menu (2/5)
Layout
Function
Roll Setup
Centro.
Setup menu (3/5)
Network
Backup
Utility
Setup menu (4/5)
File Mng.
Initial.
Data Dump
Head Wash
Setup menu (5/5)
Long Save
Mainte.
Setup menu (1/5 to 5/5)
–
Descriptions
To set the start position (origin) for printing data.
Refer to: “Origin setup menu”
To perform Test print.
Refer to: “Test print menu”
To perform various settings for media.
Refer to: “Media setup menu”
To check the setup values for the printer.
Refer to: “Set review menu”
To perform various settings in the Printing mode.
Refer to: “Printing mode menu”
To perform various settings in printer commands.
Refer to: “Command setup menu”
Makes various settings on layout function.
Refer to: “Layout setup menu”
To perform various settings for processing of printing
data. Refer to: “Function setup menu”
To perform various settings for roll media.
Refer to: “Roll Media setup menu”
To set communication mode to Centronics interface.
Refer to: “Centronics menu”
To set the network interface IP address.
Refer to: “Network setup menu”
To backup the set parameters.
Refer to: “Backup setup menu”
Makes various advanced function settings.
Refer to: “Utility menu”
Makes various settings for the processing method of
the printing data sent from a computer to the installed
hard disk in the printer.
Refer to: “File management setup menu”
Returns parameters to the factory setting.
Refer to: “Initialize setup menu”
To perform dump printing for online function check.
Refer to: “Data dump menu”
To perform process for washing print head.
Refer to: “Head wash menu”
To perform process for Long-term storage cleaning.
Refer to: “Long-term storage cleaning” menu
To check the parts’ life cycle of the product.
Refer to: “Maintenance status” menu
[CANCEL] key: To cancel the setup menu, and to shift
to the normal condition.
113
AP-75102, Rev. 2.0, 28/11/2007
User’s Guide – Osprey 75/102/130
Chapter 6: Printer menu
6.5.1 Setup menu 1/5
6.5.1.1 Origin setup menu
Sets printing start position (origin) for printing data.
Set this when you want to re-print to blank area of the printed media by changing the layout of the printing data.
Setup items
Origin Set
Parameters
•
•
Descriptions
Change print head position and media feed
amount by operating the following keys.
• [F1] key: Increase setup value L
• [F2] key: Increase setup value W
• [F3] key: Decrease setup value L
• [F4] key: Decrease setup value W
L: Media feed value
W: Print head
movement value (Unit:
mm)
• [ENTER] key:
Determines the setup values.
The print head moves to drawing start point.
The following messages are displayed on the
operation panel.
Setup items
Parameters
Descriptions
Origin Set
Origin Position check
Confirm origin position and
push ENTER.
•
•
[ENTER] key: Determines the setup values.
The print head returns as before. The
operation panel returns to the normal status.
Notes
The print head automatically returns after none of the keys are pressed for a certain period (5 sec.)
while checking the origin position, to avoid that the print head is drying out.
114
AP-75102, Rev. 2.0, 28/11/2007
User’s Guide – Osprey 75/102/130
Chapter 6: Printer menu
6.5.1.2 Test print menu
Setup items
Parameters
Setup
Setup ALL
Test Print (1/4)
Nozzle Chk 1
Nozzle Chk 2
Setup items
Parameters
Uni-Qlty 1
Uni-Qlty 2
Test Print (2/4)
Uni-Spd 1
Uni-Spd 2
Bi-Qlty 1
Bi-Qlty 2
Test Print (3/4)
Bi-Spd 1
Bi-Spd 2
Test Print (4/4)
Palette
Test Print(1/4
~ 3/4)
-
Descriptions
To perform Setup Listprinting.
Refer to: “Setup List”
To perform Nozzle check 1 (horizontal line) pattern printing. Refer
to: “Nozzle Check”
To perform Nozzle check 2 (step line) pattern printing. Use this
function when it is difficult to check if there is any clogging of
nozzles, missing dots, or faint printing by using Nozzle check 1
pattern.
Refer to: “Nozzle Check”
To perform Palette printing.
Refer to: “Palette”
Descriptions
To print an adjustment pattern in quality mode, unidirectional-single path
Refer to: “Alignment”
To print an adjustment pattern in quality mode, unidirectional-double path
Refer to: “Alignment”
To print an adjustment pattern in speed mode, unidirectional-single path
Refer to: “Alignment”
To print an adjustment pattern in speed mode, unidirectional-double path.
Refer to: “Alignment”
To print an adjustment pattern in quality mode, bidirectional-single path
Refer to: “Alignment”
To print an adjustment pattern in quality mode, bidirectional-double path
Refer to: “Alignment”
To print an adjustment pattern in speed mode, bidirectional-single path
Refer to: “Alignment”
To print an adjustment pattern in speed mode, bidirectional-double path.
Refer to: “Alignment”
To perform Palette printing
Refer to: “Palette”
[CANCEL] key: To shift to the previous hierarchy menu.
Refer to: “Setup menu”
115
AP-75102, Rev. 2.0, 28/11/2007
User’s Guide – Osprey 75/102/130
Chapter 6: Printer menu
6.5.1.3 Media setup menu
Be sure to read and understand the safety warnings before handling the printer.
Performs various settings for media.
Setup items
Parameters
Media
Media Set
Media Cut
–
Descriptions
Makes setting for media type used for test printing.
Refer to: “Media type menu”
The method of cutting the media after printing is set here.
Refer to: “Media cut menu”
[CANCEL] key: To shift to the previous hierarchy menu.
Refer to: “Setup menu”
6.5.1.4 Media type menu
Makes setting for media type used for test printing.
Setup items
Media (1/4)
Media (1/4)
Media (3/4)
Media (4/4)
Media (1/4 to 4/4)
Parameters
User 1
User 2
User 3
User 4
User 5
User 6
User 7
User 8
User 9
User 10
User 11
User 12
User 13
User 14
User 15
User 16
–
Descriptions
Makes setting for media type used for test printing. For setup values of
printing operation, sixteen settings of "user media 1-16" can be set.
Refer to: “User media menu”
[CANCEL] key: shifts to the previous menu.Refer: “Media setup menu”
116
AP-75102, Rev. 2.0, 28/11/2007
User’s Guide – Osprey 75/102/130
Chapter 6: Printer menu
6.5.1.5 User media menu
Makes various settings on user defined media. In the User media menu, sixteen settings of "User 1" to "User
16" can be set.
•
•
Notes
If non-recommended media is used (user media), the following problems may occur.
o Media detection error
o Oblique, torn, and creased media
o Media jams
o Decrease in print quality due to blurring, missing, or smudging of ink
o End detection error of roll media, etc.
Problems caused by using non-recommended media will void the warranty. For more information,
contact your local MUTOH dealer.
Setup items
Parameters
Ink Dry Timer
Height
User 1 to 16 (1/3)
Stiffness
Lever Pressure
Heater
Drier
User 1 to 16 (2/3)
Prev. Stick
Media feed
compensation
Idle heat
User 1 to 16 (3/3)
Idle timeout
1 to 16 (1/3 to 3/3)
–
Descriptions
To set waiting period from the end of operation to the start of
next printing to dry ink on the printed media.
Refer to: “Ink Dry menu”
To set the distance (head height) from print head face to
media.
Refer to: “Head Height menu”
Makes the setting for the absorbing power of the media to the
printing board depending on the hardness of the media.
Refer to: “Stiff menu”
To set the pressure of the pressure lever.
See “Lever pressure menu”
To set the platen heater temperature during printing is set.
Refer to: “Platen heater menu”
To set the ink drier temperature during printing is set.
Refer to: “Drier menu”
To set the Stick prevention operation when start printing.
Refer to: “Prev. Stick menu”
To perform various settings for media feed compensation
Refer to: “Media feed compensation menu”
To set the idle heat temperature of the platen heater when
the product is on standby.
Refer to: “Idle heat menu”
To set the idle heat time of the platen heater when the
product is on standby
Refer to: “Idle timeout menu”
[CANCEL] key: To shift to the previous hierarchy menu. See
“Media type menu”
117
AP-75102, Rev. 2.0, 28/11/2007
User’s Guide – Osprey 75/102/130
Chapter 6: Printer menu
6.5.1.6 Ink Dry menu
Sets the waiting period from the end of the operation to the start of the next printing operation, to dry ink on the
printed media.
Setup items
Ink Dry Timer
Parameters
0 to <30 sec. > to 270
sec. to 60 min.
Descriptions
To change Ink Dry time by operating the following keys.
• [F2] key: Increases setup value.
• [F4] key: Decreases setup value.
• [ENTER] key: To confirm setup value, shifts to the
previous hierarchy menu.
• [CANCEL] key: To cancel setup value, shifts to the
previous hierarchy menu. User media menu
6.5.1.7 Head Height menu
Sets the distance (head height) between the print head face and the media.
Head height can be changed to different levels according to media thickness.
Setup items
Parameters
<2.5mm>
3.0mm
Head height (1/2)
3.5mm
4.0mm
Head height (2/2)
4.5mm
Head height (1/2 to 2/2)
–
Descriptions
Set the head height to 2.5 mm. when the media of
normal thickness is used.
Set the head height to 3.0 mm. when the thick media is
used.
Set the head height to 3.5 mm. when the further thick
media is used.
Set the head height to 4.0 mm when the media easily
causing warp is used. Use this height when the head
friction needs to be avoided in preference to the quality
of printing result. This function does not allow good
printing result.
Set this height the head can contact with media in the
4.0 mm setting. Use this height when the head friction
needs to be avoided in preference to the quality of
printing result. This function does not allow good printing
result.
After the setting, shifts to the previous hierarchy menu.
118
AP-75102, Rev. 2.0, 28/11/2007
User’s Guide – Osprey 75/102/130
Chapter 6: Printer menu
6.5.1.8 Stiff menu
Sets media sticking force to the media guide according to media stiffness.
Setup items
Parameters
Soft
<Normal> j
Stiffness
–
Descriptions
Setting for normal media.
Setting for soft media where media feeding errors and
media jams may occur.
After setting, shift to the previous hierarchy menu.
User media menu
6.5.1.9 Lever pressure menu
Be sure to read and understand the safety warnings before handling the printer.
Sets the pressure of the pressure lever. Select the setting according to the media type.
Setup items
Parameters
Weak (1)
<Normal (2)>
Lever pressure
Strong (3)
–
6.5.1.10
Descriptions
For sensitive media. The pressure is lower than normal.
For normal media.
For hefty media. The pressure is higher than normal to
improve the feeding accuracy.
After setting, shifts to the previous hierarchy menu.
Refer to: “User media menu”
Platen heater menu
Be sure to read and understand the safety warnings before handling the printer.
The platen heater temperature during printing is set.
Setup items
Parameters
Heater
OFF / 25 °C to <30 °C
> to 45 °C
Descriptions
To change Platen heater temperature by operating the
following keys.
• [F2] key: Increases setup value.
• [F4] key: Decreases setup value.
• [ENTER] key: To confirm the setup value, shifts to
the previous hierarchy menu.
• [CANCEL] key: To cancel the setup value, shifts to
the previous hierarchy menu.
Refer to: “User media menu”
119
AP-75102, Rev. 2.0, 28/11/2007
User’s Guide – Osprey 75/102/130
Chapter 6: Printer menu
6.5.1.11
Drier menu
Sets Ink Drier temperature during printing.
Setup items
Parameters
Drier
OFF / 50 °C to <60 °C
> to 70 °C
6.5.1.12
Descriptions
Change Ink Drier temperature by operating the following
keys.
• [F2] key: Increases setup value.
• [F4] key: Decreases setup value.
• [ENTER] key: To confirm the setup value, shifts to
the previous hierarchy menu.
• [CANCEL] key: To cancel the setup value, shifts to
the previous hierarchy menu.
Refer to: “User media menu “
Prev. Stick menu
Sets the Stick prevention operation when start printing.
Setup items
Prev. Stick
Parameters
<OFF>
ON
–
Descriptions
No stick prevention operation.
Performs stick prevention operation. To set media
sticking force to the media guide according to media
stiffness.
After setting, shifts to the previous hierarchy menu.
Refer to: “User media menu”
120
AP-75102, Rev. 2.0, 28/11/2007
User’s Guide – Osprey 75/102/130
Chapter 6: Printer menu
6.5.1.13
•
Media feed compensation menu
Notes
Refer to "Media feed compensation" for more details.
Performs various settings for media feed compensation
Setup items
Parameters
Printing
Change
Dist Adj. (1/2)
Print Unit
Depth
Dist Adj. (2/2)
Data Size
Dist Adj. (1/2 to 2/2)
–
Descriptions
To perform printing with media feed compensation.
Refer to: “Printing by Media feed compensation menu”
To change media feed compensation value.
Refer to: “Change media feed compensation value
menu”
To set the printing intervals when perform printing with
media feed compensation.
Refer to: “Print Unit menu”
To set the print depth during media feed compensation
printing.
Refer to: “Print depth menu”
Sets the print size per 1 colour of print pattern, during
media feed compensation printing.
Refer to: “Data size menu”
[CANCEL] key: Shifts to the previous hierarchy menu.
Refer to: “Media type menu”
121
AP-75102, Rev. 2.0, 28/11/2007
User’s Guide – Osprey 75/102/130
Chapter 6: Printer menu
6.5.1.14
Printing by Media feed compensation menu
Performs printing by media feed compensation.
Setup items
Parameters
Printing
Dist Adj.
–
6.5.1.15
Descriptions
Now printing by media feed compensation. Wait for a
while until printing has been finished.
After printing, shift to the previous hierarchy menu.
Refer to: “Media feed compensation menu”
• [CANCEL] key: Product performs following
operations.
• Printing by media feed compensation is cancelled.
• Eject media.
• Shifts to the previous hierarchy menu.
Refer to: “Media feed compensation menu”
Change media feed compensation value menu
Performs printing by media feed compensation.
Setup items
Parameters
Change
90.00% to <100.00%>
to 110.00%
Descriptions
To change media feed compensation value by operating
the following keys.
• [F2] key: Increases setup value.
• [F4] key: Decreases setup value.
• [ENTER] key: To confirm setup value, shifts to the
previous hierarchy menu.
• [CANCEL] key: To cancel setup value, shifts to the
previous hierarchy menu.
Refer to: “Media feed compensation menu”
122
AP-75102, Rev. 2.0, 28/11/2007
User’s Guide – Osprey 75/102/130
Chapter 6: Printer menu
6.5.1.16
Print Unit menu
Sets the printing intervals when perform printing by media feed compensation.
•
•
Notes
Refer to “Media feed compensation" for more details.
For setup values of the print area menu, all settings of user media (1-16) are used in common.
Setup items
Parameters
Carve 0.20
<Carve 0.05>
Print Unit menu
Carve 0.01
–
6.5.1.17
Descriptions
Performs printing by media feed compensation at 0.20%
steps of setup value from the current parameter (for
rough adjustment).
Performs printing by media feed compensation at 0.05%
steps of setup value from the current parameter.
Performs printing by media feed compensation at 0.01%
steps of setup value from the current parameter (for fine
adjustment).
After setting, shifts to the previous hierarchy menu.
Refer to: “Media feed compensation menu”
Print depth menu
Sets the print depth during media feed compensation printing.
•
Notes
Refer to “Media feed compensation" for more details.
Setup items
Depth
Parameters
<Deep>
Light
Both (PF)
Both (CR)
–
Descriptions
Prints with a dark colour.
Prints with a light colour.
Both print patterns of light and dark colours are printed
vertically next to each other.
Both print patterns of light and dark colours are printed
horizontally next to each other.
After setting, shifts to the previous hierarchy menu.
Refer to: “Media feed compensation menu”
123
AP-75102, Rev. 2.0, 28/11/2007
User’s Guide – Osprey 75/102/130
Chapter 6: Printer menu
6.5.1.18
Data size menu
Sets the print size per 1 colour of print pattern, during media feed compensation printing.
•
Notes
Refer to “Media feed compensation" for more details.
Setup items
Parameters
PF
Data Size
CR
–
6.5.1.19
Descriptions
Sets the print size in the vertical direction (PF: Media
feed direction)
Refer to: “PF size menu”
Sets the print size in the horizontal direction (CR:
Carriage movement direction)
Refer to: “CR size menu”
[CANCEL] key: Cancels the setup value, shifts to the
previous hierarchy menu.
Refer to: “Media feed compensation menu”
PF size menu
Sets the print size in the vertical direction (PF: Media feed direction) during media feed compensation printing.
Setup items
Parameters
PF
30mm to <85mm> to
200mm
Descriptions
To perform the following key operations to set the print
size in the PF direction.
• [F2] key: Increases setup value.
• [F4] key: Decreases setup value.
• [ENTER] key: To confirm the setup value, shifts to
the previous hierarchy menu.
• [CANCEL] key: To cancel the setup value, shifts to
the previous hierarchy menu.
Refer to: “Data size menu”
124
AP-75102, Rev. 2.0, 28/11/2007
User’s Guide – Osprey 75/102/130
Chapter 6: Printer menu
6.5.1.20
CR size menu
Setup items
Parameters
CR
15mm to <35mm> to
50mm
6.5.1.21
Descriptions
Perform the following key operations to set the print size in the CR
direction.
• [F2] key: Increases setup value.
• [F4] key: Decreases setup value.
• [ENTER] key: To confirm setup value, shifts to the previous
hierarchy menu.
• [CANCEL] key: To cancel setup value, shifts to the previous
hierarchy menu.
Refer to: “Data size menu”
Idle heat menu
When the product is on standby, sets the idle heat temperature of the platen heater and the Drier.
•
•
Notes
If set to "OFF" in the dryer menu, the product will not perform idle heating of the platen during standby.
Refer to “Drier menu”
If the settings of the idle heat menu are as follows, the platen heater / Drier will perform as shown
below.
o OFF: Idle heating of the platen heater / drier will not be performed. 30° to 70°: Idle heating is
performed at the set temperature.
o The temperature set in the idle heat menu cannot be set higher than the temperature set in the
dryer menu.
Setup items
Parameters
Idle heat
Heater / Drier
Descriptions
Operate the keys below to change the idle heat temperature.
• [F2] key: Increases setup value.
• [F4] key: Decreases setup value.
• [ENTER] key: To confirm setup value, shifts to the previous
hierarchy menu.
• [CANCEL] key: To cancel setup value, shifts to the previous
hierarchy menu.
Refer to: “Media type menu”
125
AP-75102, Rev. 2.0, 28/11/2007
User’s Guide – Osprey 75/102/130
Chapter 6: Printer menu
6.5.1.22
Idle timeout menu
When the product is on standby, sets the idle heat time of the platen heater / drier.
•
Notes
If the settings of the heat timeout menu are as follows, the platen heater will each operate as shown
below.
o OFF: After reaching the idle heat temperature set in the idle heat menu, the idle heat temperature is
maintained until start of printing.
o 1 to 10 minutes: After reaching the idle heat temperature set in the idle heat menu, when the set
time has passed, temperature is lowered to 30° and idle heating is continued.
o Refer to: “Idle heat menu”
Setup items
Parameters
Idle timeout
Heater / Drier
6.5.1.23
Descriptions
The idle heat time of the platen heater is changed with
the following key operations.
• [F2] key: Increases setup value.
• [F4] key: Decreases setup value.
• [ENTER] key: To confirm setup value, shifts to the
previous hierarchy menu.
• [CANCEL] key: To cancel setup value, shifts to the
previous hierarchy menu.
• Refer to: “Media type menu”
Media cut menu
Be sure to read and understand the safety warnings before handling the printer.
The method of cutting the media after printing is set here.
Setup items
Media Cut
Parameters
OFF
Manual
–
Descriptions
No media feed after printing.
Feed media to the media cut position after printing.
See “Roll media cutting procedure”
After setting, shifts to the previous hierarchy menu.
Refer to: “Media setup menu”
126
AP-75102, Rev. 2.0, 28/11/2007
User’s Guide – Osprey 75/102/130
Chapter 6: Printer menu
6.5.1.24
Set review menu
Display each setup value of the printer.
Setup items
Parameters
Paper Det.
Set review (1/5)
Paper Width
Heater Temp.
Set review (2/5)
Drier Temp.
Set review (3/5)
Flushing
Take Up Unit
Set review (4/5)
Load Unit
Set review (5/5)
Lever pressure
Set review (1/5 to 5/5)
–
Descriptions
Displays the setup value of media detection.
Refer to: “Media detection menu”
Displays the media width as follows.
• Setup value of Paper Det. is "ON": The width of the
media is displayed on the printer.
• Setup value of Paper Det. is "OFF": The width of the
media set in the section "Media width menu" is
displayed.
Refer to: “Media width menu”
Displays the value of the platen heater.
Refer to: “Platen heater menu”
Displays the value of the ink drier.
Refer to: “Drier menu”
Displays the value of the Left Flush.
Refer to: “Left flush menu”
Displays the value of the winding unit.
Refer to: “Winding unit menu”
Displays the value of the feed unit.
Refer to: “Feed unit menu”“
Displays the value of the lever pressure.
Refer to: “Lever pressure menu”
[CANCEL] key: Shifts to the previous hierarchy menu.
Refer to: “Setup menu”
127
AP-75102, Rev. 2.0, 28/11/2007
User’s Guide – Osprey 75/102/130
Chapter 6: Printer menu
6.5.2 Setup Menu 2/5
6.5.2.1 Printing mode menu
Performs various settings for printing mode.
Setup items
Parameters
Descriptions
Prn Mode 1
Prn Mode 2
Print Mode
Prn Mode 3
Prn Mode 4
–
For each setup value of this mode, 4 settings can be
chosen.
Refer to: “Printing mode setup menu”
[CANCEL] key: Shifts to the previous hierarchy menu.
Refer to: “Setup menu”
6.5.2.2 Printing mode setup menu
Perform various settings in the printing mode. For each setup value of printing mode, 4 settings can be chosen.
Setup items
Parameters
Condition
Priority
1/2
Prn Mode 1 to 4
Direction
Repeat Prn
2/2
Effect
–
Descriptions
To set printing quality.
Refer to: “Printing quality menu”
To set the printing speed while printing
Refer to: “Priority menu”
To set print head moving direction for printing.
Refer to: “Printing direction menu”
To perform various settings when printing is repeated
with one printing data.
Refer to: “Repeat printing menu”
Set up the effect menu
Refer to: “Effect menu”
[CANCEL] key: Shifts to the previous hierarchy menu.
Refer to: “Setup menu”
128
AP-75102, Rev. 2.0, 28/11/2007
User’s Guide – Osprey 75/102/130
Chapter 6: Printer menu
6.5.2.3 Printing quality menu
Sets printing quality in consideration with application, printing data and printing speed.
Setup items
Parameters
180×360dpi
Condition
<360×360dpi>
360×720dpi
–
Descriptions
The display changes to interlace setup items after the
print quality items settings have been finished.
Refer to: “InterLace Setup menu”
[CANCEL] key: Shifts to the previous hierarchy menu.
Refer to: “Printing mode setup menu”
6.5.2.4 Interlace Setup menu
Sets InterLace for printing.
Setup items
Interlace
Parameters
OFF
2 pass
–
Descriptions
No InterLace.
Ink is discharged two times per line.
After setting, shifts to the previous hierarchy menu.
Refer to: “Printing mode setup menu”
6.5.2.5 Priority menu
Sets printing speed while printing.
Setup items
Parameters
Quality
Priority
<Speed>
–
Descriptions
Performs in quality preference. Set when preferring
quality to printing speed.
Performs in speed preference. Set when preferring
printing speed to quality.
After setting, shifts to the previous hierarchy menu.
Refer to: “Printing mode setup menu”
129
AP-75102, Rev. 2.0, 28/11/2007
User’s Guide – Osprey 75/102/130
Chapter 6: Printer menu
6.5.2.6 Printing direction menu
Sets print head moving direction for printing.
Setup items
Direction
Parameters
Uni Dir.
Bi Dir.
–
Descriptions
Prints one-directionally
Prints bi-directionally.
After setting, shifts to the previous hierarchy menu.
Refer to: “Printing mode setup menu”
6.5.2.7 Repeat printing menu
Perform various settings to repeat print.
Setup items
Parameters
Count
Repeat Prn
Time
–
Descriptions
To set repeat times of printing with one printing line.
Refer to: “Repeat times menu”
To set interval time for repeat printing.
Refer to: “Interval time menu”
After setting, shifts to the previous hierarchy menu.
Refer to: “Printing mode setup menu”
6.5.2.8 Repeat times menu
Set repeat times of printing with one printing line.
Setup items
Parameters
Count
1 cnt to 4 cnt
Descriptions
To change repeat times by operating the following keys.
• [F2] key: Increases setup value.
• [F4] key: Decreases setup value.
• [ENTER] key: To confirm setup value, shifts to the
previous hierarchy menu.
• [CANCEL] key: To cancel setup value, shifts to the
previous hierarchy menu.
Refer to: “Repeat printing menu”
130
AP-75102, Rev. 2.0, 28/11/2007
User’s Guide – Osprey 75/102/130
Chapter 6: Printer menu
6.5.2.9 Interval time menu
Sets interval time for repeat printing.
Setup items
Parameters
Interval Time
<0.0 sec.> to 0.1 to
5.0 sec.
6.5.2.10
Descriptions
Change interval time by operating the following keys.
• [F2] key: Increases setup value.
• [F4] key: Decreases setup value.
• [ENTER] key: To confirm setup value, shifts to the
previous hierarchy menu.
• [CANCEL] key: To cancel setup value, shifts to the
previous hierarchy menu.
Refer to: “Repeat printing menu”
Effect setup menu
Setup items
Parameters
None 1
None 2
1/2
Wave 1
Wave 2
Fine&W1
Effect
Fine&W2
2/2
NozzleODD
NozzleEVN
Descriptions
• The wave mode is not used.
• If white lines or uneven print density appear in printed media in
“None1” set to “None2”
• The machine will print while using the wave.
• It will improve the printing quality.
• If white lines or uneven print density appear in printed media in
“Wave1” set to “Wave2”
• The machine will print at a slower speed while using wave.
• Set up this menu when improving the printing quality compared with
“Wave”
• If white lines or uneven print density appear in printed media in
“Fine&W1” set to “Fine&W2”
• Performs “None1” printing using one side of the nozzles of the print
head.
• Since only one side of the nozzles are used, printing speed becomes
half of “None1"
This mode is for engineering purposes only!
• Performs “None1” printing using the other side of the nozzles of the
print head that is used for “NozzleODD”.
• Since only one side of the nozzles are used, printing speed becomes
half of “None1”
This mode is for engineering purposes only!
131
AP-75102, Rev. 2.0, 28/11/2007
User’s Guide – Osprey 75/102/130
Chapter 6: Printer menu
6.5.2.11
Command setup menu
To perform various settings for printer commands.
Setup items
Parameters
Resolu.
Command
Online Timer
–
6.5.2.12
Descriptions
Makes settings for image resolution while printing with
image data.
Refer to: “Image resolution menu”
Makes settings for the time from the end of receiving
printing data from a computer to recognizing the end of
printing data.
Refer to: “Online time out menu”
[CANCEL] key: Shifts to the previous hierarchy menu.
Refer to: “Setup menu”
Image resolution menu
Makes settings for image resolution while printing with image data.
Setup items
Resolu. (1/2)
Resolu. (1/2)
Resolu. (1/2 to 2/2)
Parameters
180dpi
300dpi
<360dpi>
540dpi
600dpi
720dpi
–
Descriptions
Makes settings for image resolution while printing with
image data.
After setting, shifts to the previous hierarchy menu.
Refer to: “Command setup menu”
132
AP-75102, Rev. 2.0, 28/11/2007
User’s Guide – Osprey 75/102/130
Chapter 6: Printer menu
6.5.2.13
Online time out menu
Sets time from the moment of receiving termination of printing data sent by computer to the recognition of end
of printing data.
Setup items
Parameters
Online Timer
<OFF>/2sec to 30sec.
to 800sec.
6.5.2.14
Descriptions
Changes the Online time out time by operating the
following keys.
• [F2] key: Increases setup value.
• [F4] key: Decreases setup value.
• [ENTER] key: To confirm setup, shifts to the
previous hierarchy menu.
• [CANCEL] key: To cancel setup, shifts to the
previous hierarchy menu.
Refer to: “Command setup menu”
Layout setup menu
Makes various settings on layout function.
Setup items
Parameters
Joint
Layout
Joint margin
–
6.5.2.15
Joint printing menu
Setup items
Joint
Descriptions
Sets joint printing.
Refer to: “Joint printing menu”
In the joint printing item, when set to ’ON’, the media
feed direction margin for the second media and on is set
here.
Refer to: “Joint margin menu”
[CANCEL] key: Shifts to the previous hierarchy menu.
Refer to: “Setup menu”
Parameters
<OFF>
ON
–
Descriptions
Does not perform jointing print.
Performs jointing print
After setting, shifts to the previous hierarchy menu.
Refer to: “Layout setup menu”
133
AP-75102, Rev. 2.0, 28/11/2007
User’s Guide – Osprey 75/102/130
Chapter 6: Printer menu
6.5.2.16
Joint margin menu
In the joint printing item, when set to "ON", the media feed direction’ margin for the second media is set here.
Setup items
Parameters
Joint margin
<0mm> to 50mm
6.5.2.17
Descriptions
To change joint margin by operating the following keys.
• [F2] key: Increases setup value.
• [F4] key: Decreases setup value.
• [ENTER] key: To confirm setup, shifts to the previous
hierarchy menu.
• [CANCEL] key: To cancel setup, shifts to the
previous hierarchy menu.
Refer to: “Layout setup menu”
Function setup menu
To perform various settings for processing of printing data.
Setup items
Parameters
CMY→K
Function
Mirror
–
Descriptions
Makes settings for printing method to present black.
Refer to: “CMY→K menu”
Set this to print reversed printing data.
Refer to: “Mirror menu”
[CANCEL] key: Shifts to the previous hierarchy menu.
Refer to: “Setup menu”
134
AP-75102, Rev. 2.0, 28/11/2007
User’s Guide – Osprey 75/102/130
Chapter 6: Printer menu
6.5.2.18
CMY→K menu
Makes settings for printing method to present black.
Setup items
CMY→K
Parameters
<No>
Yes
–
6.5.2.19
Descriptions
Use CMY (colour) ink and K (black) ink together.
Always use K (black) ink.
After setting, shifts to the previous hierarchy menu.
Refer to: “Function setup menu”
Mirror menu
Sets this to print reversed printing data.
Setup items
Mirror
Parameters
<OFF>
Descriptions
No reversal of printing data.
Y ON
–
After setting, shifts to the previous hierarchy menu.
Refer to: “Function setup menu”
135
AP-75102, Rev. 2.0, 28/11/2007
User’s Guide – Osprey 75/102/130
Chapter 6: Printer menu
6.5.3 Setup menu 3/5
6.5.3.1 Roll Media setup menu
To perform various settings for roll media.
Setup items
Roll Setup
Parameters
Disable
Roll 1
Roll 2
Roll 3
–
Descriptions
Set this when roll media setup is not used.
For each setup value of roll media, 3 settings can be set.
See “Roll media length menu”
[CANCEL] key: Shifts to the previous hierarchy menu.
Refer to: “Setup menu”
6.5.3.2 Roll media length menu
Sets roll media length.
Setup items
Parameters
Roll 1 to 3
1m to <30m> to 99m
Descriptions
Change the roll media length by operating the following
keys.
• [F2] key: Increases setup value.
• [F4] key: Decreases setup value.
• [ENTER] key: To confirm setup value, shift to the
previous hierarchy menu.
• [CANCEL] key: To cancel setup value, shift to the
previous hierarchy menu.
Refer to: “Roll Media setup menu”
136
AP-75102, Rev. 2.0, 28/11/2007
User’s Guide – Osprey 75/102/130
Chapter 6: Printer menu
6.5.3.3 Centronics menu
Be sure to read and understand the safety warnings before handling the printer.
Sets communication mode to Centronics interface.
Setup items
Centro.
Parameters
Centro.
<Bi Centro.>
–
Descriptions
To set communication mode to Centronics mode.
To set communication mode to Bi-Centronics mode.
After setting, shifts to the previous hierarchy menu.
Refer to: “Setup menu”
6.5.3.4 Network setup menu
Sets the network interface.
•
Notes
Be sure to consult the network administrator before changing the network setup parameters.
Setup items
Parameters
IP ADDRESS
Subnet mask
Network
Gateway
–
Descriptions
To set the product IP address.
Refer to: “IP address menu”
To set the product subnet mask.
Refer to: “Setup menu”
To set the IP address of the connected gateway. Refer
to: “Gateway menu”
[CANCEL]: Shifts to the previous hierarchy menu.
Refer to: “Setup menu”
137
AP-75102, Rev. 2.0, 28/11/2007
User’s Guide – Osprey 75/102/130
Chapter 6: Printer menu
6.5.3.5 IP address menu
Sets the product IP address.
Setup items
Parameters
IP address
<000.000.000.000> to
255.255.255.255
Descriptions
To change the IP address, use the following keys.
• [F1] key: Shifts digit position of to-be-changed setup value to
the left.
• [F2] key: Increases setup value.
• [F3] key: Shifts digit position of to-be-changed setup value to
the right.
• [F4] key: Decreases setup value.
• [ENTER] key: To confirm setup value, shifts to the previous
hierarchy menu.
• [CANCEL] key: To cancel setup value, shifts to the previous
hierarchy menu.
Refer to: “Network setup menu”
6.5.3.6 Subnet mask menu
Sets the product subnet mask.
Setup items
Parameters
Subnet mask
000.000.000.000 to
<255.255.255.000> to
255.255.255.255
Descriptions
To change the subnet mask using the following keys.
• [F1] key: Shifts digit position of the to-be-changed setup
value to the left.
• [F2] key: Increases setup value.
• [F3] key: Shifts digit position of the to-be-changed setup
value to the right.
• [F4] key: Decreases setup value.
• [ENTER] key: To confirm setup value, shifts to the previous
hierarchy menu.
• [CANCEL] key: To cancel setup value, shifts to the previous
hierarchy menu.
Refer to: “Network setup menu”
138
AP-75102, Rev. 2.0, 28/11/2007
User’s Guide – Osprey 75/102/130
Chapter 6: Printer menu
6.5.3.7 Gateway menu
Sets the IP address of the gateway assigned to the product.
Setup items
Parameters
Gateway
<000.000.000.000>
to 255.255.255.255
Descriptions
To change the IP address, use the following keys.
• [F1] key: Shifts digit position of the to-be-changed setup
value to the left.
• [F2] key: Increases setup value.
• [F3] key: Shifts digit position of the to-be-changed setup
value to the right.
• [F4] key: Decreases setup value.
• [ENTER] key: To confirm setup value, shifts to the
previous hierarchy menu.
• [CANCEL] key: To cancel setup value, shifts to the
previous hierarchy menu.
Refer to: “Network setup menu”
6.5.3.8 Backup menu
Setup list
Backup
Descriptions
Press ENTER if you want to back up your parameters.
139
AP-75102, Rev. 2.0, 28/11/2007
User’s Guide – Osprey 75/102/130
Chapter 6: Printer menu
6.5.4 Setup menu 4/5
6.5.4.1 Utility menu
Setup items
Parameters
Error Disp.
Utility (1/2)
Paper Det.
Take Up Unit
Load Unit
Neg Press
Utility (2/2)
PaperSlant
Flushing
ModePrint
Utility (1/2 to 2/2)
–
Descriptions
To set display method to the operation panel when minor
error occurred.
Refer to: “Error Display menu”
When media is initialized, set to perform detection of
width and edge of the media.
Refer to: “Media detection menu”
To set the winding unit during printing.
Refer to: “Winding unit menu”
Sets the operation of the feeding unit.
Refer to: “Feed unit menu”
The operational pressure of the vacuum pump is set
here.
Refer to: “Negative pressure pump menu”
To set to detect a slant while feeding media.
Refer to: “Slant check menu”
To set the operation of the flushing.
Refer to: “flushing menu”
To set the operation of the mode print.
Refer to: “Mode print menu”
[CANCEL] key: Shifts to the previous hierarchy menu.
Refer to: “Setup menu”
140
AP-75102, Rev. 2.0, 28/11/2007
User’s Guide – Osprey 75/102/130
Chapter 6: Printer menu
6.5.4.2 Error Display menu
Sets display method to the operation panel when minor error occurred.
Setup items
Error Disp.
Parameters
<OFF>
ON
–
Descriptions
No Error Display.
To perform Error Display.
After setting, shift to the previous hierarchy menu.
Refer to: “Utility menu”
6.5.4.3 Media detection menu
When media is initialized, sets whether to perform detection of width and edge of the media.
Setup items
Parameters
<Yes>
Paper Det.
No
–
•
Descriptions
To perform media detection automatically. After setting,
shift to the previous hierarchy menu.
Refer to: “Utility menu”
Winding is not performed. When "OFF" is set, go to the
Media width setup menu.
Refer to: “Media width menu”
[CANCEL] key: Shifts to the previous hierarchy menu.
Refer to: “Utility menu”
Notes
When setup value is changed from "OFF" to "ON" in the media detection menu, go to the media initial
menu.
Refer to: “Setting media type”
141
AP-75102, Rev. 2.0, 28/11/2007
User’s Guide – Osprey 75/102/130
Chapter 6: Printer menu
6.5.4.4 Media width menu
When media detection is not performed during media initialization, the distance between the media loading
position and the left edge of media (paper width) is set here.
•
Notes
If the set value is larger than the media width set by the media width menu, media and product may be
tainted by ink during printing.
Setup items
Parameters
210mm to <841mm> to
2600mm
Descriptions
To change media width by operating the
following keys.
• [F2] key: Increases setup value.
• [F4] key: Decreases setup value.
• [ENTER] key: To confirm setup value,
shifts to the previous hierarchy menu.
• [CANCEL] key: To cancel setup value,
shifts to the previous hierarchy menu.
Refer to: “Utility menu”
6.5.4.5 Winding unit menu
Sets Winding unit operation during printing.
Setup items
Take Up Unit
Parameters
<OFF>
Outside
Inside
–
Descriptions
No use of winding unit.
Sets in outer winding.
Sets in inner winding.
After setting, shifts to the previous hierarchy menu.
Refer to: “Utility menu”
142
AP-75102, Rev. 2.0, 28/11/2007
User’s Guide – Osprey 75/102/130
Chapter 6: Printer menu
6.5.4.6 Feed unit menu
Sets the operation of the feeding unit.
Setup items
Load Unit
Parameters
Inside
<Outside>
–
Descriptions
Set when using roll media with the printable side inside.
Set when using roll media with the printable side outside.
After setting, shift to the previous hierarchy menu.
Refer to: “Utility menu”
6.5.4.7 Negative pressure pump menu
The operational pressure of the vacuum pump is set here.
•
•
Notes
Adjust the working pressure of the negative pressure pump when:
o Printing becomes smeared or misprinted and cannot be corrected by performing head cleaning:
increase the parameter
Ink drips from the print head face during ink replenishment: decrease the parameter “Text normal”.
Setup items
Neg Press
Parameters
-3.0kPa to <2.1kPa>
to -1.5kPa
Descriptions
Change the operating pressure of negative pressure
pump by operating the following keys.
• [F2] key: Increases setup value.
• [F4] key: Decreases setup value.
• [ENTER] key: To confirm setup value, shifts to the
previous hierarchy menu.
• [CANCEL] key: To cancel setup value, shifts to the
previous hierarchy menu.
Refer to: “Utility menu”
6.5.4.8 Slant check menu
Set to detect a slant while feeding media.
Setup items
Paper slant
Parameters
OFF
<ON>
–
Descriptions
No slant check.
To perform check.
[CANCEL] key: Shift to the previous hierarchy menu.
Refer to: “Utility menu”
143
AP-75102, Rev. 2.0, 28/11/2007
User’s Guide – Osprey 75/102/130
Chapter 6: Printer menu
6.5.4.9 Flushing menu
Sets the flushing operation.
When making data with long width print, and missing dots are evident.
Setup items
Parameters
<OFF>
Descriptions
Flushing is not performed.
To perform Flushing. When "ON" is set, go to the Shot
Count menu.
[CANCEL] key: Shifts to the previous hierarchy menu.
Refer to: “Utility menu”
ON
Flushing
–
6.5.4.10
Mode Print
Make this setting when you draw present printing condition after online printing.
Drawn printing conditions are as follows.
• Condition
• Interlace
• Priority
• Direction
Setup items
Mode print
Parameters
<OFF>
ON
–
144
Descriptions
No printing condition printing.
To perform condition printing.
[CANCEL]-key: Shifts to the previous
hierarchy menu.
Refer to: “Utility menu”
AP-75102, Rev. 2.0, 28/11/2007
User’s Guide – Osprey 75/102/130
Chapter 6: Printer menu
6.5.4.11
File management setup menu
Makes various settings for the processing method of the printing data sent from a computer to the installed hard
disk in the printer.
•
•
Notes
The items on the File Management menu are displayed if a hard disk has been installed on the
product.
To format the hard disk when installing the hard disk of another product.
Setup items
Parameters
Write Mode
Re-print
File Mng.(1/2)
Delete
Rename
Format
File Mng.(2/2)
Free Area
File Mng. (1/2 to 2/2)
–
Descriptions
To set writing method of printing data to the hard disk
and printing method.
Refer to: “Write mode menu”
To set this when you want to draw the printing data
saved in the hard disk.
Refer to: “Reprint menu”
To set this when you delete printing data saved in the
hard disk.
Refer to: “File delete menu”
To change file name for printing data saved in the hard
disk. Refer to: “Re-name menu “
To perform formatting of the hard disk.
Refer to: “Format menu”
Displays the current condition of the hard disk.
Refer to: “Free area menu”
[CANCEL] key: Shifts to the previous hierarchy menu.
Refer to: “Setup menu”
145
AP-75102, Rev. 2.0, 28/11/2007
User’s Guide – Osprey 75/102/130
Chapter 6: Printer menu
6.5.4.12
Write mode menu
Sets the writing method of the printing data.
•
•
•
Notes
Write mode menu is displayed if a hard disk has been installed on the product.
When writing printing data to the hard disk,
o Be sure to set the media in the tray.
Refer to: “Media handling”
o To change the printing start position, perform origin setup.
Refer to: “Origin setup menu”
o Printing data is processed according to the size of the set media and the printing start position.
If there is no media set in the tray, the printing data cannot be written.
146
AP-75102, Rev. 2.0, 28/11/2007
User’s Guide – Osprey 75/102/130
Chapter 6: Printer menu
6.5.4.13
Reprint menu
Sets following items when you want to draw printing data saved in the hard disk.
• File name
• Printing media number
•
•
Notes
Reprint menu is displayed if a hard disk is installed in the product.
When reprinting the printing data,
o Use media of the same size as when writing printing data.
The size of the printing data will be the same as the initial paper size, even if paper of a different
size has been set, and the printing will start from the same printing start position.
o Use a cartridge with the same colour and type of ink that will be used during the printing data write.
If an ink cartridge with differing colours or type is used, it will not print correctly.
Setup items
Parameters
File name
Number: 0 to 99
Re-print
Descriptions
• [F1] key: To select the file name with back feed way.
• [F3] key: To select the file name with forward feed
way. To select the file name to be printed by
operating the following keys.
To change the printing media number by operating the
following keys.
• [F2] key: Increases setup value.
• [F4] key: Decreases setup value.
• [ENTER] key: To confirm setup value.
o Product starts printing.
o After printing, shifts to normal condition.
–
o The unit enters the normal status
• [CANCEL]-key: To cancel setup value, shifts to the
previous hierarchy menu.
Refer to: “File management setup menu”
147
AP-75102, Rev. 2.0, 28/11/2007
User’s Guide – Osprey 75/102/130
Chapter 6: Printer menu
6.5.4.14
File delete menu
To set when you delete printing data saved in the hard disk.
•
•
Notes
File delete menu can be set when hard disks have been installed.
If you delete file by the File delete menu, you cannot retrieve that file again. If you want to use the
deleted file again, send the printing data to the hard disk of the product from the computer again.
Setup items
Delete
Parameters
File name
Descriptions
Select to-be-deleted file name by operating the following
keys.
• [F1] key: To select file name with back feed way.
• [F3] key: To select file name with forward feed way.
• [ENTER] key: To delete selected file, shifts to the
previous hierarchy menu.
• [CANCEL] key: To cancel setup value, shifts to the
previous hierarchy menu.
Refer to: “File management setup menu”
148
AP-75102, Rev. 2.0, 28/11/2007
User’s Guide – Osprey 75/102/130
Chapter 6: Printer menu
6.5.4.15
Re-name menu
To change file name for printing data saved in the hard disk.
Notes
•
Re-name menu can be set when hard disks have been installed.
Setup items
Parameters
Rename
Setup items
To-be-changed file name
File name
Descriptions
To select the to-be-changed file name by operating the
following keys.
• [F1] key: To select file name with back feed way.
• [F3] key: To select file name with forward feed way.
• [ENTER] key: To confirm setup value. The following
messages are displayed on the operation panel.
• [CANCEL] key: To cancel setup value, shifts to the
previous hierarchy menu.
Refer to: “File management setup menu”
Parameters
Descriptions
Select characters you want to change by operating
the following keys.
Characters you want to • [F1] key: To select characters you want to
change
change with back feed way.
• [F3] key: To select characters you want to
change with forward feed way.
Select the to-be-changed characters by operating the
following keys.
Characters you can use: • [F2] key: Selects the to-be-changed characters
with back feed way.
A-Z or 0-9
• [F4] key: Selects the to-be-changed characters
with forward feed way.
• [ENTER] key: To confirm setup value, shifts to
the previous hierarchy menu.
–
• [CANCEL] key: To cancel setup value, shifts to
the previous hierarchy menu.
Refer to: “File management setup menu”
149
AP-75102, Rev. 2.0, 28/11/2007
User’s Guide – Osprey 75/102/130
Chapter 6: Printer menu
6.5.4.16
Format menu
To format the hard disk.
•
•
Notes
Format menu can be set when hard disks are installed.
If formatting of the hard disk has been performed, all data saved in the hard disk will be deleted.
Setup items
Format
Parameters
No
–
OK
Setup items
Descriptions
Format is not performed.
[CANCEL] key: To cancel the setup value, shifts to the
previous hierarchy menu.
Perform formatting.
Parameters
•
•
•
Format
Format will be
performed.
OK?
Descriptions
[ENTER] key:
Product starts formatting.
The following messages are displayed on the operation
panel.
• After formatting, shifts to the previous hierarchy menu.
Refer to: “File management setup menu”
• [CANCEL] key:
• Formatting will not be performed.
• Shifts to the previous hierarchy menu.
Refer to: “File management setup menu”
150
AP-75102, Rev. 2.0, 28/11/2007
User’s Guide – Osprey 75/102/130
Chapter 6: Printer menu
6.5.4.17
Free area menu
Displays the current condition of the hard disk.
•
Notes
Free area menu can be set when the hard disk have been installed
Setup items
Parameters
Free Area
6.5.4.18
•
•
Input File
Free Area
Descriptions
The following items regarding the current status of the
hard disk is displayed.
• Input File: Displays the number of print data saved
on the Hard disk.
• Free Area: Shows the remaining space in the hard
disk.
• [ENTER] key: Shifts to the previous hierarchy menu.
Refer to: “File management setup menu”
Initialize setup menu
Returns parameters to the factory setting.
•
•
Notes
Network initialize menu is displayed when the network interface board has been installed.
File management initialize menu is displayed when the hard disk has been installed.
151
AP-75102, Rev. 2.0, 28/11/2007
User’s Guide – Osprey 75/102/130
Chapter 6: Printer menu
Setup items
Parameters
All
Media Set
Initialize (1/3)
Print Mode
Command
Layout
Function
Initialize (2/3)
Roll Setup
Centro.
Network
Initialize (3/3)
Utility
File Mng.
Initialize (1/3 to 3/3)
6.5.4.19
–
Descriptions
Returns all parameters to the factory setting.
Refer to: “Setup menu”
Returns parameters in the media setup menu to the
factory setting.
Refer to: “Media setup Initialize menu”
Returns parameters in the print mode menu to the factory
setting.
Refer to: “Printing mode initialize menu”
Returns parameters in the command setup menu to the
factory setting.
Refer to: “Command setup Initialize menu”
Returns parameters in the layout setup menu to the
factory setting.
Refer to: “Layout setup Initialize menu”
Returns parameters in the function setup menu to the
factory setting.
Refer to: “Function setup Initialize menu”
Returns parameters in the roll media setup menu to the
factory setting.
Refer to: “Roll media setup Initialize menu”
Returns parameters in the Centronics setup menu to the
factory setting.
Refer to: “Centronics Initialize menu”
Returns parameters in the network setup menu to the
factory setting.
Refer to: “Network Initialize menu”
Returns parameters in the utility setup menu to the
factory setting.
Refer to: “Utility Initialize menu”
The file management setup menu values are reset to
factory default settings.
Refer to: “File management Initialize menu”
[CANCEL] key: Shifts to the previous hierarchy menu.
Refer to: “Setup menu”
All Initialize menu
All values are set to the setup value (initial value) at the factory shipping.
Setup items
All
Parameters
No
OK
–
Descriptions
No initialization.
To perform initialization.
After setting, shifts to the previous hierarchy menu.
Refer to: “Initialize setup menu”
152
AP-75102, Rev. 2.0, 28/11/2007
User’s Guide – Osprey 75/102/130
Chapter 6: Printer menu
6.5.4.20
Media setup Initialize menu
Setup of Media setup menu are set to the setup value (initial value) at the factory shipping.
Setup items
Media Set
Parameters
No
OK
–
6.5.4.21
Descriptions
No initialization.
To perform initialization.
After setting, shifts to the previous hierarchy menu.
Refer to: “Initialize setup menu”
Printing mode initialize menu
Setup of printing mode menu are set to the setup value (initial value) at the factory shipping.
Setup items
Parameters
Printing Mode
No
No initialization.
OK
To perform initialization.
–
6.5.4.22
Descriptions
After setting, shifts to the previous hierarchy menu.
Refer to: “Initialize setup menu”
Command setup Initialize menu
Setup values of Command Setup menu are set to the setup value (initial value) at the factory shipping.
Setup items
Command
Parameters
Descriptions
No
No initialization.
OK
To perform initialization.
–
After setting, shifts to the previous hierarchy menu.
Refer to: “Initialize setup menu”
153
AP-75102, Rev. 2.0, 28/11/2007
User’s Guide – Osprey 75/102/130
Chapter 6: Printer menu
6.5.4.23
Layout setup Initialize menu
Values of the Layout setup menu are set to the setup value (initial value) at the factory shipping.
Setup items
Parameters
Layout
No
No initialization.
OK
To perform initialization.
–
6.5.4.24
Descriptions
After setting, shifts to the previous hierarchy menu.
Refer to: “Initialize setup menu“
Function setup Initialize menu
Values of the function setup menu are set to the setup value (initial value) at the factory shipping.
Setup items
Parameters
Function
No
No initialization.
OK
To perform initialization.
–
6.5.4.25
Descriptions
After setting, shifts to the previous hierarchy menu.
Refer to: “Initialize setup menu”
Roll media setup Initialize menu
Values of the roll Media setup menu are set to the setup value (initial value) at the factory shipping.
Setup items
Roll Setup
Parameters
Descriptions
No
No initialization.
OK
To perform initialization.
–
After setting, shifts to the previous hierarchy menu.
Refer to: “Initialize setup menu”
154
AP-75102, Rev. 2.0, 28/11/2007
User’s Guide – Osprey 75/102/130
Chapter 6: Printer menu
6.5.4.26
Centronics Initialize menu
Values of the Centronics menu are set to the setup value (initial value) at the factory shipping.
Setup items
Centro.
Parameters
No
No initialization.
OK
To perform initialization.
–
6.5.4.27
Descriptions
After setting, shifts to the previous hierarchy menu.
Refer to: “Initialize setup menu”
Network Initialize menu
Values of the Network menu are set to the setup value (initial value) at the factory shipping.
•
Notes
Network initialize menu is displayed when the network interface board has been installed.
Setup items
Network
Parameters
No initialization.
OK
To perform initialization.
–
6.5.4.28
Descriptions
No
After setting, shifts to the previous hierarchy menu.
Refer to: “Initialize setup menu”
Utility Initialize menu
Values of the Utility menu are set to the setup value (initial value) at the factory shipping.
Setup items
Utility
Parameters
Descriptions
No
No initialization.
OK
To perform initialization.
–
After settings, shifts to the previous hierarchy menu.
Refer to: “Initialize setup menu”
155
AP-75102, Rev. 2.0, 28/11/2007
User’s Guide – Osprey 75/102/130
Chapter 6: Printer menu
6.5.4.29
File management Initialize menu
Values of the File management menu are set to the setup value (initial value) at the factory shipping.
•
Notes
File management initialize menu is displayed when the hard disk has been installed.
Setup items
Parameters
File Mng.
Descriptions
NO
No initialization.
OK
To perform initialization.
After setting, shifts to the previous hierarchy menu.
Refer to: “Initialize setup menu”
–
6.5.5 Setup menu 5/5
6.5.5.1 Data dump menu
To perform dump printing for online function check.
Setup items
Data Dump
Parameters
Start / End
•
All
Descriptions
Notes
Damp printing is used by service
person to check the functions of
the printer. Do not use this function
for normal printing.
After setting, shifts to the previous
hierarchy menu.
Refer to: “Setup menu”
-
156
AP-75102, Rev. 2.0, 28/11/2007
User’s Guide – Osprey 75/102/130
Chapter 6: Printer menu
6.5.5.2 Head wash menu
To perform process for washing print head.
•
Notes
Refer to "Washing print head" for more details.
Setup items
Parameters
No
Head Wash (1/2)
Head Wash (2/2)
Head Wash (1/2 to 2/2)
All
Black
Cyan
Light Cyan
Magenta
Light Magenta
Yellow
–
Descriptions
Does not perform washing print head.
Shifts to the previous hierarchy menu.
Refer to: “Setup menu”
Washing print head is performed individually for each
colour in order.
Washing print head is performed for the selected print
head colour.
After setting, shifts to the previous hierarchy menu.
Refer to: “Setup menu”
157
AP-75102, Rev. 2.0, 28/11/2007
User’s Guide – Osprey 75/102/130
Chapter 6: Printer menu
6.5.5.3 Long-term storage cleaning menu
To perform process for Long-term storage cleaning.
•
Notes
For operation procedures for Long-term storage cleaning, refer to "Long-term storage cleaning".
Setup items
Parameters
No
Long Save (1/2)
Long Save (2/2)
Long Save (1/2 to 2/2)
All
Black
Cyan
Light Cyan
Magenta
Light Magenta
Yellow
–
Descriptions
Does not perform the cleaning for long-term storage.
To shift to the previous hierarchy menu.
Refer to: “Setup menu”
Cleaning for long-term storage is performed individually
for each colour in order.
Cleaning for long-term storage is performed for the
selected print head colour.
[CANCEL] key: Shifts to the previous hierarchy menu.
Refer to: “Setup menu”
158
AP-75102, Rev. 2.0, 28/11/2007
User’s Guide – Osprey 75/102/130
Chapter 6: Printer menu
6.5.5.4 Maintenance status menu
Check the parts’ life cycle of the product.
159
AP-75102, Rev. 2.0, 28/11/2007
User’s Guide – Osprey 75/102/130
Chapter 6: Printer menu
Setup items
Parameters
Mainte. (1/6 to 6/6)
Descriptions
Displays the life cycles of the following parts of the
product.
• CR motor
• PF motor
• Lever motor
• Head U/D motor
• Winding unit motor
• Media feed motor
• Print head K
• Print head C
• Print head Lc
• Print head M
• Print head Lm
• Print head Y
Part’s life cycle is shown be the amount of * Mark (max.
5: remain 100%).
When a part’s life cycle comes to an end, the * mark
reduces one (each 20%).
If the * mark is reduced, the life cycle of the part comes to
an end.
Replace the parts that have reached their usable life
According to “Replacement of the print head and CR
motor".
Life cycle:
E*****F
[CANCEL] key: Shifts to the previous hierarchy menu.
Refer to: “Setup menu”
–
•
•
Notes
The user will be charged for replacement of a part that has reached its usable life span even during
the free warranty period or covered by maintenance contract.
If parts that have reached their usable life span continue to be used without replacing them, and
troubles arise, they will not be guaranteed.
6.5.5.5 Mode print menu
Make this setting when you draw present printing condition after online printing.
Drawn printing conditions are as follows.
• Condition
• Interlace
• Priority
• Direction
Setup items
Mode print
Parameters
<OFF>
ON
–
160
Descriptions
No printing condition printing.
To perform condition printing.
[CANCEL]-key: Shifts to the previous
hierarchy menu.
Refer to: “Utility menu”
AP-75102, Rev. 2.0, 28/11/2007
User’s Guide – Osprey 75/102/130
Chapter 7: Troubleshooting
7 TROUBLESHOOTING
7.1
INTRODUCTION
162
7.2
FAILURES AND MALFUNCTIONS OF THE PRINTER
163
7.3
ERROR MESSAGES
168
7.3.1 Status messages
168
7.3.2 Message type error display and solutions
170
7.3.3 Data error display and solutions
171
7.3.4 Command error display and solutions
172
7.3.5 Error requiring a restart
173
7.4
WHEN MEDIA JAMS OCCUR
174
7.4.1 How to remove the media
174
161
AP-75102, Rev. 2.0, 28/11/2007
User’s Guide – Osprey 75/102/130
Chapter 7: Troubleshooting
7.1 INTRODUCTION
Be sure to read and understand the safety warnings before handling the printer.
This chapter explains troubles that may occur when using the printer and how to solve them.
If you encounter an error not described in this chapter, refer to "Error messages" and contact your local
MUTOH dealer.
•
Notes
To receive our customer support service, present your warranty. If you do not present it, you may be
changed for the service even if it is within the term of warranty.
•
If you have a maintenance service contract, show the agreement or other documents.
162
AP-75102, Rev. 2.0, 28/11/2007
User’s Guide – Osprey 75/102/130
Chapter 7: Troubleshooting
7.2 FAILURES AND MALFUNCTIONS OF THE PRINTER
This section describes the failures and malfunctions of the printer not displayed as errors, and their causes and
solutions.
(1) The printer does not work after the power is switched ON.
No.
Possible cause
Solutions
1
You did not plug the power cable in.
Plug in the power cable.
2
The AC power does not match the
specified voltage.
Use the printer at the specified
voltage.
References
“Connecting the power
cable”
“Connecting the power
cable”
3
Is the front cover open?
Close the front cover.
“Media handling”
4
Is the maintenance cover open?
Close the maintenance cover.
“Switching the power
ON/OFF”
(2) The printer does not work after the media is loaded.
No.
1
Possible cause
Close the maintenance cover.
Solutions
Close the front cover.
References
“Media handling”
2
Is the pressure roller raised?
Lower the pressure roller.
“Media handling”
3
Is the maintenance cover open?
Close the maintenance cover.
“Switching the
“power ON/OFF”
4
You did not load the media straight
into the printer.
Load the media straight into the
printer.
5
Are all main tanks filled with ink?
Fill all ink tanks with ink.
“Filling the
ink - jet wash fluid”
Use a recommended media.
“Media type“
Use the printer in the specified
environment.
“Product Specifications”
6
7
Is the recommended media being
used?
You used the printer in direct
sunlight or other locations not
appropriate for the specified
environment.
“Media handling”
(3) The printer does not work after data is sent from a computer.
No.
Possible cause
Solutions
References
1
You did not connect the interface
cable.
Connect the Centronics interface
cable.
“Centronics interface
connection”
2
Are all tanks filled with ink?
Fill all ink tanks with ink.
“ Filling the ink - jet wash
fluid”
(4) The printer does not print and an error is generated after data is sent from a computer.
No.
1
2
Possible cause
Does the settings of the computer and
the printer match?
The interface setting or command
mode on a computer and the printer
do not match.
Solutions
References
Insure that the computer and
printer setting match.
“Connecting the printer to
your PC”
163
AP-75102, Rev. 2.0, 28/11/2007
User’s Guide – Osprey 75/102/130
Chapter 7: Troubleshooting
(5) Printouts are partially blurred or missing.
Notes
When using a media other than those recommended, a proper printing quality may not be gained.
•
No.
1
2
Possible cause
The media is damp.
You used folded, creased, or curled
media.
Solutions
References
Replace with new media.
“Replacing roll media”
(6) Printing position is not correct (some position is not printed.)
No.
1
Possible cause
The loading position of the media is
not correct.
2
Has the mirror been set?
3
You set the origin or starting
position.
Solutions
References
Load the media correctly.
“Loading roll media”
Disable the setting for the mirror,
or make the setting again.
Switch OFF the origin or starting
position setting, or make the
setting again.
“Menu setup on the
operation panel”
“Setup on the operation
panel”
(7) Media jams occur frequently.
Notes
A proper media feed cannot be guaranteed for media that are not in the recommendation.
•
No.
1
2
3
4
Possible cause
Is the recommended media being
used?
You used the printer in an
environment other than that
specified.
You used old media.
You used folded, creased, or curled
media.
Solutions
References
Use a recommended media.
“Media type”
Use the printer in the specified
environment.
“Cautions on handling
media”
Replace with new media.
“Replacing roll media”
(8) Roll media cannot be cut correctly.
No.
1
2
Possible cause
The edge of the cutting blade is not
sharp.
The roll media has static electricity.
Solutions
References
Replace the cutting blade.
–
Remove the static electricity on the
roll media.
–
(9) You cannot perform initial ink charging.
No.
1
Possible cause
Is the front cover open?
Solutions
Close the front cover.
References
“Media handling”
2
Is the pressure roller raised?
Lower the pressure roller.
3
Is the maintenance cover open?
Close the maintenance cover.
4
Are all main tanks filled with ink?
Fill all ink tanks with ink.
“Media handling”
“Switching the power
ON/OFF”
“Filling the ink - jet wash
fluid”
164
AP-75102, Rev. 2.0, 28/11/2007
User’s Guide – Osprey 75/102/130
Chapter 7: Troubleshooting
(10) Ink is not used though you performed initial ink charge.
No.
Possible cause
1
Is the ink frozen?
2
3
You switched OFF the printer
during the initial ink charging.
The printer rarely prints correctly
just after initial ink charging.
Solutions
Leave in room temperature for at
least 3 hours, and perform headcleaning a few times.
Switch ON the printer to continue
the initial ink charging.
Perform head cleaning a few times,
and check after each cleaning.
References
“Head cleaning”
“Filling the ink - jet wash
fluid”
“Head cleaning”
(11) The media is off or damaged when loading it.
Notes
Remove the jammed or damaged media, see "When media jams occur".
•
No.
1
2
3
4
5
Possible cause
Is the recommended media being
used?
The loading position of the media is
not correct.
Foreign material, such as piece of
media, is attached to the pressure
roller.
You used the printer in direct
sunlight or other locations not
appropriate for the specified
environment.
You used media folded, creased,
damaged, tore, curled, or inclined
to be curled.
Solutions
References
Use a recommended media.
“Media type”
Load the media correctly.
“Loading roll media”
Clean the pressure roller.
“Cleaning inside the
printer”
Use the printer in the specified
environment.
“Product Specifications”
Replace the media.
“Cautions on handling
media”
(12) Media is damaged during media Initial.
Notes
Remove the jammed or damaged media, see "When media jams occur".
•
No.
1
2
3
4
5
6
Possible cause
Is the recommended media being
used?
The loading position of the media is
not correct.
You did not load the media straight
into the printer.
Foreign material, such as piece of
media, is attached to the pressure
roller.
You used the printer where air from
an air conditioner blows or other
location not appropriate for the
specified environment.
You used folded, creased,
damaged, tore, curled, or inclined
to be curled media.
Solutions
References
Use a recommended media.
“Media type”
Load the media correctly.
“Loading roll media”
Load the media straight into the
printer.
“Loading roll media”
Clean the pressure roller.
“Cleaning inside the
printer”
Use the printer in the specified
environment.
“Product Specifications”
Replace the media.
“Cautions on handling
media”
165
AP-75102, Rev. 2.0, 28/11/2007
User’s Guide – Osprey 75/102/130
Chapter 7: Troubleshooting
(13) Cannot detect the media
No.
1
2
3
Possible cause
Is the recommended media being
used?
You used the printer in direct
sunlight or other locations not
appropriate for the specified
environment.
The loading position of the media is
not correct.
Solutions
References
Use a recommended media.
“Media type”
Use the printer in the specified
environment.
“Product” Specifications
Load the media correctly.
“Loading roll media”
(14) Media size is wrong during media Initial.
No.
1
2
3
4
5
Possible cause
Is the recommended media being
used?
You did not load the media straight
into the printer.
The curled surface of media is up
when loading.
You used the printer where air from
an air conditioner blows or other
location not appropriate for the
specified environment
Solutions
References
Use a recommended media.
“Media type”
Load the media straight into the
printer.
Remove the curl in the media, or
replace with new media.
“Media handling”
“Media handling”
Use the printer in the specified
environment.
“Product Specifications”
Use new, not printed media.
“Media type”
Solutions
References
Use a recommended media.
“Media type”
Load the media correctly.
“Loading roll media”
You reused printed media.
(15) Media is fed crooked while printing.
No.
1
2
Possible cause
Is the recommended media being
used?
The loading position of the media is
not correct.
(16) The printer is not connected to a computer using the Centronics interface.
No.
1
2
3
Possible cause
You did not connect the Centronics
interface cable correctly.
When sending printing data from
the computer, does the data lamp
of the control panel light?
The Centronics setting on the
printer does not match the setting
on the computer.
Solutions
Connect the Centronics interface
cable correctly.
References
“Centronics interface
connection”
If the DATA lamp does not light,
contact the computer manufacturer.
–
Make the Centronics setting on the
printer so that it matches the setting
on the computer.
“System requirements”
166
AP-75102, Rev. 2.0, 28/11/2007
User’s Guide – Osprey 75/102/130
Chapter 7: Troubleshooting
(17) The printer is not connected to a computer using LAN interface.
No.
1
2
3
4
Possible cause
You did not connect the LAN cable
correctly.
The network setting is not correct.
The network setting on the printer
does not match the setting on the
computer.
The DATA lamp on the operation
panel does not light when printing
data is sent from computer.
Solutions
Connect the LAN cable correctly.
Set the network correctly.
Make the network setting on the
printer so that it matches the setting
on the computer.
If the DATA lamp does not light,
contact to the computer
manufacturer.
References
“Centronics interface
connection”
“Network setup menu”
“System requirements”
–
(18) The printed lines are blurry.
No.
1
2
3
4
Possible cause
Is the recommended media being
used?
You used too thick or thin media.
The printed surface is not the
printable side.
Did you try cleaning the head?
Solutions
References
Use a recommended media.
“Media type”
Use a recommended media.
Pay attention to the printable side
to load media correctly.
Perform head cleaning.
Perform cleaning on the "Powerful"
setting.
“Media type”
Clean the print head surface.
Perform cleaning for long-term
storage.
“Media handling”
“Head cleaning”
“Cleaning of the print
head surface”
“Long-term storage
cleaning”
(19) White or black lines appear on printouts.
No.
1
2
Possible cause
Is the recommended media being
used?
Did you perform media feed
compensation?
Solutions
References
Use a recommended media.
“Media type”
Perform media feed compensation.
“Media feed
compensation”
(20) Lines are missing on printouts.
No.
1
2
3
Possible cause
Was the ink that was used for refill
within its date of expiration?
Is the recommended media being
used?
Did you try minor adjustments for
image quality?
Solutions
References
“ Refilling the ink and jet
wash fluid”
Use new ink.
Use a recommended media.
“Media type”
Try minor adjustments for image
quality.
“Alignment”
167
AP-75102, Rev. 2.0, 28/11/2007
User’s Guide – Osprey 75/102/130
Chapter 7: Troubleshooting
7.3 ERROR MESSAGES
Be sure to read and understand the safety warnings before handling the printer.
This chapter explains the messages displayed on the operation panel both when the printer works normally and
when an error occurs, and the solutions for the errors.
7.3.1 Status messages
The following are the status messages while the printer works normally.
(1) Displays of the operational status
The following operational status is displayed on the first line on the operation panel.
No.
Message
1
Ready to print
2
Paper End
3
4
5
6
Receiving
Converting
Printing
Data Writing
7
Waste Ink Tank Full
8
No Jetwash
9
Moving Origin Pos
10
WarmingUp P:
**%D:**%
Solutions
Waiting for the next operation.
(The media is loaded.)
The printer is waiting for the next operation.
(No media is loaded into the printer.)
The printer is receiving data.
The printer is converting data.
The printer is printing.
The printer is writing data to the hard disk.
Replace the waste liquid absorption material
in the tank.
Refill the jet wash fluid.
The Print head is returning to the origin
position of the origin setting process.
The platen heater / ink drier is warming up.
The thermal state of P (platen heater) and D
(ink drier) is displayed. (** displays a thermal
state by 00-99. When it reaches 100%, it is
displayed as “OK”.)
References
–
“Media handling”
–
–
–
–
“Disposal of waste fluids”
“Refilling the ink and jet
wash fluid”
See “Origin setup menu”
-
(2) Displays of the operational status
The following operational status is displayed between the first and the third line on the operation panel.
168
AP-75102, Rev. 2.0, 28/11/2007
User’s Guide – Osprey 75/102/130
Chapter 7: Troubleshooting
No.
1
2
Message
Filling Ink
Wait for a while
Purging
Wait for a while
3
Initializing Paper
********
4
Warming up
Wait for a while
5
Washing Head
Wait for a while
6
*Capping Out*
Remove Head Cap on
and press ENTER
7
8
*Manual Cut Paper*
Cut paper
and press ENTER
*Roller Turn*
Take up Roll -OFFcan not operate
9
Discharging JW
10
Injecting Jetwash
11
Power OFF
12
13
*Cap Cover Set*
Put Cap Cover on
and press ENTER
*Origin Pos. Check*
Confirm Position
and press ENTER
14
*Check Maintenance*
Motor [CR PF LV UD]
Motor [Takeup Send]
Head [KCcMmY]
15
*Purge End*
Print -> CANCEL
Purge -> ENTER.
Solutions
The printer performs ink charging.
Please wait.
The printer performs head cleaning.
Please wait.
The printer performs initial setting of media.
Please wait.
(******** indicates the media type setting mode.)
The platen heater /ink drier is warming up.
Please wait.
The print head is being cleaned for the cleaning
process of the long-term storage.
Please wait.
References
“Filling the ink - jet wash
fluid”
“Head cleaning before
printing”
“Setting media type”
–
“Long-term storage
cleaning”
The print head cap is attached. Remove the print
head cap, and press the [ENTER] key.
“Long-term storage
cleaning”
“Switching the power
ON/OFF”
Cut the roll media, and press the [ENTER] key of
the control panel.
“Roll media cutting
procedure”
The winding unit is set to "OFF". Set to "ON" on
the winding unit menu.
“Menu setup on the
operation panel”
The jet wash fluid is being discharged the jet wash
fluid for the cleaning process of the log-term
storage or washing print head.
The jet wash fluid is being injected the jet wash
fluid for the cleaning process of the log-term
storage or washing print head.
The ink is being discharged into the print head cap
for the power OFF process.
“Washing print head”
“Long-term storage
cleaning”
“Washing print head”
“Long-term storage
cleaning”
“Switching the power
OFF”
Install the print head cap, and press the [ENTER]
key.
“Switching the power
OFF”
Waits to determine the setup values of the origin
setup menu. Press [ENTER] key on the operation
panel.
There is the part that becomes end of the life
cycle.
• Check the maintenance record menu.
• Exchange the parts shown in the maintenance
record.
The Purge process during printing is completed.
Press the following keys
on the operation panel:
• When restart printing: [CANCEL] key
• When continue purging: [ENTER] key
169
“Origin setup menu”
“Switching the power
ON”
See “Replacement of the
print head and CR motor”
“Head cleaning before
printing”
AP-75102, Rev. 2.0, 28/11/2007
User’s Guide – Osprey 75/102/130
Chapter 7: Troubleshooting
7.3.2 Message type error display and solutions
The following message type errors are displayed when an error occurs while operating the printer.
When one of the following message type error displays appears, the printer may stop operation.
If the printer stops operation, solve the problem to delete the error message and restart the printer.
(1) Error messages regarding media feeding
The following error message is displayed on the first line on the operation panel.
No.
Message
1
Undefined paper
2
Paper Slant
3
End Of Roll
4
Cover Open
5
Please Set Paper
6
Paper JAM Error
Descriptions
The printer failed to detect
the media.
(The printer stops.)
The media was fed at an
angle into the printer.
(The printer stops.)
Roll media runs out.
(The printer stops.)
The front cover is open.
(The printer stops.)
The pressure roller is
raised. There is no media.
The media has jammed.
(The printer stops.)
Solutions
References
Reload the media.
“Media handling”
Reload the media.
“Media handling”
Load new roll media.
“Replacing roll media”
Close the front cover.
–
Set the media, and lower
the pressure roller.
Remove the jammed
media, and reset a media.
–
“Menu setup on the
operation panel”
(2) Error messages regarding warnings of the remaining ink
The following error message is displayed on the forth line on the operation panel.
No.
Message
1
Near End [*]
2
No Jetwash
•
Descriptions
The amount left in the
main tank becomes low.
(The printer does not
stop.)
The jetwash fluid inside
the main tank is run out.
(The printer does not
stop.)
Solutions
References
Prepare new ink for
refilling.
“Refilling the ink and
jet wash fluid”
Refill the new jet wash
fluid immediately.
“Refilling the ink and
jet wash fluid”
Notes
The [*] of the error will display shows the colour of the ink causing the error according to the following
codes:
o K: Black
o C: Cyan
o c: Light Cyan
o M: Magenta
o m: Light Magenta
o Y: Yellow
170
AP-75102, Rev. 2.0, 28/11/2007
User’s Guide – Osprey 75/102/130
Chapter 7: Troubleshooting
(3) Other error messages
The following error message is displayed on the operation panel.
No.
Message
1
Ink Status
No Ink [*]
2
3
Ink Status
Not Filled [*]
Memory Status
No Memory
DIMM 64 MB
Descriptions
The ink inside the
main tank is run out.
(The printer stops.)
Initial filling has not
been performed.
Short of memory while
converting or printing
data.
Solutions
References
Replace the ink
cartridge(s)
“Refilling the ink and jet
wash fluid”
Perform initial filling of
the ink.
“Filling the ink - jet wash
fluid”
Contact your local
MUTOH dealer.
–
Notes
The [*] of the error will display shows the colour of the ink causing the error according to the following
codes:
o K: Black
o C: Cyan
o c: Light Cyan
o M: Magenta
o m: Light Magenta
o Y: Yellow
•
7.3.3 Data error display and solutions
Following are data error displays and their solutions during printer operations.
Data errors are displayed when a communication error occurs between the computer and the printer.
If data error display occurs, the following error messages are displayed and the printer stops.
Solve the problem to delete the error message and restart the printer.
No.
1
•
Message
Online Status
I**** Err [ ]
Descriptions
An error has occurred
while receiving data.
Solutions
Confirm the
communication condition
between the computer
and the printer.
References
“Menu setup on the
operation panel”
Notes
*** In error messages are code numbers indicating what kind of error occurred.
171
AP-75102, Rev. 2.0, 28/11/2007
User’s Guide – Osprey 75/102/130
Chapter 7: Troubleshooting
7.3.4 Command error display and solutions
Following are command error descriptions and their solutions during the printer operations.
Command errors are displayed when an error has occurred while converting the command data sent from a
computer to the printer.
If a command error occurs, the following error messages are displayed and the printer stops.
Solve the problem to delete the error message and restart the printer.
No.
1
•
•
•
Message
Command Status
MH**** Err [ ]
Descriptions
Invalid command data
is sent from a
computer.
Solutions
Make sure that the
settings of the computer
and the printer match.
References
“Menu setup on the
operation panel”
Notes
*** In error messages are code numbers indicating what kind of error occurred.
[ ] may indicate the command code of the error.
For the settings on a computer, refer to the computer’s operation manual.
172
AP-75102, Rev. 2.0, 28/11/2007
User’s Guide – Osprey 75/102/130
Chapter 7: Troubleshooting
7.3.5 Error requiring a restart
Error requiring a restart is displayed when the following fatal error has occurred during printer operation.
• Foreign material disturbing the printer operation is involved in the printer.
• An electrical circuit (such as board, motor, or sensor) failure has occurred.
• An error on control program of the printer has occurred.
If an error requiring a restart has occurred, the printer works as shown below then stops.
Step 1 :
Power relating to the driving system is shut down automatically.
Step 2 :
All indicator lights on the operation panel are switched ON and beeps sound continuously.
Step 3 :
An error message is displayed on the operation panel.
Press any key on the operation panel to stop the beep sounds.
If error requiring a restart has occurred, solve the problems to restart the printer and delete the error.
If the same error message is displayed again, contact your local MUTOH dealer. Be sure to inquire by the code
numbers of the error messages.
No.
1
Message
System Err I****Err [ ]
Descriptions
An error which
cannot be solved
promptly has
occurred.
Solutions
1. If foreign materials
such as a piece of
media or media dust
are involved in the
driving system,
remove them.
2. Make sure that the
replaced parts are
installed correctly.
References
“When media jams
occur”
“Replacing
consumables”
3. Switch OFF the
printer. After 10
seconds or more
have passed, switch
the printer back ON.
•
•
•
Notes
*** In error messages are code numbers indicating what kind of error occurred.
[ ] may indicate the command code of the error.
For the settings on a computer, refer to the computer’s operation manual.
173
AP-75102, Rev. 2.0, 28/11/2007
User’s Guide – Osprey 75/102/130
Chapter 7: Troubleshooting
7.4 WHEN MEDIA JAMS OCCUR
Be sure to read and understand the safety warnings before handling the printer.
If the loaded media has been jammed in the printer, follow the steps below to remove the jammed media.
7.4.1 How to remove the media
Step 1
Restart the printer. Switch OFF the power supply of the product and switch ON again.
Step 2
Press the [F3] key in the media initial menu to raise the pressure roller.
• The MEDIA SET lamp lit (green).
• The following message is displayed on the operation panel.
•
Notes
When raising or lowering the pressure roller, you can use the foot switch instead of the control panel.
No.
1
Name
Foot switch
174
AP-75102, Rev. 2.0, 28/11/2007
User’s Guide – Osprey 75/102/130
Chapter 7: Troubleshooting
Step 3
Remove the roll media from the media feed slot and the tension roller.
No.
1
2
3
Step 4
Name
Media feed slot
Tension roller
Roll media
If a piece of media or media dust are in the printer, open the front cover and remove the media or
media dust.
175
AP-75102, Rev. 2.0, 28/11/2007
User’s Guide – Osprey 75/102/130
Chapter 7: Troubleshooting
This page is intentionally left blankٛ
176
AP-75102, Rev. 2.0, 28/11/2007