1
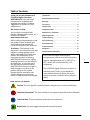
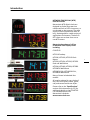
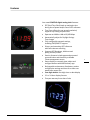
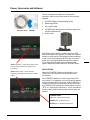
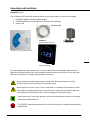
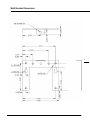
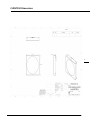
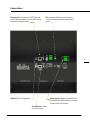
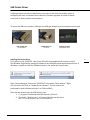
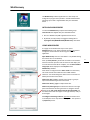
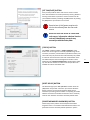
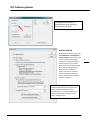
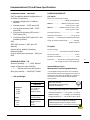
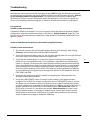
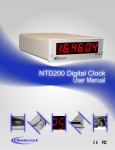
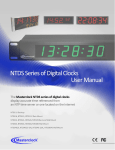
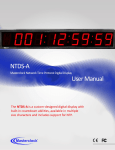
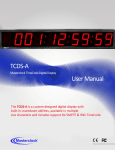
1 Masterclock www.masterclock.com Table of Contents Thank you for your purchase of a CLDNTD12 digital clock from MASTERCLOCK. Here you’ll find instructions for unpacking and installing your clock(s), including suggestions for proper care and configuration. We are here to help. You can reach us using various contact methods (phone, email, etc.) found at our website: www.masterclock.com Introduction ......................................................................... 3 Before calling, please attempt to find the answer to your situation here. You’ll find this user manual will handle virtually all of your questions. Disclaimer - The material in this document is for information only and subject to change without notice. While reasonable efforts have been made in the preparation of this document to assure its accuracy, MASTERCLOCK assumes no liability resulting from errors or omissions in this document, or from the use of the information contained herein. MASTERCLOCK reserves the right to make changes or revisions in the product design or the product manual without reservation and without obligation to notify any person of such revisions and changes Care and Cleaning .............................................................. 28 Supplied (Ship Kit) Checklist ................................................ 6 Mounting ............................................................................. 7 Connections ....................................................................... 10 Configurations ................................................................... 11 USB Device Drivers ............................................................ 16 WinDiscovery - Installation ............................................... 17 Addressing Modes ............................................................. 22 Trouble Shooting ............................................................... 26 Limited Warranty .............................................................. 30 Health and Safety ............................................................... 31 Compliance ........................................................................ 32 Service/Contact Information ............................................. 33 The CLDNTD12 digital clocks contains microprocessor control electronics designed to operate indoors between 32˚ to 140°F (0˚ to 60˚C) with 0-90% relative humidity, noncondensing. The CLDNTD12 digital clocks are not water- or moisture-proof. Treat it as you would any other delicate electronic device and do not expose it to water, excessive heat or physical abuse Icons Used In This Manual Caution: This icon signifies a potential hazard, and gives tips on how to avoid them. Important Information: This icon indicates to an important step that must be followed. Technical Note: This icon describes technical terms and actions. Helpful Hint: This icon suggests the general setup and practice. Masterclock www.masterclock.com 2 Introduction CLDNTD12 NETWORK TIME DISPLAY (NTD) DIGITAL CLOCKS Masterclock NTD digital clocks are designed to display accurate time referenced from an NTP time server, or one located on the Internet. The wide variety of sizes (illustrated to scale at left), are designed for a wide variety of applications and mounts. The built-in NTP client can set time from one or two NTP servers. Masterclock produces a full line of Network Time Display clocks including: CLDNTD12 NTDS 16 Desktop NTDS16, NTDS19, NTDS112 Rack Mount NTDS24, NTDS24, NTDS26, NTDS29 Rack and Wall Mount NTDS44, NTDS46, NTDS84, NTDS86 NTDS4626 Wall Mount NTDS4626-3AL, NTDS4626-12AL, NTDS8646 Wall Mount Many of these include dual face models. All may be ordered in your choice of four LED colors (blue, amber, green, red) and several metal case styles. Please refer to the “Specifications” section of this document (p. 25) for additional details on the CLDNTD12. For available options visit Masterclock’s website: www.masterclock.com. Masterclock www.masterclock.com 3 Features Your new CLDNTD12 digital-analog clock features: RTC (Real Time Clock) back-up maintains time during loss of power and/or loss of NTP reference Time Zone offsets (to one second resolution) supports any biasing requirements Operates on WAN or LAN at 10/100 Mbps Automatically adjust for Daylight Savings Time change Masterclock Fully configurable network settings, including DHCP/BOOTP support Primary and secondary NTP reference with fault-tolerant switching Supports NTP Broadcast, Multicast and query (Unicast) modes Security features include password protected communication and the ability to disable Telnet management access Status display to remotely view, adjust and configure devices with WinDiscovery app Rechargeable maintenance-free battery retains configuration settings and time for at least two weeks after power loss Four-digit models: four-digit time or date display 12- or 24-hour display formats Five year warranty from date of sale www.masterclock.com 4 Power, Accessories and Software Cat5 patch cable CD-ROM Above: DC power – Insert the DC power cord into the 2.1mm connector located on the back panel. Below: Ethernet PoE – Insert the CAT5 Ethernet patch cable (included) into the RJ45 socket. The list of accessories below is for illustrative purposes. Refer to your sales order for actual items shipped. CLDNTD12 digital-analog display (clock) Mounting bracket Cat 5 patch cable CD-ROM (with WinDiscovery software application and User Manual pdf) Power cord – PoE (Power over Ethernet) models require an IEEE 802.3af compliant PoE injector or switch with +48VDC output on spare pairs of the network cable conductor 4 and 5, with corresponding 48 VDC returns on pins 7 and 8 or by sharing the data pins and their returns. This single network cable carries both data and power. Maximum cable distance is 328 feet (100m). RELAY OPTION When the CLDNTD12 digital-analog display is not locked to a NTP reference, the dry contact relay will actuate. The CLDNTD12 request time from the primary NTP time server. If no response, then it will send a request to the secondary NTP time server. If the CLDNTD12 is unable to communicate with either NTP time servers, the CLDNTD12 will change its Current Reference from “NTP” to “Internal Osc (oscillator)”. This is considered an un-locked condition and the dry contact relay will actuate. TERMINAL BLOCK Top: Pin 1 – NO (Normally Open) Middle: Pin 2 – COM (Common) Bottom: Pin 3 – NC (Normally Closed) Masterclock www.masterclock.com 5 Unpacking and Installation Supplied (Ship Kit) The list below is for illustration purposes. Refer to your sales order for actual items shipped. CLDNTD12 digital-analog clock/date display CD-ROM (WinDiscovery Configuration Utility and User Manual) Power cord Cat5 patch cable CLDNTD12 Powder coated steel case Power cord WinDiscovery Configuration Utility 6 4 Digit LED Display Only qualified persons are authorized to carry out maintenance on this device. Read this User’s Manual carefully and follow the correct procedure when setting up the device. Do not open your Masterclock product or attempt to disassemble or modify it. Never insert any metallic object into the clocks case, doing so increases the risk of electrical shock, short circuiting, fire or personal injury. Never expose your clock to rain or use it near water or in damp or wet conditions. Never place objects containing liquids on or near this clock, as they may spill into its openings increasing the risk of electrical shock, short circuiting, fire or personal injury. Please refer to the “Care and Cleaning” section of this document for details on cleaning and recommended products. The CLDNTD12 warranty may be void as a result of the failure to respect the precautions stated above. Masterclock www.masterclock.com Mounting The CLDNTD12 digital time display is designed for wall mount. Power and low voltage signal wiring should be installed according to local electrical codes, so to access the back of the clock. Do not route power or signal cables between the case and the wall (along the exterior of the wall), which may pinch the power or signal cable and create a hazardous condition. Wall Mount Bracket A wall mounting bracket is supplied which has been designed to fit on either a standard 2”x 4” or 4” x 4” conduit box. Mount the bracket on the wall/conduit box, attach the power cord and CAT5 Ethernet patch cable and secure the CLDNTD12 to the bracket using the supplied retaining screws. See page 7 for a plan view with measurements. 7 Masterclock www.masterclock.com Wall Bracket Dimensions 8 Masterclock www.masterclock.com CLDNTD12 Dimensions 9 Masterclock www.masterclock.com Connections Ethernet PoE: Connect the CAT5 Ethernet patch cable (included) into the RJ45 socket, located on the back panel. DC: Insert the DC power cord into the 2.1 mm connector located on the back panel. 10 USB Port: For configuration. Relay Option: When the CLDNTD12 is not locked to a NTP reference, the dry contact relay will actuate. Reset Button - Clears current settings Masterclock www.masterclock.com Configuration Checklist The CLDNTD12 digital-analog clocks get their time signals from the Ethernet. Therefore, before installing this device, one should be prepared with the following basic configuration information that the device will require. It may be necessary to obtain some or all of this information from a network administrator in your organization. STATIC NETWORKING CONFIGURATION __ IP address and netmask designation for device __ Primary and secondary DNS (Domain Name Server) __ Gateway/router __ Primary and secondary NTP time references DYNAMIC NETWORKING CONFIGURATION __ Confirm that a DHCP/BOOTP service is accessible on the local network __ Determine if DHCP server will provide NTP server configuration __ Determine if DHCP server will provide Time Zone configuration NTP ADDRESSING MODE __ Determine if this device (client) will query the NTP server (Unicast mode), listen for NTP broadcast messages (Broadcast mode), or listen to NTP as part of a Multicast group. NAMING All NTP devices can be provided with a verbose name. The name is arbitrary and may be useful for organizing and managing devices once installed. By default, device names are the product name abbreviation followed by the device’s MAC address. Customers should designate their own custom names relating to their own organizational requirements, 32 characters max. Default Recommendation (Examples) SL26-21:4B Bldg101-Rm121 SL29-45:8A Conference_Room-342 INITIAL OPERATION / SERVER ACQUISITION After receiving power, the CLDNTD12 digital-analog clock will go through an internal check. Time from the RTC backup will be applied until the CLDNTD12 server signal is acquired. Masterclock www.masterclock.com 11 LED STATE STATUS INDICATION Flashing No Reference: The CLDNTD12 is not able to reference Time Code On Solid Referenced Time: The CLDNTD12 is receiving time referenced from a Time Code If the Time Code input is different from UTC, do not adjust the Time Zone and/or DST offset. These will adjust automatically. STATUS LED (LIGHT EMITTING DIODE) The LED colons on the display will follow the following protocol after power is applied: TIME ZONE OFFSETS The CLDNTD12 digital time display maintains time as UTC initially. A Time Zone offset or bias can be provided to adjust the time for display purposes. A bias can be set as a positive (+) or negative (-) value. Expect a resolution of one second. DAYLIGHT SAVING TIME An automatic Daylight Saving Time (DST) adjustment can be configured separately and in addition to a Time Zone offset. DST begins on the second Sunday of March at 2:00 AM (Local Time) and ends the first Sunday of November at 2:00 AM (Local Time). EU STANDARD – EUROPEAN UNION In the European Union, daylight change times are defined relative to the UTC time of day. Summertime Period begins at 1:00 AM, UTC on the last Sunday of March and ends at 1:00 AM, UTC on the last Sunday of October. 12 FREEWHEELING ACCURACY Daylight Savings Time (DST) adjustments must be configured using the daylight time option and not with the Time Zone offset option in order to ensure proper year-around operation. European customers: Please carefully consult the section entitled “Device Settings” for details on setting your “Summertime Period.” The CLDNTD12 has built-in provisions to allow it to freewheel and maintain accuracy for extended periods in the absence of Time Code. These features also allow the unit to be set manually and run without Time Code with precision. TCXO AND RTC CIRCUIT The CLDNTD12 contains a precision TCXO (Temperature Compensated Crystal Oscillator) and RTC (Real Time Clock) circuit allowing the clock to maintain an accuracy of ± 1 minute per year to the last known Time Code input (±165 mSec per day) when Time Code is not present or cannot be decoded (i.e. freewheeling mode) MAINTENANCE-FREE RECHARGEABLE BATTERY The RTC and TCXO are maintained continuously from a rechargeable battery circuit during periods of power outage. Minimum holdover period is two weeks with a fully-charged battery under constant drain. Masterclock www.masterclock.com Configuration Masterclock CLDNTD12 clocks maintain their configuration data in non-volatile flash memory, even when the power is off. The CLDNTD12 clocks are configured on screen using WinDiscovery software. The factory default configuration: SETTING CONFIGURATION SELECTION Enabled DHCP/BootP provided network configuration Enabled DHCP provided NTP server address entry Enabled Query (Unicast) NTP client Disabled Time Zone offset Disabled Automatic Daylight Savings Time adjustment None Telnet access DHCP/BOOTP AUTO-CONFIGURATION DHCP (Dynamic Host Configuration Protocol) is a mechanism for automating the configuration of network devices that use TCP/IP. When DHCP is enabled, DHCP configuration acquisition will overwrite any manual configuration items. 13 Factory default: DHCP enabled. BOOTP was a precursor to DHCP. The network device can obtain configuration from a BOOTP server when no DHCP server is present. The following RFC2132 DHCP options defined configuration items are, when available, used by the network device for configuration purposes: OPTION # COMMENTS Time Offset 2 The value provided will be used for the Time Zone offset configuration, unless it is defined as zero in which case it will be ignored and the network device will rely on internal configuration. Note: this option does not provide information appropriate for dynamic Daylight Savings Time use. Router 3 The first IP address provided will be used for router/gateway configuration. Domain Name Server 6 Up to two server IP addresses may be specified. Network device will treat addresses as primary and secondary DNS servers. Network Time Protocol Server 42 Up to two server IP addresses may be specified. Network device will treat addresses as primary and secondary NTP servers. Masterclock www.masterclock.com Device Name/Default Password A network device will not function properly if configured to use DHCP services when no DHCP server is available on the network. The factory default displaying local time is disabled. You must enable and configure that setting to display local time. We suggest you use an NTP time server with a UTC reference to configure the offset for your Time Zone and DST. To ensure proper year-around operation, the automatic DST adjustments must be configured using the “Daylight Saving Time” option and not with the “Time Zone” option. European customers, please refer to the “WinDiscovery, DST Settings” section of this document for additional details on, setting daylight saving time. SETTING CONFIGURATION SELECTION Disabled Time Zone Offset Disabled Daylight Savings Time Enabled NTP Client with DHCP Enabled 24 Hour format Masterclock DEVICE NAME/DHCP NAME REGISTRATION As mentioned earlier, all network devices should be provided with a custom name (e.g. “reception-northwall”). By default, device names are the product name abbreviation followed by the last octet of the device’s MAC (Media Access Control) address (e.g. CLD12-04:F7). If a DHCP server is networked when the NTP device is installed, the unit will be auto-registered with the DHCP server. The network system administrator can then view this DHCP name registration and the currently assigned IP address, at the DHCP server. DEFAULT PASSWORD The factory-default password for the network device is: public. Please use lower case. RESET FACTORY DEFAULT CONFIGURATION In some situations (such as a lost password) it may be necessary to return your device to its factory default configuration. A [RESET] button is located on the clock’s rear cover. To reset the configuration to factory default: Press and hold the reset button for 10 seconds (until dashes appear on the digits) and then release. The configuration will now be reset, including the password. The unit will need to be reconfigured to your custom settings. DEFAULT CONFIGURATION The factory defaults may be restored by using the WinDiscovery program or by using the reset button at the rear of the CLDNTD12 digital-analog clock. Your CLDNTD12 clock/device ships from the factory with the following configuration as defined on pg 13. The CLDNTD12 firmware interprets the incoming time as UTC. www.masterclock.com 14 IGMP Use of the multicast addressing method requires the use of routers and switches and other network devices which support the Internet Group Management Protocol (IGMP). In addition, the IGMP mode must be enabled and configured for multicast addressing to be implemented properly. Please ensure that your network system components are capable of, and configured properly for, IGMP before utilizing the multicast addressing feature. Consult you network administrator for assistance in utilizing the multicast addressing feature. FIREWALLS Check with your firewall vendor to determine how to enable multicast traffic through a firewall. In addition, you may want to read RFC 2588: IP Multicast and Firewalls. Port 123 Some NTP/SNTP servers will expect NTP clients to operate on port 123. If the advanced settings have been altered for your clock and you begin experiencing difficulty in getting your clock to synchronize to the NTP time server, or the clock begins acting erratically, try returning the advanced settings to the default values: “123.” NTP CLIENT ADVANCED SETTINGS From the NTP Client window, the [NTP Client Advanced Settings] button allows for the adjustment of additional network communication settings. Under most operating circumstances it is not necessary to change these settings. The factory-default TCP/UDP port for NTP service is: “123” Masterclock MULTICAST The network device also supports Multicast Addressing of NTP packets. Multicasting is useful because it conserves bandwidth. Multicasting’s replicate only the necessary packets and only as needed to send them only to clients that want them. The concept of a group, and group membership, is crucial to multicasting. Every multicast requires a multicast group; the sender transmits to the group address, and only members of the group can receive the multicast data. A group is defined by a Class D address. The network device does not restrict the use of the multicast address assignment and supports the full range of class D multicast addresses or groups from “224.0.0.0” to “239.255.255.255”. These are defined and governed by RFC3171, IANA IPv4 Multicast Guidelines. Typically, the multicast address range “224.0.1.0” to “224.0.1.255” (Internetwork Control Block) is used for NTP traffic. However, please refer to the RFC3171 for your specific application and implementation. The IGMP (Internet Group Management Protocol) controls group membership for individual hosts. This protocol only operates in a LAN setting, but is required if you wish to be able to join a multicast group on a host. IGMP is defined in RFC 2236. ANYCAST The network device does not currently provide Anycast capability. STATIC IP To use a static IP address, de-select the checkbox for “Automatically obtain network configuration from DHCP/BOOTP.” You must enter the IP address, netmask, gateway, primary DNS and also a secondary DNS. Devices which have been assigned a fallback IP address of “169.254.xxx.xxx” will be displayed in the main WinDiscovery window with RED text, indicating a problem with the configuration. NTP CLIENT AUTHENTICATION SETTINGS The CLDNTD12 series uses the MD5 Message Digest Algorithm, which is a widely used cryptographic hash function that produces a 128-bit hash value. www.masterclock.com 15 USB Device Driver A USB type B port has been included on the rear cover of the clock to provide a means of configuring the clock via software and to allow for firmware upgrades for either firmware corrections or future product enhancements. To utilize the USB port, connect a USB type A to USB type B cable from the computer to the clock. USB A cable end (to computer) USB B cable end (to clock) USB port on back (back panel view) Installing the Device Driver First, power-on the CLDNTD12. Next, use a USB cable (not supplied) and connect to the PC. The Windows Plug and Play manager will detect a new USB device and request device drivers. If Windows is unable to install the USB device drivers, the system will send an alert. Open “Device Manager” and locate “CLDNTD12” listed under “Other devices”. Right click the device and click on “Update Driver Software”. This will need to be performed for both USB device drivers (i.e. COM and BUS). There are two locations for the USB Device Driver: 1. C:\ Program Files\Masterclock\WinDiscovery \Drivers\ 2. CD labeled, “WinDiscovery” X:\Products\WinDiscovery\Drivers\ Note: “X” is the CD/DVD drive letter of your Windows PC. Masterclock www.masterclock.com 16 WinDiscovery The WinDiscovery software application is a clock setup and configuration program that operates in the Microsoft Windows operating system and is supplied FREE with your CLDNTD12 device. INSTALLING WINDISCOVERY To install the WinDiscovery complete the following steps: Insert the CD that shipped with your CLDNTD12 device. 1. Run the “WinDiscovery.exe” application from the CD. 2. By default, the setup utility will suggest installing files to C:\Program Files\MASTERCLOCK\WinDiscovery. Click OKAY. USING WINDISCOVERY It is highly recommended that only one user opens WinDiscovery at a time. Other methods should not be used to manage the network devices while using this software application. Open WinDiscovery from the “Start Menu” or by double-clicking the shortcut icon on the desktop. Once you click [Discover], all devices accessible on the network will announce their presence and the status bar will display the count of devices found. When complete, a list of device families and groups will be displayed in the left pane of the WinDiscovery window. Each device is configured with a device name from the factory. This name includes the model name and a MAC address extension. You should change the device name to one that can identify the location of the device. Click on the plus [+] sign to the left of any family or group to open and view device types that were found. Click on the minus [-] sign to collapse these files. Click on any device group and it will list the devices in the right pane with all devices of that type found. To configure another device group, click on the device name in the left window and the device names will then appear in the right window, ready to be managed. To configure and manage a device, right click the device name in the left panel and a drop-down menu appears. The top item is a [Properties] button. Masterclock www.masterclock.com 17 To open the “Device Settings” window, double click the CLDNTD12 clock name. The top left item is labeled “Configurable Options.” WITHIN THE DROP-DOWN WINDOW: Click on a menu choice to open the window for that function. [PROPERTIES] BUTTON The “Properties” window lists the name, model, firmware and network configuration of your CLDNTD12 clock. These configurations may be changed in other windows, but not in this one. Click [OK] to exit. [NETWORK CONFIGURATION] BUTTON The “Network Configuration” window (lower left) lists the device name and offers a checkbox to “Automatically obtain network configuration from DHCP/BOOTP” or not. If not, you may manually fill in the IP address, Netmask, Gateway and DNS. DEVICE SETTINGS BUTTON The “Device Settings” window is the same one that appears with a left double-click of the device on the “Network Discovery” window (left above, grayed out) and is detailed on page 17. 18 SET PASSWORD BUTTON The “Set Password” window permits the user to enter a unique password for every device to change the factory default password, “public”. A password is one to eleven characters and is case-sensitive. For added password strength, you should use a combination of alphanumeric and special ASCII characters. Fill in the old password, “public” then enter the new password twice. Click [Change Password] to save. When a password is set for a device, each time you click [OK], [Apply] or [Apply and Close] for that device you will be asked for the password. You can select the “Remember this password for the session” box and you will not be prompted for the password, until you restart WinDiscovery. Or you can use the Global Password feature, (page x). If you enter the wrong password and selected the [Remember this password for the session] checkbox, you will receive an error upon clicking [Save] or [Save and Close] to any configuration changes. You can close the WinDiscovery session to forget the wrong password(s), however this will require entering the passwords again for each device. Alternately, you can remove the incorrect password entry during a WinDiscovery session by going to the drop-down menu for the device and selecting the [Forget memorized password] button. Masterclock www.masterclock.com [SET TIME/DATE] BUTTON Here you may break the link to UTC time to create a custom time. Click this button to reveal a preliminary warning. Read the warning and continue if you wish to create a custom time for your CLDNTD12 clock by unclicking the [UTC] button. By clicking the [UTC] button you will return to UTC time. Practical use of this feature requires the clock to be removed from the time code source. When the clock has access to a valid time code source, information obtained via time code will immediately overwrite any manually established time/date. [STATUS] BUTTON The “Status” window includes a “Display snapshot” of the clock’s face. On the right are constantly updated listings of the UTC Time, Local Time, Current Reference, Reference Status, Last Time Lock Lost (UTC) and Last Time Lock Restored (UTC). Below is a NTP tab. The first lists the name and model number of the unit followed by the network configuration numbers. These would echo the “Network Configuration” window figures (page 13). The tab lists whether or not the server and/or client are enabled and various stats about each. [RESET DEVICE] BUTTON This button brings up the “Are you sure?” window. Press the [Yes] button and you will “soft reset” your clock to allow the device to clear its current communications buffer and reinitialize its processing, which includes re-requesting of a DHCP address. This feature is intended to allow the user to remotely reset the unit and does not restore the factory default state. [FORGET MEMORIZED PASSWORD] BUTTON Click this (if present) and the memorized password will be forgotten. There is no window associated with this button. The password reverts to the factory default password: “public”. Masterclock www.masterclock.com 19 GLOBAL PASSWORD The Global Password feature allows the user to enter a single password for all devices using the same password. During this session and subsequent sessions of WinDiscovery, you will not have to enter the password. The Global Password being used must match the password on all the devices being administered. On any new system being installed, the factory default password on all devices is “public”. 1. Check [Enable Global Password]. 2. Type your password. 3. Click [OK] To disable the Global Password, de-select the [Enable Global Password] checkbox and click [OK]. [DEVICE SETTINGS] BUTTON The “Device Settings” window includes three sections. In “Configurable options” the [Input Control] button takes you to a [NTP button]. Clicking it permits the user to enable or disable the NTP client. If enabled, you can choose Query, Broadcast or Multicast services to receive Time Code. The [NTP] button and window are detailed on page 13. The [Display Properties] button and window (at left) permits the user to change the brightness of the LEDs, to change the Time/Date presentation order, to choose 12 or 24-hour time formats with leading zeroes on or off and to choose UTC or local time (once local time offsets have been input). The “Local Time Settings” section includes two buttons for [Daylight Savings Time] and [Time Zone/Time Offset] to offset your displayed time from UTC to Local time. The [Save] and [Save and Close] buttons must be clicked before hitting the [Exit] button. Otherwise any entered changes will not take effect. Masterclock www.masterclock.com 20 ADMINISTRATIVE FUNCTIONS From the “Device Settings” window, click [Administrative Functions]. SET TIME AND DATE This feature may be most useful for demonstration, in lab situations, environments where an external reference time signal is not available, when the built-in Time Code client is disabled or when a network connection to an Time Code server is not available. SET PASSWORD See page 18. RESET DEVICE See page 19 under Properties Button. INSTALL NEW OPTION Paste the Option Key you receive here. 21 LEAP SECOND DATE Manually enter the date of the next leap second. The leap second insertion/deletion always occurs at 11:59:59 p.m. UTC time on the date selected. SET TO DEFAULT CONFIGURATION Click this button to set your clock back to the factory defaults. The password will revert to “public”. EXIT Returns to Device Settings. Masterclock www.masterclock.com NTP Addressing Modes Setting up to receive NTP is relatively easy to do once you known what you want. UNICAST (QUERY) NTPS clocks and devices support the Unicast Method of NTP (Network Time Protocol) packets transfer. The unicast method involves direct transfer of requested information from the NTP server to the NTP client (clock or other device) based on an automatically generated electronic query or NTP time request. The Unicast method is supported simultaneously when either the Broadcast or Multicast modes are selected. UDP (User Datagram Protocol) Broadcasts Some firewalls and routers will not forward UDP broadcasts by default. Security configurations may need to be adjusted to allow the UDP broadcast packets to pass on the configured port. Masterclock www.masterclock.com 22 BROADCAST NTPS clocks and devices also support the broadcasting of NTP packets. The broadcast mode is a widespread or open-ended broadcast, not intended for any specific IP address. Broadcast packets are useful in situations where network administrators may wish to avoid heavy network traffic created by periodic NTP requests. Often such periodic requests end up synchronized, which can exceed the time server’s ability to reply promptly. The network device listens for NTP using the UDP (User Datagram Protocol) broadcasts using the broadcast address “255.255.255.255”. “SOFT” RESTARTS Special Error Indicator In addition to the standard status indications, the network clock will display a special error indicator under the status window if either a DHCP server cannot be located, or if the device has an IP address conflict due to either DHCP or Static IP addressing. Under these conditions the unit will also be assigned a fallback IP address of “169.254.xxx.xxx”, and appear in RED text under the main “WinDiscovery” window. To determine the cause of why the clock received a “169.254.xxx.xxx” address the user should display the status of the clock. Near the bottom of the “Status” window the error will be displayed. Masterclock A soft restart may periodically be performed by the network device to automatically attempt to rectify a problem it may be experiencing. The network device will perform a soft restart under the following conditions: 1. If the device is not receiving an NTP poll response or an NTP broadcast response depending on which mode the CLDNTD12 is in. 2. If the CLDNTD12 device is set to use DHCP and no DHCP server can be found. The timeout before doing a soft restart is not less than ten minutes. Note: Several factors can increase the time between these soft restarts. 1. The soft restart will be delayed by two hours if a connection is made WinDiscovery. 2. The soft restart could be delayed if the user changes the default parameters for NTP poll retries/timeouts or the NTP broadcast times out. For example, if the NTP broadcast timeout is increased to 60 minutes the soft restart timeout will also be increased to 60 minutes. www.masterclock.com 23 Time Zone Offset Modify the time zone by clicking the [Time Zone] button. This opens a new window that gives you a list of time zones, including descriptions to help with the selection. Select the desired time zone and click [OK] to close the window. Changes are applied when you click [OK]. Daylight Saving Time Configure and/or enable the daylight saving function by clicking the [Daylight Saving Time] button. North American and European Union DST settings are quickly entered by clicking the appropriate button; [US Standard] or [EU Standard]. Daylight saving time configurations will be applied when you click [OK]. US/Canada Standard, Post 2006 Masterclock European Union Standard www.masterclock.com 24 Communications I/O and Power Specifications COMMUNICATIONS – PROTOCOL DHCP (enabled by default) configuration, or via Static IP mode entry. Network configuration: IP address, Netmask Gateway (router – DHCP option 03) Primary and secondary DNS – DHCP option 06) Primary and secondary NTP servers – DHCP option 042 ) Time Zone offset (DHCP option 02) – Not enabled by default IPV6 SNTP /NTP version 4 – UDP, port 123 (default) Unicast (query, default), Broadcast, Multicast modes Control: WinDiscovery protocol – UDP, port 6163 COMMUNICATIONS – I/O Ethernet (10mbps).............. RJ45, 10baseT Length of Ethernet cable (Cat5/5e) .............. 328 feet maximum (100 meters) Relay (dry contact)...... 24V AC/DC, 250Ma …….Size and Weight 4 Digit Display CLDNTD12 Physical Size Width Height Depth 12” (30.48 cm) 12” (30.48) 2.080” (5.28cm) Weight 4.23 lb (1.92 kg) Material Case Lens Powder Coated Steel Acrylic Masterclock POWER REQUIREMENTS PoE option Power over Ethernet input voltage .............................................. +48VDC per IEEE802.3af Mode A: ..................... +48VDC on spare pins 4 and 5, return on pins 7 and 8 Mode B: .................+48VDC and data on pins 1 and 2, return on pins 3 and 6 PoE input connector ........................................... RJ45 PoE power consumption..................... < 15 W, class 0 Protection ..... . Provided by the IEEE802.3af standard Length of network cable (Cat5/6) ................. 328 feet (100m) maximum DC option DC Input Voltage ................................. International 115/230, 50-60 Hz DC Input Connector ......................................... 2.1mm DC power consumption ...................................... 15 W Protection ........... Built in fuse, output power limiting, over voltage and short circuit protection. Internal Battery Circuit Maintenance Free Rechargeable Battery A rechargeable manganese lithium coin cell battery (Panasonic ML1220) and recharging circuit requires no maintenance and retains all configuration settings for two weeks (minimum holdover) without applied external power. 3V,17 mAh, coin cell Rechargeable manganese lithium Panasonic ML1220/V1A Operating/Storage Temperature and Humidity Operating temperature….….32˚ to 140°F (0˚ to 60˚C) Relative Humidity…………....0 to 90%, non-condensing Storage Temperature…..…-40° to 185°F (-40° to 85°C) There are no user serviceable parts inside the CLDNTD12 digital-analog time display. Please contact Masterclock, Inc. if you require servicing or repair. www.masterclock.com 25 Troubleshooting WinDiscovery uses bi-directional UDP messaging on port 6163 for both the discovery process and to communicate configuration and status packets to and from the NTP network device(s). Delivery of UDP messages/packets is not guaranteed. If you experience intermittent problems with WinDiscovery, close the current session and restart the application. If this does not resolve the issue try the following troubleshooting tips, or switch to an alternate method of configuration. Lost password Possible reasons and solutions: A password cannot be recovered if it is lost or forgotten. Reset the device to the factory default configuration using the procedure described in the section, “Default Password” (page 14). Then the unit can be reconfigured and provided with a new password. The default password will once again be “public”. Unable to find/discover the device on the network using WinDiscovery Possible reasons and solutions: 1. The discovery process was not complete before selecting your device(s). After clicking [Discover] wait until the status indicates 100% completion. 2. Verify that all network cables, hubs, etc. are in proper working order. Be sure that Ethernet cross-over cables are not being used where inappropriate. 3. Verify that the network device is on the same physical network as the computer from which you are running WinDiscovery. If the computer is separated from the device by a router or a firewall it is likely that the router/firewall is blocking communication with the device. Run WinDiscovery from a computer within the remote network, or ask a network system administrator to configure the router/firewall in question to pass through (both directions) UDP broadcasts on port 6163. If this does not resolve the detection problems you may additionally configure to pass through both directions UDP broadcasts on ports 6165, 6166, and 6264. 4. Verify that the hub/router/switch is capable of supporting the 10mb speed that the attached network device requires. 5. Verify that a DHCP/BOOTP server is present on the network. If the device has been configured to use DHCP for network configuration but no DHCP/BOOTP server is present, the device may not respond to discovery requests for up to twenty seconds after poweron. DHCP configuration is enabled as a factory-default. In addition, the device will reset its fallback address to one within the link-local address space “169.254.xxx.xxx” when no DHCP server is present or is not able to be reached. Reset the device to initiate a new DHCP IP address request, or use static IP address mode. Consult your network system administrator to ensure that a DHCP server is present and accessible on your network and/or to obtain a list/range of available IP addresses. Masterclock www.masterclock.com 26 Clock does not respond to configuration changes and/or status display is intermittent Device was found using WinDiscovery, but the status display is intermittent or not updating and/or the clock does not appear to be responding to configuration changes under the current WinDiscovery session. Clock(s) previously found during a recent session of WinDiscovery do not show up during the current session. The clock status or settings displayed under WinDiscovery show garbled characters. Possible reasons and solutions: 1. The WinDiscovery application has been open for too long and the clock configuration(s) have changed. For example, this can occur if the DHCP server has issued a new/ refreshed address. Close the WinDiscovery application and restart. 2. The discovery process was not complete before selecting began. After clicking [Discover] wait until the discovery status indicates 100% completion. 3. Verify that the physical network cables and equipment are configured for UDP. 4. Verify that you are currently the only user accessing the device via WinDiscovery. 5. The network may currently be experiencing heavy traffic which is reducing bandwidth and/or causing collisions with the UDP packets between the device(s) and WinDiscovery. Since delivery of UDP messages are not guaranteed, this can cause WinDiscovery to not receive the latest configuration or status packets and thus show outdated or garbled information. 6. In some cases, the device may not be discovered and displayed in the WinDiscovery device tree. In others, previously discovered devices may no longer be accessible or responding. Click [Discover] again and wait until the discovery process to complete. Close the current WinDiscovery session and restart the WinDiscovery application. Take steps to increase the bandwidth and reduce network traffic. If these continue to be ongoing problems, remove the device to an isolated LAN. Clock periodically resets itself Clock appears in red text under WinDiscovery device tree Clock is being assigned an IP address of 169.254.xxx.xxx Clock is showing an “Error” field under the status window in WinDiscovery Possible reasons and solutions: 1. Incorrect network configuration may be causing the device to receive a fallback IP address and or perform soft restarts. Verify that the IP address configured for the device is correct. If you manually enter (or DHCP assigns) an IP address that already exists on the network, this will create an IP address conflict. The device will reset its address (fallback) to one within the link-local address space. Determine the cause of fallback IP address and resolve issue. View the error status field under the status window to help determine the cause of why the device received a “169.254.xxx.xxx”. Near the bottom of the status window the error will be displayed. (If there is no error the text box will not be displayed.) 2. If static IP addressing is being used the original conflicting static IP address can be restored. Perform a soft restart of the network device using WinDiscovery prior to changing any other configuration parameters. Masterclock www.masterclock.com 27 If the configuration of the network device is changed while a “169.254.xxx.xxx” is being used (for example: changing the Time Zone offset), then the current “169.254.xxx.xxx” address will become the permanent static address and the original conflicting static address will be lost. At this point, it is necessary to manually change the static IP address to one that does not conflict, or you may do a [Reset Configuration] to restore the system to factory default settings. 3. If DHCP was selected and the network device falls back to a “169.254.xxx.xxx” address approximately every 10 minutes (depending upon the “Advanced Settings” values) the Ethernet interface will be reinitialized and the network device will attempt to get an IP address from the DHCP server. If the network device is successful, the error will be cleared and the new address from the DHCP server will be used. If a discovery was done using WinDiscovery was used this initialization will be delayed by two hours. Status LED is flashing Status in WinDiscovery says ‘”Unsynchronized” Clock is unable to find NTP reference, either primary or secondary Possible reasons and solutions: 4. Verify that the NTP server(s) specified are reachable, communicating, and are not flagging their reported time as invalid. Use a PC-based SNTP client application to verify the server(s) if necessary. 5. Verify that a gateway/router/firewall has been configured that allows the device to communicate outside of its local network. 6. Verify that the IP address configured for the device is correct. If you manually enter or DHCP assigns an IP address that already exists on the network, this will create an IP address conflict. The device will reset its address to one within the link-local address space “169.254.xxx.xxx”. If you see that the IP address starts with “169.254”, obtain a new IP address for the device or resolve the duplication. Consult your network administrator for a range of available IP addresses to avoid IP address conflicts. 7. If using DHCP mode, consult your network administrator to ensure that your DHCP server is configured to automatically supply the NTP server address before selecting the “Use NTP server(s) address provided by DHCP server” checkbox. If the DHCP server cannot automatically supply the NTP server address(s), then deselect this option and enter the NTP server(s) address(s) manually. 8. Verify that the device is connected to the Ethernet LAN. 9. Verify that all network cables, hubs, etc. are in proper working order. Be sure that Ethernet crossover “patch cables” are not being used where inappropriate. Masterclock www.masterclock.com 28 Clock is not displaying the correct local time or date Possible reasons and solutions: 1. Clock did not properly negotiate the DST to standard time (or vice-versa) transition 2. Time Zone offset has been configured incorrectly. Provide the correct Time Zone configuration. 3. DST has been configured incorrectly. This is configured separately from the Time Zone configuration. Provide the correct DST configuration by either manually entering the DST rules or selecting the single button configuration under WinDiscovery. If using the convenient single-button configuration for [US/Canada] or [EU DST], be certain to use the latest version of WinDiscovery and apply it for each device. If using the [Current Windows Setting] button to apply the DST rules, verify that the rules on the computer are correct. 4. If using DHCP/BOOTP for network configuration, consult with your network administrator to see if the optional Time Zone option has been changed as this option as provided by DHCP can override manual settings. 5. If you have used the Set Time/Date function, note that the device assumes that you have entered UTC and will apply your Time Zone and DST configuration relative to the manually entered time. 6. The NTP time server(s) is not available or the NTP server being used has the incorrect UTC time. Verify the NTP time server(s) are available and is providing the correct UTC time. “Bad Password” Windows pop-up each time a configuration setting is applied 29 Possible reasons and solutions: 1. You have entered and “remembered” an incorrect password in the password windows. This is now causing multiple error indication windows titled “Bad Password” to pop-up for each portion of the configuration message that is being sent to the device. You must clear the memorized password using one of the two options below. a. WinDiscovery only remembers the password for the current session, close the WinDiscovery session and reopen. All passwords will be forgotten by WinDiscovery. b. As an alternative to closing the WinDiscovery session, from the drop-down menu on the device being administered, click on “Forget memorized password”. 2. If using the Global Password feature, the global password does not match the existing password of the device you are trying to manage. Either change the device password to match that of the global password, or change the global password to match that of the device(s) you are attempting to manage. IF THESE INSTRUCTIONS ARE CONFUSING OR NOT WORKING FOR YOU Send us an e-mail or call right away. See last page (p. 35). Masterclock www.masterclock.com Care and Cleaning Adherence to regular and proper cleaning procedures is recommended to preserve appearance. Scratched or otherwise damaged lens caused by misuse, mishandling and improper storage or improper cleaning is not covered under the limited warranty. Job Site Precautions It is recommended the clock be removed from the wall and stored face up in its protective shipment bag during painting and construction. New construction and renovations frequently require that the job site be cleaned of any excess mortar, paint, sealant, primers or other construction compounds. Only recommended cleaners should be used to clean the polycarbonate lens. Contact with harsh solvents such as methyl ethyl ketone (MEK) or muriatic acid can result in surface degradation and possible crazing of the polycarbonate. When the clock is first installed, glazing compound and masking tape adhesive can be easily removed from the lens by applying naphtha (VMandP) or kerosene with a soft cloth, followed immediately with a thorough soap and water cleaning. Stainless Steel Case If your clock has a stainless steel case, a cleaner and polish designed for use on stainless steel is recommended. Use a recommended product to maintain and protect the stainless steel finish while resisting water spots and fingerprints. Compatible Cleaners and Polish The following cleaning and polish agent has been found to be compatible with the stainless steel case finish. Manufacturer's instructions should be followed. Magic® Complete™ Stainless Steel Cleaner and Polish Spray (Magic American Products. Washing to Minimize Scratching Wash with a mild soap or detergent (such as 409™ (Clorox Co.), cleaner) and lukewarm water, using a clean sponge or a soft lint free cloth. DO NOT USE PAPER TOWELS OR PAPER PRODUCTS TO CLEAN OR DRY THE LENS. Rinse well with clean water. Dry thoroughly with a chamois or moist cellulose sponge to prevent water spots. Do not scrub or use brushes or abrasives on these products; the UV coating is not mar resistant. Also do not use butyl cellosolve in direct sunlight. Fresh paint splashes, grease and smeared glazing compounds can be removed easily before drying by rubbing lightly with a good grade of naphtha or isopropyl alcohol. Follow the alcohol rub with a mild detergent wash with warm water and end with a thorough rinsing with clean water using a clean damp lint free cloth. Masterclock www.masterclock.com 30 Minimize Hairline Scratches Always store the clock face-up in the protective plastic shipping bag until ready for installation and during transporting to the installation site. Do not place the clock face (lens surface) down on any surface as this may scratch or mar the lens. Scratches and minor abrasions can be minimized by using a mild automobile polish. Three such products that tend to polish and fill scratches are: 1. Johnson Paste Wax (Johnson and Johnson Co.) 2. Novus Plastic Polish #1 and #2 (Novus, Inc.) 3. Mirror Glaze plastic polish (MG M10) (Mirror Bright Polish Co.) It is suggested that a test be made on a very small section of the polycarbonate lens with the polish selected and that the manufacturer's instructions be followed. "Don't" - Very Important Don't store the clock without the protective plastic shipment bag. Don't store or place the clock face down on any surface, as this may scratch the lens. Don't use abrasive or highly alkaline cleaners. Don't use paper towels, paper products, rayon or polyester cloths to clean or dry the lens. Don't scrape the lens with squeegees, razor blades or other sharp instruments. Don't ever use benzene, gasoline, acetone, methyl ethyl ketone (MEK), muriatic acid or carbon tetrachloride on the lens. Don't clean lenses in hot sun or on very hot days. Cleaning the Lens The following cleaning agents have been found to be compatible with the Polycarbonate and Acrylic lens. Manufacturer's instructions should be followed. Formula 409™ (Clorox Co.) Top Job™ (Proctor and Gamble) VM and P grade Naphtha Joy™ (Proctor and Gamble) Windex w/Ammonia D™ (Drackett Products) Palmolive Liquid™ (Colgate Palmolive) Foreign Substance Removal Butyl Cellosolve (For removal of paints, marking pens, lipstick, etc.) The use of adhesive tape or lint removal tools work well for lifting off old weathered paints. To remove labels, stickers, etc., the use of kerosene, naphtha or petroleum spirits is generally effective. When the solvent will not penetrate sticker material, apply heat (hair dryer) to soften the adhesive and promote removal. Gasoline should never be used. Masterclock www.masterclock.com 31 Limited Warranty This MASTERCLOCK product warranty extends to the original purchaser. MASTERCLOCK warrants this product against defects in materials and workmanship for a period of five years from date of sale. If MASTERCLOCK receives notice of such defects during the warranty period, MASTERCLOCK will, at its option, either repair or replace products that prove to be defective. Should MASTERCLOCK be unable to repair or replace the product within a reasonable amount of time, the customer's alternate remedy shall be a refund of the purchase price upon return of the product to MASTERCLOCK. This warranty gives the customer specific legal rights. Other rights, which vary from state to state or province to province, may be available. Exclusions The above warranty shall not apply to defects resulting from improper or inadequate installation or maintenance by the customer, customer-supplied software or interfacing, unauthorized modification or misuse, operation outside of the environmental specifications for the product or improper site preparation and maintenance (if applicable). Limitations MASTERCLOCK makes no other warranty, either expressed or implied, with respect to this product. MASTERCLOCK specifically disclaims the implied warranties of merchantability of fitness for a particular purpose. In any state or province which does not allow the foregoing disclaimer, any implied warranty of merchantability or fitness for a particular purpose imposed by law in those states or provinces is limited to the one-year duration of the written warranty. Exclusive Remedies The remedies provided herein are the customer’s sole and exclusive remedies. In no event shall MASTERCLOCK be liable for any direct, indirect, special, incidental or consequential damages, whether based on contract, tort or any other legal theory. In any state or province that does not allow the foregoing exclusion or limitation of incidental or consequential damages, the customer may have other remedies. General Use Precautions Do not expose this clock to temperatures outside the range of 0° C to 50° C (32° F to 122° F). Placing your device in an environment that is too cold or humid may damage the unit. Do not place heavy objects on top of this clock or use excessive force on it. Never use benzene, paint thinners, detergent or other chemical products to clean the outside of this clock. Such products will disfigure and discolor the casing. Masterclock www.masterclock.com 32 Health and Safety These devices generate, use and can radiate radio frequency energy and, if not installed and used in accordance with the instructions, may cause harmful interference to radio communications. There is no guarantee that interference will not occur in a particular installation. If this device does cause harmful interference to radio or television reception, which can be determined by removing power from the device, the user is encouraged to try to correct the interference by one or more of the following measures: 1. Connect the devices DC power cord into an outlet on a different circuit than other devices. Never insert any metallic object into the devices case. Doing so increases 2. Increase the physical distance between the the risk of electrical shock, short CLDNTD12 digital time display and other devices. circuiting, fire or personal injury. 3. Contact MASTERCLOCK. Never expose this device to rain, or use This CLDNTD12 has been tested and found to comply it near water or in damp or wet with the limits for a Class B digital device, pursuant to conditions. Part 15 of the FCC Rules. These limits are designed to provide reasonable protection against harmful Never place objects containing liquids interference in a residential installation. on or near this device, as they may spill into its openings increasing the risk of Only qualified persons are authorized to carry out maintenance on this device. Read this User’s Manual electrical shock, short circuiting, fire or carefully, and follow the correct procedure when personal injury setting up the device. Do not open your Masterclock product or attempt to disassemble or modify it. 33 COPYRIGHT ©All rights reserved. No part of this publication may be reproduced, stored in a retrieval system, or transmitted in any form or by any means, electronic, mechanical, photocopying, recording or otherwise, without the prior written consent of Masterclock. TRADEMARKS Microsoft is a registered trademark of Microsoft Corporation. Other trademarks mentioned in this manual are the property of their respective owners. PRINTING While optimized for onscreen viewing, the pages of this manual are formatted for printing on 8.5” x 11” and A4 sized paper, giving you the option to print the entire manual or just a specific page or section. Masterclock www.masterclock.com Compliance Electromagnetic Compatibility 2004/108/EC Tested and Conforms to EMC standards Low voltage directive 2006/95/EC Tested and Conforms to Safety standards FCC Statement This device complies with Part 15 of the FCC Rules and found to comply with the limits for a Class B digital device. These limits are designed to provide reasonable protection against harmful interference in a commercial/residential installation. Operation is subject to the following two conditions: (1) This device may not cause harmful interference, and (2) this device must accept any interference received, including interference that may cause undesired operation WEEE Waste Electrical and Electronic Equipment Directive (WEEE) 2002/95/EC The CLDNTD12 is considered WEEE Category 9 (Monitoring and Control Instruments Equipment) as defined by the WEEE Directive and therefore fall within the scope of the WEEE Directive. For more information about Masterclock’s WEEE compliance and recycle program, please visit: http://www.masterclock.com/rohs_compliance.php Operation is subject to the following two conditions: (1) This device may not cause harmful interference, and (2) this device must accept any interference received, including interference that may cause undesired operation. RoHS Restriction of the Use of Certain Hazardous Substances Directive 2002/95/EC Compliant by Exemption The RoHS directive covers the same scope of electrical and electronic equipment that are under the WEEE directive, except that Category 8, Medical Devices, and Category 9, Monitoring and Control Instruments, which are under WEEE, are excluded from the RoHS directive. The CLDNTD12 falls under the category of Monitoring and Control Instruments Equipment (Category 9 as defined in Annex 1A of WEEE 2002/96/EC Directive) which is excluded from the RoHS directive 2002/95/EC (reference Article 2, paragraph 1) requirements. These products are manufactured using lead in the soldering process as allowed for items excluded from the RoHS directive. These units are RoHS Compliant only in that they are excluded from the RoHS directive under Category 9, Monitoring and Control Instruments. Masterclock www.masterclock.com 34 Service Information We sincerely hope that you never experience a problem with any Masterclock product. If you do need service, contact Masterclock. Many problems are easily resolved with a single phone call or email. Visit our website for FAQs and contact information. http://www.MASTERCLOCK.com/faq.php Please supply us with as many details about the problem as you can. The information you provide will be supplied to the repair department before your unit arrives. This helps us to provide you with the best service, in the fastest manner. We apologize for any inconvenience that the need for repair may cause you. We hope that our rapid service meets your needs. If you have any suggestions to help us improve our service, please give us a call. We appreciate your ideas and will respond to them. Contact Information USA OFFICE Masterclock, Inc., 2484 West Clay Street Saint Charles, MO 63301 USA and Canada: Tel +1 (636) 724-3666 | +1 (800) 940-2248 | Fax +1 (636) 724-3776 International: Tel +1 (636) 724-3666 | Fax +1 (636) 724-3776 Email Contacts General Enquiries: [email protected] Sales Enquiries: [email protected] Technical Support: [email protected] Website: www.masterclock.com Follow us: All content Copyright © MASTERCLOCK 1999-2013. All rights reserved. Masterclock www.masterclock.com 35 36 Masterclock www.masterclock.com