1
Made in Korea
Owner's Manual
MODELS : MR-320 / MR340 / MR-380
EVR-320 / EVR-340 / EVR-380
For product quality improvement, the product design and accessories are subject to be changed without notice.
Thanks for purchasing this product.
• Please read this owner’s manual before use, and use it after understanding all the features.
• Please make sure to write down the date and the place of purchase on the certificate of warranty attached.
• Free of charge warranty maintenance will be served only on the presence of the certificate of warranty.
• As this appliance is registered for electromagnetic compatibility for home use (B class),
it is intended for primarily home use and may be used in all areas.
P/No. 6311-320-01B
CONTENTS
2
1. SAFETY PRECAUTIONS ....................................................................... 3
2. NAMES OF PARTS ................................................................................ 4
3. LCD PANEL DESCRIPTION ................................................................... 5
4. PREPARATION PRIOR TO USE ........................................................... 5
5. DC POWER SUPPLY USE .................................................................... 6
5-1. POWER SUPPLY USE OF PC USB PORT ...................................... 6
5-2. USE OF USB DC POWER SUPPLY ADAPTER(5V) ........................ 6
6. POWER ON/OFF ................................................................................... 6
6-1. POWER ON ...................................................................................... 6
6-2. POWER OFF ..................................................................................... 6
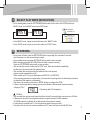
7. SELECT PLAY MODE (VOICE/MUSIC) ................................................ 7
8. RECORDING .......................................................................................... 7
9. RECORDED FILE PLAY ......................................................................... 8
10. AUDIO VOLUME CONTROL ................................................................. 8
11. RECORDED TIME CHECK .................................................................... 8
12. REMAINING RECORDING TIME CHECK ............................................. 8
13. FILE PREVIEW FEATURE ..................................................................... 9
14. RECORDED FILE ERASE ..................................................................... 9
15. FILE UPLOAD/DOWNLOAD .................................................................. 9
16. MODE SETTING .................................................................................. 10
16-1. RECORDING MODE SETTING ..................................................... 11
16-2. RECORDING FOLDER SETTING ................................................. 11
16-3. VOS(VOICE OPERATED SYSTEM) RECORDING SETTING ...... 12
16-4. REPEATED PLAY SETTING ......................................................... 12
16-5. LCD PANEL DISPLAY SETTING ................................................... 12
16-6. EQ (EQUALIZER, PLAY ATTRIBUTE) SETTING .......................... 13
16-7. CLEAN (ERASE A FOLDER FILE/ALL OF THE FILES) SETTING 13
17. RECORDING BY USE OF EXTERNAL DEVICES................................ 15
17-1. RECORDING TELEPHONE WITH THE EAR-MICROPHONE ........ 15
17-2. RECORDING CALL WITH WIRED TELEPHONE ADAPTOR ........ 15
1
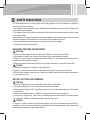
SAFETY PRECAUTIONS
• As these instructions are for user’s safety and property protection, the user is required to read before
use and to follow the instructions.
• The company shall not be entitled to take responsibility for the damage caused by the use of this product
or any claims from third parties.
• The company shall not be liable to the damage from the loss of recorded data caused by failure, repair
or any other reasons.
• As the memory of the product is subject to malfunction caused by the computer viruses, and the recorded
data may be deleted, please make sure to treat viruses of the computer to be used.
• It is recommended to store the important recordings promptly to the computer.
• Unauthorized use is strictly prohibited.
MAIN BODY CAUTIONS AND WARNINGS
Warning
• Please do not disassemble or alter the main body. Otherwise, it may cause fire or failure.
• If the earphone is used in loud volume for a long time, it may cause damage to hearing.
• Please do not use in the lower or higher temperature. Otherwise, it may cause short circuit due to condensation and may cause fire or failure.
• Please keep away from the humid places or the oily places. Otherwise, it may cause fire or failure.
Caution
• If the product is impacted or dropped, it may cause failure.
• Please do not clean the surface of the product with such as alcohol, benzene or paint thinner.
• While driving or walking, to avoid the risk of the traffic accidents, please avoid to hear with the earphone
or to operate the product
BATTERY CAUTIONS AND WARNINGS
Warning
• Please do not apply short circuit, disassemble, heat or impact to the battery.
• Fire may be caused by the friction, please keep away from metal objects.
• Only prescribed batteries (“AAA” type Alkaline) are to be used, and please make sure of the polarity
(+,-) before use.
• Please do not charge the battery. Otherwise, it may cause fire or injury due to explosion.
• If not used for a long time (i.e. over a month), the battery should be removed from the product and kept
in the safe place. Otherwise, the battery leakage may cause fire or injury.
Caution
• If the skin or cloths are adhered by the battery leakage, they should be washed with clean water immediately. In case of eye contact, please do not rub the eyes. Please wash eyes with running clean water
immediately and make sure to get medical attention.
3
2
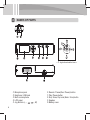
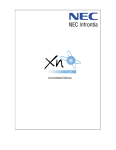
NAMES OF PARTS
< g Jog buttons detailed view >
V
V
4
V
V
c Microphone jack
d Earphone / USB jack
e Built-in microphone
f LCD panel
g Jog buttons (+, -,
,
, M)
h Record / Pause(Rec / Pause) button
i Play /Pause button
j Stop / Erase, Play mode (Music / Voice) button
k Speaker
l Battery cover
3
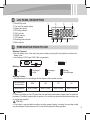
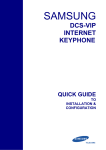
LCD PANEL DESCRIPTION
c Record/Play mode
d Time and File number display
e Battery life indicator
f RECording indicator
g PLAY indicator
h ERASE indicator
i VOS indicator
j Recording folder indicator
k Music indicator
4
ྙ
ྛ
ྚ
ྡ
ྠ
ྜྷ
ྜ
ྟ
ྞ
PREPARATION PRIOR TO USE
Battery Placement
• Open the battery cover of the main body, place a battery according to the right polarity, and close the
battery cover.
• Use a battery of “AAA” type, LR03, UM-4 or equivalents.
ORP
OTP
Battery Status Icons
Full
Discharged
a little
Discharged
a lot
(Blinking)
Fully discharged
Battery Duration
• The battery duration for recording under the earphone disconnected condition.
Recording mode
(Audio quality)
PCM
HQ
SP
LP
Battery duration
About 13 hours
About 13 hours
About 18 hours
About 19 hours
Caution
• If there is no display on the LCD panel after the new battery replacement, please check the polarity of
the battery. The battery supplied with the product is for monitoring purpose and the battery duration may
be shorter than specified.
Warning
• If the battery is removed while recording, recording paused, playing or erasing, the recording content
may be damaged. Please make sure not to remove the battery while being operated.
5
5
DC POWER SUPPLY USE
This appliance may be operated with the external power supply (DC adaptor), without a battery
installed.
5-1. Power Supply Use of PC USB PORT
• Connect the earphone/USB jack to a USB port of a PC with USB cable.
• When the USB communication is established, the LCD panel displays
.
• If the PLAY/PAUSE button is pressed for more than 3 seconds, it enters the operation mode and in the
standby (stop) state, and it is enabled to “play and record”.
• If it is in the PC UCB power supply operation mode, the file upload/download feature is not operational.
• Disconnect and then connect again, then it enters the USB communication mode, and the file upload/
download feature is operational.
5-2. Use of USB DC Power Supply ADAPTER(5V)
• Connect the earphone/USB jack with USB DC Power Supply ADAPTER port.
After a while, the LCD panel turns into
.
• If the PLAY/PAUSE button is pressed for more than 3 seconds, it enters the operation mode and
in the standby (stop) state, and it is enabled to “play and record”.
Caution
• When to disconnect the product from the PC, it is recommended to execute safe hardware removal utility
for the data protection of the product.
6
POWER ON/OFF
6-1. Power On
• Press the PLAY/PAUSE button long enough (for more than 3 seconds), then the power is on.
• Press the REC/PAUSE button long enough (for more than 3 seconds), then the power is on and the
recording is started.
6-2. Power Off
• When in the STOP state for more than 3 minutes, the power is automatically off.
• When in the standby mode, press the REC/PAUSE button long enough (for more than 3 seconds),
then the power is off.
6
7
SELECT PLAY MODE (MUSIC/VOICE)
• In the standby state, press the STOP/ERASE button briefly, then it enters into VOICE mode from
MUSIC mode, or into MUSIC mode from VOICE mode.
My Computer
Local Disc (C:)
• In the MUSIC mode, it plays the music files under the “MUSIC” folder.
• In the VOICE mode, it plays the voice files under the “VOICE” folder.
8
<Initial folder configuration>
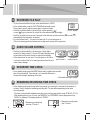
RECORDING
• In the power off state, press the REC/PAUSE button long enough (for more than 3 seconds),
then the power is on and the recording is started.
• In the standby mode, press the REC/PAUSE button briefly to start recording.
• While recording, press the REC/PAUSE button briefly to pause recording.
Press the STOP/ERASE button briefly to stop recording.
• The recording file format is either mp3 or PCM(*.wav), which has excellent compatibility,
the files are to be stored under the selected folder.
• The recorded files are stored under the selected folder of the product,
and are named sequentially from 001.
When viewed from PC, they are displayed as A-REC0001 or B-REC0001.
(If the recording operation is stopped within 3 seconds after recording starts, the data being recorded is
not stored and the operation is terminated.)
• The factory set recording mode (refer to MODE setting) is configured as PCM.
• If there is not enough memory storage space or the number of files exceeds maximum number,
it displays “FULL”.
< Recording data FULL displayed >
Caution
• The recorded files may be stored under the folders A and B, and each folder may store up to 999 files.
• If files are not recorded or the played sounds are corrupted, execute CLEAN operation.
(If CLEAN operation is initiated, all the data stored in the product is erased.)
• If a file name is modified from PC, the file cannot be played from the product.
• If to play the file of which the name is modified from PC, store the file under the MUSIC folder.
7
9
RECORDED FILE PLAY
V
V
• To play the recorded files, the play mode should be set to VOICE.
• In the standby state, press the PLAY/PAUSE button briefly to play.
Press again to pause, and then press again to continue to play.
< VOICE display >
• Push the jog buttons briefly in the directions of either previous (
)
or next (
)to go to previous file or next file in the selected folder accordingly.
• Push the jog buttons for more than 2 seconds in the directions of either previous (
) or next (
)
while playing, then fast search is initiated.
• For over volume level 11, it is reset to volume level 10 on the next power on.
(This is the hearing protection feature from the high audio volume of the earphone.)
AUDIO VOLUME CONTROL
• Push the jog buttons briefly in the directions of either higher
volume(+) or lower volume(-), then the LCD panel displays audio
volume level and the audio volume is controlled accordingly.
• If the volume is set to over level 11 and the power is off and on,
it is reset to volume level 10 for hearing protection from the loud
audio volume damage.
11
V
V
V
V
V
V
10
< Minimum
audio volume >
< Maximum
audio volume >
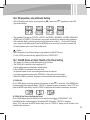
RECORDED TIME CHECK
• In the standby mode, press the MODE button briefly to display the recorded
time of the selected file. There may be 1 or 2 seconds difference in
the actual time length depending on the files.
< Recorded time length display >
12
REMAINING RECORDING TIME CHECK
• In the standby mode, push the jog button long enough ( for more than 2 seconds) in the direction of
volume(-), then it display the remaining recording time. The time differs depending on the audio
recording quality.
-.The time is automatically calculated according to the recording auto quality mode (PCM, HQ, SP, LP).
If the remaining time is over 10 hours, the “MINUTEs” and “SECONDs” are not displayed and only
“HOURs” is displayed. The display method is “TIME H”.
< Remaining recording time
over 10 hours >
< Remaining recording time
less than 10 hours >
8
hour min sec
hour
13
FILE PREVIEW FEATURE
In the standby state, press the PLAY/PAUSE button long enough (for more than 5 seconds), then the file preview feature is initiated as the each file from selected one to the end file is played for 5 seconds and stopped.
14
RECORDED FILE ERASE
V
V
V
V
1) In the standby state, operate the previous(
) and/or next (
) buttons to select the file to be erased.
2) Press STOP/ERASE button long enough (for more than 5 seconds),
then the file to be erased starts to be played for verification, the LCD
panel blinks ERASE and the file is played for 5 seconds.
<Erase operation display>
3) While playing for 5 seconds, press STOP/ERASE button briefly to erase the file.
If any other button is pressed or STOP/ERASE button is not pressed, the erase command is cancelled.
* For further information for erase of all of the files or folder deletion, refer to MODE setting.
Caution • The erased files cannot be restored. • It is recommended to check if the file is important before erase
and to perform backup of the important files to PC. • If a file is erased, the internal numbers move accordingly.
Example) If the number 001 is erased, the number 002 becomes the number 001, and the number 003 becomes the
number 002, that is the numbers move one step ahead.
15
Erase
(Files before erase) GGGWWXSGGGGGGGGGGWWYSGGGGGGGGGGWWZSGGGGGGGGGGWW[SGGGGGGGGGGWW\GUUUUU
(Files after erase) GGGWWXSGGGGGGGGGGWWYSGGGGGGGGGGWWZSGGGGGGGGGGWW[GUUUUU
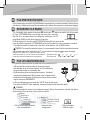
FILE UPLOAD/DOWNLOAD
• Connect the earphone jack of the main body of the product to the PC
USB port with the connection cable as shown in the figure.
• After standby (for up to several minutes), the PC automatically
recognize the product as a removable disk.
• By identically using the windows explorer function, file upload /
download may be executed. (My Computer, refer to figures below)
• Regardless of the file types, the files may be stored, and the product
may be used as a USB MEMORY.
• If the recorded files are stored under the “VOICE” folder and the music
files under the ”MUSIC” folder separately, they may be played in the best audio quality.
Caution
• It is recommended to execute “safe hardware removal” utility for the protection of stored data, before
disconnecting of the main body of the product from the PC.
Wallpaper
My Document
My Computer
Local Disc (C:)
DVD/CD-RW Drive (D:)
< PC window showing connected
as a removable disc >
Saving the music file
Saving the voice file
< Recorder folder
configuration >
LCD panel display:
USB connection
9
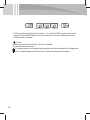
16
MODE SETTING
• The MODE setting feature is to set recording MODE, recording FOLDER, VOS (voice operated system)
recording, REPeated play, LCD panel display, EQ (equalizer, play attribute) and CLEAN of folders/all
of the files.
• In the standby (stop) mode, press the MODE button for more than 3 seconds, it enters into the
MODE setting feature.
• Push the jog buttons in the directions of volume(+) and/or volume(-) briefly to select the mode to be set.
• Press the MODE button for more than 3 seconds to store the mode settings and to exit to the standby mode.
Jog buttons
( Push in the directions of left, right, top and bottom to use)
V
V
(
) direction
(
) direction
V
V
(-) direction (+) direction
MODE button
(Press the center to use)
--------- Set recording quality MODE
--------- Set recording FOLDER
(+) direction
--------- Set VOS (voice operated system) recording
--------- Set REPeated play
(-) direction
--------- Set LCD panel display
--------- Set EQ (equalizer) play attribute
--------- Set CLEAN of folders/all the files
10
<LCD panel display by mode>
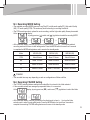
16-1. Recording MODE Setting
V
V
V
V
• The available recording MODE types are Long Play(LP), middle audio quality(SP), High audio Quality
(HQ), CD audio quality (PCM). The mode may be set according to recording conditions.
• The PCM recording mode is optimal for music recording, and the high audio quality file may be created.
At the
display,
by using previous (
) and/or next (
) jog buttons to select the recording MODE.
• At the selected display, push the jog buttons in the directions of volume (+, -) to store the selected
recording mode and to move to next setting mode. Press the MODE button for more than 3 seconds
to complete the MODE setting feature and to move to the standby mode.
Mode
MR-320 (2G)
MR-340 (4G)
MR-380 (8G)
PCM
About 6 hours
About 12 hours
About 24 hours
HQ
About 72 hours
About 144 hours
About 288 hours
SP
About 144 hours
About 288 hours
About 576 hours
LP
About 576 hours
About 1,152 hours
About 2,304 hours
Caution
• The recorded time may vary depending on such as configurations of folder and files.
16-2. Recording FOLDER Setting
V
V
V
V
• The FOLDER selecting feature enables the recorded file to be stored in the folder selected.
• If the recorded contents are managed by separated folders, it is convenient.
At the
display, by using previous (
) and/or next (
) jog buttons to select the folder.
• At the selected display, push the jog buttons in the directions of volume (+, -) to store the folder
selection and to move to next setting mode. Press the MODE button for more than 3 seconds to
complete the recording FOLDER setting feature and to move to the standby mode.
11
16-3. VOS(Voice Operated System) Recording Setting
V
V
V
V
• The VOS feature is the feature to detect the audio sound during recording.
If the audio sound is not detected, the recording is paused and if the audio sound is detected,
the recording is continued again. The memory may be utilized effectively.
At the
display,
by using previous (
) and/or next (
) jog buttons to select ON/OFF.
• At the selected display, push the jog buttons in the directions of volume (+, -) to store the VOS
recording setting and to move to next setting mode. Press the MODE button for more than 3 seconds
to complete the VOS recording setting feature and to move to the standby mode.
Caution • The VOS feature does not increase the battery life.
16-4. REPeated Play Setting
V
V
V
V
• The repeated play setting may be set by file NO, 1 (single file) and folder.
At the
display, by using
previous (
) and/or next (
) jog buttons to select REPeated play mode.
• The REP NO plays the remaining files from the current position in the folder one time and stops.
• The REP 1 plays repeatedly on the file displayed on the LCD panel.
• The REP F plays repeatedly the files under the folder selected.
• At the selected display, push the jog buttons in the directions of volume (+, -) to store the REPeated
play setting and to move to next setting mode. Press the MODE button for more than 3 seconds to
complete the REPeated play setting feature and to move to the standby mode.
16-5. LCD Panel Display Setting
V
V
12
V
V
• If the LCD panel display off time (10, 30, 60seconds) is set, the LCD panel display goes off after the set
time (10, 30, 60seconds) while recording.
• If the LCD Panel Display is set to ON, the LCD display is on all the time.
At the
display, by using
previous (
) and/or next (
) jog buttons to select ON, 10, 30, 60 seconds.
• While the LCD panel display is off, press any button to turn the LCD panel display on. While the LCD
panel display is on, press the STOP/ERASE button to stop recording.
• At the selected display, push the jog buttons in the directions of volume (+, -) to store the setting and to
move to next setting mode. Press the MODE button for more than 3 seconds to complete the LCD
panel display setting feature and to move to the standby mode
) and/or next (
V
V
• At the EQ setting mode display, by using previous (
play attribute setting.
V
V
16-6. EQ (equalizer, play attribute) Setting
) jog buttons to select EQ
• The available EQ modes are FL(FLAT), ro(ROCK), Ho(HOUSE), dA(DANCE), JA(JAZZ), bA(BALLAD),
rb(R&B) and CL(CLASSIC). The feature is to enjoy music as selecting by category and/or preference.
• At the selected display, push the jog buttons in the directions of volume (+, -) to store the EQ setting
and to move to next setting mode. Press the MODE button for more than 3 seconds to complete the
EQ setting feature and to move to the standby mode.
Caution
• The EQ(equalizer, play attribute) feature is only applied to the MUSIC file play.
For the VOICE (recorded) file play, applied EQ is set to FLAT(EQ OFF).
16-7. CLEAN (Erase a Folder File/All of the Files) Setting
• The feature is for erasing a folder file selected or all of the files.
• The CLEAN ALL is identical to the formatting of PC,
and the setting values are initialized to default setting.
• If the CLEAN ALL is performed at the main body,
the operation speed for such as recording start and stop is improved.
• It is highly recommend to perform the CLEAN ALL at the main body of the product.
• When the CLEAN is performed, the power is off automatically after erasing the file(s).
V
V
1) CLEAN ALL
At the CLEAN display, push the jog button in the direction of next (
) to select ALL. If the MODE button
is pressed briefly at the selected display, “YES NO” is displayed for erase confirmation. Select “YES” and
press the MODE button briefly, then the “CLEAN” is display and all the data in the memory are erased.
V
V
2) CLEAN All the Files in the Selected Folder
At the CLEAN display, push the job button in the direction of next (
) to FOLD(MUSIC, A, B).
If the MODE button is pressed briefly at the selected FOLDer display, “YES NO” is displayed.
Select “YES” and press the MODE button briefly, then the “CLEAN” is display and all the data in the
selected folder are erased.
13
<Folder MUSIC>
<Folder A>
<Folder B>
• Push the jog buttons in the directions of volume (+, -) to cancel the CLEAN operation and to move to
next mode. Press the MODE button for more than 3 seconds, it exits to the standby mode and the
CLEAN operation is cancelled.
Caution
• Make sure to store the important files to PC prior to formatting.
The erase files cannot be restored.
• For system protection, the formatting may be operational only when the battery life level is bigger than
level 2. If remained battery life is less than level 1, replace the battery before formatting.
14
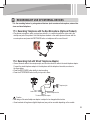
17
RECORDING BY USE OF EXTERNAL DEVICES
It is the recording feature by using external devices (such as external microphone, external devices and wired telephone.
17-1. Recording Telephone with the Ear-Microphone (Optional Product)
• Plug the ear-microphone, which a microphone is built in, in a ear and connect the other side to the
microphone jack of the product. Hold the telephone handset or the mobile phone at the ear with the
ear-microphone and press the REC/PAUSE button on telephone call to record the call.
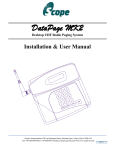
17-2. Recording Call with Wired Telephone Adaptor
• Connect the audio cable to the microphone jack, and the other side of the cable to the wired telephone adaptor.
Connect the wired telephone adaptor to the telephone with the telephone line cable, as shown in
the figure below.
• Press the REC/PAUSE button briefly to start recording.
• Press the STOP/ERASE button briefly to stop and to store.
Line cable
Audio cable
Telephone jack
External telephone line
The wired telephone adaptor
Caution
• The design of the wired telephone adaptor is subject to be changed without notice.
• Some handsets of keyphones (digital telephones) may not be recorded depending on the models.
15
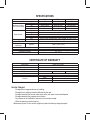
SPECIFICATIONS
Model
Memory
PCM
Maximum recording
HQ
SP
hours by audio quality
LP
PCM
HQ
Battery life time
SP
LP
Play
Recording (folder)
Voice
Speaker output power
Practically maximum
Earphone
output power
Dimension (W x H x D)
Power supply
Operating environment
Accessories
MR-320
2GB
About 6 hours
About 72 hours
About 144 hours
About 576 hours
MR-340
MR-380
4GB
8GB
About 12 hours
about 24 hours
About 144 hours
about 288 hours
About 288 hours
about 576 hours
About 1152 hours
about 2304 hours
About 13 hours
About 13 hours
About 18 hours
About 19 hours
About 15 hours {earphone, MP3 (1 kHz, 128 kbps, 44.1 kHz), Vol 10}
999 files(A) + 999 files(B)
17 mm (8 ohms, 90 mW)
2 mW + 2 mW / 16 ohm
105.5 x 22.5 x 14.5 (mm)
1.5 V (AAA Alkaline x 1)
0 °C ~ 40 °C
Earphone x 1 , battery x 1, Owner’s manual, USB cable x 1
CERTIFICATE OF WARRANTY
Product name
Model name
Date of purchase
Place of purchase
Telephone
Others
Warranty period
Customer
Digital voice recorder
Purchase price
1 year
Name
Address
Telephone
Service Charged
- Damage due to inappropriate use or handling.
- Damage due to arbitrary internal modification by the user.
- Damage caused by the force of nature such as fire, salt water, flood and earthquake.
- Damage caused by the computer virus infection
- No presence of the certificate of warranty or the purchase receipt.
- When the warranty period is expired.
Maintenance by door to door service: eligible only when the delivery charge is prepaid.