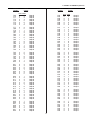
1
Model AD1273 CobraDome
Indoor Surveillance Unit
Installation and Operation Instructions
This manual describes the installation and maintenance procedures for the American Dynamics Model AD1273 CobraDome
Indoor Surveillance unit. Before installation, become familiar with all of the special features and warnings associated with this
equipment. Once installation is complete, store this manual in a safe, convenient location for future reference.
The software/firmware furnished with this equipment is confidential to, and copyrighted by, AMERICAN DYNAMICS. It is
not to be copied or disclosed in any manner without the express written consent of AMERICAN DYNAMICS. The
software/firmware is furnished to the purchaser under a license for use on a single system.
Information furnished by AMERICAN DYNAMICS is believed to be accurate and reliable. However, no responsibility is
assumed by AMERICAN DYNAMICS for its use; nor for any infringements of other rights of third parties which may result
from its use. No license is granted by implications or otherwise under any patent or patent rights of AMERICAN DYNAMICS.
AMERICAN
DYNAMICS
The installation of this product should be made by qualified
service personnel and should conform to all local codes.
CAUTION
RISK OF ELECTRIC SHOCK
DO NOT OPEN
The lightning flash with arrowhead
symbol, within an equilateral
triangle, is intended to alert the
user to the presence of uninsulated
"dangerous voltage" within the
product's enclosure that may be of
sufficient magnitude to constitute a
risk of electric shock to persons.
!
CAUTION: TO REDUCE THE RISK OF ELECTRIC SHOCK,
DO NOT REMOVE COVERS (OR BACK) .
NO USER-SERVICEABLE PARTS INSIDE.
REFER SERVICING TO QUALIFIED SERVICE PERSONNEL
WARNING
To reduce the risk of fire or shock hazard, do
not expose this product to rain or moisture.
Warning: This product generates, uses, and can
radiate radio frequency energy and if not
installed and used in accordance with the
instructions manual, may cause interference to
radio communications. It has been tested and
found to comply with the limits for a Class A
computing device pursuant to Part 15 of FCC
Rules, which are designed to provide reasonable
protection against such interference when
operated in a commercial environment.
Operation of this product in a residential area is
likely to cause interference in which case the
user at his own expense will be required to take
whatever measures may be required to correct
the interference.
!
The exclamation point within an
equilateral triangle is intended to
alert the user to the presence of
important operating and maintenance
(servicing) instructions in the
literature accompanying the product.
UNPACKING AND INSPECTION
Unpack carefully. This is an electronic product and should
be handled as such. Compare the items received with the
packing list with your order.
Be sure to save:
1. The shipping cartons and insert pieces. They are the
safest material in which to make future shipments of
the product.
2. The IMPORTANT SAFEGUARDS sheet.
3. These Installation and Operating Instructions.
)
MAINTENANCE
User maintenance of this unit is limited to external cleaning
and inspection. For specific recommendations refer to the
IMPORTANT SAFEGUARDS sheet packaged with this product.
INSTALLATION AND SERVICE
If you require information during installation of this
product or if service seems necessary, contact the
American Dynamics Repair and Service Department at
(800) 442-2225. You must obtain a Return Authorization
Number and shipping instructions before returning any
product for service.
Do not attempt to service this product yourself. Opening or
removing covers may expose you to dangerous voltages or
other hazards. Refer all servicing to qualified personnel.
QA301C
Table of Contents
DESCRIPTION ..............................................................................................................
1
ROUTINE MAINTENANCE ........................................................................................
1
COMPONENT IDENTIFICATION ..............................................................................
Chassis Housing ......................................................................................................
Chassis Assembly ...................................................................................................
2
2
2
SETUP ............................................................................................................................
Control Switches .....................................................................................................
8-Position DIP Switch.............................................................................................
Camera Number Assignment ..................................................................................
Camera Number Sequencing ..................................................................................
Setting Camera Number thumbwheel Switches......................................................
Dome Configurations ..............................................................................................
Star Configuration...................................................................................................
Daisy Chain Configuration .....................................................................................
Jumper Removal .....................................................................................................
4
4
4
6
6
6
8
8
8
9
CONNECTIONS ............................................................................................................
Data Line Connections............................................................................................
Power Connections .................................................................................................
Wire Selection.........................................................................................................
10
10
11
11
INSTALLATION ...........................................................................................................
Drop Ceiling Mount ................................................................................................
Direct and Remote Hard Mount..............................................................................
Ceiling Preparation .................................................................................................
Direct Hard Mount ..................................................................................................
Remote Hard Mount................................................................................................
Pendant Mount ........................................................................................................
Preparation ..............................................................................................................
Chassis Installation .................................................................................................
Lower Dome Installation ........................................................................................
Lower Dome Ball Stud Positive Engagement.........................................................
Fascia Plate Installation ..........................................................................................
Trim Ring Installation .............................................................................................
Pendant Shroud Installation ....................................................................................
12
12
14
14
14
14
16
16
18
20
20
21
21
22
OPERATION..................................................................................................................
Autopan ...................................................................................................................
Configuring Autopan ..............................................................................................
Operating Autopan ..................................................................................................
Stopping Autopan ...................................................................................................
Preset Operation ......................................................................................................
Configuring Presets.................................................................................................
Operating Presets ....................................................................................................
Special Commands..................................................................................................
24
24
24
24
24
24
24
24
26
ADJUSTMENTS............................................................................................................
Backlash Adjustment ..............................................................................................
Checking and Setting Backlash...............................................................................
Lens Tracking Adjustment......................................................................................
28
28
28
30
APPENDIX
Typical System Connections...................................................................................
Camera Number Sequence Tables ..........................................................................
Troubleshooting ......................................................................................................
Index........................................................................................................................
Dimensions..............................................................................................................
Specifications ..........................................................................................................
A1-A3
A4-A10
A11
A12
A13
Back Page
AD1273
DESCRIPTION
AAAAAAAAAAAAAA
Figure 1 - AD1273 CobraDome Indoor Surveillance Unit in Drop Ceiling
DESCRIPTION
ROUTINE MAINTENANCE
The AD1273 CobraDome Indoor Surveillance unit is designed
for applications requiring a precision, high-speed pan/tilt
mechanism with a variety of options. The standard AD1273
CobraDome is shipped ready for either drop-ceiling or hard
mounting. Optional kits are available for a) converting to a
pendant mount, and for b) replacing the original ceiling tile
with a 2 ft. x 2 ft. pre-cut aluminum tile in a drop ceiling
mount.
Clean the lower dome outer surface with a non-abrasive
cleaning cloth and cleaning agent that is safe for use on acrylic
plastic.
• Always handle the lower dome from the outside circular
flange.
• Wipe the smoked lower dome with a clean, damp cloth.
Standard AD1273 Model: The standard AD1273 is available
with a factory-installed color or black and white camera
viewing through an auto-iris 10X motorized zoom lens with
manual override. The standard lower dome is made of optical
quality acrylic plastic, with a smoked finish and a clear
viewing slot.
Pan/Tilt Drive: High precision, gold contact slip-rings
provide a smooth, continuous 360° rotation with instant
reversal, precise tracking, and accurate target acquisition. The
dome drive mechanism provides smooth acceleration and quiet
camera movement with drift-free braking. Spring-loaded,
quick-disconnect mechanical couplings and wiring connectors
ease installation (or removal) of the pan/tilt chassis from the
dome housing.
Automation: Automatic control of pan/tilt speeds in relation
to zoom position is provided. Operating the AD1273 with an
American Dynamics Matrix Controller allows definable dwell
times for each of the 64 (maximum) programmable presets.
1
COMPONENT IDENTIFICATION
AD1273
COMPONENT IDENTIFICATION
CHASSIS HOUSING
CHASSIS ASSEMBLY
The CHASSIS HOUSING contains the major components
of the AD1273 CobraDome. Also, all mounting hardware is
attached to the CHASSIS HOUSING.
The CHASSIS ASSEMBLY contains all the camera/lens
hardware, the pan/tilt motors and gears, the on-board
electronics, and the power supply.
Aluminum Tile The Aluminum Tile is used in drop ceiling
installations. In a 2’ x 2’ grid, it replaces the
ceiling tile entirely. In a 2’ x 4’ grid, it
replaces half of the standard tile and comes
with a length of T-rail to support the seam
between the two half tiles (see Figure 2).
PCB Cover The PCB Cover is bolted to the top of the
CHASSIS ASSEMBLY and serves as a
protective cover for the AD1273 printed
circuit board and power supply. The PCB
Cover also serves as a connection point for a
safety cable between the CHASSIS
ASSEMBLY and the CHASSIS HOUSING
(see Figure 2).
Fascia Plate The Fascia Plate provides a neat appearance
to the bottom of the CobraDome in drop
ceiling or pendant mount installations. The
Fascia Plate attaches to the CHASSIS
HOUSING via four ball-and-socket snap
connectors.
Wheel Switches Two Wheel Switches mounted on the
printed circuit board permit setting the
individual CobraDome identification
numbers.
Trim Ring The Trim Ring provides a neat appearance
to the bottom of the CobraDome in drop
ceiling or hard-mount installations where a
hole was cut in the existing ceiling.
DIP Switch One eight position DIP Switch mounted on
the Printed Circuit Board configures the
CobraDome for Black/White or color
operation, NTSC or PAL operation,
motorized lens operation, and Auto-Line
Control operation.
Corner Brackets Four Corner Brackets bolt to the
CHASSIS HOUSING and provide
additional support when mounted in a
dropped ceiling grid.
Lower Dome The Lower Dome mounts to the CHASSIS
ASSEMBLY and provides cover to the
camera lens.
Safety Hook A Safety Hook bolts to the top of the
CHASSIS HOUSING to provide primary
safety against the CHASSIS HOUSING
falling during normal service or unrelated
building conditions. A suitable chain or
cable must be strung between the Safety
Hook and a solid location on the upper
building structure.
Safety Cable The Safety Cable connects between the
PCB Cover and the CHASSIS HOUSING
as a backup safety to prevent the chassis
falling during normal service operations or
unrelated building conditions.
7-Pin Connector The 7-Pin Connector routes the incoming
Data and 24VAC Power wiring harness to
the CobraDome printed circuit board.
NOTE: The Safety Hook is not to be confused with
the Safety Cable described in the CHASSIS
ASSEMBLY section.
BNC Connector The BNC Connector routes the outgoing
video signal.
2
AD1273
COMPONENT IDENTIFICATION
Safety Hook
CHASSIS HOUSING
Corner Brackets
DIP Switch
BNC Connector
Wheel Switch (2)
Chassis to Housing
Mounting Pin (2 each side)
Lower Dome
Mounting Snap Receptacle (4)
Fascia Mounting
Snap Receptacle (4)
A
A
A
AAAAAAA
A
AAAAAAA
AA
A
AA
AA
AA
Safety Cable
7 Pin
Connector
PCB Cover
CHASSIS
Lower Dome
Mounting Snap (4)
Viewing Port
Aluminum Mount Plate
(Drop Ceiling Only)
AAAAAAAAAAAAAAAAA
Lower Dome
Fascia Mounting Snap (4)
Fascia Cover (Standard)
Trim Ring (Optional)
Figure 2 - Major Component Identification
3
SETUP
AD1273
SETUP
8-Position DIP Switch
This section describes the required settings for proper
operation of the AD1273. Before installing the AD1273,
determine the intended operating requirements and set the
related switches accordingly.
An 8-position DIP switch labeled S1 configures each dome to
the particular type of hardware. The DIP switch is configured
at the factory, and only needs to be verified prior to
installation. The DIP switch is mounted to the printed circuit
board on top of the chassis frame (see Figure 3).
Control Switches
DIP switch positions and functions are described below and in
Table 1.
An 8-position DIP switch configures each dome for the
particular user-selected hardware. Two thumbwheel switches
identify the specific dome location within a Matrix Switching
System.
DIP Switch 1 - Set switch #1 in the OFF position for a
COLOR camera and the ON position for a
BLACK/WHITE camera.
Both thumbwheel switches and the 8-position DIP switch are
mounted to the printed circuit board located on top of the
chassis (see Figure 3).
DIP Switch 2 - Set switch #2 in the OFF position if using
NTSC standards and the ON position for PAL
standards.
NOTE: Verify all switch positions before installing the
chassis into the chassis housing.
DIP Switch 3 - Set switch #3 in the OFF position to ENABLE
the motorized lens and the ON position to
DISABLE the motorized lens.
DIP Switch 4 - Set switch #4 in the OFF position to ENABLE
the ALC and the ON position to DISABLE the
ALC.
NOTE:
The ALC default is OFF.
DIP Switch 5 - Set switch #5 in the OFF position to ENABLE
the LINE-LOCK and the ON position to
DISABLE the LINE-LOCK.
NOTE:
The LINE-LOCK default is OFF.
DIP Switch 6 - Not used.
DIP Switch 7 - Not used.
DIP Switch 8 - Not used.
Table 1 - DIP Switch Positions and Related Functions
Switch Function
DIP Switch Number
DIP Switch ON
DIP Switch OFF
Camera Selection
1
B/W Camera
Color Camera
Video Type
2
PAL
NTSC
Motorized Lens
3
Disabled
Enabled
Automatic Light Control (ALC)
4
Disabled
Enabled
Line Lock
5
Disabled
Enabled
Not Used
6
N/A
N/A
Not Used
7
N/A
N/A
Not Used
8
N/A
N/A
4
AD1273
SETUP
Thunbwheel Switch (2)
DIP Switch
Tens Digit
Units Digit
4
5
ON
OFF
8
7
6
5
4
3
2
1
S1
CHASSIS
A
A
AAAAA
A A
AA
AA
Figure 3 - DIP Switch Setting Locations
5
SETUP
AD1273
Camera Number Assignment
Setting Camera Number Thumbwheel Switches
For individual control of camera pan/tilt functions by a matrix
switching system, an individual camera number must be
assigned to each AD1273 unit. Two thumbwheel switches,
located on the printed circuit board, identify the camera
number for each AD1273 (see Figure 4).
All possible thumbwheel switch settings for the AD1273,
along with the associated GROUP numbers, are listed in the
Appendix (see pages A4 through A10 - Camera Number
Sequence Tables).
To specify the correct thumbwheel switch settings and
GROUP number;
NOTE: Valid identification numbers on the thumbwheel
switches are 1 - 64 only. Switches reading zero-zero
(00) and 65 - 99 are not valid numbers.
1) Confirm the camera number.
2) Locate the GROUP for that camera (see Table 2).
Units Digit: Set identification numbers ZERO through NINE
with the Units switch.
3) Locate that GROUP in the Appendix (pages A4-A10)
4) Locate the camera number within the appropriate GROUP.
Tens Digit: Set identification numbers TEN through SIXTY
with the Tens switch.
5) Set the thumbwheel switches to the corresponding Tens and
Units digits.
EXAMPLE: Camera Identification Number is 45.
6) Set the GROUP number on the Data Distributor. Refer to
the data distributor installation manual for the GROUP
identification setting procedure.
Set Units switch to five (5).
Set Tens switch to four (4).
Camera Number Sequencing
Table 3 gives an example of the Camera Number Sequence
Tables found in the Appendix.
For systems containing more than 64 cameras, camera number
assignment is determined by GROUPing the cameras into
blocks and then determining a particular camera number within
that GROUP.
Table 3 - Camera Number Sequence Table Example
Camera
Number
In this case, a GROUP contains 64 cameras (the thumbwheel
switches on the AD1273 can be set for 1-64 only). A data
distributor in the switching system routes the control signals to
the proper GROUP of cameras.
1
2
3
Table 2 identifies which GROUP a specific camera number
belongs to.
Table 2 - Camera-to-GROUP Number Relationship
Camera Numbers 1-64.........................GROUP # 1
Camera Numbers 65-128.....................GROUP # 2
Camera Numbers 129-192...................GROUP # 3
Camera Numbers 193-256...................GROUP # 4
Camera Numbers 257-320...................GROUP # 5
Camera Numbers 321-384...................GROUP # 6
Camera Numbers 385-448...................GROUP # 7
Camera Numbers 449-512...................GROUP # 8
Camera Numbers 513-576...................GROUP # 9
Camera Numbers 577-640...................GROUP # 10
Camera Numbers 641-704...................GROUP # 11
Camera Numbers 705-768...................GROUP # 12
Camera Numbers 769-832...................GROUP # 13
Camera Numbers 833-896...................GROUP # 14
Camera Numbers 897-960...................GROUP # 15
Camera Numbers 961-1024.................GROUP # 16
6
Switch
Setting
Tens Units
0
1
0
2
0
3
Group 1
Group 1
Group 1
201
202
203
0
1
1
9
0
1
Group 4
Group 4
Group 4
385
386
387
388
0
0
0
0
1
2
3
4
Group 7
Group 7
Group 7
Group 7
AD1273
SETUP
Tens Digit
Units digit
4
5
CHASSIS
A
AA
A
AA
AAAAAA
AA A
A
A
Figure 4 - Camera Identification Thumbwheel Switches
7
SETUP
AD1273
Dome Configurations
Daisy Chain Configuration
When using the AD1273 with other domes in a security
system, determine the type of configuration that best suits the
particular application.
A daisy chain configuration triples the number of AD1273
units wired to each outlet port of a data distribution unit (see
Figure 6). A maximum of three AD1273 domes may be daisy
chained on a single data line.
Star Configuration
A star configuration refers to the direct hardwiring of one
AD1273 unit to one outlet port of a data distribution unit. A
star configuration limits the number of AD1273 units to the
available number of outlet ports on the data distribution unit.
Each AD1273 unit is equipped with a 120-ohm resistor to
provide a low impedance termination to the data lines between
the AD1273 and the data distribution unit (see Figure 5).
A
AA
A
AA
A
AA
AA
A
AA
AAA
AA
AAAAAAAA
When using the AD1273 in a daisy chain configuration, a
jumper connecting a 120-ohm terminating resistor must be
removed from all but the last dome in the chain (see Figure 6).
Eliminate the termination by removing jumper J2 (see Page 9)
on the printed circuit board mounted to the AD1273 chassis.
NOTE: Retain the 120-ohm termination for the last dome in
the chain.
* 120-Ohm Termination
*
AD1273
*
AD1273
*
AD1273
B
W
S
B
W
S
* 120-Ohm Termination
Other
Receivers
AA
AA
AA
AAA
A
AA
AA
AA
AAAA
AA
AAAA
AAAA
AA
AA
AA
A
A
*
B
W
S
S W B
S W B
S W B
Data Distribution Unit
AA
AA
A
A
AAAAAA
S
W
B
S
W
B
AD1273
AD1273
AD1273
S
W
B
S
S
S
W
B
W
B
W
Data Source
Data Source
Figure 5 - Star Configure Connection
Figure 6 - Daisy Chain Connection
8
B
AD1273
SETUP
Jumper Removal
1) Disconnect all data, video, and power connections from the
dome.
To remove the J2 jumper from the AD1273 printed circuit
board:
2) Remove the chassis from the chassis housing.
3) Remove the four PCB cover retaining screws.
4) The jumper (labeled J2) is located to the left of pin number
one on the 7-Pin connector attached to the PCB (see
Figure 7).
5) Gently remove the jumper and store in a safe location.
6) Reassemble the dome in the reverse order of the
disassembly.
Printed Circuit Board
U6
C54
C49
R42
R59
R61
FB 1
C27
R47
T1
BNC
Connector
C53
VR1
U16
C51
U21
C46
CR10
R30
U18
R46
U15
!
CAUTION
Due to the presence of non-insulated components
with hazardous voltages, the following
adjustments should be performed by qualified
service personnel.
VR3
1 2 3 4 5 6 7
C50
7-Pin Connector
J2 Jumper
AD1273 Chassis
Figure 7 - Jumper Location
9
A
A
A
AAAAA
A
A AA
A
AA
CONNECTIONS
AD1273
CONNECTIONS
Data Line Connections
Data line connections to the AD1273 are made with usersupplied, 2-wire twisted pair, shielded, Belden 8760 or
equivalent (Plenum 88760). The maximum data line length is
5000 feet (1524m).
Data lines enter the AD1273 through a 7-pin Plug and Ramp
connector unit (see Figure 8). The 7-pin Ramp connector is
attached to the AD1273 printed circuit board. The 7-pin Plug
mating connector is shipped with the AD1273 unit.
Assemble the 7-pin Plug connector by inserting the appropriate
data lines into the corresponding pin slots listed in Table 4 and
tightening the hold-down screws.
Table 4 - Data Line Connections to 7-Pin Plug Connector
• Pin 1 - Data line SHIELD (S)
• Pin 6 - Data line WHITE (W) wire
• Pin 7 - Data line BLACK (B) wire
7-Pin Ramp Connector
(Mounted to Circuit Board)
1
1
2
3
2
3
4
4
5
5
6
6
7
7
S
W
7-Pin Plug Connector
B
Data Lines
Figure 8 - Data Line Connections
10
A
AAA
A
AAAAA
A
AAAA
AA
A
A
AA
AA
PCB Cover
AD1273
CONNECTIONS
Power Connections
Wire Selection
The 24VAC power lines enter the AD1273 through a 7-pin
Plug and Ramp connector (see Figure 9). The 7-pin Ramp
connector is mounted to the printed circuit board. The 7-pin
Plug mating connector is shipped with the AD1273 unit.
Table 6 lists the wire gauge versus maximum distance allowed
between the AD1273 pan/tilt and the voltage source. Shielded
cable is recommended for most applications.
Assemble the 7-pin Plug connector by inserting the appropriate
24VAC power and ground lines into the corresponding slots
listed in Table 5 and tightening the hold-down screws.
Note: Distance calculations are based on solid copper wire,
single common, and worst case current draw (i.e.,
diagonal pan/tilt operation).
Table 5 - 24VAC Power Lines to 7-Pin Plug Connector
Table 6 - Wire Gauge -vs- Distance
• Pin 3 - 24VAC INPUT power signal
22AWG
20AWG
18AWG
16AWG
89ft
142ft
226ft
359ft
27.1m
43.3m
68.9m
109.4m
• Pin 4 - Dome chassis GROUND
• Pin 5 - 24VAC INPUT power signal
7-Pin Ramp Connector
(Mounted to Circuit Board)
1
1
2
3
2
3
4
4
5
5
6
6
7
7
7-Pin Plug Connector
24VAC
24VAC
Dome Chassis
Ground
Figure 9 - Power Connections
11
A
AAA
A
AAAAA
A
AAAA
AA
A
A
AA
AAA
PCB Cover
INSTALLATION
AD1273
INSTALLATION
1)
Determine the ceiling tile for the AD1273 installation.
Obtain adequate working space by removing that tile and
two or three tiles immediately surrounding it.
2)
Determine a location in the building frame centered above
the intended installation site for securing a safety chain to
the AD1273 chassis housing (see Figure 11).
3)
Verify that the ceiling grid T-rails immediately
surrounding the intended installation location are secured
to the building frame with safety wires.
Drop Ceiling Mount
The weight of the AD1273 unit requires additional support of
the dropped ceiling grid. This additional support provides a
stable, vibration free platform and ensures that the unit not
move during unrelated repairs to the ceiling.
Before installing the AD1273, strengthen the ceiling grid by
affixing four (minimum) lengths of bailing wire from the
corners of the grid T-rails to the building frame directly above
the AD1273 installation site (see Figure 11). Cut these support
wires to a length such that no slack exists between the building
frame and the ceiling grid.
!
These wires must be snug between the building
frame and the ceiling grid BEFORE the additional
weight of the AD1273 is added.
One safety hook is provided with the AD1273 for connecting a
safety chain between the building frame and the chassis
housing (see Figure 11). This chain prevents the AD1273
from falling should anything happen to the ceiling grid. Cut
the safety chain to a length such that no slack exists between
the building frame and the chassis housing.
4)
NOTES: For a 2 ft. x 2 ft. ceiling grid, an optional, precut
aluminum tile houses the AD1273 assembly and
replaces the original tile.
5)
Secure the safety hook to the top of the chassis housing.
6)
Bolt the four corner support brackets (provided) to the
corners of the chassis housing (see Figure 10).
7)
Fit the chassis housing into the ceiling grid.
8)
Suspend the chassis housing with a chain (not provided)
between the building frame and the safety hook.
Assemble the chassis housing, safety hook, corner support
brackets, housing flange, and ceiling tile on the floor.
For a 2 ft. x 4 ft. ceiling grid, an optional, precut
aluminum tile houses the AD1273 assembly. The
original 2 ft. x 4 ft. tile must be reduced to a 2 ft. x
2 ft. tile. A two-foot T-rail is provided to support
the seam between the aluminum tile and the
original tile.
Drop Ceiling
Support Points
(4 Total)
Bulding Frame to
Chassis Housing Safety
Eye-Bolt
Chassis
Housing
Cut an 11.25-inch diamond into the center of the ceiling
tile used to mount the AD1273.
Corner Support
Brackets
Drop Ceiling T-rail Grid
Figure 10 - Corner Support Installation Pattern
12
AD1273
INSTALLATION
AAAAAAAAAAAAAAAAAA
Building Frame
Safety
Chain
Safety Wires
Safety Wires
Safety
Hook
Chassis
Housing
AAAAAAAAAAAAAAAA
AAA
Drop Ceiling Tile
or
2 ft. x 2 ft. Custom Tile
Fascia Cover
or
Trim Ring
Lower Dome
Figure11 - AD1273 Drop Ceiling Mounting
13
Drop
Ceiling Grid
Runner
INSTALLATION
AD1273
Direct and Remote Hard Mount
Direct hard mounting refers to bolting the AD1273 housing
directly to a ceiling. Remote hard mounting involves locating
the housing from a raised ceiling or a building frame through
the use of pipes and flanges (not provided).
2.0"
50.8 mm
2.0"
50.8 mm
7.125"
181 mm
2.0"
50.8 mm
3.5"
90 mm
Ceiling Preparation
Two circular bolt patterns are located in the roof of the
AD1273 chassis housing (see Figure 12). The outer pattern is
for bolting the chassis housing directly to a ceiling or building
frame (see Figure 13).
7.125"
181 mm
NOTES: Inspect the ceiling area around the proposed
installation site looking for wires, pipes, or
obstructions that interfere with the installation.
!
4"
101.6 mm
3.5"
90 mm
2.0"
50.8 mm
3.5"
90 mm
Inspect the ceiling area around the proposed
installation site. The ceiling must be capable of
supporting 19 pounds plus any additional weight
of the installation hardware.
4"
101.6 mm
3.5"
90 mm
Chassis Housing
Direct Hard Mount
1) Remove the electric knock-out plug in the center of the
chassis housing roof.
2) Place the chassis housing against the ceiling location and
support it from below. Mark the pre-drilled holes and the
electric knock-out hole on the ceiling.
Figure 12 - Chassis Housing Pre-Drilled Hole Pattern
3) Lower the chassis housing. Drill out the mounting and
electric cable holes in the mounting surface.
Remote Hard Mount
4) Tape (preferably) or wire-tie the data, the video, and the
24VAC power wires together into a neat harness with no
kinks or bends.
The inner bolt pattern (see Figure 12) attaches a pipe flange to
the chassis housing for remote hard mounting the AD1273 to
different building construction types and/or different height
requirements (see Figure 14).
NOTE: Do not attach the 7-pin Plug connector or the BNC
connector to the harness at this time.
5) Feed the data, the video, and the 24VAC power wiring
harness through the opening in the ceiling or the building
frame, through the electrical knock-out opening, and into
the chassis housing.
1) Remove the electrical knock-out plug in the center of the
chassis housing.
2) Place the chassis housing in the desired location and
support from below. Measure and install the support
pipes/flanges between the housing and the intended surface.
6) Bolt the chassis housing to the mounting surface.
3) Tape (preferably) or wire-tie the data, the video, and the
24VAC power wires together into a neat harness with no
kinks or bends.
NOTE: Do not attach the 7-pin Plug connector or the BNC
connector to the harness at this time.
4) Feed the data, the video, and the 24VAC power wiring
harness through the pipe/flange assembly, through the
electrical knock-out opening, and into the chassis housing.
5) Bolt the chassis housing to the mounting surface.
14
AD1273
INSTALLATION
Incoming Data, Video, and
24VAC Power Harness
AAAAAAAAAAAAAAAA
AAAAAAAAAAAAAAAA
Existing Ceiling
Figure 13 - Direct Chassis Housing-to-Ceiling Hard Mounting
AAAAAAAAAAAAAAA
AAAAAAAAAAAAAAA
A
AA
Building Frame
Detail A
Incoming Data, Video, and
24VAC Power Harness
AAAAAAAAAA
Existing
Ceiling
Figure 14 - Remote Chassis Housing-to-Ceiling Hard Mount
15
INSTALLATION
AD1273
1*) Slide the pendant shroud over the user supplied 1 1/4inch mounting pipe (see Figure 15).
Pendant Mount
Mounting the AD1273 in a pendant configuration requires
using a pipe flange bolted to the chassis housing, a length of
pipe determined by the installer, and a second pipe flange
bolted to the ceiling, the building frame, or the foundation.
2*) Slide a hose clamp (not supplied) onto the mounting pipe
to hold the pendant shroud out of the way during
installation.
Preparation
3)
Two circular bolt patterns are drilled in the AD1273 chassis
housing (see Figure 12, page 14 - Pre-Drilled Hole Pattern).
Use the inner pattern for bolting a pipe flange to the chassis
housing.
Remove the safety hook from outside the AD1273
chassis housing and re-position it inside the housing
(see Figure 15, Detail A).
4)
Remove the knockout plug in the top center of the
AD1273 chassis housing and install the knockout
grommet (see Figure 15).
5)
Thread the pipe flange assembly onto the 1 1/4-inch
installation pipe.
NOTES: The AD1273 is designed for pendant mounting with
or without the pendant shroud (see Figure 15).
Procedural steps involving the pendant shroud are
marked with an asterisk (*) in the text and
drawings. Disregard steps marked with an asterisk
(*) if the shroud is not installed.
NOTE: Apply a thread locking compound such as LockTite™
to the inner threads of the pipe flange assembly.
Inspect the ceiling area around the proposed
installation site looking for wires, pipes, or
obstructions that interfere with the installation.
!
Inspect the ceiling area around the proposed
installation site. The ceiling must be capable of
supporting 19 pounds plus any additional weight
of the installation hardware.
6)
Place the AD1273 chassis housing under the pipe flange
assembly and support the housing from below.
7)
Route the safety cable and the incoming wiring harness
through the hanging pipe, through the flange assembly,
and into the AD1273 chassis housing.
8)
Connect the safety cable to the safety hook inside the
chassis housing.
9)
Slide one 1/4-inch flat washer over each of the four 1inch mounting bolts.
10) Place one bolt (with washer) through one of the pipe
flange bolt holes and through the chassis housing.
11) Place a 1/4-inch flat washer over the bolt threads
protruding through the inside of the chassis housing.
12) Place a 1/4-inch lock washer over the bolt threads
protruding through the inside of the chassis housing.
13) Place a 1/4-inch x 20 hex nut over the exposed threads
and tighten.
NOTE: Apply a thread locking compound such as LockTite™
to the bolt threads.
14) Repeat the above procedure for the remaining three bolts.
* NOTE: The installation of the pendant shroud can not be
completed until after the chassis assembly (see page
18), lower dome (see page 20), and the fascia plate
(see page 21) are installed.
15) Refer to page 22 for details about completing the pendant
shroud installation.
16
AD1273
INSTALLATION
AAAAAAAAAAA
AAAAAAAAAAA
Mounting Surface
Detail A
Incoming Data,
Video, and
24VAC
Power Harness
Safety Cable
1 1/4" Mounting Pipe
(User supplied)
1.25" Mounting Pipe
(User supplied)
Safety Cable
AAAAAA
A
A
AAAAAAA
A A
1/4"-20 x 1" Bolt (4)
1/4" Flat Washer (4)
Pipe Flange
Incoming Data,
Video, and 24VAC
Power Harness
Knockout Grommet
Re-positioned
Safety Hook
1/4" Flat Washer (4)
1/4" Lock Washer (4)
1/4"-20 Nut (4)
Chassis Housing
Pendant Shroud *
Pendant Shroud
Fascia Plate *
Figure 15 - Pendant Mounting the AD1273
17
INSTALLATION
AD1273
Chassis Installation
1) One end of the 18-inch safety cable (provided) is connected
to the top of the AD1273 chassis at the factory. Attach the
free end of the safety cable to the clip attached to the inside
center of the chassis housing (see Figure 16).
Prior to installing the chassis in the chassis housing, set the 8position DIP switch and the camera number thumbwheel
switches. Both switches are mounted on the printed circuit
board located on top of the chassis.
!
Refer to page 4, Setup, for instructions on Dome
Configuration and Camera Number Assignment.
CAUTION
Secure the safety cable to the chassis housing
before connecting the data, video, and 24VAC
power wires. The wires are not strong enough to
support the weight of the chassis and severe
damage WILL result should the chassis fall!
2) Feed the data, the video, and the 24VAC power wiring
harness through the opening in the upper corner of the
chassis housing.
!
CAUTION
Prior to connecting the wiring harness to the
AD1273, ensure that the incoming 24VAC power
is OFF. At power-up, the AD1273 automatically
executes a start-up test routine of the pan and tilt
motors. Serious injury may result by
connecting a live wiring harness to the
AD1273.
3) Attach the 7-pin Plug connector to the data wires and the
24VAC power wires in the wiring harness (see page 10,
Connections).
4) Connect the 7-pin Plug connector of the wiring harness to
the 7-pin Ramp connector mounted to the chassis PCB.
5) Attach the female BNC connector to the video co-ax wire in
the wiring harness.
6) Connect the female BNC connector of the wiring harness to
the male BNC connector mounted to the chassis PCB.
7) Coil any excess wiring on top of the PCB cover to prevent
contact with the pan-drive gear.
8) Squeeze the four spring-loaded chassis mounting pin
handles together with both hands. Insert the chassis
mounting pins into the appropriate mounting pin sockets
within the chassis housing and release.
!
18
CAUTION
Ensure that the chassis mounting pins are
properly seated in the chassis mounting sockets.
See Figure 16, Detail A.
AD1273
INSTALLATION
Side View
Safety Cable
Attachment Clip
Bottom View
Chassis
Housing
Squeeze together
Chassis
(Only the Frame is
Shown for Clarity)
Squeeze together
Chassis-toHousing
Mounting Pins
A
AAA
A
A
AAAAA
AAAA
A
AAA
AA
A
A
AAA
AA
Mounting Pin
Socket
Mounting
Pin
Detail A: Chassis Mounting Pin Positive Engagement
Figure 16 - Chassis-to-Housing Installation
19
Safety Cable
Chassis
(Full Assembly
Shown)
INSTALLATION
AD1273
Lower Dome Installation
Lower Dome Ball Stud Positive Engagement
Align the viewing port (clear area) of the lower dome with the
camera lens.
The lower dome attaches to the chassis frame via four ball
studs connecting to four clips on the AD1273 chassis. The
bubble is correctly installed when the shoulders of the ball
studs are in complete contact with the shoulders of the chassis
clips.
NOTE: Prevent fingerprints accumulating on the lens surface
by holding the lower dome around the outer edges.
1) Align the lower dome viewing port to the camera lens
opening.
!
2) Push the plastic safety lanyard attached to the lower dome
into the lanyard tab slot on the pan axis frame (see Figure
17, Detail C). The tab must be all the way through the tab
slot to prevent the lower dome from accidental dropping.
CAUTION
Ensure that the mounting snaps seat properly into
the sockets to eliminate any possibility of the
lower dome wobbling or dropping during a dome
rotation. Figure 17, Detail B, shows the correct
and incorrect positions of the ball studs in the
mounting clips.
Adjust the height (higher or lower) of the ball studs by adding
or removing washers to the base of the ball stud.
3) Push the four lower dome mounting snaps into the four
snap sockets located on the pan axis chassis (see Figure 17
Detail A).
DETAIL A
Chassis
Housing
Chassis
Frame
DETAIL C
Lower Dome
Mounting Socket
DETAIL B
Pan Axis
Frame
AAAAAA
AAA
AAAAAA
A
AA
AAA
Adjustment
Washers
Chassis Housing
Lower Dome
Safety
Lanyard Tab
Slot
Lower Dome
Snap Receptacle
Correct
Lower Dome
Lower Dome
Safety Lanyard
Lower Dome
Figure 17 - Lower Dome Installation
20
Incorrect
AD1273
INSTALLATION
Fascia Plate Installation
Trim Ring Installation
1) Push the plastic safety lanyard attached to the fascia plate
into the lanyard tab slot on the chassis frame. The tab must
be all the way through the tab slot to prevent accidental
dropping of the fascia plate (see Figure 18).
An optional trim ring (part number AD1273/TR) is available to
improve the final appearance of installations that require
cutting the existing ceiling or drop ceiling tile.
NOTE: The AD1273/TR Trim Ring replaces the fascia cover
provided with the standard AD1273 unit.
2) Push the fascia plate snaps into the snap receptacles located
on the chassis housing.
1) Remove the fascia cover from the AD1273 chassis housing
by gently prying loose the cover-to-chassis mounting snaps.
2) Remove the fascia cover safety lanyard by twisting the
plastic tabs where the lanyard inserts into the chassis frame
mounting slot (see Figure 18).
3) Insert the trim ring safety lanyard by twisting the plastic
tabs and inserting into the chassis mounting slot (see Figure
18, Detail A).
NOTE: The fascia cover safety lanyard and the trim ring
safety lanyard use the same chassis frame mounting
slot.
4) Align the four mounting snaps on the upper surface of the
trim ring to the four chassis frame mounting snap
receptacles.
5) Push the trim ring upwards until the four mounting snaps
are secure in the four mounting snap receptacles.
Chassis
(Rotated 90 degrees)
AAA
AAAAAA
AAA
AAAAA
AA
A A
AA
AAAAA
AA
AAA
Chassis Housing
Snap Receptacle (4)
Fascia Plate
Mounting Snap (4)
Fascia Plate
Trim Ring
Mounting Snap (4)
Detail A
Chassis
Frame
Safety Lanyard Slot
Fascia Plate
Safety Lanyard
Trim Ring
Safety Lanyard
Trim Ring
Figure 18 - Fascia Plate OR Trim Ring Installation
21
INSTALLATION
AD1273
Pendant Shroud Installation
This procedure applies only to pendant installations using the
pendant shroud. These instructions complete the pendant
mount installation procedure (refer to page 16, Pendant
Mount).
NOTE: Verify that the chassis, the lower dome, and the fascia
cover installation procedures are complete before
proceeding with the pendant shroud installation.
1) Attach the pendant shroud fascia plate to the chassis
housing with four 1/4-inch x 20 x 1-inch machine screws
(see Figure 19).
2) Loosen the hose clamp on the pendant mounting pipe and
lower the pendant shroud into place on the pendant shroud
fascia plate (see Figure 19).
NOTES: Leave the hose clamp snugly attached to the pendant
mount pipe for future servicing.
The original trim plate provided with the CobraDome
is not used with the pendant mount kit.
22
AD1273
INSTALLATION
AAAAAAA
AAAAAAAA
Mounting Surface
Pendant Shroud *
Completed
Installation
Chassis
Housing
Pendant Shroud
Fascia Plate *
Machine Screws (4)
Figure 19 - Pendant Shroud Installation
23
OPERATION
AD1273
OPERATION
Stopping Autopan
The AD1273 Series dome uses AD Manchester Control Code
for pan/tilt positioning, camera zoom, camera focus, and lens
iris functions. A single Manchester Control Code (data) line
provides uni-directional support for a group of 64 camera &
pan/tilt units (see page 6, Camera Number Assignment).
Larger systems use one additional Manchester Control Code
line for each additional 64 cameras (see page 6 - Camera
Number Sequencing).
The AD1273 camera continues panning until manually stopped
by the operator. Moving the keyboard joystick in any direction
or CALLing a preset shot from the AD1273 memory cancels
the Autopan operation.
Preset Operation
The Preset Scene feature of the AD1273 permits the operator
to pre-select and recall a particular scene (64 maximum) via
keyboard command(s). The pre-selected scene is stored in the
AD1273 on-board memory.
Table 7, page 27 lists the operating commands and their related
functions.
Autopan
Three separate speeds are available for calling presets;
Default (Normal), Next Slow, and Next Slowest.
The Autopan feature allows the operator to program the
AD1273 for continuous pan-motion across a user-defined field
of view. The pre-selected pan area is stored in on-board
memory.
A Default (Normal) call acquires the desired target
within a period of two (2) seconds.
A Next Slow call acquires the desired target within a
period of four (4) seconds for the next Call Shot
command only.
Configuring Autopan
NOTE:
Refer to the keyboard diagram (Figure 20 for
AD1678CM and Figure 21 for AD2078) while
reading the following directions.
A Next Slowest call acquires the desired target within
eight (8) seconds for the next Call Shot command
only.
1) Position the camera to the desired start position (first
Autopan boundary) with the keyboard joystick.
Configuring Presets
2) Enter 70, then press SET SHOT on the keyboard.
1) Manually position the camera to the desired location
using the keyboard joystick.
3) Position the camera at the desired end position (second
Autopan boundary) with the keyboard joystick.
2) Enter the desired position number (1-64). Press SET
SHOT on the system keyboard to store the location.
4) Enter 71, then press SET SHOT on the keyboard.
NOTES: The path/direction taken to reach the stop position
in step 3 is the same direction that the camera will
move when Autopan is activated.
Operating Presets
To call a particular scene, enter the scene number (1-64)
then press CALL.
A detailed explanation of all the AD1273
programming functions begins on page 26.
1) To call a particular scene at the Default rate (2 sec),
enter the SCENE # (1-64), then press CALL.
Operating Autopan
2) To call a particular scene at the Next Slow rate (4 sec),
enter 68 CALL, followed immediately by the
SCENE # (1-64), then press CALL.
To start the Autopan feature, enter 72 Shot. The system
receiver uses the positions stored in Set Shot(s) 70 and 71 to
determine the Autopan operation.
3) To call a particular scene at the Next Slowest rate
(8 sec), enter 69 CALL, followed immediately by the
SCENE # (1-64), then press CALL.
24
AD1273
OPERATION
STATUS
MONITOR
A
CAMERA
ENTER
128
1 2 8
16
SHOT
SO
IRIS
F1
EXT
OFF
ARM
OFF
ARM
1
ACK
2
3
CLOSE
SET
OPEN
TITLE
AUXILIARY
OFF
ON
PROG
NEXT
RUN
4
5
6
7
8
9
CLEAR
0
T & D SHOT
FOCUS
HOLD
NEAR
FAR
ZOOM
CAM
MON
WIDE
TELE
AD1678CM
Figure 20 - AD1678CM Operator Keyboard
STATUS
MONITOR
16
CAMERA
128
ENTER
1024
PRESET
AUXILIARY
E
N
T
E
R
64
OFF
ON
E
X
I
T
IRIS
F1
F2
USER
SITE
OFF
ARM
PROG
LAST
B-PAS
ACK
NEXT
RUN
HOLD
1
2
3
4
5
6
CLOSE
8
OPEN
P
A
G
E
FOCUS
NEAR
7
FAR
9
ZOOM
OFF
PROG
DISP
P
A
G
E
MONITOR
SALVO
0
CAMERA
CLEAR
WIDE
TELE
AD2078CM
Figure 21 - AD2078 Operator Keyboard
25
CALL
SET
OPERATION
AD1273
Special Commands
The following is a list of special AD Manchester Control Code
commands available to the AD1273.
RESET DOME - (65 CALL then 65 SET)
This command sequence resets the dome and enables Auto Iris
mode (color cameras only). The Iris defaults to the factory
setting.
AUTO IRIS - (70 CALL)
This command enables the auto iris with the current set point.
Iris control commands move the set point. This is the default
state of the dome.
NOTE: This command will not affect battery backed presets.
NOTE: Issuing a 70 CALL command ENABLES the AGC
circuit in the color camera of the CobraDome model
# C10C.
AUTO IRIS RESET - (66 CALL then 66 SET)
This command sequence resets the iris to factory default
settings for optimal lighting/viewing conditions.
MANUAL IRIS - (71 CALL)
This command enables the manual iris. This mode allows full
control of the iris from open to close using iris control
commands.
FLIP - (67 CALL)
This command immediately rotates the dome 180° degrees
along the pan axis only.
NOTES: Issuing a 71 CALL-69 SET command sequence
DISABLES the Automatic Gain Control (AGC)
circuit in the color camera of the CobraDome model
# C10C.
VIDEO PHASE ADJUST - (67 SET)
This command toggles the dome between Video Phase Adjust
and the normal operating mode. In the Video Phase Adjust
mode, IRIS OPEN advances the vertical video phase and IRIS
CLOSE retards the vertical video phase.
In a low light situation, the Auto Iris Mode provides
the brightest possible image through a combination of
a fully opened iris and the maximum level of gain
from the AGC circuit. Switching to Manual Iris may
not provide the capability to obtain a brighter image
and may actually dim the scene by as much as two full
f-stops.
NEXT SLOW - (68 CALL)
This command causes the next preset received to acquire the
target position within four seconds. The preset command
immediately follows the speed command. All subsequent
CALL commands return to the default target acquisition rate
of two seconds.
AUTOPAN SETUP - (70 SET)
Position the camera to the first end point, enter 70 SET. Move
the camera in the desired direction to the second end point,
enter 71 SET. These pan positions are remembered as the end
points for autopan.
NEXT SLOWEST - (69 CALL)
This command causes the next preset received to acquire the
target position within eight seconds. The preset command
immediately follows the speed command. All subsequent
CALL commands return to the default target acquisition rate
of two seconds.
AUTOPAN Activation - (72 CALL then 72 PRESET SET)
This command starts the autopan operation. Autopan speed is
a fixed speed. Any subsequent pan, tilt, or preset command
terminates the autopan function.
AUTOMATIC GAIN CONTROL - (68 SET)
This command turns the Automatic Gain Control (AGC)
circuitry in a color camera on. The AGC circuit is designed to
maintain the video signal at a specific level as the amount of
available scene illumination decreases.
NOTE: The default state of the AGC circuit is ON. The AGC
circuit is always on EXCEPT when the Manual Iris
command (71 CALL) is issued.
26
AD1273
OPERATION
Table 7 - Standard and Special AD1273 Control Commands
Keyboard Command
Dome Function
1 - 64 Set Shot
Set Preset 1 - 64
Saves Pan/Tilt position as preset 1 - 64
1 - 64 Call Shot
Goto Preset 1 - 64
Moves Pan/Tilt to preset position 1 - 64
65 Call, then, 65 Set
Reset Dome
66 Call, then, 66 Set
Auto-Iris Reset
(Iris Function)
67 Set
Video Phase Adjust
Toggles Video Phase Adjustment ON/OFF
67 Call
Flip
(Pan Axis Function)
Rotates camera 180° on the pan axis only
68 Call
Next Slow
(Pan Axis Function)
Acquires preset position in 4 seconds
69 Call
Next Slowest
(Pan Axis Function)
Acquires preset position in 8 seconds
68 Set
AGC Enabled
Turns Auto Gain Control (AGC) ON
(Color Cameras Only)
71 Call, then, 69 Set
AGC Disabled
Turns Auto Gain Control (AGC) OFF
(Color Cameras Only)
70 Set
71 Set
Auto-Pan Setup
(Pan Axis Function)
70 Call
Auto-Iris
(Iris Function)
Enables Auto-Iris
(Turns AGC on automatically when using
a color camera)
71 Call
Manual Iris
(Iris Function)
Enables Manual Iris
72 Call
Auto-Pan Activation
(Pan Axis Function)
27
Dome Action
Recalibrates dome to original startup
position
Resets Iris to factory default settings
Saves start position of Auto-Pan Sweep
Saves end position of Auto-Pan Sweep
Starts Auto-Pan operation
ADJUSTMENTS
AD1273
ADJUSTMENTS
Backlash Adjustment
6) Repeat the measurement process four times, using a
different location (typically between the gear spokes) on the
pan axis drive gear.
Proper backlash adjustment eliminates any apparent video
image hesitation during a slow pan rotation through 360
degrees. Also, when the pan action stops, the video image
should not bounce back and forth.
NOTE: During the cooling process, gears tend to warp
slightly and develop a “high” point. This high point
is generally found above the blank spaces between the
gear spokes (see Figure 22).
Checking and Setting Backlash
The backlash is properly adjusted when the bit fits snugly
between the “high” point on the pan motor drive gear teeth and
the pan gear teeth.
1) Disconnect all power to the CobraDome.
7) Adjust the backlash by loosening the pan axis drive motor
mounting bracket screws on the side of the CobraDome
chassis. Adjust the pan axis motor until the proper
clearance is achieved.
2) Remove the CobraDome chassis from the back box and
place the chassis on a solid, flat surface.
3) Obtain a #73 twist drill bit. Verify with calipers that the
solid end of the bit measures 0.023 inches (0.71mm)
NOTE: The pan drive motor gear must always remain at right
angles to the pan axis drive gear.
NOTE: The thickness of a standard resistor lead is
approximately 0.023 inches/23 Mils (0.71mm) and
may be substituted for a #73 twist drill bit.
4) Insert the bit between any pan axis drive gear tooth and a
pan axis motor gear tooth (see Figure 23).
5) Slowly rotate the pan gear by hand and note the clearance of
the bit between the pan axis gear teeth and the pan motor
gear teeth.
Typical Location
of "High" Spot on Gear
Pan Axis
Drive Gear
Gear
Spokes
Figure 22 - Pan Axis Drive Gear
28
AD1273
ADJUSTMENTS
Pan Axis
Drive Gear
Pan Motor
Drive Gear
#73 Twist Drill
Pan Motor
Mounting
Bracket
Pan Axis
Drive Motor
AA
A
A
A
AAAAAAA
AA
AA
AAAAA
AAA
Pan Gear Bevel
Pan Gear
Chassis
Camera
Housing
Figure 23 - CobraDome Backlash Adjustment
29
ADJUSTMENTS
AD1273
Lens Tracking Adjustment
When connected to a monitor, the image generated by the
CobraDome camera must stay in focus during transitions from
telephoto mode to wide angle mode.
11) Manually zoom in on the object (i.e., increasing the
magnification) using the zoom ring ⑧.
12) Rotate the tracking adjustment wheel ➉ until the object
appears in focus.
If an image losses focus during the transition from tele to wide
angle, the lens tracking needs adjustment.
13) Repeat steps 8 through 12 until the camera stays in focus
through the entire zoom range.
1) Disconnect the 7-pin Plug connector from the 7-pin Ramp
connector ① (see Figure 24).
14) Re-tighten the tracking adjustment wheel set screw ④.
2) Remove the four screws securing the printed circuit board
cover to the top of the 1273 chassis, exposing the 8-position
DIP switch ⑤.
The zoom tracking adjustment is now complete.
15) Unplug the 7-pin plug connector from the 7-pin ramp
connector ①.
3) Disable the lens motors by setting switch 3 of the 8position DIP switch (S1) ⑤ to the ON position (disabled).
16) Replace the camera shroud ② and the lens shroud ③.
4) Remove the four screws securing the camera shroud ② and
the lens shroud ③ to the camera/lens frame. Remove both
shrouds.
17) Enable the lens drive motors by setting switch 3 of the 8position DIP switch (S1) ⑤ to the OFF position (enabled).
5) Loosen the lens tracking adjustment wheel set screw ④.
18) Replace the printed circuit board cover on top of the
CobraDome chassis.
NOTE: Early CobraDome models use a 0.035 inch Allenhead set screw ④ while later models use a Phillipshead set screw ④.
19) Restore power to the CobraDome by connecting the 7-pin
Plug connector to the 7-pin Ramp connector ①.
6) Restore power to the CobraDome by connecting the 7-pin
Plug connector to the 7-pin Ramp connector ①.
7) Connect a monitor to the video out BNC ⑥.
8) Manually open the iris using the iris ring ⑦. Open the iris
to its maximum opening.
9) Manually retract the lens using the zoom ring ⑧. Retract
the zoom to its minimum (wide angle) magnification range.
10) Manually focus on an object as clearly as possible by
rotating the lens focus ring ⑨.
IF YOU ENCOUNTER ANY PROBLEMS
OPERATING THIS UNIT, OR NEED TECHNICAL
ASSISTANCE, CALL OUR TECHNICAL SUPPORT
CENTER AT:
within the United States: 1-800-442-2225
outside the United States: (914) 624-7640
30
AD1273
ADJUSTMENTS
Printed Circuit Board Cover
6
7-Pin Ramp
Connector
1
5
Video Out BNC (J1)
8-Position DIP Switch (S1)
AAAAAA
A
AA
AA
A
AA
AAAAAAAAAAA
AA
AAAAAAAAAAA
AA
AA
AA AAAAAA
AAAAA
AA
A
AAAAA
AA
A
A
AA
A
AAAAA
A AA
AA
AAAAAA
Pan Axis
Drive Gear
2
CobraDome
Chassis
Camera
Shroud
CCD Camera
Printed Circuit Boards
Lens Tracking
4 Adjustment
Wheel
Set Screw
10
Lens Tracking
Adjustment Wheel
Iris Ring
Zoom Ring
Focus Ring
Lens Shroud
7
8
Camera
Lens Frame
Tilt Axis
Drive Gear
9
3
Camera Lens
Figure 24 - Zoom Lens Tracking Adjustment
31
Appendix
TYPICAL SYSTEM CONNECTIONS
AD1273 Data Line Connections-to-AD1650 Matrix Switcher/Controller-to-AD1691 Data Distributor
7-Pin Ramp Connector
(Mounted to Circuit Board)
1
1
2
3
4
5
6
18 AWG Twisted Pair, Shielded,
Belden 8760 or Equivalent
7
2
3
4
5
6
S
7
7-Pin Plug
Connector
AD1691 Data Distributor
W
B
CODE LED
S
A
AA
AAA
AA
AAAAA
A
AA
AAA
A
AAA
AA
AA
A
J1
AD1273 CobraDome
18 AWG Twisted Pair, Shielded,
Belden 8760 or Equivalent
S
W
B AC AC
TP800
2
W
12 VOLTS AC
10 VA
B
S
2
AD1650B Matrix Switcher
NOTE: These Connections Are Typical of One Data Distribution Unit
A1
BNC
Connector
TYPICAL SYSTEM CONNECTIONS
AD1273 Data Line Connections-to-AD2150 Matrix Controller
1
3
5
7
9
11 13
15 17
19 21 23
25 27
29 31
ALARMS
BWS BWS BWS
120
V
60Hz
KEYBOARDS
MONITORS
1
2
4 6
CAMERAS
8
10
12 14
16 18 20
22 24
26 28 30
2
1
CODE
RELAYS
3
2
4
3
5
32
2
3
4
5
RS232 PORTS
AD2150 Matrix Controller
Video Line
S
B W
7-Pin Ramp Connector
(Mounted to Circuit Board)
1
1
2
3
4
5
6
7
2
3
4
5
6
S
18 AWG Twisted Pair, Shielded,
Belden 8760 or Equivalent
7
7-Pin Plug
Connector
BNC
Connector
A
AA
A
AAAA
A
AAA
A
AA
A
A
AD1273 CobraDome
A2
TYPICAL SYSTEM CONNECTIONS
AD1273 Data Line Connections-to-AD1996 CPU-to-AD2050 Switcher-to-AD2091 Matrix Controller
PORTS
DATA LINE
PROG
MON
120V
6 0 Hz
1
2
1
2
3
4
5
6
7
8
9
10
AD1996 System CPU
DATA LINE
IN
OUT
SYNC
120 VAC
50/60 Hz
A
A
AD2050 Matrix Switcher
DATA LINE
SELECT
CODE
IN
1
1
2
OUT
PWR
IN
2
OUT
B WS B WS B WS B WS
CO
M
AD2091 Matrix Controller
B W S
7-Pin Ramp Connector
(Mounted to Circuit Board)
1
1
2
3
4
5
S
B
6
2
3
4
5
6
7
7
W
MAXIMUM DISTANCE between
AD1273 and AD2091 is 5000 Feet
using shielded, 18 AWG cable
7-Pin Plug
Connector
BNC
Connector
A
AA
A A
AAAA
AAA
A
AA
A
A
AD1273 CobraDome
A3
CAMERA NUMBER SEQUENCE
Camera
Number
1
2
3
4
5
6
7
8
Camera
Number
Switch
Setting
Tens Units
0
1
0
2
0
3
0
4
0
5
0
6
0
7
0
8
Group 1
Group 1
Group 1
Group 1
Group 1
Group 1
Group 1
Group 1
65
66
67
68
69
70
71
72
Switch
Setting
Tens Units
0
1
0
2
0
3
0
4
0
5
0
6
0
7
0
8
Camera
Number
Group 2
Group 2
Group 2
Group 2
Group 2
Group 2
Group 2
Group 2
129
130
131
132
133
134
135
136
Switch
Setting
Tens Units
0
1
0
2
0
3
0
4
0
5
0
6
0
7
0
8
Group 3
Group 3
Group 3
Group 3
Group 3
Group 3
Group 3
Group 3
9
10
11
12
13
14
15
16
0
1
1
1
1
1
1
1
9
0
1
2
3
4
5
6
Group 1
Group 1
Group 1
Group 1
Group 1
Group 1
Group 1
Group 1
73
74
75
76
77
78
79
80
0
1
1
1
1
1
1
1
9
0
1
2
3
4
5
6
Group 2
Group 2
Group 2
Group 2
Group 2
Group 2
Group 2
Group 2
137
138
139
140
141
142
143
144
0
1
1
1
1
1
1
1
9
0
1
2
3
4
5
6
Group 3
Group 3
Group 3
Group 3
Group 3
Group 3
Group 3
Group 3
17
18
19
20
21
22
23
24
1
1
1
2
2
2
2
2
7
8
9
0
1
2
3
4
Group 1
Group 1
Group 1
Group 1
Group 1
Group 1
Group 1
Group 1
81
82
83
84
85
86
87
88
1
1
1
2
2
2
2
2
7
8
9
0
1
2
3
4
Group 2
Group 2
Group 2
Group 2
Group 2
Group 2
Group 2
Group 2
145
146
147
148
149
150
151
152
1
1
1
2
2
2
2
2
7
8
9
0
1
2
3
4
Group 3
Group 3
Group 3
Group 3
Group 3
Group 3
Group 3
Group 3
25
26
27
28
29
30
31
32
2
2
2
2
2
3
3
3
5
6
7
8
9
0
1
2
Group 1
Group 1
Group 1
Group 1
Group 1
Group 1
Group 1
Group 1
89
90
91
92
93
94
95
96
2
2
2
2
2
3
3
3
5
6
7
8
9
0
1
2
Group 2
Group 2
Group 2
Group 2
Group 2
Group 2
Group 2
Group 2
153
154
155
156
157
158
159
160
2
2
2
2
2
3
3
3
5
6
7
8
9
0
1
2
Group 3
Group 3
Group 3
Group 3
Group 3
Group 3
Group 3
Group 3
33
34
35
36
37
38
39
40
3
3
3
3
3
3
3
4
3
4
5
6
7
8
9
0
Group 1
Group 1
Group 1
Group 1
Group 1
Group 1
Group 1
Group 1
97
98
99
100
101
102
103
104
3
3
3
3
3
3
3
4
3
4
5
6
7
8
9
0
Group 2
Group 2
Group 2
Group 2
Group 2
Group 2
Group 2
Group 2
161
162
163
164
165
166
167
168
3
3
3
3
3
3
3
4
3
4
5
6
7
8
9
0
Group 3
Group 3
Group 3
Group 3
Group 3
Group 3
Group 3
Group 3
41
42
43
44
45
46
47
48
4
4
4
4
4
4
4
4
1
2
3
4
5
6
7
8
Group 1
Group 1
Group 1
Group 1
Group 1
Group 1
Group 1
Group 1
105
106
107
108
109
110
111
112
4
4
4
4
4
4
4
4
1
2
3
4
5
6
7
8
Group 2
Group 2
Group 2
Group 2
Group 2
Group 2
Group 2
Group 2
169
170
171
172
173
174
175
176
4
4
4
4
4
4
4
4
1
2
3
4
5
6
7
8
Group 3
Group 3
Group 3
Group 3
Group 3
Group 3
Group 3
Group 3
49
50
51
52
53
54
55
56
4
5
5
5
5
5
5
5
9
0
1
2
3
4
5
6
Group 1
Group 1
Group 1
Group 1
Group 1
Group 1
Group 1
Group 1
113
114
115
116
117
118
119
120
4
5
5
5
5
5
5
5
9
0
1
2
3
4
5
6
Group 2
Group 2
Group 2
Group 2
Group 2
Group 2
Group 2
Group 2
177
178
179
180
181
182
183
184
4
5
5
5
5
5
5
5
9
0
1
2
3
4
5
6
Group 3
Group 3
Group 3
Group 3
Group 3
Group 3
Group 3
Group 3
57
58
59
60
61
62
63
64
5
5
5
6
6
6
6
6
7
8
9
0
1
2
3
4
Group 1
Group 1
Group 1
Group 1
Group 1
Group 1
Group 1
Group 1
121
122
123
124
125
126
127
128
5
5
5
6
6
6
6
6
7
8
9
0
1
2
3
4
A4
Group 2
Group 2
Group 2
Group 2
Group 2
Group 2
Group 2
Group 2
185
186
187
188
189
190
191
192
5
5
5
6
6
6
6
6
7
8
9
0
1
2
3
4
Group 3
Group 3
Group 3
Group 3
Group 3
Group 3
Group 3
Group 3
CAMERA NUMBER SEQUENCE
Camera
Number
193
194
195
196
197
198
199
200
Switch
Setting
Tens Units
0
1
0
2
0
3
0
4
0
5
0
6
0
7
0
8
Camera
Number
Group 4
Group 4
Group 4
Group 4
Group 4
Group 4
Group 4
Group 4
257
258
259
260
261
262
263
264
Switch
Setting
Tens Units
0
1
0
2
0
3
0
4
0
5
0
6
0
7
0
8
Camera
Number
Group 5
Group 5
Group 5
Group 5
Group 5
Group 5
Group 5
Group 5
321
322
323
324
325
326
327
328
Switch
Setting
Tens Units
0
1
0
2
0
3
0
4
0
5
0
6
0
7
0
8
Group 6
Group 6
Group 6
Group 6
Group 6
Group 6
Group 6
Group 6
201
202
203
204
205
206
207
208
0
1
1
1
1
1
1
1
9
0
1
2
3
4
5
6
Group 4
Group 4
Group 4
Group 4
Group 4
Group 4
Group 4
Group 4
265
266
267
268
269
270
271
272
0
1
1
1
1
1
1
1
9
0
1
2
3
4
5
6
Group 5
Group 5
Group 5
Group 5
Group 5
Group 5
Group 5
Group 5
329
330
331
332
333
334
335
336
0
1
1
1
1
1
1
1
9
0
1
2
3
4
5
6
Group 6
Group 6
Group 6
Group 6
Group 6
Group 6
Group 6
Group 6
209
210
211
212
213
214
215
216
1
1
1
2
2
2
2
2
7
8
9
0
1
2
3
4
Group 4
Group 4
Group 4
Group 4
Group 4
Group 4
Group 4
Group 4
273
274
275
276
277
278
279
280
1
1
1
2
2
2
2
2
7
8
9
0
1
2
3
4
Group 5
Group 5
Group 5
Group 5
Group 5
Group 5
Group 5
Group 5
337
338
339
340
341
342
343
344
1
1
1
2
2
2
2
2
7
8
9
0
1
2
3
4
Group 6
Group 6
Group 6
Group 6
Group 6
Group 6
Group 6
Group 6
217
218
219
220
221
222
223
224
2
2
2
2
2
3
3
3
5
6
7
8
9
0
1
2
Group 4
Group 4
Group 4
Group 4
Group 4
Group 4
Group 4
Group 4
281
282
283
284
285
286
287
288
2
2
2
2
2
3
3
3
5
6
7
8
9
0
1
2
Group 5
Group 5
Group 5
Group 5
Group 5
Group 5
Group 5
Group 5
345
346
347
348
349
350
351
352
2
2
2
2
2
3
3
3
5
6
7
8
9
0
1
2
Group 6
Group 6
Group 6
Group 6
Group 6
Group 6
Group 6
Group 6
225
226
227
228
229
230
231
232
3
3
3
3
3
3
3
4
3
4
5
6
7
8
9
0
Group 4
Group 4
Group 4
Group 4
Group 4
Group 4
Group 4
Group 4
289
290
291
292
293
294
295
296
3
3
3
3
3
3
3
4
3
4
5
6
7
8
9
0
Group 5
Group 5
Group 5
Group 5
Group 5
Group 5
Group 5
Group 5
353
354
355
356
357
358
359
360
3
3
3
3
3
3
3
4
3
4
5
6
7
8
9
0
Group 6
Group 6
Group 6
Group 6
Group 6
Group 6
Group 6
Group 6
233
234
235
236
237
238
239
240
4
4
4
4
4
4
4
4
1
2
3
4
5
6
7
8
Group 4
Group 4
Group 4
Group 4
Group 4
Group 4
Group 4
Group 4
297
298
299
300
301
302
303
304
4
4
4
4
4
4
4
4
1
2
3
4
5
6
7
8
Group 5
Group 5
Group 5
Group 5
Group 5
Group 5
Group 5
Group 5
361
362
363
364
365
366
367
368
4
4
4
4
4
4
4
4
1
2
3
4
5
6
7
8
Group 6
Group 6
Group 6
Group 6
Group 6
Group 6
Group 6
Group 6
241
242
243
244
245
246
247
248
4
5
5
5
5
5
5
5
9
0
1
2
3
4
5
6
Group 4
Group 4
Group 4
Group 4
Group 4
Group 4
Group 4
Group 4
305
306
307
308
309
310
311
312
4
5
5
5
5
5
5
5
9
0
1
2
3
4
5
6
Group 5
Group 5
Group 5
Group 5
Group 5
Group 5
Group 5
Group 5
369
370
371
372
373
374
375
376
4
5
5
5
5
5
5
5
9
0
1
2
3
4
5
6
Group 6
Group 6
Group 6
Group 6
Group 6
Group 6
Group 6
Group 6
249
250
251
252
253
254
255
256
5
5
5
6
6
6
6
6
7
8
9
0
1
2
3
4
Group 4
Group 4
Group 4
Group 4
Group 4
Group 4
Group 4
Group 4
313
314
315
316
317
318
319
320
5
5
5
6
6
6
6
6
7
8
9
0
1
2
3
4
A5
Group 5
Group 5
Group 5
Group 5
Group 5
Group 5
Group 5
Group 5
377
378
379
380
381
382
383
384
5
5
5
6
6
6
6
6
7
8
9
0
1
2
3
4
Group 6
Group 6
Group 6
Group 6
Group 6
Group 6
Group 6
Group 6
CAMERA NUMBER SEQUENCE
Camera
Number
385
386
387
388
389
390
391
392
Switch
Setting
Tens Units
0
1
0
2
0
3
0
4
0
5
0
6
0
7
0
8
Camera
Number
Group 7
Group 7
Group 7
Group 7
Group 7
Group 7
Group 7
Group 7
449
450
451
452
453
454
455
456
Switch
Setting
Tens Units
0
1
0
2
0
3
0
4
0
5
0
6
0
7
0
8
Group 8
Group 8
Group 8
Group 8
Group 8
Group 8
Group 8
Group 8
393
394
395
396
397
398
399
400
0
1
1
1
1
1
1
1
9
0
1
2
3
4
5
6
Group 7
Group 7
Group 7
Group 7
Group 7
Group 7
Group 7
Group 7
457
458
459
460
461
462
463
464
0
1
1
1
1
1
1
1
9
0
1
2
3
4
5
6
Group 8
Group 8
Group 8
Group 8
Group 8
Group 8
Group 8
Group 8
401
402
403
404
405
406
407
408
1
1
1
2
2
2
2
2
7
8
9
0
1
2
3
4
Group 7
Group 7
Group 7
Group 7
Group 7
Group 7
Group 7
Group 7
465
466
467
468
469
470
471
472
1
1
1
2
2
2
2
2
7
8
9
0
1
2
3
4
Group 8
Group 8
Group 8
Group 8
Group 8
Group 8
Group 8
Group 8
409
410
411
412
413
414
415
416
2
2
2
2
2
3
3
3
5
6
7
8
9
0
1
2
Group 7
Group 7
Group 7
Group 7
Group 7
Group 7
Group 7
Group 7
473
474
475
476
477
478
479
480
2
2
2
2
2
3
3
3
5
6
7
8
9
0
1
2
Group 8
Group 8
Group 8
Group 8
Group 8
Group 8
Group 8
Group 8
417
418
419
420
421
422
423
424
3
3
3
3
3
3
3
4
3
4
5
6
7
8
9
0
Group 7
Group 7
Group 7
Group 7
Group 7
Group 7
Group 7
Group 7
481
482
483
484
485
486
487
488
3
3
3
3
3
3
3
4
3
4
5
6
7
8
9
0
Group 8
Group 8
Group 8
Group 8
Group 8
Group 8
Group 8
Group 8
425
426
427
428
429
430
431
432
4
4
4
4
4
4
4
4
1
2
3
4
5
6
7
8
Group 7
Group 7
Group 7
Group 7
Group 7
Group 7
Group 7
Group 7
489
490
491
492
493
494
495
496
4
4
4
4
4
4
4
4
1
2
3
4
5
6
7
8
Group 8
Group 8
Group 8
Group 8
Group 8
Group 8
Group 8
Group 8
433
434
435
436
437
438
439
440
4
5
5
5
5
5
5
5
9
0
1
2
3
4
5
6
Group 7
Group 7
Group 7
Group 7
Group 7
Group 7
Group 7
Group 7
497
498
499
500
501
502
503
504
4
5
5
5
5
5
5
5
9
0
1
2
3
4
5
6
Group 8
Group 8
Group 8
Group 8
Group 8
Group 8
Group 8
Group 8
441
442
443
444
445
446
447
448
5
5
5
6
6
6
6
6
7
8
9
0
1
2
3
4
Group 7
Group 7
Group 7
Group 7
Group 7
Group 7
Group 7
Group 7
505
506
507
508
509
510
511
512
5
5
5
6
6
6
6
6
7
8
9
0
1
2
3
4
Group 8
Group 8
Group 8
Group 8
Group 8
Group 8
Group 8
Group 8
A6
CAMERA NUMBER SEQUENCE
Camera
Number
513
514
515
516
517
518
519
520
Switch
Setting
Tens Units
0
1
0
2
0
3
0
4
0
5
0
6
0
7
0
8
Camera
Number
Group 9
Group 9
Group 9
Group 9
Group 9
Group 9
Group 9
Group 9
577
578
579
580
581
582
583
584
Switch
Setting
Tens Units
0
1
0
2
0
3
0
4
0
5
0
6
0
7
0
8
Group 10
Group 10
Group 10
Group 10
Group 10
Group 10
Group 10
Group 10
521
522
523
524
525
526
527
528
0
1
1
1
1
1
1
1
9
0
1
2
3
4
5
6
Group 9
Group 9
Group 9
Group 9
Group 9
Group 9
Group 9
Group 9
585
586
587
588
589
590
591
592
0
1
1
1
1
1
1
1
9
0
1
2
3
4
5
6
Group 10
Group 10
Group 10
Group 10
Group 10
Group 10
Group 10
Group 10
529
530
531
532
533
534
535
536
1
1
1
2
2
2
2
2
7
8
9
0
1
2
3
4
Group 9
Group 9
Group 9
Group 9
Group 9
Group 9
Group 9
Group 9
593
594
595
596
597
598
599
600
1
1
1
2
2
2
2
2
7
8
9
0
1
2
3
4
Group 10
Group 10
Group 10
Group 10
Group 10
Group 10
Group 10
Group 10
537
538
539
540
541
542
543
544
2
2
2
2
2
3
3
3
5
6
7
8
9
0
1
2
Group 9
Group 9
Group 9
Group 9
Group 9
Group 9
Group 9
Group 9
601
602
603
604
605
606
607
608
2
2
2
2
2
3
3
3
5
6
7
8
9
0
1
2
Group 10
Group 10
Group 10
Group 10
Group 10
Group 10
Group 10
Group 10
545
546
547
548
549
550
551
552
3
3
3
3
3
3
3
4
3
4
5
6
7
8
9
0
Group 9
Group 9
Group 9
Group 9
Group 9
Group 9
Group 9
Group 9
609
610
611
612
613
614
615
616
3
3
3
3
3
3
3
4
3
4
5
6
7
8
9
0
Group 10
Group 10
Group 10
Group 10
Group 10
Group 10
Group 10
Group 10
553
554
555
556
557
558
559
560
4
4
4
4
4
4
4
4
1
2
3
4
5
6
7
8
Group 9
Group 9
Group 9
Group 9
Group 9
Group 9
Group 9
Group 9
617
618
619
620
621
622
623
624
4
4
4
4
4
4
4
4
1
2
3
4
5
6
7
8
Group 10
Group 10
Group 10
Group 10
Group 10
Group 10
Group 10
Group 10
561
562
563
564
565
566
567
568
4
5
5
5
5
5
5
5
9
0
1
2
3
4
5
6
Group 9
Group 9
Group 9
Group 9
Group 9
Group 9
Group 9
Group 9
625
626
627
628
629
630
631
632
4
5
5
5
5
5
5
5
9
0
1
2
3
4
5
6
Group 10
Group 10
Group 10
Group 10
Group 10
Group 10
Group 10
Group 10
569
570
571
572
573
574
575
576
5
5
5
6
6
6
6
6
7
8
9
0
1
2
3
4
Group 9
Group 9
Group 9
Group 9
Group 9
Group 9
Group 9
Group 9
633
634
635
636
637
638
639
640
5
5
5
6
6
6
6
6
7
8
9
0
1
2
3
4
Group 10
Group 10
Group 10
Group 10
Group 10
Group 10
Group 10
Group 10
A7
CAMERA NUMBER SEQUENCE
Camera
Number
641
642
643
644
645
646
647
648
Switch
Setting
Tens Units
0
1
0
2
0
3
0
4
0
5
0
6
0
7
0
8
Camera
Number
Group 11
Group 11
Group 11
Group 11
Group 11
Group 11
Group 11
Group 11
705
706
707
708
709
710
711
712
Switch
Setting
Tens Units
0
1
0
2
0
3
0
4
0
5
0
6
0
7
0
8
Group 12
Group 12
Group 12
Group 12
Group 12
Group 12
Group 12
Group 12
649
650
651
652
653
654
655
656
0
1
1
1
1
1
1
1
9
0
1
2
3
4
5
6
Group 11
Group 11
Group 11
Group 11
Group 11
Group 11
Group 11
Group 11
713
714
715
716
717
718
719
720
0
1
1
1
1
1
1
1
9
0
1
2
3
4
5
6
Group 12
Group 12
Group 12
Group 12
Group 12
Group 12
Group 12
Group 12
657
658
659
660
661
662
663
664
1
1
1
2
2
2
2
2
7
8
9
0
1
2
3
4
Group 11
Group 11
Group 11
Group 11
Group 11
Group 11
Group 11
Group 11
721
722
723
724
725
726
727
728
1
1
1
2
2
2
2
2
7
8
9
0
1
2
3
4
Group 12
Group 12
Group 12
Group 12
Group 12
Group 12
Group 12
Group 12
665
666
667
668
669
670
671
672
2
2
2
2
2
3
3
3
5
6
7
8
9
0
1
2
Group 11
Group 11
Group 11
Group 11
Group 11
Group 11
Group 11
Group 11
729
730
731
732
733
734
735
736
2
2
2
2
2
3
3
3
5
6
7
8
9
0
1
2
Group 12
Group 12
Group 12
Group 12
Group 12
Group 12
Group 12
Group 12
673
674
675
676
677
678
679
680
3
3
3
3
3
3
3
4
3
4
5
6
7
8
9
0
Group 11
Group 11
Group 11
Group 11
Group 11
Group 11
Group 11
Group 11
737
738
739
740
741
742
743
744
3
3
3
3
3
3
3
4
3
4
5
6
7
8
9
0
Group 12
Group 12
Group 12
Group 12
Group 12
Group 12
Group 12
Group 12
681
682
683
684
685
686
687
688
4
4
4
4
4
4
4
4
1
2
3
4
5
6
7
8
Group 11
Group 11
Group 11
Group 11
Group 11
Group 11
Group 11
Group 11
745
746
747
748
749
750
751
752
4
4
4
4
4
4
4
4
1
2
3
4
5
6
7
8
Group 12
Group 12
Group 12
Group 12
Group 12
Group 12
Group 12
Group 12
689
690
691
692
693
694
695
696
4
5
5
5
5
5
5
5
9
0
1
2
3
4
5
6
Group 11
Group 11
Group 11
Group 11
Group 11
Group 11
Group 11
Group 11
753
754
755
756
757
758
759
760
4
5
5
5
5
5
5
5
9
0
1
2
3
4
5
6
Group 12
Group 12
Group 12
Group 12
Group 12
Group 12
Group 12
Group 12
697
698
699
700
701
702
703
704
5
5
5
6
6
6
6
6
7
8
9
0
1
2
3
4
Group 11
Group 11
Group 11
Group 11
Group 11
Group 11
Group 11
Group 11
761
762
763
764
765
766
767
768
5
5
5
6
6
6
6
6
7
8
9
0
1
2
3
4
Group 12
Group 12
Group 12
Group 12
Group 12
Group 12
Group 12
Group 12
A8
CAMERA NUMBER SEQUENCE
Camera
Number
769
770
771
772
773
774
775
776
Switch
Setting
Tens Units
0
1
0
2
0
3
0
4
0
5
0
6
0
7
0
8
Camera
Number
Group 13
Group 13
Group 13
Group 13
Group 13
Group 13
Group 13
Group 13
833
834
835
836
837
838
839
840
Switch
Setting
Tens Units
0
1
0
2
0
3
0
4
0
5
0
6
0
7
0
8
Group 14
Group 14
Group 14
Group 14
Group 14
Group 14
Group 14
Group 14
777
788
779
780
781
782
783
784
0
1
1
1
1
1
1
1
9
0
1
2
3
4
5
6
Group 13
Group 13
Group 13
Group 13
Group 13
Group 13
Group 13
Group 13
841
842
843
844
845
846
847
848
0
1
1
1
1
1
1
1
9
0
1
2
3
4
5
6
Group 14
Group 14
Group 14
Group 14
Group 14
Group 14
Group 14
Group 14
785
786
787
788
789
790
791
792
1
1
1
2
2
2
2
2
7
8
9
0
1
2
3
4
Group 13
Group 13
Group 13
Group 13
Group 13
Group 13
Group 13
Group 13
849
850
851
852
853
854
855
856
1
1
1
2
2
2
2
2
7
8
9
0
1
2
3
4
Group 14
Group 14
Group 14
Group 14
Group 14
Group 14
Group 14
Group 14
793
794
795
796
797
798
799
800
2
2
2
2
2
3
3
3
5
6
7
8
9
0
1
2
Group 13
Group 13
Group 13
Group 13
Group 13
Group 13
Group 13
Group 13
857
858
859
860
861
862
863
864
2
2
2
2
2
3
3
3
5
6
7
8
9
0
1
2
Group 14
Group 14
Group 14
Group 14
Group 14
Group 14
Group 14
Group 14
801
802
803
804
805
806
807
808
3
3
3
3
3
3
3
4
3
4
5
6
7
8
9
0
Group 13
Group 13
Group 13
Group 13
Group 13
Group 13
Group 13
Group 13
865
866
867
868
869
870
871
872
3
3
3
3
3
3
3
4
3
4
5
6
7
8
9
0
Group 14
Group 14
Group 14
Group 14
Group 14
Group 14
Group 14
Group 14
809
810
811
812
813
814
815
816
4
4
4
4
4
4
4
4
1
2
3
4
5
6
7
8
Group 13
Group 13
Group 13
Group 13
Group 13
Group 13
Group 13
Group 13
873
874
875
876
877
878
879
880
4
4
4
4
4
4
4
4
1
2
3
4
5
6
7
8
Group 14
Group 14
Group 14
Group 14
Group 14
Group 14
Group 14
Group 14
817
818
819
820
821
822
823
824
4
5
5
5
5
5
5
5
9
0
1
2
3
4
5
6
Group 13
Group 13
Group 13
Group 13
Group 13
Group 13
Group 13
Group 13
881
882
883
884
885
886
887
888
4
5
5
5
5
5
5
5
9
0
1
2
3
4
5
6
Group 14
Group 14
Group 14
Group 14
Group 14
Group 14
Group 14
Group 14
825
826
827
828
829
830
831
832
5
5
5
6
6
6
6
6
7
8
9
0
1
2
3
4
Group 13
Group 13
Group 13
Group 13
Group 13
Group 13
Group 13
Group 13
889
890
891
892
893
894
895
896
5
5
5
6
6
6
6
6
7
8
9
0
1
2
3
4
Group 14
Group 14
Group 14
Group 14
Group 14
Group 14
Group 14
Group 14
A9
CAMERA NUMBER SEQUENCE
Camera
Number
897
898
899
900
901
902
903
904
Camera
Number
Switch
Setting
Tens Units
0
1
0
2
0
3
0
4
0
5
0
6
0
7
0
8
Group 15
Group 15
Group 15
Group 15
Group 15
Group 15
Group 15
Group 15
961
962
963
964
965
966
967
968
Switch
Setting
Tens Units
0
1
0
2
0
3
0
4
0
5
0
6
0
7
0
8
Group 16
Group 16
Group 16
Group 16
Group 16
Group 16
Group 16
Group 16
905
906
907
908
909
910
911
912
0
1
1
1
1
1
1
1
9
0
1
2
3
4
5
6
Group 15
Group 15
Group 15
Group 15
Group 15
Group 15
Group 15
Group 15
969
970
971
972
973
974
975
976
0
1
1
1
1
1
1
1
9
0
1
2
3
4
5
6
Group 16
Group 16
Group 16
Group 16
Group 16
Group 16
Group 16
Group 16
913
914
915
916
917
918
919
920
1
1
1
2
2
2
2
2
7
8
9
0
1
2
3
4
Group 15
Group 15
Group 15
Group 15
Group 15
Group 15
Group 15
Group 15
977
978
979
980
981
982
983
984
1
1
1
2
2
2
2
2
7
8
9
0
1
2
3
4
Group 16
Group 16
Group 16
Group 16
Group 16
Group 16
Group 16
Group 16
921
922
923
924
925
926
927
928
2
2
2
2
2
3
3
3
5
6
7
8
9
0
1
2
Group 15
Group 15
Group 15
Group 15
Group 15
Group 15
Group 15
Group 15
985
986
987
988
989
990
991
992
2
2
2
2
2
3
3
3
5
6
7
8
9
0
1
2
Group 16
Group 16
Group 16
Group 16
Group 16
Group 16
Group 16
Group 16
929
930
931
932
933
934
935
936
3
3
3
3
3
3
3
4
3
4
5
6
7
8
9
0
Group 15
Group 15
Group 15
Group 15
Group 15
Group 15
Group 15
Group 15
993
994
995
996
997
998
999
100
3
3
3
3
3
3
3
4
3
4
5
6
7
8
9
0
Group 16
Group 16
Group 16
Group 16
Group 16
Group 16
Group 16
Group 16
937
938
939
940
941
942
943
944
4
4
4
4
4
4
4
4
1
2
3
4
5
6
7
8
Group 15
Group 15
Group 15
Group 15
Group 15
Group 15
Group 15
Group 15
1001
1002
1003
1004
1005
1006
1007
1008
4
4
4
4
4
4
4
4
1
2
3
4
5
6
7
8
Group 16
Group 16
Group 16
Group 16
Group 16
Group 16
Group 16
Group 16
945
946
947
948
949
950
951
952
4
5
5
5
5
5
5
5
9
0
1
2
3
4
5
6
Group 15
Group 15
Group 15
Group 15
Group 15
Group 15
Group 15
Group 15
1009
1010
1011
1012
1013
1014
1015
1016
4
5
5
5
5
5
5
5
9
0
1
2
3
4
5
6
Group 16
Group 16
Group 16
Group 16
Group 16
Group 16
Group 16
Group 16
953
954
955
956
957
958
959
960
5
5
5
6
6
6
6
6
7
8
9
0
1
2
3
4
Group 15
Group 15
Group 15
Group 15
Group 15
Group 15
Group 15
Group 15
1017
1018
1019
1020
1021
1022
1023
1024
5
5
5
6
6
6
6
6
7
8
9
0
1
2
3
4
Group 16
Group 16
Group 16
Group 16
Group 16
Group 16
Group 16
Group 16
A10
TROUBLESHOOTING
PROBLEM
Unit does not respond to
power-up tests
After power on tests, unit does
not respond to joystick commands
CHECKLIST
Check that 24VAC is connected to pins 3 & 5 of 7-pin connector
Check that BLACK data wire is connected to pin 7 of 7-pin connector and
WHITE data wire is connected to pin 5 of 7-pin connector
Check that address of dome is properly set to match camera ID number
Check that dipswitch position 1 is set to match camera type
ON = color OFF = monochrome
Cannot control lens function ( Zoom )
Check that dipswitch position 3 is set to the OFF position
Auto-Iris not working
Check that dipswitch position 4 is set to the OFF position
A11
INDEX
ADJUSTMENTS . . . . . . . . . . . . . . . . . . . . . . . . . . . . . . . 28
Backlash . . . . . . . . . . . . . . . . . . . . . . . . . . . . . . . . . . 28
Checking and Setting Backlash. . . . . . . . . . . . . . . . . 28
Lens Tracking Adjustment . . . . . . . . . . . . . . . . . . . . 30
APPENDIX . . . . . . . . . . . . . . . . . . . . . . . . . . . . . . . . . . . .
Autopan . . . . . . . . . . . . . . . . . . . . . . . . . . . . . . . . . . . . . . 24
Configuring . . . . . . . . . . . . . . . . . . . . . . . . . . . . . . . . 24
Operating . . . . . . . . . . . . . . . . . . . . . . . . . . . . . . . . . . 24
Stopping . . . . . . . . . . . . . . . . . . . . . . . . . . . . . . . . . . 24
Automatic Gain Control (AGC) . . . . . . . . . . . . . . . . . . . . 26
Lower Dome
Ball Stud Engagement . . . . . . . . . . . . . . . . . . . . . . . . 20
Installation . . . . . . . . . . . . . . . . . . . . . . . . . . . . . . . . . 20
Camera
Number Assignment. . . . . . . . . . . . . . . . . . . . . . . . . . 6
Number Sequencing . . . . . . . . . . . . . . . . . . . . . . . . . . 6
Number Sequence Tables . . . . . . . . . . . . . . . . . . . A4-A10
Thumbwheel Switches . . . . . . . . . . . . . . . . . . . . . . . . 6
Chassis Assembly . . . . . . . . . . . . . . . . . . . . . . . . . . . . . . . 2
Chassis Housing . . . . . . . . . . . . . . . . . . . . . . . . . . . . . . . . 2
Chassis Installation. . . . . . . . . . . . . . . . . . . . . . . . . . . . . . 18
COMPONENT IDENTIFICATION . . . . . . . . . . . . . . . . . 2
Configurations . . . . . . . . . . . . . . . . . . . . . . . . . . . . . . . . . . 8
Daisy Chain . . . . . . . . . . . . . . . . . . . . . . . . . . . . . . . . 8
Star . . . . . . . . . . . . . . . . . . . . . . . . . . . . . . . . . . . . . . . 8
CONNECTIONS . . . . . . . . . . . . . . . . . . . . . . . . . . . . . . . 10
Data Line . . . . . . . . . . . . . . . . . . . . . . . . . . . . . . . . . . 10
Power. . . . . . . . . . . . . . . . . . . . . . . . . . . . . . . . . . . . . 11
Control Switches . . . . . . . . . . . . . . . . . . . . . . . . . . . . . . . . 4
Preparation, Ceiling . . . . . . . . . . . . . . . . . . . . . . . . . . . . . 14
Presets. . . . . . . . . . . . . . . . . . . . . . . . . . . . . . . . . . . . . . . . 24
Operation . . . . . . . . . . . . . . . . . . . . . . . . . . . . . . . . . . 24
Configuring . . . . . . . . . . . . . . . . . . . . . . . . . . . . . . . . 24
Operating . . . . . . . . . . . . . . . . . . . . . . . . . . . . . . . . . . 24
DESCRIPTION. . . . . . . . . . . . . . . . . . . . . . . . . . . . . . . . . 1
DIMENSIONS . . . . . . . . . . . . . . . . . . . . . . . . . . . . . . . . A13
DIP Switch. . . . . . . . . . . . . . . . . . . . . . . . . . . . . . . . . . . . . 4
Mount, Drop Ceiling . . . . . . . . . . . . . . . . . . . . . . . . . . . . 12
Mount, Direct . . . . . . . . . . . . . . . . . . . . . . . . . . . . . . . . . . 14
Mount, Pendant. . . . . . . . . . . . . . . . . . . . . . . . . . . . . . . . . 16
Mount, Remote . . . . . . . . . . . . . . . . . . . . . . . . . . . . . . . . . 14
OPERATION . . . . . . . . . . . . . . . . . . . . . . . . . . . . . . . . . . 24
ROUTINE MAINTENANCE . . . . . . . . . . . . . . . . . . . . . . 1
SETUP. . . . . . . . . . . . . . . . . . . . . . . . . . . . . . . . . . . . . . . . 4
Special Commands . . . . . . . . . . . . . . . . . . . . . . . . . . . . . . 26
Specifications . . . . . . . . . . . . . . . . . . . . . . . . . . . . . . Back Page
Typical Connections
AD1273 -to- AD1650 Matrix Switcher . . . . . . . . . . A1
AD1273 -to- AD2050 Matrix Switcher . . . . . . . . . . A3
AD1273 -to- AD2150 Matrix Switcher . . . . . . . . . . A2
Troubleshooting . . . . . . . . . . . . . . . . . . . . . . . . . . . . . . . A11
Wire Selection . . . . . . . . . . . . . . . . . . . . . . . . . . . . . . . . . 10
Hard Mount, Direct . . . . . . . . . . . . . . . . . . . . . . . . . . . . . 14
Hard Mount, Remote . . . . . . . . . . . . . . . . . . . . . . . . . . . . 14
INSTALLATION . . . . . . . . . . . . . . . . . . . . . . . . . . . . . . . 12
Chassis Assembly . . . . . . . . . . . . . . . . . . . . . . . . . . . .
Chassis Housing . . . . . . . . . . . . . . . . . . . . . . . . . . . . .
Fascia Plate . . . . . . . . . . . . . . . . . . . . . . . . . . . . . . . . 21
Lower Dome . . . . . . . . . . . . . . . . . . . . . . . . . . . . . . . 20
Pendant Shroud . . . . . . . . . . . . . . . . . . . . . . . . . . . . . 22
Trim Ring . . . . . . . . . . . . . . . . . . . . . . . . . . . . . . . . . 21
Jumper Plug Removal . . . . . . . . . . . . . . . . . . . . . . . . . . . . 9
A12
DIMENSIONS
24"/609.6 mm
11.25"/285.75 mm
9.65"/245 mm
4.5"
114.3 mm
10.9"/277 mm
A13
SPECIFICATIONS
MODELS:
B/W CAMERA
AD1273/B10C: Smoked Dome, B/W camera, 10X zoom
lens, for drop or hard ceiling mount
AD1273/C10C: Smoked Dome, Color Camera, 10x
Zoom Lens, for drop or hard ceiling
mount
AD1273/DC: 24" x 24" Drop Ceiling Panel Insert
AD1273/PM: Pendant Mount conversion kit (includes
top cover)
MECHANICAL
Pan Speed:
Pan Range:
Tilt Speed:
Tilt Range:
Braking:
Connectors:
Upper Dome:
Lower Dome:
Weight:
Type:
Scanning Area:
Scanning System:
Horiz Resolution:
Min Illumination:
Synchronization:
Interline transfer 1/2" CCD array
6.4mm (H) X 4.8mm (V)
2:1 interlaced
500 lines @ center
0.22 lux @ f 1.2 (AGC on)
Phase adjustable line lock
Crystal (internal)
Signal to Noise: 48 dB (typical rating)
Video output: Composite video: 1.0 Vp-p, 75 Ω
AGC: >24 dB
EIA Standards
Pick-up device:
Scanning:
Up to 200°/sec (1-126°/sec during target
Horizontal:
acquisition)
Vertical:
360° continuous
Up to 60°/sec
> 90°
COLOR CAMERA
Dynamic
Spring-loaded quick disconnect
Type:
mechanical coupling, multi-pin electrical
Scanning Area:
connector, and BNC connector
Scanning System:
Plenum steel w/ standard size electric Horiz Resolution:
knockouts
Video Out:
High quality thermoformed optical
S/N ratio:
acrylic
Min Illumination:
19.0 pounds (8.6 kg)
White Balance:
ELECTRICAL
682 (H) x 492 (V) pixels
525 Lines, 60 fields, 30 frames
15.734 KHz
59.9 Hz Internal Sync
60.0 Hz (Line-Locked)
Interline transfer 1/2" CCD array
6.4mm (H) X 4.8mm (V)
2:1 interlaced
430 lines @ center
1.0 Vp-p/75 Ω composite
48 dB (Typical rating)
2.25 lux @ f 1.2 (AGC on)
Through the lens (TTL)
Automatic Tracing
White Balance (ATW)
Input Voltage: 24VAC, 50/60 Hz
Power: 20 Watt max
NTSC Standards
Data Format: AD Manchester Control Code, balanced.
Pick-up Device: 682 (H) X 492 (V) pixels
Use directly with AD Matrix
Scanning: 525 lines, 60 fields, 30 frames
Switcher/Control Systems or other AD
Horizontal: 15.734 KHz
Manchester Control Code Generators
Vertical: 59.9 Hz Internal Sync
60 Hz (Line-Locked)
ENVIRONMENTAL
CAMERA LENS:
Environment: Indoor
Temp Range: 14° F to 122° F (-10°C to +50°C)
10X Zoom, 8-80 mm, F/1.2 auto-iris w/manual override
Rel. Humidity: 95% (non-condensing)
An American Dynamics Product
Designed and built by
Sensormatic CCTV Systems Division
One Blue Hill Plaza
Pearl River, New York, 10965
(914) 624-7600
Technical Support Center: 1-800-442-2225
FAX: 914-624-7685
OP1273D
October1995
8000-0712-01 Rev D
Printed in U.S.A.