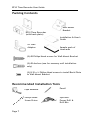
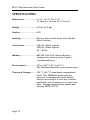
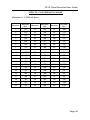
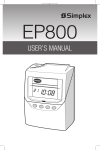
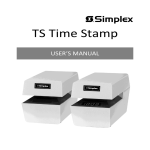
1
EP10 USER’S MANUAL This device complies with Part 15 of the FCC Rules. Operation is subject to the following two conditions: (1) this device may not cause harmful interference, and (2) this device must accept any interference received, including interference that may cause undesired operation. WARNING: Changes or modifications to this product not expressly approved by the party responsible for compliance could void the user‟s authority to operate this equipment. NOTICE: This equipment has been tested and found to comply with the limits for a Class B digital device, pursuant to Part 15 of the FCC Rules. These limits are designed to provide reasonable protection against harmful interference in a residential installation. This equipment generates, uses, and can radiate radio frequency energy and, if not installed and used in accordance with the instructions, may cause harmful interference to radio communications. However, there is no guarantee that interference will not occur in a particular installation. If this equipment does cause harmful interference to radio or television reception, which can be determined by turning the equipment off and on, the user is encouraged to try to correct the interference by one or more of the following measures: Reorient or relocate the receiving antenna. Increase the separation between the equipment and receiver. Connect the equipment into an outlet on a circuit different from that to which the receiver is connected. Consult the dealer or an experienced radio TV technician for help. This Class B digital apparatus complies with Canadian ICES-003. Cet appareil numerique de la classe B est conforme a la norme NMB-003 du Canada. For questions about the operation of this time recorder, please contact our Time Recorder Support Hotline at (800) 224-1881 or (404) 591-3199. Simplex EP10 User’s Guide © 2011 SimplexGrinnell LP. All rights reserved. SimplexGrinnell is continually improving its products; specifications are subject to change without notice. SimplexGrinnell, Simplex and Be Safe are trademarks of Tyco International Services AG or its affiliates. License numbers available at www.simplexgrinnell.com or contact your local SimplexGrinnell office. MC109-151-610 Rev 1/2011 Table of Contents Introduction .............................................................. 5 Quick Easy Setup (Wall Mount) ........................................ 8 Quick Easy Setup (Table Top Mount) ................................. 9 Setup ..................................................................... 10 Using the Time Recorder .............................................. 27 Appendix A - Changing the Print Intensity ......................... 29 Appendix B - Calibrating the TruAlign Function................... 30 Appendix C - Testing the Print Head ................................ 33 Appendix D - Changing the dates for Daylight Savings ........... 34 Appendix E - Disable Daylight Savings Correction ................ 35 FREQUENTLY ASKED QUESTIONS ..................................... 36 SPECIFICATIONS ......................................................... 37 EP10 Time Recorder User Guide Introduction Thank you for purchasing our time recorder. For safe and proper operation, please carefully read this manual before using the time recorder and save it for reference. Simplex‟s EP10 TruAlign Time Recorder is a maintenance-free employee time recorder that uses no ink, ribbon or toner and operates without any loud impact noise to disturb the working environment. Simplex‟s EP10 TruAlign Time Recorder features the patented “TruAlign” feature, which helps employees align their timecards to ensure a clear registration at the correct position on the timecard. The employee places the long edge of the timecard on the timecard shelf of the EP10 and aligns the timecard to the cell to be printed. When the timecard is aligned correctly an automatic imprint with the day and time will be recorded on the timecard. The indicator turns green when the printing is complete and the timecard can be removed. The EP10 TruAlign Time Recorder uses the Simplex thermal time card. The time and date programming is protected by an internal lithium battery Features Typical applications: Payroll or job cost recorder. Quartz time clock Perpetual calendar Automatic daylight savings time Prints in 3 languages 12 or 24 hour format Regular minute or 1/100 of hour Thermal printer Digital LCD display (AM/PM, Hour, Minute, Day of week and Daylight Savings indication) Page 5 Print intensity adjustment Automatic imprint on timecard Internal lithium battery backup EP10 Time Recorder User Guide Caution Avoid placing the time recorder in environments that are: humid dusty exposed to direct sunlight subject to frequent or continuous vibrations affected by chemicals or ozone outside the temperature range between +25°F and 113°F Place the time recorder close to a wall outlet so that it is easy to disconnect. Do not put a heavy object on the time recorder, or forcefully press the time recorder onto the back-plate. This may cause trouble with the punching mechanism. Lithium battery contains perchlorate material – special handling may apply. Please go to the web site http://www.dtsc.ca.gov/hazardouswaste/perchlorate for information about proper methods of disposal. About this Manual This manual will guide you through the installation, set up and use of your EP10 TruAlign Time Recorder. Accessories Thermal Time Cards Time Card Rack Note: The thermal timecards are sensitive to temperature and should always be stored in a cool dry location preferably out of exposure to direct sun light. Storage temperature should not exceed 150oF (65 oC). Page 6 EP10 Time Recorder User Guide Packing Contents Wall-Mount Bracket EP10 Time Recorder (with back-plate) Installation & User‟s Guide AC Wall Adapter Sample pack of timecards (2) #8 Philips Head screws for Wall-Mount Bracket (2) #8 Anchors (use for masonry wall installation only) (2) 8-32 x ¼ Philips Head screws to install Back-Plate to Wall-Mount Bracket Recommended Installation Tools Tape Measure Philips Head Screw Driver Page 7 Pencil OptionalPower Drill & Drill Bits EP10 Time Recorder User Guide Quick Easy Setup (Wall Mount) To setup your EP10, follow these next steps: Step 1 Step 2 Separate the back-plate from the EP10 by removing the Philips head screw. Retain the screw for later. Install the wall-mount bracket to the wall using the supplied wall-mount screws. Note: For best visibility mount the EP10 about 48 inches from the floor. 48 inches Step 3 Step 4 Using the supplied 8-32 x ¼ Philips head screws install the back-plate to the wall-mount bracket. With the back-plate secured to the wall-mount bracket, plug the AC wall adapter into the EP10. Note: The time, date and other settings are factory set. See “Factory Settings” below. If these settings are acceptable you are ready to begin, otherwise see Page 11 “Programming the EP10”. Step 5 Factory Settings Align and place the EP10 on the back-plate and secure the two together with the 8-32 x ¼ Philip head screw. Be careful not to pinch the AC cord. Note: Make sure the bottom of the timecard shelf is over the edge of the back-plate before securing the screw. Time=U.S. Eastern Time Daylight Savings=On Spring Daylight Savings=Second Sunday in March Fall Daylight Savings=First Sunday in November Displayed Time Format=AM/PM hours & Minutes Printed Time Format=AM/PM hours & Minutes Day of Week Language=English Confirmation Beep=Disabled Page 8 EP10 Time Recorder User Guide Quick Easy Setup (Table Top Mount) To setup your EP10, follow these next steps: Step 1 Step 2 Separate the back-plate from the EP10 by removing the Philips head screw. Retain the Philips head screw for later. Plug the AC adapter into the EP10 and then plug the wall adapter into the AC outlet. Step 3 Secure the back-plate to the EP10 with the Philips head screw being careful not to pinch the AC cord. Make sure the bottom of the timecard shelf is over the edge of the backplate before securing the screw. Place the EP10 on a solid flat surface. You are ready to begin using the EP10. Factory Settings Time=U.S. Eastern Time Daylight Savings=On Spring Daylight Savings=Second Sunday in March Fall Daylight Savings=First Sunday in November Note: The time, date and other settings are factory-set. See “Factory Settings” to the right. If these settings are acceptable you are ready to begin, otherwise see Page 11 “Programming the EP10”. Displayed Time Format=AM/PM hours & Minutes Printed Time Format=AM/PM hours & Minutes Day of Week Language=English Confirmation Beep=Disabled Page 9 EP10 Time Recorder User Guide Setup To set up your EP10time recorder, follow these next steps: Remove the Back-Plate Separate the back-plate from the time recorder by removing the Philips head screw. Retain the Philips head screw for later. Connect the AC Power Plug the AC adapter into the time recorder and then plug the wall adapter into the AC outlet. NOTE: The time recorder has an internal battery that will retain the programming if the time recorder is unplugged from AC power. Page 10 EP10 Time Recorder User Guide Programming the EP10 After removing the back-plate and connecting the AC power you will be ready to begin programming the EP10 time recorder. Use the three buttons on the back to program the time recorder. Hold the time recorder with both hands with the display facing you. Use your index and middle fingers to press the programming buttons on the back of the time recorder while watching the settings on the display. Note: An undisturbed environment is recommended when programming the timeclock. Using the 3 programming buttons + (Plus) When you press the selected setting. + button, you increment or change the SET You can set the value of the selected setting on the display by pressing the SET button which also moves you to the next available setting. - (Minus) When you use the selected setting. - button, you decrement or change the What if I press the SET button by mistake? If you make a programming mistake by pressing the SET button too soon, simply unplug the AC power or continue pressing the SET button until you have the normal time and date on the display. Then go back into the Set Up Mode and continue your programming. Page 11 EP10 Time Recorder User Guide Setting the Time To enter the „Time Set Up Mode‟, press the buttons at the same time. + and SET The blue light will turn off and the display will show the hours and minutes, release the + and SET buttons. Press the + button to move the time forward or press the button to move the time backwards. To move quickly through the time, press and hold down the + or - button. Holding down either button will increase how quickly you scroll through the time. When you have the desired hours and minutes on the display, press the SET button. Note: The seconds will be zeroed when you press the SET button, so it‟s recommended to set the time 1 or 2 minutes ahead of the actual time. Wait until the actual time matches the time recorder, and then press the SET button which will synchronize the time recorder time with the actual time. Example: Set the time from 11:00am to 1:00pm Hours and Minutes Step 1 AM 1100 Press the button to scroll forward until the display shows „PM 0 1 0 0‟. Notice while you are scrolling through the hours the AM will change to PM. Step 2 PM 0100 Press the SET button when the AM/PM indicator, hour and minutes are correct. The time will be accepted and the time recorder will return to a normal display. Page 12 EP10 Time Recorder User Guide Setting the Date and Other Functions To enter the „Setup Mode‟, press the the same time. - and SET buttons at Release the buttons, the blue light will turn off, the „Set Month‟ function (1) will display. Press the + or - buttons to change the value of the settings. The + button moves you forward and the - button moves you backwards through the available selections. When you have the desired setting on the display, press the SET button. Factory Settings The time recorder has several settings that are pre-set at the factory. The factory default settings include: Daylight Savings=On Spring Daylight Savings=Second Sunday in March Fall Daylight Savings=First Sunday in November Displayed Time Format=AM/PM hours & Minutes Printed Time Format=AM/PM hours & Minutes Day of Week Language=English Confirmation Beep=Disabled Simply press the SET button to accept these factory settings when you are programming the time recorder. Page 13 EP10 Time Recorder User Guide Set up Functions The set up functions of the time recorder are in sequential order from 1 through 15. When in the „Setup Mode‟ you must pass through each function even if you only need to change a single setting. Simply press the SET button to accept the settings that you do not wish to change. Note: If you do not pass through each setting your time recorder may not be configured as you desired. To enter the „Setup Mode‟ for date and other functions, press the Function - and SET buttons at the same time. Settings Selections Factory Settings 1 Set Month 01 – 12 - 2 Set Date 01 – 31 - 3 Set Year 00 – 99 - 4 Change Factory Default Daylight Savings y–n n 5 Set Spring DST Month 00 – 12 03 6 Set Spring DST Sunday 1,2,3,4,Last 02 7 Set Fall DST Month 00 – 12 11 8 Set Fall DST Sunday 1,2,3,4,Last 01 9 Set 12/24 Hr Display 12 / 24 12 10 Set 12/24 Hr Print 12 / 24 12 11 Set Print Minute Format 1-Mins/ 2- 1/100s of Hour 1 12 Set Day of Week Print Language English, French, Spanish E 13 Set Print Intensity 1–9 5 14 Confirmation Beep n-Disabled, y-Enabled n 15 TruAlign Calibration/ 0-No, 1-Yes, 0 Print Head Test 2 – 9 Print Head Test Page 14 EP10 Time Recorder User Guide Function 1 – Set Month When prompted to set the month, use the + button to scroll forward or the - button to scroll backwards. With the desired month showing on the display, press the SET button. The „Set Date‟ function (2) will display next. Example: Set the month from 01 to 10 Function # Month Step 1 1:01 Press the or shows „10‟. - button until the display Step 2 1:10 Press the SET button when the month is correct. The month will be accepted, go to the „Set Date‟ function. Note: If you scroll past the month you wish, continue pressing the or - button until the desired month displays, then press the SET button. Important Note: The set up functions of the time recorder are in sequential order and you must pass through each setting to complete the programming. Simply press the SET button to accept the settings that you do not wish to change. Your time recorder may not be programmed as you desired if you do not pass through each setting. Page 15 EP10 Time Recorder User Guide Function 2 – Set Date When prompted to set the date, use the + button to scroll forward or the - button to scroll backwards. With the desired date showing on the display, press the SET button. The „Set Year‟ function (3) will display next. Note: If setting the date in February make sure you set the date correctly, for example leap year has 29 days, otherwise the daylight savings may not activate correctly. Example: Set the date from 21 to 05 Function # 2:21 Date Step 1 Press the or shows „05‟. - button until the display Step 2 2:05 Press the SET button when the date is correct. The date will be accepted, go to the „Set Year‟ function. Note: If you scroll past the date you wish, continue pressing the or - button until the desired date displays, then press the SET button. Page 16 EP10 Time Recorder User Guide Function 3 – Set Year When prompted to set the year, use the + button to scroll forward or the - button to scroll backwards. With the desired year showing on the display, press the SET button. The „Set DST‟ function (4) will display next. Example: Set the year from 01 to 09 Function # Year Step 1 3:01 Press the or shows „09‟. - button until the display Step 2 3:09 Press the SET button when the year is correct. The year will be accepted, go to the „Change Factory Default Daylight Savings‟ function. Note: If you scroll past the year you wish, continue pressing the or - button until the desired date displays, then press the SET button. Page 17 EP10 Time Recorder User Guide Function 4 – Change Factory Default Daylight Savings This function allows you to change or modify the factory default daylight savings settings. The daylight savings setting are set at the factory for the Second Sunday in March and the First Sunday in November. Most customers should use the factory settings for daylight savings. The daylight savings setting are set at the factory for the Second Sunday in March and the First Sunday in November. To use the factory settings for daylight savings, press the SET button at Function 4. Note: Normally you would use the default settings and by pass the Daylight Savings settings by pressing the SET button. For more information see: Appendix D - Changing the dates for Daylight Savings Appendix E - Disable Daylight Savings Correction Page 18 EP10 Time Recorder User Guide Function 9 – Set 12/24 Hr Display When prompted to select the format for how hours show on the display, use the + button to scroll forward or the - button to scroll backwards. With the desired format showing on the display, press the SET button. The „Set 12/24 Hr Print‟ function (10) will display next. Setting Values 12 = Show hours on display as AM / PM (1:00 in the afternoon will show as PM 1:00) 24 = Show hours on display as 0 - 23 (1:00 in the afternoon will show as 13:00) Example: Set the format from 12 to 24 Function # Hour Format for Display Step 1 9:12 Press the or shows „24‟. - button until the display Step 2 9:24 Press the SET button when the format selection is correct. The format will be accepted, go to the „Set 12/24 Hr Print‟ function. Note: If you scroll past the format you wish, continue pressing the or - button until the desired format displays, then press the SET button. Page 19 EP10 Time Recorder User Guide Function 10 – Set 12/24 Hr Print When prompted to select the format for how hours will print on the timecard, use the + button to scroll forward or the button to scroll backwards. With the desired format showing on the display, press the SET button. The „Set Print Minute Format‟ function (11) will display next. Setting Values 12 = Print hours on the timecard as AM / PM (1:00 in the afternoon will print as 1:00 P) 24 = Print hours on the timecard as 0 - 23 (1:00 in the afternoon will print as 13:00) Example: Set the format from 12 to 24 Function # Hour Format For Print Step 1 10: 1 2 Press the or shows „24‟. - button until the display Step 2 10: 2 4 Press the SET button when the format selection is correct. The format will be accepted, go to the „Set Print Minute Format‟ function. Note: If you scroll past the format you wish, continue pressing the or - button until the desired format displays, then press the SET button. Page 20 EP10 Time Recorder User Guide Function 11 – Set Print Minute Format When prompted to select the format for how minutes will print on the timecard, use the + button to scroll forward or the button to scroll backwards. With the desired format showing on the display, press the SET button. The „Set Day Print Language‟ function (12) will display next. Setting Values 1 = Print minutes on the timecard as 00 - 59 (30 minutes will print as :30) 2 = Print minutes on the timecard as hundredths of hour 0 - 99 (30 minutes will print as .50) Note: See page 38 for a “minutes to 1/100s of hour conversion chart”. Example: Set the format from minutes to hundredths of an hour Minute Format for Print Function # 11: 1 Step 1 Press the or shows „2‟. - button until the display Step 2 11: 2 Press the SET button when the format selection is correct. The format will be accepted, go to the „Set Day Print Language‟ function. Note: If you scroll past the format you wish, continue pressing the or - button until the desired format displays, then press the SET button. Page 21 EP10 Time Recorder User Guide Function 12 – Set Day Print Language When prompted to select the language the day of the week will print on the timecard, use the + button to scroll forward or the - button to scroll backwards. With the desired language showing on the display, press the SET button. The „Set Print Intensity‟ function (13) will display next. Setting Values E = Print the day of the week abbreviation in English on the timecard S = Print the day of the week abbreviation in Spanish on the timecard F = Print the day of the week abbreviation in French on the timecard Example: Set the day of week language from English to French Language Function # Step 1 12: E Press the or shows „F‟. - button until the display Step 2 12: F Press the SET button when the language selection is correct. The language will be accepted, go to the „Set Print Intensity‟ function. Note: If you scroll past the language you wish, continue pressing the or - button until the desired language displays, then press the SET button. Page 22 EP10 Time Recorder User Guide Function 13 – Set Print Intensity When prompted to select the intensity of the imprint on the timecard, press the SET button to accept the factory setting. The „Confirmation Beep Disable/Enable‟ function (14) will display next. Note: Normally you would press the SET button to by pass the Set Print Intensity function. For more information see: Appendix A - Changing the Print Intensity Page 23 EP10 Time Recorder User Guide Function 14 – Confirmation Beep Disable/Enable When prompted to select whether the confirmation beep will sound or will be disabled, use the + button to scroll forward or the - button to scroll backwards. With the desired setting showing on the display, press the SET button. The „TruAlign Calibration‟ function (15) will display next. If enabled, a confirmation beep will sound after each imprint on a timecard. Setting Values n = Confirmation beep disabled, this is the factory setting y = Confirmation beep is enabled Example: Set the confirmation beep to enabled (y) Function # Enable/Disable Beep Step 1 14: n Press the or shows „y‟. - button until the display Step 2 14: y Press the SET button when the setting is correct. The setting will be accepted, go to the „TruAlign Calibration‟ function. Note: If you scroll past the setting you wish, continue pressing the or - button until the desired setting displays, then press the SET button. Page 24 EP10 Time Recorder User Guide Function 15 – TruAlign Calibration / Print Head Test When prompted to activate the TruAlign Calibration / Print Head Test, press the SET button to accept the factory setting. After pressing the SET button the time recorder will go to the normal time/date display and will be operational. Note: Normally you would press the SET button to by pass the TruAlign calibration function. For more information see: Appendix B - Calibrating the TruAlign Function Appendix C - Testing the Print Head Page 25 EP10 Time Recorder User Guide Wall Mount Select a site to install the EP10 time recorder that will be convenient to employees clocking In and Out. The EP10 time recorder can be mounted directly to a wall. When deciding where the time recorder will be installed, keep in mind that 115VAC power outlet should be within 6 feet of the mounting location. Mounting to a Wall Note: If you are installing the time recorder on a wall with drywall, it is recommended to use a “Molly Bolt” or Toggle Bolt” type of wall anchor. Step 1 Run wall adapter cord from underneath through the center hole in wall-mount bracket. 48 inches Using the wall-mount bracket as a guide, mark the location on the wall of where the screws will be installed. Run the AC wall adapter cord through hole in the wall-mount bracket and then install the wall-mount bracket to the wall using the supplied wallmount screws. Note: The time recorder should be mounted for best visibility, about 48 inches from the floor. Step 2 Remove the Philips head screw holding the back-plate on the time recorder. Be sure to retain the Philips head screw for later. Page 26 EP10 Time Recorder User Guide Wall Step 3 Using the supplied 6/32 x 3/8 Philips head screws install the back-plate to the wall-mount bracket. Wall Step 4 With the back-plate secured to the wall-mount bracket, plug the AC wall adapter into the time recorder. Align and place the time recorder on the back-plate and secure the two together with the 832 x ¼ Philips head screw, being careful not to pinch the AC cord. Plug the wall adapter into the AC outlet. Note: Make sure the bottom of the timecard shelf is over the edge of the back-plate before securing the screw. Page 27 EP10 Time Recorder User Guide Using the Time Recorder Front View AM/PM Indicator Display Daylight Savings Indicator Timecard shelf Day of Week Indicator TruAlign LED Guide The employee places the long edge of the timecard on the timecard shelf of the EP10 and aligns the timecard to the cell to be printed. When the timecard is aligned correctly an automatic imprint with the day and time will be recorded on the timecard. Next, four dashes (- - - -) show on the display and the indicator turns green indicating the printing is complete and the timecard can be removed. Page 28 EP10 Time Recorder User Guide Appendix A - Changing the Print Intensity How to change the print intensity on the timecard If the imprint on the timecard is getting faint you may wish to increase the print intensity setting from the factory setting of 5. See the instructions below. Enter the „Setup Mode‟. See Page 13. Press the SET button until you get to Function 13 Use the + button to scroll through and set the desired print intensity level. Press the SET button through Function 14 and 15. The time recorder will go to the normal time/date display with the changes to the print intensity applied. Example: Set the print intensity from 5 to 7 Function # 13: 13: Print Intensity 5 7 Step 1 Press the or shows „7‟. - button until the display Step 2 Press the SET button when the setting is correct. The setting will be accepted, continue pressing the SET button through Function 14 and 15. The time recorder will go to the normal time/date display with the changes to the print intensity applied. Note: If you scroll past the setting you wish, continue pressing the or - button until the desired setting displays, then press the SET button. Page 29 EP10 Time Recorder User Guide Appendix B - Calibrating the TruAlign Function The time recorder was calibrated at the factory but with the passage of time or shifts in temperature you may find it necessary to recalibrate the time recorder. When should I calibrate the TruAlign function for the timecard? Recalibration may be needed if you insert a timecard in the time recorder and the blue LED changes to green when the timecard is not aligned correctly. See below for an example of a timecard when the TruAlign function needs to be recalibrated. TruAlign function needs to be recalibrated. Imprint is not lined up correctly in timecards print area when the green LED displays. TruAlign function is calibrated correctly. Imprint is lined up correctly in timecards print area when the green LED displays. How to calibrate the TruAlign function To recalibrate the TruAlign function, see the instructions below. Note: It is recommended when performing the calibration function to be in a sitting position with the timeclock on a stable flat surface in an undisturbed environment. Enter the „Setup Mode‟. See Page 13. Press the SET button until you get to Function 15 Page 30 EP10 Time Recorder User Guide Function # 15: TruAlign Calibration Press the or - button until the display shows „1‟. Selecting „1‟ activates the TruAlign calibration mode. Press the SET button. 1 The display will show „CAL 1‟, insert and visually align a timecard, see Figure 1. CAL1 With the timecard fully inserted and properly aligned, press and hold the button to register the alignment. Note the value showing on the display. Shift the card slightly left and right, the value will increase or decrease. When the display is at the smallest value, release the button, the display will show „CAL2‟. Remove the timecard. Proper alignment when the indicator falls in the middle of print area. CAL 1 Figure 1 Page 31 EP10 Time Recorder User Guide CAL2 With the display showing „CAL 2‟, insert and intentionally misalign the timecard, see Figure 2. With the timecard fully inserted and misaligned, press and hold the - button to register the alignment. Note the value showing on the display. Shift the card slightly left and right, the value will increase or decrease. End When the display is at the highest value, release the - button, the display will show „END‟. Remove the timecard. Subtract the smaller registration value from the larger; the difference should be greater than 50. If the value is less than 50 you should repeat the TruAlign calibration. Press the SET button to complete the calibration. The time recorder will go to the normal time/date display with the changes to the TruAlign calibration applied. CAL 2 Misalignment of timecard. Figure 2 Page 32 EP10 Time Recorder User Guide Appendix C - Testing the Print Head When should I run the test on the print head? If you notice that the imprint on the timecard appears to be missing segments, you can test the print head to make sure it is working correctly. To test the print head, see the instructions below. Enter the „Setup Mode‟. See Page 13. Press the SET button until you get to Function 15 Example: Set the print test to 4 imprints Print Head Test Function # Step 1 15: 0 15: 4 Press the or - button until the display shows „4‟. Note: Any value between 2 and 9 puts the time recorder into print head test mode. Step 2 Press the SET button when the setting is correct. The time recorder will be in the print head test mode. Note: If you scroll past the setting you wish, continue pressing the or - button until the desired setting displays, then press the SET button. Step 3 With the time recorder in a normal time/date display. Insert a timecard and make an imprint. The imprint should look similar to the example. Make 3 additional imprints, after the 4th imprint the time recorder will have completed the „print head test mode‟ and be ready to imprint on the timecards normally. Page 33 EP10 Time Recorder User Guide Appendix D - Changing the dates for Daylight Savings By default, daylight saving time is factory set for the second Sunday in March and the first Sunday in November. To change the factory set daylight savings dates, see the instructions below. Enter the „Setup Mode‟. See Page 13. Press the SET button until you get to Function 4. + or - button until the display shows „Y‟. Then press the SET button to go to Function 5. Press the Use the + or - button to scroll through and set the desired month for the spring daylight savings. Then press the SET button to go to Function 6. Press the + or - button to scroll through and set the desired Sunday for the spring daylight savings. Then press the SET button to go to Function 7. Setting Values 1 = First Sunday 4 = Fourth Sunday 2 = Second Sunday L = Last Sunday 3 = Third Sunday Use the + or - button to scroll through and set the desired month for the fall daylight savings. Then press the SET button to go to Function 8. Press the + or - button to scroll through and set the desired Sunday for the fall daylight savings, and then press the SET button. Setting Values 1 = First Sunday 4 = Fourth Sunday 2 = Second Sunday L = Last Sunday 3 = Third Sunday Press the SET button through Function. 9, 10, 11, 12, 13, 14 and 15. The time recorder will go to the normal time/date display with the changes for daylight savings applied. Page 34 EP10 Time Recorder User Guide Appendix E - Disable Daylight Savings Correction By default, daylight saving time is factory set for the second Sunday in March and the first Sunday in November. If you are located in an area that does not recognize daylight saving time, you can disable the automatic correction. To disable the daylight savings correction, see the instructions below. Enter the „Setup Mode‟. See Page 13. Press the SET button until you get to Function 4. + or - button until the display shows „Y‟. Then press the SET button to go to Function 5. Press the + or - button until the display shows „00‟. Then press the SET button to go to Function 9. Press the Press the SET button through Function 9, 10, 11, 12, 13, 14 and 15. The time recorder will go to the normal time/date display with the daylight savings correction disabled. Page 35 EP10 Time Recorder User Guide FREQUENTLY ASKED QUESTIONS Why will the EP10 not power up? Why will nothing print on the timecard when it is inserted in the EP10? Why is the EP10 printing on the timecard when it is not aligned in the timecard cell? When I press the SET button to accept a setting the display shows “Err #”. (# = the function number you are currently configuring.) What does this error mean? Why is it when there is a power failure I have to reset the time and date on the EP10? Is there a way to reset all of the settings except the time and date to the factory default settings? Why does the display show 4 dashes ( - - - - ) after an employee punches the timecard? Check to make sure the AC power connector is plugged in securely on the back of the time recorder. Make sure the AC wall outlet is supplying power. To check this you could plug in a lamp or radio. Make sure the wall adapter is securely plugged into the AC wall outlet. Make sure the timecards being used are designed for the EP10 time recorder. Not all cards will work with the EP10 time recorder. Use timecard # THERMAL. You may need to recalibrate the TruAlign function. See page 30 for details. Typically if you see “Err #”, it means you have selected an invalid entry. For example if you see „Err 4‟, this means you have entered an invalid setting for Function 4. You may need to change the internal BR2325 coin-cell lithium battery. Contact Simplex‟s technical support at 1-800-224-1881. Yes, to reset the EP10 to the factory settings, press the + and - and SET buttons at the same time. The display will show rESt for 2 seconds and then the normal time / date will show. This is normal operation; the print head is readying itself for the next imprint. Page 36 EP10 Time Recorder User Guide SPECIFICATIONS Dimensions ...............5 1/3 " H x 6" W x 3" D 13.5cm H x 15.2cm W x 7.6cm D Weight ....................5.0 lbs (2.3 kg) Display ....................LCD Housing ...................Electro-Galvanized Steel with PowderPaint Coating Line Power ...............120vAC, 80mA typical 220vAC, 80mA typical 50 / 60 Hz Memory ...................BR2325 Coin-Cell Lithium Battery (change the battery every 7 yearsrecommendation) Environment .............32o to 140 o F (0 o to 60 o C) 95% Relative Humidity (non-condensing) Timecard Storage .......150 o F (65 o C) maximum temperature Note: The THERMAL timecards are sensitive to temperature and should always be stored in a cool dry location preferably out of exposure to direct sun light. Storage temperature should not exceed 150oF (65 oC). Page 37 EP10 Time Recorder User Guide MINUTE CONVERSION CHART Minutes to 1/100s of Hour Minutes Decimal Hrs Minutes Decimal Hrs Minutes Decimal Hrs 1 .01 21 .35 41 .68 2 .03 22 .36 42 .70 3 .05 23 .38 43 .71 4 .06 24 .40 44 .73 5 .08 25 .41 45 .75 6 .10 26 .43 46 .76 7 .11 27 .45 47 .78 8 .13 28 .46 48 .80 9 .15 29 .48 49 .81 10 .16 30 .50 50 .83 11 .18 31 .51 51 .85 12 .20 32 .53 52 .86 13 .21 33 .55 53 .88 14 .23 34 .56 54 .90 15 .25 35 .58 55 .91 16 .26 36 .60 56 .93 17 .28 37 .61 57 .95 18 .30 38 .63 58 .96 19 .31 39 .65 59 .98 20 .33 40 .66 60 1.00 Page 38 EP10 Time Recorder User Guide Limited Warranty Subject to the limitations set forth below, SimplexGrinnell warrants that the Products shall be free from defects in material and workmanship under normal use for the period of 90 days commencing on the date of 1) first beneficial use of all or any part of Product if installed by SimplexGrinnell or 2) Product shipment, whichever is earlier. SimplexGrinnell’s sole liability, and purchaser’s sole remedy, under this Warranty, shall be limited to the repair or replacement of any Product, or part thereof, which SimplexGrinnell determines to be defective, at SimplexGrinnell’s sole option and subject to the availability of service personnel and parts, as determined by SimplexGrinnell. Warranty service will be performed between the hours of 8:00 a.m. to 5:00 p.m. local time, Monday through Friday exclusive of SimplexGrinnell’s holidays. Warranty service requested to be performed at other than during SimplexGrinnell’s normal work hours shall be chargeable to SimplexGrinnell’s standard overtime and travel rates. All repairs that are or may become necessary under the warranty provisions of this Agreement shall be performed only by an authorized SimplexGrinnell representative. Purchaser agrees to provide full and free access to such authorized SimplexGrinnell representative to make such repairs. Any repairs, adjustments, or interconnections performed by the purchaser or anyone other than an authorized SimplexGrinnell representative shall void all warranties. This warranty extends to the original purchase only and is nontransferrable. THIS WARRANTY DOES NOT APPLY TO ANY PRODUCT THAT HAS BEEN SUBJECTED TO ABUSE, MISHANDLING, OR IMPROPER USE AS DETERMINED BY SIMPLEXGRINNELL AND IS IN LIEU OF ALL OTHER WARRANTIES, EXPRESSED OR IMPLIED, INCLUDING ANY IMPLIED WARRANTY OF MERCHANTABILITY OR FITNESS FOR A PARTICULAR PURPOSE. This Warranty expressly excludes program and schedule changes, failures due to external causes, including but not limited to electrical surges, lightening, failure of electrical power, air conditioning or humidity control, damaging foreign substances, transportation, construction dust or debris, user programming errors, electrical work external to the equipment supplied by SimplexGrinnell, maintenance of accessories, alterations, attachments or other devices not furnished by SimplexGrinnell, ribbon replacement (other than defects), batteries, devices designed to fail in protecting a system such as, but not limited to, fuses and circuit breakers or any other causes other than manufacturing defect. SimplexGrinnell makes no warranty relating to or arising out of a claim or assertion that any Product infringes or violates any patent, copyright, or other proprietary right of any third party. LIMITATION OF LIABILITY: SIMPLEXGRINNELL SHALL NOT BE LIABLE FOR ANY INDIRECT, INCIDENTAL, ECONOMIC, OR CONSEQUENTIAL LOSS OR DAMAGE TO THE PURCHASER OR USER OF THIS PRODUCT ARISING OUT OF, AMONG OTHER THINGS, THE OPERATION OR FAILURE OF THE PRODUCT TO OPERATE, THIS AGREEMENT, THE INSTALLATION, USE, DESIGN OR FUNCTION OF ANY SIMPLEXGRINNELL PRODUCT. Page 39 EP10 Time Recorder User Guide Page 40 Corporate Sales and Marketing: 50 Technology Drive, Westminster, MA 01441-0001, Toll Free: 1-888-7777-9237 Canada: 2400 Skymark Avenue, Mississauga, Ontario L4W 5K5 Telephone 1-800-565-5400 © 2011 SimplexGrinnell LP. All rights reserved. Printed in the U.S.A. MC109-151-610 Rev 1/2011