1
USE
A UAL
WB3OFANB31F/WB32F
Click a topic
SHOOT
SHARE WOW.
NOW! I J
This user manual includes detailed usage instructions for
your camera. Please read this manual thoroughly.
Always comply with the following
precautions
anG usage tips to avoid dangerous situations and ensure peak performance
of your camera.
Prevent damage to subjects' eyesight,
_
Warning--situations
Do not disassemble
that could cause injury to yourself or others
or attempt
to repairyour
Do not use the flash in close proximity (closer than 1 m/3 ft) to people or animals,
If you use the flash too close to your subject's eyes, you can cause temporary or
permanent eyesight damage.
camera.
This may result in electric shockor damage to the camera.
Keep your camera away from small children and pets.
Do not use your camera near flammable
or explosive
gases and liquids.
This may cause a fire or explosion.
Keep your camera and all accessories out of the reach of small children and animals.
Small parts may cause choking or serious injury if swallowed. Moving parts and
accessories may present physical dangers as well.
Do not insert flammable
materials
into the camera or store these materials
near the camera.
This may cause a fire or electric shock.
Do not handle your camera with wet hands.
This may result in electric shock.
Do not expose the camera to direct sunlight or high temperatures
extended
for an
period of time.
Prolonged exposure to sunlight or extreme tem peratu res can cause permanent
damage to your camera's internal components.
Avoid covering the camera or charger with blankets or clothes.
Avoid interference
The camera may overheat, which may distort the camera or cause a fire.
Maintain the distance between this camera and all pacemakers to avoid potential
nterference, as recommended by the manufacturer and research groups. If you
have any reason to suspect that your camera is interfering with a pacemaker
Do not handle the power supply cordor go near the charger during a
thunderstorm.
or other medical device, turn offthe camera immediately and contact the
manufacturer of the pacemaker or medical device for guidance.
This may result in electric shock.
if liquid or foreign
objects enter your camera, immediately
disconnect all
power sources, such as the battery or charger, and then contact a Samsung
service
center.
Comply with any regulations that restrict the use of a camera in a certain area.
. Avoid interference
, Turn offthe
with other electronic
devices.
camera when in an aircraft.Your camera can cause interference
aircraft equipment. Follow all aidine regulations and turn offyour
directed by airline personnel.
• Turn offthe
camera near medical equipment.Your
with pacemakers.
with
camera when
camera can interfere with
medical equipment in hospitals or health care facilities. Follow all regulations,
posted warnings, and directions from medical personnel.
2
Use the battery only for its intended purpose.
your
_
(::aution--situations
equ pment
that could cause damage to
camera or other
Misusing the battery may cause a fire or electric shock.
Do not touch the flash while
it fires.
Remove the batteries from your camera when storing it for an extended period
of time.
The flash isvery hot when fired and may burn your skin.
Installed batteries may leakor corrode over time and causeseriousdamage to your
camera.
When you usethe AC charger,turn off the camera before you disconnect the
power to the AC charger.
Failing to do so may result in fire or electric shock.
Use only authentic, manufacturer-recommended, Lithium-ion replacement
batteries. Do not damageor heat the battery.
Inauthentic, damaged, or heated batteries may causea fire or personal injury_
Use on ly Samsung-approved
• Using unauthorized
Disconnectthe chargerfrom the wall socketwhen not in use.
Failingto do so may result in fire or electric shock.
batteries, chargers, cables and accessories.
Do not use a damaged power supply cord, plug, or loose outlet when you
charge batteries.
This may causeafireor electric shock.
batteries, chargers, cables or accessories can cause batteries
to explode, damage your camera, or cause injury.
• Samsung is not responsible for damage or injuries caused by unapproved
batteries, chargers, cables or accessories.
Do not allow the AC chargerto come in contactwith the +/- terminals on the
battery.
This may causeafireor electric shock.....
3
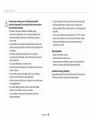
Donot drop or subject the camera to strong impacts.
You must plug the small end of the USB cable into your camera,
Doing so may damage the screen or external or internal components.
If the cable is reversed, it may damage your files.The manufacturer
is not
responsible for any loss of data.
Exercisecaution when you connectcables or adapters and install batteries and
memory cards.
If you force the connectors, improperlyconnect cables,or improperlyinstall
batteries and memory cards,you can damage ports, connectors, and accessories.
Avoid interference with other electronic devices.
Your camera emits radio frequency (RF) signals that may interfere with unshielded
or improperly shielded electronic equipment, such as pacemakers, hearing aids,
medical devices, and other electronic devices in homes or vehicles. Consult the
manufacturers
Keep cardswith magnetic strips away from the camera case.
Information storedon the card may be damaged or erased.
of your electronic
experience.To prevent unwanted
or accessories.
Never use a damaged charger, battery, or memory card.
This may resultin electric shock or camera malfunction or causeafire.
devices to solve any interference
interference,
problems you
Jse only Samsung-approved
devices
Use your camera in the normal position.
Avoid contact with your camera's internal antenna.
Do not place the camera in or near magnetic
fields.
Doing so may cause the camera to malfunction,
Do not usethe camera if the screenisdamaged.
If the glassor acrylic parts are broken, visit a Samsung Electronics ServiceCenter to
havethe camera repaired.
• Data transferred via WLANcan be hacked,so avoid transferring sensitive data in
public areasor on open networks.
• The camera manufacturer is not liable for any data transfers that infringe on
copyrights, trademarks,intellectual property laws,or public decency ordinances.
Checkthat the camera isoperating properly before use.
The manufacturer takes no responsibilityfor any lossof files or damage that may
result from camera malfunction or improper use.
4
< .........
Copyright
information
• Microsoft Windows and theWindows
Microsoft Corporation.
)tthe
b ..............
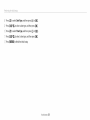
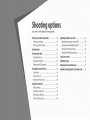
Basic 1unctions
logo are registered trademarks of the
18
Learn about your camera's layout, icons, and basic functions for
shooting.
• Mac and Apple App Store are registered trademarks of the Apple
Corporation.
__u:_:nded lunct_ol
• Google Play Store is a registered trademark
of Google, Inc.
• microSD% microSDHC% and microSDXC TM are registered trademarks of the
SD Association.
• Wi-Fi ®,the Wi-Fi CERTIFIED logo, and the Wi-Fi logo are registered
trademarks of the Wi-Fi Allance.
• Trademarks and trade names used in this manual are the property of their
respective owners.
42
Learn how to capture a photo and record a video by selecting a
mode.
)OL .:, . _DtlOlq5
Learn howto
91_
{XI( R/l':Ol
57
set the options in Shooting mode.
78
{I[I(
Learn how to play back photos or videos, and edit photos. Also, learn
how to connect your camera to your computer orTV.
• Camera specifications or contents of this manual may be changed
without prior notice due to an upgrade of the camera's functions.
• We recommend
using your camera within the country where you
purchased it.
• Use this camera responsibly and adhere to all laws and regulations
concerning
its use.
• You are not allowed to reuse or distribute
without prior permission.
any part of this manual
I01
Learn how to connect to wireless local area networks (WLANs) and
use functions.
121
:>e_ung_
Referto options to configureyour camera'ssettings.
_
pents_xes
Get information about error messages, specifications,
maintenance .......
127
and
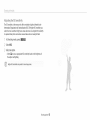
Subject, background, and composition
- Subject:The main object in a scene, such as a person, animal, or still life
Additional information
, Background:The
ob,ects around the subject
• Composition:The
combination
of a subject and background
Safety warnings and precautions
[ ]
( }
Camera buttons.
For example, [Shutter]
Backg round
represents the shutter button.
Page number of related information
_oComposition
The order of options or menus you must select to perform a step; for
example: Select Face Detection --_ Normal
Detection, and then select Normal}.
_e
[represents Select Face
Annotation
Exposure (Brightness)
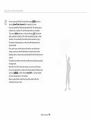
The amount of light that enters your camera determines the exposure. You can alter
the exposure Dychanging the shutter speed, aperture value, or ISO sensitivity.
By altering the exposure, your photos will be darker or lighter.
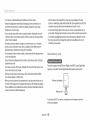
Pressing the shutter
• Half-press [Shutter]:
• Press [Shutter]:
Press the shutter halfway down
Press the shutter all the way down
\
A Normal exposure
Half-press [Shutter]
Press [Shutter]
6
A Overexposure
(too bright}
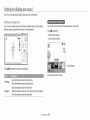
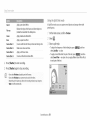
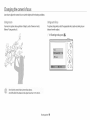
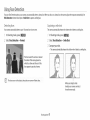
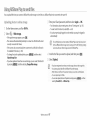
Usng t_}e D R_!_CTLHK butto_t
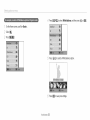
Setting a DIRECT LINK button option
You can select a Wi-Fi function to launch when you press the DIRECT LINK button.
Access Settings.
Press the DIRECT LINK button to activate the Wi-Fi function that you have
designated.
2 Access the DIRECTLINK button option.
,_} Select a Wi-Fi feature from the list.
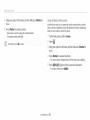
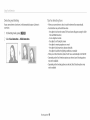
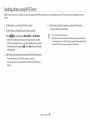
When
youcapture
a photo
with yourcamera,the photo issavedto the smartphoneautomatically.
Thecameraconnectsto a smartphonewirelessly.
Install S_,_ms_.
t g ,,,. F,F(A v,£F,,
App on the smart phone.
4
Select the camera from the list and
connect the smart phone to the
camera.
• Ifa pop-up messageappears on your
camera,allow the smart phone to
connect to your camera.
z Turn on the£
toShaefeature.
_:_Capturea photo.
_/
• The captured photo is saved to the camera, and then transferred
smart phone.
Launch Samsu_ 9:>w,_ CAS_IERA
App on the smart phone.
to the
Us _g i'vob
:/_l'k
You can send files easily from your camera to a smart phone. The camera con nects wirelessly to smart phones that support the MobileLin k feature.
4
Install S_,_ms_.g _:t,,. ,_F (.Av,£ ,,
App on the smart phone.
Select the camera from the list and
connect the smart phone to the
camera.
• Ifa pop-up messageappears on your
camera,allow the smart phone to
connect to your camera.
Z Access the ls_ot:,eL nk mode.
• If a pop-up
option.
£ On the smart phone or camera,
select files to transfer from the
camera.
message appears, select an
Launch %msu_ 9:::_v__ CAStlERA
App on the smart phone.
/
On the smart phone, touch the copy
button or on the camera, select
Sb_ e.
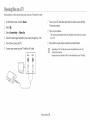
You can remotely control your camera from a smart phone. The camera connects to a smart phone wirelessly. Use the smart phone as a remote shutter release with the Remote
Viewfinderfeature.Thecapturedphotowill appearon the smartphone.
Select the camera from the list and
Install S_,_ms_.g .;t, ,. ,_[ (,A v,.Eo
App on the smart phone.
connect the smart phone to the
camera.
• Ifa pop-up messageappears on your
camera,allow the smart phone to
connect to your camera.
A Touch and hold @ to focus, and
_! Access the Re_noteVieJ_f _de
mode.
Launch Samsu _9 ::_v_,,_ o CAMERA
App on the smart phone.
_/
then release it to capture a photo.
/
_ Touch the thumbnail to view the
photo.
10
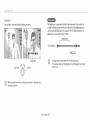
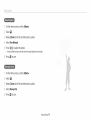
Select the macro option (_,_).
You
cancapture
close
upshots
ofsmall
subjects,
such
asflowers
orinsects.
2_!Capture a photo.
\
11
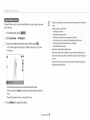
Basic t oubleshooti
Learn to solve common
problems by setting shooting options.
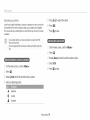
[he subject's eyes
appear red,,
Red eye occurs when the subject's eyes reflect light from the camera flash.
• Set the flash option to _
Red-eye or c__ Red-eye Fix. (p. 61)
• If the photo has already been captured, select _
IIl:_hotoshave dust spots,,
Red-eye Fix in the edit menu. (p. 91)
If dust particles are present in the air, you may capture them in photos when you use the flash.
• Turn offthe flash or avoid capturing
photos in a dusty place.
• Set ISO sensitivity options. (p. 63)
Blurring can occur if you capture photos in low light conditions
Use the OIS function or half-press [Shutter]
IIl:_hotosare blurred
shootiHg
at Hiftht,,
wheH
or hold the camera incorrectly.
to ensure the subject is in focus. (p. 40)
As the camera tries to let in more light, the sh utter speed slows. This can make it difficult to hold the camera steady long
enough to capture a clear photo and may result in camera shake.
• Select Night Shot mode. (p. 51)
• Turn on the flash. (p. 61)
• Set ISO sensitivity options. (p. 63)
• Use a tripod to prevent your camera from shaking.
When the light source is behind the subject or when there is a high contrast between light and dark areas, the subject may
appear too dark.
Avoid shooting toward the sun.
Select Backlight
in Scene mode. (p. 47)
Set the flash option to _F Fill in. (p. 61)
Adjust the exposure. (p. 69)
Set the Auto Contrast Balance (ACB) option. (p. 70)
Set the metering option to []
Spot if a subject is in the center of the frame. (p. 70)
12
Q i@
efe eHce
Adjusting the exposure (brightness)
Applying
o Beauty Shot mode
Red-eye/Red-eye
o Face Detection
_ 50
Fix (to prevent or correct red-eye)
_ 67
o ISO sensitivity (to ad}ust the sensitivity to light) _ 63
o ACB(to compensate for sub}ects against bright
backgrounds) _ 70
I:{educilr_g camelra shake
° Optical image Stabilization (OIS) _ 39
o AEB (to capture 3 photos of the same scene with
different exposures) _ 73
o viewino hies asmumDnaHs _ 8(
o Scene mode > Sunset, Dawn _ 47
Viewing file_ uy categor
o Night Shot mode _ 51
Capturing
o FLashoptions _ 61
o ISO sensitivity (to ad}ust the sensitivity to light) _ 63
o Movie Filter mode _ 53
o EV(to ad}ust exposure) _ 69
o Metedng _ 70
CalptUd_'_gphotos at ir_ight oil"k'_dhe da_'k
effects to videos
photos of scenery
_ 8]
)eleting al! flies on the memor
_ 8s
o Scene mode > Landscape _ 47
o Viewing hies asa slide sno / _ sS
o Live Panorama mode _ 48
o Viewing hies on aTV _ 92
° Conneddng ] our camera _oa curr_4u_er _ _:s
Calptulrii_'_gactiolr_ photos
° Sending photos c rvideos wa email _ 112
o Continuous, Motion Capture _ 73
photos of text, insects_ olr
o Scene mode > Text _ 47
o Close-up Shot mode _ 51
o Macro _ 64
._
Applying
effects to photos
o dsin t pno[o or video sharing uebsRes _ 115
o Magic Frame mode _ 52
o Adiusting sound aria volume _ 12_
o Photo Filter mode _ 52
o Adiusting the brightness of the display _ I z4
o Split Shot mode _ 54
o Changing me @spEa} _nguage _ 125
o Motion Photo mode _ 55
o Setting the date and time _ I zJ
Image Ad]ust (to ad}ust Sharpness, Contrast, or
Saturation) _ 74
13
o Before contacting a service center _ 139
14
_
_e
_b
15
16
k
_
_e
_3
17
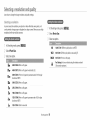
Learn about your camera's layout, icons, and basic functions
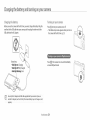
Unpacking
..............................................
Camera layout ............................................
Usingthe DIRECTLINKbutton .....................
Inserting the battery and memory card
for shooting.
_9
Selecting options or menus
2o
22
Setting the display and sound .......................
Setting the dBplay type ..................................
.......... 23
Setting the sound
Capturing
Charging the battery and turning on
photos
......................
........................
25
Learning icons ..........................................
27
Using the Home screen .................................
Accessingthe Home screen .......................
Icons on the Home screen .........................
28
28
29
Setting Wallpaper .....................................
31
34
:54
...................................
35
....................................
36
Zooming
.......
your camera .......................................................................
24
Reducing camera shake (OJS
.....................
Charging the battery ................................
24
Tips for getting a clearer photo ...................
Turning on your camera
.........................
2_
Performing the initial setup
32
37
39
40
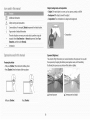
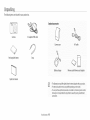
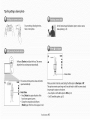
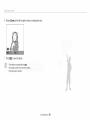
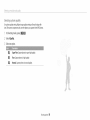
Thefollowing
items
areincluded
inyourproduct
box.
Camera
Rechargeable
battery
Optional
accessorie_
ACadapter/USB
cable
Camera
case
AiVcable
Battery
charger
Memory
card/Memory
card
adapter
Strap
Quick
Start
Guide
Q
tThe i!lustratio ns may diffe r slightly from the items shiPped with your #roduct_
• The items !no uded in the box may differ depending on the mode .
• You can purchase optional accessories at a retailer or a Samsung service center.
Samsuog is not responsible for any problem s _aused by using unauthorized
accessories.
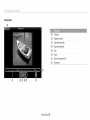
Basic functions
19
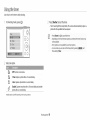
Before you start, familiarize you rself with your camera's parts and their functions.
Power button
Microphone
Shutter button --
Speaker
I
Flash --
AF-assistlight/Timer
Tripod mount
port
Accepts USB cable and A/V cable
Battery chamber cover
Insert a memory card and battery
Basicfunctions 20
Zoom button
• In Shooting mode: Zoom in or out
• In Playback mode: Zoom in on part of a photo or
view files asthumbnails, or adjust the volume
Status lamp
Blinking: When the camera is saving a photo
or video, being read by acomputer, when the
image is out of focus,or there is a problem
charging the battery, when the camera is
connecting to WLANor sending a photo
• Steady:When the camera is connected to a
computer, charging the battery, or when the
image is in focus
Attaching the strap
Display
Buttons
(See the table below)
@
@
@
@
@
Start a preset Wi-Fi function.
::::
(p. 22)
Basicfunctions
Other functions
Access the Home screen. (p. 28)
_
Access options or menus.
Changethe macro option.
DISP Changethedisplayoption.
Changethe flash option.
e:.3
Enter Playback mode.
Delete files in Playback mode.
Changethe timer option.
Confirm the highlighted option or menu.
Basic functions
21
Move down
Moveup
Move left
Move right
Using the DIRKT
UIIHK button
Youcan turn on the Wi-Fifeature conveniently with ['@%
Press['_] to activate the WJ-FJ
function that you have designated.
Press['@'] again to return to the previous mode.
i
You can select a Wi-Fi function
i
i
i
to launch when you press [_"].
f
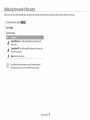
On the Home screen, scroll to <Basic>.
2
Select _.
";_ Select General --> DIRECT LINK (WI-FI Button).
4
Select a Wl-Fi feature. (p. 126)
....
S
Basicfunctions 22
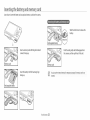
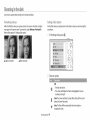
IIIliHsert£ tBe battery a
Learn how to insert the battery and an optional
memory card
memory card into the camera.
Slide the lock down to release the
battery.
Insert a memory card with the gold-colored
contacts facing up.
Push the card gently until it disengages from
the camera, and then pull it out of the slot.
Insert the battery with the Samsung logo
You Can use the intema! memory for temporary
inserted.
facing up.
Rechargeable battery
Basic functions
23
Storage if a mem0[y card is no t
Char
Charging
the batteryand
tumi
on your camera
the battery
Turning
on your cameir8
Before you use the camera for the first time, you must charge the battery. Plug the
Press [(_] to turn your camera on or off.
small end of the USBcable into your camera, and then plug the other end of the
USB cable into the AC adapter.
• The initial setup screen appears when you turn on
the camera for the first time. (p. 25)
Status lamp
Red light on: Charging
Red light
. Red light
Press [r_l]. The camera turns on and immediately
accesses Playback mode.
off: Fully charged
blinking:
Error
u]e Only the AC adapter and USBcable supplied With Youi came[a; if you use
another Ac adapter (such as SAC:48),the camera battery may not Charge °r w0r k
properly.
Basicfunctions 24
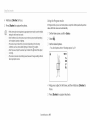
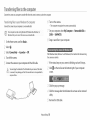
IIIIPe fo
the initial setup
When you turn on your camera for the first time, the initial setup screen appears. Follow the steps below to configure the camera's basic settings. The language is preset for the
country or region where the camera is sold. You can change the language as desired.
Press [_]
to select Time Zone, and then press [_t_)]or [OK].
Press [_]
_J
Press [DISP/_]
to select Heine, and then press [OK].
• When you travel to another country, select Visit, and then select a new time
zone.
to select
Date/Time
Set, and then
press [_)]
or [OK].
Date/Time Set
Year
Month
Day
Hour
Min
DST
Press [_./_.)] to select a time zone, and then press [OK].
• The screen may differ depending
on the language selected.
Press[_/_.)] to select an item.
7 Press[DISP/_] to set the date, time, and daylight-saving time, and
then press [01(].
Press[MENU].
Basic functions
25
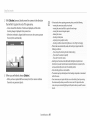
Press[_] to select DateType, and then press [_..)]or [OK].
Press[DISP/_]
to select a date type, and then press [OK].
0 Press[_] to select Time Type, and then press [_)] or [OK].
_/_Press[DISP/_]
/
to select a time type, and then press [OK].
Press[MENU] to finish the initial setup.
Basic functions
26
L
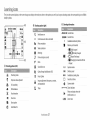
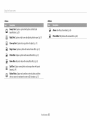
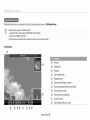
icons
The icons the camera displays on the screen change according to the mode you select or the options you set. If you change a shooting
briefly in yellow.
@
I
option, the corresponding
icon will blink
Shooting information
@ Shooting option (right)
z01]! _l/01 w0_0Rnu
"I_ZlSllILl
i!iiliii==
:iiliiiiiiiiliii
=I
6_
i
1't
..................
%i,
@
(_
Intelli zoom on
[[RI;:
Continuous
@ Shooting options/eft)
@
|Gin
Photo resolution
lid
Video resolution
f]o
_"
,S,
RLI_/E
_
Shooting mode
I
8
Exposure value adjusted
ISO sensitivity
White balance
II:IIIII
Current time
Available number of photos
Memory card inserted
II_:
Fully charged
Metering
• _]_ C]_: Partially charged
Frame rate (per second)
, C_]: Empty (Recharge)
, Ill:
Flash
Charging (Connected with the
charger)
Sound Alive on
F ].!
Aperture value
Optical Image Stabilization
I/]DS
Shutter speed
61:11
Available recording time
r-]
Auto focus frame
(t_1))
Camera shake
(OIS)
Focus Option
Image adjustment
and saturation)
(sharpness, contrast,
=_
i Timer
Face detection
Zoom indicator
3M
Face tone
x _I].II
Burst option
CD
Current date
I
Dx_O_
k
auto focus activated
£II]IIIIIII
AutoShare On
Basic functions
27
Photo resolution when the
Intelli zoom is on
Zoom ratio
UsiH I the IIIIF-IIIIome
sc eeH
You can select a shooting mode or access the settings menu by selecting the icons on the Home screen.
Accessing the Home scFeen
In Shooting or Playback mode, press [1_1"].Press ['[_'] again to return to the previous
mode.
Current Home screen
• Rotate [Zoom] to the left or right to switch to another Home screen.
@
II]_ZE]I
--
• Press [BISP] to scroll to the Home screen name, and then press [_/@]
to switch to another Home screen.
• Press [_/@]
repeatedly to switch to another Home screen.
Mode icons
@
@
Smart Auto
Program
Scene
Uve
Panorama
Smart
Movie
Movie
Settings
Basic functions
28
° Press [DlSP/_/_/(!)]
to access the mode.
to scroll to a desired mode, and then press [01(]
_cens es the Heine screen
<Wi-Fi>
<Basic>
IVIobileLink: Send photos or videos to a smart phone. (p. 107)
Smart Auto: Capture a photo with a scene mode selected
Remote Viewfinder:
automatically
and see a preview on your smart phone of an image from your camera.
(p. 108)
by the camera. (p. 43)
Program: Capture a photo with settings you have adjusted manually.
(p. 44)
Auto Backup: Send photos or videos that you captured with the
camera to a PC wirelessly. (p. 110)
Smart Movie: Record a video with a scene mode selected
automatically
Use a smart phone as a remote shutter release
by the camera. (p. 45)
Email: Send photos or videos stored on the camera via email. (p. 112)
Movie: Record a video. (p. 46)
SNS & Cloud: Upload photos or videos to Ele sharing websites. (p. 115)
Scene: Capture a photo with options that are preset for a specific scene.
(p. 47)
Live Panorama: Capture and combine
AIIShare Play: Upload photos to AIIShare Play online storage or view
Eles on other AIIShare Play supported
a series of photos to create a
panoramic image. (p. 48)
Settings: Adjust settings to match your preferences. (p. 122)
Basic functions
29
devices. (p. 117)
<Scene>
<Album>
Beauty Shot: Capture a portrait with options to hide facial
imperfections. (p. 50)
Album: View files as thumbnails.
Photo Editor: Edit photos with various effects. (p. 88)
Night Shot: Capture a night scene by adjusting shutter speed. (p. 51)
Close-up Shot: Capture close-up photos of subjects. (p. 51)
Magic Frame: Capture a photo with various frame effects. (p. 52)
Photo Filter: Capture a photo with various filter effects. (p. 52)
Movie Filter: Record a video with various filter effects. (p. 53)
Split Shot: Capture several photos and arrange them with preset
layouts. (p. 54)
Motion Photo: Capture and combine a series of photos, and then
select an area to be animated to create a GIF animation. (p. 55)
Basic functions
(p. 80)
30
Scroll to the desired wallpaper, and then press [OK].
_J
Set wallpaper
• If you select a photo you have captured, you can set a specified area as
wallpaper. Rotate [Zoom] to the left or right to reduce or enlarge the area.
for the Home screen with the desired image.
On the Home screen,scroll to <Basic>.
Press
_
i_! Select _.
_:_Select Display-_
Album
Gallery
to move the area.
Press [OK] to save.
• If you select a photo you have captured, press [OK], and then select Yes.
Wallpapers.
<_ Selectan option.
Wallpaper
[DISP/_/_/_]
You can also Setth e photo you are ,viewing aswallpaper by pressing [MENU];
and then Selecting Set Wallpaper in Playbackmode_
Select the desired wallpaper
from the default gallery.
Set a photo you have captured as a wallpaper.
Basic functions
31
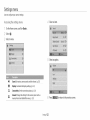
Se
tioHs
To select an option or a menu, press
meH s
[MENU], and
then press
[OISP/_/_/®] or [OK].
In Shooting or Playback mode, press [MENU].
Scroll to an option or a menu.
• To move up or down, press IDISP]
Press [MENU]
or
[_I.
• To move left or right, press [_] or [_].
Press[DK] to confirm the highlighted option or menu.
Basic functions
32
to go back to the previous menu.
O}%0"lOr!T(
_!I
<_ Press[I::IISP/_] to select White Balance, and then press [_t_D]
or [OK].
On the Home screen,scroll to <Basic>.
_! Select _.
Press[MENU].
Press[_/_t_)] to select a White Balance option.
_J
_ Press[OK] to saveyour settings.
Basic functions
33
Setti
the display a
Learn how to change the basic display information
Setting
the display type
You can select
different
and sound settings.
a display type for the Shooting
shooting
or playback
information.
or Playback mode. Each type displays
See the table
below.
You can hide or show the option display appearing in some modes.
Press [OK] repeatedly.
• Hide the option display.
• Showthe
|_
[]
option display.
O0
©©
i
Option display
Press [DISP] repeatedly to change the display type.
A For example, in Scene mode
Shooting
• Hide all information
• Show all information
• Hide all information
Playback
about shooting options.
about shooting
options.
about the current file.
• Hide all information about the current file except basic information.
° Show all information about the current file.
Basic functions
34
Setting
tBe sound
Turn the sound your camera emits when you perform functions on or off.
On the Home screen,scroll to <Basic>.
_! Select _}.
o
Select
Sound
-_ Beep Sound.
4_ Selectan option.
off
The camera does not emit any sounds.
on
The camera emits sounds.
Basic functions
35
Learn howto
capture photos easily and quickly in Smart Auto mode.
On the Home screen,scroll to <Basic>.
_!
Select
_;_ Align
Half-press [Shutter] to focus.
_.
your
subject
,
A green frame means the subject is in focus.
,
A red frame means the subject is out of focus.
in the frame.
F],I
Q 16M
,i_!_Press [Shutter]
_
to capture a photo.
Press [[]E]] to view the captured photo.
• Todelete the photo, press[@], and then select Yes.
_2 Press [I-_1]to return to Shooting
Basic functions
36
mode.
.....
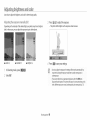
©'0;0:
The Digital zoom is supported by default in Shooting mode. If you zoom in on
a subject in Shooting mode and the zoom indicator is in the digital range, your
You can capture close-up photos by adjusting the zoom.
camera is using the Digital zoom. By using both the 10X Optical zoom and 5X
Digital zoom, you can zoom in up to 50 times.
Optical range
[
Zoom indicator
I
--_
D XS&I
I
I
Digital range
Zoom ratio
Zoom out
, The Digital zoom is not available with the Tracking AF option.
capture a Ph0tOwith the D!gita I z00ml the ph0to quality may be ,ower
than normal.
Zoom in
Basic functions
37
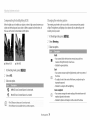
.....
©'0;0:
If the zoom indicator is in the Intelli range, your camera is using the Intelli zoom.
Photo resolution varies according to the zoom ratio if you use the Intelli zoom. By
using both the Optical zoom and Intelli zoom, you can zoom in up to 20 times.
? Select IntelliZoom.
Photo resolution
Optical range
r
/
I
3_
Zoom indicator--_
[]
L
In Shooting mode, press [MENU].
o Selectan option.
when the Intelli
zoom is on
£'7_F
_
X21.1
l
i Off: The Intelli zoom is deactivated.
i On: The Intelli zoom is activated.
Intelli range
• Intelli zoom is not available with theText option in SCNmode and theTracking AF
option.
• The Intel/zoom helps you capture a photowith lessquafty deterioralon than
the Digital zoom. However, the photo quality may be lower than when you use
the Optical zoom.
, The Intelli zoom is available only when you set a 4:3 resolution ratio. If you set
another resolution ratio with Intelli zoom on. the Intell zoom will be turned off
automatically.
• The Intel/zoom is always on in Smart Auto mode.
Basic functions
38
Reducing
camei_a shake {OIS}
leduce camera shake opticallyin Shooting mode.
i_
• OIS may not function properly when:
- you move your camera to follow a moving subject
- you use the Digital zoom
- there istoo much camera shake
- the shutter speed is slow (for example, when you capture night scenes]
- the battery is low
- you capture a close-up shot
• If you use the OISfunction with a tripod, your images may be blurred by the
vibration of the OIS sensor. Deactivate the OISfunction when you use a tripod.
. If the camera is hit or dropped, the display will be blurry. If this occurs, turn off
the camera, and then turn iton again.
A Before correction
A After correction
In Shooting mode, press [MENU].
_!
SeLect OIS.
o
SeLectan
_
_
option.
i Off: OIS is deactivated.
On: OIS is activated.
Basic functions
39
Tips for getting
a dearer
photo
Ensurenothing is bloc king the lens,
flash, or microphone.
Set the Optical Image Stabilization
shake optically. (p. 39)
option to reduce camera
\
f].t
Half-press [Shutter] and adjust the focus. The camera
adjusts the focus and exposure automaticaJly.
_
Ills
m
-° Camera shake
= The camera sets the aperture value and shutter
speed automatically.
F3.1//385
[]
_R
Focus frame
• Press [Shutter] to capture the photo if the
focus frame appears in green.
When you shoot inthe dark, avoid setting the flash option to SlowSync or Off
The aperture remainsopen longer and it may be harder to hold the camera steady
long enough to capture a clear photo.
. Usea tripod or setthe flash option to Fill in. (p.61)
• Set ISOsensitivityoptions, tO.63)
- Changethe composition and half-press
[Shutter] again if the focus frame appears in red.
Basic functions
40
It may be difficult to get your subject in focus when
. When you capture photos in low light
- there is little contrast between the subject and background (for example,
when your subject is wearing clothing that is similar in color to the
Turn on the flash.
background)
- the light source behind the subject is too bright
_p.61)
- the subject is shiny or reflective
- the subject includes horizontal patterns, such as blinds
- the subject is not positioned
in the center of the frame
- When subjects are moving rapidly
Use the Continuous
or Motion Capture
function.
Using the focus lock
Half-press [Shutter] to focus. When the subject is in focus, you can
reposition the frame to change the composition. When you are ready,
)tess [Shutter]
to capture your photo.
Basic functions
41
.......
(p. 73)
dealfun
Learn howto
@
on$
capture a photo and record a video by selecting a mode,
Using Basic modes
..........................................
Using the Smart Auto mode
Using the Program mode
Using Scene modes ..................................
>o
43
Using the Beauty Shot mode
...........................
44
Using the Night Shot mode
_5
Using the Close-up Shot mode .................
5
4¢
Using the Magic Frame mode
s2
_7
Using the Photo Filter mode
¢8
Using the Movie Filter mode
Using the Smart Movie mode
Ising the Movie mode
4:3
........................
....................
..........................................
Using the Scene mode
Using the Live Panorama mode
.................
.....................
50
.........................
51
°
52
.....................
5,3
Using the Split Shot mode ........................
54
Using the Motion Photo mode
55
.....................
Usi
Basic modes
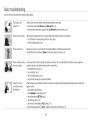
Capture photos or record videos using basicmodes.Youcan also usethe Scenemode and the Live Panoramamode.
Using the Smart Auto mode
In SmartAuto mode,your camera automatically chooses the appropriate camera
settings based on the type of sceneit detects. The SmartAuto mode is helpful if you
are not familiar with the camera settings for various scenes.
'f
Portraits at night
Landscapes with backlighting
Portraits with backlighting
On the Home screen, scroll to <Basic>.
Portraits
"_;,_Select _
3
Close-up photos of objects
Align your subject in the frame.
Close-up photos of text
• The camera automatically selects a scene. An appropriate scene icon appears
at the top left of the screen. The icons are listed below.
Sunsets
Blue skies
Forestedareas
Close-up photos of colorful subjects
g
Camera is stabilized or on a tripod (when shooting
Actively moving subjects
Fireworks (when using atripod)
Indoors, dark
Partially lit
Landscapes
Close-up with spot lighting
Scenes with bright white backgrounds
Portraits with spot lighting
Landscapes at night
Extendedfunctions 43
in the dark)
s _gi,i_sci;odes
Half-press [Shutter] to focus.
Using the P_og_am mode
Press [Shutter] to capture the photo.
In Program mode, you can set most options, except the shutter speed and aperture
value, which the camera setsautomatically.
• If the camera does not recognize
settings
an appropriate
scene mode. it uses the default
On the Home screen, scroll to <Basic>.
for the Smart Auto mode.
• Even if it detects a face, the camera may not select a portrait
on the subject's
position
such as camera shake, lighting,
• Even if you use a tripod,
2
Select _.
_
Set the desired options.
or lighting.
• The camera may not select the correct scene depending
conditions,
mode depending
on the shooting
or distance to the subject.
•
For a list of options,
refer to "Shooting
options".
(p. 57)
the camera may not detect the ,_ mode if the subject
is moving.
• The camera consumes
select appropriate
more battery
power, because it changes
settings
often to
ii!i_!i_!d
i!i!if
................
scenes.
I_M
d Align your subject in the frame, and then half-press [Shutter] to
focus.
5 Press [Shutter] to capture the photo.
Extended functions
44
Using the Smart Movie mode
In SmartMoviemode,yourcameraautomaticallychoosesthe appropriatecamera
settingsbasedon thesceneit hasdetected.Thismodeisavailableonlywhenyou
inserta memorycardintothe camera.
Landscapes
Sunsets
Blue skies
-f On the Home screen,scroll to <Basic>.
Forested areas
7
Select _.
©
Align your subject in the frame.
• The camera automatically
selects a scene. An appropriate
appear at the top left of the screen.
Press [Shutter] to start recording.
scene icon will
5 Press [Shutter] again to stop recording.
@
lib
Extendedfunctions 45
i
If the Cam_ia does not recognize an appropiiat e Scenemode, it usesth e default
settings fo[ Sma[t Movie mode _
Camela may not select the correct seene depend!ng on the shooting
conditions, such ascamera shake,lighting, and distance to the subject.
s _gi,:_sci;odes
On the Home screen, scroll to <Basic>.
Using the Movie mode
In Movie mode, you can customize
settings to record HD videos (1280x720) of up
to 20 minutes in length.The camera saves recorded videos as MP4 (H.264) files.This
mode is available only when you insert a memory card into the camera.
d
• H.264 (MPEG-4partl0/AVC) is a high-compression video format established bv
the international standards organizations ISO-IECand ITU-T.
• If you use memory cards with slow write speeds, the camera may not save
videos properly. Video recordings may be corrupted or fail to play back
correctly.
° Memory cards with slow wdtJng speeds will not support high-resolution videos.
To record high-resolution videos, use memory cards with faster write speeas.
• If you activate the Image Stabilization function while recording a video, the
camera may record the operating sound of the Image Stabilization function.
, If you use the zoom function when recording a video, the camera may record
the noise of the zoom operating.To decrease zoom noise, use the Sound Alive
function. (p. 75}
o _'._:' (Continuous AFt: Usethis function to shoot by changing composition
while automatically focusing on the center area.
2
Select _.
_
Set desired options.
. For a list of options, refer to "Shooting options". (p. 57)
d,
Press [Shutter] to start recording.
. While recording a video, press [_] once to cancel the continuous auto
focus function and once again to activate the function.
,i_!_Press [Shutter]
Extended functions
46
again to stop recording.
ias:
i_,od#_s
Using the Scene
The camera allows you to temporarily
pause a video while recording.
function, you can record separate scenes as a single video.
With this
mode
In Scene mode, you can capture
scene.
a photo
with options
On the Home screen, scroll to <Basic>.
HI]
I_
_
2 Select _:_.
Select a scene.
[]
n
, Press [OK] to pause while recording.
• Press [OK] to resume.
Extended functions
47
that are preset for a specific
s _gi,i_sci;odes
Using the Live Panorama
Landscape
Sunset
Capture still-life scenes and landscapes.
Capture scenes at sunset, with natural-looking
yellows.
In Live Panorama
reds and
Dawn
Capture scenes at sunrise.
Backlight
Capture backlJt subjects.
Beach & Snow
Reduce underexposure of subjects caused by sunlight
reflected from sand or snow.
Text
Clearly capture text from printed or electronic
photo. Capture
mode
mode, you can capture a wide panoramic
and combine
scene in a single
a series of photos to create a panoramic
image.
A Shooting example
documents.
On the Home screen, scroll to <Basic>.
d Align your subject in the frame, and then half-press [Shutter] to
/_!' Select
_.
focus.
_
Press [Shutter] to capture the photo.
Align
your
subject
in the frame,
and then
half-press
[Shutter]
to
focus.
• Align the camera with the far left or the far right, or very top or bottom, of the
scene you want to capture.
d
Extended functions
Pressand hold [Shutter] to start shooting.
48
ins:
_J
i_,od#:s
With [Shutter] pressed, slowly move the camera in the direction
that will let it capture the rest of the panorama.
Arrows
toward
shooting
When
image
the
the next
the direction
is displayed
viewflnder
photo
of motion
are displayed,
in the preview
is aligned
with
the
and the
,
entire
box,
next
scene,
the camera
For best results when capturing
moving
the camera too quickly
-
moving
moving
tne camera too little [o cap[ure
the camera at irregular speeds
- shaking
captures
-
automatically,
shooting
avoid the following:
the next image
the camera
conditions
where the brightness
or color of light is changing
saved, and shooting
-
if you change the shooting
-
if you move the camera too rapidly
if you don't move the camera
o Selecting
functions.
direction
is stopped
under the
while shooting
Live Panorama mode will disable the digital and optical zoom
If you select Live Panorama mode while the lens is zoomed in. the
camera automatically
, Some shooting
zooms
options
o The camera maystop
within the scene.
out to the default position.
are not available.
shooting
due to the shooting
composition
• Your camera may not capture the last scene in its entirely
or movement
if you stop moving
the camera exactly where you want the scene _o end. To capture the entire
scene, move your camera slightly
to end.
Extended functions
photos,
or too slowly
shooting in dark places
capturing moving subjects nearby
o Photos taken are automatically
following conditions:
When you are finished, release [Shutter].
, When you have captured all the necessary shots, the camera combines
them into one panoramic photo.
panoramic
-
49
beyond
the point where you want the scene
Usi
SceHe modes
Capture a photo or record a video by selecting appropriate modes for various scenesor effects.
Using the Beauty Shot mode
Press [_/_0] to adjust Face Tone.
• Forexample, increasethe face tone setting to make skin appear lighter.
In Beauty Shot mode, you can capture a portrait with options to hide facial
imperfections.
f
On the Home screen, scroll to <Scene>.
_! Select _.
Press [_/_]
to adjust Face Retouch.
• For example, increase the face retouch setting to hide more imperfections.
II
]2 Press [OK} to save the setting.
iF_ _to_
_!:9Align your subject in the frame, and then half-press [Shutter] to
focus.
b
9 Press[Shutter] to capture the photo.
Press
_F
[MENU].
Select Face Tone.
Extended
functions
50
(.s'_(
USing
S<_ "':) Yod#:s
Night Shot
the
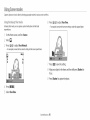
Using the Cbseoup
mode
In Night Shot mode, you can use a slow shutter speed to extend the time the
shutter stays open. Increase the aperture value to prevent overexposure.
In Close-up Shot mode, you can capture close-up photos of subjects, such as
flowers or insects.
On the Home screen,scroll to <Scene>.
_!
Select
_.
Press
[_/_)]
On the Home screen, scroll to <Scene>.
2
to adjust
the
shutter
Shot mode
speed.
Select
_.
,_} Align your subject
focus.
in the
frame,
and
IGM
®
4 Align your subject in the frame, and then half-press [Shutter] to
focus.
4_ Press [Shutter]
Press [Shutter] to capture the photo.
Extended functions
51
to capture
the photo.
then
half-press [Shutter]
to
(.s'_(
Uging
S<_ "#:)Yod#:s
the Magic Frame mode
Using
In Magic Frame mode,you can apply various frame effects to your photos.The
shape and the feel of the photos will change according to the frame you select.
the Photo Fi_ter mode
Apply various filter effects to your photos to create unique images.
On the Home screen,scroll to <Scene>.
2
Select _.
o Select a desired frame.
d Align your subject in the frame, and then half-press [Shutter] to
Miniature
Vignetting
Fish-eye
Sketch
focus.
On the Home screen, scroll to <Scene>.
Press [Shutter] to capture the photo.
2 Select _.
Extended functions
52
(.s'_(
S<_ "':) Yod#:s
9 Select an effect.
Miniature
4_ Align your subject in the frame, and then half-press [Shutter] to
focus.
Apply a tilt-shift
miniature.
Press [Shutter] to capture a photo.
effect to make the subject appear in
Vignetting
Apply the retro-looking colors, high contrast, and strong
vignette effect of Lomo cameras.
Ink Painting
Apply a watercolor
,
Depending
on the option
you select, the resolution
• To apply filter effects to saved photos,
painting effect.
Image
press [MENU]
Apply an oil painting effect.
Cartoon
Apply a cartoon painting effect.
Cross Filter
Add lines that radiate outward from bright objects to
imitate the visual effect of a cross flter.
Sketch
Apply a pen sketch effect.
Soft Focus
Hide facial imperfections
Fish-eye
Blacken the edges of the frame and distort objects to
imitate the visual effect of a fisheye lens.
On the Home screen, scroll to <Scene>.
Old Film
Apply a vintage film effect.
Select
_.
Half Tone Dot
Apply a halftone effect.
Select
an effect.
Classic
Apply a black and white effect.
Retro
Apply a sepia tone effect.
Shot
and then select Open
_ an image.
Oil Painting
Zooming
may change to _M or
smaller automatically.
A oply various filter effects to your videos to create unique images. This mode is
available only when you insert a memory card into the camera.
or apply dreamy effects.
Blur the edges of a photo to emphasize the subjects in
the center.
Extended functions
Miniature
Apply a tilt-shift
miniature.
Vignetting
Apply the retro-looking colors, high contrast, and strong
vignette effect of Lomo cameras.
HalfTone Dot
Apply a halftone effect.
53
effect to make the sub ect appear in
(.s'_(
S<_ "':) Yod#:s
Using the Split Shot
Sketch
Apply a pen sketch effect.
Fish-eye
Blacken the edges of the frame and distort objects to
imitate the visual effect of a fisheye lens.
Classic
Apply a black and white effect.
Retro
Apply a sepia tone effect.
Palette Effect 1
Create a vivid look with sharp contrast and strong color.
Palette Effect 2
Make scenes clean and clear.
Palette Effect 3
Apply a soft brown tone.
Palette Effect 4
Create a cold and monotone
Press [Shutter]
mode
In Split Shot mode, you can capture several photos and arrange them with
preset layouts.
On the Home screen, scroll to <Scene>.
2
Select
_.
9
Select
a
,
split style.
To adjust the sharpness of the dividing
select Line Blur _ a value.
line, press [MEN[J],
• To apply a Smart Filter effect to part of the shot, press [MEN[J],
effect.
select Smart Filter _ an option. You can apply different
to each part of the shot.
to start recording.
Press [Shutter] again to stop recording.
Se!eit Ntiniatute Piayback speed Wi!l !niieasel
• !f YOUSe!ectMiniature, YOUCannot recordsound jn the video.
Depending on the option you Select,the recordingresolution may Changeto
VGR or Smallerautomatically.
Extended functions
54
and then
and then
Smart Filter effects
(.s_g Scene_"odes
d Align your subject in the frame, and then half-press [Shutter] to
focus.
Press [Shutter] to capture a photo.
Using the Motion
Photo mode
In Motion Photo mode, you can capture and combine a series of photos, and then
select an area to be animated to create a GIF animation.This mode is available only
when you insert a memory card into the camera.
• Repeat steps 4 and 5 to capture the rest of the photos.
To recapture
On the Home screen, scroll to <Scene>.
a photo, press [_].
2 Select _.
3 Align your subject in the frame, and then half-press [Shutter] to
focus.
d
Press [Shutter] to capture the photo.
• The camera captures
,i_!_Press [DISP/_/_/@]
.
Extended functions
55
To recapture
multiple
photos while
the status lamp is blinking.
to scroll to an area to be animated.
a photo, press [MENU].
(.s'_(
S<_ "#:)Yod#:s
Rotate [Zoom] to the left or nght to reduce or enlarge the area.
_2 Press [OK] to save the photo.
'{_ii({ii
L :_i!_i!_i!_i!_i!_i!_i!_i!_i!_i!_i!_i!_i!_i!_i!_i!_i!j_
i iiiii x
It may take longer to save files.
Extended functions
56
Learn how to set the options
Selecting
a resolution
and quality
Selecting a resolution
Shooting
mode.
.................
..............................
Selecting a photo a aaiity
Using the timer
in Shooting
...........................
.......................................
58
Adjusting
brightness
and color ......................
_
s8
Adjusting the exposure manually (EV) ...........
6_
S9
Compensating
70
5o
Changing the metering option
Selecting a White Balance setting .................
for backJighting
(ACB
............
.................
70
in the dark
.................................
61
Preventing red-eye
.................................
51
Using burst modes
Setting a flash option ................................
61
Adjusting
Adjusting the ISO sensitivity
63
Reducing the sound ofthe zoom ..................
75
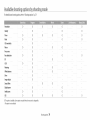
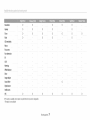
Available shooting options by shooting mode,..
7e
Changing
........................
the camera's focus ......................
Using nacro
.................................................
Using auto focus
...................................
Adjusting the focus area
Using Face Detection
.........................
.........................
54
54
o5
57
Detecting faces ......................................
57
CaptuNng a smile shot
..............................
_7
Detecting eye blinking
............................
58
faces ..............................
68
Tips for detecting
....................................
images .....................................
Zl
73
74
5electi
a eselutieH
Learn how to change
Selectilg
the image resolution
a
ality
and quality settings.
a _esolutio_
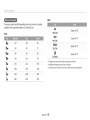
Asyou increasethe resolution, your photo or video will include more pixels,so it
can be printed on larger paper or displayed on a larger screen.When you usea high
resolution, the file size will also increase.
In Shooting mode, press
]_! Select
Movie
[MENU].
Size.
'o Selectan option.
In Shooting mode, press [MENU].
HB
_! Select Photo Size.
VGA
o Selectan option.
_,,,}
OVGA
290
llEM
4608 X 3456: Print on A1 paper.
iqur
4608 X 3072: Print on A1 paper in wide ratio (3:2).
12Mm
4608 × 2592 : Print on A1 paper in panorama ratio (16:9) or play
back on an HDTV.
IIM
3648 X 2736: Print on A2 paper.
Sm
2592 X 1944: Print on A4 paper.
1280X 720: HD files to play back on an HDTV.
640 X 480: SD files to play back on an analog TV.
320 X 240: Post on a web page.
For Sharing:
Post on a website using the wireless network
(30 seconds maximum).
1984 X 1488: Print on A5 paper.
2Mw
1920 X 1080: Print on A5 paper in panorama ratio (16:9) or play
back on an HDTV.
IM
1024 X 768: Attach to an email.
Shooting options 58
Sdecs/ing a !esoiufion and quSky
Selecting
a photo
quality
Set a photo quality setting. Higher image quality settings will result in larger file
sizes. The camera compresses and saves the photos you capture in the JPEG format.
JnShooting mode, press [MENU].
i! SeLectQuality.
S SeLectan option.
Super Fine: Capture photos in super high quality.
Fine: Capture photos in high quality.
Normal:
Capture photos in normal quality.
uuuuuuuuuuu
.............
,,,,,,,,,,,,,,,,,,,,,,
iiii!iii!F_
,
....
S
Shooting options 59
the t
Usi
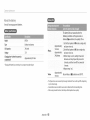
Learn how to set the timer to delay shooting.
o Press[Shutter] to start the timer.
In Shooting mode, press [_].
• The AF-assist light/timer lamp blinks.The camera will automatically
photo after the specified time has elapsed.
Ill
_
F-a_
; P_essiShutter]oi[_PD]tocancelthetimer:
i DePending on the FaceDetection options you Selected, the timer function may
not be availablel
Ill
'
; i::i
:i:i:i :] i
:,_ Selectan option.
z,
@,
Off: The timer is not active.
10 Sec: Capture a photo after a 10-second delay.
2 Sec: Capture a photo after a 2-second delay.
Double: Capture one photo after a 10-second delay and another
photo after a 2-second delay.
Available
options
may differ depending
on the shooting
Timer 0ptions are not available if you Setburst options.
• In some modes, you can also setthe timer option by pressing [MENU], and
then selecting Timer.
i
oo
LI
capture a
conditions.
Shooting options 60
iH the
Learn howto
Preventing
capture photos at night or in low light conditions.
Setting
redoeye
a flas/s option
When the flash fires when you captu re a photo of a person in the dark, a red glow
Use the flash when you capture photos in the dark or when you need more light in
may appear in the person's eyes. To prevent this, select Red-eye or Red-eye Fix.
Refer to flash options in"Setting a flash option"
your photos.
In Shooting mode, press [_].
OO
A Before correction
A After correction
OO
7 Select an option.
Off:
(_)
. Theflash will not fire.
• The camera will display the shake warning _j_ when you are
shooting in low light.
Shooting options
61
s_T
Auto: The camera will select a proper flash setting for the scene it
detects in Smart Auto mode.
_R
Auto: The flash will fire automatically
background is dark.
when the subject or
Red-eye:
• The flash will fire twice when the subject or background is dark to
reducethe red-eye effect.
• There is an interval between the 2 bursts of the flash. Do not move
until the flash fires a second time.
J
. If light from the flash is reflected or there is a substantial amount of dust in the
air, tiny spots may appear in your photo
° In some modes, you can also setthe flash option by pressing [MENU],
then selecting Flash.
Fill in:
• The flash alwaysfires.
• The camera automatically adjusts light intensity.
S
SlowSync:
• The flash fires and the shutter staysopen longer.
• This option is recommended when you want to capture more
ambient light to reveal more details in the background.
• Usea tripod to prevent your photos from blurring.
• The camera will display the shakewarning _} when you are
shooting in low light.
Red-eye Fix:
• The flash fires twice when the subject or background is dark.The
cameracorrects red-eyesthrough its advanced software analysis.
• There is an interval between the 2 bursts of the flash. Do not move
until the flash fires a second time.
Available
options
may differ
depending
on the shooting
conditions.
Shooting options
. Flashoptions are not available if you set burst options or select Blink Detection.
. MakesurethatycursubjectsarewJthintherecommendeddistancefromthe
flash. (p. 143}
62
and
Adjusting
the ISO sensitivity
The ISOsensitivity isthe measureof a film's sensitivity to light as defined by the
International Organization for Standardization (ISO).The higher ISOsensitivity you
select, the more sensitive to light your camera becomes. Usea higher ISOsensitivity
to capture better photos and reducecamera shakewhen not using the flash.
In Shooting mode, press
[MENU].
_! SeLectI$0.
,o SeLectan option.
• Select_ to use an appropriate ISOsensitivity based on the brightness of
the subject and lighting.
'_ii_ii_ii_iiii:ii_,;,=
' ]!_i!_i!_i!_i!_i!_i!_i!_i!_i!_i!_i!_i!_i!_i!_i!_i!j_,_
iii:i x
Shooting options
63
CBaH
the came Js focus
Learn how to adjust the camera's focus to suit the subject and the shooting conditions.
Using nsac_o
Using auto focus
Usemacroto captureclose-upphotosof subjects,suchasflowersor insects.
To capture sharp photos, select the appropriate
(Refer to "Using auto focus".)
distance from the subject.
focus option according to your
In Shooting mode, press [_].
OOi
\.j
@
; -Fryto ho!d the camera firmly tOprevent blurry photos.
Turn offthe flash if the distance to the subject is ess than 15.7 in. (40 cm).
Shooting options 64
0
_
2 Select an option.
Adiusting
r. i
LRFj
Normal {AF): Focus on a subject farther than 31 in. (80 cm) away,
Farther than 98 in. (250 cm) away when you use the zoom,
_
Macro: Focus on a subject that is 2-31 in. (5-80 crn) from the camera.
51-98 in, d 30-250 cm) when you use the zoom.
Auto Macro:
the focus area
You can get clearer photos by selecting an appropriate
subject's location in the scene.
focus area according to your
In Shooting mode, press [MENU].
2 Select FocusArea.
S Selectan option.
• Focus on a subject farther than 2 in. (5 cm) away. Farther than
R_'
51 in. (130 cm) away when you use the zoom.
• Auto Macro is set automatically
manually.
Available
In
options
ma,
differ
depending
some modes, you can
selecting Focus.
also
in some modes.You cannot set it
on the shooting
set
the focus
conditions.
option by pressing [MENU],
and
then
[]
Center AF: Focus on the center of the frame (suitable when subjects
are located at or near the center).
[]
D
Multi AF: Focus on one or more of 9 possible areas,
Available
Shooting options
65
Tracking AF: Focus on and trackthe
shooting
options
may differ depending
subject. (p. 66)
on the shooting
mode.
r ,¸ ._. _ _. ,_. _
._ y.,_.
_ .._/_
Tracking AF allows you to track and automatically
you are moving.
In Shooting mode, press
• If you do not select a focus area. the focus frame will appear
screen.
focus on your subject, even when
• Tracking a subject mayfail
you want
to track, and then
when:
- the subject is too small
[MENU].
- the subject moves excessively
- the subject is backlit oryou are shooting
i! SeLectFocusArea -_ Tracking AF.
Focus on the subject
in the center of the
- coJors or patterns
- the subject includes horizontal
- the camera shakes excessively
press [OK].
• A focus frame appears on the subject and follows the subject as you move
the camera.
. When tracking
in a dark place
on the subject and the background
patterns,
are the same
such as blinds
fails, the feature will be reset.
• If the camera fails to track the su @ect, you must reselect the subject to track.
6
.
1 _1 _]_
Ifthe camera fails to focus, the focus frame will change to red and the focus will
be reset.
• If you use this function,
Burst options,
D
• The white frame means that your camera is tracking the subject.
• When you half-press [Shutter], the green frame means that your subject is in
focus.
• The red frame means that your camera failed to focus.
Press [Shutter] to capture the photo.
Shooting options
66
you cannot set Face Detection
and Intelli zoom
options. Timer options.
Usi
IIIFace
DetectieH
If you use Face Detection options, your camera can automatically detect a human face. When you focus on a human face, the camera adjusts the exposure automatically.
Blink Detection to detect closed eyes or Smile Shot to capture a smiling face.
Detecting
faces
Your camera automatically
Capturing
detects up to 10 human faces in one scene.
a smile shot
The camera automatically
In Shooting mode, press [MENU].
Use
releases the shutter when it detects a smiling face.
In Shooting mode, press [MENU].
:!_ Select Face Detection -_ Normal,
_! Select FaceDetection --_ Smile Shot.
_!] Compose your shot.
• The camera automatically
releases the shutter when it detects a smiling face.
The face nearest the camera or nearest
the center of the scene appears in a
white focus frame and the rest of the
faces appear in gray focus frames.
When your subject smiles
broadly, your camera can detect
the smile more easily.
Shooting options 67
1. S '_( i:)(:)
©etecting
eye blinking
If your camera detects closed eyes, it will automatically capture 2 photos in
succession.
In Shooting mode, press [MENU].
_! Select Face Detection --_ Blink Detection.
Tips fo_ detecting
faces
• When your cameradetects a face,it tracks the detected face automatically.
• FaceDetection may not be effective when:
- the subject isfar from the camera (Thefocus frame will appear orange for Smile
Shot and Blink Detection.)
- it is too bright or too dark
- the subject is not facing the camera
- the subject iswearing sunglassesor a mask
- the subject's facial expression changesdrastically
- the subject is backlit or the lighting conditions are unstable
• When you set FaceDetection options, the AFarea is automatically set to Multi AF.
• Depending on the FaceDetection options you selected,some Shooting options
may not be available.
• Depending on the shooting options you selected, FaceDetection options may
not be available.
Shooting options 88
Ad]ustiH htHessa
Learn how to adjust the brightness and color for better image quality.
the exposure ma_aHy
(EV}
Depending on the intensity of the ambient light, your photos may be too bright or
dark. In these cases,you can adjust the exposure to get a better photo.
3 Press [_/_.)] to adjust the exposure.
A Darker (-)
d
Adjusting
A Neutral (0)
In Shooting mode, press [MENU].
A Brighter (+)
° Thephotowill be brighterasthe exposurevalueincreases.
Press [OK] to saveyour settings.
@
t 0n_eYau adjust the exP0su[e the setting WiII be Stared aut0maiiCa!!Y.You
may need to _hange the exposure value later to avoid overexposure or
underexposure_
2 Select EV.
!f You cannot decide on an appropriate exposure, select the AEB (Aut °
Exposure
Bracket) opt!on,The camera wi!! capture 3 consecutiv e photos, each
with
a different exposure: normal, underexposed, and overexposed. (p. 73)
Shooting options 69
Compensating for back[ighting
(ACB)
Changing
When the light source is behind your subject or there is high contrast between your
subject and the background, your subject is likely to appear dark in the photo. In
this case, set the Auto Contrast Balance (ACB) option.
the meiteFiDg
optioD
The metering mode refers to the way in which a camera measures the
of light. The brightness and lighting of your photos will vary depending
metering mode you select.
In Shooting mode, press
_!
Select
",:_ Select
quantity
on the
[MENU].
Metering.
an
option.
Multi:
A Without ACB
[]
A With ACB
• Your camera divides the frame into several areas, and then
measures the light intensity of each area.
• Suitable for general photos.
_!
In Shooting mode, press [MENU].
Spot:
Select
• Your camera measures only the light intensity
the frame.
":_ Select
ACIB.
an
[]
option.
at the very center of
• Ifa subject is not in the center of the frame, your photo may be
improperly exposed.
• Suitable for a subject with backlighting.
Off: ACB (Auto Contrast Balance) is deactivated.
Center-weighted:
On: ACB (Auto Contrast Balance) is activated.
[]
• Your camera averages the meter reading of the entire frame with
emphasis placed on the center.
° Suitable for photos with subjects in the center of the frame.
The ACBfeature iS always 0n in Smart AUt0 mode.
• The ACBfeature is not available when you SetBurst options.
Shooting options 70
Selecting
a White Balance setting
In Shooting mode, press [MENU].
The color of your photo depends on the type and quality of the light source. If you
want the color of your photo to be realistic, select a White Balance setting that
is appropriate for the lighting conditions, such as Auto WB, Daylight, Cloudy, or
]_! Select
White
",:_ Select
an
Balance.
option.
Tungsten.
Auto WB: Automatically
conditions.
set the White Balance based on the lighting
Daylight: For outdoor photos on a sunny day,
6_
Cloudy: For outdoor
FluorescentH:
photos on a cloudy day or in shadows.
For shooting
under a daylight fluorescent or 3-way
For shooting
under white fluorescent
fl uorescent light,
Im Auto WB
.l°
_0_-Daylight
Fluorescent_L:
light.
Tungsten: For shooting indoor photos under incandescent
halogen lamps,
Ill
6_ Cloudy
s6:Tungsten
Shooting options 71
bulbs or
Custom Set: To use White Balance settings that you define. (p. 72)
You can customize the White Balance by capturing a photo of a white surface, such
as a piece of paper, under the lighting conditions in which you intend to capture a
photo. The White Balance feature will help you to match the colors in your photo
with the actual scene.
In Shooting mode, press [MENU].
_!
SeLect White
Balance
_> Aim the lens at a piece
--_ Custom
of white
Set.
paper,
and then
press [Shutter].
Shooting options
72
Usi
burst m
es
It can be difficult to capture photos of fast-moving subjects or capture natural facial expressions and gestures of your subjects in photos. Also, it can be dimcult to adjust the
exposure correctly and select a proper light source. In these cases, select one of the burst modes.
AEB:
• Capture 3 consecutive photos, each with a different exposure:
normal, underexposed, and overexposed.
° It may take longer to capture the photo. Use a tripod for best
results.
d Align your subject in the frame, and then half-press [Shutter]
focus.
In Shooting mode, press [MENU].
_!
Select
to
Drive.
o Select an option.
"s_
Pressand hold [Shutter].
• While you are pressing
[Shutter],
the camera captures
photos
continuously
Single: Capture a single photo. (Single is not a burst option.)
. Available
Continuous:
• While you are pressing [Shutter],
captures photos.
the camera continuously
• Depending
• The maximum number of photos depends on the capacity of your
memory card.
may differ depending
on the shooting
conditions.
on the Face Detection
of 30
Shooting options 73
options
you selected, some Shooting
to VGR
options
may not be available.
. it may take longer
and performance.
Motion Capture: While you are pressing [Shutter], the camera
captures VGR photos (5 photos per second; maximum
photos).
options
• When you select lVlotion Capture, your camera will set the resolution
and set the iSO sensitivity to Auto,
to save the photos depending
on the memory
card capacity
Adjust
thesharpness,
contrast,
orsaturation
ofyourphotos.
In Shooting mode, press
2
Select
Image
Select
an option.
[MENU].
<_ Press [_/_]
to adjust each value.
Adjust.
i
Soften the edges on your photos (suitable for editing the
photos on your computer).
• Sharpness
+
• Contrast
Sharpen the edges to improve the clarity of your photos.
(This may also increase the noise in your photos.)
• Saturation
-
Decrease the color and brig htness.
+
Increase the color and brightness.
i
Decrease the satu ration.
+
Increase the saturation.
_:::
Press [01(] to saveyour settings.
_J
Shooting options
74
Red
tBeso
oftBezoom
When you use the zoom while recording videos, the camera can record the sound of the zoom. Use the Sound Alive function to reduce the zoom noise.
In Shooting mode, press
_!
Select
[MENU].
Voice.
_:_ Selectan
option.
,_,
RUVE
Sound Alive On: Turn on the Sound Alive function to reduce the
zoom noise.
,_
RUVE
Sound Alive Off: Turn off the Sound Alive function. The camera can
record the zoom noise.
Mute: Do not record sounds.
' Do not block the microphone when you use the Sound Alive function.
i Rec0rdingsmadewith s0und AliVe maydifferfr0mactual
sounds.
Shooting options 75
Available shoo
_
Hsby shoo
g mode
For details about shooting options, refer to "Shooting options". (p. S7)
Resolution
O
Quality
O
0
0
Flash
0
0
ISO sensitivity
0
0
0
O
O
O
O
0
0
0
0
0
O
O
O
O
Metering
O
O
O
O
Drive
O
Image adjust
O
o
Sound Alive
o
o
Digital zoom
O
O
White balance
Intelli zoom
o
o
OIS
O
O
O:The option is available. Some options
-:The option is not available.
O
O
EV
ACB
0
O
0
0
Focus area
Face detection
O
O
Timer
Macro
O
o
o
o
may be limited or may not be changeable.
Shooting options
76
o
o
Resolution
0
0
0
Quality
0
0
0
0
Timer
0
0
0
0
Flash
0
0
0
0
0
0
0
0
0
0
ISO sensitivity
Macro
Focus area
Face detection
EV
ACB
Metering
White balance
Drive
Image adjust
o
Sound Alive
Digital zoom
Intelli zoom
OIS
O:The option is available. Some options
-:The option is not available.
0
0
may be limited or may not be changeable,
Shooting options 77
0
0
0
0
Learn how to play back photos or videos, and edit photos. Also, learn how to connect your camera to your
corn puter or TV.
Viewing photos or videos in Playback mode
Starting Playbackmode
....................
Viewing photos ...................................
Playinga video ........................................
79
79
8:3
8(
............................................
Transfemngfiles to your Windows OS
computer ...............................................
Transferringfiles to your Mac OScomputer
Editing a photo
88
Using programs on a computer
.......................................
Resizingphotos .......................................
Rotating a photo ...................................
Applying Smart Filter effects ..........................
Adjusting your photos .............................
Viewing files on a TV ..................................
88
88
89
90
92
93
93
........
......................
[nstdhng i-Launcher .................................
Using i-Launcher ...................................
94
95
95
96
ViewiH hetes
videos
iH Playback
mode
Learn how to play back photos or videos and how to manage files.
Starting
Playback
mode
View photos or play videos stored in your camera.
1oo-iol_
II£
Memory in use
Press [[]_]].
• The most recent file will be displayed.
• If the camera is off, it will turn on and display the most recent file.
Press [_/@]
• Press and hold [_/_)]
[_
--
to scroll through files.
to scroll through
files quickly.
• If you want to view files stored in the internal memory, remove your memory
card.
• You may not be able to edit or play back files that were captured with other
cameras, due to unsupported sizes (image size,etc) or codecs, Use a computer
or another device to edit or play back these files.
° Photos or videos captured in portrait orientation do not rotate automatically
and are displayed in landscape orientation by the camera and other devices.
l/;_
Current file/Total files
I19-III!
i Folder name-File name
GIFfile
Protected file
Playback!Editing 79
File Information
Scan thumbnails
of files.
In Playback mode, rotate [Zoom] to the left to view thumbnails
(12 at a time). Rotate [Zoom] to the left once more to display more
thumbnails (24 at a time). Rotate [Zoom] to the right to return to
the previous view.
-- File Information
Album
!ii ii j:i:i!i!i
1/_
Current file/Total files
WO-ilO0_
;ii....
i;!!i!i i
iiiiiiiiiiiiiiiiiiii_ii_!_!!:_i!_iiiiii_i!_i!_i_i_i!i!iii_iii_i_i_i
iiiiiiiiiiiiiiiiii_i!_j
_ _i_i_i_!
Folder name-File name
OIl:DO
Current playback time
011:2a
Video length
Protected file
• You can also view files as thumbnails
screen, and then selecting
Press
To display file information on the screen, press [BISP].
Playback!Edking 80
[DISP/_/f/_]
by scrolling to <Album>
_.
to scroll through
files.
on the Home
9
Scroll to a desired list, and then press [OK] to open the list.
View
filesbycategory,
such
asdate
orfiletype.
Scroll to a desired file, and then press [OK] to view the file.
In Playback mode, rotate [Zoom] to the left.
• You can also view files as thumbnails
screen, and then selecting 7.
Press [MENU],
by scrolling to <Album>
and then select Filter --_ a category.
_L
All:View files normally.
D
Date: View files by the date they were saved.
Rotate [Zoom] to the left, and then press
the previous view.
on the Home
@
FileType: View files bythe file type.
Playback!Editing
81
[MENU] to return to
• Ifyo u change the category, it may take some time fo rthe camera t0 reorganize
files depending on the number of files,
; !fyou delete a category classified by Date or File Typel al!files in th e Categ0ry
will be deleted.
Deleting
Protecta file from accidentaldeletion.
multiple
flies
You can select multiple
files, and then delete them at once.
In Playback mode, select a file to protect.
In Playback mode, press [_].
Press[MENU],
• When in thumbnails view, press [MENU],
select Delete _ Select, and then
skip to step 3, or press [_], select Select, and then skip to step 3.
and then select Protect -_ On.
Repeat steps 1 and 2 to protect additional files.
_! When the pop-up message appears, select Multiple Delete.
_ Scroll to each file you want to delete, and then press [OK].
• Press [OK] again to cancel your selection.
4_ Press [_].
,5 When the pop-up message appears, select Yes.
Select files to delete in Playback mode.
Deleting
a single file
You can select one file, and then delete it.
In Playback mode, select a file, and then press [_].
9 When the pop-up message appears, select Yes.
You can also delete files in Playback mode by pressing
Selecting Delete _ Delete _ Yes.
[MENU];
and then
Playback!Editing
82
Deleting all files
Viewing
You can select all files, and then delete them at once.
photos
Enlarge part of a photo or view photos as a slide show.
In Playback mode, press [MENU].
• When in thumbnails view, press[MENU], select Delete -_ Delete All, and
then skip to step 3, or press [_], select Delete All,and then skip to step 3.
?
Select Delete -_ Delete All.
©
When the pop-up message appears,
• All unprotected files are deleted.
In Playback mode, rotate [Zoom] to the right to enlarge a portion of
the photo. Rotate [Zoom] to the left to zoom out.
select Yes.
Enlarged area
Copy files from the internal
memory
to a memory
card.
In Playback mode, press [MENU].
:> Select Copy to Card.
Playback!Editing 83
Vewi _gpi_otos o vdeos r PByb::_cki; ode
[DISP/_/_/@].
View photos captured in Live Panorama mode.
Move the enlarged area
Press
Trim the enlarged photo
Press [OK], and then select Yes. (The trimmed photo
will be saved as a new file.The original photo is
In Playback mode, press [_/@] to scroll to a desired panoramic
photo.
retained in its original form.)
.
2
The entire panoramic
photo appears on the screen.
Press [OK].
• The camera automatically scrolls through the photo from left to right for a
horizontal panoramic photo and from top to bottom for a vertical panoramic
photo. The camera then switches to Playback mode.
• While playing back a panoramic
photo, press [OK] to pause or resume.
• After you have paused the playback of a panoramic photo, press
[DISP/_/_/@] to move the photo horizontally or vertically, depending
the direction you moved when capturing
3
Press [MEN[J]
on
the photo.
to return to Playback mode.
The _amera aut°matica!ly scro!Bthr0ugb the pan0iamic Phot0 only if the !0ngeSt
side of the photo istwo or more times longer than the shortest side.
Playback!Editing
84
Default
View animated GIF files repeatedly that were captured in Motion Photo mode.
Music
Set background
In Playback mode, press [_/_...)] to scroll to a desired GIF file.
Press [01(].
Relax, Lively, Sweet)
• Select Off to cancel effects.
Effect
• The GIF file plays back repeatedly.
° When you use the Effect option, the interval between photos
will be setto 1 second.
Press[OK[]to return to Playback mode.
4
Select Slide Show Options.
9
Select a slide show effect option.
• Skipto step 4 to start a slide show with no effects.
Start
Slide
Show.
_ View the slide show.
• Press [OK[] to pausethe
[MENU].
2
Press [MENU].
_:_
Select
_/
Apply effectsand audio to a slide show of your photos.The slide show function
does not work for videos and GIFfiles.
In Playback mode, press
audio.
• Set a scene change effect between photos. (Off, Calm _, Shine,
slide show.
• Press [OK] again to resumethe
slide show.
, Rotate [Zoora] to the left or dght to adjust the volume level.
Default
Play Mode
Set whether or not to repeat the slide show. (One Play_, Repeat)
Interval
. Set the interval between photos. (1 see*, 3 se¢, 5 sec, 10 se¢)
• You must set the Effect option to Off to set the interval.
Playback!Editing
85
Mayiog
a video
In Playback mode, you can view a video, and then capture or trim parts of the
playing video. You can save the captured or trimmed segments as new files.
In Playback mode, select a video, and then press [OK].
i! View the video.
-- Cu trent playback time/
Video length
Scan backward
Press ]%]. Each time you press [_], you change the scan
speed in this order: 2X, 4X, 8X.
Pause
or
resume
playback
Press ]OK].
Scan forward
Press ]_,.)].Each time you press [_], you change the
scan speed in this order: 2X, 4X, 8X.
Adjust the volume
level
Rotate [Zoom] to the left or right.
When playing a movie, you can begin using features such a scanning backward,
scanning forward, or pausing after the video has run for 2 seconds.
Playback!Editing 86
In Playback mode, select a video, and then press [MENU].
While viewing a video, press [OK] at the point where you want to
capture an image.
_! Select Trim Movie.
9 Press[_].
Press[OK] to start playing the video.
Press[OK] -_ [_] at the point where you want the trimming to
begin.
The resolution of the captured image w il!
• The Captured
Press[OK] to resumeplaying the video.
Press[OK] -_ [_f_]at the point where you want the trimming to end.
_2 Press[_] to trim.
_!i_When the pop-up messageappears, select Yes.
' The °r!gina! video sh°u!d be at least ! 0 seconds long'
The camera w!!! savet he edited video asa new file and leave th e origina! video
intact.
Playback!Editing
87
image is saved as a new file.
yide°.
Learn howto
@
edit photos.
i Theiame[a Wi!! sayeedited ph0t0i as new fi!eS.
t When you edit ph0t0s, the camera will automatically Convert them to a lower resolution. Photos that you rotate manuJ!y a(e not automatically converted to a !0wer res01ution.
• Photos captured in some modes cannot be edited.
Resizing photos
Rotating
Change the size of a photo and save it as a new file.
On the Home screen, scroll to <Album>.
In Playback mode, select a photo, and then press [MENU].
2
Select
a photo
2 Select _.
ResJze.
,_} Rotate [Zoom] to the left, and then select a photo.
,3 Select an option.
# Select Rotate--_ an option.
5 Press [_,_]to save.
Q
Playback!Editing
The €#me[a w!!l o_erwdte the original f!!el
In Playback mode, press [MEN[J]; and then SelectRotate to rotate a photo:
88
/ "_ _
_
AppUng
Smart Fike_ effects
Apply special effects to your photos,
Ink Painting
Apply a watercolor painting effect.
f
Oil Painting
Apply an oil painting effect.
Cartoon
Apply a cartoon painting effect.
Cross Filter
Add lines that radiate outward from bright objects to imitate
the visual effect of a cross filter.
Sketch
Apply a pen sketch effect.
Soft Focus
Hide facial imperfections
Fish-eye
Blacken the edges of the frame and distort objects to imitate
the visual effect of a fisheye lens.
Old Film
Apply a vintage film effect.
HalfTone Dot
Applya
Classic
Apply a black and white effect.
Retro
Apply a sepia tone effect.
£
4_
On the
Home
Select
_.
Rotate
[Zoom]
Select
Smart
screen,
to the
scroll
to <Album>,
left, and
then
select
a photo.
Filter --_ an option.
.....
Looming
_:_ Press [_]
%/
No effect
Apply a tilt-shift effect to make the subject appear in
miniatu re. (The top and bottom of the image will be unclear.)
Vignetting
Apply the retro-looking
colors, high contrast, and strong
vignette effect of Lomo cameras.
Playback!Editing
89
_no_
or apply dreamy effects.
halftone effect.
Blur the edges of a photo to emphasize the subjects in the
center.
to save.
/ "_ _
_
Adjusting
_:; Press [_/__._] to adjust
your photos
%/
Learn how to adjust the brightness, contrast, or saturation or how to correct the
red-eye effect. If the center of a photo is dark, you can adjust it to be brighter.
The camera will save an edited photo as a new file, but may convert it to a lower
resolution.
@
option.
8 Press [01(].
_2 Press [_]
to save.
You can adjust brightness, contrast, and saturation and apply Smart Filter
effects at the Same time.
You cannot apply the ACB,FaceRetouch, and Red-eye F!Xeffects at the same
time.
On the Home screen, scroll to <Album>,
2
Select _,
_
Rotate [Zoom]
to the left, and then select a photo.
4_ Select ACB.
f
the
On the Home screen, scroll to <Album>.
.{!; Press [_]
_! Select _.
Rotate [Zoom]
to the left, and then select a photo.
4_ Select an adjusting
option,
-_0_- Brightness
_D
Contrast
_o
Saturation
Playback!Editing
90
to save.
/ "_ _
f
_,
On the Home screen, scroll to <Album>.
i_! Select _.
Rotate [Zoom]
4
to the left, and then select a photo.
Select Face Retouch.
i
i
i
i
Press [_/_)] to adjust the option.
. Asthe number increases, the skin tone becomes brighter and smoother.
Press [_]
f
to save.
iiiiiiiiiiiiiiili
@
On the Home screen, scroll to <Album>.
_! Select _.
Rotate [Zoom]
4
Select Red-eye
Press [_]
to the left, and then select a photo.
....
S
Fix.
to save.
Playback!Editing
91
Viewing
oH a TV
Play back photos or videos by connecting
f
your camera to a TV with the AA/cable.
On the Home screen,scroll to <Basic>.
Y Turn on your TV, and then select the A/V video source with the
TV remote control.
2 Select _.
_:f Turn on your camera.
_ Select Connectivity--_ Video Out.
,
d Select the video signal output for your country or region. (p. 124)
The camera automatically
it to a TV.
enters into Playback mode when you connect
_? View photos or play videos using the camera buttons.
,i_!_Turn offyourcamera andTV.
_ Connect your camera to your TV with the A/V cable.
@
,
Depending on the TV model, YOu may see some digital
image may not appear.
Images may not be centered
Playback!Editing
92
on theTV
screen depending
noise o! pait of an
on your TV settings.
"[ aHsfe iH 9 lles to the <omp te
Connect the camera to a computer to transfer files from the camera's memory card to the computer.
(;i Turn on the camera.
"l'mnsfe_dng files to you_ Windows OS compute,_
Connectthe camerato yourcomputerasa removabledisk,
You[ Computer must be running Windows XRWindo ws vista, Windows 7; 0r
Windows 8 for you to Connect the camera asa removable disk.
• The computer
......
recognizes
the camera automatically.
);_ On your computer, select My Computer --> Removable Disk-->
DCIM --_ IOOPHOTO.
_;_ Drag or save files to your computer.
'f On the Home screen,scroll to <Basic>.
_]! Select _).
_]_ Select Connectivity --_ i-Launcher --_ Off.
With Windows Vista, Windows
the camera are similar.
Turn offthe camera.
7 and Windows
8, the methods
for disconnecting
If the status lamp on your camera is blinking, wait until it stops.
_ Connect the camera to your computer with the USBcable.
You must P!ug ih e Smal!end ofihe USBCable into Y0I[ camera: Ifthe Cable
is rove[sod, it may damage your files:The manufacturer is not responsible f°r
any
lossof data.
:,_ Click
on the tool bar at the bottom right of your computer
screen.
3 Click the pop-up message.
Click the message box that indicates the camera can be removed
safely.
_ Remove the USBcable.
PlaybacWEditing 93
Y answer:
'! _gfiles to fi_e co _,pu_e_
3 Turn on the camera.
T_ansfe_Hng fi_es to you_ Mac OS compute_
,
When you connect the camera to your Mac OS computer, the computer will
automatically
recognize the device, You can transfer files directly from the
camera to the computer without installing any programs.
The computer recognizes
removable disk icon.
d Open the removable disk.
,{!_ Drag
Turn offthe camera.
2 Connect your camera to your Mac OS computer with the USB
cable.
4],o}
the camera automatically
You must plug the small end of the USBcable into your camera: if the Cable
is reversed, it may damage your files.The manufacturer is not iesponSible for
any Jossofdata:
......
Playback!Editing
94
or save files
to your
computer.
and displays a
UsiH ams
oH a corn
i-Launcher allows you to play back files with Multimedia
Viewer and provides links so that you can download
useful programs.
_nstaHing ioLauncher
_ Turn on the camera.
f
7 When the pop-up window prompts you to install i-Launcher,
On the Home screen,scroll to <Basic>.
select Yes.
. If a pop-up window prompting you to run iLinker.exeappears,run it first.
. Whenyou connectthe camerato a computer with i-Launcherinstalled,
the programwill launchautomatically.
2 Select _.
o SeLectConnectivity -_ i-Launcher -_ On.
d Turn offthe camera.
8 Follow the on-screen instructions to complete the installation.
_:;
Connect the camera to your computer with the USBcable.
_/
_
. An i-Launchershortcutwill appearon the computer.
You muii plug the sma!! end Qfthe UsB _ab!e int0 y0ui c_meia] if the cab! e
is[eversed, itmaydamageyourfiles.Themanufacturerisnotresponsiblefor
any lossof data.
Playback!Editing
Befo[e insta!ling the prog[am] ensure that the Pc is €onnected iO a netwo[k.
, Toinstalli-Launcher0ny0urMacOSc0mputer_clickDevices_i,Launcher_
Mac _ iLinker.
_
95
Multimedia Viewer
Youcan view files with Multimedia Viewer.
Firmware Upgrade
Youcan update the firmware of your camera.
PCAuto Backup
i-Launcher provides a link for downloading the PC
Auto Backup program when you connect the camera
to acomputer. Youcan send photos or videos that you
captured with the camerato a PCwirelessly.
CPU
Intel Pentium®4, 3.2 GHz or higher/
AMD Athlon TM FX D2.6 GHz or higher
RAM
Minimum
OS*
Windows XP SP2, Windows Vista, Windows 7, or Windows 8
Hard disk
capacity
512 MB RAM (1 GB or more recommended)
250 MB or more (1 GB and above recommended)
• 1024 X 768 pixels, 16-bit color display compatible
@
monitor
(1280 X 1024 pixels, 32-bit color display recommended)
!fyouabuse
avai
e. a Mac Os €omputeB °n!Y Firmware Upgrade and PCAUt° BackuP are
Others
• USB 2.0 port
• nVlDIA Geforce 7600GT or higher/
ATI X1600 series or higher
Using i-Launche_
i-Launcher allows you to play back files with Multimedia
link to download the PC Auto Backup program.
, Microsoft
Viewer and provides
a
* A 32-bit version of i-Launcher will be installed--even
Windows Vista, Windows 7, and Windows 8.
• The requirements are recommendation only. J-Launcher may not work properly
even when the computer meets the requirements, depending on the condition
of your computer.
• If your computer does not meet the requirements, videos may not play
correctly.
The manufacturer is not responsible for any damage that results from using
unqua ified computers such as a computer you assemb ed yourse f.
Playback!Editing
DirectX 9.0c or higher
96
on 64-bit editions
of Windows
XP,
OS
Mac OS 10.5 or higher (except PowerPC)
RAM
Minimum
256 MB RAM (512 MB or more recommended)
Minimum
110MB
Hard disk
capacity
Others
On your computer, select Start --_ All Programs -_ Samsung _ i-Launcher
Samsung i-Launcher. On your Mac, click Applications _ Samsung _ i-Launcher.
USB 2.0 port
Playback!Editing
97
Usii,_gpiogi_ms oi,__ coi'_p_t_ ¸
Multimedia
Viewer allows you to play back files. From the Samsung i-Launcher screen, click Multimedia
Viewer.
- Photos: JPG,GIF,BMP,PNG,TIFF,MPO
,
Files that have been recorded with other manufacturersfdevices may not play back smoothly.
Viewing photos
@
File name
Enlarged area
@
@
@
@
@
@
@
Histogram
Open the selected file.
Histogram button
Rotate to the left/Rotate to the right.
Move to the previousfile/Move to the next file.
Fit the photo to the screen.
View the photo in its original size.
Zoom in/Zoom out
@
Playback!Editing 98
Switches between 2D and 3Dmode.
Usii"_gpi'ogi'_ms oi"__ cOmpL_t_¸
Viewing videos
@
@
@
@
@
@
@
@
Playback!Editing 99
File name
Adjust the volume.
Open the selected file.
Move to the next file.
Stop
Pause
Move to the previous file.
Progressbar
From
theSamsung
i-Launcher
screen,
click
Firmware
Upgrade.
From the Samsungi-Launcher screen,click PCAuto Backup. Forinformation about
installing the PCAuto Backup program, referto page 110.
Playback!Editing
1 O0
Learn how to connect to wireless local area networks (WLANs) and use functions.
Connecting to a WLAN and configuring
network settings ........................................
Connecting to a WLAN .....................
Usingthe Io@nbrowse_ ........................
Network connection ttps ............................
Entering text ............................................
Saving files to a smart phone automatically
Sending photos or videos to a smart phone
Using a smart phone as a remote shutter
release ...................................
°.
102
102
Sending photos or videos via email .................. 112
Changing email settings .............................
1/2
Sending photos or videos via email ............... }/_
103
1_
1o5
Using photo or video sharing websites .........
Accessinga website .................................
Uploading photos or videos ........................
_ 5
15
115
106
Using AllShare Play to send files
11/
107
Using Auto Backupto send photos orvideos °°. luo
Installing the program for Auto Backupon
yourPC
....................
11o
Sending
photos
or videos to a PC ...............
Uploading photos to online storage ................
Viewing photos
_08
'_1o
..................
support
Sending
or videos on devices
AIIShare Play
photos
...............................
using Wi-Fi Direct
1'1i7
that
...............
1is
12o
CoHHecd
toaWllL,,AHa
co
Hetwo Isetd
Learn to connect via an access point (AP) when you are in a range ofa WLAN. You can also configure
to a WLAIH
Conneictilg
(<I})
On the Home screen, scroll to <Wi-Fi>.
2
s
network settings.
Ad hoc AP
I_
Select
Press
_,
e,
[MENU], and
or
then
SecuredAP
WPSAP
select
Signalstrength
Wi-Fi Setting.
• In some modes, follow the on-screen instructions
until the Wi-Fi Setting
Press[_O..)]
to open network setting options.
screen appears.
• The camera automatically
searches for available AP devices.
When you select a secured AP, a pop-up window appears. Enter the
required passwords to connect to the WLAN. For information
about
4 Select an AR
entering
Wi-FiSetting
text, refer to "Entering
text". (p. 105)
o
When a Iogin page appears, refer to "Using the Iogin browser". (p. 103)
o
When you select an unsecured
o
If you select a WPS profile supported AP, select _ _ WPS PIN connection,
and then enter a PIN on the AP device. You can also connect to a WPS
Refresh
profile supported
AP, the camera will connect to the WLAN.
AP by selecting
_ _
WPS button connection
camera, and then pushing the WPS button
C6_6_g _XK::) ¸::77_ ¸_ _i_k
.
Select Refresh to refresh connectable
.
Select Add wireless
network
APs.
to add an AP manually. Your AP name must
be in English to add the AP manually.
Wireless network
102
on the AP device.
on the
In the Wi-Fi Setting screen, move to an AP,and then press [_.)].
Using the _ogin browser
YoucanenteryourIogininformationviathe Ioginbrowserwhenconnectingto
someAPs,sharingsites,or cloudservers.
_! Select each option, and then enter the required information.
Network Password
Enter the network password.
IP Setting
Set the IPaddress automatically
[DISP/_/_/®]
[OK]
Move to an item or scroll the page.
Select an item
Access the following options:
or manually.
• Previous Page: Move to the previous page.
[MENU]
• Next Page: Move to the next page.
• Reload: Reload the page.
• Stop: Stop loading the page.
• Exit: Close the Iogin browser,
In the Wi-Fi Setting screen, move to an AP,and then press [_)].
Close the Iogin browser,
_! Select IP Setting --_ Manual.
G
",:_Select each option, and then enter the required information.
• You may not be able to select some items depending
connected to.This does not indicate a malfunction
• The Iogin browser
IP
Enter the static IP address.
Subnet Mask
Enter the subnet mask.
Gateway
Enter the gateway.
DNS Server
Enter the DNS address.
may not close automatically
in this case, close the Iogin browser
on the page you
after you log into some pages.
by pressing
[_], and then proceed
with the
desired operation.
• it maytake
longer to load the Iogin page due to the page size or network
If this occurs, wait until the Jogin information
Wireless network
103
input window
appears.
speed.
IIHe_wo_k c@n_eiction
tips
• You must insert a memory card to usethe WJ-FJ
features.
• The quality of the network connection will be determined by the AR
• The further the distance between your camera and the ABthe longer it will take
to connect to the network.
If a nearby device is using the same radio frequency signal asyour camera, it may
interrupt your connection.
If your AP name is not in English,the camera may not be able to locate the device
or the name may appear incorrectly.
For network settings or a password,contact your network administrator or
network service provider.
If a WLAN requires authentication from the serviceprovider, you may not be able
to connect to it. Toconnect the WLAN,contact your network service provider.
Depending on the encryption type, the number of digits in the password may
differ.
A WLANconnection may not be possible in all surroundings.
• The camera may display a WLANenabled printer on the AP List.You cannot
con nect to a network viaa printer.
• Youcannot connect your camerato a network and aTV simultaneously.
• Connecting to a network may incur additional charges.Costswill vary based on
the conditions of your contract.
• If you cannot connect to aWLAN,try another APfrom the available AP list.
Wireless network
• A Iogin page may appear when you select free WLANsprovided by some
network serviceproviders. Enteryour ID and passwordto connect to the WLAN.
Forinformation about registering or the service,contact the network service
providers.
• Becautious when you enter personal information for an AP connection. Do not
enter any payment or credit card information on your camera.The manufacturer
is not liable for any problem caused by entering such information.
• Available network connections may differ by country.
• The WLANfeature of your camera must comply with radio transmission laws in
your region. Toensure compliance, usethe WLAN feature only in the country
where you purchasedthe camera.
• The processfor adjusting network settings may differ, depending on network
conditions.
•
•
•
•
Do not accessa networkthat you are not authorized to use.
Beforeyou connect to a network, ensureyour battery is fully charged.
Youcannot upload or sendfiles captured in some modes.
Filesthat you transfer to another device may not be supported by the device. In
this case,use acomputer to playbackthe files.
104
"" .........
_:/c,........... J_W A_",i
Entering
........_'..... ......1"eW}
'< Seis'
text
Learn how to enter text. The icons in the table below let you move the cursor,
change the case, etc. Press [DISP/_/_/@]
to move to a desired key, and then press
[OK] to enter the key.
!@#/ABC
Switch between Symbol mode and ABC mode.
Enter a space.
Done
®
[_
Save the displayed text.
View the entering text guide.
• You can use only the English alphabets
language.
• To move to Done directly,
in some modes, regardless of the display
press [[_]].
. You can enter up to 64 characters.
• The screen may differ depending
Delete the last letter.
Move the cursor.
t
.com
In ABC mode, change the case.
Enter
".com".
Wireless network
105
on the input mode.
5avi
Ilestoasma I
oHeautomatically
The camera connects to a smart phone that supports the AutoShare feature via a WLAN. When you capture a photo with your camera, the photo is saved to the smart phone
automatically.
The AutoShare feature is suPPorted by Galaxy sedes smart phone s o! Ga!axyTab models with the Android 2:20 SOr highe[ or !OSdevices with the iOS 4:3 Orhighec Before using this
feature, check the device's firmware and update it if neede&
• You should instal! the Samsung SMARTCAMERAApp on you[ phone or device before using this feature, You can downloa d the application from Samsung Apps, G00gle P!aySt0re_o[
Apple App Store,The Samsung SMARTCAMERAAPP !scompatible with Samsung camera models manufactured Jn20] 3 or later:
Ifyou setthis function, the setting is majntained even when you change SheShooting mode:
, This feature may not be supported in some modes.
On the camera, in Shooting mode, press [MENU].
_!
On the camera,
select
AutoShare
,.,_A
On the camera, allow the smart phone to connect to your
camera.
-_ On.
• If the pop-up message that prompts you to download
,
the application
connected
appears, select Next.
,
On the smart phone, turn on the Samsung SMART CAMERA App.
,
For lOS devices, turn on the Wi-Fi feature before turning
on the
,
4 Select the camera from the list and connect the smart phone to
camera.
, The smart phone can connect
has been connected
to your camera before, it is
automatically.
An icon that shows the connection
camera's screen.
status ({_)
will appear
on the
On the camera, capture a photo.
application.
the
If the smart phone
to only one camera at a time.
Wireless network
The captured
photo
is saved to the camera, and then transferred
to the
smart phone.
,
If you recorded a video, it is saved only to the camera.
,
A GIF file captured
phone.
106
in the motion
capture
mode is not saved on the smart
Se
iH hotos
vileos to a smart phone
The camera connects to a smart phone that supports the MobileLin k feature via a WLAN. You can easily send photos or videos to you r smart phone.
The MobileLink feature is supported by Galaxy series smart phones or GalaxyTab model swit h the Android 2:20S or hi!her 0 [ lOSdevices with the iOS4.3 or higher: Before using this
feature, check the deyicels firmware and update it if needed.
You Should instal! the Samsung SMARTCAMERAApp on your phone or ctevice before using this feature, You can ctownloacl the application from Samsung Apps, Google Play Store,or
App!e APP Storeilhe Samsung SMARTCAMERAAPP is _ompatible with Samsung _ame[a models manufactured in 20!3 or later.
_ when there are no files in the camera memory, you cannot use this featurel
' If you Selectfiles from the smart phonel you can view up to 1,000recent files and send up to _50 files at a time. If you select files from the camera, you can view files that were
selectecltfrom the camera ancl the maximum number of files that can be senclvaries cltepenclingon the storage space of the smart phone.
On the camera's Home screen, scroll to <Wi-Fi>.
,i_!_Select the camera from the list and connect the smart phone to
the
_! On the camera, selectS.
• If the pop-up messagethat prompts you to download the application
appears,select Next.
,
If you select Select Files from Smartphone,
,
you can use your smart
If you select Select Files from
the camera.
Camera,
you can select files to send from
For lOS devices, turn on the Wi-Fi feature before turning
_2 On the
smart
has been connected
to your camera before, it is
automatically.
phone
or camera,
select
files
to transfer
from
the
camera.
4 On the smart phone, turn on the Samsung SMART CAMERA App.
,
If the smart phone
connected
phone to view and share files stored on the camera.
.
to only one camera at a time.
_ On the camera, allow the smart phone to connect to your
camera.
On the camera, select a sending option.
.
camera.
The smart phone can connect
on the
8 On the smart phone, touch the copy button or on the camera,
select
application.
Share.
The camera will send the files.
Wireless network
107
UsiH I a smart pBoHe as a remote sButter release
The camera connects to a smart phone via a WLAN. Use the smart phone as a remote shutter release with the RemoteViewflnder
smart phone.
feature. The captured photo will display on the
x
_A
' The Remote Viewfinder feature is supported by Galaxy seriessmart phones or Galaxy Tab models with the Android 2.20S or higher or lOSdevices with the iOS4.3 or higher. Before
using this featurel Checkthe device's firmware and update it if needed.
You Should insta!l the Samsung SMARTCAMERAApp on your phone or device before using this feature. You can downloa d the application from Samsung Apps, Goog le Play Storel °r
Apple App Store.The Samsung SMARTCAMERAApp is compatible with Samsung camera models manufactured in 2013 or later.
On the camera's Home screen, scroll to <Wi-Fi>.
_ On the smart phone, set the following shooting options.
:_! On the camera, select _.
• If the pop-up messagethat prompts you to download the application
appears,select Next.
9
m
il
m
m
On the smart phone, turn on the Samsung SMART CAMERA App.
,
For lOS devices, turn on the Wi-Fi feature before turning
application.
on the
4 Select the camera from the list and connect the smart phone to
the
%/
to only one camera at a time.
On the camera, allow the smart phone
camera.
to connect
Timer option
Photo size
Saving location
i Zoom ratio
camera.
, The smart phone can connect
Flash option
While using this feature,
The zoom button
to your
function
Wireless network
108
are not available
button
on your camera.
on your smart phone will not
when using this feature.
Remote Viewfinder
, If the smart phone has been connected to your camera before, it is
con nected automatically.
some buttons
and the shutter
mode supports
the _
and _
photo sizes only.
(.iSiN(_
aSi'Ti_;_
¸_iSOiS_
D£
ai_mO_C
_Si_ ¸¸i_b_asF
_
]2 On the smart phone, touch and hold _: to focus.
,
The focus
is automatically
setto
Multi
Release _
to capture the photo.
• The
will
photo
be resized
AF.
to 640 X 360 when
it is stored
to the smart
phone.
o When you use this feature, the ideal distance between the camera and the
smart phone mayvary, depending on your surroundings.
, The smart phone
must be within
7 m of the camera to use this feature.
• It will take some time to capture the photo after you release _@ on the smart
phone.
• The Remote Viewfinder
- there is an incoming
function
will deactivate
when:
call on the smart phone
- either the camera or the smart phone turn off
- the memory isfu
- either device loses its connection to the WLAN
- theWi-Fi
connection
is poor or unstable
Wireless network
'109
Usi
Auto Backup to sendpBotes or videos
You can send photos or videos that you captured with the camera to a PCwirelessly.
_nstaHing
the
program
Sending
for Auto Backup on your PC
2 Connect the camera to the PCwith the USBcable.
2
to complete
connecting
• You must configure
the application
the backup PC information
to use the Auto Backup
feature. For more details, refer to "Installing the program for Auto Backup on
your PC".(p. 110) If the Auto Backup program is installed on your PC, save the
PC information via USBcable or Wi-Fi connection.
the installation.
You can also store the information
_.
appears, select Next.
, The Auto Backup program is installed on the PC and the information
about the PC will be stored to the camera. Follow the on-screen
instructions
Select
• If the the pop-up message that prompts you to download
When the Auto Backup program icon appears, click it.
,
or videos to a PC
On the Home screen, scroll to <Wi-FJ>.
Install i-Launcher on the PC. (p. 95)
9
photos
about the PC to the camera by
the PC and the camera via Wi-Fi.
• The camera will automatically attempt to connect to a WLAN via the most
recently connected AP device.
Remove the USBcable.
• If the camera has not previously been connected to a WLAN, it will search for
available AP devices. (p. 102)
Wireless network
110
Select a backup PC.
.
If you
have performed
a backup
before,
skip
. When you connect the camera to the WLAN. select the AP that is connected
the PC.
to step 4.
The camera will search for available
d Select OK.
.
To cancel
.
You cannot
.
The
.
When
new
sending,
Cancel.
individual
files
.
to backup.This
function
backs
up only
the
progress
transfer
To change
be shown
is completed,
the camera
the
Select
from
the backup
select
on the
camera
Cancel
turning
PC automatically
and then
If you turn off the camera or remove the battery while
• While you are using this feature, the shutter
will
30 seconds.
offyour
[MENU],
_o
Shut
PC, select
after
down
. You can connect
PC monitor.
will
turn
to return
off automatically
to the previous
. The backup
in
transfer
PC after
Change
is complete,
backup
_
control
is disabled
may be canceled clue to network
When there are no files in the camera memory,
press
, You must turn offWindows
featu re.
On.
PC.
on your camera.
only one camera _o _he PC at a time for sending files
conditions.
Photos or videos can be sent to a PC one time only. Files cannot
even if you reconnect your camera to another PC,
screen
offautomatically.
the
sending files, the file
transfer will be interrupted..
files on the camera.
and prevent
.
select
select
backup's
To turn
access points even if you are connecting
the same access point again.
approximately
.
to
be sent again
you cannot use this feature,
Firewall and any other firewalls
before using this
. You can send up to 1,000 recent files.
. On the PC software, the server name must be entered
can contain no more than 48 characters.
in the Latin alphabet
and
• When multiple file types are created at once. only the image files (JPG) will be
sent to the PC with this feature.
Wireless network
111
Se
iH hotos
or videos via email
You can change settings in the email menu and send photos or videos stored on the camera via email.
Changing
5 Select the Name box, enter your name, and then select Done.
email settings
In the email menu, you can change settings for storing your information.
also set or change the email password. For information
"Entering text". (p. 105)
You can
Sender Setting
about entering text, refer to
"@
Name
Email
On the Home screen, scroll to <Wi-Fi>.
2
Select 0.
• The camera will automatically attempt to connect to aWLAN via the most
recently connected AP device.
• If the camera hasnot previously been connected to a WLAN,it will search for
available APdevices.(p. 102)
6 Select the Entail box, enter your email address, and then select
Press [MENU].
7
Done.
Select Save to save your changes.
, To delete your information, select Reset.
4_ select Sender Setting.
Wireless network
112
F
2
On the Home screen, scroll to <Wi-Fi>.
On the Home screen, scroll to <Wi-Fi>.
Select @.
2 Select e.
• The camera will automatically attempt to connect to aWLAN via the most
recently connected AP device.
• If the camera hasnot previously been connected to a WLAN,it will search for
available APdevices.(p. 102)
d
• The camera will automatically attempt to connect to a WLAN via the most
recently con nected AP device.
• If the camera has not previously been connected to a WLAN, it will search for
available AP devices. (p. 102)
Press [MENU].
";_ Press [MEN[J].
Select Setting Password -_ On.
• To deactivate the password,selectOff.
d Select Change Password.
_:; Enteryour current4-digit password.
_J
When the pop-up appears, select OK.
. The pop-up
disappears
automatically
_ Entera new4-digit password.
even if you do not select OK.
_2 Enter the new password again.
Enter a 4-digit password.
_:J When the pop-up appears, select OK.
_2 Enter the password again.
8 When the pop-up appears, select OK.
@
If YOUlOS
t Your passwoid, Y0u can ieset it by Selecting Reset on th e paSswoid
setting Screen.When you reset the information, the previously saved use[is setting
information, email address,and recently sent email list will be deleted.
Wireless network
113
Sending
photos
8 Scroll to files to send, and then press [OK].
or videos via emai_
,
You can send photos or videos stored on the camera via email. For information
about entering text, refer to "Entering text". (p. 105)
7
On the Home screen, scroll to <Wi=Fi>.
2
Select Next.
8 Select the Comment box, enter your comments, and then select
Done.
Select
• The camera will automatically attempt to connect to a WLAN via the most
recently connected AP device.
• If the camera has not previously
available AP devices. (p. 102)
9
You can select up to 20 files.The total size must be 7 MB or less.
Select the Sender
Done.
9
Select Send.
- The camera will send the email.
been connected to a WLAN, it will search for
• Even if a photo appears to have transferred
successfully,
errors with the
recipJent's email account may cause the photo to be rejected or recognized
box, enter your email address, and then select
• You may not be able to send
. If you have previously saved your information, it will be inserted
automatically. (p. 112)
. To use an address from the list of previous senders, select V _ an
address.
photo resolution
you can send
30 seconds
at QVGi_ resolution
photo resolution
resolution.
Done.
• If you cannot
. To use an address from the list of previous recipients,
address.
,
Select _-to
,
Select X to delete an address from the list.
_:_ Select
recipients.You
an email if no network
your email account settings are incorrect
• You cannot send an email if the file size exceeds
d Select the Receiver box, enter an email address, and then select
add additional
as
spare.
select V _ an
contact
, When
can input up to 30 recipients.
your
there
Next.
114
an email because
administrator
of firewall
or network
are no files in the camera
an email
Share(Wi-FJ)
is available
in Playback
-_ EmaJl.
memory,
mode
or if
the limit. The maximum
is 2M and the longest video you can u aload
or a video recorded
using i_. If the selected
is hig her than 2M. it will be automatically
network
° You can also send
selecting
Wireless network
send
connection
resized
or user authentication
service
to a lower
settings,
provider
you canna[
by pressing
is
use this feature.
[MEN[J],
and then
UsiH hotoo videosha i
websites
Upload your photos or videos to file sharing websites.
register before connecting your camera.
Available websites
will be displayed
on your camera. To upload
Accessing a website
Uploading
f On the Home screen, scroll to <Wi-Fi>.
2
Select
_.
3
Select
a website.
,
attempt to connect to a WLAN via the most
recently connected AP device.
• If the camera has not previously
been connected to a WLAN, it will search for
available AP devices. (p. 102)
3
or videos
about entering
to SkyDrive,
text, refer to "Entering
text". (p. 105)
refer to "Using the Iogin browser". (p. 103)
To select an ID from the list, select V
• If you have previously
_ an ID.
logged in to the website, you may be logged in
automatically.
You must have an existing account on theft! e sharing website t ° use th is feature:
Wireless network
You can select up to 20 files.The total size must be 10 MB or less.
(On some websites, the total size or number of files may vary.)
Select Upload.
. Ifyou connected to Facebook, select Upload _ Upload.
. On some websites, you can enter your comments by selecting the
Comment box. For information about entering text, refer to "Entering
text". (p. 105)
Enter your ID and password to log in.
If you connected
and
2 Scroll to the files you want to upload, and then press [OK].
• The camera will automatically
For information
you must visit the website
Access the website with your camera.
• If the pop-up message that prompts you to create an account appears, select
OK.
,
photos
files to some websites,
115
• You can set an upload folder for Facebook by pressing
selecting Upload Folder (FacebooE) on the website's
[MENU],
and then
list screen.
o You cannot upload files if the file size exceedsthe
limit.The maximum
photo
resolution you can upload is 2M. and the longest video you can upload is
30 seconds at I]V_lcl resolution
photo
resolution
resolution.
(On some websites.the
° The method of uploading
selected websJte.
contact your network
• Uptoaded
using _.
maximum
photo
If the se ected
resized to a lower
resolution
may vary.)
photos or videos may differ depending
. Ifyoucannotaccessawebsite
settings,
or a video recorded
is higher than 2M, it will be automatically
on the
i
becauseoffirewa[I
administrator
i
i
or user authentJcation
or network
photos or videos may be automatically
i
service provider.
titled with the date they were
captured
• The speed of your Jnternet connection
may affect how quickly
photos upload
or
web pages open.
° When there are no files in the camera memory,
you canno_ use this feature.
° You can also upload photos or videos to file sharing
by pressing
[MENU],
and then selecting
websJtes in Playback mode
Share(Wi-Fi)
-_ a desired website,
• You cannot upload videos _a some websites.
• When you upload photos to SkyDrive. theywJll
maintaining
their aspect ratios.
be resized to 2M while
....
S
Wireless network
116
Usi
AIISha e IIIPlayto se
ties
You can upload files from your camera to AIIShare Play online storage or view files on a AIIShare Play device connected to the same AR
Up_oading
F
2
photos to
o_ine
i
Enter your ID and password, and then select Login --_ OK.
storage
On the Home screen, scroll to <Wi-Fi>.
Select
.
-_ Web
storage.
.
For information
.
To select an ID from the list, select V _ an ID.
.
If you have previously
attempt to
text, refer to "Entering
text". (p. 105)
logged in to the website, you may be logged in
automatically.
If the guide message appears, press [OK].
. The camera will automatically
recently connected AP device.
about entering
connect
to a WLAN via the most
@
. If the camerahasnot previouslybeenconnectedto a WLAN,it will search
To use this feature , you must create an AllShare P!ay account and an account
with
an affiliated online storage service using your PC,After finishing creating
accountsi add your online storage account to A!lShare P!ay.
for available AP devices. (p. 102)
• To change the size for uploaded
photos, press [MENU],
and then select
Upload Image Size.
• If you have registered more than one web storage, you can select from the list
by pressing [MENU],
and then selecting ChangeWeb
d Scroll to the files you want to upload, and then press [OK].
_!!i Select Upload.
storage.
@
Ify0u have registered more than One WebStorage; Selectaweb Storagefirst,
• You cannot up!0ad vide0 files t0 A!lShare Play onl!ne st0rage.
i When there ar e no files in the camera memory, you cannot use this feature,
You Canup!oad uPto 20 fileS.
; You can also upload photos in Playback mod e bYPressing [!VIENU]i and then
selecting Share(WkFi) _ AllShare Play.
Wireless network
117
Viewing
photos or videos on devices that support
Al_Share Play
C On the A!lShare Play device, browse the shared photos or videos.
• For information
On the Home screen, scroll to <Wi=Fi>.
2
Select
--_ Nearby
• If the guide message appears, press [OK].
the photos
_GR or smaller quality and play it again. If videos do not play smoothly
on your device over the wireless connection, try connecting the camera
to the device with an A/V cable.
attempt to connect to a WLAN via the most
recently connected AP device.
• If the camera has not previously
for the camera and browsing
• Videos may not play smoothly depending on the type of AIIShare Play
device or the network condition. If this happens, re-record the video in
Devices.
• The camera will automatically
about searching
or videos on the AIIShare Play device, refer to the device's user manual.
been connected to a WLAN, it will search for
available AP devices. (p. 102)
• You can set to allow only selected devices or all devices to connect by
pressing [MENU],
and then selecting DLNA Access Control on the screen.
• A sharing file list is created. Wait until other devices can find your camera.
3 Connect the A!lShare Play device to a network, and then turn on
the A!lShare Play feature.
• Refer to your device's user manual for more information.
# On the camera, allow the AIIShare Play device to connect to your
camera.
S On the AIIShare Play device, select a camera to connect.
AP
A A camera is connected to a TV that supports AIIShare Play via WLAN.
Wireless network
118
A
?':iay_>s
_d_:,::<
• You can share up to 1.000 recent files.
• Depend!ng
• On an AIIShare Play device, you can view only photos or videos captured
your camera.
. The -ange of the wireless connection between your camera and an AIIShare
Play device mayvarydepending
on the specifications of the AR
. If the camera is connected
to 2 AIIShare Play devices, playback
• Photos or videos will be shared in their original
of photos or videos you want to share, it may
the initial
Set:up
While viewing photos Or videos on the AI!Share p!ay device, contjnu0usly
using
the device's remote or performing
additjona! operations o n the devic e may
may be slower.
prevent
!fyou
sizes.
• You can use this feature only with devices that support
on the number
take some time to load your photos or videos and complete
process,
with
this featur e from working pr0pedy.
reorder or sort files on the camerawhi!e
viewing
them o n an AIISha[e P!ay
device; you must repeat the init!al set-up process 50 upda te the !ist of Nes on
AlIShare Play
. Shared photos or videos will not be stored on the AIIShare Play device, but they
can be stored in the camera to meet the device's
• Transferring
photos or videosto
depending on the network
sizes of the files.
. If you power offthe
When
specifications
the AIISha re Play device maytake
connection,
camera abnormally
the number
of files to be shared, or the
while viewing
an AIIShare Play device [for example, by removing
considers the ca mera to still be connected.
. The order of photos or videos on the camera may be different
AIIShare Play device.
yo u canno t use
t To view fi!es on an A!lShar e P!ay devJc e using the Nearby
enable
multicast mode on your AR
photos or videos on
the battery),
there are no fi!es in the camera mem0ry,
We recommend
you use a network cable to connec t your A!!Share play devic e
to your AP._is will minimize any video'Stuttering'you
may experience when
streaming content.
some time
the device
than on the
Wireless network
119
devices
feature,
Se
iH hetesusi
Wi-£iDi ect
When the camera connects via a WLAN to a device that supports the Wi-Fi Direct function, you can send photos to the device. This feature may not be supported on some
devices.
,i_!_On the device, allow the camera to connect
• The photo will be sent to the device.
On the device, turn on the Wi-Fi Direct option.
2 On the camera, in Playback mode, scroll to a photo.
Press [MENU], and then select Share(Wi-Fi) --_ Wi-Fi Direct.
Y°u iin Seid Up t_ 20 files at aiimel
• When there ale no ph0tos in the camera memory,
• When in the single image view, you can send only one photo at a time.
° When in the thumbnails
Select the device from
view, you can select multiple photos by scrolling
the camera's list of Wi-Fi Direct devices.
. Ensure that the device's Wi-Fi Direct option is turned on.
You can also select your camera from the device's list of Wi-Fi Direct
devices.
Wireless network
you cann0t use this feature.
Ify0u cannot connect to a w!-Ei Direct device_ update th e device with the latest
firmware.
This feature may not be supported on some devices.
to thumbnails, and then pressing [OK]. Select Next when you are finished
selecting photos.
4
to the device.
120
@
rigs
Refer to options to configure
your camera's settings.
$etti
s meH
Learn to configure
your camera's settings.
Accessing the settings
f
4_ Selectan
menu
item.
On the Home screen,scroll to <Basic>.
_! Select _.
,_ Selecta menu.
_)i:Select an option.
I11_)
Sound: Set various camera sounds and the volume. (p. 123)
Display: Customize the display settings. (p. 123)
Connectivity:
Z
Set the connection
options. (p. 124)
General: Change the settings for the camera system such as
memory format and default file name. (p. 125)
_ Press[MENU] to return to the previous screen.
Settings 122
* Default
* Default
Volume
Set the volume of all sounds. (Off, Low, Medium*; High)
Set a start image to display when the camera turns on.
• Off*: Display no start image.
Beep Sound
Set the sound the camera emits when you press the buttons or
switch modes on or off. (Off, On*)
ShUttei
Sound
Set the SOund the Came[a emits when you Press [he Shutter
button. (Off, Sound 1"; Sound 2, Sound 3)
Start Sound
Set the sound the camera emits when you turn on your camera.
(Off*, Star Right, Laser Show, Cloud)
A F s°una
• Logo: Displaya default image stored in the internal memory.
Start Image
• User Image: Select User Image from the photos you captured
in the memory,
_
• The camera will saveonly one User Image in the JnternaJ
memory at a time,
. If you select a new photo asa User Image or reset your
camera the camera will delete the current image.
Set the SOund the Camera emits when you half-press the Shutter
button on or off. (Off, One)
Wallpapers
Guide Line
Set wallpaper for the Home screen with the desired image.
(Wall paper Gallery, Album)
Select a guide to help you compose a scene. _Off*, 3 X 3, 2 X 2.
Cross, Diagonal)
Settings
Date/Time
Set whether
Display
display. (Off*, On)
Help Guide
Display
_. ,
ulsplay a brief descri ption of an option or menu. (Off, On*)
123
or not to display the date and time on the camera's
*Default
* Default
Adjust the brightness of the screen. (Auto*, DarE, Normal,
Display
Brightness
Bright)
_
Set the video signal output for your region.
• NTSC: USA. Canada, Japan, Korea, Taiwan, Mexico etc
Normal is fixed in Playback mode even if you have selected
Auto.
Video Out
Set whether or not to review a Captured image before returning
• PAL (supports only BDGH I): Australia. Austria. Belgium, China.
DenmarK, England, Finland, France, Germany, Italy, Kuwait,
Malaysia, Netherlands. New Zealand, Norway, Singapore, Spain,
Sweden, Switzerland, Thailand, etc
i-Launcher
Set i-Launcher to launch automatically
camera to your computer. (Off. On*)
If you perform no operations for 30 seconds, the camera
automatically switches to Power save mode. (Off*, On)
Power Save
In Power savemode, press any button other than [(_)]to resume
using the camera.
Settings 124
when you connect your
* Default
* Default
Specify how to name files.
• Reset: Set the file number to start from 0001 when you
Information
your camera
Language
Set a language for the display text.
insert a new memory card, format a memory card, or
delete all files.
• Series*: Set the file number to resume from the previous
file number when you insert a new memory card, format a
the time zone for your location. When YOU trave! to
Time Zone
another country, select Visit, and then select the appropriate
time zone. (Home*; Visit)
Date/Time Set
Set the date and time.
Set a date format. (YYYY/MM/DD,
MM/DD/YYYY,
memory card, or delete all flies.
_j
File No.
• The default name of the first folder is 100PHOTOand the
default name of the first file is SAM 0001.
• The file number increases by one, from SAM 0001 to
SAM_9999, each time you capture a photo or record a
video.
• The folder number increases by one, from 100PHOTOto
999PHOTO.each time a folder is full.
• The maximum number of files that can be stored in one
folder is 9,999.
Set the time format. (12 Hr, 24 Hr)
Time Type
_
The default time type may differ depending on the
language selected.
• The camera defines file names according to the Deslgn
rule for Camera File system (DCF)standard. If you
intentionally change file names, the camera may not play
back the files,
Settings 125
* Default
Set whether
photos.
_4
Imprint
(Off*,
or not to display
Date.
the date and time
Set a light to automatically turn on in dark placesto he!p you
on captured
AE Lamp
Date & Time)
" The date and time will be displayed
corner of the photo.
. Some printer
properly.
* Default
on the bottom
Format
DIRECT LINK
(Wi-Fi Button)
Formatting
will delete
all files, including
files. (Yes, No)
Errors can occur if you use a memory card formatted by
another brand of camera, a memory card reader, or a
computer.
Please format
memory
before using them to capture
cards in the camera
photos.
Photo mode
turn off when you perform
no operations for a specified period.
(Off, 1 rain. 3 rain*, 5 rain. 10 rain)
Auto Power Off
the memory.
protected
. The ahoto will not display the date and time if:
Set the camera to automatically
(Off, On*)
Format
right
models may not print the date and time
- you select Text in Scene mode
- you select Live Panorama Motion
focus.
..
Keset
Open Source
Licenses
• Your settings will not change when you replace the
battery.
• The camera will not automatically turn offwhen the
camera is connected to a computer or WLAN, and when
you are playing a slide show or videos.
Start a preset Wi-Fi function by pressing ['_'].
tAutoShare*. MobileLink,
RemoteViewfinder.
Auto Backup, Ema& SNS & Cloud, AIIShare Play)
Settings 126
Reset menusand
shoot
an d video
settings
Showthe
output
Open
source
ng optons
Dateandt
me, anguage,
will not be reset. (Yes, No)
licenses
information.
Get information
about error messages, specifications,
and maintenance.
IIIF, o messages
When the following
error messages
appear,
• Turn offyour
Card Error
try these
remedies.
camera, and then turn it on again.
• Remove your memory card, and then insert it again.
• Format your memory card.
Card not supported.
File Error
The inserted memory card is not supported by your
camera. Insert a microSD microSDHC or microSDXC
Delete the damaged file or contact a service center.
File system not
:
supPorted"
memory card.
• The camera cannot connect to the network using the
Connection
failed.
selected access point. Select another AP and try again.
• The camera has failed to connect to the other devices.
Try connecting
again.
File names do not match the DCF standard. Transfer the
DCFFull Error
files from the memory card to your computer and format
the card.Then, open the Settings menu and select File
No. -_ Reset. tP. 125)
Appendixes
Your
the
the
camera does not support the FAT file structure of
.
inserted memory card. Format the memory card Qn
Camera.
The camera has failed to locate a device that supports
Initialization
failed.
,,
,,
.
vassworo incorrect
AIIShare Play.Turn on devices on the networkthat
support AIIShare Play.
The password for transferring
files to another camera is
wrong. Enter the €orrect password.
Low Battery
128
Insert a charged battery or recharge the battery.
Mem0[)/FUll
No Image File
Phototransferfailed.,
Delete unnecessary files or insert a Mew memory Card.
Capture photos or insert a memory card that contains
some photos.
Network Connect on d sconneCted Wh e transferr ng
J
_
: ::
_, _ _,
_
_ :
pno[os./ry res_arung _ne _ll_nare Hay [ea[ure.
• The camera has failed to send a photo to the other
Transfer failed.
camera.Try sending again.
• The camera has failed to send an email or transfer a
photo to a device that supports AIIShare Play. Check
the network connection
and try again.
Appendixes 129
Camera maiHteHaHce
C_eia_ing
your
cameiFa
Wipe gently with a soft, dry cloth.
Use a blower brush to remove dust and wipe the lens gently with a soft cloth. If any
dust remains, apply lens cleaning liquid to a piece of lens cleaning paper and wipe
gently.
i Never use benzene, ihinne[s, oi akoho] to Clean the deyjce:TheSe Soluti0ns ian
damage the camera or Cause it to malfunction_
, Do not press on the lens Cover or use a blower brush on the lens Cover.
Appendixes 130
k_<s_ _ _: __
_'iF_3_3F_i'_
Using o_ stodng
_
the camera
• When you store the camera for an extended period, place it in a sealed container
with an absorbent material, such as silica gel.
• Avoid exposing the camera to very cold or very hot temperatures.
• Over time, unused batteries will discharge and must be recharged before use.
° Avoid using your camera in areas with extremely high humidity, or where the
• You must reset the date and time when you turn the camera on after the camera
and battery have been separated for a prolonged period.
humidity
changes drastically.
• Avoid exposing the camera to direct sunlight and storing it in hot, poorlyventilated areas, such as in a car during summer time.
• Protect your camera and the display from impact, rough handling, and excessive
When you transfer the camera from a cold environment to a warm one,
condensation can form on the lens or internal components of the camera. In this
situation, turn offthe camera and wait for at least ] hour. If condensation forms
vibration to avoid serious damage.
• Avoid using or storing your camera in dusty, dirty, humid, or poorly-ventilated
areas to prevent damage to moving parts and internal components.
° Do not use your camera near fuels, combustibles,
or flammable
on the memory card, remove the memory card from the camera and wait until all
chemicals. Do
moisture
not store or carry flammable liquids, gases, or explosive materials in the same
compartment as the camera or its accessories.
has evaporated
before reinserting
it.
° Do not store the camera where there are mothballs.
• Do not swing your camera by the strap. This may cause injury to yourself or others
or damage to your camera.
° Protect your camera from sand and dirt when you use it on beaches or in similar
areas.
• Your camera is not waterproof. Do not handle the battery, adapter, or memory
card with wet hands. Operating the camera with wet hands may cause damage to
• Do not paint your camera, as paint can clog moving parts and prevent proper
operation.
• Turn offthe
your camera.
Appendixes131
camera when not using it.
• Your camera contains delicate parts. Avoid impacts to the camera.
• Paint or metal on the outside of the camera may cause allergies, itchy skin,
eczema, or swelling for people with sensitive skin. If you experience any of these
symptoms, stop using the camera immediately and consult a doctor.
• Protect the display from external force by keeping it in the case when not in
use. Protect the camera from scratches by keeping it away from sand, sharp
implements, or loose change.
• Do not use the camera if the screen is cracked or broken. Broken glass or acrylic
could cause injury to your hands and face. Take the camera to a Samsung service
center to have it repaired.
• Do not insert foreign objects into any of your camera's compartments, slots, or
access points. Damage due to improper use may not be covered by your warranty.
• Do not allow unqualified personnel to service the camera or attempt to service
the camera yourself. Any damage that results from unqualified service is not
covered by you r warranty.
• Never place cameras, batteries, chargers, or accessories near, on, or in heating
devices, such as microwave ovens, stoves, or radiators. These devices may be
deformed and can overheat and cause a fire or explosion.
• Do not expose the lens to direct sunlight, as this may discolor the image sensor or
cause it to malfunction.
• Protect the lens from fingerprints
debris-free lens cloth.
About
memory
cards
and scratches. Clean the lens with a soft, clean,
• The camera may turn off if struck or dropped. This is to protect the memory card.
Turn on the camera to use it again.
Your camera supports microSD (Secure Digital), microSDHC (Secure Digital High
Capacity), or microSDXC (Secure Digital eXtended
Capacity) memory cards.
• While you use the camera, it may heat up. This is normal and should not affect
your camera's lifespan or performance.
• When you use the camera in low temperatures, it may take some time to turn on,
the color of the display may be changed temporarily, or after-images may appear.
These conditions are not malfunctions and they will correct themselves when the
camera is returned to milder temperatures.
To read data with a PC or memory card reader, insert the memory card into a
memory card adapter.
Appendixes132
L<_
_ _: __
_Tii_]_]i_i']
_
Video
The memory capacity may differ depending on the scenes you shoot or shooting
conditions.These capacities are based on a 2 GB microSD card:
Photo
_l_R
640 X 480
|_M
218
430
637
I_MP
244
481
711
|_m
340
666
979
Approx. 46' 55"
i
I_!_GFI
320 X 240
2qB
Appr0x126ii
ii.
Approx. 261' 11"
For Sharing
• The figures above are measured without
• Available
_M
1000
1887
2678
|M
2495
4336
5750
• Several videos were recorded
Appendixes
133
using the zoom function,
recording time may vary if you use the zoom.
in succession to determine
the total recording time,
k_<_
_ _: __
_'i_i'_
_
• Prevent memory cards from making contact with liquids, dirt, or foreign
• Avoid exposing memory cards to very cold or very hot temperatures (below
0 °C/32 °F or above 40 °C/104 °F). Extreme temperatures can cause memory cards
to malfunction.
• Insert a memory card in the correct direction. Inserting a memory card in the
wrong direction may damage your camera and memory card.
• Do not use memory cards that have been formatted
by other cameras or by a
substances. If dirty, wipe the memory card clean with a soft cloth before you
insert the memory card into your camera.
• Do not allow liquids, dirt, or foreign substances to come in contact with memory
cards or the memory card slot. Doing so may cause memory cards or the camera
to malfunction.
• When you carry a memory card, use a case to protect the card from electrostatic
discharges.
computer. Reformat the memory card with your camera.
• Turn off the camera before you insert or remove the memory card.
• Transfer important
• Do not remove the memory card or turn offyour
• When you use the camera for an extended period, the memory card may become
warm.This is normal and does not indicate a malfunction.
camera while the lamp is
blinking, as this may damage your data.
zzzzzzzzzzzzzzzzzzzzzzzzz
• When the lifespan of a memory card has expired, you cannot store any more
photos on the card. Use a new memory card.
• Do not bend, drop, or subject memory cards to heavy impact or pressure.
• Avoid using or storing memory cards near strong magnetic fields.
• Avoid using or keeping memory cards in areas with high temperatures,
data to other media, such as a hard disk, CD, or DVD.
high
humidity, or corrosive substances.
Appendixes 134
z
z
zz
k_<_
_ _: _c_ _T'i;_3T_3;_i'_
About
_
the battery
Use only %msung-approved
batteries.
The battery life was measu red under the
following conditions: in Program mode, in
Model
darkness, |GM resolution, Fine quality, OIS on.
BP70A
Type
Lithium-ion
Voltage
3.7 V
battery
Photos
appr0x!ma_e!y
* Charging the battery
by connecting
it to a computer
Approximately
I. Set the flash option to Fill in, take a single shot,
and zoom in or out.
120 min/
Approximately
2. Set the flash option to Off, take a single shot,
and zoom in or out.
240 photos
3. Perform steps I and 2, waiting 30 seconds
! bu mm
between each step. Repeat the process for
5 minutes, and then turn offthe camera for
I minute.
may take longer.
4. Repeat steps I to 3.
Videos
Approximately
1O0 mm
Record videos at Hi] resolution and 30 FPS.
• The figures above are measured
by Samsung's standards. Your results may differ, depending
on your actual usage,
• Several videos were recorded
• When using network
Appendixes 135
functions,
in succession to determine
the total recording time,
the battery will be depleted
more quickly.
k_<_
_ _ __
_'i_i'_
_
Protect batteries, chargers,and memory cardsfrom damage
Prevent batteries from making contact with metal objects, asthis can createa
connection between the + and - terminals of your battery and lead to temporary or
permanent battery damage and may causea fire or electric shock.
When the battery has fully discharged, the battery icon will turn red and the
"Low Battery" message will appear.
• Avoid exposing batteries to very cold or very hot temperatures (below 0 °C/32°F
or above 40 °C/104°F). Extremetemperatures can reduce the charging capacity of
you r batteries.
• When you usethe camera for an extended period, the area around the battery
chamber may become warm. This does not affect the normal use of the camera.
• Do not pull the power supply cord to disconnect the plug from the power outlet,
asthis may causeafire or electric shock.
• In temperatures below 0 °C/32 °F,battery capacity and battery life may decrease.
• Battery capacity may decrease in Iowtemperatures, but will return to normal in
milder temperatures.
• Removethe batteries from your camera when storing it for an extended period.
Installed batteries may leakor corrode over time and causeserious damage
to your camera. Storing the camera for extended periods with the battery
installed causesthe battery to discharge.You may not be able to recharge a fully
discharged battery.
• When you do not usethe camera for an extended period (3 months or more),
checkthe battery and recharge it regularly. Ifyou let the battery discharge
continually, its capacity and life may decrease,which can lead to a malfunction,
fire, or explosion.
• Ifthe status lamp is off, make surethat the battery is inserted correctly.
° Ifthe camera is on while charging, the battery may not fully charge.Turn offthe
camera before charging the battery.
° Do not useyour camera when you are charging the battery. This may causea fire
or electric shock.
° Do not pull the power supply cord to disconnect the plug from the power outlet,
asthis may causea fire or electric shock.
° Let the battery charge for at least 10 minutes before turning on the camera.
° Ifyou connect the camera to an external power source when the battery is
depleted, using high energy-consuming functions will causethe camera to turn
off. To usethe camera normally, rechargethe battery.
Appendixes136
k_<_
_ _: __
_'i_i'_
_
• If you reconnect the power cable when the battery is fully charged, the status
lamp turns on for approximately
30 minutes.
• Never dispose of batteries in a fire. Follow all local regulations when you dispose
of used batteries.
• Using the flash or recording videos depletes the battery quickly. Charge the
battery until the red status lamp turns off.
• Never place batteries or cameras on or in heating devices, such as microwave
• If the status lamp blinks in red, reconnect the cable, or remove the battery and
ovens, stoves, or radiators. Batteries may explode when they are overheated.
insert it again.
• If you charge the battery when the cable is overheated or the temperature is too
high, the status lamp may blink in red. Charging will start when the battery cools
down.
• Overcharging
batteries may shorten battery life. After charging is finished,
disconnect the cable from your camera.
• Do not bend or place heaw objects on the AC cable. Doing so may damage the
cable.
• Use only the provided
USBcable.
• The battery may not charge when:
- you usea USB hub
- other USB devices are connected to your computer
- you connect the cable to the port on the front side of your computer
- the USB port of your computer does not support the power output standard
(5 V, 500 mA)
Appendixes 137
k_<_
_ _:___
L_.
_Ti_i'_
_
Persona[injury or death can occurif the battery ishandled
carelesslyor improperly. For your safety,follow these instructions
for proper battery handling:
- The battery can igniteor explode if not handled properly.
If you notice any deformities, cracks,or other abnormalities in the
battery, immediately discontinue use of the battery and contact a
servicecenter.
-Do
not disassemblethe battery or PUnCtureit with any sharp obJecL
Avoid exPosing the batte[y tO high pressu[e Orcrushing forcesi
i Avoid expos bg the battery to major impacts, such asdropping it from
high place£
Do not expose the battery t0 temperatures 0f60 °c(140 %) o[ above.
°DobO t a!!ow the batte[_ to come in contact with moistu[e Or!iquid s.
o Useonly authentic, manufacturer-recommend battery chargers and
adapters and charge the batteryonly by the methods described in this
user manual.
• Do not placethe battery near heating devices or expose itto
excessivelywarm environments, such asthe inside of an enclosed car
n the summertime.
DisPoseof the battery wit hcare:
• Do not dispose of the battery in a fire.
i Disposal regulations may differ by country or regionlDispose ofthe
battery in accordanceWith a!!loca! and federal regu!ationsl
. Do not place the battery in a microwave oven.
. Avoid storing or using the battery in hot, humid places,such asspasor
shower enclosures.
° Do not rest the camera on flammable surfaces,such as bedding.
carpets,or electric blankets for a prolonged period.
. When the camera is switched on, do not leave it in any confined space
fora prolonged period.
• Do not allow battery terminals to come in contact with metallic
objects, such as necklaces,coins, keys,or watches.
. Useonly authentic, _anufacturer-recommended, Lithium-ion
replacement batteries.
Gu!de,nesfor
charging
thebattery
Charge the battery on!y by the methods described inthis user manuaL
The
battery can igniteor explode if not charged properly.
Appendixes138
Before coHtacti
a service ceHter
If you are having trouble with your camera, try these troubleshooting
procedures before you contact a service center. If you have attempted
having problems with your device, contact your local dealer or service center.
the suggested remedy and are still
When You leave Your _ameraat a ServiceCenter, be Sureto a!s0 leave the oth er €0mp0nents that maY have Contributed to the malfunction, such asthe memory card and battery.
Cannot turn on the camera
The power turns off suddenly
The camera is losing battery
power quickly
- Ensurethat the battery is inserted,
• Ensurethatthe battery is inserted correctly.
tp. 231
• Chargethe battery.
• There is no space on the memory card. Delete
unnecessary files or insert a new card.
• Format the memory card.
Cannot capture photos
• Chargethe battery.
• Your camera may be in Auto PowerOff mode.
tp. 126)
. The camera may turn off to prevent the
memory card from being damaged due to an
Jmpact.Turn on your camera again.
• The battery may lose power more quickly in
low temperatures Ibelow 0 °C/32 °F).Keepthe
battery warm by putting it into your pocket.
- Usingthe flash or recording videos depletes the
battery quickly. Rechargeif needed.
Batteriesare consumable parts that must be
replaced over time. Get a new battery if the
battery life is diminishing quickly.
• The memory card is defective. Get a new
memory card.
• Make sure that the camera is switched on.
° Chargethe
battery.
• Make sure that the battery is inserted correctly.
The camera freezes
Remove the battery and insert it again.
While you usethe camera, it may heat up.This
The camera heats up
The flash does not work
The flash fires unexpectedly
Appendixes 139
s normal and should not affect your camera's
ifespan or performance.
- The flash option may be set to Off. (p. 61)
• You cannot usethe flash in some modes,
The flash may fi re due to static electricity. The
camera is not malfunctioning.
Thedateandtimeare
Set
thedateandtimeinthedisplay
settings.
incorrect
/P.125)
Thedisplay
orbuttons
donot Remove
thebattery,
andtheninsert
itagain.
work
Ifyouuseyourcamera
atverylowtemperatures,
itmay
c
ause
the
camera
screen
tomalfunction
Thecamera
display
responds
ordiscolor.
For
b
etter
performance
ofyour
poorly
camera
screen
useyourcamera
inmoderate
temperatures.
• Turn
offyourcamera,
andthenturnitonagain.
. Remove
yourmemory
card,
andtheninsert
it
again.
Thememory
card
hasanerror . Format your memory card.
• Make sure that the focus option you set is
suitable for close-up shots. (p. 64)
The photo is blurry
. Make sure that the subject is within range of
the flash. (p. 143)
_.,,
:
i
i
|he co ors n the pnoto ao not
: :
mat ch the actua scene
An inc0rrect White Balance can Create unrealistic
color. Select the proper White Balance oplon to
Suit the light source. (p: 71)
Your photo is overexposed.
The photo is too bright
• Turn offthe
flash. (p. 61)
• Adjust the ISO sensitivity. (p. 63)
• Adjust the exposure value. (p. 69)
See "Cautions when using memory cards"for
Youi photo is undeiexPoSed.
more detail, tP. 134)
Cannot
playback
files
• Make sure that the lens is clean. If not, clean the
lens. (p. 130)
If you change the name of a file, your camera may
not play the file (the name of the file should meet
.._ ?
_
/he pno1:o sI:oo aarK
the DCF standard). If you encounter this situation,
play back the files on your computer.
Appendixes 140
Tuin on theflash:
(P16!)
t Adjust the Iso sensitivity. (p. 63)
, Adjust the exposure value. (p169)
TheTVdoes
notdisplay
your
photos
• Make sure that the camera is correctly
connected to theTV with the A V cable.
• End i-Launcher and restart the program.
• Make sure that i-Launcher is set to On in the
. Make sure that your memory card contains
settings menu. (p. 124)
photos.
• Depending
Your
computer
does
not
recognize
yourcamera
correctly.
operating
Your computer disconnects
the camera while transferring
files
i-Launcher is not functioning
• Make sure that your camera is switched on,
o Make surethat
properly
The file transmission may be interrupted by static
electricity. Disconnect the USBcable and connect
i-Launcher.)
programs. To play video files captured with your
camera, use the Multimedia Viewer program that
your computer.
In this case, click Start
_ Samsung _ i-Launcher --_
Or, click Applications
Samsung -_ FLauncher
computer.
it agai n.
you can install with the i-Launcher program on
automatically.
All Programs
specifications
the program may not launch
Samsung i-Launcher on your Windows
computer. (For Windows 8, open Start screen,
and then select All apps _ Samsung
you are using a supported
system.
Videos may not play on some video player
Your computer cannot play
videos
on your computer's
and environment,
- Make sure that the USB cable is connected
on your Mac OS
YoUrTV or computer
microSDXC memory Caids use the e×FATfile
canno t display photos and
videos that are stored on a
system. Ensure that the external device is
Compat b e w th the exFAT file System before
m!crosDxc
connecting
mem0ry card.
the camera to the device.
microSDXC memory cards use the exFAT file
Your computer does not
recognize a microSDXC
system.To use microSDXC memory cards on a
Windows XP computer, download and update
memory card.
the exFAT file system driver from the Microsoft
website.
Appendixes141
Camera
sped catieHs
Type
1/2.3" (Approximately
Effective pixels
Approximately
7.73 mm) CCD
Normal (AF)
162 mega-pixels
Total pixels
Approximately
Focal length
Samsung Lens f = 4.3-43.0 mm
(35 mm film equivalent: 24-240 mm)
F-stop range
F3i (W)-F6.3(T)
Range
16.6 mega-pixels
Zoom
(Optical zoom X Digital zoom: 50.0X,
Optical zoom X Intelli zoom: 20.0X)
• Playback mode: 1.0-14.4X (depending
Type
TFTLCD
Feature
3.0" (75.0mm) 230K
Type
• Program:
on image size)
TTL auto focus (Center AF, Multi AF,Tracking AF,
Face Detection AF), Video continuous auto focus
1-1/2,000
• Night: 16-1/2,000
• Fireworks: 2 sec.
Tele (T)
98 in. (250 cm)infinity
51-98 in.
(130-250cm)
infinity
Macro
2-31 in. (5-80 cm)
Auto Macro
2 in. (5 cm) -infinity
• Smart Auto: 1/8-1/2,000
• Still image mode: 1.0-10.0X
Wide (W)
31 in. (80 cm)-
51 in. (130 cm)infinity
sec.
sec.
sec.
Control
Program AE
Metering
Multi, Spot, Center-weig hted, Face Detection
Compensation
_+2EV(1/3 EVStep)
ISO equivalent
Auto, ISO 80, ISO 100, ISO 200, ISO 400, ISO 800, ISO 1600,
ISO 3200
Appendixes142
Mode
Auto, Red-eye, Fill in, Slow Sync, Off, Red-eye Fix
Range
• Wide: 7.87-129.92 in. (0.2-3.3 m) (ISO Auto)
. Tele: 19.69-62.99 in. (0.5-1.6 m) (ISO Auto)
Recharging time
Approximately4
Optical Image Stabilization
Modes: Smart Auto (Portrait, Night Portrait, Backlight
Portrait, Night, Backlight, Landscape, White, Natural Green,
Blue Sky, Sunset, Macro, Macro text, Macro Color, Tripod,
Action, Fireworks, Candle, Spotlight, Spotlight (Macro),
sec.
Spotlight (Portrait)), Program, Scene (Landscape, Sunset,
Dawn, Backlight, Beach & Snow, Text), Live Panorama,
Photos
Beauty Shot, Night Shot, Close-up Shot, Magic Frame,
Photo Filter, Split Shot, Motion Photo
(OIS)
Burst: Single, Continuous, Motion Capture, AEB
• Photo Filter (Smart Filter): Miniature, Vignetting,
Photo Shooting
mode
Timer: Off, 10 Sec, 2 Sec, Double (10 Sec, 2 Sec)
Ink Painting,
Oil Painting, Cartoon, Cross Filter, Sketch, Soft Focus, Fish-eye,
Old Film, HalfTone Dot, Classic, Retro, Zooming Shot
o
. Image Adjust: Sharpness, Contrast, Saturation
Video Shooting
mode
Modes: Smart Scene Detection (Landscape, Blue Sky,
Natural Green, Sunset), Movie Filter
Format: MP4 (H.264) (Max recording time: 20 min)
Movie Filter (Smart Filter): Miniature, Vignetting, HalfTone Dot,
Sketch, Fish-eye, Classic, Retro, Palette Effect 1, Palette Effect 2,
Palette Effect 3, Palette Effect 4
Videos
Size: 1280 X 720, 640 X 480, 320 X 240, 240 Web
Frame Rate: 30 fps
Sound Alive: Sound Alive On, Sound Alive Off, Mute
Video editing (embedded):
Auto WB, Daylight, Cloudy, Fluorescent_H, Fluorescent_L, Tungsten, Custom Set
Date &Time, Date, Off
Appendixes 143
Timer: Off, 10 Sec
Pause during recording
i iii_ii
_i_!_i_:_ii_ii_ii_ii_ii_ii_ii_ii_ii_ii_ii_ii_ii_ii_ii_ii_ii_ii_ii_ii_ii_ii_ii_ii_ii_ii_ii_ii_ii_ii_ii_ii_ii_ii_iii_ii_iiii_i_i_i_i!i_i
i!!!!ii_ii!!!i_!ii
iliiiill
i_iiiiiiiiiiiiiiiiiiiiiiiiiiiiiiiiiiiiiiiiiiiiiiii!i!i_i!i!
iiiiiii
iiiiiiiiiiiiiiiiiiiiiiiiiiiiiiiiiiiiiiiiiiiiiiiiiiiiiiiiiiiiiiiiiiiiiiiiiii
iiiiiii_
iiiii
_¸¸'¸¸'
....
__________________________________________________________________
___
_________________________________________________________
• Still Image: JPEG (DCF), EXIF2.21, GIF
File format
• Type: Single image, Thumbnails,
and Effect
• Movie Clip: MP4 (Video: MPEG-4.AVC/H.264, Audio: AAC)
Multi Slide Show with Music
Icon
Size
|[_M
4608 X 3456
|q_
4608 X 3072
12_
4608 X 2592
IBM
3648 X 2736
Su
2592 X 1944
3M
1984 X 1488
2Mw
1920 X 1080
IM
1024 X 768
• Edit: Resize, Rotate, Smart Filter, Crop
Photos
° Effect: Brightness, Contrast, Saturation, ACB, Face Retouch,
Red-eye Fix, Smart Filter (Normal, Miniature, Vignetting,
Ink Painting, Oil Painting, Cartoon, Cross Filter, Sketch,
Soft Focus, Fish-eye, Old Film, HalfTone Dot, Classic, Retro,
Zooming
Videos
Image size
Shot)
Edit: Still image capture, Time trimming
• Internal memory: Approximately
9.5 MB
• External memory (Optional):
Media
microSD card (2 GB guaranteed),
microSDHC card (up to 32 GB guaranteed),
microSDXC card (up to 64 GB guaranteed)
Internal memory capacity may not match these specifications.
Appendixes144
MobileLink,
Remote Viewfinder, Auto Backup, Email, SNS & Cloud, AIIShare Play,
3.86 X 2.28 X 0.65 in. (98.0 X 57.9 X 16.5 mm) (without
protrusions)
AutoShare, Wi-Fi Direct, S/W Upgrade Notifier
4.62 oz (131 g) (without
Digital output
connector
Audio input/
output
battery and memory card)
USB 2.0
0-40 °C (32-104 °F)
Internal speaker(Mono), Microphone (Mono)
Video output
A/V: NTSC,PAL(selectable)
DC power input
connector
5.0V
5-85 %
i-Launcher
Specifications may change without notice to improve performance.
Rechargeable
battery
Lithium-ion
battery (BPTOA, 700 mAh)
Connector type
Micro USB(5 pin)
The power source may differ depending
on your region.
Appendixes 145
ACB
(AutoContrast
Balance)
This feature automatically
Composition
backlit or when there is a high contrast between your subject and the background.
Composition in photography means arranging objects in a photo. Usually, abiding
by the rule of thirds leads to a good composition.
AEB (Auto Exposure Bracket)
DCF (Design rule for Camera File system)
This feature automatically
improves the contrast of your images when the subject is
captures several images at different exposures to help
you capture a properly-exposed
image.
A specification
to define a file format and file system for digital cameras created by
the Japan Electronics and Information Technology
Industries Association (JEITA).
AF (Auto Focus)
Depth of field
A system that automatically focuses the camera lens on the subject. Your camera
uses the contrast to focus automatically.
The distance between the nearest and farthest points that can be acceptably
focused in a photograph. Depth of field varies with lens aperture, focal length, and
Aperture
distance from the camera to the subject. Selecting a smaller aperture, for example,
will increase the depth of field and blur the background of a composition.
The aperture controls the amount of light that reaches the camera's sensor.
Digital zoom
Camera shake (Blur)
A feature that artificially
If the camera is moved while the shutter is open, the entire image may appear
blurred.This occurs more often when the shutter speed is slow. Prevent camera
(Optical zoom). When using the Digital zoom, the image quality will deteriorate
the magnification increases.
shake by raising the sensitivity, using the flash, or using a faster shutter speed.
Alternately, use a tripod, the DIS or OIS function to stabilize the camera.
Appendixes 146
increases the amount of zoom available with a zoom lens
as
EV (Exposure
Flash
Value)
All the combinations
of the camera's shutter speed and lens aperture that result in
A speed light that helps to create adequate exposure in low-light conditions.
the same exposure.
EV Compensation
This feature allowsyou to quickly adjust the exposure value measured by the
camera, in limited increments,to improve the exposure of your photos. Setthe EV
compensation to -1.0 EVto adjust the value one step darker and 1.0 EVto one step
brighter.
Exif (Exchangeable
Focal length
The distance from the middle of the lensto its focal point (in millimeters). Longer
focal lengths result in narrower anglesof view and the subject is magnified. Shorter
focal lengths result in wider anglesof view.
H,264/MPEG-4
A high-compression video format established by international standard
organizations ISO-IECand ITU-Tand developed by the Joint VideoTeam (JVT).This
codec is capable of providing good video quality at low bit rates.
image File Format)
A specification to define an image file format for digital cameras created by the
Japan Electronic Industries Development Association (JEIDA).
image
Exposure
The amount of light allowed to reachthe camera'ssensor.Exposureis controlled by
a combination of the shutter speed, the aperture value,and ISOsensitivity.
sensor
The physical part of a digital camera that contains a photosite for each pixel in
the image. Each photosite records the brightness of the light that strikes it during
an exposure. Common sensor types are CCD (Charge-coupled
(Complementary Metal Oxide Semiconductor).
Appendixes 147
Device) and CMOS
ISO sensitivity
Metering
The sensitivity of the camera to light, based on the equivalent
film speed used in
The metering
refers to the way in which the camera measures the quantity
a film camera. At higher ISO sensitivity settings, the camera uses a higher shutter
speed, which can reduce blur caused by camera shake and low light. However,
to set the exposure.
images with high sensitivity are more susceptible to noise.
MJPEG (Motion JPEG)
of light
A video format which is compressed as a JPEG image.
JPEG (Joint Photographic
Experts Group)
A Iossy method of compression for digital images. JPEG images are compressed to
reduce their overall file size with minimal deterioration of the image resolution.
Noise
Misinterpreted
pixels in a digital image that may appear as misplaced or random,
bright pixels. Noise usually occurs when photos are shot with a high sensitivity or
LCD (Liquid Crystal Display)
when a sensitivity is automatically
A visual display commonly used in consumer electronics.This display needs a
separate backlight, such as CCFL or LED,to reproduce colors.
OIS (Optical Image Stabilization)
This feature compensates
set in a dark place.
in real-time for shaking and vibrating while shooting.
Macro
There is no image degradation
This feature allows you to capture close-up photos of very small objects. When
using the macro feature, the camera can maintain a sharp focus on small objects at
a near life-size ratio (1:1).
Optical
compared to Digital Image Stabilization
feature.
zoom
This is a general zoom which can enlarge images with a lens and does not degrade
the quality of images.
Appendixes 148
White balance (color balance)
Quality
An expression of the rate of compression
used in a digital image. Higher quality
images have a lower rate of compression, which usually results in a larger file size.
An adjustment of the intensities of colors(typically the primary colorsred,green,
and blue), in an image. The goal of adjusting the white balance,or colorbalance,is
to correctlyrender the colorsin an image.
Resolution
The number of pixels present in a digital image. High resolution images contain
more pixels and typically show more detail than low resolution images.
Shutter speed
Shutter speed refersto the amount of time it takes to open and closethe shutter,
and it is an important factor inthe brightness of a photo, asit controlsthe amount
of light which passesthrough the aperture before it reachesthe image sensor.A
fast shutter speed allows lesstime to let light in and the photo becomesdarker and
more easily freezessubjects in motion.
Vignetting
A reduction
of an image's brightness or saturation at the periphery (outer edges)
compared to the center of the image. Vignetting
positioned in the center of an image.
can draw interest to subjects
Appendixes 149
Correct disposal
Waste Electrical & Electronic Equipment)
_
(Applicable
of batteries in this product
in countries with separate collection
systems)
orrect Disposal
of Thiswith
Product
(Applicable
in countries
separate collection systems)
This marking on the product, accessories or literature indicates that the product and
its electronic accessories (e.g. charger, headset, USB cable) should not be disposed
of with other household waste at the end of their working life. To prevent possible
harm to the environment or human health from uncontrolled waste disposal, please
separate these items from other types of waste and recycle them responsibly to
promote the sustainable reuse of material resources.
This marking on the battery, manual or packaging indicates that the batteries in
this product should not be disposed of with other household waste at the end of
their working life. Where marked, the chemical symbols Hg, Cd or Pb indicate that
the battery contains mercury, cadmium or lead above the reference levels in EC
Directive 2006/66. If batteries are not properly disposed of, these substances can
cause harm to human health or the environment.
To protect natural resources and to promote material reuse, please separate
Household
users should contact either the retailer where they purchased this
product, or their local government office, for details of where and how they can take
these items for environmentally safe recycling.
batteries from other types of waste and recycle them th rough your local, free
battery return system.
Business users should contact their supplier and check the terms and conditions
of the purchase contract.This
mixed with other commercial
product and its electronic
wastes for disposal.
accessories should not be
PlanetFirst represents samsung Electronics' Commitment
Sustainable deve!0pment and social responsibility
driven business and management activities.
to
through ec0_
oHs
Appendixes 150
A
AF-assist light
Location 20
Battery
Caution
136
Settings 126
Charging
24
AF Sound 123
Inserting
23
A[IShare Play 117
Auto Backup 11o
Auto Contrast Balance (ACB)
Playback mode 90
Shooting mode 70
Auto Exposure Bracket (AEB) 73
AutoShare lO6
A!V port 2o
Beauty Shot mode
Blink Detection
50
68
Brightness
Playback mode 90
Shooting
mode 59
Burst modes
D
CAF (Continuous AF) 46
Date/Time Set 125
Camera maintenance 130
Deleting files 82
Camera spedfications 142
Digital zoom 37
Capturing an image from video 87
DIRECTLiNK button 22
Charging 24
Disconnecting the camera 93
Cleaning
Camera body 130
Display 130
Lens 130
Display brightness 124
Display type 34
E
Auto Exposure Bracket (AEB) 73
Continuous 73
Motion Capture
C
73
Close-up Shot mode 51
Connecting to your Mac
computer 94
Contrast
Playbackmode 90
Shooting mode 74
Editing photos 88
Editing videos
Capturing 87
Trimming 87
Enlarging 83
Error messages 128
Exposure 69
Appendixes 151
dex
H
imprint 126
FaceDetection 67
Ha[fopressshutter 40
[nte[[i zoom 38
Flash
Auto 61
Fill in 62
Home screen 28
ISO sensitivity 63
Off
61
Red-eye 62
Red-eyeFix 62
Slow Sync 62
Focus area
Center AF 65
Multi AF 65
Tracking AF 65
Formatting 126
G
GuideLine 123
[cons
Playbackmode 79
Shooting mode 27
image Adjustment
ACB 90
Brightness
Playback mode 90
Shooting mode 69
Contrast
Playback mode 90
Shooting mode 74
Red-eye 91
Satu ration
Playback mode 90
Shooting mode 74
Center-weighted 70
Multi 70
Spot 70
MobileLink lo7
L
Motion Capture 73
Language settings 125
Motion Photo mode 55
Live Panorama mode 48
Movie Filter mode 53
Movie mode 46
M
H
Macro
Auto Macro 65
Macro 65
Night Shot mode 51
Magic Frame mode 52
O
Memory card
Caution 134
Insert 23
Optical Image Stabilization (OIS) S9
Menu button 21
Sharpness 74
Metering
Appendixes152
Optional accessories 19
<iex
P
Photo
Filtermode52
Playback
button21
Playback
mode79
Power
button2o
Power
save
mode124
Program
mode44
Protecting
files82
Remote
Viewfinder
108
Reset
125
Resolution
Playback
mode
88
Shooting
mode
58
Retouching
faces
Playback
mode
91
Shooting
mode50
Rotating
88
$
Quick
view124
R
Red-eye
Playback
mode
91
Shooting
mode
61
Saturation
Playbackmode 90
Shooting mode 74
Sharpness 74
Start Image 123
Shooting portraits
Blink Detection 68
FaceDetection 67
Smile Shot 67
Status lamp 21
Shutter button 20
Slide show 85
Smart Auto mode 43
Smart Filter
Photo shooting mode 52
Playback mode 89
Video recording mode 53
Smart Movie mode 45
Smile Shot 57
Scene mode 47
Service center _39
Sound settings 35
Split Shot mode 54
Settings 125
T
Thumbnails 8o
Timer
Shooting mode 60
Timer lamp 20
Time settings 25
Time zone settings 25,125
Tracking AF 66
Transferring files
Auto Backup 110
Email 112
Mac 94
Windows 93
Tripod mount 20
Appendixes153
dex
U
W
Unpacking 19
Website
USBport 2o
Accessing
115
Uploading
photos or videos 115
Write
V
Wireless network
Video
Playback mode s6
Shooting mode 40
Zoom
files
Animated
photos
Category
81
Panoramic photos
Slide show 85
Thumbnails
lO2
Z
Video out 124
Viewing
Balance 71
85
Using the zoom 37
Zoom button 21
Zoom sound settings 75
84
80
TV 92
Appendixes 154
Please
refertothewarranty
thatcame
withyourproduct
or
visitourwebsite,
www.samsung.com,
forafter-sales
service
orinquiries.
[c_o6z8]