1
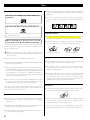
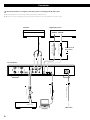
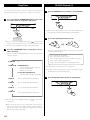
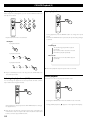
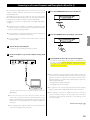
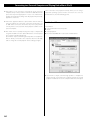
D01102420A
RZ-1
Integrated Music System
OWNER’S MANUAL..................... 4
MODE D’EMPLOI....................... 28
MANUAL DEL USUARIO............ 52
IMPORTANT SAFETY INSTRUCTIONS
CAUTION: TO REDUCE THE RISK OF ELECTRIC SHOCK, DO NOT
REMOVE COVER (OR BACK). NO USER-SERVICEABLE PARTS
INSIDE. REFER SERVICING TO QUALIFIED SERVICE PERSONNEL.
The lightning flash with arrowhead symbol, within an
equilateral triangle, is intended to alert the user to the
presence of uninsulated “dangerous voltage” within the
product’s enclosure that may be of sufficient magnitude
to constitute a risk of electric shock to persons.
The exclamation point within an equilateral triangle is
intended to alert the user to the presence of important
operating and maintenance (servicing) instructions in the
literature accompanying the appliance.
1) Read these instructions.
2) Keep these instructions.
3) Heed all warnings.
4) Follow all instructions.
5) Do not use this apparatus near water.
6) Clean only with dry cloth.
7) Do not block any ventilation openings. Install in accordance with
the manufacturer’s instructions.
8) Do not install near any heat sources such as radiators, heat
registers, stoves, or other apparatus (including amplifiers) that
produce heat.
9) Do not defeat the safety purpose of the polarized or groundingtype plug. A polarized plug has two blades with one wider than
the other. A grounding type plug has two blades and a third
grounding prong. The wide blade or the third prong are provided
for your safety. If the provided plug does not fit into your outlet,
consult an electrician for replacement of the obsolete outlet.
10)Protect the power cord from being walked on or pinched
particularly at plugs, convenience receptacles, and the point
where they exit from the apparatus.
11) Only use attachments/accessories specified by the manufacturer.
12)Use only with the cart, stand, tripod, bracket, or
table specified by the manufacturer, or sold with
the apparatus. When a cart is used, use caution
when moving the cart/apparatus combination to
avoid injury from tip-over.
13)Unplug this apparatus during lightning storms or when unused
for long periods of time.
14)Refer all servicing to qualified service personnel. Servicing is
required when the apparatus has been damaged in any way, such
as power-supply cord or plug is damaged, liquid has been spilled
or objects have fallen into the apparatus, the apparatus has been
exposed to rain or moisture, does not operate normally, or has
been dropped.
China RoHS
< The information in the following table is only applicable to products for sale in the People’s Republic of China.
< The products sold in the European area are manufactured in accordance with the European RoHS Directive.
<Les informations contenues dans le tableau suivant sont applicables uniquement aux produits en vente en République populaire de
Chine.
< Les produits vendus en Europe sont fabriqués conformément avec la directive européenne RoHS.
< La información de la siguiente tabla se aplica únicamente a los productos de venta en la República Popular China.
< Los productos vendidos en el espacio europeo se fabrican en conformidad con la directiva europea RoHS.
2
For U.S.A.
This equipment has been tested and found to comply with the
limits for a Class B digital device, pursuant to Part 15 of the FCC Rules.
These limits are designed to provide reasonable protection against
harmful interference in a residential installation. This equipment
generates, uses, and can radiate radio frequency energy and, if not
installed and used in accordance with the instructions, may cause
harmful interference to radio communications. However, there is no
guarantee that interference will not occur in a particular installation. If
this equipment does cause harmful interference to radio or television
reception, which can be determined by turning the equipment off
and on, the user is encouraged to try to correct the interference by
one or more of the following measures:
• Reorient or relocate the equipment and/or the receiving antenna.
• Increase the separation between the equipment and receiver.
• Connect the equipment into an outlet on a circuit different from
that to which the receiver is connected.
• Consult the dealer or an experienced radio/TV technician for help.
CAUTION
Changes or modifications to this equipment not expressly approved
by ESOTERIC COMPANY for compliance will void the user’s warranty.
This product has been designed and manufactured according to
FDA regulations “title 21, CFR, chapter 1, subchapter J, based on the
Radiation Control for Health and Safety Act of 1968“, and is classified
as class 1 laser product. There is not hazardous invisible laser radiation
during operation because invisible laser radiation emitted inside of
this product is completely confined in the protective housings.
The label required in this regulation is as follows:
WARNING: TO PREVENT FIRE OR SHOCK HAZARD,
DO NOT EXPOSE THIS APPLIANCE TO RAIN OR
MOISTURE.
For U.S.A. and Canada
CAUTION
< DO NOT REMOVE THE EXTERNAL CASES OR CABINETS TO EXPOSE
THE ELECTRONICS. NO USER SERVICEABLE PARTS ARE WITHIN.
< IF YOU ARE EXPERIENCING PROBLEMS WITH THIS PRODUCT,
CONTACT ESOTERIC FOR A SERVICE REFERRAL. DO NOT USE THE
PRODUCT UNTIL IT HAS BEEN REPAIRED.
< USE OF CONTROLS OR ADJUSTMENTS OR PERFORMANCE OF
PROCEDURES OTHER THAN THOSE SPECIFIED HEREIN MAY RESULT
IN HAZARDOUS RADIATION EXPOSURE.
Declaration of Conformity
Model Number:
RZ-1
Trade Name:
ESOTERIC
Responsible party: TEAC AMERICA, INC.
Address:
7733 Telegraph Road, Montebello, California, U.S. A.
Telephone number: 1-323-726-0303
This device complies with Part 15 of the FCC Rules. Operation
is subject to the following two conditions: (1) this device may
not cause harmful interference, and (2) this device must accept
any interference recieved, including interference that may cause
undesired operation.
For Europe/Asia/others
“Super Audio CD” is a registered trademark.
“DSD” is a registered trademark.
Windows XP and Windows Vista are either registered trademarks or
trademarks of Microsoft Corporation in the United States and/or other
countries.
Laser :
Type
:
Manufacturer :
Laser output :
Wavelength :
OWY8075
PIONEER CORPORATION
Less than 1 mW on the objective lens
770 to 810 nm (CD)
640 to 665 nm (Super Audio CD)
3
ENGLISH
< Do not expose this apparatus to drips or splashes.
< Do not place any objects filled with liquids, such as vases, on the
apparatus.
< Do not install this apparatus in a confined space such as a book
case or similar unit.
< The apparatus draws nominal non-operating power from the
AC outlet with its POWER or STANDBY/ON switch not in the ON
position.
< The apparatus should be located close enough to the AC outlet so
that you can easily grasp the power cord plug at any time.
< The mains plug is used as the disconnect device, the disconnect
device shall remain readily operable.
< Products with Class construction are equipped with a power
supply cord that has a 3-prong grounding plug. The cord of such
a product must be plugged into an AC outlet that has a protective
grounding connection.
< If the product uses batteries (including a battery pack or installed
batteries), they should not be exposed to sunshine, fire or excessive
heat.
< CAUTION for products that use replaceable lithium batteries: there
is danger of explosion if a battery is replaced with an incorrect type
of battery. Replace only with the same or equivalent type.
< Caution should be taken when using earphones or headphones
with the product because excessive sound pressure (volume) from
earphones or headphones can cause hearing loss.
Contents
Thank you for choosing ESOTERIC. Read this manual carefully
to get the best performance from this unit.
Before Use. . . . . . . . . . . . . . . . . . . . . . . . . . . . . . . . . . . . . . . . . . . . . . . . . . . . . . . . . . . . 5
Discs. . . . . . . . . . . . . . . . . . . . . . . . . . . . . . . . . . . . . . . . . . . . . . . . . . . . . . . . . . . . . . . . . 6
Speaker Connections. . . . . . . . . . . . . . . . . . . . . . . . . . . . . . . . . . . . . . . . . . . . . . . . . 7
Connections. . . . . . . . . . . . . . . . . . . . . . . . . . . . . . . . . . . . . . . . . . . . . . . . . . . . . . . . . . 8
Identifying the Parts (Main Unit). . . . . . . . . . . . . . . . . . . . . . . . . . . . . . . . . . . . 10
Identifying the Parts (Display). . . . . . . . . . . . . . . . . . . . . . . . . . . . . . . . . . . . . . . . 11
Identifying the Parts (Remote Control Unit). . . . . . . . . . . . . . . . . . . . . . . . . . 12
Remote Control Unit. . . . . . . . . . . . . . . . . . . . . . . . . . . . . . . . . . . . . . . . . . . . . . . . . 13
Basic Operation. . . . . . . . . . . . . . . . . . . . . . . . . . . . . . . . . . . . . . . . . . . . . . . . . . . . . . 14
Dimmer/Muting. . . . . . . . . . . . . . . . . . . . . . . . . . . . . . . . . . . . . . . . . . . . . . . . . . . . . 15
Sleep Timer . . . . . . . . . . . . . . . . . . . . . . . . . . . . . . . . . . . . . . . . . . . . . . . . . . . . . . . . . 16
CD/SACD Playback. . . . . . . . . . . . . . . . . . . . . . . . . . . . . . . . . . . . . . . . . . . . . . . . . . . 16
Connecting to a Personal Computer and Playing Back a Music File. . . . . . . 19
Setup Mode. . . . . . . . . . . . . . . . . . . . . . . . . . . . . . . . . . . . . . . . . . . . . . . . . . . . . . . . 22
Restoring Factory Settings. . . . . . . . . . . . . . . . . . . . . . . . . . . . . . . . . . . . . . . . . . 24
Protection Circuit. . . . . . . . . . . . . . . . . . . . . . . . . . . . . . . . . . . . . . . . . . . . . . . . . . . 24
Troubleshooting. . . . . . . . . . . . . . . . . . . . . . . . . . . . . . . . . . . . . . . . . . . . . . . . . . . . 25
Rear Panel Layout . . . . . . . . . . . . . . . . . . . . . . . . . . . . . . . . . . . . . . . . . . . . . . . . . . 26
Specifications . . . . . . . . . . . . . . . . . . . . . . . . . . . . . . . . . . . . . . . . . . . . . . . . . . . . . . 27
4
Before Use
Read this before attempting any operations.
Placement of the unit
What’s in the box
Confirm the supplied standard accessories.
Remote control unit (RC-1251) x 1
< Choose the installation location of your unit carefully. Avoid placing
it in direct sunlight or close to a source of heat. Also avoid locations
subject to vibrations and excessive dust, heat, cold or moisture.
Batteries (AA) x 2
< Do not place the unit on an amplifier or receiver or any other
device that generates heat.
Power cord x 1
< When the unit is turned on, switching on the TV may cause lines
to appear on the TV screen, depending on the condition of the
electric waves of the TV broadcast. This is not malfunction in the
unit or the TV. If you see such lines, keep this unit well away from
the TV set.
ENGLISH
< As the unit may become warm during operation, always leave
sufficient space around the unit for ventilation.
Make sure there is at least 20 cm (8”) of space above and at least
5 cm (2”) of space on each side of the unit. Do not place anything
on top of the unit.
Felt pads x 4
<To protect the supporting furniture surface, you may stick the
felt pads to the bottom of the metal feet.
Owner’s manual (this document) x 1
CAUTION
< Do not move the unit during playback.
During playback, the disc rotates at high speed. Do not lift or
move the unit during playback. Doing so may damage the disc
or the unit.
< The voltage supplied to the unit should match the voltage as
printed on the rear panel. If you are in any doubt regarding this
matter, consult an electrician.
< Do not open the cabinet as this might result in damage to the
circuitry or electrical shock. If a foreign object should get into the
unit, contact your dealer or service company.
< When removing the power plug from the wall outlet, always pull
directly on the plug, never yank on the cord.
< Always remove the disc before relocating or moving this unit.
Moving the unit with a disc inside it could cause malfunction.
<Keep this manual in a safe place for future reference.
Warranty card x 1
Maintenance
If the surface of the unit gets dirty, wipe it with a soft cloth or
use diluted mild liquid soap. Allow the surface of the unit to dry
completely before using.
For safety, disconnect the power cord from the socket before
cleaning.
< Never spray liquid directly on this unit.
< Do not use thinner, benzene or alcohol as they could damage the
surface of the unit.
< Avoid allowing rubber or plastic materials to touch this product for
long periods of time, because they could damage the cabinet.
Beware of condensation
When the unit is moved from a cold to a warm place, or used after a
sudden temperature change, there is a danger of condensation; vapor
in the air could condense on the internal mechanism, making correct
operation impossible. To prevent this, or if this occurs, leave the unit
turned on for one or two hours. Then the unit will stabilize at the
temperature of its surroundings.
5
Discs
< Never use a stabilizer. Using commercially available CD stabilizers
with this unit will damage the mechanisms and cause them to
malfunction.
Discs that can be played on this unit
CDs that bear the “COMPACT disc DIGITAL AUDIO” logo.
(12 cm/8 cm)
< Do not use irregularly-shaped discs (octagonal, heart-shaped,
business card size, etc.). CDs with these shapes could damage the
unit.
Super Audio CDs that bear the “Super Audio CD” logo.
< The multi-channel area of a Super Audio CD cannot be
played with this unit.
Handling precautions
< Always insert the disc into the disc slot with the label side up. Only
one side of a Compact Disc can be played or used for recording.
CD-R and CD-RW discs that have been correctly
recorded in the audio CD format (CD-DA) and finalized.
< To remove a disc from its storage case, press down on the center of
the case and lift the disc out, holding it carefully by the edges.
This unit can play these types of discs without an adapter. It cannot
play any other type of disc.
Playback of any other type of disc could cause loud noise and
damage to speakers as well as harm hearing. Never play back any
other type of disc.
< The logo should be on the disc label or the CD jacket.
< DVDs, Video CDs, DVD-ROMs, CD-ROMs and similar types of discs
cannot be played on this unit.
< Copy-protected discs and other discs that do not conform to the
CD standard might not play correctly in this player. If you use such
discs in this unit, ESOTERIC company and its subsidiaries will not
be responsible for any consequences or guarantee the quality of
reproduction. If you experience problems with such non-standard
discs, you should contact their issuers.
< Discs created by a CD recorder must be finalized before use with
this unit. If you are uncertain about the handling of a CD-R or
CD-RW disc, please contact the seller of the disc directly.
Depending on disc quality and recording conditions, playback of
some discs might not be possible. Please see the manual for the
device that you used to create the disc.
How to remove the disc
How to hold the disc
Storage precautions
< Discs should be returned to their cases after use to avoid dust and
scratches that could cause the laser pickup to “skip.”
< Do not expose discs to direct sunlight or high-temperature
and humidity for extended periods. Long exposure to high
temperatures will warp discs.
< CD-R and CD-RW discs are more sensitive to the effects of heat
and ultraviolet rays than ordinary CDs. It is important that they
are not stored in locations where they will be exposed to direct
sunlight. They should also be kept away from sources of heat, such
as radiators and heat-generating electrical devices.
Maintenance
< If a disc becomes dirty, wipe its surface radially from the center
hole outward towards the outer edge with a soft, dry cloth.
CAUTION
< Do not play any disc that is warped, deformed or damaged.
Playing such discs could cause irreparable harm to the playing
mechanisms.
< Printable CD-R and CD-RW discs are not recommended because
their label sides could be sticky and damage the unit.
< Do not stick papers or protective sheets on the discs and do not
use any protective coating sprays.
6
< Never clean discs using chemicals such as record sprays, antistatic
sprays and fluids, benzene and thinner. Such chemicals will do
irreparable damage to the disc’s plastic surface.
If you are in any doubt as to the care and handling of a disc, read the
precautions supplied with the disc or contact the disc manufacturer.
Speaker Connections
CAUTION
How to connect
< After all connections are complete, connect the power cord’s plug
to the AC wall socket.
< The metal portions of the two separate wires should not touch or
an electrical short can occur. Shorted wires can create a fire hazard
or induce a failure in your equipment.
Right Speaker
Left Speaker
The red speaker terminals are + (positive) and the black speaker
terminals are _ (negative).
Generally, the + side of the speaker cable is marked to make it
distinguishable from the _ side of the cable.
Make sure to connect:
Marked + side
e Red + terminal
Unmarked _ side e Black _ terminal
Turn the terminal cap counter-clockwise to loosen, clockwise to
tighten.
Using speaker cables with bare wire
Turn the terminal cap counter-clockwise to loosen it. Insert the wire
core through the hole in the terminal and tighten the terminal cap.
RZ-1 (back side)
ESOTERIC uses ESOTERIC MEXCEL stress-free 7N cable as
a reference. The following items are available in the ESOTERIC
MEXCEL cable series.
RCA audio cable
XLR audio cable
RCA digital cable
XLR digital cable
BNC digital cable
Speaker cable
Power cable
Speaker cables
Connect the speakers with commercially-available speaker cables.
< Use the shortest speaker cables possible. As cables become longer,
electrical resistance increases and damping characteristics are
reduced. Moreover, inductance and capacitance also increase,
degrading the quality of high frequency sounds.
Using speaker cables with spades
Turn the terminal cap counter-clockwise to loosen it. Insert the
spade around the terminal and tighten the terminal cap.
Using speaker cables with banana plugs
With the terminal cap tightened, insert the plug into the jack on
the end of the cap.
< Read the instructions supplied with the banana plug.
For European customers
In accordance with European safety regulations, it is not possible
to connect banana plugs into the speaker terminals on European
models. The holes into which banana plugs are inserted have
been covered with black caps. Connect the speakers using spades
or bare wires. If the black caps become separated from the
terminals, return them to their original position.
< Ideally, left and right speaker cables should be the same length.
7
ENGLISH
< Be sure to connect each plug securely. To prevent hum and noise,
do not bundle the connection cords.
Connections
After all connections are complete, connect the power cord’s plug to the AC wall socket.
< Read the instructions of each component you intend to use with this unit.
< Be sure to connect each plug securely. To prevent hum and noise, do not bundle the connection cords.
Turntable
Digital audio device
DIGITAL OUT
COAXIAL OPTICAL
Optical digital cable
RCA coaxial cable
A
Connect one of
these cables.
C
B
RZ-1 (back side)
D
USB cable
RCA cable
L
E
Supplied power cord
A
R
AUDIO OUT
Tuner, etc.
8
Computer
Wall socket
A Analog audio input terminals [LINE IN]
Used for the input of analog 2-channel audio signals from a
cassette tape deck, tuner, etc.
Connect the component with commercially-available RCA cables.
Make sure to connect:
White plug e White jack (L: left channel)
Red plug e Red jack (R: right channel)
< Connect the ground lead of the turntable to the SIGNAL GND
terminal of the RZ-1.
Inputs PCM format digital audio.
Connect any one of these terminals to the digital output terminal
of a digital device using a commercially-available cable.
COAXIAL: Use RCA (pin) digital audio cable
OPTICAL: Use optical digital audio cable (TOS)
< This unit’s optical terminal has a shutter. When connecting a
cable, insert it firmly in the same orientation as the terminal. If
you force the cable into the terminal in the wrong orientation,
the terminal could be deformed and the shutter might not be
able to be closed again.
< If the equipment that you are connecting has an on/off setting
for its digital output, set it to on.
< When connecting a DVD player, a digital broadcast tuner or
similar device, set the digital output of the connected device to
convert the output to PCM.
< Compatible sampling frequency is 32 kHz to 192 kHz.
< When using a MC (Moving Coil) type cartridge, an external stepup transformer or similar equipment is necessary.
D USB input terminal
B SIGNAL GND
Connection of this terminal with the ground terminal of another
device may improve sound quality.
< This is not an electrical safety ground (earth).
< When a turntable is connected to the LINE2/PHONO terminal,
make sure to connect the ground lead of the turntable to this
terminal.
Inputs digital audio from a personal computer.
Connect to the USB port (USB 1.1 or higher) of a personal
computer using a commercially available USB cable (page 19).
< The USB port of this unit is type B.
< Compatible sampling frequency is 32 kHz to 96 kHz.
E Power cord
Connect the power cord to the power cord receptacle.
After all other connections are complete, connect the power
cord's plug to the AC wall socket.
Do not use any power cords other than the one included
with this unit or a power cord specified by ESOTERIC. Use of
other power cords may result in fire or electric shock.
9
ENGLISH
LINE2/PHONO terminal
In addition to a cassette tape deck or tuner, you can also connect
a turntable with MM (Moving Magnet) type cartridge to this
terminal.
In setup mode, select whether you are connecting a record
player or another device such as a cassette deck (page 22 “LINE2/
PHONO terminal”).
When connecting a phono amplifier such as an ESOTERIC E-03,
set the unit to “LINE.”
C Digital audio input terminals [DIGITAL IN]
Identifying the Parts (Main Unit)
Disc slot
Display
A B C
D
A STANDBY/ON
Use this button to turn the unit on and to standby mode (off).
The blue indicator lights when the unit is turned on.
Press and hold this button for more than 2 seconds to enter the
sleep timer setting mode (page 16).
B SOURCE
Use this button to select a source. Select the terminal that is
connected to the device that you want to play (page 14).
Press and hold this button for more than 2 seconds to enter the
setup mode. In setup mode, use this button to select an item
(page 22).
E
F
D Remote sensor
When operating the remote control unit, point it towards here.
E Play/Skip (y//)
When a disc is loaded, press this button to start playback. The
unit turns to CD/SACD mode automatically.
In CD/SACD mode, press this button to skip forward during
playback.
In all modes, Press and hold this button for more than 2 seconds
to mute the sound (page 15).
F VOL (+/−)
Use these buttons to adjust the volume.
C Eject/Stop (L/H)
In CD/SACD mode, press this button to stop playback. When
playback is stopped, press this button again to eject the disc.
When in other than CD/SACD mode, press this button to eject
the disc.
10
In setup mode, use these buttons to change the setting of each
item (page 22).
Identifying the Parts (Display)
CD/SACD mode
COAX/OPT/USB mode
During playback
Current input
(COAX, OPT or USB)
Volume (0 to 99)
Currently playing track number
(This is not displayed when remaining time of disc is displayed.)
Volume (0 to 99)
Sampling frequency
(32k, 44k, 48k, 88k, 96k, 176k or 192k)
< If no input device is connected, or this unit is unable to lock with
that device, instead of the sampling frequency being shown, the
name of the input source will blink. Check the connections.
Changing the display
LINE1/LINE2 (PHONO) mode
During playback, each time the DISPLAY button is pressed, the
display changes as follows:
Elapsed time of current track
Current input
(LINE1, LINE2 or PHONO)
Volume (0 to 99)
< When you use LINE2 as PHONO input, select “PHONO” in “L-2”
setting (page 22 “LINE2/PHONO terminal”).
Remaining time of current track
Remaining time of disc
Setup mode
When playback is stopped
The display shows the type of disc currently loaded (CD or SACD).
“NO DISC” is displayed when no disc is loaded.
Setup indicator
Setup item or setting
11
ENGLISH
Elapsed time of current track (min./sec.)
or remaining time of current track (min./sec.)
Identifying the Parts (Remote Control Unit)
A ON
Press this button to turn the unit on. The blue indicator lights
when the unit is turned on.
B STANDBY
Press this button to turn the unit to standby mode (off).
C Number buttons
A
N
B
D PLAY AREA
C
O
P
D
F
G
H
I
In CD/SACD mode, use these buttons to enter the track number
for playback.
E
S
Q
R
T
U
In CD/SACD mode, when playback is stopped, press this button
to change the play area of the SACD disc (page 18).
E 2CH/MULTI
This button will not work on the RZ-1. Please ignore this button.
F AUDIO
In CD/SACD mode, press this button to change the shuffle mode
(page 18).
G SCAN (m/,)
J
In CD/SACD mode, use these buttons to scan forward and
backward during playback.
K
H STOP (H)
L
M
In CD/SACD mode, press this button to stop playback.
V
I PLAY (y)
When a disc is loaded, press this button to start playback. The
unit turns to CD/SACD mode automatically.
J VOLUME +/−
Use these buttons to adjust the volume.
K INPUT ( / )
Use these buttons to select a source. Select the input terminal
that is connected to the device that you want to play (page 14).
In setup mode, use these buttons to change the setting of each
item (page 22).
L DIMMER
Use this button to select one of four brightness levels for the
display and indicator lamps (page 15).
12
Remote Control Unit (1)
M SETUP
Press this button to enter the setup mode. In setup mode, use
this button to select an item (page 22).
The included remote control allows this unit to be operated from a
distance.
Point the remote control unit at the main unit’s remote sensor
within 7 m (23 feet) of the main unit.
N Eject (OPEN/CLOSE L)
Press this button to eject the disc.
Remote sensor
O CLEAR
If you accidentally press the “+10” key, press this to cancel the
input value (page 18).
7 m
(23 feet)
In setup mode, use this button to exit the setup mode (page 22).
ENGLISH
P DISPLAY
In CD/SACD mode, during playback, press this button to change
the display (page 11).
Q REPEAT
In CD/SACD mode, press this button to change the repeat mode
(page 18).
R GROUP/TITLE (
)
This button does not work on the RZ-1. Please ignore this button.
S GROUP/TITLE (
)
Press this button to enter the sleep timer setting mode (page 16).
T Skip (TRACK/CHAP .//)
In CD/SACD mode, use these buttons to skip forward and
backward during playback or pausing.
U PAUSE (J)
In CD/SACD mode, press this button to pause playback.
< Depending on the angle, reception might be difficult. Use the
remote control from directly in front of the unit as much as
possible.
< Even if the remote control unit is used within its effective range,
operation by remote control might be impossible if there are any
obstacles between the unit and the remote control.
< If direct sunlight or strong artificial illumination shines on the
remote sensor for the remote control, it might not function.
< If the remote control unit is operated near other devices that
generate infrared rays, or if other remote controls that use infrared
rays are operated near the unit, this unit might operate incorrectly.
The other devices might also operate incorrectly.
Battery Installation
V MUTING
Press this button to mute the sound (page 15).
Note:
To simplify explanations, instructions in this manual might refer to the
main unit or remote control only. In such cases, the same controls on
the remote control and main unit will operate similarly.
Use a Philips driver to remove the cover from the bottom of
the remote control, and pull out the battery case. Insert two AA
batteries in the correct +/_ orientations, reinsert the case and
close the cover.
13
Remote Control Unit (2)
Battery Replacement
If the distance required between the remote control unit and main
unit decreases, the batteries are exhausted. In this case replace the
batteries with new ones.
For more information about collection of batteries, please contact
your local municipality, your waste disposal service or the point of sale
where you purchased the items.
Precautions concerning batteries
Misuse of batteries could cause them to rupture or leak leading
to fire, injury or the staining of nearby things. Please read and
observe the following precautions carefully.
< Be sure to insert the batteries with correct positive (+) and
negative (_) orientations.
< Use batteries of the same type. Never use different types of
batteries together.
Basic Operation
1 Press the STANDBY/ON button to turn the unit on.
The blue indicator lights.
<Turn on the power of the connected devices before you turn on
the RZ-1.
2 Press the SOURCE button repeatedly to select an input
source.
< Both rechargeable and non-rechargeable batteries can be used.
Refer to the precautions on their labels.
< If the remote control will not be used for a long time (more than a
month), remove the batteries to prevent them from leaking.
< If the batteries leak, wipe away the leakage inside the battery
compartment and replace the batteries with new ones.
< Do not use batteries of types other than those specified. Do not
mix new batteries with old ones or use different types of batteries
together.
The selected source is shown on the display.
Each time the SOURCE button is pressed, the source changes as
follows:
CD/SACD
< Do not heat or disassemble batteries. Never throw batteries into
fire or water.
< Do not carry or store batteries with other metallic objects. The
batteries could short circuit, leak or explode.
< Never recharge a battery unless it is confirmed to be a
rechargeable type.
COAX
OPT
USB
LINE1
LINE2 or PHONO*
*When you use LINE2 as PHONO input, select “PHONO” in “L-2”
setting (page 22 “LINE2/PHONO terminal”).
<You can also use the INPUT ( / ) buttons on the remote
control unit to select a source. If you press the button, the
source changes in the opposite order of that shown above.
< When set to COAX, OPT or USB, if no input device is connected
to the selected terminal, or this unit is unable to lock with that
device, instead of the sampling frequency being shown, the
name of the input source will blink. Check the connections.
14
Dimmer/Muting
3 Play the source, and adjust the volume using the VOL
These operations are available in every mode.
(+/−) buttons.
Dimmer
You can change the brightness of the display and indicator lamps.
Each time the DIMMER button is pressed, the brightness changes
as follows:
3 full brightness
Turning the unit standby (off)
2
To prevent sudden noise from the speakers, make sure to turn the unit
off in the following way.
1
1 Stop the playback of the connected component.
2 Press the STANDBY/ON button to turn the RZ-1 standby
(off).
0 off
< In off mode, when you press a button, the illuminations turn
temporarily on for 3 seconds.
< In setup mode, the illuminations turn on with full brightness.
Muting
You can mute the sound temporarily.
To mute the sound, press the MUTING button.
Press the MUTING button again to restore the sound.
< You can also mute the sound by pressing and holding the Play/
Skip button (y//) for more than 2 seconds.
< While muting is engaged, “MUTING” and the name of the selected
terminal alternately blink on the display.
< You can also restore the sound by pressing the VOL buttons (+/−).
15
ENGLISH
Sudden loud noises can cause hearing damage and other
issues. Before starting playback, minimize the volume, and
adjust it to a suitable level after playback begins.
Sleep Timer
CD/SACD Playback (1)
You can set the sleep timer so that the unit turns itself off after a
specified amount of time. This operation is available in every mode.
1 Press the SOURCE button repeatedly to select “CD/SACD”.
1 Press and hold the STANDBY/ON button for more than
2 seconds to enter the sleep timer setting mode.
<When a disc is loaded while a source other than CD/SACD mode
is selected, the unit turns automatically to CD/SACD mode.
2 Insert a disc with the printed label face up.
Hold down
more than 2 sec.
<You can also use the GROUP/TITLE button ( ) on the remote
control unit. (This button does not need to be pushed for more
than 2 seconds. It will start sleep timer mode immediately.)
2 Press the STANDBY/ON button repeatedly to select a
timer’s off setting.
Each press of the STANDBY/ON button cycles through timer
options as follows:
S_TMR OFF
off
S_TMR AUTO
In CD/SACD mode
Turns to standby (off) after 90 minutes
or when playback ends,
whichever comes first
The disc is automatically loaded into the player. Let go of the
disc when it starts loading.
M Do not push the disc forcibly.
M Do not insert more than one disc.
M Do not attach adhesive label, etc. to either side of discs.
M Do not use irregular-shaped discs.
Doing so may cause malfunction or damage the unit.
<It takes a few seconds for the unit to load the disc.
< If a disc cannot be played by this unit, it is ejected. (See page 6
for information about compatible discs.)
In other than CD/SACD mode
Turns to standby (off) after 90 minutes
S_TMR 30
Turns to standby (off) after 30 minutes
S_TMR 60
Turns to standby (off) after 60 minutes
S_TMR 90
Turns to standby (off) after 90 minutes
S_TMR 120
Turns to standby (off) after 120 minutes
<You can also use the GROUP/TITLE button ( control unit.
) on the remote
<When the sleep timer is active, “XXm” (“XX” is the amount of
time and “m” represents minutes) and the ordinary indicators
appear alternately on the display. The display and indicators
become darker while in this mode.
16
3 Press the Play/Skip button (y//) to start playback.
Suspending playback temporarily
(Pause mode)
Stopping playback
During playback
Press a Skip button (. or /) repeatedly until the desired track
is selected. The selected track will be played from the beginning.
< If the . button is pressed once during playback, the track being
played will be played again from the beginning. To return to the
beginning of the previous track, press the . button repeatedly.
However, If it is pressed within one second from the start of the
track, playback returns to the start of the previous track.
When playback is paused
Press a Skip button (. or /) repeatedly to select the track you
want to hear. Then, press the PLAY button (G) to start playback of
the selected track.
Press the Stop button (L/H) to stop playback.
Searching for a part of a track
Ejecting a disc
In CD/SACD mode, when playback is stopped, press the Eject
button (L/H) to eject a disc.
You can also eject the disc when in modes other than CD/SACD
mode.
Precaution when reinserting an 8-cm CD after ejecting it.
Remove the disc completely before reinserting it into this unit.
If you push it back in without removing it first, the disc could
become stuck in the unit.
If a disc cannot be ejected, put the unit in standby (turn the power
off) and then turn it on again, or press the Eject button (L/H) for
2 seconds or more.
During playback, hold down a SCAN button (m or ,) to scan
backwards and forwards. Press the PLAY button (G) to restart
playback at the desired location.
Repeated presses of the SCAN buttons (m or ,) changes the
scanning speeds.
1
Slow
2
3
4
Normal playback
Fast
17
ENGLISH
Press the PAUSE button (J) during playback to stop playback at
the current position. To resume playback, press the PAUSE button
(J) again.
Skipping to an earlier or later track
CD/SACD Playback (2)
Direct playback
Repeat playback
When stopped or playing back, you can use the Number buttons to
directly select a track.
Playback starts from the selected track.
During playback, press the REPEAT button to change the repeat
mode.
Each time the REPEAT button is pressed, the repeat setting changes
as follows:
Examples:
To playback track 5
Track repeat
The track being played will be played
repeatedly.
If you select another track, the selected
track will be played repeatedly.
To playback track 23
Disc repeat
All the tracks on the disc will be played
repeatedly.
To playback track 30
off
< When the playback stops the repeat mode is canceled.
<If you accidentally press the “+10” key, press the CLEAR button to
cancel the input value.
Shuffle playback
Selecting the playback area (SACD)
The tracks on a disc can be played in random order.
You can change the playback area of Super Audio CD that contains
Super Audio CD and regular CD data.
Pressing the AUDIO button turns the shuffle mode on and off.
When playback is stopped, press the PLAY AREA button to change
the playback area.
< This unit can only play the 2 channel stereo layer of an SACD. The
multi-channel area of a Super Audio CD, if the SACD contains that
feature, cannot be played with this unit.
18
During shuffle playback, “ ” appears on the right of time display.
Connecting to a Personal Computer and Playing Back a Music File (1)
By connecting the USB input terminal of this unit to a personal
computer using a USB cable, music files on the computer can be
played with this unit.
The USB-connected personal computer must be running with
Microsoft Windows XP or Windows Vista. This unit might not function
properly when used with a computer running a different OS.
In addition, you must use a computer that is compatible with USB 1.1
or higher.
3 Press the STANDBY/ON button to turn the RZ-1 on.
< Depending on the hardware and software configuration of the
personal computer, operation may not be possible, even with the
above-mentioned operating systems.
< It is not possible to control this unit from the personal computer or
control the personal computer from this unit.
4 Press the SOURCE button repeatedly to select “USB”.
ENGLISH
< It is not possible to send music files from this unit to a personal
computer via USB.
1 Turn on the personal computer.
Confirm that the operating system starts normally.
2 Connect the RZ-1 to a personal computer using a USB
cable.
5 Start playback of a music file on a personal computer.
For the best sound quality, set the volume to maximum on the
personal computer and then adjust the volume on this unit. Set
the volume of this unit to the minimum, start playback and then
gradually increase the volume.
< When music files are being played through a USB connection, do
not perform the following operations. They will cause problems
with the operations of the personal computer. Exit the music
playback software on your PC before performing these operations.
-Removing the USB cable
-Turning the RZ-1 standby mode (off)
-Changing the input source of RZ-1
The cable must match the connection terminal of this unit
(USB-B type).
<The first time the personal computer and this unit are
connected, the personal computer automatically detects the
USB connection with this unit and installs the drivers. Follow the
instructions of the operating system to complete installation of
the drivers.
< If a computer is not connected properly, instead of the sampling
frequency being shown, “USB” will blink. Check the connections.
< When playing a music file via a USB connection, the sounds of
personal computer operations are also played. To prevent these
sounds from being played, change the sound settings on the
personal computer.
Continue to the next page <The computer will recognize a USB connection with this unit
even if it is in standby mode (power off).
19
Connecting to a Personal Computer and Playing Back a Music File (2)
< Depending on the operation environment of the personal
computer, it may not be possible to maintain the USB data transfer
speed. This may interrupt playback or cause noise. Furthermore,
starting other applications during music file playback may interrupt
playback or cause noise.
< If the music playback software is started before this unit and the
personal computer are connected, or the input of this unit is set
to “USB” before connection, music files may not be played back
correctly. If this occurs, restart the music playback software or the
personal computer.
< Even if this unit is in standby mode (power off), a computer will
recognize the USB connection (if the USB cable is connected), and
try to output sound through this unit.
If you want to output sound through loud speakers or headphones
that are directly connected to the computer, disconnect the USB
cable or change the “Sound playback” device setting (see right).
If the sound does not playback normally when you are using a
supported operating system, and the connections are correct as
described above, check the following points.
For Windows XP
“Control Panel”
e“Sound and Audio Devices Properties”
e“Audio”
e“Sound playback”
eCheck that “ESOTERIC RZ-1” is selected as “Default device”.
< If you want to output sound through speakers or headphones
that are directly connected to the computer, change the “Sound
playback” “Default device” to the computer’s built-in sound output.
20
For Windows Vista
eClick “Advanced” tab.
eSelect “2 channel, 24 bit, ********Hz”.
“Control Panel”
e“Sound”
eCheck that “SPDIF Interface ESOTERIC RZ-1” is selected in “Playback”
tab.
ENGLISH
< Regardless of the format of the music file being played, the
USB connection sends a PCM signal at the sampling frequency
selected.
Furthermore, it is recommended to change the following settings:
Clicking “Properties” at this window displays the following window.
e“Supported Formats”
eUncheck all checkboxes of “Encoded formats”.
eCheck the sample rates you want to set.
21
Setup Mode
3 Press the VOL (+/−) buttons to change the setting.
Changing settings
1 Press
and hold the SOURCE button for more than
2 seconds to enter the setup mode.
<You can also use the INPUT ( / ) buttons on the remote
control unit.
Hold down
more than 2 sec.
The setup indicator (
display.
) and setup item appear on the
<You can also use the SETUP button on the remote control
unit. (This button does not need to be pushed for more than
2 seconds. It will start setup mode immediately.)
See “Available setup items and settings” on the next page for
Individual setting.
Repeat steps 2 and 3 as required.
4 Press the SOURCE button repeatedly to exit the setup
mode.
2 Press the SOURCE button repeatedly to select an item.
<If one of the following buttons is pressed, the setup mode will
be canceled:
Each time the SOURCE button is pressed, the item changes as
follows:
BAL >
Speaker balance
TREBLE >
Level of high frequency sound range
BASS >
Level of low frequency sound range
DF >
Digital filter
L-2 >
LINE2/PHONO terminal
DIMMER >
Return to the previous display
(Exit setup mode)
<You can also use the SETUP button on the remote control unit.
<If no button is pressed for more than 10 seconds, the setup
mode will be canceled and return to the previous display.
22
Eject button (L/H)
STOP button (H) on the remote control unit
CLEAR button on the remote control unit
<Memorized settings are stored even after the power cord has
been disconnected.
Available setup items and settings
HBAL > (Speaker balance)
Use this to adjust the left/right speaker output balance.
The higher the R value, the more the sound will be balanced to
the right speaker. The higher the L value, the more the sound will
be balanced to the left speaker.
R3.0 (dB)
(0.5dB steps)
HDF > (Digital filter)
Changes the digital filter of D/A converter.
FIR
A 32-bit FIR digital filter (Finite impulse response) oversamples the
input signal to 8 times the frequency of the original signal. This
provides a fuller, richer and deeper sound.
S_DLY (Apodizing filter type)
A 32-bit short delay filter oversamples the input signal to 8 times
the frequency of the original signal. This provides an impulse
response without pre-echo, natural attack and reverberation. This
setting provides tonal quality that is closer to the original and
without enhancement.
0.0 (Center)
L3.0 (dB)
HTREBLE >
Adjusts the level of high frequency sound range.
The higher the number, the more the high frequencies are
emphasized.
+10
ENGLISH
(0.5dB steps)
HL-2 > (LINE2/PHONO terminal)
Changes the phono equalizer setting of LINE2.
LINE
The phono equalizer is not used. Use this setting for ordinary line
level equipment.
PHONO
The phono equalizer is used. Use this setting when connecting a
record player with MM (Moving Magnet) type cartridge.
< When using an MC (Moving Coil) type cartridge, an external stepup transformer or similar equipment is necessary.
< When connecting an external phono amplifier such as an
ESOTERIC E-03, set the unit to “LINE.”
0 (Flat)
HDIMMER >
−10
Changes the brightness of the display and indicator lamps.
The DIMMER button on the remote control has the same function
(page 15).
3 full brightness
2
HBASS >
Adjusts the level of low frequency sound range.
The higher the number, the more the low frequencies are
emphasized.
1
0 off
+10
< In off mode, when you press a button, the illuminations turn
temporarily on for 3 seconds.
0 (Flat)
< In setup mode, the illuminations turn on with full brightness.
−10
23
Restoring Factory Settings
Protection Circuit
Memorized settings are stored even after the power cord has been
disconnected.
This unit has a built-in protection circuit.
“AMP ERROR!” blinks on the display when the protection circuit is
activated. In this case, follow the steps below.
If you have made changes through the setup process, and want to
restart from a known set of options, restore the unit to the default
factory settings as follows:
1 Turn the unit to standby mode (off).
Wait for more than 30 seconds.
1.Turn the unit to standby mode (off) and unplug the power cord
from the outlet.
2.Check the speaker cables.
eThe protection circuit might be activated because there is a
+/_ short in a speaker cable.
3.Turn the unit on.
2 Press and hold down the STANDBY/ON button while
holding down the SOURCE button.
If the error message continues even after the above procedures, put
the unit in standby (power off) again and disconnect the power cord
from the socket. Wait about 10 minutes before turning the power
back on.
eThe protection circuit might be activated because the
temperature inside the unit has become too hot (always make
sure that you have ample ventilation around the unit).
If the protection circuit continues to be activated, please contact your
dealer or an ESOTERIC service center.
Hold down
Release the buttons when “Setup CLR” appears on the display.
All memories are now erased and the unit returns to the factory
settings.
24
Troubleshooting
If you experience any problems with the unit, please take a moment
to look through this chart and see if you can solve the problem
yourself before you call your dealer or ESOTERIC customer service/
technical support.
Moreover, the problem might be caused by something other than this
unit. Confirm that connected devices are also being used properly.
General
Remote control does not work.
eIf the batteries are exhausted, change the batteries.
eUse the remote control unit within the ef fective range
(7 m/23 feet) and point it toward the remote sensor on the front
panel.
eMake sure that there are no obstacles between the remote
control unit and the main unit.
eIf a fluorescent light is near the unit, turn it off.
Buttons do not work properly.
eIf another operation is still in process, wait a moment and try
again.
Other units with remote controls operate incorrectly.
eNote that other units with remote controls may operate
incorrectly because of infrared light “overspill” when you operate
the remote control of this unit.
Severe hum or noise is heard.
ePlace the unit as far away from a TV as possible.
There is no sound or only a very low-level sound is heard.
eAdjust the volume by pressing the VOL (+/−) buttons.
eCheck that the speakers and components are connected
securely.
eCheck the operation of the connected component.
eThere might be a +/_ short in a speaker cable. Check the
speaker cables.
eSelect the proper input source using the SOURCE button.
There is no sound from a connected digital device.
eWhen connecting the digital output terminal of a DVD player or
other digital device, set the digital audio output of the connected
device to PCM. You can also connect the analog outputs of a
digital device to this unit’s analog inputs (LINE IN).
The display shows “AMP ERROR!”.
eSee “Protection Circuit” on previous page.
Will not play.
ePress the SOURCE button repeatedly to select “CD/SACD”.
eReload the disc with the label side up. If not, insert the disc
correctly.
eIf the disc is dirty, clean the surface of the disc. If the disc is
scratched or has any sticky substance on it's surface, do not play
the disc until you have corrected the condition of the disc. Under
all circumstances, do not use after market stick on labels or “disc
enhancement” devices that sit on top of a disc or wrap around a
disc.
eIf the unit has become condensed with moisture, leave the unit
for one or two hours with the power turned on.
eThe multi-channel area of a Super Audio CD cannot be played
with this unit. This unit is a 2 channel player only.
Noticeable difference in CD and Super Audio CD’s volume.
eThat is because CDs and Super Audio CDs use different recording
methods. This is normal.
USB connections with personal computers
This unit is not recognized by personal computers.
eUSB connections are possible with personal computers running
with Microsoft Windows XP or Windows Vista. Other operating
systems are not guaranteed but may operate. This unit might
not function properly when used with a computer running a
different OS. In addition, the connected computer should be
compatible with USB 1.1 or higher.
Noise occurs.
eStarting other applications during playback of a music file may
interrupt playback or cause noise. Do not start other applications
during playback.
Music files cannot be played.
eConnect this unit to the personal computer before launching
music playback software and starting playback. If the music
playback software is launched or the input of this unit is switched
to “USB” before this unit is connected to the personal computer,
music data may not be played back correctly.
eCheck the points on page 20 - 21.
Sound is too low.
eConfirm that the volume settings of the music playback software
and the operating system are not low. Turn up the output volume
on the PC as needed.
Since this device uses a microcontroller, external noise and
other interference can cause the unit to malfunction. If this
occurs, turn the power off and restart operations after waiting
for about one minute.
25
ENGLISH
No power.
eCheck the connection to the AC power source. Check and
make sure the AC source is not a switched outlet and if it is, the
switch is turned on. Make sure there is power to the AC outlet by
plugging another item such as a lamp or a fan.
CD/Super Audio CD Player
Rear Panel Layout
26
Specifications
Amplifier Section
Output power. . . . . . . . . . . . . . . . . . . . . . . . 100 W + 100 W (1 kHz, 6 Ω, JEITA)
Minimum rated power output. . . . . . . . . . . . . . . . . . . . . . . . . . . 80 W + 80 W
(1 kHz, 0.1 %, 6 Ω, LPF 20 kHz) (JEITA)
Minimum impedance.. . . . . . . . . . . . . . . . . . . . . . . . . . . . . . . . . . . . . . . . . . . . . 4 Ω
Frequency response. . . . . . . . . . . 15 Hz - 65 kHz (+1 dB, –3 dB, 6 Ω) (JEITA)
Total harmonic distortion. . . . . . . . . . . . . . . . . . . . . . . . . . . . . . . . . . . . . 0.003 %
(1 kHz, output 45 W, 6 Ω, LPF 20 kHz) (JEITA)
Signal-to-Noise Ratio (S/N). . . . . . . . . . . . . . . . . . . . . . . . . . . . . . . . . . . . . . 102 dB
Input Sensitivity (input level for rated output at maximum volume)
LINE: 46 mVrms (JEITA)
PHONO (MM): 1.0 mVrms (JEITA)
Accessories
Power cord x 1
Remote control unit (RC-1251) x 1
Batteries (AA, R6 or SUM-3) x 2
Felt pads x 4
Owner’s manual (this document) x 1
Warranty card x 1
External dimensions
Analog input
Jacks. . . . . . . . . . . . . . . . . . . . . . . . . . . . . . . . . . . . . . . RCA jacks (2 channels) x 2
Input impedance. . . . . . . . . . . . . . . . . . . . . . . . . . . . . . . . . . LINE: 100 kΩ (JEITA)
PHONO: 48 kΩ (JEITA)
RIAA deviation PHONO (MM) . . . . . . . . . . . . . . . . . 20 Hz to 15 kHz, ±0.5 dB
Digital input
COAXIAL jack. . . . . . . . . . . . . . . . . . . . . . . . . . . . . . RCA jack x 1 (0.5 Vp-p/75 Ω)
OPTICAL jack. . . . . . . . . . . . . . . . . . . . . . . . . . . . . . . . . . . Optical digital jack x 1
(−24.0 to −14.5 dBm peak)
USB port. . . . . . . . . . . . . . . . . . . . . . . . . . . . . USB type B x 1 (USB 1.1 or higher)
Input sampling frequency
COAXIAL/OPTICAL . . . . . . . . . . . . . . . . . . . . . . . . . . . . . . . 32 kHz to 192 kHz
USB . . . . . . . . . . . . . . . . . . . . . . . . . . . . . . . . . . . . . . . . . . . . . . . 32 kHz to 96 kHz
ENGLISH
Audio input
368mm
342mm
77mm
CD/Super Audio CD Player
400mm
Compatible format. . . . . . . . . . . . . . . . . . . . . . . . . . . Super Audio CD, CD-DA
Compatible disc type. . . . . . . . . . . . . . Super Audio CD, CD, CD-R, CD-RW
Playback mode. . . . . . . . . . . . . . . . . . . . . . . . . . . . . . . . . . . . . . . . . . . . DSD native
< Design and specifications are subject to change without notice.
D/A Converter
Digital filter. . . . . . . . . . . . . . . . . . . . . . . . . . . . . . . 32 bit 8-times oversampling
< Weight and dimensions are approximate.
< Illustrations may differ slightly from production models.
General
Power supply
Europe model. . . . . . . . . . . . . . . . . . . . . . . . . . . . . . . . . . . . . . AC 230 V, 50 Hz
U.S.A./Canada model. . . . . . . . . . . . . . . . . . . . . . . . . . . . . . . AC 120 V, 60 Hz
Korea model . . . . . . . . . . . . . . . . . . . . . . . . . . . . . . . . . . . . . . . AC 220 V, 60 Hz
Power consumption. . . . . . . . . . . . . . . . . . . . . 105 W (standby mode: 0.5 W)
External dimensions (W x H x D)
400 x 77 x 368 mm (15-3/4” x 3” x 14-1/2”)
(including protrusions)
Weight. . . . . . . . . . . . . . . . . . . . . . . . . . . . . . . . . . . . . . . . . . . . . . . . . 9 kg (19-7/8 lb)
Operating temperature. . . . . . . . . . . . . . . . . . . . . . . . . . . . . . . . +5 °C to +35 °C
Operating humidity . . . . . . . . . . . . . . . . . . . . 5 % to 85 % (no condensation)
Storage temperature . . . . . . . . . . . . . . . . . . . . . . . . . . . . . . . . . –20 °C to +55 °C
27
ESOTERIC COMPANY
1-47 Ochiai, Tama-shi, Tokyo 206-8530 Japan Phone: (042) 356-9156 e-mail: [email protected]
TEAC AMERICA, INC.
7733 Telegraph Road, Montebello, California 90640 U.S.A. Phone: (323) 726-0303 e-mail: [email protected]
TEAC CANADA LTD.
5939 Wallace Street, Mississauga, Ontario L4Z 1Z8, Canada Phone: (905) 890-8008
TEAC MEXICO, S.A. DE C.V.
Río Churubusco 364, Colonia Del Carmen, Delegación Coyoacàn, CP 04100, México DF, México Phone: (5255)5010-6000
TEAC UK LTD.
Suites 19 & 20, Building 6, Croxley Green Business Park, Hatters Lane, Watford, Hertfordshire, WD18 8TE, U.K. Phone: (0845) 130-2511
TEAC EUROPE GMBH
Bahnstraße 12, D-65205 Wiesbaden-Erbenheim, Deutschland Phone: 0611-71580
This appliance has a serial number located on the rear panel. Please record the
model number and serial number and retain them for your records.
Model number
Serial number
0110. MA-1537A