1
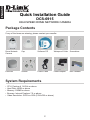
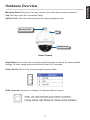
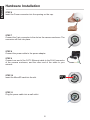
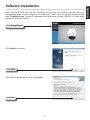
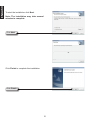
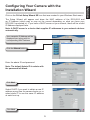
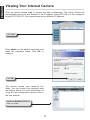
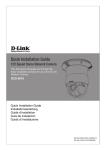
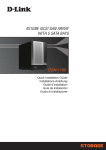
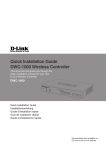
High Speed
Dome Network Camera
DCS-6915
Quick Installation Guide +
Installationsanleitung +
Guide d’installation +
Guía de instalación +
Guida di Installazione +
ENGLISH
Quick Installation Guide
DCS-6915
High Speed Dome Network Camera
Package Contents
If any of the items are missing, please contact your reseller.
Dome Network
Camera
Cap
Software CD
Waterproof Collar Screwdriver
Lubricant
Screws
Power Cable
Power Adapter
System Requirements
•
•
•
•
•
CPU: Pentium 4 1.4GHz or above
Hard Disk: 40GB or above
Memory: 256MB or above
Browser: Internet Explorer 7.0 or above
Video Resolution: SVGA or XGA (1024x768 or above)
2
Mini Pendant
Mounting Point:This part of the cap is used to mount the dome camera enclosure.
Cap:This cap covers the Connection Panel.
Optical Cover:This clear dome protects the camera apparatus from.
Mounting Point
Cap
Optical Cover
Dome Camera
Reset Button:The button can be used to reset the system or restore the factory default
settings. To reset, simply press and hold the button for 10 seconds.
Power Socket:This is 3 pin socket accepts the power cable.
RJ45 connector:Connect you category 5 ethernet cable to this port.
3
ENGLISH
Hardware Overview
ENGLISH
Hardware Overview
Alarm I/O:Support two digital alarm outputs and four digital alarm inputs.
Audio I/O:Support one audio input and one audio ouput.
Micro SD card slot:Support micro sd card storage.
Alarm I/O
Reset Button
Audio I/O
RJ45 connector
Power Socket
Micro SD card slot
Connections Panel
4
STEP 1
Unpack the DCS-6915 and remove the dome camera unit.
STEP 2
Remove the protective cover and PE sheet.
STEP 3
Apply some lubricant on the cover’s waterproof seal to make
the installation process smoother. Attach the optical cover to the
camera body.
The small protrusions on the cover must align with the four holes
on the camera body.
STEP 4
Gently press down the dome cover with two hands on the side of it.
Warning: DO NOT press down on the optical cover. This might
cause damage to the camera.
STEP 5
Screw the dome cover and body together.
5
ENGLISH
Hardware Installation
ENGLISH
Hardware Installation
STEP 6
Insert the Power connector into the opening on the cap.
STEP 7
Connect the 3-pin connector to the slot on the camera enclosure. The
connector will lock into place.
STEP 8
Connect the power cable to the power adapter.
STEP 9
Connect one end of the CAT 5 Ethernet cable to the RJ-45 connector
of the camera enclosure, and the other end of the cable to your
network.
STEP 10
Insert the MicroSD card into the slot.
STEP 11
Plug the power cable into a wall outlet.
6
Insert the DCS-6915 CD into the CD-ROM drive. If the CD Autorun function does not
automatically start on your computer, click Windows® Start > Run. In the Run command box
type “D:\autorun.exe”, where D: represents the drive letter of your CDROM. If it does start,
proceed to the next screen.
Click Setup Wizard
Click Next to continue.
Click Next
Click Yes to accept the License Agreement.
Click Yes
7
ENGLISH
Software Installation
ENGLISH
To start the installation click Next.
Note: The installation may take several
minutes to complete.
Click Next
Click Finish to complete the installation.
Click Finish
8
Click on the D-Link Setup Wizard SE icon that was created in your Windows Start menu.
The Setup Wizard will appear and show the MAC address of the DCS-6915 and
an IP Address (which may or may not be correct depending on what you have your
DCS-6915 connected to). If you have a DHCP server on your network, there will be a valid
IP Address displayed here.
Note: A DHCP server is a device that supplies IP addresses to your network devices
automatically.
Your camera’s IP Address will be
displayed here along with its
corresponding MAC Address.
00.ff.11.11.66.88
Click the Wizard button
Enter the admin ID and password.
Note: The default Admin ID is admin with
the password left blank.
Click Next
Select DHCP if you want to obtain a new IP
address every time the camera boots up, or
select static IP to use the same IP address
at each boot up.
Click Next
9
192.168.0.20
DCS-6915
ENGLISH
Configuring Your Camera with the
Installation Wizard
ENGLISH
Viewing Your Internet Camera
Click the button labeled Link to access the web configuration. The Setup Wizard will
automatically open your web browser to the IP address of the DCS-6915, in this example it
is:http://192.198.0.20. Your camera may have a different IP Address.
00.ff.11.11.66.88
192.168.0.20
Click Link
Enter admin as the default username and
leave the password blank. Click OK to
continue.
DCS-6915
Click OK
This section shows your camera’s live
video. You can control your settings using
the buttons below. For more information on
using the web configuration, please refer to
the user manual.
Install the ActiveX control to
view live video.
10
DCS-6915
Follow the steps below to mount the camera enclosure with the pendant mount.
STEP 1
Make a cable entry hole on the wall to recess the
cables. Alternatively, cables can be threaded
through the cable entry hole on the mounting
plate.
Sponge
STEP 2
To prevent insects from entering the pendant
mount, you may block the cable entry hole with
the supplied sponge in two different ways.
STEP 3
Thread the cables through the pendant mount
and affix the pendant mount on the wall with
screws and screw anchors (not supplied).
Sponge
STEP 4
Attach the waterproof collar to the pendant
mount.
STEP 5
Thread the cables through the cap and affix it
to the pendant mount with the supplied screws
and washers.
STEP 6
Connect the cables to the camera enclosure.
Attach the camera enclosure to the mount and
affix it with the supplied bolt.
Note: After threading the cables, please block the cable entry hole with the supplied sponges
to prevent insects from entering the tube.
11
ENGLISH
Standard or Mini Pendant Mount
ENGLISH
TECHNICAL SUPPORT
United Kingdom (Mon-Fri) , Website: http://www.dlink.com
Home Wireless/Broadband 0871 873 3000 (9.00am–06.00pm, Sat 10.00am-02.00pm)
Managed, Smart, & Wireless Switches, or Firewalls 0871 873 0909 (09.00am- 05.30pm)
(BT 10ppm, other carriers may vary.)
Ireland (Mon-Fri), Website: http://www.dlink.com
All Products 1890 886 899 (09.00am-06.00pm, Sat 10.00am-02.00pm)
Phone rates: €0.05ppm peak, €0.045ppm off peak times
12