1
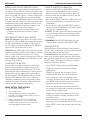
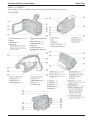
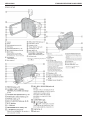
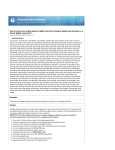
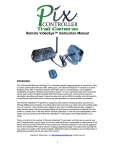
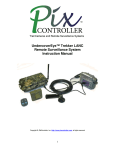
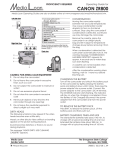
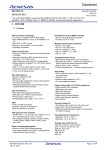
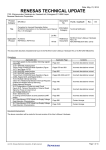
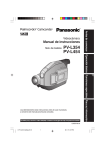
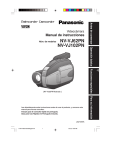
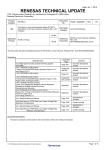
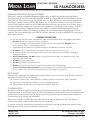
Media Loan Proficiency Required Operating Guide for SD Palmcorders Media Loan Operating Guides are also available online at www.evergreen.edu/media/ml/. Standard Definition (SD) Palmcorders There are a variety of Standard Definition Palmcorders available for checkout through Media Loan’s General Access. These include Sony TRV38 &HC65, Canon ZR series (800/850/900), and the Canon DC410. All cameras except the four DC410’s use Mini DV tapes as their recording medium. The DC410 cameras record to Mini DVD. Proficiency is required to checkout any of these cameras. You must be proficient in the use of the SD Palmcorders and have one quarter of successful usage/ checkouts with these cameras in order to receive a proficiency in HD and 3-chip cameras available through General Access. Additional restrictions apply to cameras available through Advanced Production Services (APS). This handout provides basic information about the operation of these cameras. For more information and a PDF of complete manuals, visit the “Handouts” page on the Media Loan web site. General Precautions 11 As with any sensitive piece of equipment, care should be taken when using digital palmcorders. 11 Do not expose this equipment to rain or moisture. 11 To avoid damage to the internal parts of the EVF (electronic viewfinder), do not aim your camcorder at the sun or other bright objects. 11 Extended high temperature or sudden changes in temperature should be avoided. 11 Do not leave your camcorder or the power supply turned on when not in use. 11 Store and handle your camcorder so that it will not be subjected to unnecessary shaking or striking movement. 11 Mini DV Palmcorders - Do not record over a previously used tape, this degrades quality and gets the video heads dirty. 11 Do not drop the camcorder! 11 Do not use excessive physical force! 11 Never push objects of any kind into the camcorder through any opening! 11 You are 100% financially responsible for any equipment you checkout from Media Loan. Please review Media Loan’s Policies & Procedures prior to checking out equipment. Dirty Heads The following symptoms may appear if the video heads become even a little dirty. Return camera to Media Loan to have the heads cleaned. 00 Mosaic or other blocky video artifacts or banding appear on the picture during playback. 00 Sound becomes distorted, or there is no sound during playback. 00 The message “HEADS DIRTY, USE CLEANING CASSETTE” appears. Condensation Moving the camcorder rapidly between hot and cold temperatures may cause condensation (water droplets) to form on its internal surfaces. When condensation is detected the camcorder automatically shuts off, a warning message should appear. Stop using the camcorder if condensation is detected. Continued use may damage the camcorder. Remove the cassette or dvd, place the camcorder in an airtight plastic bag and let it adjust to temperature changes slowly before removing it from the bag. A cassette can not be loaded when condensation is detected. After the condensation warning stops flashing, wait for one more hour before resuming use. Media Loan 360.867.6253 Please Recycle! The Evergreen State College Olympia, WA 98505 SD Palmcorders | 08.31.10 | AG Media Loan Standard Definition Palmcorders Media Loan Palmcorder Package Cassette insertion & removal 1. Slide the TAPE EJECT or OPEN/EJECT switch to open the Cassette Compartment cover (located on bottom of camera). The Cassette Holder slides out. 2. Insert a cassette with its window side facing out and the arrow pointing down. 3. Press on the PUSH or PUSH TO CLOSE mark to close the cassette compartment cover then close the outer compartment. 4. To eject the tape—slide the TAPE EJECT switch to open the Cassette Compartment cover and pull out the tape, after the compartment opens. All palmcorders are provided with some general accessories. These always include one battery and an AC able for powering the camera. Additionally, there are usually AV cables, a remote control and lens cap. The Canon ZR series cameras should also come with an additional adapter that is used to convert the AV output to a stereo signal so that headphones can be used with the camera. If you checkout headphones with these cameras, also make sure that you have this adapter. Note: Please refer to illustrations at end of Operating Guide for location of camera features. Note: You may need to loosen the hand strap to eject the tape. When inserting tape, make sure it faces the right direction and push in completely. Providing power to the camera With AC Adapter: Open DC In jack cover, insert DC cable into place. Make the connection between the DC cable and the AC adaptor. Then plug in the AC Adaptor. Always unplug the AC Adaptor from the AC outlet when not in use. warning: DO NOT PUSH where the tape compartment is marked “DO NOT PUSH.” Menu Selection Although many of the functions of the cameras are the same, methods of accessing them through the menus of each camera varies. With Battery: Slide battery into camera with the connectors facing into the camera. Battery should slide in easily and click into place. To remove battery, make sure camera is powered off. Slide or depress Battery Release, then slide battery and lift away from camera. Canon ZR series: For most functions, camera must be in Program mode. Open the LCD Panel and locate the joystick on the bottom left and the FUNC button. The joystick is used to navigate the menu and select options: Charging the Battery Turn off the camcorder and attach the battery pack to the camcorder by lightly pressing the battery pack and sliding it down until it clicks. Then plug the power adaptor into a power outlet. Connect the power adaptor to the camcorder’s DC IN terminal. The CHARGE indicator starts flashing. The indicator will stay on when the charging is completed. Once the battery is fully charged disconnect the power adapter from the camcorder and from the power outlet. •Press FUNC to bring up the menu options. MORE Battery precautions •Select the desired menu from the left side of the column by toggling the joystick up or down and pressing it when found. •Toggle the joystick up or down to change applications. •Toggle the joystick left or right to choose desired setting from the available options. •Select the menu icon at the bottom of the screen by pressing the joystick. You can also hold FUNC down for more than 2 seconds to open directly the setup menus screen. 11 Do not drop or knock it 11 Do not get it wet 11 Charged battery packs will discharge naturally, so charge them the day of use to ensure a full charge. •Toggle the joystick up or down to select the setting you want to change and press in the joystick to select. 11 Attach the terminal cover whenever a battery pack is not in use. Contact with metallic objects may cause a short circuit and damage the battery pack. •Select the desired option by toggling the joystick up or down and then press it in to save. •Press FUNC to save the settings and close the menu. 2 Standard Definition Palmcorders Media Loan Sony TRV38: Touch FN on the LCD Touch Screen. The options shown are different depending on whether the camera power switch is set to CAMERA or VCR. Touch desired operation, MENU or Page 1 - 3. Steadyshot Select Steadyshot from the menu for hand-held shot to compensate for camera shake. In the case of excessive camera shake, Steadyshot will not compensate. Sony HC65: Touch MENU on the LCD Touch Screen. The options shown are different depending on whether the camera power switch is set to CAMERA or VCR. Use the Up and Down arrows to navigate through the menu options and press OK to select. Program auto exposure Program AE is part of the menu selection and has settings for the following: 1. Sports—for recording fast action scenes 2. Portrait—ignores subjects in the background 3. Low-light—for extreme low light conditions. 4. Spotlight—where subjects are under a bright light. 5. Surf & Snow—when recording in bright reflective light situations. Canon DC410: Navigating the menu by using the joystick is similar to the Canon ZR series cameras. Camera Recording Manual Focus After connecting the camcorder to a power source, insert a cassette with record tab closed or DVD. Set power mode switch to CAMERA. Locate and press the RECORD/PAUSE Button to start recording. Press it again to pause recording. Canon Cameras - With the mode switch in P, zoom completely into your subject. Press the joystick in then push down towards [FOCUS] to activate manual focus. Adjust the focus with the left and right arrows (right for farther focal distance, left for closer focus. Press down to return to auto-focus or up to save focus adjustment. Zoom out to frame subject. Using the Zoom Move the zoom lever toward W to zoom out (wideangle). Move it toward T to zoom in (telephoto). You can also change the zoom speed by pressing gently for a slow zoom and harder for faster zooms. For focusing on faraway objects, adjust the zoom, then keep the joystick pushed down towards [FOCUS] for more than 2 seconds until an infinite sign appears. Push the joystick down towards [FOCUS] again will return the camcorder to autofocus and left or right will return the camera to manual focus. Playing Back Movies Holding down the lock button set the POWER switch to PLAY or VCR. Canon Cameras - If the joystick guide does not appear on screen, press the joystick to display it. Use the joystick to locate the point where you want to begin playback by toggling it left or right. Push the joystick up to begin playback. Push the joystick up to pause the playback or down to stop it. Sony Cameras - Press FOCUS and the focus indicator (small hand with an F) and turn the focus ring to sharpen focus. Press FOCUS again to return to autofocus. White Balance The white balance function helps you accurately reproduce colors under different lighting conditions so that white objects will always look truly white in your recordings. There are 4 options for the white balance setting. Sony Cameras - If you wish to review your footage without going into VCR mode, hold down the EDIT SEARCH forward or reverse buttons to perform a forward or a reverse visual search. Auto - Settings are automatically set by the camcorder. Use this setting for outdoor scenes. By pressing PLAY for more than 5 seconds, you will turn on the Repeat Playback when the tape reaches its end. Daylight - For recording outdoors on a bright day. Special Effects and features Tungsten - For recording under tungsten and tungsten type (3-wavelength) fluorescent lighting. Steadyshot, digital zoom, program AE, high speed shutter, audio dubbing using external or builtin microphone, auto focus with manual focus capability, and many digital effects. Set - Use the custom white balance for special situations not covered by the other options. 3 Media Loan Standard Definition Palmcorders Palmcorder Proficiency test Canon Cameras - With the mode switch on P, press FUNC button then scroll to the currently selected white balance. When you select [SET] do not press FUNC and continue instead with the procedure below. Written Test: Complete this written portion on a separate sheet of paper before arriving for your operational proficiency. 1. What general precautions should you observe when using the palmcorder? Point the camera at a white object, zoom in until it fills the whole screen and press the joystick. When the adjustment is completed, the WB icon will stop flashing and stays on. The camcorder retains the custom setting even if you turn off the camcorder. Press FUNC to save the setting and close the menu. 2. List the steps in providing battery power to the palmcorder. 3. List the steps to insert a casette. 4. List the steps in displaying the menu and selecting an item for each camera. Sony Cameras - Select White Balance from the menu and choose HOLD. Follow the above procedure. 5. How do you adjust the white balance for each camera? 6. How do you set manual focus for each camera? Manual Exposure Adjustment 7. List the different auto exposures for each camera. Backlit subjects may be underexposed or subjects under strong lights may be overexposed. To correct this, you can manually adjust the exposure. 8. Where can you find the complete manuals for more information about these cameras? 9. What is the extent of your financial responsibility when you check out the palmcorder? Canon Cameras - With the Mode switch set to P (except for fireworks settings), if the joystick does not appear on screen, press the joystick to display it. Push the joystick UP towards [EXP]. [EXP] on the joystick guide changes to light blue and the exposure adjustment indicator and the neutral value “+/- 0” appear on the screen. If you operate the zoom during exposure lock, the brightness of the image may change. Pushing up on the joystick will return the camcorder to auto exposure. Operational Proficiency: To be done during your scheduled appointment. A. Remove the palmcorder from the case and identify all controls and parts. B. Correctly and securely set up palmcorder on a tripod. AV Transfer C. Attach the palmcorder to its AC adaptor and a monitor. Use a 4 to 4 or 4 to 6 pin DV firewire cable to dub between two digital camcorders or to dub to a DV deck or a computer. Media Loan has the DV 4 to 4 pin or the 4 to 6 pin firewire cables. You can check them out separately . D. Load a tape. E. Set the clock/date display. F. Set and describe the white balance, auto exposure, and tape speed. more information/features G. Demonstrate how to manually focus each camera. For more information on camera operation and features, please refer to the complete manuals located online at www.evergreen.edu/media/ml. PDFs of the complete manuals are available on the handouts page for your convenience. H. Set the palmcorder for recording using AC. Set up an external mic and plug in headphones. Starting at the beginning of the tape, do some recording. Playback the recording. I. Set up a battery to be charged. J. Pack the palmcorder back in its case. 4 Standard Definition Palmcorders Media Loan Parts & controls Page numbers refer to complete manuals available on the Media Loan web site. SONY trv38 5 Media Loan Standard Definition Palmcorders SONY HC65 6 Standard Definition Palmcorders Media Loan Canon zr series 7 Media Loan Standard Definition Palmcorders Canon DC410 8