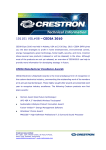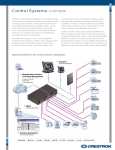
1
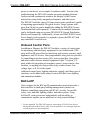
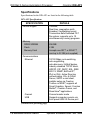
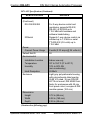
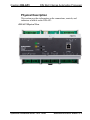
Crestron DIN-AP3
DIN Rail
3-Series™ Automation Processor
Operations & Installation Guide
Regulatory Compliance
This product is Listed to applicable UL Standards and requirements by Underwriters Laboratories Inc.
As of the date of manufacture, the DIN-AP3 has been tested and found to comply with specifications for CE
marking and standards per EMC and Radiocommunications Compliance Labelling.
Federal Communications Commission (FCC) Compliance Statement
CAUTION: Changes or modifications not expressly approved by the manufacturer responsible for
compliance could void the user’s authority to operate the equipment.
NOTE: This equipment has been tested and found to comply with the limits for a Class B digital device,
pursuant to part 15 of the FCC Rules. These limits are designed to provide reasonable protection against
harmful interference in a residential installation. This equipment generates, uses and can radiate radio
frequency energy and, if not installed and used in accordance with the instructions, may cause harmful
interference to radio communications. However, there is no guarantee that interference will not occur in a
particular installation. If this equipment does cause harmful interference to radio or television reception,
which can be determined by turning the equipment off and on, the user is encouraged to try to correct the
interference by one or more of the following measures:
•
Reorient or relocate the receiving antenna
•
Increase the separation between the equipment and receiver
•
Connect the equipment into an outlet on a circuit different from that to which the receiver is connected
•
Consult the dealer or an experienced radio/TV technician for help
Industry Canada (IC) Compliance Statement
CAN ICES-3(B)/NMB-3(B)
The specific patents that cover Crestron products are listed at patents.crestron.com.
Crestron, the Crestron logo, 3-Series, 3-Series Control System, Cresnet, Crestron Fusion, Crestron Mobile, Crestron
Mobile Pro, Crestron Studio, Crestron Toolbox, Fusion EM, Fusion RV, RoomView, and Smart Graphics are either
trademarks or registered trademarks of Crestron Electronics, Inc. in the United States and/or other countries. BACnet is
either a trademark or registered trademark of American Society of Heating, Refrigerating and Air-Conditioning
Engineers, Inc. in the United States and/or other countries. Apple, iPad, and iPhone are either trademarks or registered
trademarks of Apple Inc. in the United States and/or other countries. IOS is either a trademark or registered trademark of
Cisco Technology, Inc. in the United States and/or other countries. Android is either a trademark or registered trademark
of Google, Inc. in the United States and/or other countries. Internet Explorer, Microsoft, and Windows are either
trademarks or registered trademarks of Microsoft Corporation in the United States and/or other countries. Samsung
Smart TV is either a trademark or registered trademark of Samsung Electronics Co., Ltd. In the United Stated and/or
other countries. SD and SDHC are either trademarks or registered trademarks of SD-3C, LLC in the United States and/or
other countries. UL and the UL logo are either trademarks or registered trademarks of Underwriters Laboratories, Inc. in
the United States and/or other countries. Other trademarks, registered trademarks, and trade names may be used in this
document to refer to either the entities claiming the marks and names or their products. Crestron disclaims any
proprietary interest in the marks and names of others. Crestron is not responsible for errors in typography or
photography.
This document was written by the Technical Publications department at Crestron.
©2013 Crestron Electronics, Inc.
Crestron DIN-AP3
DIN Rail 3-Series Automation Processor
Contents
DIN Rail 3-Series Automation Processor: DIN-AP3
1
Introduction ............................................................................................................................... 1
Features and Functions ................................................................................................ 1
DIN Rail Mounting...................................................................................................... 2
3-Series Control Systems ............................................................................................ 3
Modular Programming Architecture ........................................................................... 3
Robust Ethernet and IP Control ................................................................................... 3
Control Apps and XPanel ............................................................................................ 4
Crestron Fusion Enterprise Management .................................................................... 4
SNMP Support ............................................................................................................ 4
Cresnet ......................................................................................................................... 4
Onboard Control Ports................................................................................................. 5
BACnet/IP ................................................................................................................... 5
Specifications .............................................................................................................. 6
Physical Description .................................................................................................... 9
Setup ........................................................................................................................................ 16
Network Wiring ......................................................................................................... 16
Identity Code ............................................................................................................. 16
Installation ................................................................................................................. 17
Hardware Hookup ..................................................................................................... 17
Additional Configuration........................................................................................... 19
Uploading and Upgrading ........................................................................................................ 20
Establishing Communication ..................................................................................... 20
Programs and Firmware ............................................................................................ 21
Configure for Operations ......................................................................................................... 23
Set Date and Time ..................................................................................................... 23
Online Configuration ................................................................................................. 23
Problem Solving ...................................................................................................................... 26
Troubleshooting......................................................................................................... 26
Check Network Wiring.............................................................................................. 28
Reference Documents ................................................................................................ 30
Further Inquiries ........................................................................................................ 30
Future Updates .......................................................................................................... 30
Return and Warranty Policies .................................................................................................. 31
Merchandise Returns / Repair Service ...................................................................... 31
Crestron Limited Warranty........................................................................................ 31
Operations & Installation Guide – DOC. 7491B
Contents • i
Crestron DIN-AP3
DIN Rail 3-Series Automation Processor
DIN Rail 3-Series Automation
Processor: DIN-AP3
Introduction
The Crestron® DIN-AP3 is a 3-Series Control System® designed for DIN
rail mounting applications. Featuring the 3-Series™ control engine, the
DIN-AP3 forms the core of any modern networked home or commercial
building, managing and integrating all the disparate technologies
throughout the facility to make life easier, greener, more productive, and
more enjoyable.
Features and Functions
• Next generation control system
• 3-Series control engine—substantially faster and more
powerful than other control systems
• Exclusive modular programming architecture
• Onboard 256 MB RAM and 2 GB Flash memory
• Rear panel memory card slot
• Industry-standard Ethernet and Cresnet® wired communications
• XPanel with Smart Graphics™ computer and Web based
control
• iPhone®, iPad®, Android™, and Samsung Smart TV® control
app support
• Crestron Fusion™ Enterprise Management Software support
(Continued on following page)
Operations & Installation Guide – DOC. 7491B
Automation Processor: DIN-AP3 • 1
DIN Rail 3-Series Automation Processor
Crestron DIN-AP3
Features and Functions
(Continued)
• SNMP support
• Two RS-232/422/485 COM ports with hardware and software
handshaking
• 4 IR/serial, 4 relay, and 8 Versiport I/O ports
• Native BACnet®/IP support1
• Installer setup via Crestron Toolbox™ or Internet Explorer®2
• Backwards compatible to run existing SIMPL programs
• Full Unicode (multilanguage) support
• Increased network throughput and security
• Secure access though Active Directory integration or
standalone account management
• Hardware level security using 802.1x authentication
• IIS v.6.0 Web Server
• IPv6 ready
• Front panel USB computer console port
• 9M wide DIN rail mountable
DIN Rail Mounting
The DIN-AP3 is designed to snap onto a standard DIN rail for
installation in a wall mount enclosure—Crestron DIN-EN series (sold
separately) or similar—or on a wall panel. DIN rail mounting affords a
very space-efficient, cost-effective, and modular solution for configuring
complete automation systems using the DIN-AP3 along with additional
Crestron and third-party DIN rail mountable devices.
1. License required. The DIN-AP3 support a maximum of 500 BACnet objects
when dedicated for BACnet use only. Actual capabilities are contingent upon the
overall program size and complexity.
2. Web-based installer setup requires the Microsoft® Internet Explorer Web browser
running on a Windows® PC.
2 • Automation Processor: DIN-AP3
Operations & Installation Guide – DOC. 7491B
Crestron DIN-AP3
DIN Rail 3-Series Automation Processor
3-Series Control Systems
Today's commercial buildings and custom homes comprise more
technology than ever before, and all these systems need to be networked,
managed, and controlled in fundamentally new ways. The IP based
3-Series platform is engineered from the ground up to deliver a networkgrade server appliance capable of faithfully handling everything from
lighting and AV system control to total building management.
Crestron 3-Series embodies a distinctively robust, dynamic, and secure
platform to elevate system designs to higher levels of performance and
reliability. Compared to other control systems, Crestron 3-Series provides
a pronounced increase in processing power and speed with more
memory, rock solid networking and IP control, and a unique modular
programming architecture.
Modular Programming Architecture
Designed for enhanced scalability, the DIN-AP3 affords high-speed, realtime multitasking to seamlessly run multiple programs simultaneously.
This exclusive programming architecture lets programmers
independently develop and run device-specific programs for lighting,
shades, HVAC, security, AV, etc., allowing for the optimization of each
program, and allowing changes to be made to one program without
affecting the whole. Even as a system grows, processing resources can
easily be shifted from one 3-Series processor to another without rewriting
any code. The end benefit is dramatically simplified upgradability with
minimal downtime, whether implementing changes on site or remotely
via the network.
Robust Ethernet and IP Control
IP technology is the heart of 3-Series, so it should be no surprise that its
networking abilities are second to none. High-speed Ethernet
connectivity enables integration with IP-controllable devices and allows
the DIN-AP3 to be part of a larger managed control network. Whether
residing on a sensitive corporate LAN, a home network, or accessing the
Internet through a cable modem, the DIN-AP3 provides secure, reliable
interconnectivity with IP-enabled touch screens, computers, mobile
devices, video displays, media servers, security systems, lighting, HVAC,
and other equipment—whether on premises or across the globe.
Operations & Installation Guide – DOC. 7491B
Automation Processor: DIN-AP3 • 3
DIN Rail 3-Series Automation Processor
Crestron DIN-AP3
Control Apps and XPanel
Years ago, Crestron pioneered the world’s first IP-based control system
unleashing vast new possibilities for controlling, monitoring, and
managing integrated systems over a LAN, WAN, and the Internet.
Today, Crestron offers more ways than ever to control the world. Using a
computer, smartphone, tablet, or Smart TV, Crestron controls anything in
the home or workplace from anywhere in the world.
Native to every 3-Series control system, Crestron XPanel technology
transforms any laptop or desktop computer into a virtual Crestron touch
screen. Crestron control apps deliver the Crestron touch screen
experience to iPhone, iPad, and Android devices, allowing safe
monitoring and control of the entire residence or commercial facility
using the one device that goes everywhere. Even Samsung Smart TV has
a Crestron control app available.
Crestron Fusion Enterprise Management
Crestron Fusion provides an integrated platform for creating truly smart
buildings that save energy, enhance worker productivity, and prolong the
life-span of valuable equipment. As part of a complete managed network
in a corporate enterprise, college campus, convention center or any other
facility, the DIN-AP3 works integrally with Fusion RV® Remote Asset
Management Software to enable remote scheduling, monitoring, and
control of rooms and technology from a central help desk. Fusion EM™
Energy Management Software enables organizations to reduce energy
consumption by tracking real-time usage and automating control of
lighting, shades, and HVAC.
SNMP Support
Built-in SNMP support enables integration with third-party IT
management software, allowing network administrators to manage and
control Crestron systems on the network in an IT-friendly format.
Cresnet
Cresnet provides a dependable network wiring solution for Crestron
keypads, lighting controls, thermostats, and other devices that do not
require the higher speed of Ethernet. The Cresnet bus offers easy wiring
and configuration, carrying bidirectional communication and 24 Vdc
4 • Automation Processor: DIN-AP3
Operations & Installation Guide – DOC. 7491B
Crestron DIN-AP3
DIN Rail 3-Series Automation Processor
power to each device over a simple 4-conductor cable. To assist with
troubleshooting, the DIN-AP3 includes our patent-pending Network
Analyzer which continuously monitors the integrity of the Cresnet
network for wiring faults, marginal performance, and other errors.
The DIN-AP3 includes a pair of Cresnet master ports (paralleled) capable
of supporting approximately 20 typical devices. Larger systems with
more than 20 devices can be handled by adding the DIN-HUB Cresnet
Distribution Hub (sold separately). Connectivity for multiple homeruns
can be facilitated using one or more DIN-BLOCK Cresnet Distribution
Blocks (sold separately). Additionally, at least one DIN-PWS50 Cresnet
Power Supply (sold separately) is required to power the DIN-AP3 and
any connected Cresnet devices.
Onboard Control Ports
In addition to Ethernet, the DIN-AP3 includes a variety of control ports
for interfacing with third-party equipment. Its two bidirectional COM
ports and four IR ports allow for interfacing with security systems, small
appliances, and AV devices. Four programmable relay ports are provided
for controlling projection screens, lifts, power controllers, door strikes,
and other contact-closure actuated equipment. Eight “Versiport” I/O
ports enable the integration of occupancy sensors, power sensors, door
switches, or anything else that provides a dry contact closure, lowvoltage logic, or 0-10 volt dc signal.
Additional control ports, lighting and motor controls, and other types of
interfaces can be added easily using Crestron DIN Rail series lighting
and automation modules.
BACnet/IP
Native support for the BACnet/IP communication protocol provides a
direct interface to third-party building management systems over
Ethernet, simplifying integration with HVAC, security, fire and life
safety, voice and data, lighting, shades, and other systems. Using
BACnet/IP, each system runs independently with the ability to
communicate together on one platform for a truly smart building.*
* License required. The DIN-AP3 supports a maximum of 500 BACnet objects
when dedicated for BACnet use only. Actual capabilities are contingent upon the
overall program size and complexity.
Operations & Installation Guide – DOC. 7491B
Automation Processor: DIN-AP3 • 5
DIN Rail 3-Series Automation Processor
Crestron DIN-AP3
Specifications
Specifications for the DIN-AP3 are listed in the following table.
DIN-AP3 Specifications
SPECIFICATION
DETAILS
Control Engine
3-Series;
Real time, preemptive multithreaded / multitasking kernel;
Transaction-Safe Extended FAT
file system; supports up to 10
simultaneously running programs
Memory
DDR3 SDRAM
Flash
Memory Card
256 MB
2 GB
Accepts one SD™ or SDHC™
card up to 32 GB (not supplied)
Communications
Ethernet
10/100 Mbps; auto-switching,
auto-negotiating,
auto-discovery, full/half duplex,
industry-standard TCP/IP stack,
UDP/IP, CIP, DHCP, SSL, IEEE
802.1X; SNMP; BACnet/IP1;
IPv4 or IPv6, Active Directory
authentication, IIS v.6.0 Web
Server, SMTP e-mail client,
installer setup via Crestron
Toolbox or MSIE2; supports all
Smart Graphics, Xpanel, Crestron
Mobile®, Crestron Fusion, and
RoomView® applications
Cresnet master mode
Cresnet
USB
Supports computer console via
front panel USB 2.0 Device port
(Continued on following page)
6 • Automation Processor: DIN-AP3
Operations & Installation Guide – DOC. 7491B
Crestron DIN-AP3
DIN Rail 3-Series Automation Processor
DIN-AP3 Specifications (Continued)
SPECIFICATION
DETAILS
Communications
(Continued)
RS-232/422/485
IR/Serial
Power
Cresnet Power Usage
Default Net ID
Environmental
Installation Location
Temperature
Humidity
Heat Dissipation
Enclosure
Dimensions
Height
Width
Depth
For 2-way device control and
monitoring, supports RS-232,
RS-422, or RS-485 up to
115.2 kBd with hardware and
software handshaking
Supports 1-way device control via
infrared up to 1.2 MHz or serial
TTL/RS-232 (0-5 volts) up to
115.2 kBd
8 watts (0.33 amps @ 24 volts dc)
02
Indoor use only
32º to 104º F (0º to 40º C)
10% to 90% RH
(non-condensing)
26 Btu/h
Light gray polycarbonate housing
with polycarbonate label overlay,
UL94 V-0 rated, 35 mm DIN EN
60715 rail mount, DIN 43880 form
factor for enclosures with 45 mm
front panel cutout, occupies 9 DIN
module spaces (162 mm)
3.72 in (95 mm)
6.28 in (160 mm)
2.29 in (59 mm)
(Continued on following page)
Operations & Installation Guide – DOC. 7491B
Automation Processor: DIN-AP3 • 7
Crestron DIN-AP3
DIN Rail 3-Series Automation Processor
DIN-AP3 Specifications (Continued)
SPECIFICATION
Weight
Available Accessories:
DETAILS
10 oz (277 kg)
3-Series BACnet/IP
Support
CNSP-XX
3-Series Native BACnet/IP
License
Custom Serial Interface Cable
Crestron App
Crestron App for Apple® iOS®
Crestron App for
Samsung Smart TV
Crestron Mobile Pro®
CSP-LIR-USB
DIN Series
Control App for Samsung Smart
TV
Crestron App for iPhone, iPad,
and Android Devices
IR Learner
DIN Rail Modules
Fusion EM
Energy Management Software
Fusion RV
Remote Asset Management
Software
IR Emitter Probe
IRP2
myCrestron
RoomView Express
XPanel
Dynamic DNS Service for
Crestron Systems
Remote Help Desk and Resource
Management Software
Crestron Control for Computers
1. License required. The DIN-AP3 support a maximum of 500 BACnet objects when
dedicated for BACnet use only. Actual capabilities are contingent upon the overall
program size and complexity
2. Web-based installer setup requires the Microsoft Internet Explorer Web browser
running on a Windows PC.
8 • Automation Processor: DIN-AP3
Operations & Installation Guide – DOC. 7491B
Crestron DIN-AP3
DIN Rail 3-Series Automation Processor
Physical Description
This section provides information on the connections, controls, and
indicators available on the DIN-AP3.
DIN-AP3 Physical View
Operations & Installation Guide – DOC. 7491B
Automation Processor: DIN-AP3 • 9
Crestron DIN-AP3
DIN Rail 3-Series Automation Processor
DIN-AP3 Overall Dimensions (Front View)
1
2 3 4 5 6
7
3.56 in
(91 mm)
3.72 in
(95 mm)
LAN
8
9
10
11
12
DIN-AP3 Overall Dimensions (Bottom View)
6.28 in
(160 mm)
2.29 in
(59 mm)
13
10 • Automation Processor: DIN-AP3
Operations & Installation Guide – DOC. 7491B
Crestron DIN-AP3
DIN Rail 3-Series Automation Processor
DIN-AP3 Physical Drawing (Top View)
13
DIN-AP3 Physical Drawing (Side View)
Operations & Installation Guide – DOC. 7491B
Automation Processor: DIN-AP3 • 11
DIN Rail 3-Series Automation Processor
Crestron DIN-AP3
Connectors, Controls, and Indicators
#
CONNECTORS*,
CONTROLS, AND
INDICATORS
DESCRIPTION
1
IO G, 8-1
2
PWR LED
3
NET LED
(1) 9-pin 3.5 mm detachable
terminal block comprising (8)
“Versiport” digital input/output
or analog input ports
(referenced to GND);
Digital input: Rated for 0-24
volts dc, input impedance
20 kΩ, logic threshold
>3.125 V low/0 and <1.875 V
high/1;
Digital output: 250 mA sink
from maximum 24 volts dc,
catch diodes for use with “real
world” loads;
Analog input: Rated for
0-10 volts dc, protected to
24 volts dc maximum, input
impedance 21 kΩ with pull-up
resistor disabled;
Programmable 5 volts, 2 kΩ
pull-up resistor per pin
(1) Dual-color green/amber
LED;
Amber indicates power
supplied to unit via either NET
port;
Green indicates firmware
upload is complete
(1) Amber LED indicates
communication with Cresnet
system
(Continued on following page)
12 • Automation Processor: DIN-AP3
Operations & Installation Guide – DOC. 7491B
Crestron DIN-AP3
DIN Rail 3-Series Automation Processor
Connectors, Controls, and Indicators (Continued)
#
CONNECTORS*,
CONTROLS, AND
INDICATORS
DESCRIPTION
4
HW-R Button
5
Ground
6
SW-R Button
7
Relays 1-4
8
NET – 24 Y Z G
9
MSG LED
(1) Recessed miniature push
button for hardware reset
(reboots the processor)
(1) Captive screw terminal,
chassis ground lug
(1) Recessed miniature push
button for software reset
(restarts the SIMPL program)
(1) 8-pin 3.5 mm detachable
terminal block comprising (4)
normally open, isolated relays;
Rated 1 amp, 30 volts ac/dc;
MOV arc suppression across
contacts
(2) 4-pin 3.5 mm detachable
terminal blocks, paralleled;
Cresnet master port and 24
volt dc power input;
Cresnet master port
24: Power (24 Vdc)
Y:
Data
Z:
Data
G:
Ground
(1) Red LED indicates
processor has generated an
error message
(Continued on following page)
Operations & Installation Guide – DOC. 7491B
Automation Processor: DIN-AP3 • 13
Crestron DIN-AP3
DIN Rail 3-Series Automation Processor
Connectors, Controls, and Indicators (Continued)
#
CONNECTORS*,
CONTROLS, AND
INDICATORS
10
COM 1-2
DESCRIPTION
(2) 5-pin 3.5 mm detachable
terminal block;
Bidirectional RS-232/422/485
port;
Up to 115.2 kBd;
Hardware and software
handshaking support
RS-232
GND
TX
RX
RTS
CTS
RS-422
GND
TXRX+
TX+
RX-
RS-485
GND*
TX-/RXNot Used
TX+/RX+
Not Used
* A ground terminal connection is
recommended but not required.
Ground potential difference must
be under ±4 V.
11
IR/SERIAL 1-4
(1) 8-pin 3.5 mm detachable
terminal block comprising (4)
IR/Serial output ports;
IR output up to 1.2 MHz;
1-way serial TTL/RS-232 (0-5
volts) up to 115.2 kBd;
Individual signal generator per
port, allowing simultaneous
firing of all ports
(Continued on following Page)
14 • Automation Processor: DIN-AP3
Operations & Installation Guide – DOC. 7491B
Crestron DIN-AP3
DIN Rail 3-Series Automation Processor
Connectors, Controls, and Indicators (Continued)
#
CONNECTORS*,
CONTROLS, AND
INDICATORS
12
COMPUTER
Pin 2
Pin 1
Pin 3 Pin 4
DESCRIPTION
(1) USB Type B female, USB
2.0 computer console port
(cable included);
For setup only
PIN
1
2
3
4
13
LAN
Pin 1
Pin 8
Green
LED
Amber
LED
MEMORY
+5 Vdc
Data Data +
Ground
(1) 8-wire RJ-45 with 2 LED
indicators;
10/100BASE-T Ethernet port;
Green LED indicates link
status;
Amber LED indicates Ethernet
activity
PIN
1
2
3
4
14
DESCRIPTION
SIGNAL
TX +
TX RX +
N/C
PIN
5
6
7
8
SIGNAL
N/C
RX N/C
N/C
(1) SD memory card slot;
Accepts one SD or SDHC card
up to 32 GB for memory
expansion (SD memory card
not included)
* Interface connectors for I/O 1-8, RELAYS 1-4, NET, COM 1-2, and
IR/SERIAL 1-4 ports are provided with the unit.
Operations & Installation Guide – DOC. 7491B
Automation Processor: DIN-AP3 • 15
DIN Rail 3-Series Automation Processor
Crestron DIN-AP3
Setup
Network Wiring
When wiring the Cresnet/Ethernet network, consider the following:
• Use Crestron Certified Wire.
• Use Crestron power supplies for Crestron equipment.
• Provide sufficient power to the system.
CAUTION: Insufficient power can lead to unpredictable results
or damage to the equipment. Use the Crestron Power Calculator to
help calculate how much power is needed for the system
(www.crestron.com/calculators).
For networks with 20 or more devices, use a Cresnet Hub/Repeater
(CNXHUB, sold separately) to maintain signal quality.
For more details, refer to “Check Network Wiring” on page 28.
Identity Code
NOTE: The latest software can be downloaded at
www.crestron.com/software.
Net ID
The Net ID of the DIN-AP3 has been factory set to 02. The Net ID is
defined as the “Master” control system on the Cresnet network and
cannot be changed.
IP ID
The IP ID is set within the DIN-AP3’s IP table using Crestron Toolbox.
For information on setting an IP table, refer to the Crestron Toolbox
help file.
16 • Automation Processor: DIN-AP3
Operations & Installation Guide – DOC. 7491B
Crestron DIN-AP3
DIN Rail 3-Series Automation Processor
Installation
The DIN-AP3 should be used in a well-ventilated area. The venting holes
should not be obstructed under any circumstances.
To prevent overheating, do not operate this product in an area that
exceeds the environmental temperature range listed in the table of
specifications. Consider using forced air ventilation to reduce
overheating. Consideration must be given if installed in a closed or multiunit rack assembly since the operating ambient temperature of the
environment may be greater than the room ambient temperature. Contact
with thermal insulating materials should be avoided on all sides of the
unit.
Hardware Hookup
Make the necessary connections as called out in the illustration that
follows this paragraph. Refer to “Network Wiring” on page 16 before
attaching the 4-position terminal block connectors. Apply power after all
connections have been made.
When making connections to the DIN-AP3, note the following:
• Use Crestron power supplies for Crestron equipment.
• The included cable cannot be extended.
Operations & Installation Guide – DOC. 7491B
Automation Processor: DIN-AP3 • 17
Crestron DIN-AP3
DIN Rail 3-Series Automation Processor
Hardware Connections for the DIN-AP3 (Front View)
I/O (G, 8 - 1):
To Controllable Devices
From Device Outputs
-Contact Closures
-Relay Closures
COM (1 - 2):
To RS-232/422/485
Devices
NET (24 Y Z G):
To Any Cresnet
Network Device
18 • Automation Processor: DIN-AP3
RELAY (1 - 8):
To Controllable Devices
IR/SERIAL (1 - 4):
To IRP2 or Serial
Devices
COMPUTER:
To Computer Console
Operations & Installation Guide – DOC. 7491B
Crestron DIN-AP3
DIN Rail 3-Series Automation Processor
Hardware Connections for the DIN-AP3 (Bottom View)
LAN:
10BASE-T / 100BASE-TX
Ethernet to LAN
Hardware Connections for the DIN-AP3 (Top View)
MEMORY:
For SD Card
NOTE: Ensure the unit is properly grounded by connecting the chassis
ground lug to an earth ground (building steel).
NOTE: To prevent overheating, do not operate this product in an area
that exceeds the environmental temperature range listed in the table of
specifications.
Additional Configuration
The DIN-AP3 can be configured from a Web browser. For details, refer
to “Online Configuration” on page 23.
Operations & Installation Guide – DOC. 7491B
Automation Processor: DIN-AP3 • 19
DIN Rail 3-Series Automation Processor
Crestron DIN-AP3
Uploading and Upgrading
Crestron recommends using the latest programming software and that
each device contains the latest firmware to take advantage of the most
recently released features. However, before attempting to upload or
upgrade it is necessary to establish communication. Once communication
has been established, files (for example, programs or firmware) can be
transferred to the control system (or device). Finally, program checks can
be performed (such as changing the device ID or creating an IP table) to
ensure proper functioning.
NOTE: Crestron software and any files on the Web site are for
authorized Crestron dealers and Crestron Service Providers (CSPs) only.
New users must register to obtain access to certain areas of the site
(including the FTP site).
Establishing Communication
Use Crestron Toolbox for communicating with the DIN-AP3; refer to the
Crestron Toolbox help file for details. There are two methods of
communication: USB and TCP/IP.
USB
NOTE: Required for initial setup of Ethernet parameters.
NOTE: Required for loading projects and firmware.
USB Communication
DIN-AP3
USB
PC Running
Crestron Toolbox
The COMPUTER port on the DIN-AP3 connects to the USB port on the
PC via the included Type A to Type B USB cable:
1. Click Tools | System Info.
2. Click the
icon.
20 • Automation Processor: DIN-AP3
Operations & Installation Guide – DOC. 7491B
Crestron DIN-AP3
DIN Rail 3-Series Automation Processor
3. For Connection Type, select USB. When multiple USB devices are
connected, identify the DIN-AP3 by entering “DIN-AP3” in the
Model text box, the unit’s serial number in the Serial text box or
the unit’s hostname (if known) in the Hostname text box.
4. Click OK. Communications are confirmed when the device
information is displayed.
TCP/IP
Ethernet Communication
DIN-AP3
N
LA
PC Running
Crestron Toolbox
The DIN-AP3 connects to PC via Ethernet:
1. Use the Device Discovery Tool (click the
icon) in Crestron
Toolbox to detect all Ethernet devices on the network and their IP
configuration. The tool is available in Toolbox version 1.15.143 or
later.
2. Click on the DIN-AP3 to display information about the device.
Programs and Firmware
Program or firmware files may be distributed from programmers to
installers or from Crestron to dealers. Firmware upgrades are available
from the Crestron Web site as new features are developed after product
releases. One has the option to upload programs via the programming
software or to upload and upgrade via the Crestron Toolbox. For details
on uploading and upgrading, refer to the Crestron Studio™ help file,
SIMPL Windows help file, or the Crestron Toolbox help file.
Crestron
Studio /
SIMPL
Windows
If a Crestron Studio (or SIMPL Windows) program is provided, it can be
uploaded to the control system using Crestron Studio (or SIMPL
Windows) or Crestron Toolbox.
Firmware
Check the Crestron Web site to find the latest firmware. (New users must
register to obtain access to certain areas of the site, including the FTP
site.)
Operations & Installation Guide – DOC. 7491B
Automation Processor: DIN-AP3 • 21
DIN Rail 3-Series Automation Processor
Crestron DIN-AP3
Upgrade DIN-AP3 firmware via Crestron Toolbox.
1. Establish communication with the DIN-AP3 and display the
“System Info” window.
2. Select Functions | Firmware… to upgrade the DIN-AP3
firmware.
22 • Automation Processor: DIN-AP3
Operations & Installation Guide – DOC. 7491B
Crestron DIN-AP3
DIN Rail 3-Series Automation Processor
Configure for Operations
Before setting up the DIN-AP3 the time and time zone need to be set.
The DIN-AP3 can also be further configured using a Web browser.
Set Date and Time
1. Establish communication with the DIN-AP3 as described in
“Establishing Communication” on page 20.
2. In Crestron Toolbox, select Functions | System Clock….
3. Set the date and time.
Online Configuration
The DIN-AP3 can be configured using the built-in Web-based setup tool.
1. Using Internet Explorer, navigate to http://xxx.xx.xx.xxx/setup
where xxx.xx.xx.xxx is the IP address of the control system.
NOTE: The Web-based setup tool is only accessible from Internet
Explorer.
NOTE: If a security warning is displayed, click Install to
continue.
The control system’s splash screen is displayed.
Operations & Installation Guide – DOC. 7491B
Automation Processor: DIN-AP3 • 23
DIN Rail 3-Series Automation Processor
Crestron DIN-AP3
Splash Screen
2. Click Setup to display the “DIN-AP3 Setup” menu.
“DIN-AP3 Setup” Menu
The “DIN-AP3 Setup” menu displays the IP address, hostname and
MAC address of the device. It also allows access to various setup
and programming screens. The “DIN-AP3 Setup” menu contains
buttons for Ethernet Setup, Application Setup, Input/Output
Control, Diagnostics, and About, as shown in the illustration
above.
24 • Automation Processor: DIN-AP3
Operations & Installation Guide – DOC. 7491B
Crestron DIN-AP3
DIN Rail 3-Series Automation Processor
3. Click one of the following options:
• Ethernet Setup – Configures the DIN-AP3’s Ethernet
settings and displays DHCP, hostname, IP address, subnet
mask, default router, domain, and MAC address settings.
⇒ Click Advanced Settings to specify DNS servers, Web
server settings, and SSL settings.
⇒ Click MyCrestron Dynamic DNS to configure the
myCrestron.com Dynamic DNS service.
⇒ Click Ethernet Diagnostics to test Ethernet
communications.
⇒ Click Reboot to reboot the DIN-AP3.
• Application Setup – Selects programs to be loaded on
startup and controls which program(s) are running.
• Input/Output Control – Configures the COM ports,
operates the relays, and monitors the Versiports.
• Diagnostics – Displays information about the connected
devices, hardware configuration, and error logs.
• About – Displays firmware information.
4. Click the
icon to return to the previous screen.
Operations & Installation Guide – DOC. 7491B
Automation Processor: DIN-AP3 • 25
DIN Rail 3-Series Automation Processor
Crestron DIN-AP3
Problem Solving
Troubleshooting
The following table provides corrective action for possible trouble
situations. If further assistance is required, please contact a Crestron
customer service representative.
DIN-AP3 Troubleshooting
TROUBLE
POSSIBLE
CAUSE(S)
CORRECTIVE
ACTION
Device does not
function.
Device is not
communicating
with the network.
Use Crestron Toolbox
to poll the network.
Verify network
connection to the
device.
Use the provided
Crestron power
source. Verify
connections.
Use the Crestron
Power Calculator to
help calculate how
much power is
needed for the
system.
Verify that hardware
configuration matches
software
configuration. Use
Crestron Toolbox to
display the error log.
Device is not
receiving power
from a Crestron
power source.
Device is not
receiving sufficient
power.
MSG LED
illuminates.
Hardware or
software failure.
(Continued on following page)
26 • Automation Processor: DIN-AP3
Operations & Installation Guide – DOC. 7491B
Crestron DIN-AP3
DIN Rail 3-Series Automation Processor
DIN-AP3 Troubleshooting (Continued)
TROUBLE
POSSIBLE
CAUSE(S)
Compilation
error
RLCMCVT166
and
RLCMCVT177.
System locks
up.
Poor analog
versus serial
signal definition in
the SIMPL
Windows program.
Various.
Cresnet device
does not
respond.
Device not wired
correctly.
Improper NET ID
used.
Loss of
functionality due
to electrostatic
discharge.
Improper
grounding.
CORRECTIVE
ACTION
Confirm properly
defined signal
definition in the
program.
Hold down SW-R
button on control
system front panel to
bypass program and
communicate directly
with processor. Refer
to “Troubleshooting
Communications” in
the Crestron 3-Series
Control System
Reference Guide
(Doc. 7150) at
www.crestron.com/
manuals for more
details.
Verify Cresnet wiring.
Verify that device ID
matches NET ID in
the program.
Check that all ground
connections have
been made properly.
(Continued on following page)
Operations & Installation Guide – DOC. 7491B
Automation Processor: DIN-AP3 • 27
DIN Rail 3-Series Automation Processor
Crestron DIN-AP3
DIN-AP3 Troubleshooting (Continued)
TROUBLE
POSSIBLE
CAUSE(S)
CORRECTIVE
ACTION
A/V system
device does not
respond.
IRP2 or serial port
not placed
properly.
Verify placement of
IRP2 (hold phosphor
card under IRP2 while
pressing button) and
tighten serial cables.
Verify that proper IR
or serial port is
defined.
Verify that serial cable
is wired correctly for
RS-232, 422, 485.
User the Crestron
Power Calculator to
help calculate how
much power is
needed for the
system.
Used wrong
IR/serial port.
Serial cable not
wired correctly.
Device is not
receiving sufficient
power.
Check Network Wiring
Use the
Right Wire
To ensure optimum performance over the full range of the installation
topology, use Crestron Certified Wire only. Failure to do so may incur
additional charges if support is required to identify performance
deficiencies because of using improper wire.
Calculate
Power
CAUTION: Use only Crestron power supplies for Crestron equipment.
Failure to do so could cause equipment damage or void the Crestron
warranty.
CAUTION: Provide sufficient power to the system. Insufficient power
can lead to unpredictable results or damage to the equipment. Use the
Crestron Power Calculator to help calculate how much power is needed
for the system (www.crestron.com/calculators).
When calculating the length of wire for a particular Cresnet run, the wire
gauge and the Cresnet power usage of each network unit to be connected
28 • Automation Processor: DIN-AP3
Operations & Installation Guide – DOC. 7491B
Crestron DIN-AP3
DIN Rail 3-Series Automation Processor
must be taken into consideration. Use Crestron Certified Wire only. If
Cresnet units are to be daisy chained on the run, the Cresnet power usage
of each network unit to be daisy chained must be added together to
determine the Cresnet power usage of the entire chain. If the unit is run
from a Crestron system power supply network port, the Cresnet power
usage of that unit is the Cresnet power usage of the entire run. The wire
gauge and the Cresnet power usage of the run should be used in the
following equation to calculate the cable length value on the equation’s
left side.
Cable Length Equation
40,000
L<
RxP
Where: L = Length of run (or chain) in feet
R = 6 Ohms (Crestron Certified Wire: 18 AWG (0.75 mm 2 ))
or 1.6 Ohms (Cresnet HP: 12 AWG (4 mm 2 ))
P = Cresnet power usage of entire run (or chain)
Make sure the cable length value is less than the value calculated on the
right side of the equation. For example, a Cresnet run using 18 AWG
Crestron Certified Wire and drawing 20 watts should not have a length of
run more than 333 feet (101 meters). If Cresnet HP is used for the same
run, its length could extend to 1250 feet (381 meters).
NOTE: All Crestron certified Cresnet wiring must consist of two
twisted pairs. One twisted pair is the 24 and G pair and the other twisted
pair is the Y and Z pair.
Strip and Tin
Wire
When daisy chaining Cresnet units, strip the ends of the wires carefully
to avoid nicking the conductors. Twist together the ends of the wires that
share a pin on the network connector and tin the twisted connection.
Apply solder only to the ends of the twisted wires. Avoid tinning too far
up the wires or the end becomes brittle. Insert the tinned connection into
the Cresnet connector and tighten the retaining screw. Repeat the
procedure for the other three conductors.
Add Hubs
Use of a Cresnet Hub/Repeater (CNXHUB) is advised whenever the
number of Cresnet devices on a network exceeds 20 or when the
combined total length of Cresnet cable exceeds 3000 feet (914 meters).
Operations & Installation Guide – DOC. 7491B
Automation Processor: DIN-AP3 • 29
DIN Rail 3-Series Automation Processor
Crestron DIN-AP3
Reference Documents
All documents mentioned in this guide are available from the Crestron
Web site.
List of Related Reference Documents
DOCUMENT TITLE
3-Series Control Systems Reference Guide
Further Inquiries
To locate specific information or resolve questions after reviewing this
guide, contact Crestron's True Blue Support at 1-888-CRESTRON
[1-888-273-7876] or, for assistance within a particular geographic region,
refer to the listing of Crestron worldwide offices at
www.crestron.com/offices.
To post a question about Crestron products, log onto Crestron’s Online
Help at www.crestron.com/onlinehelp. First-time users must establish a
user account to fully benefit from all available features.
Future Updates
As Crestron improves functions, adds new features and extends the
capabilities of the DIN-AP3, additional information may be made
available as manual updates. These updates are solely electronic and
serve as intermediary supplements prior to the release of a complete
technical documentation revision.
Check the Crestron Web site periodically for manual update availability
and its relevance. Updates are identified as an “Addendum” in the
Download column.
30 • Automation Processor: DIN-AP3
Operations & Installation Guide – DOC. 7491B
Crestron DIN-AP3
DIN Rail 3-Series Automation Processor
Return and Warranty Policies
Merchandise Returns / Repair Service
1.
No merchandise may be returned for credit, exchange or service without prior authorization from
Crestron. To obtain warranty service for Crestron products, contact an authorized Crestron dealer.
Only authorized Crestron dealers may contact the factory and request an RMA (Return
Merchandise Authorization) number. Enclose a note specifying the nature of the problem, name
and phone number of contact person, RMA number and return address.
2.
Products may be returned for credit, exchange or service with a Crestron Return Merchandise
Authorization (RMA) number. Authorized returns must be shipped freight prepaid to Crestron,
6 Volvo Drive, Rockleigh, N.J. or its authorized subsidiaries, with RMA number clearly marked
on the outside of all cartons. Shipments arriving freight collect or without an RMA number shall
be subject to refusal. Crestron reserves the right in its sole and absolute discretion to charge a 15%
restocking fee plus shipping costs on any products returned with an RMA.
3.
Return freight charges following repair of items under warranty shall be paid by Crestron,
shipping by standard ground carrier. In the event repairs are found to be non-warranty, return
freight costs shall be paid by the purchaser.
Crestron Limited Warranty
Crestron Electronics, Inc. warrants its products to be free from manufacturing defects in materials and
workmanship under normal use for a period of three (3) years from the date of purchase from Crestron,
with the following exceptions: disk drives and any other moving or rotating mechanical parts, pan/tilt heads
and power supplies are covered for a period of one (1) year; touch screen display and overlay components
are covered for 90 days; batteries and incandescent lamps are not covered.
This warranty extends to products purchased directly from Crestron or an authorized Crestron dealer.
Purchasers should inquire of the dealer regarding the nature and extent of the dealer's warranty, if any.
Crestron shall not be liable to honor the terms of this warranty if the product has been used in any
application other than that for which it was intended or if it has been subjected to misuse, accidental
damage, modification or improper installation procedures. Furthermore, this warranty does not cover any
product that has had the serial number altered, defaced or removed.
This warranty shall be the sole and exclusive remedy to the original purchaser. In no event shall Crestron
be liable for incidental or consequential damages of any kind (property or economic damages inclusive)
arising from the sale or use of this equipment. Crestron is not liable for any claim made by a third party or
made by the purchaser for a third party.
Crestron shall, at its option, repair or replace any product found defective, without charge for parts or labor.
Repaired or replaced equipment and parts supplied under this warranty shall be covered only by the
unexpired portion of the warranty.
Except as expressly set forth in this warranty, Crestron makes no other warranties, expressed or implied,
nor authorizes any other party to offer any warranty, including any implied warranties of merchantability or
fitness for a particular purpose. Any implied warranties that may be imposed by law are limited to the terms
of this limited warranty. This warranty statement supersedes all previous warranties.
Crestron software, including without limitation, product development software and product operating system software is licensed
to Crestron dealers and Crestron Service Providers (CSPs) under a limited non-exclusive, non-transferable license pursuant to a
separate end-user license agreement. The terms of this end user license agreement can be found on the Crestron Web site at
www.crestron.com/legal/software_license_agreement.
Operations & Installation Guide – DOC. 7491B
Automation Processor: DIN-AP3 • 31
Crestron Electronics, Inc.
15 Volvo Drive Rockleigh, NJ 07647
Tel: 888.CRESTRON
Fax: 201.767.7576
www.crestron.com
Operations & Installation Guide – DOC. 7491B
(2035917)
09.13
Specifications subject to
change without notice.