1
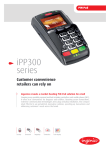
Quick Merchant Operator Guide – IPP350
IPP350 Terminal Features
USB PORT Location
INTEGRATED
CONTACTLESS reader
MAGNETIC STRIP reader
Yellow OPTION buttons
ALPHANUMERIC keys
MENU button
Red CANCEL button
Blue FUNCTION button
Green OK button
Yellow CLEAR button
SMART CARD (CHIP) reader
Note: The first three yellow option buttons will be used as the ‘Cheque’, ‘Savings’ and ‘Credit’ keys. The
fourth soft key will not be used.
During Idle state, only the [Menu] and [Func] buttons are operable. Pressing either button will open the
Main Functions Menu.
Key functions
Power ON/OFF
To POWER ON, simply connect the terminal’s USB cable to the POS.
To REBOOT, hold down both the [FUNC] and [CLEAR] keys on the terminal at the same time.
To POWER OFF, power from the POS will need to be cut-off. The terminal can’t be shut down locally as
it is powered via USB. This will need to be done by unplugging the USB cable, shutting down the POS, or
putting the POS in sleep mode (or any other state where power is cut off to the USB port).
Terminal Functions Menu
1. Press the [MENU] key
2. Press [1] to enter the EFTPOS menu
3. Press [2] to enter the TERMINAL menu
4. Press [4] to enter the PCEFTPOS menu
CBA3002 220213
Status Bar
When the terminal is powered-on, the terminals’ Operating System provides data to display the Status
Bar as follows, and consisting of the information as described below.
Information
Indicator
Description
System Date and Time
This shows the current system time and date.
Security Status
This indicates that Ingetrust keys have been injected and
that terminal data is secure.
Smart Base Indicator
This indicates that the terminal is paired with a smart base.
Note: This is only displayed for the cordless IWL252.
Power Condition
This indicates that the terminal is connected to mains
power.
Battery Level
This is the charge level on the portable device and indicates
whether or not the battery is currently charging.
Note: This is only displayed for the cordless IWL252.
Dial-up Modem Status
This indicates that the internal (dial-up) modem on the
base is configured but not enabled.
Note: This is only displayed for the ICT250 & IWL252.
This indicates that the internal (dial-up) modem on the
base is enabled and connection established.
While the modem is dialling, the Host number icon is
coloured yellow, turning green and displaying ‘PSTN’
text when connection is made.
Base Serial Number
This is the serial number of the base (cradle) to which the
portable device is paired.
Note: This is only displayed for the cordless IWL252.
Bluetooth Icon
This indicates the status of the Bluetooth link between
the portable device and the base.
Note: This is only displayed for the cordless IWL252.
Contactless LEDs
Quick Merchant Operator Guide – IPP350
The first LED, when continuously turned on (i.e. not
flashing), indicates that contactless processing is enabled
for the transaction. The rest of the LEDS are only turned
on whilst the contactless transaction is being processed.
Page 2
Purchase – Swipe and EMV with PIN/Signature
1. Initiate a purchase transaction on the POS
2. Swipe or insert the card
3. Select the account by pressing the function keys below the CHQ, SAV, CR text
4. Enter PIN or press [OK] for signature (Note: signature is only for credit transactions)
5. Wait for processing to be completed
6. Remove card when prompted by the terminal
7. Verify signature if it is a signature transaction. Press [YES] to approve or [NO] to decline
8. Transaction is approved and merchant copy of the receipt is printed
9. Press [YES] to print customer copy or [NO] to suppress
Purchase – Contactless
1. Initiate a purchase transaction on the POS
2. Tap card on the contactless reader once ‘Present Card’ sign with contactless logos are displayed
3. Wait for processing to be completed
4. Transaction is approved
Note:
For contactless transactions, the merchant receipt will only be printed if a signature is required (based
on the terminal and contactless card processing rules). A customer copy or a duplicate receipt may be
printed on request.
Purchase – Manual Entry (Damaged Card)
1. Initiate a purchase transaction on the POS
2. Press [Func] on the keypad
3. Key in the card number on the keypad and press [OK]
4. Enter the card expiry date and press [OK]
5. Enter the CCV and press [OK]
6. Transaction type defaults to credit, press [OK]
7. Wait for processing to be completed
8. Verify signature on printed merchant receipt, press [YES] to approve or [NO] to decline
9. Transaction is approved and customer copy of receipt is printed
Purchase – Low Value Payment (LVP)
Note:
This function is only available to clients that provide certain types of goods or services. The merchant
category codes allowed LVP are determined by the credit card schemes. Non-qualified merchants may
apply for an exemption if they wish to offer LVP.
If the terminal is enabled, certain other conditions must then be met for the transaction to qualify for LVP
processing including the transaction is a purchase transaction with no cash out; the card is present and
is a Visa card, MasterCard card, or an AMEX card; the credit account is used; and the total transaction
amount (including taxes) is less than or equal to the LVP limit.
Page 3
1. Initiate a purchase transaction on the POS
2. Swipe or insert the card
3. S
elect credit account by pressing the function key below the CR text (Note: only transactions using the
credit account will qualify for LVP processing. The terminal will not prompt for PIN after this screen.)
4. Wait for processing to be completed
5. Transaction is approved
6. Remove card when prompted
Note: For LVP transactions, a signature will not be required; hence, the merchant receipt will not be
printed. A customer copy or a duplicate receipt may be printed on request.
Purchase with Cashout
1. Initiate a purchase with cashout transaction on the POS
2. Swipe or insert the card
3. Select the account by pressing the function keys below the CHQ or SAV text
4. Enter PIN and press [OK]
5. Wait for processing to be completed
6. Transaction is approved
7. Remove card when prompted
Cashout
1. Initiate a cashout transaction on the POS
2. Swipe or insert the card
3. Select the account by pressing the function keys below the CHQ or SAV text
4. Enter PIN and press [OK]
5. Wait for processing to be completed
6. Transaction is approved
7. Remove card when prompted
Refund
1. Initiate a refund transaction on the POS
2. If prompted by the terminal, enter the operator password or the manager password and press [OK]
3. Swipe, insert or tap the card
Note: Remainder of refund transaction flow is the same as that of a purchase transaction
Quick Merchant Operator Guide – IPP350
Page 4
MOTO (Mail Order / Telephone Order)
MOTO is the ability to process credit card transactions when the card is not present.
Note: MOTO processing functionality is not automatically available; it is enabled/disabled from CBA TMS,
but must be supported by the POS.
1. Initiate a MOTO transaction (enter the complete card number, expiry date, and CCV) on the POS
2. Transaction type defaults to Credit, press [OK]
3. Wait for processing to be completed
4. Transaction is approved
How to obtain a duplicate receipt
This request is actioned from the POS. Allows you to reprint the last completed transaction, showing all
details of the transaction including whether the transaction was approved.
Changing passwords
1. Press [Func]
2. Select Option 2 – Terminal
3. Enter the Manager Password
4. Select Option 2 – Passwords
5. S
elect Option 1 – MANAGER to set the Manager Password or Option 2 – OPERATOR to set the
Operator Password
6. Enter the password and press [OK]. Repeat to confirm the new password.
Setting the manager refund limit
1. Press [Func]
2. Select Option 1 – EFTPOS
3. Enter the Manager Password
4. Select Option 3 – Special Functions
5. Select Option 1 – Refund Limit
6. S
elect Option 1 – Operator to set the Operator Refund Limit or Option 2 – Manager to set the
Manager Refund Limit
Settlement – Manual Settlement
1. Initiate settlement on the POS
2. Wait for processing to be completed
3. Settlement report is printed
Note: The terminal can also typically be set via the POS to automatically settle every day at a particular
time. Auto-Settlement cannot occur between 22:00 and 0:00 AEST.
Page 5
Pre-Settlement /Cumulative Totals
Pre-Settlement /Cumulative Totals indicate the amount transacted through the terminal since the last
reconciliation was processed.
1. Initiate pre-settlement on the POS
2. Wait for processing to be completed
3. Pre-settlement report is printed.
Shift Totals Request
Shift Totals indicate the amount transacted through the terminal since the last shift totals request was
processed.
1. Initiate settlement on the POS
2. Wait for processing to be completed
3. Shift Totals report is printed
Settlement – Multiple Merchant
When settlement is initiated, the host will effect settlement of all the multiple merchant accounts and the
generic account, but the terminal will not produce a Settlement report for individual multiple merchants.
The settlement, previous settlement and cumulative totals reports will show the host grand totals (bank
totals). See Settlement/ Pre Settlement / Last Settlement Report for details of these reports.
Multiple Merchant Selection
Multiple merchant selection will occur for purchase, cash out, refund and completion transactions when
the multiple merchant function is selected on the POS before the transaction is sent to the PINpad.
When the multiple merchant facility is enabled on the terminal, the terminal will store the multiple
merchant details with the transaction details and display the multiple merchant name or number on
the Financial receipt.
Store and Forward (SAF)
Store and Forward (SAF) is the ability to process offline transactions.
The PINpad will display ‘SAF’ in the top right hand corner of the screen to indicate that there are one or
more entries in the store and forward memory of the terminal.
‘Settlement Sending Stored Transactions’ is displayed if a settlement is triggered and there are SAF
entries that need to be forwarded to the Bank.
‘Sending Stored Transactions’ is displayed when a stored transaction is sent online after the idle timer has
been triggered or the cumulative totals report has been requested.
When a transaction that exceeds your floor limit is performed in the SAF mode, an authorisation number
will need to be obtained by calling the authorisation centre.
Quick Merchant Operator Guide – IPP350
Page 6
Common Terminal Error Messages
Codes
Terminal Display
Description
Recommended Next Steps
01
DECLINED – 01
CONTACT CARD
ISSUER
DECLINED – 13
INVALID AMOUNT
Refer to card
issuer
X0
DECLINED – X0
S0
DECLINED - S0
MODEM ERROR
No response
from host
Modem error
S2
DECLINED – S2
NO ANSWER
DECLINED – S8
NO EFT SERVER
DECLINED – 57
TRAN NOT
ALLOWED
Advise the cardholder to contact their card issuer for
specific details. Ask the Customer for another form of
payment (e.g. different card).
Different limits apply to different types of transactions as
defined in the merchant agreement. For instance, there
is a cashout limit and a refund limit, and if either one is
exceeded, an error message will be displayed. The user
must simply enter a value lower than the relevant limit
defined in the agreement.
Check communications link. Try processing the
transaction again. If still no response, invoke SAF.
This can represent an error with an external modem, or if the
terminal is set to fallback to internal modem and no phone
line has been plugged in. Check communications link on
base and wall plug. Ensure cables are properly connected.
Contact the CBA Merchant Helpdesk.
13
S8
57
Invalid amount
No answer
Link not setup
on EFT Server
Transaction
not permitted
to cardholder
Contact the CBA Merchant Helpdesk.
Advise the cardholder to contact their card issuer for
specific details. Ask the Customer for another form of
payment (e.g. different card).
Training Mode instructions
1. User enables training mode on the POS and initiates a purchase transaction
Note: Only financial transactions can be performed whilst in training mode. Training mode can also only
be enabled when the terminal is in a ready state and when there are no reversal or advices pending.
2. Card is swiped, tapped or inserted
3. Wait for processing “Training Mode” to be completed
4. Cardholder selects their account type (if applicable)
5. W
ait for transaction to be processed. A delay of 2 seconds is added at this stage to simulate the bank
response.
6. T
he final response is displayed based on the cents received in the total amount of the POS request.
For example: ‘APPROVED’ would appear when ‘00’ is passed in the cents field. ‘SIGNATURE
REQUIRED’ would appear when ‘08’ is passed in the cents field.
Note: All transactions processed in training mode will have the following printed on the receipt in place
of the Merchant Name and Address:
**** TRAINING ONLY ****
NOT A VALID TRANSACTION
Page 7
Support
For support, please call the dedicated CBA merchant helpdesk on 1800 022 966, 24 hours a day,
7 days a week.
When calling the Helpdesk, please make sure you have the following information ready.
For authorisations on or over floor limit manual debit card transactions, please call 1800 813 700.
For authorisations on or over floor limit manual credit card transactions, please call 13 26 36.
For stationery orders please visit https://eftposstationery.evolveshop.com.au or call 1800 230 177.
For more information on EFTPOS Integrated terminals and other CBA merchant services, please visit
http://www.commbank.com.au/business/merchant-services/default.aspx
Quick Merchant Operator Guide – IPP350
Page 8