1
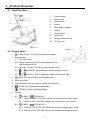
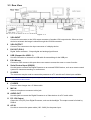
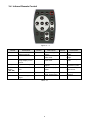
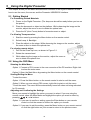
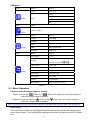
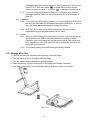
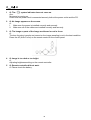
Model DVP505A
User's Manual
Digital Visual Presenter
Table of Contents
1__INTRODUCTION .......................................................................... 2
1-1 INTRODUCTION .......................................................................................2
1-2 CERTIFICATION .......................................................................................2
1-3 WARNING ...............................................................................................2
1-4 SAFETY INSTRUCTION .............................................................................2
1-5 SPECIFICATION .......................................................................................4
2__PACKAGE CONTENT ................................................................ 5
3__PRODUCT OVERVIEW .............................................................. 6
3-1 FRONT/TOP VIEW ...................................................................................6
3-2 CONTROL PANEL .....................................................................................6
3-3 REAR VIEW ............................................................................................7
3-4 INFRARED REMOTE CONTROL ..................................................................8
4__INSTALLATION ........................................................................... 9
4-1 SETTING UP THE DIGITAL PRESENTER ......................................................9
4-2 POWERING ON THE DIGITAL PRESENTER...................................................9
4-3 POSITIONING AND TURNING ON THE LAMPS ...............................................9
5__USING THE DIGITAL PRESENTER ...................................... 10
5-1 GETTING STARTED ...............................................................................10
5-2 USING THE OSD MENU .........................................................................10
5-3 BASIC OPERATION ................................................................................11
5-4 USING THE MOUSE ...............................................................................14
5-5 USING USB AND RS232.......................................................................14
5-6 ADVANCED SETTINGS ...........................................................................14
5-7 SPS SETTINGS AND OPERATION ...........................................................15
5-8 STORAGE AFTER USE............................................................................17
6__Q&A ............................................................................................. 18
1
1__Introduction
1-1 Introduction
This equipment generates and uses radio-frequency energy and, if not installed and used in
accordance with the instruction manual, may cause interference to radio and television
reception. It has been tested and found to comply with the limits for a class A computing device
in accordance with the specifications in Subpart J of Part 15 of FCC Rules, which are designed
to provide reasonable protection against such interference when operated in a commercial
environment. If this equipment does cause interference to radio or television reception, the user
may try to correct the interference by one or more of the following measures:
♦
Reorient the receiving antenna for the radio or television.
♦
Relocate the equipment with respect to the receiver.
♦
Plug the equipment into a different power outlet so the equipment and receiver are
on different branch circuits.
♦
Fasten cables using mounting screws to ensure adequate EMI controls.
1-2 Certification
FCC, CE LVD
1-3 Warning
Please carefully read the user manual before operating the product.
EN 55022 (CE radiation) Warning
This product is intended for use in a commercial, industrial, or educational environment. It is not
intended for residential use.
This is a Class A product. In a domestic environment it may cause radio interference, in which
case the user may be required to take adequate measures. The typical use is in a conference
room, meeting room or auditorium.
1-4 Safety Instruction
Always follow these safety instructions when setting up and using the Digital Presenter:
1. Do not place the Digital Presenter on an unstable trolley, stand or table.
2. Do not use the Digital Presenter near water or sources of heat.
3. Use attachments only as recommended.
4. Use the type of power source indicated on the Digital Presenter. If you are not sure of the
type of power available consult your dealer or local electricity company.
5. Insert the Digital Presenter ’s three-pin grounded plug into a properly grounded socket. If
you have a two-pin socket, contact an electrician to replace it. Do not handle the plug
with wet hands.
6. Always take the following precautions when handling the plug. Failure to do so may result
in sparks or fire.
♦
Ensure the plug is free of dust before inserting it into a socket.
♦
Ensure that the plug is inserted into the socket securely.
2
7. Do not overload wall outlets. Do not use extended extension leads or multi-way plug
boards. Fire or electric shock may be possible.
8. Do not block any cabinet opening with any kind of objects.
9. Never allow liquid of any kind to spill into the Digital Presenter.
10. Except as specifically instructed in this User’s Manual, do not attempt to service this
product yourself. Opening or removing covers may expose you to dangerous voltages
and other hazards. Refer all servicing to qualified service personnel.
11. Unplug the Digital Presenter during thunderstorms or if it is not going to be used for an
extended period. Do not place the Digital Presenter or remote control on top of
beat-emitting equipment or heated objects such as a car, etc.
12. In the following situations unplug the Digital Presenter from the wall outlet and refer
servicing to qualified service personnel:
♦
If the power cable or plug becomes damaged or frayed.
♦
If liquid has been spilled into it or it has been exposed to rain or water ventilation is
provided.
3
1-5 Specification
Image_________________________________________________________________
Pick-up Device
Effective Pixels
Frame Rate
White Balance
Exposure
Image Mode
Freeze
Analog RGB Output
H.Sync. Signal
V.Sync. Signal
Image Signal Level
S-Video, C-Video Output
Portable Storage
1/3” progress scan CCD
1077(H) x 788(V)
15 Frames/sec
Auto/Manual
Auto/Manual
Photo/Text//Gary/Film/Slide
Yes
XGA 75Hz
SVGA 75Hz
60K/47KHz, TTL level, Positive Polarity
75Hz, TTL level, Positive Polarity
0.77Vpp
NTSC / PAL
PC card type II
Optics_______________________________________________________________
Lens
Shooting Area
Zooming
Focusing
Power Source
Consumption
12X (f=5.4~64.8mm); F1.8~2.7
400 mm X 300mm(max.)
36 mm X 27 mm (min.)
12X Optical
4X Digital
Auto/Manual
AC90~240V
15Watts (Lamp off)
30Watts (Lamp on)
Lighting_______________________________________________________________
Lamp type.
Backlight
Size
Cold cathode lamp
Built in
A4 / 268mm x 208mm
Input__________________________________________________________________
VGA Input
Mouse Port
Mic. Input
RS232C
HD-SUB 15 Pins Female
Standard PS2 Mouse
Stereo Mini-Jack
D-SUB 9 Pins Male
Output________________________________________________________________
VGA Output
DVI
S-Video
Composite Video
Audio
USB
DC12V Output
HD-SUB 15 Pins Female x 2
Digital & Analog Receptacle Connector
Mini-DIN 4P
RCA jack
Stereo Mini-Jack
Standard USB Socket (Type)
DC jack, 500mA
Dimension_____________________________________________________________
Operating
Folded
Weight
640 mm (L) X 350 mm (W) X 650 mm (H)
510 mm (L) X 350 mm (W) X 130 mm (H)
About 4.5KG
4
2__Package Content
Make sure that the package contains the following items
♦
Digital Presenter
♦
User’s manual CD
♦
Remote controller
♦
Power cable
♦
VGA cable
♦
USB cable
♦
RS232 cable
♦
Slide Holder
♦
Negative Holder
5
3__Product Overview
3-1 Front/Top View
1.
Camera head
2.
Attach Lens
3.
Camera arm
4.
Lamps
5.
Base light in platform
6.
Handle
7.
Control panel
8.
Lamp Lock
9.
Remote controller slot
10.
PC Card slot
Figure: 3 - 1
Figure: 3 - 2
3-2 Control panel
1
2
(Power button): Turn on/off the Digital Presenter.
Select button:
2.1 AF: Auto Focus
2.2 Adjust: Switch the function mode between Focus
and Brightness, R, B.
2.3 ◄ Or ►: To adjust the value of the function mode,
3
2.4
(SOURCE): Switch between different signal sources.
2.5
(PHOTO / TEXT): Adjust the image of Photo and Text.
(LAMP): Turn on/off the lamps and base light.
4
AWB: Auto WB.
5
Lamp Release: Push the latch to release the lamp arm.
6
(ZOOM OUT): Make the image smaller.
7
(ZOOM IN): Make the image larger.
8
Hot Key:
8.1
(LAMP) +
(ZOOM IN):
8.1.1 Switch to NTSC: The LED indicator will twinkle green light 2 times.
8.1.2 Switch to PAL: The LED indicator will twinkle green light 4 times.
8.2
(LAMP) +
(ZOOM OUT):
8.2.1 Switch to SVGA: The LED indicator will twinkle orange light 1 times.
8.2.2 Switch to XGA: The LED indicator will twinkle orange light 3 times.
6
3-3 Rear View
Figure: 3 - 3
1
VGA INPUT
Connect the connector to the VGA output connector of another VGA output device. When an input
device is selected, the image is shown through the VGA IN connector.
2
VGA OUTPUT
Connect The connector to the input connector of a display device.
3
DVI OUT (DVI-I)
Digital Video connector:Output digital and analog signal format
4
USB (Support for USB 1.1)
Use the connector to connector a USB cable for transmitting via the USB port.
5
PS II Mouse
Connect a PS/2 mouse to this port when user wants to access the menu or cursor function.
6
Serial Control Input (RS232)
Use this port to connect the Digital Presenter to an external RS232 device, such as a remote control
system for classroom teaching or conferences.
7
S-VIDEO
The connector may be used to connect the presenter to a TV set with an S-video input available.
Note: S-Video facilitates better visual presenting effects, such as brighter color and higher resolution than
conventional video format.
8
C-VIDEO
Feed out video images via a C-Video cable.
9
MIC IN
Insert a microphone connector to this jack.
10 AUDIO OUT
Use this jack to connect the Digital Presenter to a Video device via a PC audio cable.
11 DC 12V Output
Output the 12V (DC) from Digital Presenter, such as the backlight. The output current is limited by
500mA.
12 AC IN
Use this to connect the power cable (100 - 240V) for the power input.
7
3-4 Infrared Remote Control
Figure: 3 – 4
Button
1. Power
2. AF
3. Freeze
4. Capture
Description
Turn on and off the
Digital Presenter.
Auto Focus
Keep the current
image display on the
screen.
Capture an image.
Button
Description
8. Zoom Out Make the image
smaller.
9. Focus +
Move the focus to a
nearer area.
10. Focus - Move the focus to a
further area.
11. BRT+
Make the display
brighter.
Make the display
darker.
5. Selection
Button
(▲▼◄►)
6. Menu
Select a function or
item.
12. BRT-
Enter the main menu.
13. Gamma
7. Zoom In
Make the image
larger.
14. AWB
Button
15. Play
16. Del
17.Lamp
Description
Replay the stored
image.
Delete the stored
image.
Switch the lamp
mode.
18.Flip
Turn the image up
and down by 180°.
19.Source Select the image
input source.
Switch the image
20. Enter Confirm your
mode. (Photo/Text).
selection
Auto White Balance.
Table: 3–1
8
4__Installation
4-1 Setting Up the Digital Presenter
1.
Pull up the arm. Adjust the position and height (the height should be 48.5 cm for
operation) of the arm by moving the 3-section joint.
2.
Turning the camera head toward the platform.
Figure: 4–1
Note: The angle of the camera head is limited. Do not turn it forcefully when it reaches the maximal angle.
4-2 Powering on the Digital Presenter
Note: Before using the Digital Presenter, make sure that you have connected it to the computer, video source
or other output devices. See Figure: 3-3, Rear View for the position of connector jacks.
1.
Connect the power cable to the AC IN jacks.
2.
Press (the Power button) for about 1 second to power on the Digital Presenter.
The red LED (flashing until the presenter is started) turns to green.
4-3 Positioning and Turning on the Lamps
You can use the lamps on the both sides of the Digital Presenter for auxiliary lighting
by following some simple steps:
1.
Press and slide the latches to release the lamp lock (see P.7).
2.
Pull up the lamp arms.
3.
Rotate the folded lamp to face the platform as the arrow shows. (Refer to figure
4-1)
Note: The angle of the lamp arm/lamp head is limited. Do not turn it forcefully when it reaches the maximal
angle.
4.
Turn on the lamps by pressing the
Lamp button on the remote control.
5.
You can adjust the lamp arms outward slightly for better lighting.
9
(Lamp) button on the Control panel or
5__Using the Digital Presenter
This chapter shows you the basic and advanced functions of the Digital Presenter as and
how to use the menu, the mouse, and the Presenter USB/RS232 interface.
5-1 Getting Started
For Presenting Printed Materials:
1.
Power on the Digital Presenter. (The lamp arm should be ready before you turn on
the power)
2.
Place the document or object on the platform. While observing the image on the
monitor, adjust the zoom or arm to obtain the optimal size.
3.
Press the AF (Auto Focus) button to focus document or object.
For Viewing Transparencies:
1.
Start the menu by pressing the Menu button on the remote control.
2.
Select Lamp Æ Backlight.
3.
Place the object on the stage. While observing the image on the monitor, adjust
the zoom or arm to obtain the optimal size.
For viewing remote object:
1. Pull out the Close-Up Lens, as shown in Figure 5-1.
2.
Rotate the camera head.
3. While observing the image on the monitor, adjust the zoom or
arm to obtain the optimal size.
Figure: 5-1
5-2 Using the OSD Menu
Showing the Main Menu
Option 1: Connect a PS II mouse to the rear connector of the PS machine. Right click
to show the main menu.
Option 2: Open the Main Menu by pressing the Menu button on the remote control.
Starting/Exiting the Menu
To start the menu:
Option 1: Press the Menu button on the remote control to start or exit the menu.
Option 2: When you are using a PS2 mouse, right click to start or exit the menu.
To exit the menu: The menu will be automatically turned off when not being activated
for 30 seconds.
Adjusting and Confirming the Settings
Move your mouse to highlight the option your want to select. If you are using the
remote control, show the Main Menu and highlight the option you want to select by
pressing , , ◄, or ► buttons.
Option 1: If you want to confirm a setting, press the Enter button on your remote
control or click the mouse to confirm the option you choose.
Option 2: If you want to exit the setting, press the Menu button on your remote control
or click the right button on your mouse to return to the previous menu.
10
OSD Menu
Layer 1
Layer 2
Layer 3
Gamma
Photo / Text
Normal
Display
Gary
Image
Film
Slide
Layer 1
Layer 2
Presenter / VGA In
Source
Layer 1
Layer 2
Layer 3
Capture
Processing
Playback
Delete
Storage
Layer 1
Media
Internal / PC card
Delete All
Enter /Exit
Layer 2
Layer 3
Auto Exposure
Off / On
English / Deutsch / Francais / Italiano
Language
/ Eapanol / Русский /
Setting
/
Output Format
SVGA / XGA
Pointer Color
R/G/B/W/B
Drawing Type
Frame / Line
Video Format
NTSC / PAL / Off
AC Frequency
50Hz / 60Hz
SPS-OFF
Enter Password
Factory Reset
Enter / Exit (PNxxx / VNxxx)
Table: 5-1
5-3 Basic Operation
Zoom, to make the image larger or smaller:
Option 1: Press the
(Zoom In) or
(Zoom Out) button on the control panel to
make the image larger or smaller.
Option 2: Press the Zoom In ( ) or Zoom Out ( ) button on your remote control to
make the image larger or smaller.
Note: The optical zoom will be automatically switched to the digital zoom at the last step of the optical zoom.
Auto Focus:
The Auto Focus function of the Digital Presenter automatically adjusts the camera focus
to the correct value. The function will be performed once as you switch on the PS (Power
On).
11
You may execute the AF (Auto Focus) function by pressing the Auto Focus button.
Option 1: Press the keypad “AF” for executing the AF function.
Option 2: Using the remote controller “AF” button for auto focus function.
Besides, the digital presenter will execute Auto Focus when user adjusting the zoom
in/out.
Focus:
In some cases, you may have to adjust the focus manually.
To adjust the focus manually:
Option 1: Press on the control panel to enter the "Focus" mode. Adjust the focus
) until you see a clear image.
with the Adjust buttons (
Option 2: If you are using your remote control, adjust the focus with the Focus - ( )
and Focus + ( ) buttons until you see a clear image.
Brightness:
To adjust the brightness of the image Presenter:
Option 1: Press on the control panel to enter the "Brightness" mode. Adjust the
brightness value with the Adjust buttons (
) until you are satisfied with
the image brightness.
Note: You may also adjust the lamps for proper lighting or turn on/off the lamps.
Gamma:
Select Gamma to set different gamma.
Select Gamma for different image sharpness.
When you select Photo, the image is displayed in true colors.
When you select Text, the contrast of the image becomes sharp. The Text mode is
particularly useful when you present a text that contains small fonts or is slightly blurred.
It is recommended to use the Photo mode in general conditions.
Image:
Select Image to adjust the image output of your Presenter.
The Normal mode, which is the default setting, will enhance the color display.
When you select Gray, the image is displayed in black and white.
Note: Your presenter will automatically adjust the image size, brightness, color, lamps, and AF, based on your
selection of Slide or Film modes.
You may select Film for a negative effect (each color is turned to its opposite). If you do
so, the lamps are switched to backlights.
The Slide mode is offered to view slides. In such a mode, the
lamps are switched to backlights.
You may place slides or negatives as follows:
1.
Place a slide or negative in the slide or negative holder, as
shown in Figure 5-2.
2.
Insert the slide or negative holder into the slot above the lens.
Figure: 5-2
Storage:
You may use this function to capture the current image display and save it in the internal
or external memory card of the Digital Presenter.
12
To capture an image:
Option 1: If you are using the mouse, click the "Storage". Click "Capture" to capture
the current image display. When the "image capturing" function is in
progress, "Processing" will be shown just at the place of "Capture" location.
Option 2: If you are using the remote control, press the Capture button to capture the
current image display. When the function is in progress, a "Processing ►►"
OSD displays at the upper left of the output image.
To show the captured image:
Option 1: If you are using the mouse, click on OSD "Storage". Click "Playback" to
show the Index screen, where your image storage is displayed in
thumbnails and sorted by the image number. Move the mouse; the blue
selection box on the image index changes accordingly. Whenever the box is
on a thumbnail, you may see the large image by clicking the mouse.
Option 2: If you are using the remote control, press the Play button to show the Index
screen, where you may move the blue selection box on the screen and
select an image file by using the four directional buttons. By pressing the
Enter button on the remote control, you may see the large image of your
thumbnail selection.
At this time, you may navigate through other image files one by one, by using the Left
and Right buttons on the remote control or the mouse.
To delete the captured image:
Option 1: If you use the mouse to perform the "Delete Image" function, you may not
delete any image file unless you have selected the file and enlarged it. Click
the OSD "Storage" and then "Delete" to delete the image. The next file will
be selected on the screen.
Option 2: Press Play on your remote control to enter the Image Index screen. Select
an image file by using the four directional buttons and press the Del button
on the remote control to delete it.
If you have enlarged an image file, you may also delete it by pressing the Del button
on the remote control. If you do so, the next file will be shown on the screen.
To save the image to storage media:
Press the Menu button to enter the Storage menu. Navigate to "Save" and select
"Internal" or "Card" to save the image to the media you have selected.
To delete all images:
Option 1: If you are using the mouse, click the OSD "Storage". Then click the "Delete
All" functional item. A "Delete all images" dialog box pops up asking you to
confirm your deletion. If you do want to delete all the images, move your
mouse to "OK" and click; otherwise, move your mouse to "Cancel" and click
to cancel the operation.
Option 2: If you are using the remote control, press Menu to open the menu. Highlight
"Storage" and press the Enter button. Highlight "Delete All" with the up and
down buttons. Press Enter to pop up the "Delete all images" dialog box
asking you to confirm. If you want to delete all such files, press Enter;
otherwise, press Menu.
Freeze:
Use Freeze to keep the image on screen. After you enable the Freeze mode, the image
freeze on the screen even when you take the object away from the stage.
13
Flip: Press (Flip) on the Remote Controller Select to rotate the image by 180º.
Lamp: Press (Lamp) on the Remote Controller to turn on and off the lamps and the
backlight.
Source:
Option 1: Use Source on the remote control to switch the image input device
(Presenter/VGA In).
Option 2: Use the
(Source) button on the control panel to switch the image
input device (Presenter/VGA In).
For example, when you select VGA In, the Digital Presenter will switch from camera
display to the image sent from the PC output port. You can press Source again to switch
between VGA In and Presenter.
5-4 Using the Mouse
You can also control the Digital Presenter by a PS2 mouse (see the figure 3-3 on p.8 for
PS2 connection). For example, you can move the cursor to adjust the settings or use the
cursor as a pointer for Presenter.
Mouse Keys
The left key functions as Enter. The right key is used for activating the menu. The central
key/bar (when available) is for moving your selection on the menu.
5-5 Using USB and RS232
USB:
You can transmit images to computer via USB interface. To enhance USB transmission,
make sure that your PC supports USB protocol (the Digital Presenter is based on USB
1.1).
RS232:
RS232, a kind of serial protocol, facilitates remote control functions. For example, you
can control the Digital Presenter installed in a conference room from a PC in another
building via RS232.
Note: See the rear panel (page.8) for USB and RS232 connection.
5-6 Advanced Settings
Usually you do NOT need to change the settings introduced in this section in basic
operation.
The following functions are listed in Setting on the main menu.
Note: To resume the default settings, refer to the chart in “Using the Menu.” Alternatively, you can select
Factory Reset to set all the values as default.
AE (Auto Exposure):
AE enable have the best exposing effect of the image automatically. The default value is
on. If you select off, the Auto exposure is disabled.
Note: When you turn off Auto Exposure, You need to adjust the brightness manually.
Language:
Use this function to select an OSD language from several options. There are 8 kinds of
languages English, Deutsch, Francais, Italiano, Eapanol, Русский,
14
,
.
Output Format:
Use Output Format to choose the output mode: XGA (1024 x 768), or SVGA (800 x 600).
The default setting is XGA.
Pointer Color:
Adjust the color of the indication cursor by using the selection buttons (
).
R (Red) Æ G (Green) Æ B (Blue) Æ WhiteÆ Black, the default setting is Red.
Remark setting:
You may select "Box" or "Line" as the indication cursor. The default setting is "Box". If
you use the mouse, the function is available by clicking the left button.
Video Format:
Use Video Format to choose the format of the video output or disable the function. You
can select NTSC (National Television System Committee) or PAL (Phase Alternating
Line).
AC Freq:
Please check your power system frequency (50 or 60HZ) and set it to avoid the flickering
from fluorescent lamp.
Factory Reset:
Use this function to reset all values to the factory default. Select Enter to confirm and Exit
to skip. And it will show firmware version: “PNxxx/VNxxx” (On the last row of this OSD).
5-7 SPS Settings and Operation
1
Setting: Enter the password with your remote control, follow the step:"
+ " " to initiate the SPS setting procedure.
"+"
2
There are three groups available: Setting1~3. For example, if you want to set the
Setting 1, do as follows:
SPS Setting
Setting 1
Setting 2
Setting 3
Default
V Off
Execute
Setting
2.1 Press
to open a screen and select the parameter group you want to
specify. Press "Enter" to select Setting 1. Press on the remote control to
enter the next layer.
SPS Setting
V Setting 1
Setting 2
Setting 3
Default
Off
15
"
2.2 Select the Lamp status, as shown in the following figure:
Lamp
Upper
Backlight
Lamp off
2.3 If you select Upper (Upper Lamp), press on your remote control until
is
highlighted. Press Enter to show Gamma options. Select one, as shown in
the following figure.
Gamma
Photo
Text
Cancel
Upper Lamp
2.4 If you select Photo, press on your remote control until
is highlighted.
Press Enter to show Brightness. Adjust the value, as shown in the following
figure.
Brightness
Cancel
Upper Lamp
2.5 When you complete with the Brightness, press on your remote control until
is highlighted. Press Enter to show White Balance. Adjust the R or B
value, as shown in the following figure.
White Balance
Cancel
Upper Lamp
2.6 When you complete with the R and B values for the White Balance,
press on your remote control until
is highlighted. Press Enter to show
the Setting Value window, where values you have selected untill now are
listed. You may choose to save such values or cancel, as shown in the
following figure:
Setting Value
Gamma
Photo
Brighness
32
White Balance
R
56
B
40
Discard
2.7 Proceed with your setting or stopUpper
doingLamp
so:
2.7.1 If you have selected Save
16
in Step 2.6, a "Save complete"
messages appears for three seconds. Then the screen to the one as
shown in 2.2. You may select
or press Menu on the remote
to configure another lamp.
control to return to Layer 1; or, select
2.7.2 If you have selected Discard in Step 2.6, a "Discard your settings"
message appears. Then the screen returns to the one as shown in
Step 2.2.
2.8 Operation:
2.8.1 If you have your SPS settings ready, you may change the SPS-Off to
the one you want after the presenter has been switched on. In such a
way, the Lamp parameters may be loaded for service.
2.8.2 SPS Off:If you turn off the SPS mechanism, the set of Lamp
parameters at your last presentation will be used.
2.9 Notice:
2.9.1 When the SPS Setting 3 is selected on the menu, you can still adjust
the brightness and WB to meet the varied surrounding condition.
However, your modification will not be saved; that is, the values you
have specified in your SPS selection will be loaded the next time the
presenter is switched on.
2.9.2 The Default setting is the SPS setting by factory default.
5-8 Storage after Use
1. Fold the arm and the camera head until they touch the stage.
2. Turn the camera until it is parallel with the stage.
3. Turn the upper lamps toward the supporting arms.
4. Insert the remote control into the slot on the right of the Digital Presenter.
5. Fold them to both sides of the Digital Presenter until they lock in both sides.
Figure: 5–3
17
6__Q&A
1
Q: The (
) system indicator does not come on.
Ans:
No power is coming on.
Check that the power cord is connected securely both at the power outlet and the PS.
2
Q: No image appears on the screen.
A:
I. Make sure the power is installed correctly and securely.
II. Make sure all of the cables are installed correctly and securely.
3
Q: The image or parts of the image are blurred or not in focus.
A:
The lens focusing is maybe not correct or the image sampling is not in the best condition.
Press the AF (Auto Focus) on the remote control or the control panel.
4
Q: Image is too dark or too bright.
A:
Adjusting brightness setting on the remote controller.
5
Q: Remote controller did not work.
A: Please check the battery.
18
Audio Visual Products
Dukane Corporation
Audio Visual Products Division
2900 Dukane Drive
St. Charles, IL 60174-3395
E-mail: [email protected]
Phone: (630) 762-4040
Orders: (800) 676-2485
Fax: (630) 584-5156
Parts & Service: (800) 676-2487
Fax: (630) 584-0984
Part # 401-505A-00