1
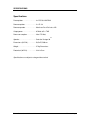
BONNEVILLE 50
Owner’s Manual
CONTENT
Content
Welcome
……………………………………………..
3
Precautions
……………………………………………..
4
Introduction
……………………………………………..
5
Getting started
……………………………………………..
6
Channel 1
……………………………………………..
7
Channel 2
……………………………………………..
7
Boost
……………………………………………..
8
Channel toggle switch ……………………………………………..
9
Master Volumes
……………………………………………..
9
Back panel
……………………………………………..
10
Specifications
……………………………………………..
12
Contact
……………………………………………..
13
Bonneville 50 – Owner’s Manual – Ver: 2.2
2
Elmwood Amps
WELCOME
Congratulations
to your purchase of this Elmwood Bonneville 50 Watt Combo.
The 50 watt tube amp will give you an awesome quality and response, no matter if you are
into jazz, blues or hard rock.
With the special Boost function on both channels you can go from a nice clean sound, to dirty
blues sound, to crunchy rhythm sound, to heavy lead sound, just by controlling the
footswitch.
Bonneville 50 – Owner’s Manual – Ver: 2.2
3
Elmwood Amps
PRECAUTIONS & WARNINGS
PRECAUTIONS & WARNINGS
Always follow the safety instructions
instru
listed here and use common sense.
•
Read this manual carefully before switching on your amplifier.
•
Do not try to open the amplifier chassis – there are no serviceable parts.
•
Vacuum tube amplifiers generate heat. Insure proper ventilation.
Keep away
y from curtains or any flammable objects.
•
Do not expose the amplifier to rain, moisture, or any kind of water or liquids.
Never use the amplifier in wet condition.
•
Do not block ventilation openings on the rear of the amplifier.
•
Never operate the amplifier
ampli
without a connected speaker or load
since this can cause severe damage to the amplifier.
•
Always insure that amplifier is properly grounded.
•
Always unplug power cord before changing fuses or any tubes. When replacing
fuse, use only same type and rating.
rating. Avoid direct contact with heated tubes.
•
Keep children away from the amplifier.
•
Be sure to always connect an AC power supply that corresponds to the amplifiers
power supply specification / setup.
•
Always turn off the power of all related equipment before
before making any connections.
•
Make sure that you are using a correct speaker cable for the speaker outputs.
Low signal cables, such as regular guitar cables, might seriously damage the
output stage of the amplifier.
•
Always remove power plug from the wall socket if there is any risk of lightning
occurring nearby or if not used for longer periods.
•
Always treat your amplifier with caution and never use excessive force.
•
Never use solvents for cleaning. Wipe of the exterior with a soft cloth.
•
Your amplifier can create high sound volumes. Do not exposure yourself to high
sound volumes that may cause permanent hearing damage.
INTRODUCTION
About Elmwood Amps
Elmwood Amps was founded in 1998 in Sweden. The goal was to build guitar tube
amplifiers with the most outstanding sound and functionality available.
The Elmwood staff, and everyone who has ever tried an Elmwood are of the opinion that
Elmwood has succeeded.
From the beginning, the goal was to take the best parts of historical tube amplifiers while
critically questioning the original ideas - making them better - re-inventing the great
potential of tube characteristics to create a sound that would stun the world - the
Elmwood sound.
The Elmwood amps are built to last. Only parts of highest possible quality are used and
each Elmwood product is carefully tested and approved before shipping.
An Elmwood amp is an amazing extension of the performing guitarist's heart and soul,
providing the most genuine and expressive tones imaginable. Elmwood users all over the
world give testimonials of the fantastic response, versatility and tone of their Elmwood
amps.
The amps are designed with a special attention to live performance versatility - giving
endless possibilities of shaping your sound with your guitar volume, tone settings, picking
technique, string handling, EQ settings and channel switching.
An Elmwood will be your best companion no matter what your style of playing - from soft
whispers to hard punches - from lush clean to screaming high gain - from heaven to hell always interacting with your deepest musical intentions.
We are always glad to get to know our existing and future users - to get your feedback
and to give you the best service possible.
The Elmwood team
Bonneville 50 – Owner’s Manual – Ver: 2.2
5
Elmwood Amps
GETTING STARTED
Getting started
1. Connect
ct the amplifier to the mains.
2. Make sure the internal speaker(s) is connected to the 8 ohm jack socket .
If use with internal and/or
nd/or external speaker cabinets,
cabinets, make sure the impedance
matching is correct - Ohms law: 2x8
2x ohms speakers equals 4 ohms and 2x
2x16 ohms
speakers equals 8 ohms.
Note: Never operate the amplifier without a connected speaker
since this
his can cause severe damage to the amplifier.
3. Connect the footswitch's plug marked 1 to jack socket 1 and the plug marked 2 to the
jack socket 2 on the back panel of the amplifier.
4. Set the switch marked " Power" to position ON.
5. Allow the amplifier to build up filament and bias voltages for approximately 30
seconds.
6. Before switching the "Standby" switch to position check that Master 1 and Master 2
are set fully counter clock wise.
7. Switch the "Standby" switch to position ON.
The amplifier
fier is now ready for use.
Plug in your guitar in the Input jack socket.
.
LET’S MAKE SOME SOUNDS
Channel 1
With the footswitch engaged, press the Master 1 switch on the footswitch to make the
Led light up.
The channel switch on the footswitch shall be set to Channel 1 - the Led in dark position.
Set the controls: Volume, Treble, Middle and Bass - to mid position.
Slowly turn up Master 1.
You should now be able to hear sound coming from the speaker(s).
Channel 1 is designed to be a clean channel as long as the Volume knob not exceeds 12
to 1 o'clock, depending on what kind of guitar plugged in – single coils or humbuckers.
After this position, 12 to 1 o'clock, the Volume knob turns into a Gain knob. You will notice
that the Volume will not increase much while turning it up, it will only make the sound
more distorted. For a cleaner sound -turn the Master 1 up higher and back off the
Channel 1's Volume knob.
The EQ section is very effective and you will not have any problem finding your favourite
sounds.
Channel 2
To activate Channel 2 you must press the Channel-switch on the footswitch so that the
Led lights up.
Channel 2 is designed to be a Crunch / Lead channel.
Set the controls: Gain, Volume, Treble, Middle and Bass to it's mid position. From here
you should be able to dial in many different Crunch and Lead sounds by tweaking the
Gain and the very effective EQ section.
Turning the Gain knob counter clockwise will decrease the Gain and clean up the sound.
Use the Channel 2's Volume knob to set a good balance between Channel 1 and
Channel 2.
Bonneville 50 – Owner’s Manual – Ver: 2.2
7
Elmwood Amps
LET’S MAKE SOME SOUNDS
Boost
The Boost function is a Gain Boost that operates on both Channel 1 and Channel 2.
To activate the Gain Boost; press the switch marked "Boost" on the footswitch so that the
Led lights up. The toggle switch ”Boost" on the front panel should be set to position
"OFF" . This is the footswitch operation mode for the Boost function. ¨
When playing on Channel1 at a clean sound you can add a little distortion by activating
the Boost function. If playing with more distortion on Channel 1 - the Volume knob
adjusted beyond 12 to 1 o'clock - you can go from Blues Rhythm to Blues Lead by
activating the Boost function.
Even with the Boost activated the amplifier will restore its touch sensitivity and dynamics.
When playing on Channel 2 you can go from crunchy Rhythm to singing Lead by
activating the Boost function.
Note: Since the Boost function is a Gain Boost it will not affect
the overall output Volume much.
The different settings with the Boost toggle switch
The toggle switch marked "Boost" on the front panel of the amplifier is a three way
switch.
When set to:
ON: The Boost is activated at all time. This is to be able to activate the Boost without
having the Footswitch connected.
OFF: This is the default mode when having the Footswitch connected. You can now
switch the Boost on or off by pressing the switch marked Boost on the Footswitch.
Master 1: When set to this position the Boost will automatically be activated when Master
1 is chosen from the Footswitch (More about Master 1 and Master 2 later).
Even in this position you can still activate / deactivate the Boost function by
pressing the Boost switch on the Footswitch while playing on Master 2 .
Note: The Boost Led on the Footswitch will not light up when
Master 1 is activated .In this mode the Boost might affect the
output Volume . Make sure to adjust the Master 1 properly.
Bonneville 50 – Owner’s Manual – Ver: 2.2
8
Elmwood Amps
LET’S MAKE SOME SOUNDS
Channel toggle switch
Between Channel 1 and Channel 2, on the front panel of the amplifier, is a toggle switch
marked Channel. This switch is to enable Channel switching when the Footswitch is not
connected.
The two Master Volumes
The Bonneville 50 is equipped with two Footswitchable Master Volumes.
This is to be able to have any sound you are playing in a louder version at any time.
Master 1 is controlling the maximum volume level of the amplifier and is used for setting
the lead volume level.
Master 2 is depending of Master 1 and is used for setting the rhythm volume level.
Master volume set up:
•
•
•
•
Press the switch marked Master 1 again so that the Led will light up.
Adjust the Master 1 to what you believe will be the loudest level you will be playing at.
Press the switch marked Master 1 again so that the Led will go dark.
Now adjust the Master 2 to rhythm level.
You have now set a relationship between the two Master Volumes.
If you find the overall volume to be too silent or to loud - simply adjust Master 1 volume
up or down and the volume level of Master 2 will follow in relation to Master 1.
If you find the difference between the two Master Volumes to mismatch - adjust the
relationship with Master 2.
Channel 1
Volume control
Master 1
Volume control
Guitar
Volume Control
Dependency
Channel 2
Volume control
Output
Volume
Master 2
Volume control
Note : When the Footswitch is not connected , only Master 1 is
active.
Bonneville 50 – Owner’s Manual – Ver: 2.2
9
Elmwood Amps
BACK PANEL
Back panel
On the back panel there are 4 speaker outputs for connecting internal
ternal and/or external
speakers.
Make sure the internal speaker(s) is connected to the 8 ohm jack socket.
If use with internal and/or external speaker cabinets, make sure the impedance matching
is correct - Ohms law: 2x8 ohms speakers equals
equals 4 ohms and 2x16 ohms speakers
equals 8 ohms.
Note: Never operate the amplifier without a connected
conn
speaker
since this can cause severe damage to the amplifier.
There are also three knobs;
Presence
The Presence control is global - it affects both Channels. Adjusting this will add more
high mid / treble to the sound.
Reverb
A four spring AccutronicsTM Reverb.
verb. Adjusting the Reverb knob will add room to the
sound. Also global - affects both Channels.
Mix
Mixing control for the F/X loop. When set fully counter clock wise,
wise, at the 10% mark, the
loop is in parallel mode.. Only some of the effects connected in the Send and Return jack
sockets are mixed in to the dry signal. The internal signal path in the amplifier is not
affected.
Turning the Mix
x knob more and more clock wise towards the 100% mark will make the
F/X loop become more and more serial. When turned fully clock wise the F/X loop is in
serial mode.
The signal path in this mode is:
is
Pre-amplifier > connected Effect unit > Power-amplifier.
The whole internal signal is now going through the connected effect unit.
This might colour the sound.
The F/X loop is designed for stomp boxes, -10dB to -20 dB, but will operate with rack
units as well. The F/X loop is active on both Channels.
Note: Parallel mode suits time related effects such as Reverb
and Delay. Serial mode suits real-time
real
related effects such as
Compressor and Equalizer
BACK PANEL
Footswitch jack sockets
Connect the Footswitch to it's respectively jack socket.
The Footswitch jack sockets can also be operated from a Patch bay /MIDI switcher.
This allows to control all the Footswitch's functions through a MIDI operated unit .
Mains input
Connect the amplifier to a earthed mains outlet.
Fuse 1 AT
Replace broken fuse only with the same type - Voltage/Current.
The fuse is a 1 Ampere / 250 Volts slow blow.
Bonneville 50 – Owner’s Manual – Ver: 2.2
11
Elmwood Amps
SPECIFICATIONS
Specifications
Preamp tubes . . . . . . . . . . . . . . . 4 x ECC83/12AX7WA
Poweramp tubes . . . . . . . . . . . . . 2 x EL 34
Poweramp mode . . . . . . . . . .. . . Ultralinear Push-Pull class AB
Output power . . . . . . . . . . . . … . 45 Watt at 5% THD
Power consumption. . . . . . . . . . . Max 175 Watt
TM
Speaker . . . . . . . . . . . . . . . . . .. . Celestion Vintage 30
Dimensions (W*D*H). . . . . . …. . 58,5x27,5x50 cm
Weight . . . . . . . . . . . . . . . . . . .. . 27 Kg Dimensions
.
Footswitch (W*D*H) . . . . . . ….. . 21x11x5 cm
Specifications are subject to change without notice!
Bonneville 50 – Owner’s Manual – Ver: 2.2
12
Elmwood Amps
Contact
Contact
Elmwood Amps
Fröstorp 3
457 93 Tanumshede
SWEDEN
Phone: +46 702 229346 or +46 707 472114
Email: [email protected]
Web: www.elmwood.se
Bonneville 50 – Owner’s Manual – Ver: 2.2
13
Elmwood Amps