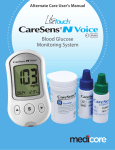
1
Getting to Know the CGM Device (continued)
Preparing the Device for Patients (continued)
Preparing the Device for Patients (continued)
Inserting the Sensor (continued)
Dexcom G4 PLATINUM Transmitter
d. The “Time/Date” option will be highlighted. Press the SELECT button.
b. Note the location of the USB opening on the receiver
shield. Stretch the receiver shield over the receiver.
f.Hold the applicator, and pull the
safety lock straight out away from
the applicator, in the direction of the
arrows in the picture. Give the safety
lock to the patient to help remove the
transmitter at the end of the sensor
session if appropriate.
e.Press the UP or DOWN button to enter each number or value.
f.Press the RIGHT or SELECT button to move to the next section.
g. After setting the “AM/PM,” press the SELECT
button to accept changes.
CONTINUOUS GLUCOSE MONITORING SYSTEM
Quick Start Guide
Step b
c. Peel the triangle seal from the paper backing and secure
the seal over the opening on the back of the receiver.
The transmitter is the grey “chip” that snaps into the sensor pod on your
body. The transmitter has a unique ID that makes it possible for the
transmitter and receiver to communicate to each other.
Keep the transmitter within 20 feet of the receiver without obstruction
throughout the entire 7 day sensor session in order to capture your sensor
glucose readings every 5 minutes.
Contact your healthcare professional immediately if
you see the Transmitter Low Battery screen so a new
transmitter can be ordered.
Your healthcare professional has recommended you use the Dexcom G4 PLATINUM
Professional CGM System in blinded mode. This means you will not be able to see your
glucose values and trends or receive any glucose alerts or alarms during the sensor session,
but the Dexcom G4 PLATINUM Professional System will be recording your glucose values.
When you return the CGM system, your healthcare professional will be able to download your
sensor glucose readings and review your glucose patterns and trends.
Dexcom G4 PLATINUM Sensor Applicator
Your healthcare professional will train you on the basic use of the Dexcom G4 PLATINUM
Professional System in blinded mode. Anytime you have questions, review the Dexcom
G4 PLATINUM Professional System User’s Guide, this quick start guide or call Dexcom®
Technical Support at 1.877.339.2664 or 1.858.200.0200 24 hours a day, 7 days a week.
Plunger
Transmitter latch
WARNING: Review all indications, contraindications, warnings, precautions and detailed
procedures in the Dexcom G4 PLATINUM Professional System User’s Guide prior to using
the Dexcom G4 PLATINUM Professional Continuous Glucose Monitoring System.
The information on the
back of the transmitter
may not exactly match
the picture above.
k.Press the UP or DOWN button to enter the letter or
number in each space.
l.Press the RIGHT or SELECT button to move to the
next space.
Sensor pod
Release tab
Setting Transmitter ID
screen
NOTE: You can only enter the transmitter ID when you
are not in an active sensor session.
In blinded mode, setting up the high/low glucose alert settings is only
necessary during the Setup Wizard, which only appears during the first
time you use the receiver.
WARNING: Low/high glucose alerts and the 55 mg/dL low glucose alarm are
all disabled when using the Dexcom G4 PLATINUM Professional System in
blinded mode and will not alert you when the glucose is low or high. Check
blood glucose meter if there are any signs or symptoms of low or high
glucose.
Step 1
Getting to Know the CGM Device
The Dexcom G4 PLATINUM Professional Continuous Glucose Monitoring
System is made up of 4 components: the receiver, the transmitter, the sensor
and the receiver shield pack.
UP button
Battery
Status area
Speaker
Antenna
RIGHT button
SELECT
button
Current
time
Trend graph hours
LEFT
button
The receiver is the small hand-held device that looks like a cell phone. It
will record your sensor glucose readings every 5 minutes, document your
glucose patterns and trends and can be downloaded for you and your
healthcare professional to review. The receiver will also alert you when
troubleshooting may be needed.
Press the UP and DOWN buttons to scroll through the 1-hour, 3-hour, 6-hour,
12-hour and 24-hour trend screens, highlight menu items, or set values.
Press the SELECT button to turn the receiver on or select the highlighted
option.
Press the LEFT button to go back to the last item or screen.
Press the RIGHT button to highlight the next item.
h.While still pinching, use your other
hand to place two fingers above the
collar (see picture). Place your thumb
on the white plunger and push down
completely. You should hear 2 clicks.
“2 CLICKS”
Step h
i. Move your 2 fingers from above the collar to below
the collar. Keep your thumb lightly on top of the white
plunger and pull the collar back towards your thumb until
you hear 2 clicks or cannot pull back any more.
“Vibrate” can be used when you want to silence the receiver and be
alerted by vibration.
Attaching the Transmitter:
“Soft” can be used when you want the alert to be discreet. This sets
all the alerts and alarms to lower volume beeps.
b. Place the transmitter in the sensor pod (with
the flat side down, and the narrower side
away from the transmitter latch).
“Normal” is the default. This sets all the alerts and alarms to higher
volume beeps.
“Attentive” can be used when you want the alert to be noticeable.
This sets all the alerts and alarms to loud and with distinctive
melodies.
“HypoRepeat” is similar to the normal profile, but if used in real time,
will provide a repetitive alarms when glucose is severely low. This
profile is not an appropriate option in blinded mode.
c. Place one finger on the transmitter to
keep it in place. With your other hand,
pull the transmitter latch up and forward
until you hear 2 clicks.
Transmitter Installed
Setting the Receiver in Blinded Mode:
Use the “Try It” feature under the Profiles option in the Main
Menu to hear an example of each alert profile.
d.Hold the sides of the sensor pod with one hand.
Remove the transmitter latch with the other hand by
quickly twisting off the latch away from your body.
Sensor
Step 2
Preparing the Device for Patients
NOTE: For multiple patient use, it is important that each user’s data is
erased from the receiver data memory after each use. This will ensure
patient privacy with subsequent users. See the Dexcom G4 PLATINUM
Professional System User’s Guide for instructions on erasing patient
data from the receiver after each use.
A full charge can take up to 5 hours and will last
about 3 days. Keep the USB port cover open
after charging.
To charge the receiver, plug the USB cable into
the AC power adapter. Then plug this adapter into
an AC power outlet (such as a wall outlet), and
plug the other end of the cable into the receiver.
Receiver USB port cover
The battery charging screen will appear first.
After a few seconds, the battery charging
symbol
will show in the upper left corner
of the 3-hour trend graph (home screen).
When the receiver is fully charged, the battery
charging symbol will be completely gray.
USB cable plugged into receiver
Confirm Time/Date and Transmitter ID is Correct:
a. Press the SELECT button to get to the Main Menu.
b. Press the DOWN button to scroll down to the “Settings” menu.
c.Press the SELECT button to enter the Settings menu.
b. Press the DOWN button to highlight “Profiles.” Press the
SELECT button.
b. Using the USB cable, connect the receiver to the computer.
c.Click on the Tools drop down menu.
Profiles menu,
Try It highlighted
c. Press the UP or DOWN button to highlight the alert profile you want to
use.
d.Click on the option Blind Attached
Receiver.
d. Press the SELECT button. A
chose.
e. Confirm your selection by clicking on “OK”
before the receiver display is updated.
Blind Attached Receiver
NOTE: In some cases the receiver may already
be blinded. If you click on the Tools menu
option and the Unblind Attached Receiver
is “checked,” the receiver is already in blind
mode.
a.From any trend graph, press the SELECT button to get
to the Main Menu.
Unblind Attached Receiver
Placing the Receiver in the Receiver Shield:
The receiver shield is necessary to help ensure
the receiver is clear of contamination.
will appear to the right of the profile you
NOTE: No matter what profile you set, all alerts and alarms will notify you by
vibrating first. There will be no beep if you confirm the alert or alarm after the
first vibration.
Step 4
Inserting the Sensor
Before you begin, make sure you have the transmitter, receiver, a sensor and
alcohol wipes. Wash your hands thoroughly, and dry them.
b. Remove the sensor from its packaging.
a.Wash hands and put on sterile gloves. Peel the acoustic
spacer from the paper backing and secure on the upper
speaker edge.
c. Clean your skin at the sensor placement site with an alcohol wipe. Let dry.
Once you have inserted the sensor and attached the transmitter, you need to
start the sensor session on the receiver.
a. From any trend graph, press the SELECT button to get to the Main Menu.
b. Press the DOWN button to highlight “Start Sensor.”
Press the SELECT button. The Start Sensor
“thinking” screen will let you know the sensor 2-hour
startup period has begun.
c. Check the receiver 10 minutes after starting the sensor session to make
sure the receiver and transmitter are communicating. The antenna symbol
(
) should be in the upper left corner of the trend graph. If the Out of
Range symbol (
) shows in the upper right corner of the trend graph
instead, see the Dexcom G4 PLATINUM Professional System User’s
Guide for more information.
d. A 2-hour countdown symbol will show in the status
area of the receiver screen and will fill in during the
2-hour startup period.
d. Remove the adhesive backing from the sensor pod one
half at a time.
Countdown symbol appears
in upper right corner
Step d
Step a
Step 5
Starting the Sensor Session
Twist transmitter latch up or down
Start Sensor
“thinking” screen
a. Choose a site on your belly that is at least 3 inches from your insulin
pump infusion set or injection site and out of the way of your waistband.
Avoid areas that are likely to be bumped or pushed or areas of your skin
with scarring, tattoos or irritation.
Receiver shield pack
Transmitter Latch
Side view of transmitter in sensor pod
The sensor is the piece that is inserted and worn
on your belly for the whole session (up to 7 days).
If you have a problem with a sensor session, keep
the sensor until you speak with Dexcom Technical
Support.
a. Launch the Dexcom STUDIO software from a computer in your office.
Step j
Install transmitter in sensor pod
Inserting the Sensor (continued)
Follow these steps to set the alert profile:
Step i
a. Clean the back of the transmitter with an alcohol wipe. Let dry.
Setting the Alert Profile (continued)
In order to blind the receiver, you must activate the Clinical Features
through the Dexcom STUDIO™ software. See the Dexcom G4 PLATINUM
Professional System User’s Guide for instructions to activate this feature.
“ 2 CLICKS”
j. Make sure the transmitter latch is down (against your
body). Squeeze the center of the ribbed tabs on the
sides of the sensor pod. Rock the applicator barrel
forward and out away from your body.
Preparing the Device for Patients (continued)
Charge Receiver:
DOWN button
You can choose receiver “alert profiles” with different sounds and volumes
to fit your needs. In blinded mode, the only alerts and alarms that will
be activated while wearing the system are low battery, out of range,
troubleshooting/error alerts and when a calibration update is required.
g. Place the fingers of one hand at the edge of the white adhesive (at the
opposite side of the sensor from the transmitter latch). You may pinch up
on your skin using this hand.
Getting to Know the CGM Device (continued)
Dexcom G4 PLATINUM Receiver
You will see this screen when you turn on the receiver during a sensor
session.
Step 3
Setting the Alert Profile
Step d
The alert profile options are:
m.After entering the last space, press the SELECT
button to accept changes.
Collar
Step c
d. Peel 1 square seal from the paper backing and secure
the seal over the USB door on the side of the receiver.
Save the additional USB seals for recharging.
i.Press the SELECT button to enter the Transmitter ID menu.
Transmitter Low Battery
screen
Safety lock
Applicator barrel
(contains small
introducer needle
and sensor)
h. Scroll down to the “Transmitter ID” menu option.
j. Find the transmitter ID on the back of the
transmitter.
The transmitter has an internal battery. When the
battery is low, the Transmitter Low Battery screen
appears. This means there is about 1 week of battery
life left.
Using the Dexcom G4® PLATINUM
Professional System in Blinded Mode
Setting Time/Date screen
Step f
e. Place the sensor horizontally, NOT vertically, on your
skin. Move your fingers around the adhesive patch to
secure the tape to your skin.
Start
[0-24
minutes]
[24-48
minutes]
[48-72
minutes]
[72-96
minutes]
Ready for
calibration
Countdown symbol fills in during sensor startup. When you see any
of these symbols, you will get NO sensor glucose readings or alerts.
Step e
NOTE: You will NOT get any senor glucose readings or glucose alerts from
the Dexcom G4 PLATINUM Professional System when in blinded mode.
Step 6
Ending the Sensor Session (continued)
Calibrating
• Use your fingers to spread the back tabs of the sensor pod. The
transmitter will pop out
You need to use your blood glucose meter to calibrate the Dexcom G4
PLATINUM Professional System. At the end of the 2-hour startup period,
you must enter two calibrations before any sensor glucose readings will
be recorded. Calibration blood glucose values need to be entered into the
receiver within 5 minutes of testing with your blood glucose meter.
Startup Calibration:
a. After the 2-hour startup period, the startup calibration
double blood drop prompt will show on the receiver
screen. Press the SELECT button to clear this alert.
b. Wash and dry your hands.
OR
Frequently Asked Questions (continued)
Sensor Troubleshooting (continued)
Sensor shuts off before end of 7-day session.
• Press the SELECT button to clear the alert/screen
• Contact Dexcom Technical Support
• Remove failed sensor and insert a new sensor
Safety lock
Sensor
Failed
• Use the safety lock (from the sensor applicator).
Insert the jagged edges of the safety lock so they
“hug” the wide end of the transmitter in the sensor
pod. Press the safety lock down until you cannot
press anymore, and then pull up. The transmitter
will pop out. DO NOT discard the transmitter
e.Press the DOWN button to highlight Enter BG. Press the SELECT button.
f. For the startup calibration, the default blood glucose value on the receiver
is 120 mg/dL. Press the UP or DOWN button to enter the exact blood
glucose value from your blood glucose meter. Press the SELECT button.
g.Press the SELECT button again to accept the
calibration. The calibration screen will then show.
• Use the same blood glucose meter for all calibrations during a sensor
session
Transmitter with
safety lock snapped in
c. Return the following components to your healthcare professional:
• Receiver with receiver shield still intact. DO NOT remove the receiver
shield before returning it to your healthcare professional
• Transmitter
• Sensor pod (if requested by healthcare professional and/or there were
technical issues with the sensor)
• AC power adapter
• Charging USB cable
Enter BG
“thinking” screen
NOTE: For proper removal of the receiver shield by the healthcare
professional, see the Dexcom G4 PLATINUM Professional System User’s
Guide.
h. Repeat steps c-g to enter a second blood glucose
value. After the second blood glucose value has been
entered, the “Display Off” screen should be visible.
Calibrating (continued)
Sensor Troubleshooting
Calibration Update:
These are the most commonly seen error messages for the Dexcom G4
PLATINUM Professional System. Follow the instructions to troubleshoot the
error message. If other error messages come up on the receiver, refer to
the Dexcom G4 PLATINUM Professional System User’s Guide or contact
Dexcom Technical Support at 1.877.339.2664 or 1.858.200.0200 for any
unresolved questions/troubleshooting issues. If the error message cannot be
resolved, contact your healthcare professional to discuss next steps.
After the startup calibration, calibration updates must be
entered once every 12 hours at a minimum.
Calibration prompt
NOTE: Calibrating less than the recommended amount
may result in inaccurate sensor glucose readings. You can enter more
calibrations each day if you want. See the Dexcom G4 PLATINUM
Professional System User’s Guide for more details on calibrating.
Step 7
Ending the Sensor Session
Blood Drop
in Status
Area
Out of
Range
The sensor automatically shuts off after 7 days. The
receiver will alert you at 6 hours, 2 hours and 30 minutes
before the sensor session ends. The Replace Sensor
Now screen will show the sensor session has ended.
The sensor pod and transmitter can be removed by the
patient or healthcare professional.
Replace Sensor Now
screen
Red stoplight in
upper right corner
Removing the Sensor Pod and Transmitter:
NOTE: Keep the sensor and transmitter together when removing from your
skin.
a. Peel the sensor pod off your body like a Band-Aid®. Do not remove the
transmitter from the sensor pod until the entire sensor has been removed
from your body.
b. Place the sensor pod/transmitter on a flat surface. There are two ways
you can remove the transmitter:
• Make sure your blood glucose test strips are coded correctly and not
expired
• Wash and dry your hands before testing your blood glucose
• Use only fingerstick blood glucose values for calibration
Calibration “Don’ts”
• Don’t calibrate when you see
or
in the status bar
• Don’t calibrate if your blood glucose value from your blood glucose meter is
higher than 400 mg/dL or lower than 40 mg/dL
Calibration needed.
• Enter a calibration as described in Step 6 of this quick
start guide
Wait 15
Minutes
Calibration
Error
Wait 1 Hour
Calibration
Error
Sensor is not calibrating correctly.
• Press the SELECT button.
will show in status bar
• Wait about 1 hour, then enter 1 calibration
• Wait 15 minutes. If no sensor glucose readings show,
contact Dexcom Technical Support
Glucose
Reading
Error
in
Status Area
Wait.
usually clears up by itself within minutes or
hours. If this continues after 3 hours, contact Dexcom
Technical Support.
• Do not calibrate
• Make sure the sensor pod is sticking well to your body
and nothing is rubbing against it
• Check that the transmitter is snapped in on both sides
How will I be able to see my glucose patterns and trends if the receiver
is in blinded mode?
Receivers can be downloaded using the Dexcom STUDIO software in your
healthcare professional’s facility. Follow up with your healthcare professional
to review your glucose patterns and trends from the sensor session.
Can the Dexcom G4 PLATINUM Professional CGM System get wet?
The receiver CANNOT get wet and is NOT water resistant. Showering,
bathing and swimming is OK while wearing the sensor and transmitter on the
body. See the Dexcom G4 PLATINUM Professional System User’s Guide for
more details.
Advanced Features of the Dexcom G4 PLATINUM
Professional CGM System
What can I do if the sensor tape starts to come loose?
Advanced Features of the Dexcom G4 PLATINUM
Professional CGM System (continued)
• Event Markers (insulin, carbohydrates, exercise and health related issues)
Main Menu,
Events highlighted
Events menu,
Carbs highlighted
• Out of Range Icon and Alert
The receiver and transmitter are not communicating.
• Make sure the receiver is within 20 feet of the transmitter
• If the out of range icon continues to display, contact
Dexcom Technical Support
Sensor is not calibrating correctly.
• Press the SELECT button.
will show in status bar
• Wait 15 minutes, then enter 1 calibration
• If error continues, enter 1 more calibration, and wait 15
minutes
• If no sensor glucose readings show, contact Dexcom
Technical Support
Peel back and remove the square seal over the receiver USB port. Plug
the USB cable into the AC power adapter, and plug the adapter into a wall
outlet. Insert the micro USB cable into the receiver USB port to recharge
the receiver. When charging is complete, use a new square seal from the
receiver shield pack and place it over the USB port (see the Dexcom G4
PLATINUM Professional Receiver Shield Package Insert for more detailed
instructions). If you use all 3 square seals during the 7 day sensor session
and the receiver needs to be charged, return the receiver to your healthcare
professional office.
• Don’t calibrate when acetaminophen (such as Tylenol®) is active in your
body
The Dexcom G4 PLATINUM Professional System has advanced features
and alerts that may provide more information to assess your glucose patterns
and trends. These advanced features that may provide additional information
in blinded mode are:
Display Off (CGM
in calibration and
recording readings)
The calibration single blood drop prompt will appear on
the receiver screen to let you know a calibration update is
needed. To confirm this prompt, press SELECT.
• The transmitter should be cleaned and disinfected after use on each
patient. This system may only be used for testing multiple patients when
Standard Precautions and the manufacturer’s cleaning and disinfection
procedures are followed.
The receiver will show the low battery alert. You can also
charge the receiver if you notice the battery symbol
is low.
How do I re-charge the Receiver during the sensor session?
Startup calibration
prompt
d.From any trend graph, press the SELECT button to get to the Main Menu.
When will the receiver need to be recharged?
Low battery alert
Calibration “Do’s”
c. Take a fingerstick blood glucose measurement using your blood glucose
meter.
Key Warnings - Risk of Blood Borne Pathogen
Transmission (continued)
Medical tape (such as Blenderm™, Tegaderm™, Smith & Nephew IV3000®,
3M™ tape) can be used for extra support. If you use tape, only tape over
the white adhesive patch on all sides for even support. See the Dexcom G4
PLATINUM Professional System User’s Guide for more details.
• Replace the receiver shield and acoustic spacer when transferring the
receiver to a new patient. Wear gloves when handling the receiver.
Handling the receiver without a shield or with a damaged shield could lead
to contamination, which could cause infection.
Key Precautions - Risk of Blood Borne Pathogen
Transmission:
• If all 3 square seals have been used before the end of the session, return
the receiver to the healthcare professional office. Do not charge the receiver
if you cannot seal it. Unsealed receivers could spread contamination.
• Do not puncture the receiver shield for any reason. Punctured shields could
spread contamination.
• Inspect the receiver shield, seals and spacer for tears or other damage
or defects before you place the components on the receiver. Do not use
any parts of the receiver shield pack that are damaged or defective. If
the receiver shield, seals and spacer are torn, damaged or otherwise
defective after giving to the patient, the patient should return the receiver
to the healthcare professional for a replacement. The damaged or
defective receiver shield should not be taken off by the patient. If a defect
or malfunction is suspected, the healthcare professional should retain the
shield and contact Dexcom Technical Support. The shield helps protect
the user and healthcare professionals from contamination and allows the
receiver to function properly.
For complete details on the cleaning and disinfection procedures of the
Dexcom G4 PLATINUM Professional CGM System, refer to the Dexcom G4
PLATINUM Professional System User’s Guide.
Indications for Use:
The Dexcom G4 PLATINUM Professional Continuous Glucose Monitoring
System is a glucose monitoring device indicated for detecting trends and
tracking patterns in persons (age 18 and older) with diabetes. The system
is intended for multiple patient use and requires purchase by a healthcare
provider. The system is not intended for use in a hospital setting.
The Dexcom G4 PLATINUM Professional System is indicated for use as an
adjunctive device to complement, not replace, information obtained from
standard home glucose monitoring devices.
The Dexcom G4 PLATINUM Professional System aids in the detection of
episodes of hyperglycemia and hypoglycemia, facilitating both acute and
long-term therapy adjustments, which may minimize these excursions.
Interpretation of the Dexcom G4 PLATINUM Professional System results
should be based on the trends and patterns seen with several sequential
readings over time.
Contraindications:
Main Menu,
Alerts highlighted
Alerts menu,
Advanced highlighted
Advanced menu,
Out of Range highlighted
Based on the recommendations of the healthcare professional, these
features can be turned off or on for the individual patient’s needs and goals.
See the Dexcom G4 PLATINUM Professional System User’s Guide for
instructions to activate and use these features.
Frequently Asked Questions
Why can’t I take any acetaminophen containing medication while I am
using the Dexcom G4 PLATINUM Professional System?
Acetaminophen is a contraindication of the Dexcom G4 PLATINUM
Professional System and should not be taken while the sensor is inserted.
The Dexcom G4 PLATINUM Professional System may record inaccurately
high when you take acetaminophen-containing drugs. The level and duration
of inaccuracy may be different for each person. To understand how long
acetaminophen-containing medicines may affect your body, consult your
healthcare professional.
• Remove the Dexcom G4 PLATINUM Sensor, Transmitter, and MR Receiver before Magnetic Resonance Imaging (MRI), Computed Tomography (CT) scan, or diathermy treatment. The device is MR
Unsafe. Do not bring any portion of the device into the MR environment.
The Dexcom G4 PLATINUM Professional System has not been tested
during MRI or CT scans or with diathermy treatment. The magnetic fields
and heat could damage the device so that it might not display sensor
glucose readings or provide alerts, and you might miss a low or high blood
glucose value.
• Taking medications with acetaminophen (such as Tylenol) while wearing
the sensor may falsely raise your sensor glucose readings. The level of
inaccuracy depends on the amount of acetaminophen active in your body
and may be different for each person.
Key Warnings - Risk of Blood Borne Pathogen
Transmission:
• Users need to adhere to Standard Precautions when handling or
using this device. All parts of the system should be considered
potentially infectious and are capable of transmitting blood-borne
pathogens between patients and healthcare professionals. For more
information, refer to “Guideline for Isolation Precautions: Preventing
Transmission of Infectious Agents in Healthcare Settings 2007,”
http://www.cdc.gov/hicpac/2007ip/2007isolationprecautions.html.
Dexcom, Inc. I 6340 Sequence Drive I San Diego, CA 92121
Technical Support: 1.877.339.2664 / 1.858.200.0200 I www.dexcom.com
Dexcom, Dexcom G4, Dexcom G4 PLATINUM, Dexcom G4 PLATINUM Professional, Dexcom STUDIO, and One Step Ahead
are either registered trademarks or trademarks of Dexcom, Inc. in the United States and/or other countries. All other product
or company names that may be mentioned in this publication are tradenames, trademarks or registered trademarks of their
respective owners.
© 2014 Dexcom, Inc. All rights reserved.
LBL-012214 Rev 05 MT21694