1
TD 92644EN
User Manual
Ascom d81 DECT Handset
31 October 2013 / Ver. G
User Manual
Ascom d81 DECT Handset
TD 92644EN
Contents
1 Introduction .................................................................................................................... 1
1.1 Target Group ............................................................................................................................. 1
1.2 Prerequisite................................................................................................................................ 1
1.3 How to Use This Document.................................................................................................... 1
1.3.1 System Administrator................................................................................................... 1
1.3.2 End User............................................................................................................................ 2
1.4 Abbreviations and Glossary................................................................................................... 2
1.5 Functions and Accessories ..................................................................................................... 3
2 Descriptions .................................................................................................................... 5
2.1 d81 DECT Handset ................................................................................................................... 5
2.1.1 Hot Keys............................................................................................................................ 8
2.1.2 Alphanumeric Keys ........................................................................................................ 8
2.1.3 Icons and Text in the Display ...................................................................................... 9
2.2 Accessories.............................................................................................................................. 12
2.2.1 Desktop Chargers ........................................................................................................ 12
2.2.2 Charging Rack .............................................................................................................. 13
2.2.3 Battery Pack Charger.................................................................................................. 13
2.2.4 Clips................................................................................................................................. 13
2.2.5 Security Cord ................................................................................................................ 13
2.2.6 Pull Cord......................................................................................................................... 14
2.2.7 Leather Casing ............................................................................................................. 14
2.2.8 Headset.......................................................................................................................... 14
3 Basic Operation............................................................................................................. 15
3.1 Switch the Handset On/Off................................................................................................. 15
3.2 Log In or Out of a Shared Phone........................................................................................ 15
3.3 Turn the Audible Signal On or Off ..................................................................................... 16
3.4 Lock and Unlock the Keypad .............................................................................................. 16
3.4.1 Lock and Unlock the Keypad in Idle Mode ............................................................ 16
3.4.2 Lock and Unlock the Keypad during a Call............................................................ 16
3.5 Lock and Unlock the Handset............................................................................................. 17
3.6 Mute Handset on Incoming Call or Message .................................................................. 17
4 Menu Tree...................................................................................................................... 18
4.1 Calls .......................................................................................................................................... 18
4.2 Contacts .................................................................................................................................. 19
4.3 Profiles . ................................................................................................................................... 20
4.4 Messaging .............................................................................................................................. 21
4.5 Services ................................................................................................................................... 22
4.6 Shortcuts ................................................................................................................................ 23
31 October 2013 / Ver. G
User Manual
Ascom d81 DECT Handset
TD 92644EN
4.7 Connections ........................................................................................................................... 25
4.8 Settings ................................................................................................................................... 25
4.9 In Call Menu............................................................................................................................. 27
4.9.1 Additional In Call Functions ...................................................................................... 28
4.10 Customizing the Menu Tree ............................................................................................. 28
5 Calling............................................................................................................................ 29
5.1 Incoming Call .......................................................................................................................... 29
5.1.1 Answer a Call ................................................................................................................ 29
5.1.2 End a Call ....................................................................................................................... 29
5.2 Outgoing Call .......................................................................................................................... 29
5.2.1 Pre-Dial .......................................................................................................................... 29
5.2.2 Post-Dial with Headset Button ................................................................................ 30
5.2.3 Dial Using a Pre-programmed Navigation Key, Hot Key, Soft key, or Headset
Button ............................................................................................................................... 30
5.2.4 Dial a Number from the Call list............................................................................... 30
5.2.5 Dial Last Called Number with Headset Button..................................................... 30
5.2.6 Dial the Sender of a Message................................................................................... 30
5.2.7 Dial a Number from the Local Phonebook ............................................................ 30
5.2.8 Dial a Number from the Company Phonebook .................................................... 31
5.2.9 Dial a Name from the Central Phonebook............................................................. 31
5.3 During a Call............................................................................................................................ 31
5.3.1 Adjust the Volume during a Call.............................................................................. 31
5.3.2 Open Contacts during a Call...................................................................................... 31
5.3.3 Open Messaging during a Call.................................................................................. 32
5.3.4 Turn the Microphone on or off during a Call ........................................................ 32
5.3.5 Audio Transfer ............................................................................................................. 33
5.3.6 Start a New Call during Conversation .................................................................... 33
5.3.7 Call Back......................................................................................................................... 33
5.3.8 End a Call ....................................................................................................................... 33
5.3.9 Transfer a Call............................................................................................................... 33
5.3.10 Transfer to New Call................................................................................................. 33
5.3.11 Conference Call .......................................................................................................... 34
5.3.12 Send Call Waiting...................................................................................................... 34
5.3.13 Switch between Calls ............................................................................................... 34
5.3.14 Answer Call Waiting................................................................................................. 34
5.3.15 DTMF ............................................................................................................................ 35
5.3.16 DECT Info..................................................................................................................... 35
5.4 Loudspeaking Function........................................................................................................ 35
5.5 Call Diversion .......................................................................................................................... 36
5.6 Declining a Call with a Predefined Message ................................................................... 36
5.7 Emergency Calls ..................................................................................................................... 36
31 October 2013 / Ver. G
User Manual
Ascom d81 DECT Handset
TD 92644EN
6 Alarm Operation ........................................................................................................... 37
6.1 Push-Button Alarm ............................................................................................................... 37
6.1.1 Test Alarm..................................................................................................................... 37
6.1.2 Personal Alarm............................................................................................................. 37
6.2 Man-Down and No-Movement Alarm .............................................................................. 38
6.3 Pull-Cord Alarm...................................................................................................................... 38
6.4 Alarm with Location Information...................................................................................... 39
6.4.1 Alarm with Data .......................................................................................................... 39
6.5 Acoustic Location Signal...................................................................................................... 39
6.6 Automatic Call after Alarm ................................................................................................. 39
7 Menu Operation ............................................................................................................ 41
7.1 Calls........................................................................................................................................... 41
7.1.1 Call List ........................................................................................................................... 41
7.1.2 Missed Calls................................................................................................................... 43
7.1.3 Call Time ........................................................................................................................ 43
7.1.4 Push to Talk Group Call .............................................................................................. 43
7.1.5 Accept an Invitation ................................................................................................... 44
7.1.6 Decline a PTT Invitation ............................................................................................. 46
7.1.7 Call a PTT Group ........................................................................................................... 46
7.1.8 Re-join a Group ............................................................................................................ 46
7.1.9 Call Services .................................................................................................................. 47
7.2 Contacts ................................................................................................................................... 48
7.2.1 Call Contact ................................................................................................................... 49
7.2.2 Add Contact .................................................................................................................. 49
7.2.3 Edit Contact .................................................................................................................. 50
7.2.4 Set Ring Signal for a Contact.................................................................................... 50
7.2.5 Delete Contact.............................................................................................................. 50
7.2.6 Central Phonebook...................................................................................................... 50
7.3 Profiles ..................................................................................................................................... 51
7.4 Messaging ............................................................................................................................... 53
7.4.1 Inbox............................................................................................................................... 53
7.4.2 Write New Messages .................................................................................................. 55
7.4.3 Unsent Messages ........................................................................................................ 56
7.4.4 Sent Messages ............................................................................................................. 56
7.4.5 Review Inbox Content while Reading a Message................................................ 57
7.5 Services .................................................................................................................................... 57
7.5.1 Add Services ................................................................................................................. 58
7.5.2 Edit Services.................................................................................................................. 58
7.5.3 Delete Services............................................................................................................. 58
7.6 Shortcuts ................................................................................................................................. 58
31 October 2013 / Ver. G
User Manual
Ascom d81 DECT Handset
TD 92644EN
7.6.1 Define Soft Keys .......................................................................................................... 58
7.6.2 Define Hot Keys ........................................................................................................... 59
7.6.3 Define Navigation Key ............................................................................................... 59
7.7 Settings.................................................................................................................................... 60
7.7.1 Sound and Alert Settings .......................................................................................... 60
7.7.2 Keypad Lock Settings................................................................................................. 61
7.7.3 Phone Lock Settings ................................................................................................... 62
7.7.4 Display Settings........................................................................................................... 64
7.7.5 Time and Date Settings ............................................................................................. 65
7.7.6 Answering ..................................................................................................................... 65
7.7.7 Change Text size for Messages................................................................................ 66
7.7.8 Change the Menu Language..................................................................................... 66
7.7.9 Change Owner ID ......................................................................................................... 66
7.7.10 Alarm Settings........................................................................................................... 67
7.8 Connections ............................................................................................................................ 68
7.8.1 Bluetooth....................................................................................................................... 68
7.8.2 Headset.......................................................................................................................... 69
7.8.3 System ........................................................................................................................... 70
7.8.4 In Charger Action when in Call ................................................................................. 72
7.8.5 In Charger Action when not in Call.......................................................................... 72
8 Procedure Call ............................................................................................................... 74
9 System Profiles............................................................................................................. 75
9.1 System Profile Status Indications ..................................................................................... 75
10 Advanced Functions................................................................................................... 77
10.1 Admin Menu......................................................................................................................... 77
10.2 Clear Lists in Charger ......................................................................................................... 77
11 Enhanced Messaging ................................................................................................. 78
11.1 Voice Mail.............................................................................................................................. 78
11.1.1 Receive a Voice Mail ................................................................................................. 78
11.1.2 Check the Voice Mail inbox..................................................................................... 78
11.1.3 One Key Voice Mail Access...................................................................................... 78
11.2 Receive a Message with Request for Answer.............................................................. 78
11.2.1 Accept/Reject the message ................................................................................... 78
11.3 Message Queuing and Message Priority....................................................................... 79
11.4 Message Priority and Call Priority................................................................................... 79
11.5 Message Indication Repetition ........................................................................................ 79
11.6 Color Messaging .................................................................................................................. 79
11.7 Interactive Messaging ....................................................................................................... 80
11.8 Calling while Reading a Text Message........................................................................... 81
11.8.1 Calling the Message Sender ................................................................................... 81
31 October 2013 / Ver. G
User Manual
Ascom d81 DECT Handset
TD 92644EN
11.8.2 Calling a Different Party.......................................................................................... 82
11.9 Message Templates............................................................................................................ 82
11.9.1 The Templates Menu................................................................................................ 83
11.9.2 Answering a Text Message with a Predefined Message ................................ 83
11.10 Mobile Data........................................................................................................................ 83
11.10.1 Send Mobile Data ................................................................................................... 83
11.10.2 Send Mobile Data with a Prefix .......................................................................... 83
11.11 Send Data with Bluetooth Barcode Reader ............................................................... 84
12 Operation Notice ........................................................................................................ 85
12.1 Accessibility and Voice Quality........................................................................................ 85
13 System Handling ........................................................................................................ 86
13.1 Software Upgrade and Additional Features ................................................................ 86
13.2 Handset Updates via Charging Rack.............................................................................. 86
14 Maintenance ............................................................................................................... 88
14.1 Maintenance of Batteries ................................................................................................. 88
14.1.1 Battery Warnings ..................................................................................................... 88
14.1.2 Charge the Battery ................................................................................................... 88
14.1.3 Charge Spare Batteries............................................................................................ 88
14.1.4 Replace the Battery.................................................................................................. 88
14.2 Easy Replacement of Handset......................................................................................... 89
14.2.1 Before Starting Easy Replacement Procedure................................................... 89
14.2.2 Easy Replacement Procedure ................................................................................ 90
14.3 Attach the Hinge-type Clip............................................................................................... 92
14.4 Attach the Swivel-type Clip.............................................................................................. 92
14.5 Attach Cover for No Clip.................................................................................................... 93
15 Troubleshooting ......................................................................................................... 94
16 Related Documents.................................................................................................... 99
Appendix A: Bluetooth Headset................................................................................... 103
Appendix B: Bluetooth Barcode Reader ...................................................................... 109
Appendix C: Display Call Information from Cisco Systems ........................................ 113
Index .............................................................................................................................. 114
31 October 2013 / Ver. G
User Manual
Ascom d81 DECT Handset
1
TD 92644EN
Introduction
This document describes features and settings available for d81 handsets. The handset is a
feature-rich handset with color display, telephony, messaging, and Bluetooth. It is a highly
robust handset for use in rough and demanding environments.
The handset is suitable for users dependent of being reachable and having a need for mobile
voice and messaging features, which makes it ideal for applications where the user needs
either one way messaging or to be able to interact with other users. The display enhances
and simplifies the use of the handset.
There are four versions of the handset:
• d81 Messenger, with messaging functions
• d81 Protector, with additional alarm functions for personal security
• Two EX classified versions: d81 Messenger EX, and d81 Protector EX
Read the chapter 2 Descriptions on page 5 before using the handset.
For software download and parameter set up, read the Installation and Operation Manual,
Portable Device Manager (PDM), Windows Version, TD 92325EN, and Configuration Manual,
Ascom d81 DECT Handset, TD 92674EN.
1.1
Target Group
This user guide is aimed at those responsible for managing the administration and
distribution of handsets at the customer site, such as a system administrator. It may also be
of benefit to those requiring in depth information about the operation and features
provided by handset, such as handset users.
1.2
Prerequisite
Before using the handset, the system administrator must register it with the system, see
7.8.3 System on page 70.
1.3
How to Use This Document
1.3.1
System Administrator
The system administrator may need to configure some of the handset functions using the
PDM/Device Manager. The following chapters in the handset Configuration Manual provide
additional information about configuring these functions.
•
•
•
•
•
•
•
•
•
•
•
3.3 Turn the Audible Signal On or Off on page 16
3.2 Log In or Out of a Shared Phone on page 15
3.4 Lock and Unlock the Keypad on page 16
4.9.1 Additional In Call Functions on page 28
5.3 During a Call on page 31
6 Alarm Operation on page 37
7.1.4 Push to Talk Group Call on page 43
7.1.9 Call Services on page 47
7.2 Contacts on page 48
9 System Profiles on page 75
10 Advanced Functions on page 77
31 October 2013 / Ver. G
1
User Manual
Ascom d81 DECT Handset
•
•
•
TD 92644EN
11.4 Message Priority and Call Priority on page 79
11.11 Send Data with Bluetooth Barcode Reader on page 84
13 System Handling on page 86
End User
1.3.2
For end-users, it is recommended to read the following chapters to getting started.
•
•
2 Descriptions on page 5
3 Basic Operation on page 15
See also Quick Reference Guide, Ascom d81 DECT Handset, TD 92667EN. Because of its
handy format you can place a print-out next to your handset as a quick reference.
1.4
Abbreviations and Glossary
ALS
Acoustic Location Signal
ATEX/IECEx
ATmosphères EXplosibles
Standard/guideline for explosion protection in the industry.
IECEx is the same as ATEX for the rest of the world (not EU/
EFTA). In this document, EX refers to ATEX/IECEx.
ELISE
Embedded LInux SErver:
A hardware platform used for Unite modules.
IPDI
International Portable DAM Identity
DAM (DECT Authentication Module)
See IPEI for more information.
IPEI
International Portable Equipment Identity
IPEI/IPDI is needed to enable network subscription of the
handset. At delivery of the handset, IPEI and IPDI are the
same and either can be used for network subscription. If
one handset is replaced with another using the Easy
replacement procedure, the IPDI is exchanged and IPEI and
IPDI will no longer be the same. If the IPEI and the IPDI differ,
the IPDI is used for network subscription.
PBX
Private Branch Exchange:
handset system within an enterprise that switches calls
between local lines and allows all users to share a certain
number of external lines.
PDM
Portable Device Manager:
An application, running on a PC, for management of
portable devices, charging racks, etc.
In this document, PDM refers to PDM Windows Version.
IMS3
Integrated Wireless Messaging and Services:
An application running on an ELISE3 server. It enables
wireless services to and from handsets and chargers.
31 October 2013 / Ver. G
2
User Manual
Ascom d81 DECT Handset
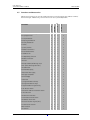
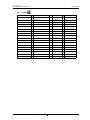
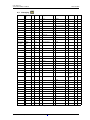
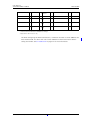
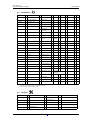
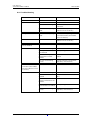
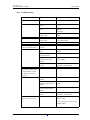
1.5
TD 92644EN
Functions and Accessories
Protector
Protector EX
Messenger
Functions
Messenger EX
NOTE: Some functions can only be used when they are configured in the handset via PDM/
Device Manager. Additionally, some functions are also system dependent.
Enhanced DECT Security
x
x
x
x
Easy Registration
x
x
x
x
Local phonebook
x
x
x
x
Company phonebook
x
x
x
x
Central phonebook
x
x
x
x
Profiles
x
x
x
x
System profiles
x
x
x
x
Handset restrictions
x
x
x
x
Personalized menus
x
x
x
x
Procedure call
x
x
x
x
Loudspeaking function
x
x
x
x
Headset connector
x
x
x
x
Vibrator
x
x
x
x
Microphone On/Off during a Call
x
x
x
x
SMS (Short Message Services)
x
x
x
x
Shared Phone
x
x
x
x
Colored Messaging
x
x
x
x
Interactive Messaging
x
x
x
x
Message Templates
x
x
x
x
Acknowledge
x
x
x
x
Voice Mail
x
x
x
x
2 programmable soft keys
x
x
x
x
9 programmable hot keys
x
x
x
x
Programmable navigation key
x
x
x
x
Push Button Alarm
-
x
-
x
Man-down and No-movement alarm
-
x
-
x
Pull cord alarm
-
x
-
x
Send Alarm with Data
-
x
-
x
Automatic Call after Alarm
-
x
-
x
Send Data with Prefix
-
x
-
x
Acoustic Location Signal (ALS)
-
x
-
x
Location, Base Station
x
x
x
x
DECT location
x
x
x
x
LF location
x
x
x
x
31 October 2013 / Ver. G
3
User Manual
Ascom d81 DECT Handset
Protector
Protector EX
Messenger
Functions
Messenger EX
TD 92644EN
Centralized Management
x
x
x
x
Push To Talk (PTT)
x
x
x
x
Downloadable Languages
x
x
x
x
Easy replaceable battery
x
x
x
x
Easy replacement of handset
x
x
x
x
Clear lists in charger
x
x
x
x
Site Survey tool
x
x
x
x
Bluetooth barcode reader support
x
x
x
x
Bluetooth
x
x
x
x
x
-
x
-
1
Upgradeable to Protector
Messenger
Protector
Messenger
EX
Protector
EX
1.Requires a product license. The d81 Messenger cannot be upgraded to d81
Protector with the No-movement/Man-down hardware.
Basic Charger
x
x
x
x
Advanced Charger
x
x
x
x
Charging rack
x
x
x
x
Battery Pack Charger
x
x
-
-
Leather Casing, including swivel-type clip
x
x
x
x
Spare Clip
x
x
x
x
Swivel-type Clip
x
x
x
x
Cover for no clip
x
x
x
x
Security cord
x
x
x
x
Pull cord
-
x
-
x
x
x
-
-
x
x
-
-
Peltor Hearing Protection Headset
x
x
-
-
Headset adapter for Mic on Boom
x
x
-
-
EX-classified headset adapter for standard Peltor headset
x
x
x
x
Accessories
Front plates (5 colours)
Headset with Microphone on Boom
1
1.Requires the headset adapter for Mic on Boom.
31 October 2013 / Ver. G
4
User Manual
Ascom d81 DECT Handset
2
TD 92644EN
Descriptions
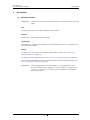
2.1
d81 DECT Handset
IMPORTANT:
The handset may retain small metal objects around the mouthcap or earcap
region.
Case
The plastic cover parts are made of durable PC/ABS material.
Antenna
The antenna is integrated inside the handset.
Loudspeaker
The handset has a separate loudspeaker for the loudspeaking function. It is placed on the
back side of the handset.
Battery
The battery is a rechargeable Li-Ion battery, placed under a battery cover. See 14.1.4
Replace the Battery on page 88.
The battery is fully charged within four hours. See 14.1.2 Charge the Battery on page 88.
The non-EX classified battery can be charged separately with a battery pack charger. See
14.1.3 Charge Spare Batteries on page 88.
IMPORTANT:
31 October 2013 / Ver. G
When charging the EX classified handset, it is only permitted to use a
charger marked with DC3-AxxB (rev. 1A), DC4-AxxB (rev. 3A), CR3-AxxB
(rev. 2A), or CR3-AxxC on the label. It is not permitted to charge the EX
battery pack alone.
5
User Manual
Ascom d81 DECT Handset
TD 92644EN
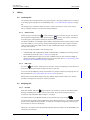
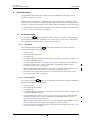
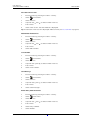
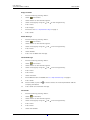
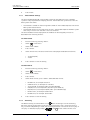
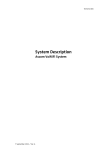
19
1
2
18
3
17
4
16
15
5
14
6
13
7
12
8
9
10
001
11
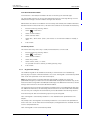
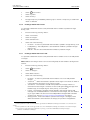
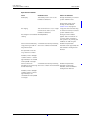
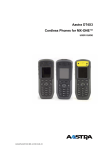
1
Push button1
The button is placed on the top side of the handset. The Push button is
used for sending alarms, see 6.1 Push-Button Alarm on page 37.
2
Earpiece speaker
3
Pull cord connector2
Is used for connection of the pull cord to the handset, see also 6.3 PullCord Alarm on page 38.
4
Colour display
The full graphic type display is 128 pixels wide and 160 pixels high.
The display has multiple colours and backlighting.
5
Four-way navigation key
Use this key to step in the menu and when working in text mode. , ,
, and are used for stepping left/right and up/down in the menu.
The navigation key can be programmed, the is by default a shortcut
to the Inbox, and is a shortcut to Call contact. See also 7.6.3 Define
Navigation Key on page 59. During a call the volume can be increased
or decreased by pressing and .
6
On-hook and On/Off key
Combined button; to end a call, to return to idle mode, and to switch
the handset on/off by long press.
7
Tactile indicators
There are two tactile indicators to indicate the centre of the key pad
1.Applicable for the d81 Protector only.
2.Applicable for the d81 Protector with the hardware variant Man-down and No-movement only.
31 October 2013 / Ver. G
6
User Manual
Ascom d81 DECT Handset
TD 92644EN
8
Sound off key
A long press on the key in idle mode, changes between ring signal on/
off, At incoming call, a long press on the key silencing the ring signal.
9
Space
To add space between text
10
Multi-purpose connector
The connector is used for battery charging, software download,
configuration and connection of an IP 65 classified headset connector.
11
Microphone
The microphone is placed on the front bottom side of the handset.
12
Key lock and Upper/Lower case key
This key is to lock the keypad in combination with the soft key "Lock".
This key is also for switching between upper/lower case and digits.
13
Voice mail access1
A quick access to the handset’s Voice mail. See also 11.1 Voice Mail on
page 78.
14
Off-hook key
To answer a call, to pre-dial a number, and as a shortcut to the Call list.
15
Soft keys
The three Soft keys are located just beneath the display and the
function of each Soft key is indicated by text in the display just above
the keys. In idle mode, the middle and right Soft key can be used for
specific functions defined by the user of the handset. See 7.6.1 Define
Soft Keys on page 58.
16
Mute and PTT button
A long press on the Mute button in idle mode, changes between ring
signal on/off. At incoming call, a long press on the Mute button
silencing the ring signal.
During a call, a long press on the button changes between microphone
on/off.
Note: A muted handset still sounds an alert, a beep, when there is an
incoming call.
17
Volume button (down)
To decrease the speaker earpiece, headset, and the loudspeaker
volume. The button is placed on the upper left side of the handset.
18
Volume button (up)
To increase the speaker earpiece, headset, and the loudspeaker
volume. The button is placed on the upper left side of the handset.
19
LED
Indicates incoming call, messaging, low battery, and charging.
1. This is a system dependent feature.
31 October 2013 / Ver. G
7
User Manual
Ascom d81 DECT Handset
2.1.1
TD 92644EN
Hot Keys
The keys "0" and "2" to "9" can be configured as Hot Keys. A long press on any of these
numbers in idle mode is, by default, a shortcut to the Call contact list. The list is in alphabetic
order and depending on which key is pressed is dependent on where in the list the contact
appears.
A Hot Key can be programmed to give access to frequently used functions such as dialling a
specific number, a shortcut on the menu, or sending an SMS. See 7.6.2 Define Hot Keys on
page 59.
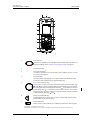
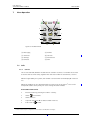
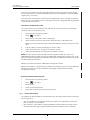
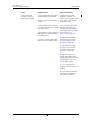
2.1.2
Alphanumeric Keys
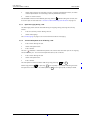
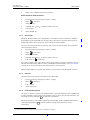
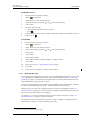
NOTE: Depending on the selected menu language and character setting in the IMS3/Unite
CM, other characters can be available. This means that the character order can differ from
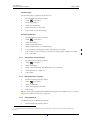
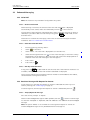
the figure below.
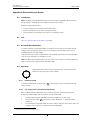
Figure 1.
abcàâäæç2
.,?!-‘”1
deféè3
jkl5
mnoñòöø6
ghiî4
pqrsβ7
wxyz9
Space + * 0
#
002
tuvùü8
Figure 1. Available Characters.
In Idle Mode, and Number Input Mode
•
•
•
A short press on a key enter the digits “0” - “9” and the characters * and #.
. A pause is indicated by a
Enter a pause in number input mode by a long press on
"P" in the display.
changes the tone sender on. Tone sender on is indicated by a "T" in
A long press on
the display.
In Text Input Mode
•
•
•
•
A short press on a key 0-9, displays the first available character on that specific key. The
marked character is selected after a timeout, or when another key is pressed.
before entering the character.
To change to upper or lower case, press
can also be used to display only the digits.
The
To add space in the text, make a short press on key 0.
The first character entered in a message, or when adding or editing a name in the
Contacts menu, is an upper level character followed by lower level characters, unless
is pressed before entering the character. To switch between "Abc", "ABC", "abc",
. A long press on
displays special characters.
and "123", press
31 October 2013 / Ver. G
8
User Manual
Ascom d81 DECT Handset
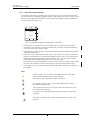
2.1.3
TD 92644EN
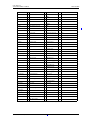
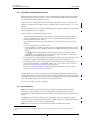
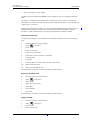
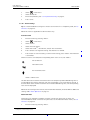
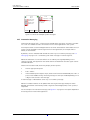
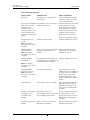
Icons and Text in the Display
All functions and settings available to the user are shown as icons and text in the display.
The icons and text in the display indicate functions and settings the user has access to. The
display normally displays date and time, the Owner ID and handset number. The Owner ID
can manually be set by the user.
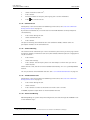
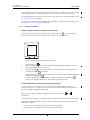
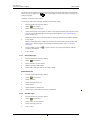
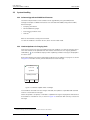
Figure 2.
11:00
1
01/12/2011
2
System A
3
Menu
4
5
003
123456
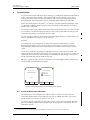
Figure 2. Example of a display configuration in idle mode.
•
•
•
•
•
The Status bar (1) display icons, which provide information about signal strength,
missed calls, new messages, the phone and key locks, sound off, and time and battery
status. The status bar is always visible.
The Header bar (2) displays the current date, headset connection, Bluetooth connection,
and system connection.
The Active area (3) displays information such as the name of the system to which the
handset is connected to. A user identity provided from the system or an Owner ID can
also be displayed if configured in the Settings menu. This is also the area for dialog
window text. For example "missed calls" or to confirm an action.
The Scroll bar (4) may be displayed to the right of the "Active area" when a menu screen
has more than six menus or when a message is too long to be displayed in one go.
The Soft key bar (5) is used for Soft keys which can be used as shortcuts for functions in
the handset.
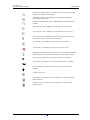
Icons
“Signal strength” icon is visible in the upper left corner. The staples
shown in display depends on the signal strength.
“Full battery” icon is displayed in upper right corner.
"Low battery warning” icon is shown when the battery has 10% or
less remaining capacity left.
"Empty battery warning" icon is flashing when the battery has 5% or
less remaining capacity left.
“Sound off” icon is displayed when the Sound off key or Mute button
is pressed.
The Silent ("Volume 0") icon is displayed when the ring volume is set
to Silent.
31 October 2013 / Ver. G
9
User Manual
Ascom d81 DECT Handset
TD 92644EN
"Microphone off" icon indicates a silenced microphone. It is displayed
after a long press on the Sound off key, Mute button during a call.
During a PTT call, the microphone is silenced when the PTT button is
released.
“Loudspeaking” icon is displayed in the soft key bar during a call.
Pressing this icon turns on the loudspeaker.
“Loudspeaking off” icon is displayed after the soft key for
Loudspeaking icon has been pressed. Pressing this icon turns off the
loudspeaker.
“New message” icon or “Interactive message” icon indicates that one
or more new text messages have been received. The icon remains in
the status bar until all new messages in the inbox are read.
"Request for answer" icon in front of a message indicates that this
message must to be acknowledge or rejected.
“Voice mail message” icon is displayed in the status bar when there
are voice mails. The icon remains until voice mail has been listened to.
“Voice mail message” icon is displayed in the inbox when there are
voice mails. The icon remains until voice mail has been listened.
“Read message” icon or “Read Interactive message” icon in front of a
message shows that this message once has been read.
"Unsent message" icon
"Sent message" icon
"New colored message" icon indicates that a new colored text
message(s) has arrived. The messages can be labelled with different
colours.
"Read colored message" icon indicates that a colored text message(s)
has been read. The messages can be labelled with different colours.
"High prio" icon included with "New message" icon indicates high
priority of a message.
"Alarm prio" icon included with "New message" icon indicates alarm
priority of a message.
“Key lock” icon indicates a locked keypad.
"Locked entry" icon indicates that the contact can not be edited or
deleted by the user.
"Phone lock" icon indicates a locked handset.
“Bluetooth” icon indicates that Bluetooth is enabled.
31 October 2013 / Ver. G
10
User Manual
Ascom d81 DECT Handset
TD 92644EN
“Bluetooth barcode reader” icon indicates that a Bluetooth barcode
reader is connected to the handset.
“Bluetooth headset” icon indicates that a Bluetooth headset is
connected to the handset.
“Headset” icon indicates that a corded headset is connected to the
handset.
“Outgoing call” icon is added to all outgoing calls in the call list.
“Incoming call” icon is added to all answered calls in the call list.
"Push to talk" icon is added to all incoming, outgoing, missed and
answered PTT calls in the call list/missed calls.
“Missed call” icon is added to all missed calls in the call list.
“Missed call” icon indicates missed calls in the status bar.
"PDM/Device Manager communication" icon is visible when handset is
communicating with PDM/Device Manager via advanced charger.
"Pull-cord" icon indicates that the Pull-cord alarm is enabled.
"Man-down" icon indicates that the Man-down alarm is enabled.
"No-movement" icon indicates that the No-movement alarm is
enabled.
"Profile active" icon
"Messenger" icon indicates that the handset has a d81 Messenger
product license.
"Protector" icon indicates that the handset has a d81 Protector
product license.
31 October 2013 / Ver. G
11
User Manual
Ascom d81 DECT Handset
TD 92644EN
Menu Icons
The "Contacts” menu contains all names/numbers in the local
phonebook. In addition, a company phonebook with up to 1000
entries can be downloaded to the phone via the PDM/Device
Manager. A central phonebook1 can also be accessed from the
"Contact" menu.
The "Services" menu can be used to create shortcuts the functions
Phone call, Send data, and Send message.
The “Messaging” menu contains all message handling such as
reading and writing messages.
The “Calls” menu contains call lists, call time, and call services. Call
services is configured in the PDM/Device Manager.
The “Connections” menu contains Bluetooth connection, headset
selection, System selection, and In charger selection.
The “Settings” menu contains personal handset settings such as
changing the ring volume, selecting language, etc.
The ”shortcuts" menu contains shortcuts for the Soft keys, Hot
keys, and Navigation keys.
The "Profiles" menu allows up to four different profiles to be added.
The "Normal" profile is active by default.
1. This is a system dependent feature.
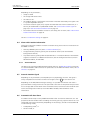
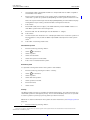
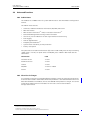
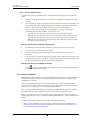
2.2
Accessories
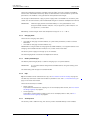
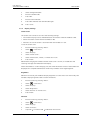
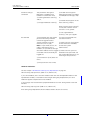
2.2.1
Desktop Chargers
Advanced
Basic
004
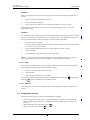
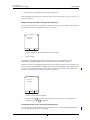
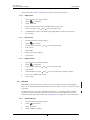
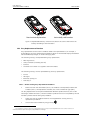
Figure 3.
Figure 3. Desktop Chargers for the Handset
31 October 2013 / Ver. G
12
User Manual
Ascom d81 DECT Handset
TD 92644EN
There are two desktop chargers available; one basic (DC3) that only charges the handset,
and one with advanced functionality (DC4) to download new software and to synchronize
parameters. The handset is fully operational while placed in the charger.
The charger is delivered with a plug-in power supply and is connected into an ordinary wall
socket. For more information, see the advanced charger’s Installation and Operation Manual.
IMPORTANT:
When charging the EX classified handset, it is only permitted to use a
charger marked with DC3-xxxB/rev. 1A (or higher rev.), DC4-xxxB/rev. 3A
(or higher rev.) on the label.
NOTE: Only use the charger within the temperature range of +5° C – +40° C.
2.2.2
Charging Rack
There are two charging racks (CR3):
•
one used for charging several handsets, to synchronize parameters, and for software
download
• one used for charging several handsets only
IMPORTANT: If using the CR3 for charging EX classified handsets, it is only permitted to use a
charging rack marked with CR3-AxxB (rev. 2A) or CR3-AxxC on the label.
The built in power supply can charge up to six handsets.
See the Charging Rack’s Installation and Operation Manual.
2.2.3
Battery Pack Charger
The Battery Pack Charger (CR4) is used for charging up to six spare batteries.
IMPORTANT:
It is not permitted to charge EX classified batteries using the battery pack
charger.
See the battery pack charger’s Installation Guide.
2.2.4
Clips
Tip: The handset can be used without a clip, see 14.5 Attach Cover for No Clip on page 93.
The belt clips cannot be used if the handset is placed in a case. See 2.2.7 Leather Casing on
page 14 for more information.
There are two belt clips available:
•
•
2.2.5
Hinge-type clip
To prevent the handset from slipping out of for example pocket or belt, see 14.3 Attach
the Hinge-type Clip on page 92.
Swivel-type clip
To be able to rotate without slipping out from for example pocket or belt, see 14.4
Attach the Swivel-type Clip on page 92.
Security Cord
The security cord is 800 mm long. The security cord is attached directly to the handset.
31 October 2013 / Ver. G
13
User Manual
Ascom d81 DECT Handset
2.2.6
TD 92644EN
Pull Cord
The pull cord is 800 mm long. The pull cord is attached directly to the handset’s pull cord
connector on the upper right side.
2.2.7
Leather Casing
The leather casing is especially designed for the handset. The casing comes with a swivel
type belt clip and the handset is fully operational while placed in the casing.
2.2.8
Headset
A headset is recommended if the handset is frequently used and/or if the user wants to
have both hands free. The headset comes in two versions; Microphone on a boom and
Hearing protection.
IMPORTANT:
The headset Microphone on a boom is not available as accessory for the EX
classified handset. If used, it is NOT permitted to use the headset in
hazardous area.
To achieve optimal audio quality with the different headset types it is recommended to
select the corresponding headset profile. See 7.8.2 Headset on page 69 for more
information.
NOTE: When Bluetooth is disabled and having an active call in loudspeaker mode on an EX
classified handset, the audio will not be transferred to the Peltor hearing protection headset
when connecting it.
31 October 2013 / Ver. G
14
User Manual
Ascom d81 DECT Handset
3
TD 92644EN
Basic Operation
Tip: For information on how to answering/ending a call, see 5.1 Incoming Call on page 29.
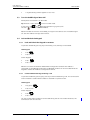
3.1
Switch the Handset On/Off
Switch on the Handset
Press and hold
until the handset vibrates and the display lights up.
Switch off the Handset
Prerequisite: The handset is in idle mode.
to return to idle mode. If the handset is a shared phone, it
Tip: While in a menu, press
must first be logged out to be able to switch off the handset. See 3.2 Log In or Out of a
Shared Phone.
.
1
Press and hold
2
A Switch off? dialog window is displayed. Confirm by pressing "Yes".
NOTE: When putting a switched off handset in a charging rack, the Owner ID of the handset
is still be shown. This simplifies the identification of the handset when for example charging
the it together with other handsets. If a handset restriction is enabled, it might not be
possible to switch off the handset. See the handset’s Configuration Manual.
3.2
Log In or Out of a Shared Phone
Note: This feature is license dependent and is applicable in IP-DECT systems only. See
Configuration Manual, Ascom d81 DECT Handset, TD 92674EN.
The feature shared phone allows more than one user to use a handset. When a handset is
configured to be a shared phone, it can be used by any shared phone user in the system. The
message and call lists are deleted when a user logs off a handset.
If the handset is configured in the PDM/Device Manager, an emergency call can be made
from a handset that is logged off. See the handset’s Configuration Manual.
Log on a Handset
Prerequisite, the handset is switched on. See 3.1 Switch the Handset On/Off for more
information.
1
A Login? dialog window appears. Press "Yes".
2
Enter User ID and password.
3
Press "Login".
NOTE: If a phone is shared and one of the users logs off the shared phone, the lock that
prevents the handset from unauthorized use is deactivated. For additional information, see
3.5 Lock and Unlock the Handset on page 17
Log off a Handset
1
Press and hold
31 October 2013 / Ver. G
.
15
User Manual
Ascom d81 DECT Handset
2
3.3
TD 92644EN
A Logout? dialog window appears. Press "Yes".
Turn the Audible Signal On or Off
Prerequisite: The handset is in idle mode:
Tip: While in a menu, press
to return to idle mode.
A long press on
, or
, changes between ring signal on/off.
indicates a silenced handset.
The icon
NOTE: If handset restrictions are enabled, you might not be able to turn the audible signal
off. See the handset’s Configuration Manual.
3.4
Lock and Unlock the Keypad
3.4.1
Lock and Unlock the Keypad in Idle Mode
To prevent accidentally pressing keys and making a call, the keys can be locked.
Lock Keypad
.
1
Press
2
Press "Lock".
Unlock Keypad
1
Press
2
Press "Yes".
.
NOTE: A call can be answered or ended while the keypad is locked. If the handset is
configured via the PDM/Device Manager. Predefined numbers can also be called while the
keypad is locked. See handset’s Configuration Manual.
3.4.2
Lock and Unlock the Keypad during a Call
To prevent accidentally pressing keys, the keys can be locked during a call. This can be useful
when a headset is used and the handset is attached to a pocket or belt.
Lock keypad
.
1
Long press
2
Press "Lock".
Unlock keypad
1
Press
2
Press "Yes".
.
TIP: The volume and mute button can be used during the call. For the d81 Protector, the
alarm button can also be used.
31 October 2013 / Ver. G
16
User Manual
Ascom d81 DECT Handset
3.5
TD 92644EN
Lock and Unlock the Handset
The handset can be protected for unauthorized use. If this function is activated, a PIN code
has to be entered, for example, to switch on the handset, to answer an incoming call etc. The
default phone lock code (0000) can be changed to any 4 - 8 digit personalized code.
NOTE: If a phone is shared and one of the users logs off the shared phone, the lock that
prevents the handset from unauthorized use is deactivated. For additional information, see
3.2 Log In or Out of a Shared Phone on page 15.
NOTE: The handset can be configured with predefined emergency numbers that can be
called while the handset is locked. See the handset’s Configuration Manual. For the d81
Protector, the Alarm button can also be used.
3.6
1
Press "Menu".
2
Select
3
Select “Locks”.
4
Select "Phone lock"
5
Select “Auto phone lock”.
6
Select “On”, "On in charger", or "Off".
7
Enter PIN code. If the PIN code is forgotten it can be removed by the system
administrator.
8
Press "OK".
.
Mute Handset on Incoming Call or Message
The handset can be muted temporarily on an incoming call or message. The call is not hung
up when the ringtone is muted. If the call is unanswered, it reverts to voicemail if the
handset has been configured for voicemail. To mute an incoming call or message, press
or
while the handset sounds.
31 October 2013 / Ver. G
17
User Manual
Ascom d81 DECT Handset
4
TD 92644EN
Menu Tree
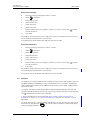
4.1
Calls
Call list
> 1234 12:00
>
1235 14:00
Call
More
>
etc.
Time of Call
Edit number
Save number
> Work number
Mobile number
Other number
Send message
>
Delete
> Yes
No
Delete all
Back
Missed calls
> 2345 15:00
>
2346 23 Sep 03
Call time
> Total time
03:15:00
Last call
00:30:00
PTT Groups1
> PTT Group 1
(example)
Call services
Absence1
No
Call
More
etc.
> Yes
>
(same as above)
Back
>
Call
>
Back
>
>
Deactivate
Lunch
Meeting
Trip
Vacation
Out
Absence 1
Absence 2
Absence 3
Absence 4
Divert calls1
>
Internal
>
Activate
Deactivate
External
>
(same as Internal)
No reply
>
(same as Internal)
When busy
>
(same as Internal)
1.Visible if defined in PDM/Device Manager
31 October 2013 / Ver. G
18
User Manual
Ascom d81 DECT Handset
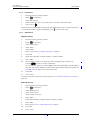
4.2
TD 92644EN
Contacts
Call contact
> Search
From contact list
Add contact
> New
>
> Name
Work number
Mobile number
Other number
Ring signal
From Call list
Edit contact
>
>
> Search
From contact list
> Name
Work number
Mobile number
Other number
Ring signal
Delete contact
> Search
From contact list
Central phonebook1
>
> Search by name
>
> Call
More
>
View contact
Add to contacts
Send message
Search by number
> More
Last result
> Call
More
>
(same as above)
>
(same as above)
1. This is a system dependent feature.
TIP: When adding or editing a number in a contact, a variable or character U can be added in
the Work/Mobile/Other number field. This allows the user to enter additional numerical
characters before calling the number. See 8 Procedure Call on page 74 for more information.
31 October 2013 / Ver. G
19
User Manual
Ascom d81 DECT Handset
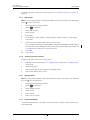
4.3
Profiles
TD 92644EN
.
Normal (default)
Meeting1 (example)
> Volume
Ring signal
>
> Internal call
>
Play
Back
Message alert
External call
>
(same as above)
Call back
>
(same as above)
PTT
>
(same as above)
> Play
Back
Vibrating alert
> On
On if silent
Off
Key sound
> Click
Tone
Silent
Answering behaviour
> Automatically
Loudspeaking
Add new
>
1.The example profile does not contain all applicable settings.
31 October 2013 / Ver. G
20
User Manual
Ascom d81 DECT Handset
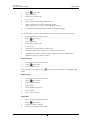
4.4
TD 92644EN
Messaging
Inbox
>
Message > View
list
> Reply
More
> Enter text
> Delete
Forward
Call sender
Call no. in text1
> Call
Save number
More
> Delete
> Yes
No
Delete all
> Yes
No
Back
Write new > Enter
message
text
> Send
> Enter number
"Contacts access"
> Send
> Send
Clear
Back
Unsent
> Message > Edit
list
> Enter number
"Contacts access"
> Send
> Send
Clear
More
> Delete
> Yes
No
Delete all
> Yes
No
Back
Sent
> Message > View
list
> Forward
> Send
> Enter
number
"Contacts
access"
>
Send
>
Send
Clear
More
> Delete
> Yes
No
Call no.
in text1
Save number
> Call
>
Close
More
> Delete
> Yes
No
Delete all
> Yes
No
Back
1.Visible if the number consists of minimum 3 digits.
31 October 2013 / Ver. G
21
User Manual
Ascom d81 DECT Handset
4.5
TD 92644EN
Services
Add new
> Enter name
> Phone call
> Phone
number
> Enter number
> Save
"Contacts access" > Save
Back
Send data
Send
message
> Enter
prefix
> Phone
number
> Save
> Enter > Save
number
Clear
"Contacts
access"
Back
Back
> Enter number
> Save
"Contacts access" > Save
Back
Service 1
(example)
> More
> Edit
Delete
> Yes
No
TIP: When configuring the Phone call function, a variable or character U can be added to the
Enter number field. This allows the user to enter additional numerical characters before
calling the number. See 8 Procedure Call on page 74 for more information.
31 October 2013 / Ver. G
22
User Manual
Ascom d81 DECT Handset
4.6
TD 92644EN
Shortcuts
Soft Keys
> Middle
>
Name
Function
>
Not used
Phone call
> Enter number
Phone call
> Enter number
Phone call PTT
> Enter number
Call list
Contact list
Central phonebook1
Message inbox
Send message
> Enter number
Change profile
> Profile A
(example)
Open a menu
> Main menu
Calls
Connections
Contacts
Messaging
Services
Profiles
Settings
Absence2
Call services
Activate
alarm3
Call absence
>
Services
>
Edit alarm data
Value
>
Control
question
>
On
Off
Right
Hot Keys
> 0, 2 - 9
>
(same as
Middle key)
>
Function
>
Value
>
Control
question
>
(same as above)
On
Off
Navigation
Keys
31 October 2013 / Ver. G
> Up
>
Function
>
Value
>
(same as above)
23
User Manual
Ascom d81 DECT Handset
TD 92644EN
Control
question
>
On
Off
Down
>
(same as Up
key)
Left
>
(same as Up
key)
Right
>
(same as Up
key)
1.This is a system dependent feature.
2. Visible if defined in handset via PDM/Device Manager.
3.Applicable for d81 Protector only.
TIP: When configuring the Phone call function, a variable or character U can be added to the
Enter number field. This allows the user to enter additional numerical characters before
calling the number. See 8 Procedure Call on page 74 for more information.
31 October 2013 / Ver. G
24
User Manual
Ascom d81 DECT Handset
4.7
TD 92644EN
Connections
Bluetooth
Headset
> Enable/Disable
Headset
> Add new
>
Barcode reader2
> Add new
>
> Mic on boom
Hearing protection
System
> Change system
> Automatically
System A
(example)
Subscribe
> Enter System
name
>
Select > PARK
system
/AC
Unsubscribe1
> Select system
>
Yes
> Protection > Yes
on?
No
No
Rename system
> Select system
>
Edit
> Save
Clear
Back
Back
Priority
> Select system
>
Up
Down
Back
In charger
> Call behavior
> No action
Loudspeaking
End call
Other actions
> No action
Change profile
>
Profile A
(example)
Switch off
Sound off
Logout2
Message absence
1.It is not possible to unsubscribe a protected system via the System menu. Unsubscribtion of the system must
be made via the Admin menu or the DECT system.
2.This is a license dependent feature.
4.8
Settings
Sound & Alerts > Volume
Ring signals
>
>
Internal call
>
External call
>
Callback
>
PTT
Message alert
31 October 2013 / Ver. G
>
25
User Manual
Ascom d81 DECT Handset
TD 92644EN
Vibrator alert
>
On
On if silent
Off
Key sound
>
Click
Tone
Silent
Locks
> Automatic key lock
>
On
On except calls
Off
Phone lock
>
Auto phone lock
>
On
On in charger
Off
Change PIN code
Display
> Screen saver
>
>
Information
Black
Brightness
>
Normal
Power save
Time & Date
Contrast
>
> Time format
>
12:00(am/pm)
12:00
Date format
>
dd mmm yy
mmm dd yyyy
yyyy-mm-dd
mm/dd/yyyy
dd/mm/yyyy
dd-mm-yyyy
dd.mm.yyyy
Answering
> Answering key
>
Hook-off
Any key
Answering behaviour
>
Automatically
Loudspeaking
Messages
> Text size
>
Normal
Large
Language
> Danish, English etc.
Owner ID
>
Alarm1
> Activate alarm
>
Pull-cord
Man-down
No-movement
Edit alarm data
1.Only visible for d81 Protector with Man-down/No-movement (factory option).
31 October 2013 / Ver. G
26
User Manual
Ascom d81 DECT Handset
4.9
TD 92644EN
In Call Menu
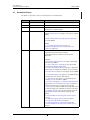
The In Call menu displays a list of functions that can be accessed during a call. To see the
available functions, press the "More" soft key. Some functions are always provided and
others may be made available by the administrator via the PDM/Device manager. To use a
function, navigate the In Call menu to highlight the required function and then press the
"Select" soft key.
The In call function can be used in combination with the Procedure call function. See chapter
8 Procedure Call on page 74.
Note: When calling from a locked handset, there are limitations to what items in the In Call
menu are shown. However, the entire menu is accessible when calling from a handset with
locked. .
NOTE: If the handset is configured via PDM/Device Manager, one of the predefined
emergency numbers can be called while the handset or keypad is locked. If calling from a
locked handset, only the Microphone on/off function in the In Call menu can be accessed.
However, the entire In call menu is accessible when calling from a handset with locked
keypad.
Contacts
>
Messaging
> Inbox
Write new message
Unsent
Sent
Microphone on/off
>
Audio transfer
>
New call
> Call
"Phonebook access"
Cancel
Switch
>
End call
>
Transfer
>
Transfer to new call
> Call
"Phonebook access"
Cancel
Conference
>
Call back
>
Call waiting
>
DTMF
DECT info
> Link
System
Location info
> DECT Location info
LF Location info
All Location info
General purpose 1 -10
31 October 2013 / Ver. G
>
27
User Manual
Ascom d81 DECT Handset
TD 92644EN
NOTE: Some options are only visible if the handsets support them or if they are configured in
the handset via PDM/Device Manager.
4.9.1
Additional In Call Functions
Besides the default In Call functions, it is possible to define 10 extra system specific codes/
general purposes. See the handset’s Configuration Manual.
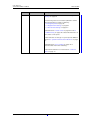
4.10 Customizing the Menu Tree
The menu tree can be customized by hiding some of the functions that are available but for
example not in use. Which functions that can be hidden are defined in the PDM/Device
Manager. See the handset’s Configuration Manual.
31 October 2013 / Ver. G
28
User Manual
Ascom d81 DECT Handset
5
TD 92644EN
Calling
5.1
Incoming Call
The flashing LED, accompanied by a ring signal and/or a vibrating handset, gives a notice of
a call. Ring signal and vibrator can be disabled, see 7.7.1 Sound and Alert Settings on page
60.
The calling party’s handset number or name is shown. The name is shown if the calling
party’s handset number is stored in the local phonebook.
5.1.1
Answer a Call
or the "Accept" soft key to answer the call. The call can
When the signal sounds press
soft key. The name or number of
be answered in loudspeaking mode by pressing the
the calling party is displayed if calling line information is available.
TIP: When a headset is connected to the handset, the headset button can be used to answer
the call. In addition, it is possible to configure the headset button with a specific function,
such as hook off, dial last called number, or dial a predefined number. See the handset’s
Configuration Manual.
A call may also be answered in the following ways:
•
•
5.1.2
Automatically and Loudspeaking: When Automatically is enabled, all incoming calls are
connected automatically. See 7.7 Settings on page 60.
With a predefined message. This lets the use decline the call, but still acknowledge its
receipt, by sending a predefined text message to the caller. See 11.9.2 Answering a Text
Message with a Predefined Message on page 83.
End a Call
ends the call. The duration of the call is shown in the display. The total time of
A press on
the call can also be retrieved from the Calls menu > Call time.
A call can also be ended by putting the handset in a charger. Note that all ongoing calls are
disconnected. See 7.8.4 In Charger Action when in Call on page 72.
NOTE: Some systems/PBXs require that the handset sends a DTMF to end a call. See the
handset’s Configuration Manual for more information.
5.2
Outgoing Call
5.2.1
Pre-Dial
to get the line. The number is shown on the display while
Enter the number and press
dialling. If needed, press "Clear" to erase the number. By using the navigation key it is
possible to step and add or delete a digit in a number.
The tone sender in a pre-dialed number can be turned on by long pressing
.
An international number can be dialled from the handset by entering a + character followed
by the country code and local number. To enter the + character, long press the 0 key until
the character is shown in the display.
NOTE: The + character cannot be entered and international numbers cannot de dialled in the
following circumstances:
31 October 2013 / Ver. G
29
User Manual
Ascom d81 DECT Handset
•
•
5.2.2
TD 92644EN
If the 0 key has been configured as a hot key.
If the handset has been set up to perform advanced functions normally used by a system
administrator, as described in 10.1 Admin Menu on page 77.
Post-Dial with Headset Button
To make a call when a headset is used, press the button2 to get the ring tone and then dial
the number.
5.2.3
Dial Using a Pre-programmed Navigation Key, Hot Key, Soft key, or Headset
Button
A Navigation key, Hot key, Soft key, or a headset button1 can be programmed with a
number. Press the pre-programmed key/button to dial the number. The call is automatically
connected.
5.2.4
Dial a Number from the Call list
Tip: A number can be dialed from the Call list by pressing
.
list and pressing "Call" or
, selecting a number from the
1
Open the menu by pressing the "Menu" soft key.
2
Select
3
Select "Call list".
4
Select a number.
5
or the soft key "Call" to dial. The number can be edited before the call is
Press
dialed. Press "More" and select "Edit number". The 25 last received, dialed or missed
calls are stored in a call list. See 7.1 Calls on page 41.
5.2.5
.
Dial Last Called Number with Headset Button
If a headset is used, the headset button can be pressed to dial the last called number. This
requires that the headset button is configured via the PDM/Device Manager.
5.2.6
Dial the Sender of a Message
It is possible to call the sender of a message stored in the message list.
1
Open the menu by pressing the "Menu" soft key.
2
Select
3
Select "Inbox".
4
Select message in the message list.
5
Press "View".
6
Press "More".
7
Select "Call sender".
5.2.7
.
Dial a Number from the Local Phonebook
1
Open the menu by pressing the "Menu" soft key.
2
Select
.
1.The headset button must be configured in the handset via PDM/Device Manager.
31 October 2013 / Ver. G
30
User Manual
Ascom d81 DECT Handset
TD 92644EN
3
Select "Call contact".
4
Select contact from list, or search name/number by entering characters and select
search.
5
Press "Call" or
5.2.8
to make the call.
Dial a Number from the Company Phonebook
1
Open the menu by pressing the "Menu" soft key.
2
Select
3
Select "Call contact".
.
The local and company phonebook appears in the same list, but the company names
in front of the name. Select the contact from list, or search
are indicated by a icon
for the name or number by entering characters and selecting search.
4
5.2.9
Press the soft key "Call" or
to make the call.
Dial a Name from the Central Phonebook
1
Open the menu by pressing the "Menu" soft key.
2
Select
3
Select "Central phonebook".
4
Select "Search by name".
5
Enter the first name, last name, or both.
.
Note: Incomplete names may be entered and searched. Names that include spaces
may be also be searched.
5.3
6
Press “Search”.
7
Press "Call", or
to make the call.
During a Call
Note: Some of these functions are system dependent. The parameters are set up in the
PDM/Device Manager, see the handset’s Configuration Manual, and Installation and
Operational Manual for PDM/Device Manager.
If the handset is configured via PDM/Device Manager, one of the predefined emergency
numbers can be called while the handset or keypad is locked. When calling from a locked
handset, only the Microphone on/off function can be accessed by pressing the soft key
"More". However, the entire In Call menu is accessible when calling from a handset with
locked keypad.
5.3.1
Adjust the Volume during a Call
to increase the volume, and
to decrease the volume. The handset stores and
Press
and
on the navigation key can also be used to
preserves the new volume level. The
adjust the volume.
5.3.2
Open Contacts during a Call
1
Press "More" during the call.
2
Select "Contacts".
31 October 2013 / Ver. G
31
User Manual
Ascom d81 DECT Handset
TD 92644EN
3
Select "Call contact" for searching a local or company phonebook contact, or select
"Central phonebook" for searching a central phonebook contact.
4
Select or search contact.
. When calling the contact, the
The selected contact can be called by pressing "Call" or
first call is put on hold. See also 5.3.6 Start a New Call during Conversation on page 33.
5.3.3
Open Messaging during a Call
The Messaging menu can be accessed during an ongoing call by pressing the soft key
"More".
1
Press the soft key "More" during the call.
2
Select "Messaging".
See 7.4 Messaging on page 53 for more information about messaging.
5.3.4
Turn the Microphone on or off during a Call
1
Press "More" during the call.
2
Select "Microphone off".
3
Press "Select".
indicates a silenced microphone. This means that the other part in an ongoing
The icon
call cannot hear you. To turn the microphone back on, do as follows:
1
Press "More" during the call
2
Select "Microphone on".
3
Press "Select".
The microphone can be turned on and off by long pressing
or
.
When long pressing
or pressing
, a short peep is also heard indicating that the
in a PTT group call, no beep is heard.
microphone is turned on or off. When pressing
31 October 2013 / Ver. G
32
User Manual
Ascom d81 DECT Handset
5.3.5
TD 92644EN
Audio Transfer
To transfer audio between the Bluetooth headset and the handset’s earpiece, do as follows:
1
Press "More" during the call.
2
Select "Audio transfer"2.
3
Press "Select".
5.3.6
Start a New Call during Conversation
1
Press "More" during the call.
2
Select "New Call".
3
Press "Select".
4
Enter the number and press
5.3.7
, or "Call".
Call Back
When a call is made to a busy handset, an automatically call back can be made when the
busy handset is free. When a busy tone sounds, do as follows:
1
Press "More".
2
Select "Call back"
3
Press "Select".
4
Press
5
When the handset alerts, press
5.3.8
and wait until the handset alerts.
and the call automatically starts.
End a Call
Prerequisite, a new call has been started during conversation, see 5.3.6 Start a New Call
during Conversation on page 33.
1
Press "More" during the call.
2
Select "End Call".
3
Press "Select". This ends the current call and the previous call is resumed.
5.3.9
Transfer a Call
Prerequisite, a new call has been started during conversation, see 5.3.6 Start a New Call
during Conversation on page 33.
When a caller has two ongoing calls, he/she can transfer the first call to the second call.
1
Press "More" during the call.
2
Select "Transfer".
3
Press "Select" to transfer the current call to the other call.
5.3.10 Transfer to New Call
An ongoing call can be transfered to a new number. When the new call is established, the
caller that initiated the transfer is disconnected.
1
Press "More" during the call.
2.Visible if Bluetooth connection is active.
31 October 2013 / Ver. G
33
User Manual
Ascom d81 DECT Handset
TD 92644EN
2
Select "Transfer to new call"3.
3
Press "Select".
4
Enter the number of the party the ongoing call is to be transfered to.
5
Press
to transfer the call.
5.3.11 Conference Call
Prerequisite, a new call has been started during conversation, see 5.3.6 Start a New Call
during Conversation on page 33.
By initiate a conference call, an conversation can be made between several participants
simultaneously.
1
Press "More" during the call.
2
Select "Conference call".
3
Press "Select".
The person initiating the conference call is the conference leader, and the other are
participant members of the conference call.
5.3.12 Send Call Waiting
This feature can be used when you want to announce a person that you are trying to reach
him/her by sending a notification tone to his/her handset. When the person is engaged in a
call, do as follows:
1
Press "More".
2
Select "Call waiting".
3
Press "Select". The other party hears two short beeps to inform that you want to
reach him/her.
When the line is free, the call on hold is redialed automatically. This is a system dependent
feature.
TIP: It is possible to switch between the calls. See 5.3.13 Switch between Calls on page 34.
5.3.13 Switch between Calls
Prerequisite, a new call has been started during conversation, see 5.3.6 Start a New Call
during Conversation on page 33.
1
Press "More" during the call.
2
Select "Switch".
3
Press "Select" to switch to the other call. The first call is on hold.
If needed, repeat the steps above to switch between the calls.
5.3.14 Answer Call Waiting
NOTE: Depending on system setup and configuration, this feature might be handled in one
of two different ways:
3.Only visible when the parameters "New call" and "Transfer" are defined in the PDM/Device Manager.
31 October 2013 / Ver. G
34
User Manual
Ascom d81 DECT Handset
TD 92644EN
Method 1
During an ongoing conversation and a short tone for another incoming call appears, do as
follows:
1
Press the soft key "More" during the call.
2
Select "Answer Call waiting".
3
Press "Select". The new call is now connected, and the first call is on hold.
When the line is free, the call on hold is automatically dialled again. This is a system
dependent feature.
Method 2
If a second caller calls during a phone call, the handset beeps and displays the text "Internal
call" for internal callers and "External call" for external callers. The handset also shows the
name or phone number of the second caller. To answer the second caller:
1
Press the soft key "Accept".
The text "Switch" briefly appears on screen, and the handset transfers to the second
call. The first call is put on hold.
2
When finished speaking with the first caller, select the "More" soft key.
3
Select "End Call".
4
The second call is closed and the first call is retrieved.
NOTE: It is possible to reject a second call by pressing the "Decline" soft key. The second
caller hears a busy tone, and the call is logged as a missed call in the handset.
5.3.15 DTMF
Some systems or PBXs require that the handset sends Dual Tone Multi Frequency (DTMF)
when pressing the keys. DTMF can be enabled as follows:
1
Press the soft key "More" during the call.
2
Select "DTMF".
3
Press "Select" to enable the use of DTMF.
TIP: It is also possible configure the handset to send DTMF when pressing
. See the handset’s Configuration Manual.
releasing
and pressing/
5.3.16 DECT Info
This submenu is only visible if the Admin menu is activated. See handset’s Configuration
Manual.
5.4
Loudspeaking Function
There are several options to activate the loudspeaking function:
•
•
•
Press a Navigation key, Hot key or Soft key defined as a shortcut to a "Phone call "
function. When pressing the key, a predefined number is called, see 7.6 Shortcuts on
page 58.
5
.
When receiving a call, press the soft key
4
.
During a call, press the soft key
31 October 2013 / Ver. G
35
User Manual
Ascom d81 DECT Handset
•
•
5.5
TD 92644EN
During a call, put the handset in a charger. Requires that the parameter Call behaviour is
set to "Put on Loudspeaker" in PDM/Device Manager. See the handset’s Configuration
Manual.
This function can also be activated by selecting another answering method, that is,
"Automatically" and/or "Loudspeaking". See 7.7.6 Answering on page 65.
Call Diversion
Internal calls, external calls, calls when busy, or calls at no answer can be diverted to another
telephone number.
The diversion is made via the Calls menu > Call services > Divert calls. See 7.1.9 Call Services
on page 47.
It is also possible to create a shortcut to the “Call Services” function or activate a call service
when a profile is activated. See the handset’s Configuration Manual for information.
NOTE: PBX settings for the call diversion must be set to show the Divert calls menu in the
handset. See the handset’s Configuration Manual.
5.6
Declining a Call with a Predefined Message
A call may be declined with a predefined message by the called party provided that both
parties are connected via an IP-DECT system. To decline a call with a predefined message
when the handset rings, perform the following steps:
5.7
1
In response to the "Reply with a message template?" prompt, press the "Yes" soft key
to send a message to the caller. A list of predefined messages is displayed in the
"Templates" menu.
2
Select, and if required, edit the message as described in 11.9.1 The Templates Menu
on page 83.
3
Click the soft key "Send". The calling party number is displayed in the handset
display.
4
Click the soft key "Send". A "Message sent" confirmation is displayed and the
message is sent to the caller.
Emergency Calls
If configured in the PDM/Device Manager, any one of up to five emergency numbers can be
called. An emergency number can be called even if the handset or keypad has been locked.
For additional information, see sections 7.7.2 Keypad Lock Settings on page 61 and 7.7.3
Phone Lock Settings on page 62.
4.The left Soft key might have another/no function depending on its configuration of the In call function in PDM/Device
Manager.
31 October 2013 / Ver. G
36
User Manual
Ascom d81 DECT Handset
6
TD 92644EN
Alarm Operation
The parameters described in this chapter are set in the PDM/Device Manager. See the
handset’s Configuration Manual.
NOTE: The alarm functionality is applicable for the d81 Protector only. In addition, some
functions are not available when upgrading the product license from d81 Messenger to d81
Protector, or require a functionality license. See the following chapters for more information.
If a shared phone is used, it must be logged in to the system to be able to send alarm. See
3.2 Log In or Out of a Shared Phone on page 15.
6.1
Push-Button Alarm
The push-button
can be defined to send an alarm by a long press and by multiple
press. By default, long press is defined for test alarm (see 6.1.1 Test Alarm), and multiple
press is defined for personal alarm (see 6.1.2 Personal Alarm).
6.1.1
Test Alarm
until a dialog window "Test Alarm" (default) is
Press and hold the push-button
displayed. Depending on set parameters;
•
•
•
•
•
•
6.1.2
a beep is heard
the orange LED flashes twice
the vibrator stirs
the handset receives a notification that the alarm has been received by the system. This
is a system dependent feature.
if configured, the ALS (see 6.5 Acoustic Location Signal on page 39) is activated after
the alarm has been sent, or a call is established to a predefined number (see 6.6
Automatic Call after Alarm on page 39)
NOTE: If the parameter "Silent alarm" is set, no ALS is triggered and no indication of an
alarm has been sent by the handset or received by the system is shown.
information about the handset’s location is sent along with the alarm, see 6.4 Alarm
with Location Information on page 39.
Personal Alarm
twice or more, the dialog window "Personal Alarm" (default) is
Press the push-button
displayed. Depending on set parameters;
•
•
•
•
•
•
a beep is heard
the orange LED flashes twice
the vibrator stirs
the handset receives a notification that the alarm has been received by the system. This
is a system dependent feature.
if configured, the ALS (see 6.5 Acoustic Location Signal on page 39) is activated after
the alarm has been sent, or a call is established to a predefined number (see 6.6
Automatic Call after Alarm on page 39).
NOTE: If the parameter "Silent alarm" is set, no ALS is triggered and no indication of an
alarm has been sent by the handset/received by the system is shown.
information about the handset’s location is sent along with an alarm, see 6.4 Alarm with
Location Information on page 39.
31 October 2013 / Ver. G
37
User Manual
Ascom d81 DECT Handset
6.2
TD 92644EN
Man-Down and No-Movement Alarm
NOTE: Man-down and No-movement are not available when upgrading the product license
from d81 Messenger to d81 Protector. That is, only applicable for d81 Protector with the
No-movement/Man-down hardware variant.
Man-down alarm: If the handset is tilted 45 degrees (default) or more for a preset time
(default 7 seconds), the Man-down alarm is triggered. The accuracy of the tilt is + or - 10
degrees.
No-movement alarm: If no movement is detected during a preset time (default 30 seconds),
the No-movement alarm is triggered.
When an alarm is triggered, the following occurs;
•
•
•
•
•
A Man-down warning. Cancel? or No- movement warning. Cancel? dialog window is
shown in the display, and a warning tone is also signalling during a period (default 7
seconds) before the alarm is sent.
To prevent the alarm from being sent and silencing the warning tone, do one of the
following:
- Press any key/button. The alarm is reset.
- Put the handset in a charger. The alarm is temporarily disabled indicated by that the
corresponding alarm icon is hidden. The alarm is enabled when removing it from the
charger.
. A Delay MD/NV detection? dialog window5 appears. Disable the alarm
- Press
temporarily for a specified time6 by pressing "Yes". When the alarm is temporarily
disabled, the corresponding alarm icon flashes.
If no key/button is pressed during the warning tone, the alarm is sent. Depending on set
parameters, a beep/vibrator/LED signal confirms that the alarm has been sent.
An acoustic location signal (ALS) may be activated after the alarm has been sent, or a
call may be established to a predefined number. See 6.5 Acoustic Location Signal on
page 39, or 6.6 Automatic Call after Alarm on page 39.
Information about the handset’s location may be sent along with the alarm, see 6.4
Alarm with Location Information on page 39.
The Man-down alarm and No-movement alarm can temporarily be disabled during calls to
avoid sending false alarms when the user tilts the handset or does not move during the call.
If the Man-down alarm and No-movement alarm are disabled during calls, the corresponding
icons are not displayed, see the handset’s Configuration Manual.
See also 7.7.10 Alarm Settings on page 67.
6.3
Pull-Cord Alarm
Note: Pull-cord alarm is not available when upgrading the product license from d81
Messenger to d81 Protector. That is, only applicable for d81 Protector with the Nomovement/Man-down hardware variant. In addition, this function requires a functionality
license.
If needed, remove the pull-cord cover from the handset using a flat screwdriver before
attaching the pull-cord. The pull-cord must be attached more than 5 seconds before pulling
it off the handset. If not, the alarm is not generated.
Note: Make sure that the clip of the pull-cord is safely attached to the clothes.
5.Requires that the parameters "NM-MD extra delay used" and "NM-MD extra delay time" are set in the PDM/Device
Manager.
31 October 2013 / Ver. G
38
User Manual
Ascom d81 DECT Handset
TD 92644EN
Depending on set parameters;
•
•
•
•
•
•
a beep is heard
the orange LED flashes twice
the vibrator stirs
the handset receives a notification that the alarm has been received by the system. This
is a system dependent feature.
An acoustic location signal (ALS) may be activated after the alarm has been sent, or a
call may be established to a predefined number. See 6.5 Acoustic Location Signal on
page 39, or 6.6 Automatic Call after Alarm on page 39.
information about the handset’s location is sent along with an alarm, see 6.4 Alarm with
Location Information on page 39.
See also 7.7.10 Alarm Settings on page 67.
6.4
Alarm with Location Information
Information about the handset’s location can be sent along with an alarm. The location can
be added as follows;
•
•
•
6.4.1
Manually added by the user (see 6.4.1 Alarm with Data) or,
An approximately location given by the closest Base Station (see the handset’s
Configuration Manual)
An precise location given by DECT location devices or LF location devices if the handset
supports LF location. For additional information, see the Configuration Manual, Ascom
d81 DECT Handset, TD 92674EN.
Alarm with Data
The data must manually be defined and stored by the user, see Edit Alarm Data on page 67.
It is recommended to add a shortcut for quick access to the "Edit alarm data" menu, see 7.6
Shortcuts on page 58.
6.5
Acoustic Location Signal
Depending on set parameters, the ramped up ALS is played after an alarm. The signal is
to turn the ALS off.
always ramped from the lowest volume to the highest. Press
Depending on the PDM/Device Manager settings, it is possible to make the user enter a
password when turning the ALS off. The password is the same as the phone lock password.
ALS is configurable for Man-down & No-movement alarm, Push-button alarm and Pull-cord
alarm. See Configuration Manual, Ascom d81 DECT Handset, TD 92674EN for more
information.
6.6
Automatic Call after Alarm
A handset can be setup to call a predefined number after an alarm has been sent. It is also
possible to dial the number without sending an alarm by pressing a push-button that is not
configured with alarm functionality. Depending on the settings, the call can be established
in the following modes;
•
•
Loudspeaking mode6, or
Monitor mode, or
31 October 2013 / Ver. G
39
User Manual
Ascom d81 DECT Handset
TD 92644EN
• Normal mode
See the handset’s Configuration Manual for more information.
6.When Bluetooth is enabled, the loudspeaker audio is lowered due to current limitations in the intrinsically safe handset.
31 October 2013 / Ver. G
40
User Manual
Ascom d81 DECT Handset
7
TD 92644EN
Menu Operation
Figure 4.
1
8
7
2
6
3
5
4
Figure 4. The Main Menu
7.1
(1) Messaging
(5) Profiles
(2) Shortcuts
(6) Services
(3) Settings
(7) Connections
(4) Contacts
(8) Calls
Calls
7.1.1
Call List
The 25 last received, dialed or missed calls are stored in a call list. If a number occurs more
than once the last time stamp, together with the total number of occurrences, is shown.
NOTE: If supported by the system, the number’s contact name can be displayed in the call
list.
NOTE: The handset can also be prevented from storing calls in the call list7. This can for
example be used to allow privacy for users sharing the same handset.
Dial number from Call list
1
Enter the menu by pressing the “Menu” soft key.
2
Select
3
Select "Call list".
4
Step with the
5
Press "Call" or
in the menu.
and
to select number in the list.
to dial.
7.These features require configuration in the handset via PDM/Device Manager.
31 October 2013 / Ver. G
41
User Manual
Ascom d81 DECT Handset
TD 92644EN
View the Time of a Call
1
Enter the menu by pressing the “Menu” soft key.
2
Select
3
Select "Call list".
4
Step with the
5
Press "More".
6
Select "Time of call". The time and date is displayed.
in the menu.
and
to select number in the list.
Tip: The duration of the last call is displayed under Call time, see 7.1.3 Call Time on page 43.
Edit Number from Call list
1
Enter the menu by pressing the “Menu” soft key.
2
Select
3
Select "Call list".
4
Step with the
5
Press "More".
6
Select "Edit number".
in the menu.
and
to select number in the list.
Save Number
1
Enter the menu by pressing the “Menu” soft key.
2
Select
3
Select "Call list".
4
Step with the
5
Press "More".
6
Select "Save number".
in the menu.
and
to select number in the list.
Send Message
1
Enter the menu by pressing the “Menu” soft key.
2
Select
3
Select "Call list".
4
Step with the
5
Press "More".
6
Select "Send message".
in the menu.
and
to select number in the list.
Delete Entry from the Call list
1
Enter the menu by pressing the “Menu” soft key.
2
Select
3
Select "Call list".
4
Step with the
5
Press "More".
6
Select entry to delete.
7
Select "Delete".
31 October 2013 / Ver. G
in the menu.
and
to select number in the list.
42
User Manual
Ascom d81 DECT Handset
8
TD 92644EN
Select "Yes" to delete the entry from the list.
Delete all Entries from the Call list
1
Enter the menu by pressing the “Menu” soft key.
2
Select
3
Select "Call list".
4
Step with the
5
Press "More".
6
Select "Delete all".
7.1.2
n the menu.
and
to select number in the list.
Missed Calls
NOTE: The dialog window that is displayed for a missed call can be turned off. In addition,
the handset can be prevented from storing calls in the call list8. The latter feature can for
example be used to allow privacy for users sharing the same handset.
The user can view missed calls by pressing "Yes". If the user presses "No", the missed calls
can be viewed as follows:
1
Enter the menu by pressing the “Menu” soft key.
2
Select
3
Select "Missed calls".
4
Step with the
5
Press "Call", or
in the menu.
and
to select number in the list.
to call back.
As in Call List there is a soft key "More" which can be used to view the time/date of the call,
edit the received number, add to contacts, and delete received numbers. See 7.1.1 Call List
on page 41 for information about the functionality in soft key "More".
NOTE: If supported by the system, the number’s contact name can be displayed in the list.
7.1.3
Call Time
The total time of the previous call and last call is displayed.
1
Enter the menu by pressing the “Menu” soft key.
2
Select
3
Press "Select".
4
Select "Call time".
7.1.4
n the menu.
Push to Talk Group Call
The push-to-talk (PTT) function can be described as a group/conference call to a predefined
group of members. If one of the group members wants to get in contact with the others, he/
to open the microphone.
she simply presses and holds
NOTE: Some legacy systems/PBXs require that the handset sends a predefined DTMF tone
. See the handset’s Configuration Manual for more
when pressing/releasing
information.
8.These features require configuration in the handset via PDM/Device Manager.
31 October 2013 / Ver. G
43
User Manual
Ascom d81 DECT Handset
TD 92644EN
To participate in the conference, the group members must first accept an invitation received
as an incoming call or as a text message. See 7.1.5 Accept an Invitation on page 44.
If a member declines an invitation, he or she can re-join the group or conference later on. See
7.1.8 Re-join a Group on page 46.
A user can also invite a group of members to participate in a conference call by calling a PTT
group, see 7.1.7 Call a PTT Group on page 46.
7.1.5
Accept an Invitation
Accept Invitation Received as Incoming Call (PTT Basic)
icon. In the dialog
A PTT invitation received as an incoming call is indicated by the
window, a message containing maximum 24 characters can also be shown.
Figure 5.
12:34
Accept
Decline
009
PTT Group 1
X-ray
Figure 5. Incoming Invitation Received as a Call.
1
.
Press “Accept”, or
Default the handset starts in inverted mute and loudspeaking mode, but it can be
configured differently in a PTT group.
2
to open the microphone for transmitting. The microphone is
Press and hold
is released.
muted again when
NOTE: Some legacy systems/PBXs require that the handset sends a predefined DTMF
.
when pressing/releasing
If DTMF is activated, it is not possible to mute the microphone by releasing
during a call. Instead, select More > Microphone off during the call.
Invitation Received as Incoming Call during an Ongoing Call
If a user receives an invitation during an ongoing call, it is displayed as an ordinary
invitation, see figure 5 on page 44. The user can either accept or decline the invitation by
pressing "Accept" or "Decline", respectively.
NOTE: It is not possible to accept or decline the invitation by pressing
respectively.
or
,
If the user presses “Accept”, the ongoing call is disconnected and the PTT call is connected.
Alternatively, the ongoing call can also be disconnected and the PTT call connected if the
following is fulfilled:
•
•
The handset is configured to answer invitations automatically
The user does not respond to the invitation within 10 seconds
31 October 2013 / Ver. G
44
User Manual
Ascom d81 DECT Handset
•
TD 92644EN
The invitation has higher priority than the ongoing call
If the user declines the invitation, the he/she can re-join the PTT later on, see 7.1.8 Re-join a
Group on page 46.
Accept Invitation Received as Message (PTT Advanced)
A PTT invitation received as a message is viewed the same way as an ordinary message. The
message can contain up to 1000 characters. See Figure 6.
Figure 6.
12:34
Accept
Reject
010
Fire alert in
building A...
Figure 6. Incoming Invitation Received as a Message
1
Press "Accept".
The handset may accept the invitation automatically, start in inverted mute and
loudspeaking mode, depending on the configuration of the received invitation.
When the invitation is accepted, the following screen appears (see figure 7 on page 45). The
invitation can now be deleted or closed by clicking the soft key Delete or Close, respectively.
The call is not disconnected when clicking these soft keys. The soft key Call is used for rejoining a group only, see 7.1.8 Re-join a Group on page 46.
Figure 7.
12:34
Call
Delete
Close
011
Fire alert in
building A...
Figure 7. Accepted PTT Invitation
2
to open the microphone for transmitting. The microphone is
Press and hold
is released.
muted again when
Invitation Received as Message during an Ongoing Call
If a user receives an invitation during an ongoing call, the call is disconnected and the PTT
call is connected if the following is fulfilled:
31 October 2013 / Ver. G
45
User Manual
Ascom d81 DECT Handset
•
•
•
TD 92644EN
The handset is configured to answer invitations automatically
The invitation is of higher priority than the call priority
The user does not reject the invitation within 10 seconds
When the invitation is received, a warning signal notifies the user before disconnecting the
current call to connect the PTT call.
NOTE: Depending on the priority of the invitation, the ongoing call might be disconnected
immediately or after 10 seconds.
If the user rejects the invitation, it can be re-joined later on, see 7.1.8 Re-join a Group on
page 46.
7.1.6
Decline a PTT Invitation
Decline Invitation Received as Incoming Call
to reject a PTT invitation. The handset returns to the previously
Press “Decline”, or
shown screen. See also 7.1.8 Re-join a Group on page 46.
Decline Invitation Received as Message
Press "Reject" to reject the invitation. The handset returns to the previously shown screen.
See also 7.1.8 Re-join a Group on page 46 for more information.
7.1.7
Call a PTT Group
Note: PTT group(s) must be defined in the PDM/Device Manager and Messaging Group(s) in
IMS3/Unite CM to be able to use this function. See the handset’s Configuration Manual, and
Installation and Operation Manual for IMS3/Unite CM.
1
Press "Menu".
2
Select
3
Select "PTT groups"9.
4
Select PTT group.
5
Press "Call", or
in the menu.
.
TIP: Alternatively, when in idle mode, press
7.1.8
quickly, select PTT group, and press
.
Re-join a Group
Re-join a Group from Call List
If a PTT invitation was received as a call and the user rejected or missed it, the PTT group can
be dialed from the Call list or Missed calls, respectively. The PTT invitation is indicated by the
icon in the list. See 7.1.1 Call List on page 41, or 7.1.2 Missed Calls on page 43.
Re-join a Group from Messaging Inbox
If an PTT invitation was received as a text message and then rejected, the PTT group can be
icon in the Messaging inbox, and
dialed by selecting the message indicated by the
then press the soft key "Call". See figure 7 on page 45.
9.Only available if PTT group(s) is defined in handset via PDM/Device Manager.
31 October 2013 / Ver. G
46
User Manual
Ascom d81 DECT Handset
7.1.9
TD 92644EN
Call Services
Note: These functions are system dependent. In addition to the default Call services
functions, up to 10 additional system specific call services can be defined, with or without
automatic disconnection. The parameters are set up in the PDM/Device Manager. See the
handset Configuration Manual.
Absence Handling
The reason for being absent and the return time can be specified here.
1
Enter the menu by pressing the “Menu” soft key.
2
Select
3
Select "Call services".
4
Select "Absence".
5
Select the applicable absence reason in the list. The number of absence reasons (for
example “Lunch”, “Meeting”, “Trip” etc.) are configured in the PDM.
6
Press "Select.
7
Enter time (HHMM) or date (MMDD) depending on the selected absence reason.
8
Press "OK".
in the menu.
The handset sends an absence reason code to the system by establishing a call. The call is
automatically disconnected after a few seconds.
Deactivate the Absence Setting
1
Enter the menu by pressing the “Menu” soft key.
2
Select
3
Select "Call services".
4
Select "Absence".
5
Select “Deactivate”.
6
Press "Select".
in the menu.
Divert Internal/External Calls
1
Enter the menu by pressing the “Menu” soft key.
2
Select
3
Select "Call services".
4
Select "Divert calls"
5
Select "Internal" or "External".
6
Select "Activate".
7
Enter number (maximum 24 digits) to divert to, or press the soft key
the call contact list.
8
Press "OK"
n the menu.
to enter
The handset sends a diversion reason code to the system by establishing a call. The call is
automatically disconnected after a few seconds.
To stop diversion select "Deactivate" and press the soft key "OK".
31 October 2013 / Ver. G
47
User Manual
Ascom d81 DECT Handset
TD 92644EN
Divert Calls if No Reply
1
Enter the menu by pressing the “Menu” soft key.
2
Select
3
Select "Call services".
4
Select "Divert calls"
5
Select "No reply".
6
Select "Activate".
7
Enter number (maximum 24 digits) to divert to, or press the soft key
the call contact list.
8
Press "OK"
n the menu.
to enter
The handset sends a diversion reason code to the system by establishing a call. The call is
automatically disconnected after a few seconds.
To stop diversion select "Deactivate" and press the soft key "OK".
Divert Calls When Busy
1
Enter the menu by pressing the “Menu” soft key.
2
Select
3
Select "Call services".
4
Select "Divert calls".
5
Select "When busy".
6
Select "Activate".
7
Enter number (maximum 24 digits) to divert to, or press the soft key
the call contact list.
8
Press "OK".
n the menu.
to enter
The handset sends a diversion reason code to the system by establishing a call. The call is
automatically disconnected after a few seconds.
To stop diversion select "Deactivate" and press the soft key "OK".
7.2
Contacts
The handset has a local phonebook with 250 entries, where names and numbers freely can
be added, deleted, and edited by the user. The phonebook lists all names in alphabetical
order, where three numbers can be added for each contact; work number, mobile number,
and other number.
A company phonebook can be downloaded via the PDM/Device Manager. The local and
company phonebook appears in the same list, but the company contacts are indicated by a
icon , which means that they are not editable.
A central phonebook can also be accessed, see 5.2.9 Dial a Name from the Central
Phonebook on page 31, or 7.2.6 Central Phonebook on page 50. This feature is system
dependent.
TIP: When searching for a contact, adding and editing a contact, the input language can be
. This can be used, for example, to temporarily access
temporarily by long pressing
foreign language characters.
31 October 2013 / Ver. G
48
User Manual
Ascom d81 DECT Handset
7.2.1
TD 92644EN
Call Contact
1
Enter the menu by pressing "Menu".
2
Select
3
Select "Call contact".
4
Select contact from the list, or enter name or number in the Search field.
5
Press "Call", or
in the menu.
.
the contact can also be edited and a message sent by selecting "View" > "More". Note that it
is not possible to edit a contact indicated by a icon in front of the name.
7.2.2
Add Contact
Add New Contact
1
Enter the menu by pressing "Menu".
2
Select
3
Select "Add contact".
4
Select "New".
5
Select "Add".
6
Enter a name, see 2.1.2 Alphanumeric Keys on page 8.
7
Press "OK".
8
Select "Work Number", "Mobile number", or "Other number".
9
Press "Add".
10
Enter number. A tone "T" or pause "P" can be included in phone numbers by
5 times or 7 times, respectively.
pressing
in the menu.
TIP: A variable or character U can be added to the Work/Mobile/Other number field to
allow the user to enter additional numerical characters before calling the number. See
8 Procedure Call on page 74 for more information.
11
Press "OK".
12
Press "Save".
A specific ring signal can be set for each contact, see 7.2.4 Set Ring Signal for a Contact on
page 50.
Add from Call List
1
Enter the menu by pressing "Menu".
2
Select
3
Select "Add contact".
4
Select "From call list".
5
Select number in the list.
6
Press "Add".
7
Select Work Number", "Mobile number", or "Other number".
8
Press "Add".
9
Enter name, see 2.1.2 Alphanumeric Keys on page 8.
10
Press "OK".
11
Press "Save".
31 October 2013 / Ver. G
in the menu.
49
User Manual
Ascom d81 DECT Handset
TD 92644EN
A specific ring signal can be set for each contact, see 7.2.4 Set Ring Signal for a Contact on
page 50.
7.2.3
Edit Contact
Note: It is not possible to edit a company phonebook contact. The contacts are indicated by
a icon in front of the name.
1
Enter the menu by pressing "Menu".
2
Select
3
Select "Edit contact".
4
Select contact.
5
Press "Edit".
6
Select "Name", "Work number", "Mobile number", "Other number", or "Ring signal".
7
Press "Edit".
8
Enter new name, number and/or select new ring signal.
in the menu.
TIP: A variable or character U can be added to the Work/Mobile/Other number field to
allow the user to enter additional numerical characters before calling the number. See
8 Procedure Call on page 74 for more information.
9
Press "OK".
10
Press "Save".
7.2.4
Set Ring Signal for a Contact
A specific ring signal can be set for each contact.
1
Add/edit a contact according to 7.2.2 Add Contact on page 49 or 7.2.3 Edit Contact
on page 50.
2
Select "Ring signal"
3
Select the ring signal to be used for the selected contact.
4
Press "Back" and the press "Save".
7.2.5
Delete Contact
Note: It is not possible to delete a company phonebook contact. The contacts are indicated
by a icon in front of the name.
1
Enter the menu by pressing "Menu".
2
Select
3
Select "Delete contact".
4
Select contact.
5
Press "Delete".
6
Press "Yes" to confirm.
7.2.6
in the menu.
Central Phonebook
In the central phonebook it is possible to search by name or number. The last search result
can be displayed.
31 October 2013 / Ver. G
50
User Manual
Ascom d81 DECT Handset
TD 92644EN
When the search result is displayed, it is possible to view contact information, add the
number to new contact, and to send a message by pressing "More". It is also possible to call
the number by pressing "Call".
Search by Name
1
Enter the menu by pressing "Menu".
2
Select
3
Select "Central phonebook".
4
Select "Search by name".
5
Enter First name and/or Last name.
in the menu.
TIP: When searching for a contact, it is possible to temporarily change the input
. This can be used to access characters in a foreign
language by long pressing
language temporarily.
6
Press "Search". The search result is displayed.
Search by Number
1
Enter the menu by pressing "Menu".
2
Select
3
Select "Central phonebook".
4
Select "Search by number".
5
Enter number.
6
Press "Search". The search result is displayed.
in the menu.
View Last Search Result
7.3
1
Enter the menu by pressing "Menu".
2
Select
3
Select "Central phonebook".
4
Select "Last result". Only the last result is displayed.
in the menu.
Profiles
It is possible to set up an own profile for incoming calls, message alerts, vibrating alerts, key
sound, soft keys etc.This can be useful when there are several users on the same handset,
and they want different sound profiles. It can also be used for temporarily settings, for
example while in a meeting when incoming calls should be silent. It is easy to switch
between the different profiles.
If no profile is selected, the normal settings are used.
NOTE: The settings in a profile can be superseded if the corresponding settings in a system
profile are activated. When the system profile is activated, its settings is not displayed in the
handset menu. However, it is possible to display when a system profile is activated in the
handset. See 9 System Profiles on page 75.
Add New Profile
1
Enter the menu by pressing "Menu".
31 October 2013 / Ver. G
51
User Manual
Ascom d81 DECT Handset
TD 92644EN
2
Select
in the menu.
3
Select "Add new".
4
Enter name of the profile.
5
Press "Save".
6
Press "More" and then select "Add setting".
7
Select the setting you want to add to the profile.
Repeat steps 6-7 if you want to add additional settings.
8
Mark the wanted setting and press "Edit" to make the changes.
It is also possible to create a new profile based on another profile by do the following:
1
Enter the menu by pressing "Menu".
2
Select
3
Select "Add new".
4
Enter name of the profile.
5
Press "Save".
6
Press "More" and then select "Import from".
7
Select the profile which settings to be used for the new profile.
8
If needed, press "More" and then select corresponding option to add/import
additional settings or remove settings.
in the menu.
Activate Profile
1
Enter the menu by pressing "Menu".
2
Select
3
Select profile from list.
in the menu.
When a profile is activated, the icon
mode.
and the name of the profile are displayed in idle
Delete Profile
1
Enter the menu by pressing "Menu".
2
Select
3
Select profile from list.
4
Press "More".
5
Select "Delete" from menu.
6
Press "Select".
7
Press "Yes" to confirm.
in the menu.
Edit Profile
1
Enter the menu by pressing "Menu".
2
Select
3
Select the profile to edited.
4
Press "More" and then select "Edit".
31 October 2013 / Ver. G
in the menu.
52
User Manual
Ascom d81 DECT Handset
5
TD 92644EN
Following options can be performed:
•
•
6
7.4
Edit the wanted setting by marking it and then press "Edit".
Add additional settings by pressing "More" and then select "Add setting" or
"Import from".
• Remove a setting by marking it and then select More > Remove setting.
If needed, mark the added settings and press "Edit" to make the changes.
Messaging
When a text message is received, the LED starts flashing green once and the message alert
nd the content of the received message are automatically
signal sounds. The icon
remains in the display until all new messages are opened. If the
displayed. The icon
message is received during a call, a beep notifies the user.
TIP: It is possible to change how incoming messages are indicated while charging a handset.
icon is displayed and the message alert is muted when
When activated, only the
receiving a message. See the handset’s Configuration Manual for more information.
It is possible to reply, forward the message, call the sender, and call number10 included in a
text.
A message can also be read later by pressing "Close". A received message is stored in the
Inbox. See Read a Stored Message on page 53.
TIP: If you want to close several new messages quickly, press
as unread messages in the Messaging inbox.
. The messages is indicated
The thirty last received messages are stored in the inbox. Time and date information is
included in the message.
If a message is received when the inbox already contains thirty messages, the message in
the inbox with the oldest time and date is automatically replaced by the newly received
message.
TIP: New messages and information about incoming calls can be displayed upside down. This
can be useful if you wear the handset in a belt and want to read the message/call
information without rotating the handset. When pressing any key, the messages are
displayed in the normal way. See the handset’s Configuration Manual for more information.
NOTE: If the phone is locked with a PIN, the user must unlock the phone to access a received
message.
See also 11 Enhanced Messaging on page 78 for additional messaging features.
7.4.1
Inbox
Read a Stored Message
1
Enter the menu by pressing "Menu".
2
Select
3
Select "Inbox" to view the message list.
4
Select a message by using the
5
Press "View".
in the menu.
and
on the navigation key.
10.The number must consists of minimum 3 digits.
31 October 2013 / Ver. G
53
User Manual
Ascom d81 DECT Handset
TD 92644EN
Reply to Sender
1
Enter the menu by pressing "Menu".
2
Select
3
Select "Inbox" to view the message list.
4
Select a message by using the
5
Press "View".
6
Press "Reply".
7
Enter text. See 2.1.2 Alphanumeric Keys on page 8.
8
Press "Send".
in the menu.
and
on the navigation key.
Delete Message
1
Enter the menu by pressing "Menu".
2
Select
3
Select "Inbox" to view the message list.
4
Select a message by using the
5
Press "More".
6
Select "Delete".
7
Press "Yes" to delete the message.
in the menu.
and
on the navigation key.
Forward Message
1
Enter the menu by pressing "Menu".
2
Select
3
Select "Inbox" to view the message list.
4
Select a message by using the
5
Press "View".
6
Press "More"
7
Select "Forward".
8
Enter additional text if needed. See 2.1.2 Alphanumeric Keys on page 8.
9
Press "Send".
10
Enter number, or press
company phonebook.
11
Press "Send" to forward the message.
in the menu.
and
on the navigation key.
to access contacts in the local phonebook and the
Call Sender
1
Enter the menu by pressing "Menu".
2
Select
3
Select "Inbox" to view the message list.
4
Select a message by using the
5
Press "View".
6
Press "More".
7
Select "Call Sender".
31 October 2013 / Ver. G
in the menu.
and
on the navigation key.
54
User Manual
Ascom d81 DECT Handset
TD 92644EN
Call Number in Text
1
Enter the menu by pressing "Menu".
2
Select
3
Select "Inbox" to view the message list.
4
Select a message by using the
5
Press "View".
6
Do one of the following:
7
• Press "More" and select "Call no. in text"11.
• Press .
If the message contains several numbers, select the number to be called from the list.
8
Press "Call", or
in the menu.
and
on the navigation key.
.
Save Number
1
Enter the menu by pressing "Menu".
2
Select
3
Select "Inbox" to view the message list.
4
Select a message by using the
5
Press "View".
6
Press "More".
7
Select "Save number".
8
Select "Work Number", "Mobile number", or "Other number".
9
Press "Add".
10
Enter name. See 2.1.2 Alphanumeric Keys on page 8.
11
Press "OK".
12
Press "Save". The number is saved in the contact list.
7.4.2
in the menu.
and
on the navigation key.
Write New Messages
A message can be constructed from scratch, or from a predefined template that can be used
as it is or edited. For additional information about message templates, see 11.9 Message
Templates on page 82 . The maximum message length is normally 160 characters but may
be less depending on the character set used.
The first character entered is always upper-case, followed by lower-case character. However,
this may be overridden by pressing the * -key before entering the character.
When pressing a key, the first available character for that key is displayed, see See 2.1.2
Alphanumeric Keys on page 8. To enter the other characters supported by the key, press the
key until that character appears in the display.
The keys 0-9, * or # can be used. Keys 0 and 1 contains special characters, see See 2.1.2
Alphanumeric Keys on page 8 to see all characters.
For example, to enter the character E, press key 3 twice. "E" appears in the display and is
selected after a timeout or when another key is pressed.
11.Visible if the number consists of minimum 3 digits.
31 October 2013 / Ver. G
55
User Manual
Ascom d81 DECT Handset
TD 92644EN
TIP: If the system supports UTF-8 character encoding, the input language can be changed
. This can be used to temporarily access characters in a
temporarily by long pressing
foreign language.
To delete a character, press "Clear".
To construct and send a message, perform the following steps:
1
Enter the menu by pressing "Menu".
2
Select
3
Select "Write new message".
4
Write the message from scratch or select a message template by pressing the "More"
soft key and, if required, edit the message as described in 11.9.1 The Templates
Menu on page 83.
in the menu.
NOTE: The "More" key is not displayed if no message templates have been defined.
5
Press "Send".
NOTE: A message can be saved and sent later by pressing the soft key "Back" and
select "Yes". The message is stored under Unsent messages. See 7.4.3 Unsent
Messages.
6
Enter number, or press
company phonebook.
7
Press "Send".
7.4.3
to access contacts in the local phonebook and the
Unsent Messages
1
Enter the menu by pressing "Menu".
2
Select
3
Select "Unsent" to view the list.
4
Select message to edit/send.
5
Select "Edit", edit text and/or just select "Send".
in the menu.
Delete/Delete All
1
Enter the menu by pressing "Menu".
2
Select
3
Select "Unsent"
4
Select message in the list.
1
Select "More".
2
Select "Delete" or "Delete all".
3
Select "Yes" if the unsent messages are deleted.
7.4.4
in the menu.
Sent Messages
1
Enter the menu by pressing "Menu".
2
Select
3
Select "Sent" to view the list.
4
Select message in the list.
5
Press "View".
31 October 2013 / Ver. G
in the menu.
56
User Manual
Ascom d81 DECT Handset
TD 92644EN
Forward message
1
Press "Menu".
2
Select
3
Select "Sent" to view the list.
4
Select message in the list.
5
Press "View".
6
Enter additional text if needed.
7
Enter number, or press
company phonebook.
8
Select "Send".
in the menu.
to access contacts in the local phonebook and the
Delete Message
1
Enter the menu by pressing "Menu".
2
Select
3
Select "Sent" to view the list.
4
Select message in the list
5
Press "View".
6
Select "Delete".
7
Select "Yes" to confirm the deletion.
in the menu.
Delete and Delete All
1
Enter the menu by pressing "Menu".
2
Select
3
Select "Sent" to view the list.
4
Select "More".
5
Select "Delete" or "Delete all".
6
Select "Yes" to confirm the deletion.
7.4.5
in the menu.
Review Inbox Content while Reading a Message
To review the content of the inbox while reading a received message, perform the following
steps:
7.5
1
Press the "More" soft key
2
From the pop-up menu, select "Inbox". The message summaries contained in the
inbox are displayed.
3
To return to the message previously being read, press the "Back" soft key.
Services
With this menu it is possible to customize your own menu with services/functions that are
used often. A list of predefined services/functions are available for example; Write new
message, Central phonebook, Call contact, etc.
TIP: If configuring the Phone call function, it is possible to add a variable/character U in the
Enter number field that allows the user to enter additional numerical characters before
31 October 2013 / Ver. G
57
User Manual
Ascom d81 DECT Handset
TD 92644EN
calling the number. See 8 Procedure Call on page 74 for more information.
7.5.1
1
Enter the menu by pressing "Menu".
2
Select
3
Select "Add new".
4
Enter a name of the service in the field, and then press "OK"
5
Select a function using
6
If needed, enter values in the fields (only applicable for some of the functions)
7
Press "Back".
7.5.2
in the menu.
and
on the navigation key.
Edit Services
1
Enter the menu by pressing "Menu".
2
Select
3
Mark a service using the
4
Press "More"
5
Select "Edit".
6
Edit the service parameters.
7
Press "Back"
7.5.3
7.6
Add Services
in the menu.
and
on the navigation key.
Delete Services
1
Enter the menu by pressing "Menu".
2
Select
3
Mark a service using the
4
Press "More".
5
Select "Delete" using the
6
Press "Yes" to delete the service.
7
Press "Back".
in the menu.
and
on the navigation key.
and
on the navigation key, and press "Select"
Shortcuts
Predefined functions can be set as shortcuts for the Soft Keys, Hot keys, and Navigation
keys. It is for example possible to define the Soft Key to make a call or as a shortcut to send
a message.
TIP: When creating a shortcut to the Phone call function, it is possible to add a variable/
character U in the Enter number field that allows the user to enter additional numerical
characters before calling the number. See 8 Procedure Call on page 74 for more information.
7.6.1
Define Soft Keys
1
Enter the menu by pressing "Menu".
2
Select
3
Select "Soft Keys".
4
Select "Middle" or "Right".
31 October 2013 / Ver. G
in the menu.
58
User Manual
Ascom d81 DECT Handset
TD 92644EN
5
Enter a name for the Soft Key. See 2.1.2 Alphanumeric Keys on page 8.
6
Press "OK".
7
Select "Function".
8
Select function from list, and press "Back".
9
Select "Value" (only for some of the functions), and press "Select". Enter a value, for
example a number. Press "Back".
10
Select "Control question", and press "Select". It is off by default. Press "Back".
If the control question is enabled, a Proceed? dialog window is displayed when
pressing the defined Soft key. Press "Yes" to proceed.
11
Press "Save".
7.6.2
Define Hot Keys
1
Enter the menu by pressing "Menu".
2
Select
3
Select "Hot keys".
4
Select "0", "2" to "9".
5
Select "Function".
6
Select function from list, and press "Back".
7
Select "Value" (only for some of the functions), and press "Select". Enter a value for
example a number. Press "Back".
8
Select "Control question", and press "Select". It is off by default.
If the control question is enabled, a Proceed? dialog window is displayed when
pressing the defined Hot key. Press "Yes" to proceed.
9
Press "Save"
7.6.3
n the menu.
Define Navigation Key
1
Enter the menu by pressing "Menu".
2
Select
3
Select "Navigation keys".
4
Select "Up", "Down", "Left", or "Right".
5
Select "Function".
6
Press "Select" to select function for the key.
7
Select function from list, and press "Back".
8
Select "Value" (only for some of the functions). Enter a value for example a number.
Press "Back".
9
Select "Control question".
It is disabled by default. If the control question is enabled, a Proceed? dialog window
is displayed when pressing the defined key. Press "Yes" to proceed.
10
Press "Save".
31 October 2013 / Ver. G
in the menu.
59
User Manual
Ascom d81 DECT Handset
7.7
TD 92644EN
Settings
7.7.1
Sound and Alert Settings
Adjust the Ring Volume
NOTE: An intrinsically safe handset’s ring volume is lower than a non-intrinsically safe
handset’s ring volume due to current limitations.
1
Enter the menu by pressing "Menu".
2
Select
3
Select "Sound & Alerts.
4
Select “Volume”.
5
Step with to increase the volume and with
the setting.
in the menu.
to decrease it. Press "Back" to save
NOTE: If a handset restriction is enabled, it might not be possible to set the ring signal to
Silent. See the handset’s Configuration Manual for more information.
Set different Ring Signals for Calls
1
Enter the menu by pressing "Menu".
2
Select
3
Select “Sound & Alerts”.
4
Select “Ring signals”.
5
Different signals for internal calls, external calls, call back and PTT calls can be set.
Select "Internal call", "External call", "Callback", or PTT". The handset has 14 different
ring signals.
n the menu.
NOTE: Additional ring signals might be selectable if they are configured via PDM/Device
Manager. See the handset’s Configuration Manual for more information.
6
Press "Back".
Set Alert for Messages
1
Enter the menu by pressing "Menu".
2
Select
3
Select “Sound & Alerts”.
4
Select “Message alert”.
5
Select the wanted message alert from the list. By pressing "Play" it is possible to
listen to the different alerts.
n the menu.
TIP: The option Custom sound should be selected you want to create an own message
alert. See the handset’s Configuration Manual for more information.
NOTE: The "Play" soft key is not available for Enhanced beep and Custom sound.
Instead, send a message to the handset to listen to the sound.
6
Press "Back".
TIP: By default, the message volume follows the ring volume setting, but it is possible to set
another message volume in the handset. See the handset’s Configuration Manual for more
information.
31 October 2013 / Ver. G
60
User Manual
Ascom d81 DECT Handset
TD 92644EN
Turn the Vibrator On and Off
If the vibrator is activated, the handset vibrates on incoming calls and messages.
TIP: The handset vibrator can also be activated when receiving a message during a call via
PDM/Device Manager. See the handset’s Configuration Manual.
NOTE: When the vibrator is enabled on an intrinsically safe handset, the handset alternates
between vibration and sound. That is, vibration and sound are not activated simultaneously.
1
Enter the menu by pressing "Menu".
2
Select
3
Select “Sound & Alerts”.
4
Select “Vibrator alert”.
5
Select “On”, “On if silent” (that is, the vibrator is on when the handset is muted), or
“Off”
6
Press "Back".
in the menu.
Set the Key Sound
This means that every time a key is used, the handset emits a small sound.
1
Enter the menu by pressing "Menu".
2
Select
3
Select “Sound & Alerts”.
4
Select “Key sound”.
5
Select “Silent, “Click”, or “Tone”.
It is possible to listen to the key sound by pressing "Play".
6
Press "Back".
7.7.2
in the menu.
Keypad Lock Settings
The handset keypad can be locked automatically to minimize the risk of accidentally
pressing keys or buttons while the handset is not in use. The keypad is automatically locked
after a lock time parameter "Auto lock time" expires.
Note: The alarm button can be pressed while the keypad is locked. Any one of five
predefined emergency numbers can also be called while the keypad is locked as long as this
feature has been configured in the PDM/Device Manager. For additional information, see the
Configuration Manual for the Ascom d62 DECT Handset.
The automatic key lock can be configured by the administrator in the PDM/Device Manager.
For additional information, see the Configuration Manual for the Ascom d62 DECT Handset.
The user may also configure the automatic key lock as described in the following sections.
Automatic key lock: One of the following options may be configured:
"On": the keypad is automatically locked if it is not used before the specified lock time
elapses.
"On, except calls": the keypad is automatically locked if it is not used for the specified lock
time. If the user is in call when the lock time elapses, the keypad remains unlocked until the
user has completed the call.
"Off": the keypad is never automatically locked.
31 October 2013 / Ver. G
61
User Manual
Ascom d81 DECT Handset
TD 92644EN
Auto lock time: specifies the time that elapses before the keypad is automatically locked.
The shortest time that may be specified before the key lock is applied is 5 seconds and the
longest time is 3 minutes.
Auto key unlock: the keypad is automatically unlocked when a call or message is received.
When the user has serviced the call or message, the key lock is reapplied after the specified
automatic lock time expires.
Activate the Automatic Key Lock
The user activates the automatic key lock and sets the Auto lock time from the handset
"Settings" menu in the following way:
1
Enter the menu by pressing "Menu".
2
Select
3
Select “Locks”. The "Locks" menu is displayed.
4
Select "Automatic key lock" menu item and select "On" or "On except calls".
n the menu.
NOTE: The current key lock setting is displayed under the "Automatic key lock" menu
item.
5
Press the "Back" soft key to redisplay the "Locks" menu.
6
Select "Auto lock time" and press the "Select" soft key.
7
Select the required lock time and press the "Select" soft key.
NOTE: The alarm button can be pressed while the keypad is locked. Any one of five
predefined emergency numbers can also be called while the keypad is locked as long as this
feature has been configured in the PDM/Device Manager. For additional information, see the
handset Configuration Manual.
NOTE: A call can be answered or ended while the keypad is locked.
NOTE: If the handset is configured via the PDM/Device Manager, any one of five predefined
emergency number can also be called while the keypad is locked. See the handset
Configuration Manual.
Deactivate the Automatic Key lock
1
Enter the menu by pressing "Menu".
2
Select
3
Select “Locks”.
4
Select "Automatic key lock".
5
Select "Off" to deactivate the automatic key lock.
7.7.3
n the menu.
Phone Lock Settings
The handset can be protected for unauthorized use by activating the phone lock. The phone
lock may be set to:
•
•
"On": The handset is automatically locked if not used for the specified automatic lock
time or when it is first turned on.
"On in charger": The handset is locked immediately when placed in the charger. When
removed from the charger and unlocked by the PIN, the handset remains unlocked
31 October 2013 / Ver. G
62
User Manual
Ascom d81 DECT Handset
•
TD 92644EN
"Off": The handset is never locked.
The default phone lock PIN code (0000) can be changed to any 4 to 8 digit personalized
code.
The length of time before the handset locks automatically is set by the "Auto lock time"
parameter. The shortest time that can be set before the handset locks is 5 seconds and the
longest time is 3 minutes.
NOTE: If configured in the handset, any one of five predefined emergency numbers can be
called while the handset is locked. See the handset’s Configuration Manual. If the d81
Protector is used, the Alarm button can also be used while the handset is locked.
Activate the Phone Lock
The phone lock settings are activated from the handset "Settings" menu in the following
way:
1
Enter the menu by pressing "Menu".
2
Select
3
Select “Locks”.
4
Select “Phone lock”.
5
Select “Auto phone lock”.
6
Select "On" or "On in charger" as required.
7
Enter PIN code.
8
Press "OK".
9
Press the "Back" soft key twice to return to the "Locks".
10
Select "Auto lock time".
11
Select the required lock time.
n the menu.
If the PIN code is forgotten it can be removed by your distributor.
Deactivate the Phone Lock
1
Enter the menu by pressing "Menu".
2
Select
3
Select “Locks”.
4
Select “Auto phone lock”.
5
Select “Off”.
6
Enter PIN code
7
Press "OK".
in the menu.
If the PIN code is forgotten it can be removed by your distributor.
Change PIN Code
1
Enter the menu by pressing "Menu".
2
Select
3
Select “Locks”.
4
Select "Phone lock".
31 October 2013 / Ver. G
in the menu.
63
User Manual
Ascom d81 DECT Handset
TD 92644EN
5
Select "Change PIN code".
6
Enter the old PIN code.
7
Press "OK".
8
Enter the new PIN code.
9
Press "OK" and enter the new PIN code again.
10
Press "Save".
7.7.4
Display Settings
Screen Saver
The screen saver can be set to one of the following settings:
•
•
•
Information: Displays status and identification information while the handset is idle.
Black: The screen is black when the handset is idle.
Black also in call: The screen is also black when the handset is in call.
To set the screen saver:
1
Enter the menu by pressing "Menu".
2
Select
3
Select “Display”.
4
Select “Screen saver”.
5
Select “Information”, “Black”, or “Black also in call”.
6
Press "Back".
in the menu.
NOTE: When charging the handset and the screen saver is shown, no missed calls and
incoming messages are indicated in the display.
When the handset is in a CR3 charging rack, the owner ID and the variant of the handset are
displayed. This simplifies identification when many handsets are charged together.
Brightness
NOTE: An intrinsically safe handset’s display brightness is lower than a non-intrinsically safe
handset’s display brightness due to current limitations.
1
Enter the menu by pressing "Menu".
2
Select
3
Select “Display”.
4
Select “Brightness”.
5
Select “Normal” or “Power save”.
6
Press "Back".
in the menu.
Contrast
1
Enter the menu by pressing "Menu".
2
Select
3
Select “Display”.
4
Select “Contrast”.
5
Step with
31 October 2013 / Ver. G
in the menu.
to increase and
to decrease the contrast.
64
User Manual
Ascom d81 DECT Handset
6
7.7.5
TD 92644EN
Press "Back".
Time and Date Settings
The time and date displayed in the handset cannot be changed by the user. The DECT
system is solely responsible for keeping the time. The handset also synchronises with the
DECT system time when:
The handset is turned on after having been turned off. The handset requests the current
DECT system date and time.
• The handset remains on for longer than 24 hours. The handset requests the DECT system
time every 24 hours from the time it was last turned on.
The time and date formats displayed in the handset can be changed by the user as
described in the following sections.
•
Set Time Format
1
Enter the menu by pressing "Menu".
2
Select
3
Select "Time & Date".
4
Press "Select".
5
Select Time format. The actual time format is displayed. Selectable time format:
•
•
6
in the menu.
12:00 (AM/PM)
24:00
Press "Select" to save the setting.
Set Date Format
1
Enter the menu by pressing "Menu".
2
Select
3
Select “Time & Date”.
4
Press "Select".
5
Select “Date format”, press "Select". Selectable date format:
•
•
•
•
•
•
•
6
7.7.6
in the menu.
DD MMM YY, for example 30 Jan 11
MMM DD YYYY, for example Jan 30 2011
YYYY-MM-DD, for example 2011-01-30 (ISO 8601)
MM/DD/YYYY, for example. 01/30/2011 (also called US)
DD/MM/YYYY, for example 10/01/2011 (also called Europe)
DD-MM-YYYY, for example 30-01-2011
DD.MM.YYYY, for example. 30.01.2011
Press "Select" to save the setting.
Answering
when answering a call. The answering
The default setting for the handset is to use
behaviour can be configured to answer the call automatically, that is, without pressing a
key, or/and in loudspeaking12 mode. The answering behaviour can also be set to any key. If
,
, and
can be used to answer a call.
"Any key" is selected, any key except
31 October 2013 / Ver. G
65
User Manual
Ascom d81 DECT Handset
TD 92644EN
Answering Key
The answering key is by default set to Hook-off.
1
Enter the menu by pressing "Menu".
2
Select
3
Select "Answering".’
4
Select "Answering key".
5
Select "Hook-off", or "Any key".
6
Press "Back" to save the settings.
n the menu.
Answering Behaviour
1
Enter the menu by pressing "Menu".
2
Select
3
Select "Answering".’
4
Select "Answer behaviour".
5
Select "Automatically" or "Loudspeaking".
6
Press "Change" to change the setting. The check box is marked.
7
Press "Back" to save the setting. To remove the setting, press "Change". The check
box is unmarked.
7.7.7
in the menu.
Change Text size for Messages
1
Enter the menu by pressing "Menu".
2
Select
3
Select "Messages".
4
Select "Text size Normal". The default text size is "Normal".
5
Select "Normal" or "Large" size.
6
Press "Back".
7.7.8
n the menu.
Change the Menu Language
1
Enter the menu by pressing "Menu".
2
Select
3
Select “*Language”.
4
Select the language to be used.
5
Press "Back".
n the menu.
Tip: It is also possible to download an additional language to the handset, see 13.1 Software
Upgrade and Additional Features on page 86.
7.7.9
Change Owner ID
The Owner ID is set to identify the handset.
1
Enter the menu by pressing "Menu".
12.1.When Bluetooth is enabled, the loudspeaker audio is lowered due to current limitations in the intrinsically safe
handset.
31 October 2013 / Ver. G
66
User Manual
Ascom d81 DECT Handset
TD 92644EN
2
Select
in the menu.
3
Select "Owner ID".
4
Enter name/identity. See 2.1.2 Alphanumeric Keys on page 8.
5
Press "Save".
7.7.10 Alarm Settings
Tip: It is recommended to configure a shortcut to this menu if it is frequently used, see 7.6
Shortcuts on page 58.
NOTE: This menu is applicable for d81 Protector only.
Activate alarm
1
Enter the menu by pressing "Menu".
2
Select
3
Select "Alarm".
4
Select "Activate alarm".
5
Select "Pull-cord"13, "Man-down", and/or "No-movement".
6
Press "Select" to change the setting. The check box is marked.
7
Press "Back" to save the setting. To remove the setting, press "Select". The check box
is unmarked.
in the menu.
When an alarm is activated, the corresponding alarm icon is show, see Table 8.
Pull-cord alarm
Man-down alarm
No-movement alarm
Table 8. Alarms icons
The Man-down alarm and No-movement alarm can temporarily be disabled during calls to
avoid sending false alarms when the user tilts the handset or not moves during the call. If
the Man-down alarm and No-movement alarm are disabled during calls, the corresponding
icons are not displayed.
NOTE: See also Configuration Manual, Ascom d81 DECT Handset, TD 92674EN for additional
settings and 6 Alarm Operation on page 37.
Edit Alarm Data
Information (for example a handset’s location) can be sent along with an alarm. It is
recommended to create a shortcut for quick access to the "Edit alarm data" menu, see 7.6
Shortcuts on page 58.
1
Enter the menu by pressing "Menu".
13.Requires a functionality license.
31 October 2013 / Ver. G
67
User Manual
Ascom d81 DECT Handset
7.8
TD 92644EN
2
Select
in the menu.
3
Select "Alarm".
4
Select "Edit alarm data".
5
Enter alarm data.
6
Press "Save".
Connections
7.8.1
Bluetooth
Enable Bluetooth Connection
1
Enter the menu by pressing "Menu".
2
Select
3
Select "Bluetooth".
4
Select "Enable". A Bluetooth connection icon
in the menu.
is displayed in the header bar.
NOTE: When enabling Bluetooth on an intrinsically safe handset, it is restarted.
Disable Bluetooth Connection
1
Enter the menu by pressing "Menu".
2
Select
3
Select "Bluetooth".
4
Select "Disable".
in the menu.
NOTE: When disabling Bluetooth on an intrinsically safe handset, it is restarted.
Pair/Connect Bluetooth Headset
To be able to use a Bluetooth headset, it must first be paired with the handset. It is only
needed to pair the Bluetooth headset once. A paired Bluetooth headset is automatically
connected, as indicated by the icon in front of the headset.
1
Set the Bluetooth headset in pairing mode, see the user manual for the Bluetooth
headset.
2
Enable Bluetooth, see Enable Bluetooth Connection.
3
Enter the menu by pressing "Menu".
4
Select
5
Select "Bluetooth".
6
Select "Headset".
7
Select "Add new". A Put headset in Pairing mode dialog window is displayed.
8
Press "OK". It now searches for a Bluetooth headset for connection.
9
When headset is found, press "Pair".
31 October 2013 / Ver. G
in the menu.
68
User Manual
Ascom d81 DECT Handset
10
TD 92644EN
If needed, enter PIN code, see user manual for the Bluetooth headset. Press "OK".
The dialog Successful pairing appears if the pairing process was successful. The
Bluetooth headset is also connected as indicated by the icon in front of the
headset.
TIP: It is possible to configure the headset button with a specific function, such as post-dial,
dial last called number, or dial a predefined number. See the handset’s Configuration Manual
for more information.
Pair/Connect Bluetooth Barcode Reader
To use a Bluetooth barcode reader, it must first be paired with the handset. It is only needed
to pair it once. A paired Bluetooth barcode reader is automatically connected, as indicated
by the icon in front of the barcode reader.
See also 11.11 Send Data with Bluetooth Barcode Reader on page 84.
1
Enable Bluetooth, see Enable Bluetooth Connection.
2
Put the Bluetooth barcode reader in pairing mode, see the user manual for the
Bluetooth barcode reader.
3
Enter the menu by pressing "Menu".
4
Select
5
Select "Bluetooth".
6
Select "Barcode reader"14.
7
Select "Add new". A dialog window "Put barcode reader in pairing mode" is displayed.
8
Press "OK". It now searches for a Bluetooth barcode reader for connection.
9
When Bluetooth barcode reader is found, press "Pair".
10
If needed, enter PIN code, see user manual for the Bluetooth barcode reader. Press
"OK".
in the menu.
The dialog Successful pairing appears if the pairing process was successful. The
Bluetooth barcode reader is also connected indicated by the icon in front of the
barcode reader.
7.8.2
Headset
To achieve optimal audio quality with the different headset types, it is recommended to
select the corresponding headset type.
The default setting is microphone on a boom, that is, the audio is optimized for using a
headset with microphone on a boom. The headset type can be changed in the menu by
doing as follows:
1
Enter the menu by pressing "Menu".
2
Select
3
Select "Headset".
4
Select the corresponding headset type from list, that is, "Mic on boom", or "Hearing
protection". Additional headsets15 might be visible in the list.
5
Press "Select".
in the menu.
14. Requires a functionality license
15.Only visible if a headset profile has been configured in the PDM/Device Manager.
31 October 2013 / Ver. G
69
User Manual
Ascom d81 DECT Handset
TD 92644EN
TIP: It is possible to configure the headset button with a specific function, such as post-dial,
dial last called number, or dial a predefined number. See the handset’s Configuration Manual
for more information.
NOTE: When Bluetooth is disabled and having an active call in loudspeaker mode on an
intrinsically safe handset, the audio is not transferred to the headset when connecting it.
IMPORTANT:
7.8.3
The headset Microphone on a boom is not available as accessory for the
intrinsically classified handset. If used, it is NOT permitted to use the headset
in hazardous areas.
System
The handset can subscribe up to eight different systems.
Change System
Select “Automatic” or a specific system. If the handset is set to “Automatic”, it selects a
system according to the priority list, see Priority on page 71.
Subscribe Handset in IP-DECT System using Easy Registration
A handset can subscribe to an IP-DECT system automatically if the following are fulfilled:
•
The IP-DECT system is configured for Easy Registration, see Installation and Operation
Manual, IP-DECT Base Station and IP-DECT Gateway, TD 92579EN.
• The handset’s extension number and IPEI are registered in the IP-DECT system, see the
corresponding manual for the IP-DECT system.
• The handset is not subscribed to any systems.
• The handset software is version 3.0.x or greater.
.
1
If needed, switch off the handset by pressing
.
2
Switch on the handset by pressing
3
Select language to be used or press "Cancel". If Cancel is pressed, the default
language English is used.
4
The handset starts to search for IP-DECT systems and subscribes to the system when
it is found.
NOTE: If no system is found within 2 minutes or "Cancel" is pressed, the handset’s
subscription menu is displayed. Continue with step 5 in chapter Subscribe Handset in
DECT System Manually for more information.
Subscribe Handset in DECT System Manually
To subscribe an DECT system manually, the “Park:” (Portable Access Right Key) and “Ac:”
(Authentication code) related to the system are needed. Contact the system administrator
for more information.
NOTE: The PARK code may not be needed if there is no alien DECT system within the
coverage area.
1
Enter the menu by pressing "Menu".
2
Select
3
Select "System".
4
Select "Subscribe".
31 October 2013 / Ver. G
in the menu.
70
User Manual
Ascom d81 DECT Handset
TD 92644EN
5
The handset’s IPDI is displayed. The IPDI is a unique code that has been assigned to
the handset. Press "Next".
6
Enter System name (optional). If no system name is entered, the default name is
used. That is System A, System B etc. depending on which system name that is free.
Note: The System name might not be displayed depending on the handset’s Display
Management Layout setting. See the handset’s Configuration Manual.
7
Press "Next".
8
Enter PARK code (max. 31 digits). The PARK code may not be needed if there is no
alien DECT system within the coverage area.
9
Enter AC code. The AC code length must be between 4 - 8 digits.
10
Press "Next".
11
An information text "Protection on?" is displayed. Select "Yes" if the new system is to
be protected. It is not possible to delete a protected subscription from the System
menu16.
12
Press "OK". A searching mode starts.
Unsubscribe System
1
Enter the menu by pressing "Menu".
2
Select
3
Select "System".
4
Select "Unsubscribe".
5
Select the system to unsubscribe.
6
Press "Yes to unsubscribe the system.
in the menu.
Rename System
It is possible to change the name of the system in the handset.
1
Enter the menu by pressing the “Menu” soft key.
2
Select
3
Select "System".
4
Select "Rename System".
5
Select system to rename.
6
Enter new name.
7
Select "Save".
in the menu.
Priority
The default order of priority is the order of entered subscriptions. This means that the first
subscribed system has the highest priority. This list can be edited by the user. It is possible
to set the systems in priority by moving them up or down in the list.
NOTE: This is used in combination with system set to be "Automatic", see Change System on
page 70.
1
Enter the menu by pressing "Menu".
16.It is not possible to unsubscribe a protected system via the System menu. The unsubscribtion must be made via the
Admin menu or the DECT system.
31 October 2013 / Ver. G
71
User Manual
Ascom d81 DECT Handset
TD 92644EN
2
Select
3
Select "System".
4
Select "Priority".
5
Change the priority if needed by selecting "Up" or "Down". The priority is saved when
"Back" is selected.
7.8.4
in the menu.
In Charger Action when in Call
It is possible to determine actions to be performed when a handset is placed in charger
during a call.
1
Enter the menu by pressing "Menu".
2
Select in the menu.
3
Select "In charger".
4
Select "Call behavior".
5
Select one of the following:
•
•
•
7.8.5
No action - no action is performed when handset is placed in charger during a call.
Loudspeaking - The loudspeaker is activated when handset is placed in charger
during a call.
End call - The call is disconnected when handset is placed in charger.
In Charger Action when not in Call
It is possible to determine actions to be performed when a handset is not in call and placed
in charger.
Note: Additional In charger actions can also be configured, see the handset’s Configuration
Manual.
1
Enter the menu by pressing "Menu".
2
Select
3
Select “In charger”.
4
Select "Other actions".
5
Select one of the following:
•
•
•
•
•
in the menu.
No action - no action is performed when handset is not in call and placed in
charger.
Switch off17 - When the handset is placed in the charger it will switch off. When it
is removed from the charger it will switch on again.
Sound off18 - The handset is muted when placed in the charger. When it is
removed from the charger it switches on the sound again. NOTE: Messages with
breakthrough, for example high or alarm priority, is not muted19.
Logout - The handset is logged out when placed in the charger and call and
message lists are deleted. When it is removed from the charger, the user needs to
log on again. NOTE: This feature is license dependent and applicable in IP-DECT
systems only. See also 3.2 Log In or Out of a Shared Phone on page 15.
Change profile - when the handset is placed in the charger it changes profile.
When the handset is removed from the charger, the profile is changed back.
17.If the parameter Possible to switch handset off is disabled in PDM/Device Manager, the handset is not switched off in
charger.
18.If the parameter Possible to turn off sound is set to "No" in PDM/Device Manager, the handset is not muted in charger.
19.If you want to mute all messages (regardless of priority), set the Show and indicate incoming messages
parameter via PDM/Device Manager.
31 October 2013 / Ver. G
72
User Manual
Ascom d81 DECT Handset
TD 92644EN
Press "Edit" and select the wanted profile. By default only the profile Normal is
visible, but additional profiles is visible if they are configured. See 7.3 Profiles on
page 51.
31 October 2013 / Ver. G
73
User Manual
Ascom d81 DECT Handset
8
TD 92644EN
Procedure Call
When configuring the functions Call services, In Call menu, Contacts, or a shortcut/service to
the Phone call function, the data added in these functions is static. When entering the data
for the function to be used, it is possible to add a variable/character U that allows the user
to enter additional numerical characters before calling the number/sending the data to a
system.
See the following example for more information.
Example of configuration:
A user wants to create a service with the Phone call function. The PBX requires that a prefix
must be added to a phone number. In this case, the user can pre-program the prefix and
then enter the applicable phone number when using the Phone call function.
1
Press "Menu", or the confirmation button.
2
Select "Services".
3
Select "Add new".
4
In the Name field, enter "Call no.".
5
Select the function "Phone call".
6
In the Number field, enter the prefix to be used followed by the character "U". In this
case, the text string is as follows *21*U. The character U represents an Enter number
dialog where the user can enter the phone number.
7
Press "Save".
When using the function, an Enter number dialog appears, see figure below. If the user
) and presses "OK",
enters "123" (or selects a contact with this number by pressing
the number *21*123 is dialed. Note that no call is established before the user presses "OK",
that is, post-dial.
Figure 8.
13:00
Services
Enter number:
123
OK
Back
Figure 9. Enter number dialog.
31 October 2013 / Ver. G
74
User Manual
Ascom d81 DECT Handset
9
TD 92644EN
System Profiles
A system profile can be used when certain settings in a handset are required and preventing
that a user changes these settings. The system profile contains settings such as alarm
settings, soft key settings, and presence settings, and can only be configured in PDM or
Device Manager, see Configuration Manual, Ascom d81 DECT Handset, TD 92674EN.
When the system profile is activated20, its settings is not displayed in the handset’s menu.
It is possible to indicate when a system profile is activated in the handset by showing its
profile name in idle mode.
The system profile can be used in combination with the user profile (see 7.3 Profiles on page
51). If there is a conflict between the settings in the system profile and the settings in the
user profile, the settings in the system profile is used.
If a user changes a setting in the handset menu that is determined by a system profile, the
menu is updated but the setting is not be changed.
Example:
A system profile System Profile A1 has been activated and is indicated by its name is
displayed in idle screen. In this case, the pull-cord alarm and no-movement alarm are
activated and is indicated by the corresponding icons in the left lower corner in the idle
screen.
A user wants to deactivate the alarms and selects Settings >Alarm>Activate alarm. The
check boxes do not indicate that the alarms are activated. The user can mark or unmark the
checkboxes without that the alarm settings is changed due to the settings in the system
profile supersedes the settings made by the user.
Tip: If this system profile is always to be active, it is recommended to hide the Alarm menu
in the handset using PDM/Device Manager.
Figure 9.
12:34
12:34
01/01/2010
System Profile A1
Activate alarm
Pull-cord
Man-down
No-movement
1122
Menu
Select
Back
Figure 10. Example showing an activated system profile.
9.1
System Profile Status Indications
The administrator may configure the handset to play a sound if the system profile is
activated or deactivated. This provides the user with an audible alert when the system
profile changes from inactive to active or vice versa.
The feature can be triggered by several kinds of event, such as moving between different
parts of a buildings where a system profile might be appropriate in one location but not
required in another.
20.The system profile can only be activated using PDM/Device Manager or remote via an Unite application.
31 October 2013 / Ver. G
75
User Manual
Ascom d81 DECT Handset
TD 92644EN
The system profile name is displayed when the handset is in idle mode. The user should be
aware that the characteristics and behaviour of the handset change when the system profile
changes. For the exact sound and characteristics of the handset associated with the
activation and deactivation of a system profile, refer to the system administrator.
31 October 2013 / Ver. G
76
User Manual
Ascom d81 DECT Handset
10
TD 92644EN
Advanced Functions
10.1 Admin Menu
The handset has a hidden menu for system administrators. See the handset’s Configuration
Manual.
The Admin menu contains:
•
•
•
•
•
•
•
•
•
•
Software, hardware and license information, IPEI/IPDI, and user ID
DECT information
DECT location information21 and/or LF location information22
Centralized Management showing online information
Site Survey Tool for indication of radio signal and base station listing
Fault logging
License upgrade menu
Frequency band selection23
System menu with ability to alter protection
Factory reset option
For quick access to the Device Information (DI) menu in idle mode, press the keys containing
*#DI# (that is *#34#). For quick access to IPEI/IPDI, press *#06# in idle mode. See the
table below.
Information
Code
Software version
*#34#
Hardware version
*#34#
License
*#34#
IPEI/IPDI
*#34# or *#06#
User ID
*#34#
10.2 Clear Lists in Charger
A parameter can be set using the PDM/Device Manager to clear the messaging and call lists
that have been stored in the handset. When the parameter is activated and the function has
been downloaded to the handset, the lists are deleted when placed in a charger. This can be
useful during administration of handsets for new users. See also the handset’s
Configuration Manual.
21.This is a license dependent feature.
22.Requires a handset that supports LF location.
23.This option is removed when the frequency band has been set.
31 October 2013 / Ver. G
77
User Manual
Ascom d81 DECT Handset
11
TD 92644EN
Enhanced Messaging
11.1 Voice Mail
Note: This feature is only available if configured in the system.
11.1.1 Receive a Voice Mail
When receiving a voice mail, the content of the voice mail notification is displayed
n the status bar.
automatically on the screen, and is also indicated by the icon
If the content of the notification is displayed, press "Call" to dial the voice mail. If "Close" is
in idle mode, or from
selected, it is possible to dial the voice mail by a long press
the Inbox menu.
Information is stored in the “Messaging” inbox until all voice mail messages have been
listened to. See 11.1.2 Check the Voice Mail inbox.
11.1.2 Check the Voice Mail inbox
1
Enter the menu by pressing "Menu".
2
Select
3
Select “Inbox”. The voice mail is displayed first in the inbox list.
4
in front of the message (a voice mail is always
Select the message with the icon
displayed first in the inbox list). Only one voice mail at the time is displayed even if
there are more voice mail messages in the message list.
5
Press "View".
6
Press "Call", or
in the menu.
.
11.1.3 One Key Voice Mail Access
in idle mode will call the voice mail. If the extension number is not
A long press on
available, a dialog window "Voice mail number not defined" is displayed.
Some systems require that the mailbox extension number is downloaded to the handset,
see the handset’s Configuration Manual.
11.2 Receive a Message with Request for Answer
In the status bar, a message with request for answer is indicated the same way as an
ordinary message, see 7.4 Messaging on page 53.
In the message list, the message with request for answer is indicated by the icon
.
11.2.1 Accept/Reject the message
Press the soft key “Accept” or “Reject”.
is shown in the message
When an acknowledged message has been replied to, the icon
list. The text “Accepted” or “Rejected”, and time and date is also added in the acknowledged
message.
Note: The option “Delete” is not available for a message with request for answer. An
unacknowledged message can only be deleted from the message list.
31 October 2013 / Ver. G
78
User Manual
Ascom d81 DECT Handset
TD 92644EN
11.3 Message Queuing and Message Priority
To notify about new incoming messages, all incoming messages are placed in a message
queue. The sorting order for the message queue depends on the system settings. By default
the messages are sorted according to message priority, and thereafter according to arrival
time.
The messages in the message queue are automatically displayed for 20 seconds until all
messages have been displayed. You can extend the time to display a message by pressing
any button. You can also close a message to immediately see the next message in the
message queue.
The messages that you do not close are put last in the message queue and remain in the
message queue until you close them. They are shown as unread in the message list and will
not be shown as read until you have closed them.
See Configuration Manual, Ascom d81 DECT Handset, TD 92674EN for more information
how to set the parameters.
11.4 Message Priority and Call Priority
The default setting is that the call information dialog is always visible in front of a message
on incoming calls. A message with a certain priority can be configured to ensure that it is
always displayed without being interrupted by a call. By setting a call priority, the handset
compares the call priority with the message priority to determine which information to be
displayed, that is, the call information dialog or the message. If the message priority and the
call priority are equal, the message is displayed.
See the handset’s Configuration Manual for more information how to set the parameters.
11.5 Message Indication Repetition
By default, when a new message is received or displayed, the LED starts flashing green once
and the message alert signal sounds. It is possible to configure the handset to repeat the
alert signal for an unread message every 7th second as long it is displayed. See the
handset’s Configuration Manual for message settings.
Priority 1 messages with certain system-defined properties are handled as extra important
and therefore will the alert signal be repeated every 10th second in 5 minutes, or until any
key is pressed. Note that this is a system/application dependent feature and cannot be
configured in the handset.
11.6 Color Messaging
It is possible to send colored messages to handsets. The sender of a message (that is, an
application) determines the color of the message. Colored messaging can be useful for
categorizing messages. In Figure 10. on page 80, there are two colored messages (a new
message, and a read message) in the message inbox (left in the figure). The messages are
indicated by a gradient colour bar behind the envelopes. In addition, a gradient color bar is
shown below the envelop when reading a colored message (right in the figure).
31 October 2013 / Ver. G
79
User Manual
Ascom d81 DECT Handset
TD 92644EN
Figure 10.
12:34
12:34
Inbox
2009-01-01 12:00
Patient ready...
2009-01-01
Patient ready...
2009-01-01
View
More
Back
Call
Help
Reject
008
Patient ready for transport.
From: X-ray
To: B/12/3
Figure 11. Shows an example of color messages.
11.7 Interactive Messaging
Interactive Messaging (IM) is a function that extends basic messaging. It makes it possible
for a user of a handset to access information from a client application in the system.
An example can be a customized application that can be accessed from the handset. A list of
actions can be included in the message sent from the application (for example AMS or
XGate) to the handset.
By default, an IM is indicated and viewed the same way as an ordinary message, see 7.4
Messaging on page 53. It is saved along with other messages in the message list.
NOTE: The indication of an IM can differ from an ordinary message depending on the
settings in the IM. The application that sends the IM can determine the alert signal volume
and LED indication.
When an IM has been read, the IM may display several options.
1
Mark an appropriate option
2
Press “Select”.
3
If the selected option requests input, enter the information needed and press “Ok”. A
press on the middle Soft key will change to digit or text input mode depending on if it
is digit or text format in the message.
A read message is indicated the same way as an ordinary message.
NOTE: If a handset receives an IM update when the original message already has been
deleted, the handset automatically sends a negative acknowledge (NAK) to the system, if
requested.
For an example of an interactive message, see figure 11 on page 81. The options depend on
the configuration in the client application.
31 October 2013 / Ver. G
80
User Manual
Ascom d81 DECT Handset
TD 92644EN
Figure 11.
Conference this evening!
Will you be there?
“John Doe <John.Doe
@company.com
2011-01-23 12:00pm
Options
Delete
Close
Options
Select
Back
009
Reply
Figure 12. Example of an Interactive Message
Mobile data from the handset can initiate the application to send the interactive message,
see 11.10 Mobile Data on page 83. The user can then select one action from the list. The
action can be sending a message back to the application and/or dialling a specific number
etc.
11.8 Calling while Reading a Text Message
A user can make a call while reading a text message to review and discuss the message with
the called party. The called party may be either:
• The message sender, that is, the same party that sent the text message
• A different party.
The user can activate the loudspeaker function during the call to make it easier to read the
received text message while talking to the called party.
11.8.1 Calling the Message Sender
To call the message sender while reading and reviewing a received text message, perform
the following steps:
1
Receive the text message and call the message sender as described in Call Sender on
page 54.
2
Wait for the called party to reply. The message is replaced by the ongoing call details.
The user may now:
• Continue with the call without referring back to the received message.
• Redisplay the message and continue the call to further review and discuss the
message. See Redisplay the Message and Continue with the Call on page 82.
• Redisplay the message and terminate the call. See Redisplay the Message and
Terminate the Call on page 82.
31 October 2013 / Ver. G
81
User Manual
Ascom d81 DECT Handset
TD 92644EN
11.8.2 Calling a Different Party
To call another party to read and review a received text message, perform the following
steps:
1
Open the message as described in 7.4 Messaging on page 53 and press the "More"
soft key.
2
From the pop-up menu, navigate to the "Call" menu item and press the "Select" soft
key. The pre-dial screen is displayed. Enter the number of the party to be called or
select a number from the handset call list or local or central phone books.
3
Press the "Call" soft key and wait for the called party to reply. The message is
replaced by the ongoing call detail. The user may now:
•
•
•
Continue with the call without referring back to the received message.
Redisplay the message and continue the call to further review and discuss the
message. See Redisplay the Message and Continue with the Call on page 82.
Redisplay the message and terminate the call. See Redisplay the Message and
Terminate the Call on page 82.
Redisplay the Message and Continue with the Call
1
To redisplay the message while the call is ongoing, select the "More" soft key.
2
From the pop-up menu, select "Messaging".
3
From the Messaging menu, select "Inbox". The received message summary is
displayed.
4
Press the "View" soft key to display the message in full. If required, use the four-way
navigation key to scroll up and down a long text message to reveal the content while
reviewing and discussing the message with the called party.
Redisplay the Message and Terminate the Call
1
. The call is terminated and the ongoing call summary details are replaced
Press
by the redisplayed text message.
11.9 Message Templates
Predefined messages contained in message templates can be used in a number of different
situations to quickly construct a message rather than having to construct the message
completely from scratch.
Up to five predefined messages can be configured for the handset in the PDM/Device
Manager. This lets the user select and send a message appropriate to the current situation,
such as "I am in a meeting" or "I am in the operating theatre".
How to use the PDM/Device Manager to create store predefined messages the handset is
described in the Message Templates section of the handset configuration manual.
Before a message is sent, the user may edit, add, or remove text from the message. For
example, the message "I am in a meeting" could be appended with " - please call back after
1500".
The message template function can be used in the following contexts:
•
When a call is received that the user wishes to decline, but still acknowledge with a
message, without having to type a completely new message. See 5.6 Declining a Call
with a Predefined Message on page 36.
31 October 2013 / Ver. G
82
User Manual
Ascom d81 DECT Handset
•
•
TD 92644EN
When a text message is received that the user wishes to answer with a text message
without having to type a completely new message. See 11.9.2 Answering a Text
Message with a Predefined Message on page 83.
When the user is writing a message using the handset Messaging function without
having to type a completely new message. See 7.4.2 Write New Messages on page 55.
11.9.1 The Templates Menu
To access a template and use it in one of the ways described above, perform the following
steps:
1
Open the "Templates" menu as described in the context in which the template is
being used.
2
Select the required message from the "Templates" menu.
3
To edit the message, use the handset navigation key to move to different parts of
the message, the handset key pad to add additional text, and the "Clear" soft key to
delete unwanted text
11.9.2 Answering a Text Message with a Predefined Message
To respond to an incoming text message with a predefined message, perform the following
steps:
1
Press the soft key "Reply"
2
Press the "More" soft key. The "Templates" option is displayed.
3
Press the soft key "Select". A list of predefined message templates is displayed.
4
Navigate to the required message template and press the "Select" soft key. If
required, edit the message as described in 11.9.1 The Templates Menu on page 83.
5
Press the soft key "Send". The message sender’s number is displayed in the handset
display.
6
Press the soft key "Send". A "Message sent" confirmation is displayed and the
message is sent to the caller.
11.10Mobile Data
11.10.1 Send Mobile Data
Predefined data can be sent from the handset by selecting a Service, see 7.5 Services on
page 57. In addition, a shortcut can be created for quick access to a Service, see 7.6
Shortcuts on page 58
Mobile data can be used for opening a door, starting/stopping a machine etc.
11.10.2 Send Mobile Data with a Prefix
Mobile data with a prefix is sent from the handset by pressing a pre-programmed Hot key or
Soft key or select a Service. Mobile data with prefix can be used to send information to an
application in the system.
The prefix is predefined by the user when programming the Service, see 7.5 Services on
page 57.
31 October 2013 / Ver. G
83
User Manual
Ascom d81 DECT Handset
TD 92644EN
11.11Send Data with Bluetooth Barcode Reader
The handset can be configured to receive data from a Bluetooth barcode reader and then
send the data to another destination. When the handset receives data, it is automatically
transmitted to the destination and is not stored in the handset. A dialog window "Message
sent" is displayed.
For more information about configuration, see Configuration Manual, Ascom d81 DECT
Handset, TD 92674EN. See also Pair/Connect Bluetooth Barcode Reader on page 69, and
user manual for the Bluetooth barcode reader.
31 October 2013 / Ver. G
84
User Manual
Ascom d81 DECT Handset
12
TD 92644EN
Operation Notice
12.1 Accessibility and Voice Quality
The base network is not always available. If you do not get in contact with your system,
contact your system administrator. For best voice quality, avoid positioning near computer,
radio or similar equipment.
Operating Area
You can only use the handset in the area that is covered by your system. Outside this area
you will loose contact with the system. The signal strength icon is low and “Searching” is
displayed.
Out of Range
When you leave the system's coverage area a short beep will sound and the text
“Searching” will appear in the display.
The out of range beep is repeated every minute for 30 minutes. The sound can be turned off
, or
.
by long pressing,
NOTE: If handset restriction is enabled, it might not be possible to turn the sound off. See
the handset’s Configuration Manual.
When re-entering the coverage area it can take a couple of minutes before the handset
automatically has registered into the system.
31 October 2013 / Ver. G
85
User Manual
Ascom d81 DECT Handset
13
TD 92644EN
System Handling
13.1 Software Upgrade and Additional Features
Software and parameters in the handset can be upgraded by using the PDM/Device
Manager. Examples of additional features that can be downloaded/configured via PDM/
Device Manager:
•
•
•
•
Company phonebook
Downloadable languages
Customizing the Menu Tree
Licenses24
Refer to the handset’s Configuration Manual.
To view the handset’s software version, enter *#34# in idle mode.
13.2 Handset Updates via Charging Rack
From time to time, users are instructed to leave their handsets in a central charging rack to
allow the handset to be updated with new features and functions. An ongoing update is
in the handset display and an "Updating handset" message is displayed in
indicated by
the active area.
During the update, a message is displayed to indicate that an update is in progress as shown
in Figure 13. The "OK" soft key can be selected to close the message.
Figure 12.
13:00
2013-03-06
System A
Updating handset..
OK
Figure 13. Handset Update while in Charger
If the handset removed from the charger and used, the update is suspended and resumed
when it is returned to the charger.
When the update is complete, a "Handset is updated" message is displayed to indicate that
the handset is available for use, as shown in Figure 14. Select the "OK" soft key to close the
message.
24.The license(s) can also be added via the Admin menu in the handset.
31 October 2013 / Ver. G
86
User Manual
Ascom d81 DECT Handset
TD 92644EN
Figure 13.
13:03
2013-03-06
System A
Handset is Updated
OK
Figure 14. Update Completed while in Charger
31 October 2013 / Ver. G
87
User Manual
Ascom d81 DECT Handset
14
TD 92644EN
Maintenance
14.1 Maintenance of Batteries
14.1.1 Battery Warnings
The "Low battery" icon is displayed when the battery has 10% or less
remaining capacity left. In addition; a warning signal sounds every minute,
the LED flashing orange, and the dialog window "Battery low. Charge now."
appears.
The "Empty battery" icon is flashing when the battery has 5% or less
remaining capacity left. In addition; a warning signal sounds every second,
the LED flashing red, and the dialog window "Battery empty. Shutting down."
appears.
During a call, only the corresponding battery warning signal will notify the user. The warning
signal cannot be silenced during a call. When not in call, the warning signal can be silenced
or
.
by pressing
14.1.2 Charge the Battery
Place the handset in the desktop charger or in the rack charger. The battery is being charged
when the LED on the handset is steady orange. When the battery is fully charged the LED is
green.
is also shown in the display indicating charging by starting
An animated battery icon
indicates a
with its current charge and ending with the full charge. A filled battery icon
fully charged battery.
Note: Only use the prescribed chargers for charging.
14.1.3 Charge Spare Batteries
Spare batteries can be charged with a separate battery pack charger. It can charge six
batteries at the same time.
IMPORTANT:
It is not permitted to charge intrinsically safe batteries using the battery
pack charger.
14.1.4 Replace the Battery
If the standby time for the handset becomes too low, the battery should be replaced by a
new one. Please contact your system administrator or your supplier, for information about
new batteries. Attach the battery as described in figure 15 on page 92. It is attached inside
the battery lid and is connected to the handset in such a way that no misalignment of the
contact is possible.
NOTE: Use the battery pack opener to untight the screws on the intrinsically safe handset.
31 October 2013 / Ver. G
88
User Manual
Ascom d81 DECT Handset
TD 92644EN
Figure 14.
3
3
1
2
2
Non-Intrinsically handset
1
1
Intrinsically safe handset
Figure 15. Replaceable battery. Unlock the lid, loosen the screws and remove the
battery according to the illustration.
14.2 Easy Replacement of Handset
Easy replacement can be used if a handset needs to be replaced due to, for example, a
broken display. The easy replacement procedure is done via the handset display and the DC4
Advanced Desktop Charger, or the CR3 Charging Rack.
The following settings are replaced during easy replacement:
•
•
•
•
DECT registration
User parameters (including User ID)
Contacts
The extension number is assigned to the new handset.
The following settings are not replaced during the easy replacement:
•
•
•
•
Call list
Messages
Bluetooth pairing list
License(s)25
14.2.1 Before Starting Easy Replacement Procedure
1
Check that both the old handset (that is, the handset to be replaced) and the new
handset (that is, the replacement handset) are of the same device type (d81).
TIP: Easy Replacement can be performed between different product licenses (that is d81
Messenger and d81 Protector). The new handset’s product license is not replaced by the old
handset’s product license during the procedure.
2
Make sure that the handset batteries are charged before starting the easy
replacement procedure.
3
Switch off the new handset by long pressing
.
25. A handset’s product license, for example d81 Protector, and/or license dependent functions can be moved to an
unlicensed handset (d81 Messenger) using PDM/Device Manager.
31 October 2013 / Ver. G
89
User Manual
Ascom d81 DECT Handset
TD 92644EN
14.2.2 Easy Replacement Procedure
During the Easy Replacement procedure, the LEDs of the handset and the charger follow the
same LED indications. This means that if the old handset has a broken display, the LED
indications on the charger and on the handset can be used to follow the replacement
procedure. Before and after easy replacement, the LEDs may have different LED indications.
For more details, see LED Indications during Easy Replacement on page 91.
IMPORTANT: Never remove a handset from the charger until the instructions in the display
or the LED tells you to do so (see status on the LED if the display is broken). If there is an
error indication it may be allowed to remove the handset, see 15 Troubleshooting on page
94 for further instructions. After the old handset has been in the charger, the new handset
needs to be placed in the charger regardless if the replacement was successful or not. Failing
to do so may result in malfunction and the new handset will need to be sent for service.
New
New
Old
1
New
3
4, 8
7
5
6
011
2
1
On the new handset, press and hold
Note: Do not release
until you are instructed to do so.
2
Put the new handset in the charger.
3
.
When the text "Start phone replacement?" is displayed, release
Press "Yes" (left soft key).
The text "Follow the instructions. Each step can take several minutes." appears in the
display. Press "OK" (left soft key).
31 October 2013 / Ver. G
90
User Manual
Ascom d81 DECT Handset
4, 5
TD 92644EN
When the text "Please insert old phone in charger" is displayed, replace the new
handset with the old handset. The handset can either be switched on or off.
Note: If the CR3 Charging Rack is used, the left charging slot must be used for both
handsets.
The handset is restarted and after a few seconds, the text "Saving settings. Do not
remove phone from charger" appears. The charger LED changes to slow orange
flashing. It may take several minutes.
IMPORTANT: If the old handset cannot communicate with the charger, put the new
handset in the charger to restore its settings (that is, the handset’s IPDI). If this step
is not performed, the new handset must be sent for service. The old handset’s
settings might be transfered to the new handset by using PDM/Device Manager. See
the handset’s Configuration Manual.
6, 7
When the text "Please insert new phone in charger" is displayed, replace the old
handset with the new handset. The text "Restoring settings" is displayed.
IMPORTANT: Do not remove the handset while the text "Restoring settings" is
displayed
8
When the text "Phone successfully replaced. Please remove phone to restart."
appears in the display, remove the handset from the charger. The handset is
automatically restarted.
LED Indications during Easy Replacement
The following table shows the LED indications that are used for the handset and the charger
during the easy replacement procedure.
LED indication
Description
Orange, flashing (1 000 ms on, 1 000
ms off)
File transfer during Easy Replacement.
Orange, flashing (100 ms on, 800 ms
off)
“Change phone” indication during Easy
Replacement.
Red, flashing (100 ms on, 800 ms off)
Error indication during Easy Replacement. Put back
new handset in charger.
Red, flashing (900 ms on, 100 ms off)
Error during Easy Replacement. Service needed for
both handsets.
31 October 2013 / Ver. G
91
User Manual
Ascom d81 DECT Handset
TD 92644EN
14.3 Attach the Hinge-type Clip
Attach the hinge-type belt clip as described in Figure 16.
012
Figure 15.
Figure 16. Screw the hinge-type clip into position.
14.4 Attach the Swivel-type Clip
Attach the swivel-type belt clip as described in Figure 16.
013
Figure 16.
Figure 17. Screw the swivel-type clip into position.
31 October 2013 / Ver. G
92
User Manual
Ascom d81 DECT Handset
TD 92644EN
14.5 Attach Cover for No Clip
Attach the enclosed cover as described in Figure 17 when no clip is to be used.
014
Figure 17.
Figure 18. Screw the cover into position.
31 October 2013 / Ver. G
93
User Manual
Ascom d81 DECT Handset
15
TD 92644EN
Troubleshooting
This section contains information on how to solve common operational problems, and
warnings you may receive.
Go through the following lists if you encounter any problems. If this checklist does not solve
the problem, contact your system administrator.
If others have similar problems, there may be a system error.
31 October 2013 / Ver. G
94
User Manual
Ascom d81 DECT Handset
TD 92644EN
Operational Problems
Fault
Probable cause
Action or comment
No display
The battery level is low or the
handset is defective.
Charge the battery or contact
system administrator.
Change the screen saver
setting as described in
Screen Saver on page 64.
No ringing
The sound off icon is on, or ringer Long press the Sound off key,
or increase volume, or contact
volume set to silent, or the
system administrator.
handset is defective.
No change in time & date PBX dependent.
setting
Changes in the handset
appear after a maximum of
24 hours after a change in
the system or by turning the
handset off and on again.
Cannot mute handset by A handset restriction preventing
long pressing Sound off the user to silence the handset.
key/Mute button.
Enable the parameter
Possible to turn off sound, see
the handset’s Configuration
Manual.
Not possible to set the
ring volume to "Silent".
Handset, with In Charger
> Other actions > Sound
off enabled, is not muted
when placed in charger.
Cannot switch off
A handset restriction preventing Enable the parameter
handset by long pressing the user to switch off the handset. Possible to switch off
the On-hook key.
handset, see the handset’s
Configuration Manual.
Handset, with In Charger
> Other actions> Switch
off enabled, is not
switched off when placed
in charger.
31 October 2013 / Ver. G
95
User Manual
Ascom d81 DECT Handset
TD 92644EN
Fault
Probable cause
Action or comment
Cannot subscribe
handset using Easy
Registration feature.
1) The handset does not support 1) Make sure that the
the Easy Registration feature.
handset’s software is of
version 3.0.x or higher. In idle
2) The handset is subscribed to a more, press "*#34#" and
system.
select "Software".
3) The IP-DECT system (release
2) Unsubscribe the handset
3.x.x and lower) does not support and then subscribe it by
following the instructions in
Easy Registration.
Subscribe Handset in IP-DECT
4) The IP-DECT system (release 4.x System using Easy
and higher) is not configured for Registration on page 70.
Easy Registration.
3) Subscribe the handset
manually, see Subscribe
5) There is ambient equipment
disturbing your IP-DECT system. Handset in DECT System
Manually on page 70.
4) Subscribe the handset
manually, see Subscribe
Handset in DECT System
Manually on page 70,
or
configure the system to
support Easy Registration,
see the applicable Installation
and Operation Manual for
your IP-DECT system.
5) Try to subscribe the
handset in other area in your
building.
6) If the problem still exists,
restart your handset and
subscribe the handset.
31 October 2013 / Ver. G
96
User Manual
Ascom d81 DECT Handset
TD 92644EN
Error or Warning Messages
Display shows
Probable cause
Action or comment
No access
The network is in range, but no
access rights.
Switch handset off and then
switch it on again or contact
system administrator.
No System. The handset The handset is out of coverage or
beeps once a minute
handset is defective.
(during max 30
minutes) with a low
tone followed by a high
tone (if enabled, the
vibrator also follows the
beeps).
Stop the beep with the Sound
off key and go into range.
Note: When re-entering the
coverage area it can take a
couple of minutes before the
handset automatically has
registered into the system.
or
contact system administrator.
Failed to read from flash
No flash driver was
found
Note: This display
message is only shown
in English.
Send the handset for service.
SERVICE NEEDED
There is a communication problem Restart the handset. If the
problem persists, send the
Hardware error
between components in the
handset.
handset for service.
Note: This display
message is only shown
in English.
SERVICE NEEDED
Invalid IPDI
Easy replacement procedure not Send the handset for service.
followed correctly or failure during
easy replacement procedure.
Note: This display
message is only shown
in English.
SERVICE NEEDED
The handset is defective.
Parameters corrupt.
Note: This display
message is only shown
in English.
Select reset option on the
middle soft key if available or if
no reset option is available or
fault does not resolve the
handset needs repair. Note:
Display message only shown in
English.
Enter PIN code
Enter the required PIN code. If
PIN code lost enter new via
PDM/Device Manager or do a
factory reset via PDM/Device
Manager.
The handset’s lock is activated.
Battery low, charge now The battery level is low.
Phonebook is not
available at the
moment.
The phonebook does not respond, Try again later or if fault
not available at the moment.
persists do a factory reset via
admin menu or PDM/Device
Manager.
Voice mail number not There is no Voice mail number
defined
defined in the handset.
31 October 2013 / Ver. G
Charge or replace the battery.
Define a Voice mail number via
PDM/Device Manager.
97
User Manual
Ascom d81 DECT Handset
Could not encrypt
connection
TD 92644EN
The parameter "Encryption
Required" is enabled in the
handset in combination with;
1) Unencrypted base station(s);
and/or,
2) Unsupported base station(s).
1) Disable the "Encryption
required" parameter in handset
via PDM/Device Manager; and/
or,
2) Enable the encryption in the
base station(s); and/or,
Note: If Ascom’s base station(s)
is used, the software version
must be 3.1.x or greater.
3) Use supported base
station(s). Ask your supplier.
Not allowed
1) The handset with the shared
phone functionality enabled
cannot be logged in due to
another handset using the
extension (that is, User).
Note: If a password (that is, AC
code) is required to login a
handset, it is possible to the login
the other handset. The first logged
in handset will automatically be
logged out.
1) Logout the handset that
uses the extension.
2) Make sure that you entered
correct extension. If needed,
contact the system
administrator.
3) Make sure that you have
entered correct password. Ask
the system administrator if you
have forgot the password.
2) The extension (User) does not
exists.
3) The password is not correct.
LED Error Indications
See also chapter LED Indications during Easy Replacement on page 91.
LED is flashing red, quick flash, (100 ms on, 800 ms off)
1) If a third handset, that is another handset other than the old replaced handset or new
replacement handset, is inserted into the charger during Easy Replacement, this error
indication appears. Replace the correct handset.
2) The charger has found that Easy Replacement does not work. Change back to the new
handset.
LED is flashing red, long flash (800 ms on, 100 ms off)
Error during Easy Replacement. Both handsets need to be sent for service.
31 October 2013 / Ver. G
98
User Manual
Ascom d81 DECT Handset
16
TD 92644EN
Related Documents
Data Sheet, Ascom d81 DECT Handset, Messenger, TD 92643EN
Data Sheet, Ascom d81 DECT Handset, Protector, TD 92711EN
Configuration Manual, Ascom d81 DECT Handset, TD 92674EN
Quick Reference Guide, Ascom d81 DECT Handset, TD 92667EN
Function Description, Product Licensing Overview, TD 92677GB
Installation and Operation Manual,
Portable Device Manager (PDM), Windows Version, TD 92325EN
Installation and Operation Manual, IMS, TD 92762EN
Installation and Operation Manual, DC4 Desktop Charger, TD 92481EN
Installation and Operation Manual, CR3 Charging Rack, TD 92480EN
Installation Guide 9dLD Location Device, TD 92175GB
Installation and Operation Manual, IP-DECT Base Station and IP-DECT Gateway, TD
92579EN
User Guide, Site Survey Tool, TD 92220GB
31 October 2013 / Ver. G
99
User Manual
Ascom d81 DECT Handset
17
TD 92644EN
Document History
For details in the latest version, see change bars in the document.
Version
Date
Description
A
19 march 2010
First released version
B
20 December 2010
See change bars in the document.
C
26 September 2011
"Redirect" option removed from In Charger menu. See
change bars in the document
D
08 June 2012
Updated:
Chapter 2 Descriptions on page 5: new power supplies
added.
Invitation Received as Message during an Ongoing
Call: Note added.
Added:
5.3.13 Switch between Calls on page 34
Appendix C: Display Call Information from Cisco
Systems on page 113
E
12 December 2012
Removed:
Removed Safety Instructions chapter.
Removed document numbers from document
references.
Updated:
1.5 Functions and Accessories on page 3: Enhanced
DECT Security added.
2.1.3 Icons and Text in the Display on page 9: New
Volume 0 icon, distinct from mute.
3.1 Switch the Handset On/Off on page 15: Owner ID
shown when a switched off handset is put in charger.
4.9 In Call Menu on page 27: messaging option added.
5.3.12 Send Call Waiting on page 34: changed heading
to distinguish from Answer Call Waiting
7.1.2 Missed Calls on page 43: note regarding the
possibility to turn off call list added.
7.2 Contacts on page 48, 7.2.6 Central Phonebook on
page 50 and 7.4.2 Write New Messages on page 55:
possible to temporarily change input language.
7.4 Messaging on page 53: Oldest message after inbox
has 30 messages gets replaced by the new message.
7.7.4 Display Settings on page 64: Display owner ID
and handset variant when in CR3 charging rack.
Added:
3.6 Mute Handset on Incoming Call or Message on
page 17
5.3.3 Open Messaging during a Call on page 32.
5.3.14 Answer Call Waiting on page 34
7.2.4 Set Ring Signal for a Contact on page 50
3.6 Mute Handset on Incoming Call or Message on
page 17
31 October 2013 / Ver. G
100
User Manual
Ascom d81 DECT Handset
TD 92644EN
Version
Date
Description
F
28 March 2013
Added 11.8 Calling while Reading a Text Message on
page 81
Modified 5.1.1 Answer a Call on page 29 to include
reference to declining a call with template. Added 5.6
Declining a Call with a Predefined Message on page 36.
Added 11.9 Message Templates on page 82, 11.9.1
The Templates Menu on page 83and 11.9.2 Answering
a Text Message with a Predefined Message on page
83.
Added 7.4.5 Review Inbox Content while Reading a
Message.
The section 7.4 Messaging has been updated with info
about unlocking the phone to access messages
received.
The section 7.7.2 Keypad Lock Settings has been
updated to reflect the option of different key locking
choices and intervals
Update 5.4 Loudspeaking Function on page 35 to
reflect position of picture soft key.
(Issue DX-5097)
The sections 13.2 Handset Updates via Charging Rack
on page 86 has been added.
How the handset updates the DECT system time is
described in 7.7.5 Time and Date Settings on page 65.
The section Menu Icons updated with correct default
profile.
Updated content of 5.1.1 Answer a Call on page 29 to
more accurately reflect handset behaviour.
The section 7.7.3 Phone Lock Settings on page 62 has
been added to separate out phone lock and key lock
concepts and make minor corrections to parameter
names
The sections 3.2 Log In or Out of a Shared Phone on
page 15 and 3.5 Lock and Unlock the Handset on page
17 have been updated to describe the effect of a user
logging off a shared phone.
31 October 2013 / Ver. G
101
User Manual
Ascom d81 DECT Handset
TD 92644EN
Version
Date
Description
G
31 October 2013
"On except calls" option is added to 7.7.2 Keypad Lock
Settings on page 61
The following sections have been updated to reflect
the five emergency number availability:
5.7 Emergency Calls on page 36
7.7.2 Keypad Lock Settings on page 61
7.7.3 Phone Lock Settings on page 62
Updated section Screen Saver on page 64 and 15
Troubleshooting on page 94 to describe "Black also in
call" screen saver option.
Audio indication of change in system profile added in
section 9.1 System Profile Status Indications on page
75.
Updated section 5.2.1 Pre-Dial on page 29 to
accommodate international dialling.
Improved introduction to In Call section 4.9 In Call
Menu on page 27.
31 October 2013 / Ver. G
102
User Manual
Ascom d81 DECT Handset
TD 92644EN
Appendix A: Bluetooth Headset
A.1
Introduction
Bluetooth technology replaces the cord between the handset and the headset. This allows
the user to move more freely and eliminates the risk of a headset cord getting stuck.
Bluetooth supported functions:
•
•
•
•
•
•
•
•
A.2
Pair the handset with it’s headset
Chose which device to use when making a call
Play ring signal in the Bluetooth headset
Answer and connect sound to the Bluetooth headset when answering with the headset’s
button.
End call with the Bluetooth headset’s button
Transfer audio to/from Bluetooth headset during call, using the menu in the handset.
Increase/decrease the volume in the Bluetooth headset with the volume buttons on the
handset.
Additional functions can be configured for the headset button, such as post-dial, dial last
called number, or dial a predefined number. See the handset’s Configuration Manual for
more information.
Icon
See 2.1.3 Icons and Text in the Display on page 9.
A.3
Wear
For optimal performance wear the Bluetooth headset and the handset on the same side of
your body. The best audio quality in the headset is achieved when no obstructions, including
your body, are between the headset and the handset.
015
Figure 18.
Figure 19. Wear the headset and the handset on the same side of your body.
31 October 2013 / Ver. G
103
User Manual
Ascom d81 DECT Handset
A.4
TD 92644EN
Headsets
A number of Bluetooth headsets for different work situations have been tested together
with the handset. Refer to the Ascom Wireless Extranet Website for a list of verified
Bluetooth headsets.
Since the Bluetooth supports the Bluetooth 2.0 standard, other headsets may also work
although not verified by Ascom.
Note: Your Bluetooth headset may have more or less functions than described here, refer to
the Manual for the Bluetooth headset.
A.5
Operation
Step between the menus with the navigation key. Confirm each menu
selection by pressing the Soft key "Select".
A.5.1
Enable Bluetooth
To enable the Bluetooth function enter
select “Enable”.
in the handset menu, select "Bluetooth" and
Note: When enabling Bluetooth on an intrinsically safe handset, it is restarted.
A.5.2
Pair and Connect a Bluetooth Headset
Before a headset can be used, a connection (pairing) between the headset and the handset
must be established.
1
Place the Bluetooth headset and the handset next to each other.
2
Enable Bluetooth, see A.5.1 Enable Bluetooth.
3
Put the Bluetooth headset in pairing mode, see the user manual for the Bluetooth
headset.
4
Enter the menu by pressing "Menu".
5
Select
6
Select "Bluetooth".
7
Select "Headset".
8
Select "Add new". An information text "Put headset in Pairing mode" is displayed.
9
Press "OK". It will now search for a Bluetooth headset for connection.
10
When headset is found, press "Pair".
11
If needed, enter PIN code, see user manual for the Bluetooth headset. Press "OK".
in the menu.
The dialog Successful pairing appears if the pairing process was successful. The
Bluetooth headset will also be connected indicated by the icon in front of the
headset.
TIP: The headset button can be configured with a specific function, such as post-dial, dial last
called number, or dial a predefined number. See the handset’s Configuration Manual for
more information.
31 October 2013 / Ver. G
104
User Manual
Ascom d81 DECT Handset
A.5.3
TD 92644EN
Add another Bluetooth Headset
Up to eight Bluetooth devices can be paired to the handset, but only one at a time can be
selected. To pair another headset repeat section “Pair and Connect a headset” steps 1-6.
The paired headsets are displayed by a default name in the handset menu “Headset”. See
A.5.6 Change the name of Bluetooth headset
A.5.4
Select a Bluetooth Headset
in the handset menu, select “Bluetooth” >
To activate a Bluetooth headset, enter
to the headset to be selected and press
“Headset”. Step with the navigation key, and
"Select". Connection successful is displayed. The headset is now selected.
When a new headset has been selected any previous headset will automatically become
disconnected.
A.5.5
Remove a Bluetooth Headset
in the handset menu, select Bluetooth >
To remove a Bluetooth headset, enter
and
to the headset to be removed and press
Headset. Step with the navigation key,
"More". Select "Delete". Confirm with "Select".
A.5.6
Change the name of Bluetooth headset
The name, in the headset list, of the headset is the default name for the headset.
in the menu, select “Bluetooth” > “Headset”. Step with the
To change the name enter
and , to select the headset. Select "More" > “Edit name”. See 2.1.2
navigation key,
Alphanumeric Keys on page 8.
A.6
Calling
A.6.1
Make a Call
. When “Transfer call to phone?” is
Dial the number on the handset and press "Call", or
displayed press "No" or ignore the message to use the Bluetooth Headset. Press "Yes" to use
the handset.
A.6.2
Answer a Call
A ring signal sounds in both the selected Bluetooth headset and the handset to signal an
incoming call.
To answer the call in the Bluetooth headset, press the button26 on the headset.
To answer the call in the handset, press
A.6.3
on the handset.
End a Call
To end the call press the button17 on the headset, or
on the handset.
26. For instruction, see headset manual.
31 October 2013 / Ver. G
105
User Manual
Ascom d81 DECT Handset
A.7
TD 92644EN
Volume/Mute Control
A.7.1
Adjust the Volume During a Call
Depending on the Bluetooth headset it may be possible to adjust the volume on the
to increase the volume and
to decrease the volume
headset17. On the handset, press
in the headset.
A.7.2
Turn the Microphone On/Off During a Call
Mute both headset and handset by pressing
A.8
or
on the handset.
Messaging
When a text message is received during an ongoing call, a beep sounds in the Bluetooth
headset.
A.9
Transfer a call
A.9.1
Transfer a Call to the Handset
To transfer a call to the handset from the Bluetooth headset, press "More" on the handset
during the call, and select “Audio transfer”.
If supported by the headset, a call can be transferred to the handset with by pressing the
headset button.
A.9.2
Transfer a Call to the Bluetooth Headset
To transfer the call to the Bluetooth headset, press "More" on the handset during the call,
and select “Audio transfer”.
A call can be transferred to the Bluetooth headset by pressing the button on the Bluetooth
headset. For additional information, see the headset manual.
A.10 Switch to a Headset with Cord
If a headset with a cord is connected during a call, the call is transferred to this headset
automatically.
A.11 Menu Tree
See 7.7 Settings on page 60.
A.12 Operation Notice
A.12.1 Accessibility and Voice quality
Bluetooth uses the frequency of 2.45 GHz. WLAN, microwave ovens, and other devices that
use the same frequency can disturb the use of a Bluetooth headset.
31 October 2013 / Ver. G
106
User Manual
Ascom d81 DECT Handset
TD 92644EN
A.12.2 Operation Area
Maximum distance between the headset and the handset is 10 metres. The communication
distance between the handset and headset may vary considerably due to the environment
and disturbances from other 2.45 GHz equipment. Different headsets can also give different
communication distances.
A.12.3 Out of Range
If a connection cannot be made with the selected Bluetooth headset, the call is transferred
automatically to the handset.
If the Bluetooth headset and the handset get out of range from each other, the connection
is temporarily lost. Since the last connected headset is always considered "selected", the
connection is automatically established again when a call is made or received. In case of
more than one paired headset in list, the preferred headset used for calls, is always first in
list.
A.13 Environmental Requirements
A.13.1 Bluetooth Headset Battery
See the manual for the Bluetooth headset.
31 October 2013 / Ver. G
107
User Manual
Ascom d81 DECT Handset
TD 92644EN
A.14 Trouble Shooting
Problem
Reason
Solution
No headset found
Headset is turned off
Turn on headset
Headset is out of battery Charge headset
Pairing fails
Headset is out of range
Move headset closer to handset
< 10 metre.
Headset is not in pairing
mode
Turn headset into pairing mode (see
headset manual for details)
Headset is not in pairing
mode
Turn headset into pairing/
discoverable mode (see headset
manual for details)
Incorrect PIN entered
Try again and enter correct PIN (see
headset manual for details)
Connecting fails/Failed to Headset is not turned on
connect headset
Turn on headset
Headset is out of range
Move headset closer to handset
Link key in headset has
been deleted
Repeat pairing procedure
Headset is already
connected to another
handset
Disconnect headset from the other
handset
Too close to disturbing
devices.
Disturbing devices can be WLAN
equipment, microwave etc.
Headset can not connect Handset is not turned on Turn on handset
to handset (see headset
manual for details on how
to connect)
Handset is out of range
Move handset closer to headset
Bluetooth module is
disabled
Enable "Bluetooth" in Bluetooth
menu
Another headset is
Disconnect the connected headset
already connected to the
handset
Link key is missing in
Repeat pairing procedure
either headset or handset.
Too close to disturbing
devices.
31 October 2013 / Ver. G
Disturbing devices can be WLAN
equipment, microwave etc.
108
User Manual
Ascom d81 DECT Handset
TD 92644EN
Appendix B: Bluetooth Barcode Reader
B.1
Introduction
Note: The Bluetooth barcode reader requires that the license dependent Bluetooth Data
Profile feature is enabled. See the handset’s Configuration Manual.
Bluetooth supported functions:
•
•
•
B.2
Pair the handset with it’s Bluetooth barcode reader
Choose which device to use when scanning barcodes
Scan barcode(s) and send the information to a handset/system.
Icon
See 2.1.3 Icons and Text in the Display on page 9.
B.3
Bluetooth Barcode Readers
A number of Bluetooth barcode readers for different work situations have been tested
together with the handset. Refer to the Ascom Wireless Extranet Website for a list of
verified Bluetooth barcode readers.
Since the Bluetooth supports the Bluetooth 2.0 standard, other Bluetooth barcode reader
may also work although not verified by Ascom.
Note: The Bluetooth barcode reader may have more or less functions than described here,
refer to the Manual for the Bluetooth barcode reader.
B.4
Operation
Step between the menus with the navigation key. Confirm each menu
selection by pressing the soft key "Select".
B.4.1
Enable Bluetooth
To enable the Bluetooth function enter
select “Enable”.
B.4.2
in the handset menu, select Bluetooth and
Pair and Connect a Bluetooth Barcode Reader
Before a Bluetooth barcode reader can be used, a connection (pairing) between the
Bluetooth barcode reader and the handset must be established.
1
Place the Bluetooth barcode reader and the handset next to each other.
2
On the handset, enter
“Add new”.
3
Put the Bluetooth barcode reader in pairing mode27 and press the soft key "OK". The
handset starts to search for the Bluetooth barcode reader.
in the menu, select “Bluetooth” > “Barcode reader” >
27.For instruction, see barcode reader manual.
31 October 2013 / Ver. G
109
User Manual
Ascom d81 DECT Handset
TD 92644EN
4
When the Bluetooth barcode reader is found it is displayed in the Barcode reader
found list. Press the soft key "Select" on the handset to select the Bluetooth barcode
reader. The pairing starts.
5
A PIN-code is requested for the Bluetooth barcode reader. Enter the PIN-code1 and
press "Select" on the handset. Pairing successful is displayed.
6
The paired Bluetooth barcode reader is displayed in the handset menu “Barcode
reader”.
B.4.3
Add another Bluetooth Barcode Readers
Up to eight Bluetooth devices can be paired to the handset, but only one at a time can be
selected.
To pair another Bluetooth barcode reader, repeat section B.4.2 Pair and Connect a Bluetooth
Barcode Reader on page 109.
The paired Bluetooth barcode readers are displayed by a default name in the handset menu
Barcode reader. See B.4.6 Change the name of Bluetooth Barcode Reader.
B.4.4
Select a Bluetooth Barcode Reader
in the handset menu, select Bluetooth >
To activate a Bluetooth barcode reader, enter
and to the barcode reader to be selected
Barcode reader. Step with the navigation key,
and press the soft key "Select". "Connection successful" is displayed. The barcode reader is
now selected.
When a new barcode reader has been selected, any previous barcode reader will
automatically become disconnected.
B.4.5
Remove a Bluetooth Barcode Reader
in the handset menu, select "Bluetooth" >
To remove a Bluetooth barcode reader, enter
and
to the barcode reader to be
"Barcode reader". Step with the navigation key,
removed and press the soft key "More". Select "Delete". Confirm with the soft key "Yes".
B.4.6
Change the name of Bluetooth Barcode Reader
In the barcode reader list, the name of the barcode reader is the default name for the
barcode reader.
in the menu, select “Bluetooth” > “Barcode reader”. Step
To change the name, enter
and , select the barcode reader. Select More > Edit name. See
with the navigation key,
2.1.2 Alphanumeric Keys on page 8.
B.5
Barcode Reader Operation
B.5.1
Using the Bluetooth Barcode Reader
The procedure on how to use the Bluetooth barcode reader may vary depending on which
type/model that is used. Refer to the manual for the Bluetooth barcode reader. The
following instruction can be used as a guideline.
1
Press the button28 of the barcode reader to scan a barcode. The barcode reader may
give a beep to confirm that the barcode has been read and sends the information the
handset.
28.For intruction, see barcode reader manual.
31 October 2013 / Ver. G
110
User Manual
Ascom d81 DECT Handset
2
TD 92644EN
When the information is received, the handset sends it immediately to a predefined
destination. A Message sent dialog window appears in the handset, and the barcode
reader gives a beep to confirm that the message has been sent.
Note: Only scan one barcode at the time and wait for the message sent acknowledgement
from the handset/barcode reader before scanning a new barcode.
B.6
Menu Tree
See 4.8 Settings on page 25.
B.7
Operation Notice
B.7.1
Accessibility and Voice quality
Bluetooth uses the frequency of 2.45 GHz. WLAN, microwave oven, and other devices that
use the same frequency can disturb the use of a Bluetooth barcode reader.
B.7.2
Operation Area
Maximum distance between the barcode reader and the handset is 10 metres. The
communication distance between the handset and barcode reader may vary considerably
due to the environment and disturbances from other 2.45 GHz equipment. Different
barcode readers can also give different communication distances.
B.7.3
Out of Range
If the Bluetooth barcode reader and the handset get out of range from each other the
connection is lost. The barcode reader must manually be connected again, see B.4.4 Select a
Bluetooth Barcode Reader on page 110.
B.8
Environmental Requirements
B.8.1
Bluetooth Barcode Reader Battery
See the manual for the Bluetooth barcode reader.
31 October 2013 / Ver. G
111
User Manual
Ascom d81 DECT Handset
B.9
TD 92644EN
Troubleshooting
Problem
Reason
No barcode reader found Barcode reader is turned
off
Pairing fails
Solution
Turn on barcode reader1
Barcode reader is out of
battery
Charge barcode reader1
Barcode reader is out of
range
Move barcode reader closer to
handset
< 10 metre.
Barcode reader is not in
pairing mode
Turn barcode reader into pairing
mode1
Barcode reader is not in
pairing mode
Turn barcode reader into pairing/
discoverable mode1
Incorrect PIN entered
Try again and enter correct PIN1
Connecting fails/Failed to Barcode reader is not
connect barcode reader
turned on
Barcode reader is out of
range
Turn on barcode reader1
Move barcode reader closer to
handset
Link key in barcode reader Repeat pairing procedure1
has been deleted
Barcode reader is already Disconnect barcode reader from the
connected to another
other handset
handset
Too close to disturbing
devices.
Barcode reader can not
connect to handset (see
barcode reader manual
for details on how to
connect)
Disturbing devices can be WLAN
equipment, microwave etc.
Handset is not turned on Turn on handset
Bluetooth module is
disabled
Enable Bluetooth in Bluetooth menu
Another barcode reader is Disconnect the connected barcode
already connected to the reader
handset
Other faults/or if the
solutions do not work.
Link key is missing in
either barcode reader or
handset.
Repeat pairing procedure1
Too close to disturbing
devices.
Disturbing devices can be WLAN
equipment, microwave etc.
1) Switch the handset and barcode
reader1 on/off.
2) Perform a factory reset on the
barcode reader1.
1. Refer to the Manual for the Bluetooth barcode reader
31 October 2013 / Ver. G
112
User Manual
Ascom d81 DECT Handset
TD 92644EN
Appendix C: Display Call Information from Cisco Systems
NOTE: This feature requires Ascom IP-DECT 5.1.2 or later.
The handset can display call information received from a Cisco system. The call information
to be displayed is system dependent and is indicated by a dialog window and a short beep
in the handset. The handset can show information about the following features:
Music on Hold - displayed in the calling party’s handset when he/she is put on hold.
Ad-Hoc conferencing
Call back - displayed when the Call back feature has been activated to call back to a busy
handset when it is free.
• Call pickup - displayed when you can answer a call that is ringing at another handset in
your Pickup Group.
• Abbreviated dialing
The user can then either close the dialog window manually by pressing "Close" or wait until
the dialog window closes automatically after few seconds. The call information will not be
stored in the handset.
•
•
•
31 October 2013 / Ver. G
113
User Manual
Ascom d81 DECT Handset
TD 92644EN
Index
Microphone ................................................................... 5
N
A
Antenna......................................................................... 5
B
No-movement Alarm............................................... 38
Number input mode ................................................... 8
O
Battery.................................................................... 5, 88
low battery...................................................... 9, 88
Bluetooth barcode reader ...................................... 69
Bluetooth Headset Module .................................. 103
C
Call info ....................................................................... 12
call priority................................................................. 79
Call service ................................................................. 12
Calling
answered call ...................................................... 11
dial a number...................................................... 29
missed call ........................................................... 11
outgoing call ....................................................... 11
quick call by a name in the phonebook ....... 30
Case ................................................................................ 5
Centralized phonebook........................................... 48
Clip ............................................................................... 13
D
DECT Location............................................................ 39
Dialling
International number ....................................... 29
E
Earpiece ......................................................................... 5
Easy Registration ..................................................... 70
Easy replacement of handset ............................... 89
Emergency Calls........................................................ 36
Keypad lock ......................................................... 61
Enable Bluetooth.......................................... 104, 109
Operating Area.......................................................... 85
Out of Coverage ........................................................ 85
P
PIN code ............................................................... 17, 63
Procedure Call............................................................ 74
Pull................................................................................ 38
Pull-cord Alarm ......................................................... 38
R
Ring signal muted ....................................................... 9
S
Screen Saver
settings................................................................. 64
Shared phone ............................................................ 15
Signal strength ............................................................ 9
Special characters..................................................... 55
Standby mode
date .......................................................................... 9
time .......................................................................... 9
user identity ........................................................... 9
System Profile
Status changes ................................................... 75
System Profiles ......................................................... 75
T
Text input mode .......................................................... 8
V
verified Bluetooth headsets ...................... 103, 109
I
W
IPEI .................................................................................. 2
Writing Text or Numbers
add space in text................................................... 8
pause........................................................................ 8
upper and lower case........................................... 8
L
LED indications ......................................................... 91
LF location.................................................................. 39
Loudspeaker................................................................. 5
Loudspeaking..................................................... 10, 29
M
Man-down Alarm .....................................................
Message
new message......................................................
old message ........................................................
template
answer text message..............................
voice message ....................................................
Message alert............................................................
Message Indication Repetition .............................
Message volume.......................................................
31 October 2013 / Ver. G
38
10
10
83
10
60
79
60
114