1
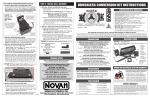
step 1–mount esc
step 3–connect receiver
Mount the ESC so the power wires are as far away from other electronics as
possible, and will not interfere with the vehicle’s moving parts. Select a location with good airflow for cooling the ESC for efficient operation.
1.MOUNT SPEED CONTROL IN VEHICLE
Use the included double-sided tape to mount ESC in vehicle (do not use glue).
Avoid contact with side walls or chassis components to avoid vibration damage.
Be sure receiver & antenna are mounted as far from ESC, power wires, battery,
and servo as possible--These components all emit RF noise.
receiver connections
The ESC has a user-replaceable input harness
with the industry-standard connector on both
the ESC and receiver ends of it.
ESC works with all major brand’s new receivers
2.INSTALL ON/OFF SWITCH
Use included double-sided tape to mount switch where it will be easy to
access--select a place where it will not get damaged/switched OFF in a crash.
3.SECURE POWER WIRES TO AVOID VIBRATION DAMAGE
Use the included tie-wraps to secure the ESC’s power wires together or to
a point on the vehicle to prevent vibration damage.
step 2–connect motor/battery
Insert 3-pin plug on other end of receiver harness into Ch.2 (throttle) slot of receiver.
Press fan screws through 2 of the holes along one edge of the fan and into the 1st
gap of ESC heat sink fins. Plug fan connector onto ESC’s fan pins--note polarity.
4. CONNECT GLITCH BUSTER CAPACITOR TO RECEIVER
Insert connector of Glitch Buster into any open slot of receiver--note polarity.
STEP 4-one-touch programming
This ESC is compatible with standard rate radio systems and also the super-high
speed Airtronics M12 radio system operating in its SSR mode. ESC must first be
switched to the correct radio system mode before it will recognize the receiver and
allow the One-Touch Set-Up programming. ESC ships from Novak in the Standard
Rate Mode and is ready to program if this is what type of system you are using.
For standard rate systems, skip steps A-D below and simply follow Steps 1-8.
If installing ESC with an M12 radio system operating in SSR mode, follow Steps A-D
below to switch modes (refer to ESC Track Guide for detailed information), then complete
Steps 1-8 afterwards. (Steps A-D need only be done the 1st time)
MAKE SURE THE PINION/SPUR GEAR MESH IS NOT TOO TIGHT!
B.Tighten motor mounting screws–Avoid using excessive force that could
break screws or strip the threaded holes in motor.
With at least 2 of the Motor power wires disconnected & the ESC connected
to a charged battery pack, the receiver, & the motor’s sensor harness:
2.CHECK FOR PROPER GEARING DURING INITIAL RUNS
The brushless motor & ESC should NOT be hotter than 160°F after a 5 minute
run. Lower the gearing until both ESC & motor are under this temperature.
A.TURN ON THE SPEED CONTROL’S POWER
B. PRESS & HOLD ESC’S SET BUTTON until Red & Green status LEDs come on
You must continue holding button until you pass through all of the ESC’s
programming options. Release SET button once Red & Green status LEDs are lit.
C. SELECT PROPER RADIO SYSTEM MODE (2 LED flashes = Std / 1 flash = SSR)
Quick press & release the ESC’s SET button to change the selection.
3.CONNECT ESC’s MOTOR POWER PHASE WIRES TO MOTOR
Note: The motor power wires are all blue, therefore you must refer to the
phase markings stamped on the ESC’s case tub for proper wiring sequence.
A. Solder the speed control’s Phase ‘A’ silicone motor power wire to the
motor’s Phase “A” solder tab.
B. Solder the ESC’s Phase ‘B’ motor wire to the motor’s Phase “B” solder tab.
C. Solder the ESC’s Phase ‘C’ motor wire to the motor’s Phase “C” solder tab.
4.CONNECT MOTOR SENSOR HARNESS TO ESC
Insert the 6-pin connector of the motor’s sensor harness into ESC’s sensor
harness socket—connector is keyed and only inserts in one direction.
D.PRESS & HOLD ESC’S SET BUTTON TO STORE NEW SELECTION
1. WITH ESC OFF, TURN ON THE TRANSMITTER’S POWER
2. PRESS & HOLD ESC’S ONE-TOUCH/SET BUTTON
3. TURN ON THE SPEED CONTROL’S POWER
With transmitter at neutral (still pressing SET button), slide ESC’s switch to ON position.
Hold it there until green status LED turns solid green. (Motor won’t run during programming).
Hold it there until the green status LED blinks green.
4. CONTINUE HOLDING SET BUTTON UNTIL RED LED COMES ON
5. RELEASE SET BUTTON AS SOON AS RED LED TURNS ON
6. PULL TRANSMITTER THROTTLE TO FULL-ON POSITION
Battery connection
7. PUSH TRANSMITTER THROTTLE TO FULL-BRAKE/REVERSE
1.CONNECT ESC’S BATTERY WIRES OR CONNECTOR TO BATTERY PACK
Solder the ESC’s RED & BLACK battery power wires to a fully charged 1S-2S
LiPo, or 4-6 cell NiMH (1.2 VDC/cell) battery pack or to a connector.
8. RETURN TRANSMITTER THROTTLE TO NEUTRAL
To use battery connectors on the ESC, we suggest using low-loss high power
connectors like Dean’s Ultra Plug or the Novak Power Connector.
Red status LED will turn on solid, indicating ESC is at neutral and programming is
complete. White LED may also be on/blinking, indicating that Timing Advance is OFF (0%).
If transmitter settings are changed, One-Touch Set-Up must be repeated.
•Use polarized connectors. Reverse voltage will damage ESC & void warranty.
•Use a female connector on battery packs to avoid shorting of exposed contacts.
•Insulate all exposed wiring connection to avoid shorting.
Transmitter adjustments are not usually required to properly complete the programming
of the One-Touch set-up. If you are unable to successfully program the One-Touch set-up,
adjust your transmitter settings as listed in the “Transmitter Adjustments” section on the
Pulse Track Guide, then repeat the One-Touch Programming steps above.
NOTE: If using NiMH/NiCd batteries, the Voltage Cut-Off Circuitry
must be turned OFF (refer to the ESC Track Guide).
NOTE: ESC will NOT revert back to factory-default settings when the One-Touch set-up is
performed. Refer to ‘Data Reset’ in Custom Programming section of ESC Track Guide.
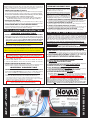
on-board
PowerCaps
Status
LEDs
19 Rancho Circle, Lake Forest, CA 92630 • 949-916-6044
Servo plugged into
steering ch. (#1)
Black power wire
Red power wire
(battery positive)
User-replaceable
input signal harness
(Ch.2)
Sensor
harness
Blue motor
power wire
(Phase C)
Battery
connector
(if used)
Battery pigtail -- Keep
connected to battery to
avoid reverse voltage!
Blue motor
power wire
(Phase A)
Sensor-based
brushless motor
*Battery pack, servo, and
receiver are not included.
(battery negative)
Set
button
Blue motor
power wire
(Phase B)
Battery pack
• 1S or 2S LiPo or 4-6 cell NiMH/NiCd •
www.teamnovak.com
set-up photo
Insert the 3-pin plug on one end of receiver input harness onto the receiver harness
3-pin header on the ESC. White wire goes on the right side pin as shown above.
3. INSTALL 25mm COOLING FAN ON ESC (OPTIONAL)
1.INSTALL PINION GEAR & ADJUST MOTOR FOR PROPER GEAR MESH
Tighten pinion’s set screw on flat of motor shaft. Align pinion & spur gears.
A. You NEED a small amount of play between the pinion and spur gear
(about thickness of a piece of paper)–check free play at several points around
spur gear to ensure a proper mesh (just in case gears are out of round).
Glitch Buster
plugged into any
open receiver slot
ON/OFF
2. CONNECT RECEIVER HARNESS TO RECEIVER
Motor connection
ESC
ON/OFF
Switch
rec. positive
(red wire)
switch
(very old receivers need wiring sequence changed in
plastic plug on receiver end--Damage may occur
rec.
Motor
negative
if sequence is incorrect) . For instructions on sensor
harness (black
wire)
connector
changing the wiring sequences, visit our web site.
1. CONNECT INPUT HARNESS TO RECEIVER HARNESS PINS ON ESC
Note: Mount antenna as close to receiver as possible--trail excess wire off top of
antenna mast (cutting/coiling excess wire reduces radio range--2.4GHz too).
Receiver
positive
fan wire
receiver signal
(white wire)